buttons MAZDA MODEL CX-9 2013 Smart Start Guide (in English)
[x] Cancel search | Manufacturer: MAZDA, Model Year: 2013, Model line: MODEL CX-9, Model: MAZDA MODEL CX-9 2013Pages: 16, PDF Size: 3.96 MB
Page 2 of 16

Key
12
Auxiliary Key Release
Auxiliary Key
Key (Rear)
StAR ting the engine
While Carrying the Advanced Key…
•
Start the engine by pushing the start knob in and turning it (like a
normal key) while depressing the brake pedal.
• Shut the engine OFF by turning the start knob to the ACC position
and then pushing in and turning to the OFF position.
•
The
indicator light will show green when the advanced key is
detected. If the
indicator light flashes green, the advanced key
transmitter battery power is low.
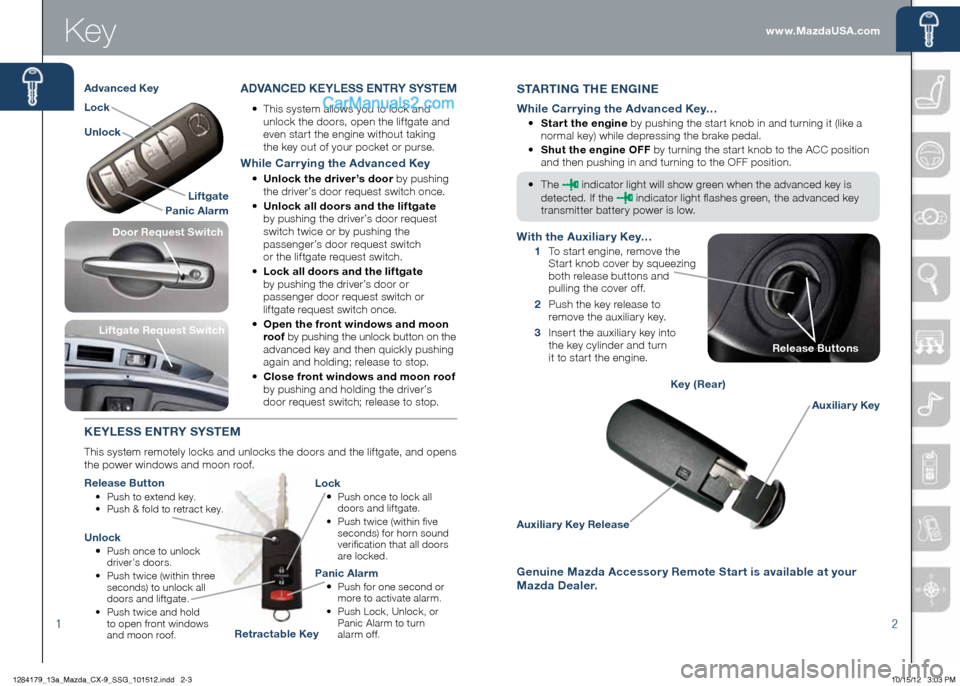
ADVA nCeD K eYL eSS ent RY SYSteM
•
This system allows you to lock and
unlock the doors, open the liftgate and
even start the engine without taking
the key out of your pocket or purse.
While Carrying the Advanced Key
• Unlock the driver’s door by pushing
the driver’s door request switch once.
• Unlock all doors and the liftgate
by pushing the driver’s door request
switch twice or by pushing the
passenger’s door request switch
or the liftgate request switch.
• Lock all doors and the liftgate
by pushing the driver’s door or
passenger door request switch or
liftgate request switch once.
• Open the front windows and moon
roof by pushing the unlock button on the
advanced key and then quickly pushing
again and holding; release to stop.
• Close front windows and moon roof
by pushing and holding the driver’s
door request switch; release to stop.
K eYL eSS entRY SYS teM
This system remotely locks and unlocks the doors and the liftgate, and opens
the power windows and moon roof.
Release Button
• Push to extend key.
• Push & fold to retract key.
Lock
•
Push once to lock all
doors and liftgate.
•
Push twice (within five
seconds) for horn sound
verification that all doors
are locked.
Unlock
• Push once to unlock
driver’s doors.
•
Push twice (within three
seconds) to unlock all
doors and liftgate.
•
Push twice and hold
to open front windows
and moon roof.
Panic Alarm
• Push for one second or
more to activate alarm.
•
Push Lock, Unlock, or
Panic Alarm to turn
alarm of f.
Liftgate Request Switch
With the Auxiliary Key…
1 To start engine, remove the
Start knob cover by squeezing
both release buttons and
pulling the cover off.
2 Push the key release to
remove the auxiliary key.
3 Insert the auxiliary key into
the key cylinder and turn
it to start the engine.
Liftgate
Panic Alarm
Lock
Unlock
Advanced Key
Retractable Key
Release Buttons
genuine Mazda Accessory Remote Start is available at your
Mazda Dealer.
Door Request Switch
www.MazdaUSA.com
1284179_13a_Mazda_CX-9_SSG_101512.indd 2-310/15/12 3:03 PM
Page 3 of 16

34
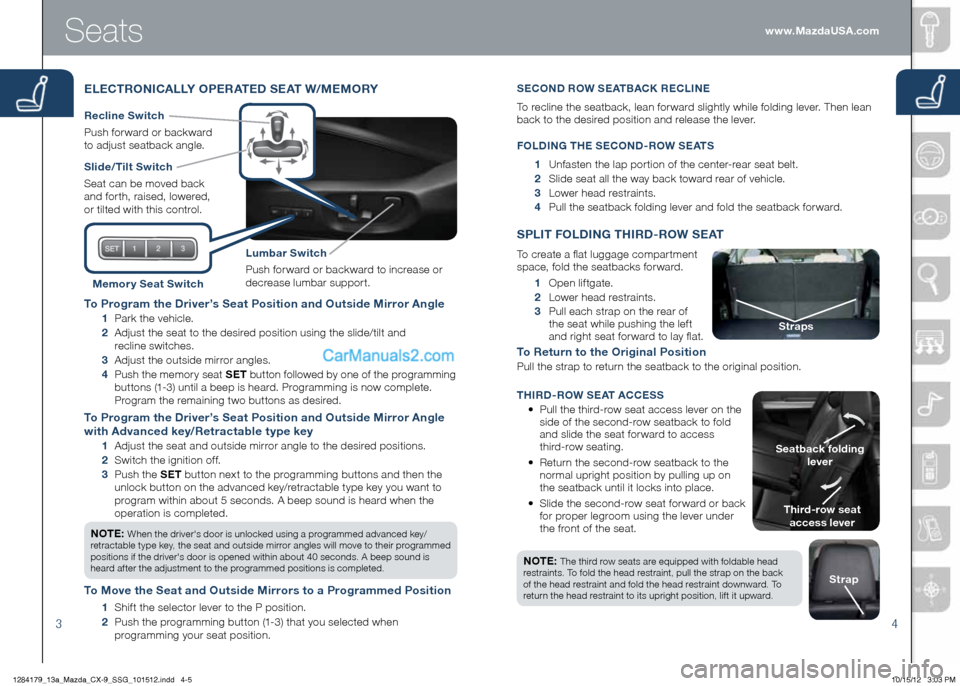
to Program the Driver’s Seat Position and Outside Mirror Angle
1 Park the vehicle.
2 Adjust the seat to the desired position using the slide/tilt and
recline switches.
3 Adjust the outside mirror angles.
4
Push the memory seat S et button followed by one of the programming
buttons (1-3) until a beep is heard. Programming is now complete.
Program the remaining two buttons as desired.
t o Program the Driver’s Seat Position and Outside Mirror Angle
with Advanced key/Retractable type key
1 Adjust the seat and outside mirror angle to the desired positions.
2 Switch the ignition off.
3
Push the S et button next to the programming buttons and then the
unlock button on the advanced key/retractable type key you want to
program within about 5 seconds. A beep sound is heard when the
operation is completed.
n O te :
When the driver's door is unlocked using a programmed advanced key/
retractable type key, the seat and outside mirror angles will move to their programmed
positions if the driver's door is opened within about 40 seconds. A beep sound is
heard after the adjustment to the programmed positions is completed.
t o Move the Seat and Outside Mirrors to a Programmed Position
1 Shift the selector lever to the P position.
2 Push the programming button (1-3) that you selected when
programming your seat position.
Seats
e Le C tROni CALLY OP eRA teD S eAt W/M eMORY
Slide/ tilt Switch
Seat can be moved back
and forth, raised, lowered,
or tilted with this control.
Lumbar Switch
Push forward or backward to increase or
decrease lumbar support.
Recline Switch
Push forward or backward
to adjust seatback angle.
Memor y Seat Switch 1 Open liftgate.
2 Lower head restraints.
3
Pull each strap on the rear of
the seat while pushing the left
and right seat forward to lay flat.
t o Return to the Original Position
Pull the strap to return the seatback to the original position.
S PL it F OLD ing t hiRD -ROW S eAt
To create a flat luggage compartment
space, fold the seatbacks forward.
t hird-row seat
access lever
Seatback folding
lever
Straps
nO te : The third row seats are equipped with foldable head
restraints. To fold the head restraint, pull the strap on the back
of the head restraint and fold the head restraint downward. To
return the head restraint to its upright position, lift it upward.
Strap
Se CO nD R OW Se AtB ACK Re CLine
To recline the seatback, lean forward slightly while folding lever. Then lean
back to the desired position and release the lever.
F OLD ing the Se COnD -R OW Se AtS
1 Unfasten the lap portion of the center-rear seat belt.
2 Slide seat all the way back toward rear of vehicle.
3 Lower head restraints.
4 Pull the seatback folding lever and fold the seatback forward.
thi RD -ROW Se At A CCeSS
• Pull the third-row seat access lever on the
side of the second-row seatback to fold
and slide the seat forward to access
third-row seating.
•
Return the second-row seatback to the
normal upright position by pulling up on
the seatback until it locks into place.
•
Slide the second-row seat forward or back
for proper legroom using the lever under
the front of the seat. www.MazdaUSA.com
1284179_13a_Mazda_CX-9_SSG_101512.indd 4-510/15/12 3:03 PM
Page 10 of 16

1718
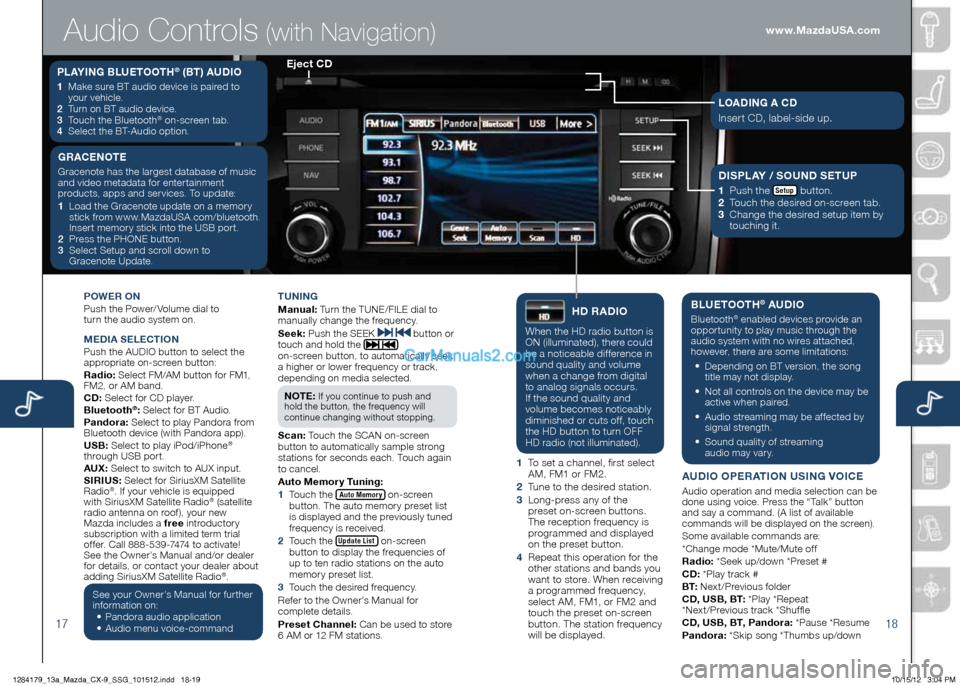
POWeR On
Push the Power/ Volume dial to
turn the audio system on.
Me DiA Se Le Cti On
Push the AUDIO button to select the
appropriate on-screen button:
Radio: Select FM/AM button for FM1,
FM2, or AM band.
CD: Select for CD player.
Bluetooth
®: Select for BT Audio.
Pandora: Select to play Pandora from
Bluetooth device (with Pandora app).
USB: Select to play iPod/iPhone
®
through USB port.
AUX: Select to switch to AUX input.
S iR iUS: Select for SiriusXM Satellite
Radio
®. If your vehicle is equipped
with SiriusXM Satellite Radio® (satellite
radio antenna on roof), your new
Mazda includes a free introductory
subscription with a limited term trial
offer. Call 888-539-7474 to activate!
See the Owner’s Manual and/or dealer
for details, or contact your dealer about
adding SiriusXM Satellite Radio
®.
See your Owner’s Manual for further
information on:
• Pandora audio application
•
Audio menu voice-command tUning
M
anual: Turn the TUNE/FILE dial to
manually change the frequency.
S eek: Push the SEEK
button or
touch and hold the
on-screen button, to automatically seek
a higher or lower frequency or track,
depending on media selected.
n O te :
If you continue to push and
hold the button, the frequency will
continue changing without stopping.
S can: Touch the SCAN on-screen
button to automatically sample strong
stations for seconds each. Touch again
to cancel.
Auto Memory t uning:
1 Touch the
Auto Memory on-screen
button. The auto memory preset list
is displayed and the previously tuned
frequency is received.
2 Touch the
Update List on-screen
button to display the frequencies of
up to ten radio stations on the auto
memory preset list.
3 Touch the desired frequency.
Refer to the Owner’s Manual for
complete details.
Preset Channel: Can be used to store
6 AM or 12 FM stations.
hD RADi O
When the HD radio button is
ON (illuminated), there could
be a noticeable difference in
sound quality and volume
when a change from digital
to analog signals occurs.
If the sound quality and
volume becomes noticeably
diminished or cuts off, touch
the HD button to turn OFF
HD radio (not illuminated).
1 To set a channel, first select
AM, FM1 or FM2.
2 Tune to the desired station.
3 Long-press any of the
preset on-screen buttons.
The reception frequency is
programmed and displayed
on the preset button.
4 Repeat this operation for the
other stations and bands you
want to store. When receiving
a programmed frequency,
select AM, FM1, or FM2 and
touch the preset on-screen
button. The station frequency
will be displayed.
BLU etOOth® AUDi O
Bluetooth® enabled devices provide an
opportunity to play music through the
audio system with no wires attached,
however, there are some limitations:
• Depending on BT version, the song
title may not display.
•
Not all controls on the device may be
active when paired.
•
Audio streaming may be affected by
signal strength.
•
Sound quality of streaming
audio may vary.
AUD iO OP eRA tiOn US ing VOiC e
Audio operation and media selection can be
done using voice. Press the “Talk” button
and say a command. (A list of available
commands will be displayed on the screen).
Some available commands are:
*Change mode *Mute/Mute off
Radio: *Seek up/down *Preset #
CD: *Play track #
B t: Next/Previous folder
CD, USB, B t: *Play *Repeat
*Next/Previous track *Shuffle
CD, USB, B t, Pandora: *Pause *Resume
Pandora: *Skip song *Thumbs up/down
PLAYing BLU etOOth® (Bt) AUD iO
1 Make sure BT audio device is paired to
your vehicle.
2
Turn on BT audio device.
3
Touch the Bluetooth
® on-screen tab.
4
Select the BT-Audio option.
e ject CD
Audio Controls (with Navigation)
g RAC enOte
Gracenote has the largest database of music
and video metadata for entertainment
products, apps and services. To update:
1 Load the Gracenote update on a memory
stick from www.MazdaUSA.com/bluetooth.
Insert memory stick into the USB port.
2
Press the PHONE button.
3 Select Setup and scroll down to
Gracenote Update.Di SPLAY / SOUnD S etUP
1
Push the Setup button.
2
Touch the desired on-screen tab.
3 Change the desired setup item by
touching it.
LOAD ing A CD
Insert CD, label-side up.
www.MazdaUSA.com
1284179_13a_Mazda_CX-9_SSG_101512.indd 18-1910/15/12 3:04 PM