reset MAZDA MODEL CX-9 2013 Smart Start Guide (in English)
[x] Cancel search | Manufacturer: MAZDA, Model Year: 2013, Model line: MODEL CX-9, Model: MAZDA MODEL CX-9 2013Pages: 16, PDF Size: 3.96 MB
Page 5 of 16

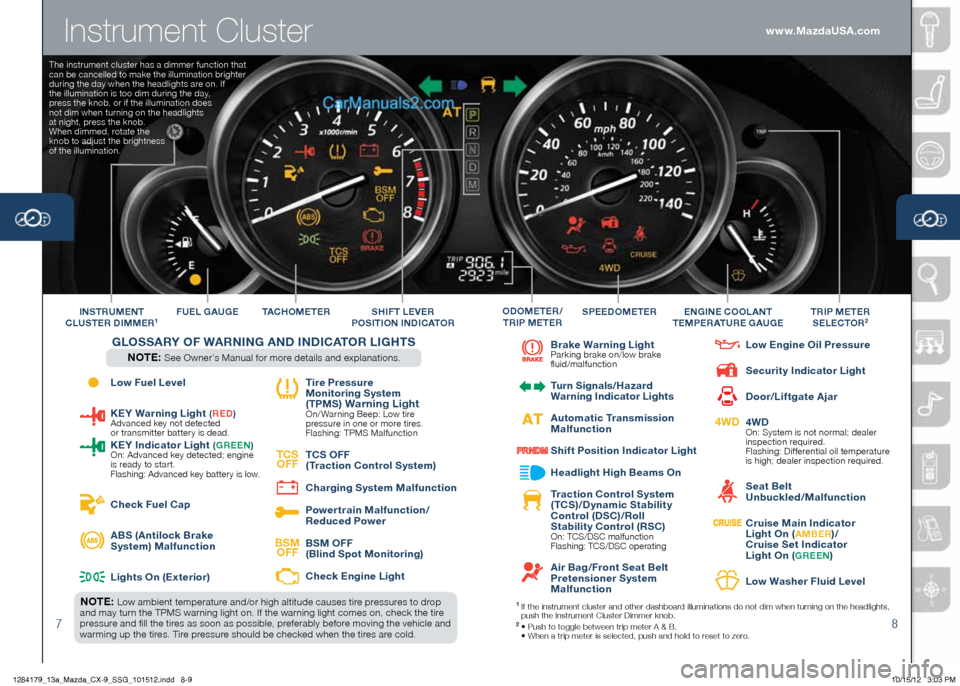
Instrument Cluster
78
Low Fuel Level
Ke
Y Warning Light (Re D) Advanced key not detected
or transmitter battery is dead.
K
eY indicator L ight (gR een ) On: Advanced key detected; engine
is ready to start.
Flashing: Advanced key battery is low.
Check Fuel Cap
ABS (Antilock Brake
System) Malfunction
Lights On (
exterior)
t
ire Pressure
Monitoring System
( t PMS
) Warning Light On/ Warning Beep: Low tire
pressure in one or more tires.
Flashing: TPMS Malfunction
tCS
OFF
t
CS OFF
( t raction Control System)
Charging System Malfunction
Powertra
in Malfunction/
Reduced Power
BSM OFF
BSM OFF
(Blind Spot Monitoring)
Check e
ngine Light
Brake Warning Light
Parking brake on/low brake
fluid/malfunction
t
urn Signals/ hazard
Warning i ndicator Lights
Automatic t
ransmission
Malfunction
Shift Position i
ndicator Light
h
eadlight h igh Beams On
t
raction Control System
( t CS)/Dynamic Stability
Control (DSC)/Roll
Stability Control (RSC)
On: TCS/DSC malfunction
Flashing: TCS/DSC operating
Air Bag/Front Seat Belt
Pretensioner System
Malfunction
Low e
ngine Oil Pressure
Security i
ndicator Light
Door/Liftgate Ajar
4WD
4WD
On: System is not normal; dealer
inspection required.
Flashing: Differential oil temperature
is high; dealer inspection required.
Seat Belt
Unbuckled/Malfunction
Cruise Main indicator
Light On (A MBe R)/
Cruise Set indicator
Light On (
gR een)
Low Washer Fluid Level
tAC
hO M e t e R
F
U eL gAU ge SPeeDOM eteRtRiP M ete R
S eLeCt OR2in StRUM ent
CLUSte R D iMM eR1engine COOLA nt
teMP eRAtUR e g AUgeODOM eteR/
tR iP M ete RShiFt Le VeR
P OS itiOn in DiCA tOR
gLOSSARY OF W ARning A nD in DiCA tOR L ight S
nOte : See Owner’s Manual for more details and explanations.
nOte : Low ambient temperature and/or high altitude causes tire pressures to drop
and may turn the TPMS warning light on. If the warning light comes on, check the tire
pressure and fill the tires as soon as possible, preferably before moving the vehicle and
warming up the tires. Tire pressure should be checked when the tires are cold.1 If the instrument cluster and other dashboard illuminations do not dim when turning on the headlights,
push the Instrument Cluster Dimmer knob.
2 • Push to toggle between trip meter A & B.
• When a trip meter is selected, push and hold to reset to zero.
The instrument cluster has a dimmer function that
can be cancelled to make the illumination brighter
during the day when the headlights are on. If
the illumination is too dim during the day,
press the knob, or if the illumination does
not dim when turning on the headlights
at night, press the knob.
When dimmed, rotate the
knob to adjust the brightness
of the illumination.
www.MazdaUSA.com
1284179_13a_Mazda_CX-9_SSG_101512.indd 8-910/15/12 3:03 PM
Page 9 of 16

1516
nOte : If the rear AUTO button is pushed while the front A /C button is off, the
rear air conditioning operates only to circulate air. Setting the temperature to the
maximum high or low will not provide the desired temperature at a faster rate.
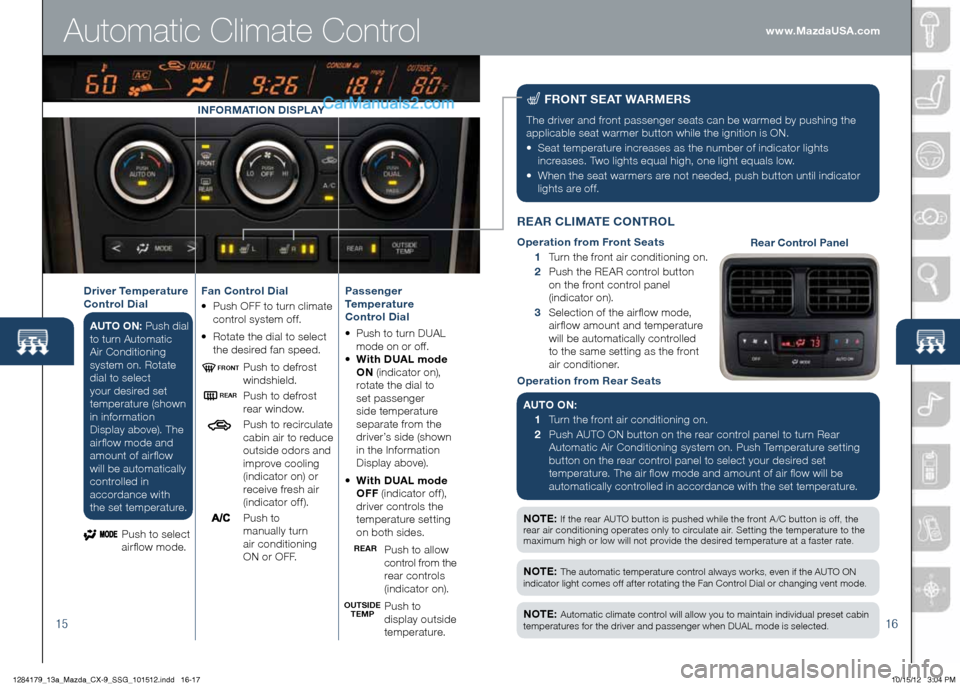
Automatic Climate Control
F
RO nt Se At W ARM eRS
The driver and front passenger seats can be warmed by pushing the
applicable seat warmer button while the ignition is ON.
• Seat temperature increases as the number of indicator lights
increases. Two lights equal high, one light equals low.
• When the seat warmers are not needed, push button until indicator
lights are off.
n Ote : The automatic temperature control always works, even if the AUTO ON
indicator light comes off after rotating the Fan Control Dial or changing vent mode.
n Ote : Automatic climate control will allow you to maintain individual preset cabin
temperatures for the driver and passenger when DUAL mode is selected.
in FORMA tiOn Di SPLAY
Passenger
temperature
Control Dial
• Push to turn DUAL
m ode on or off.
• With DUAL mode
On (indicator on),
rotate the dial to
set passenger
side temperature
separate from the
driver’s side (shown
in the Information
Display above).
• With DUAL mode
OFF (indicator off),
driver controls the
temperature setting
on both sides.
Push to allow
control from the
rear controls
(indicator on).
Push to
display outside
temperature.
Fan Control Dial
•
Push OFF to turn climate
control system off.
• Rotate the dial to select
the desired fan speed.
Push to defrost
windshield.
Push to defrost
rear window.
Push to recirculate
cabin air to reduce
outside odors and
improve cooling
(indicator on) or
receive fresh air
(indicator off).
P u s h t o
manually turn
air conditioning
ON or OFF.
Driver t
emperature
Control Dial
AU tO O n: Push dial
to turn Automatic
Air Conditioning
system on. Rotate
dial to select
your desired set
temperature (shown
in information
Display above). The
airflow mode and
amount of airflow
will be automatically
controlled in
accordance with
the set temperature.
Push to select
airflow mode.
OUtSiDe teMPReAR
ReAR
FROnt
R
eAR CL iMA te CO ntROL
Operation from Front Seats
1 Turn the front air conditioning on.
2 Push the REAR control button
on the front control panel
(indicator on).
3 Selection of the airflow mode,
airflow amount and temperature
will be automatically controlled
to the same setting as the front
air conditioner.
Operation from Rear Seats
AU tO O n:
1 Turn the front air conditioning on.
2 Push AUTO ON button on the rear control panel to turn Rear
Automatic Air Conditioning system on. Push Temperature setting
button on the rear control panel to select your desired set
temperature. The air flow mode and amount of air flow will be
automatically controlled in accordance with the set temperature.Rear Control Panel
www.MazdaUSA.com
1284179_13a_Mazda_CX-9_SSG_101512.indd 16-1710/15/12 3:04 PM
Page 10 of 16

1718
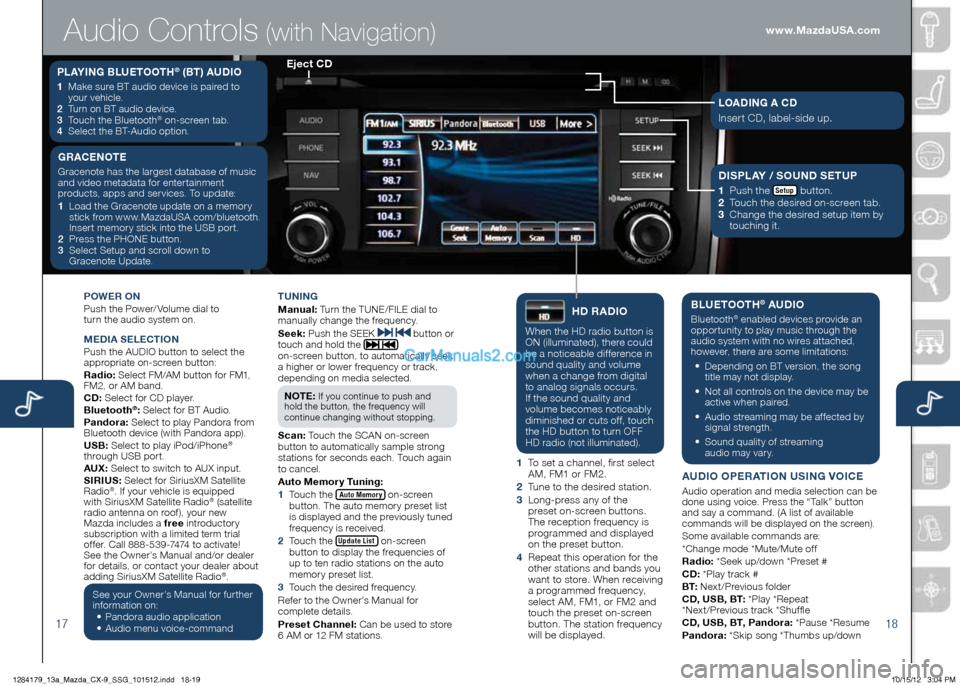
POWeR On
Push the Power/ Volume dial to
turn the audio system on.
Me DiA Se Le Cti On
Push the AUDIO button to select the
appropriate on-screen button:
Radio: Select FM/AM button for FM1,
FM2, or AM band.
CD: Select for CD player.
Bluetooth
®: Select for BT Audio.
Pandora: Select to play Pandora from
Bluetooth device (with Pandora app).
USB: Select to play iPod/iPhone
®
through USB port.
AUX: Select to switch to AUX input.
S iR iUS: Select for SiriusXM Satellite
Radio
®. If your vehicle is equipped
with SiriusXM Satellite Radio® (satellite
radio antenna on roof), your new
Mazda includes a free introductory
subscription with a limited term trial
offer. Call 888-539-7474 to activate!
See the Owner’s Manual and/or dealer
for details, or contact your dealer about
adding SiriusXM Satellite Radio
®.
See your Owner’s Manual for further
information on:
• Pandora audio application
•
Audio menu voice-command tUning
M
anual: Turn the TUNE/FILE dial to
manually change the frequency.
S eek: Push the SEEK
button or
touch and hold the
on-screen button, to automatically seek
a higher or lower frequency or track,
depending on media selected.
n O te :
If you continue to push and
hold the button, the frequency will
continue changing without stopping.
S can: Touch the SCAN on-screen
button to automatically sample strong
stations for seconds each. Touch again
to cancel.
Auto Memory t uning:
1 Touch the
Auto Memory on-screen
button. The auto memory preset list
is displayed and the previously tuned
frequency is received.
2 Touch the
Update List on-screen
button to display the frequencies of
up to ten radio stations on the auto
memory preset list.
3 Touch the desired frequency.
Refer to the Owner’s Manual for
complete details.
Preset Channel: Can be used to store
6 AM or 12 FM stations.
hD RADi O
When the HD radio button is
ON (illuminated), there could
be a noticeable difference in
sound quality and volume
when a change from digital
to analog signals occurs.
If the sound quality and
volume becomes noticeably
diminished or cuts off, touch
the HD button to turn OFF
HD radio (not illuminated).
1 To set a channel, first select
AM, FM1 or FM2.
2 Tune to the desired station.
3 Long-press any of the
preset on-screen buttons.
The reception frequency is
programmed and displayed
on the preset button.
4 Repeat this operation for the
other stations and bands you
want to store. When receiving
a programmed frequency,
select AM, FM1, or FM2 and
touch the preset on-screen
button. The station frequency
will be displayed.
BLU etOOth® AUDi O
Bluetooth® enabled devices provide an
opportunity to play music through the
audio system with no wires attached,
however, there are some limitations:
• Depending on BT version, the song
title may not display.
•
Not all controls on the device may be
active when paired.
•
Audio streaming may be affected by
signal strength.
•
Sound quality of streaming
audio may vary.
AUD iO OP eRA tiOn US ing VOiC e
Audio operation and media selection can be
done using voice. Press the “Talk” button
and say a command. (A list of available
commands will be displayed on the screen).
Some available commands are:
*Change mode *Mute/Mute off
Radio: *Seek up/down *Preset #
CD: *Play track #
B t: Next/Previous folder
CD, USB, B t: *Play *Repeat
*Next/Previous track *Shuffle
CD, USB, B t, Pandora: *Pause *Resume
Pandora: *Skip song *Thumbs up/down
PLAYing BLU etOOth® (Bt) AUD iO
1 Make sure BT audio device is paired to
your vehicle.
2
Turn on BT audio device.
3
Touch the Bluetooth
® on-screen tab.
4
Select the BT-Audio option.
e ject CD
Audio Controls (with Navigation)
g RAC enOte
Gracenote has the largest database of music
and video metadata for entertainment
products, apps and services. To update:
1 Load the Gracenote update on a memory
stick from www.MazdaUSA.com/bluetooth.
Insert memory stick into the USB port.
2
Press the PHONE button.
3 Select Setup and scroll down to
Gracenote Update.Di SPLAY / SOUnD S etUP
1
Push the Setup button.
2
Touch the desired on-screen tab.
3 Change the desired setup item by
touching it.
LOAD ing A CD
Insert CD, label-side up.
www.MazdaUSA.com
1284179_13a_Mazda_CX-9_SSG_101512.indd 18-1910/15/12 3:04 PM