display MAZDA MODEL CX-9 2014 (in English) Service Manual
[x] Cancel search | Manufacturer: MAZDA, Model Year: 2014, Model line: MODEL CX-9, Model: MAZDA MODEL CX-9 2014Pages: 600
Page 332 of 600
Black plate (332,1)
qHow to use iPod mode
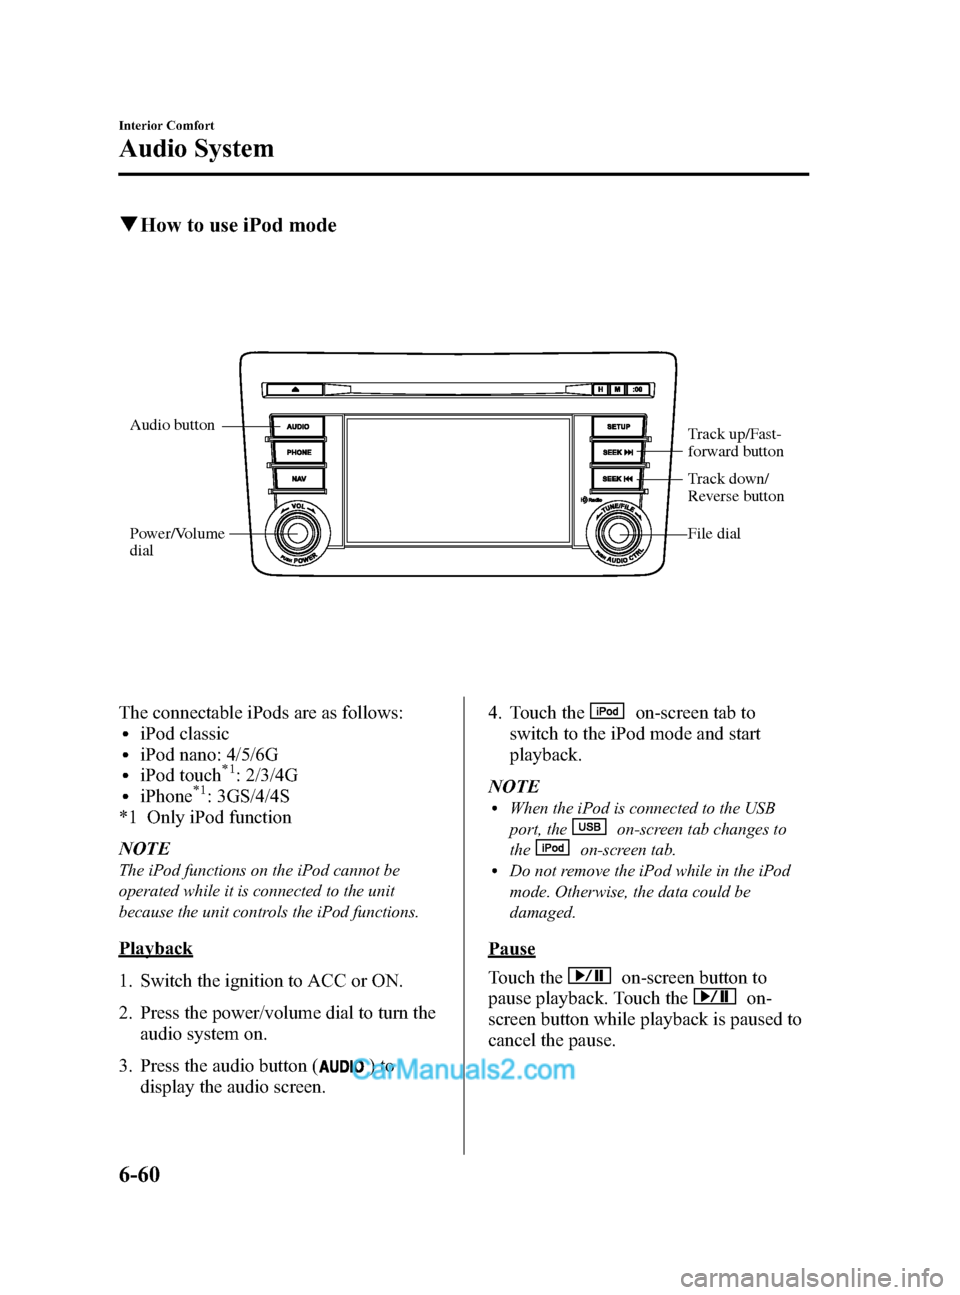
Audio button
Power/Volume
dial Track up/Fast-
forward button
File dial
Track down/
Reverse button
The connectable iPods are as follows:liPod classicliPod nano: 4/5/6GliPod touch*1: 2/3/4GliPhone*1: 3GS/4/4S
*1 Only iPod function
NOTE
The iPod functions on the iPod cannot be
operated while it is connected to the unit
because the unit controls the iPod functions.
Playback
1. Switch the ignition to ACC or ON.
2. Press the power/volume dial to turn the audio system on.
3. Press the audio button (
)to
display the audio screen. 4. Touch the
on-screen tab to
switch to the iPod mode and start
playback.
NOTE
lWhen the iPod is connected to the USB
port, the
on-screen tab changes to
the
on-screen tab.lDo not remove the iPod while in the iPod
mode. Otherwise, the data could be
damaged.
Pause
Touch the
on-screen button to
pause playback. Touch the
on-
screen button while playback is paused to
cancel the pause.
6-60
Interior Comfort
Audio System
CX-9_8DA3-EA-13G_Edition2 Page332
Monday, September 9 2013 4:8 PM
Form No.8DA3-EA-13G
Page 333 of 600
Black plate (333,1)
Fast-forward/Reverse
Operations using audio panel
Press and hold the fast-forward button
(
) to advance through a track at high
speed.
Press and hold the reverse button (
)to
reverse through a track at high speed.
Operations on screen
Touch and hold the
on-screen
button to advance through a track at high
speed.
Touch and hold the
on-screen
button to reverse through a track at high
speed.
Track search
Operations using audio panel
Press the track up button (
) or turn the
file dial clockwise once to skip forward to
the beginning of the next track.
Press the track down button (
) or turn
the file dial counterclockwise within a few
seconds (depends on iPod software
version) after playback begins to track
down to the beginning of the previous
track.
Press the track down button (
) or turn
the file dial counterclockwise after a few
seconds (depends on iPod software
version) have elapsed to start playback
from the beginning of the current track.
Operations on screen
Touch the
on-screen button once to
skip forward to the beginning of the next
track.
Touch the
on-screen button within
a few seconds (depends on iPod software
version) after playback begins to track
down to the beginning of the previous
track. Touch the
on-screen button after a
few seconds (depends on iPod software
version) have elapsed to start playback
from the beginning of the current track.
Displaying song list
The song list in the iPod can be viewed.
NOTE
The song list may not display depending on the
conditions.
(Displaying optional list)
1. Touch the
on-screen button during
playback.
2. Touch the category which you want to select. The record list or song list is
displayed.
(Displaying a list being played)
Touch the
on-screen button.
NOTE
Press theon-screen button to display the
upper list.
Selecting from list
Select the desired song to play.
1. Press the
on-screen button to select
the song list.
2. Touch the song you want to listen to.
NOTE
The selected song list becomes the play list.
Repeat playback
Touch the
on-screen button during
playback. “
”is displayed during
playback.
Touch the
on-screen button two
times while “
”is displayed to cancel.
Interior Comfort
Audio System
6-61
CX-9_8DA3-EA-13G_Edition2 Page333
Monday, September 9 2013 4:8 PM
Form No.8DA3-EA-13G
Page 334 of 600
Black plate (334,1)
Shuffle playback
(Shuffling songs in list being played)
Touch the
on-screen button during
playback. “
”is displayed during
playback.
Touch the
on-screen button two
times while “
”is displayed to cancel.
(Shuffling album in list being played)
Touch the
on-screen button two
times during playback. “
”is displayed
during playback.
Touch the
on-screen button while
“
” is displayed to cancel.
NOTE
The track number being shuffle played is in the
order of the iPod shuffle table.
Text scroll
If a whole title cannot be displayed at one
time, touch the
on-screen button on
the right side of the title to display the
whole title. When the last character is
displayed, touch the
on-screen button
to display the first character of the title.
NOTE
lTheon-screen button is displayed when
the whole title is not displayed.
lThe information (artist name, music name)
is displayed only when the iPod has
information which can be displayed on the
screen.
lThis unit cannot display some characters.
Characters which cannot be displayed are
indicated by an asterisk (
).lThe number of characters which can be
displayed is restricted.
Error Messages
If the message “iPod Error ”is displayed,
it indicates that there are no playable files
in the iPod or there is a malfunction.
Verify that the content recorded in the
iPod has playable files and re-connect
correctly. If the message reappears, have
the unit checked by an Authorized Mazda
Dealer.
q Error Indications
If you see an error indication on the
display, find the cause in the chart. If you
cannot clear the error indication, take the
vehicle to an Authorized Mazda Dealer.
Indication Cause Solution
USB Error USB device
malfunction Verify that the content
recorded in the USB
device has
MP3/WMA/AAC files
and re-connect correctly.
If the error indication
continues to display,
consult an Authorized
Mazda Dealer.
iPod Error iPod
malfunction Verify that the content
recorded in the iPod has
playable files and
re-connect correctly.
If the error indication
continues to display,
consult an Authorized
Mazda Dealer.
6-62
Interior Comfort
Audio System
CX-9_8DA3-EA-13G_Edition2 Page334
Monday, September 9 2013 4:8 PM
Form No.8DA3-EA-13G
Page 336 of 600
Black plate (336,1)
Rear Entertainment Systemí
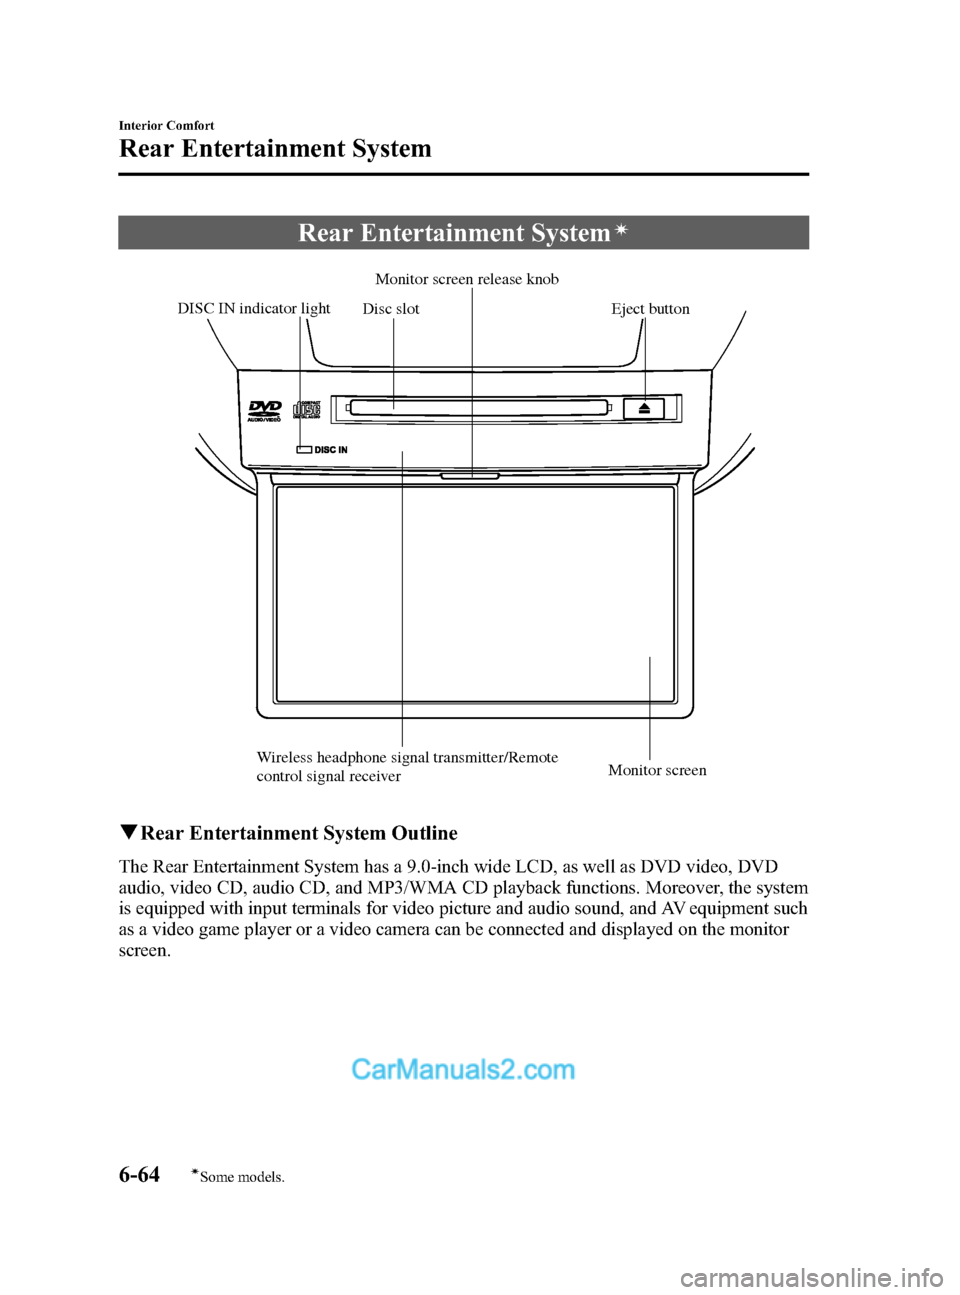
Disc slotMonitor screen release knob
DISC IN indicator light Eject button
Wireless headphone signal transmitter/Remote
control signal receiver Monitor screen
q
Rear Entertainment System Outline
The Rear Entertainment System has a 9.0-inch wide LCD, as well as DVD video, DVD
audio, video CD, audio CD, and MP3/WMA CD playback functions. Moreover, the system
is equipped with input terminals for video picture and audio sound, and AV equipment such
as a video game player or a video camera can be connected and displayed on the monitor
screen.
6-64
Interior Comfort
íSome models.
Rear Entertainment System
CX-9_8DA3-EA-13G_Edition2 Page336
Monday, September 9 2013 4:8 PM
Form No.8DA3-EA-13G
Page 343 of 600
Black plate (343,1)
lThis unit corresponds to multi-session recorded disc playback at a maximum of 49
sessions.
lSome data on multi-session recorded discs cannot be played.lPlayback of discs with added sessions is possible.lPacket Write recorded discs cannot be played.lThis unit does not correspond to MP3i (MP3 interactive), MP3 PRO, and RIFF-style
MP3 formats.
lThe maximum number of characters available for a file name is as follows, however, the
displayable number of characters on this unit is limited.
Maximum number of characters in a file name
(including a separator “.” and the three letters of the file exten-
sion)
ISO9660 level 1 12
*
ISO9660 level 2 31*
Joliet extended format 64
Romeo extended format 128
* English one-byte characters (capitalized only) and underbar “_ ” are available.
MP3
CAUTION
This unit plays files with the (.mp3) file extension as a MP3 file. Do not use the MP3
file extension for files other than MP3 files. It may cause noise or a malfunction.
lIn a MP3 file, the track name, artist name, album name and category name are recorded
with data called “ID3-Tag ”, and the information can be displayed on the monitor.
lMP3 files which do not comply with the specific standard may not be played correctly
or its file and folder name may not be displayed correctly.
lThe file extension may not be provided depending on the computer operating system,
version, software, or settings. In this case, add the file extension “.mp3 ”to the end of the
file name, and then write the disc.
Playlist
This unit can play playlist files. Playlist is a function that allows free setting of the
playback order of MP3 files. The file extension of a playlist file in which the order of
playback is recorded is “. m3u” or“. pls ”.
Operating tips for WMA
WMA is short for Windows Media Audio and is the audio compression format used by
Microsoft.
Audio data can be created and stored at a higher compression ratio than MP3.
*Microsoft and Window Media are registered trademarks of Microsoft Corporation U.S. in
the United States and other countries.
Interior Comfort
Rear Entertainment System
6-71
CX-9_8DA3-EA-13G_Edition2 Page343
Monday, September 9 2013 4:9 PM
Form No.8DA3-EA-13G
Page 344 of 600
Black plate (344,1)
Playable WMA file specification
CD-R and CD-RW including WMA files can be played with this unit. Discs which
conform to the following formats can be played.
Playable WMA files are as follows:Item Content
Specification Windows Media Audio Version7.0
Sampling frequency Bit rate 22.05kHz
....32kbps
32kHz. ......48,64 kbps
44.1kHz .....48,64,80,96, 128, 160, 192, 256, 320 kbps
48kHz. ......64,96, 128, 160, 192 kbps
VBR (Variable Bit Rate) Supported
Channel mode Stereo/Monaural
WMA tag Title, artist name, album name
WMA
CAUTION
This unit plays files with the (.wma) file extension as a WMA file. Do not use the
WMA file extension for files other than WMA files. It may cause noise or a
malfunction.
lIn a WMA file, the track name, artist name, album name and category name are
recorded with data called “WMA-Tag ”, and the information can be displayed on the
monitor.
lWMA files which do not comply with the specific standard may not be played correctly
or its file and folder name may not be displayed correctly.
lThe file extension may not be provided depending on the computer operating system,
version, software, or settings. In this case, add the file extension “.wma ”to the end of
the file name, and then write the disc.
Operating tips for Dolby
Manufactured under license from Dolby Laboratories.
“ Dolby ”, “MLP Lossless ”, and the double-D symbol are trademarks of Dolby Laboratories.
6-72
Interior Comfort
Rear Entertainment System
CX-9_8DA3-EA-13G_Edition2 Page344
Monday, September 9 2013 4:9 PM
Form No.8DA3-EA-13G
Page 347 of 600
Black plate (347,1)
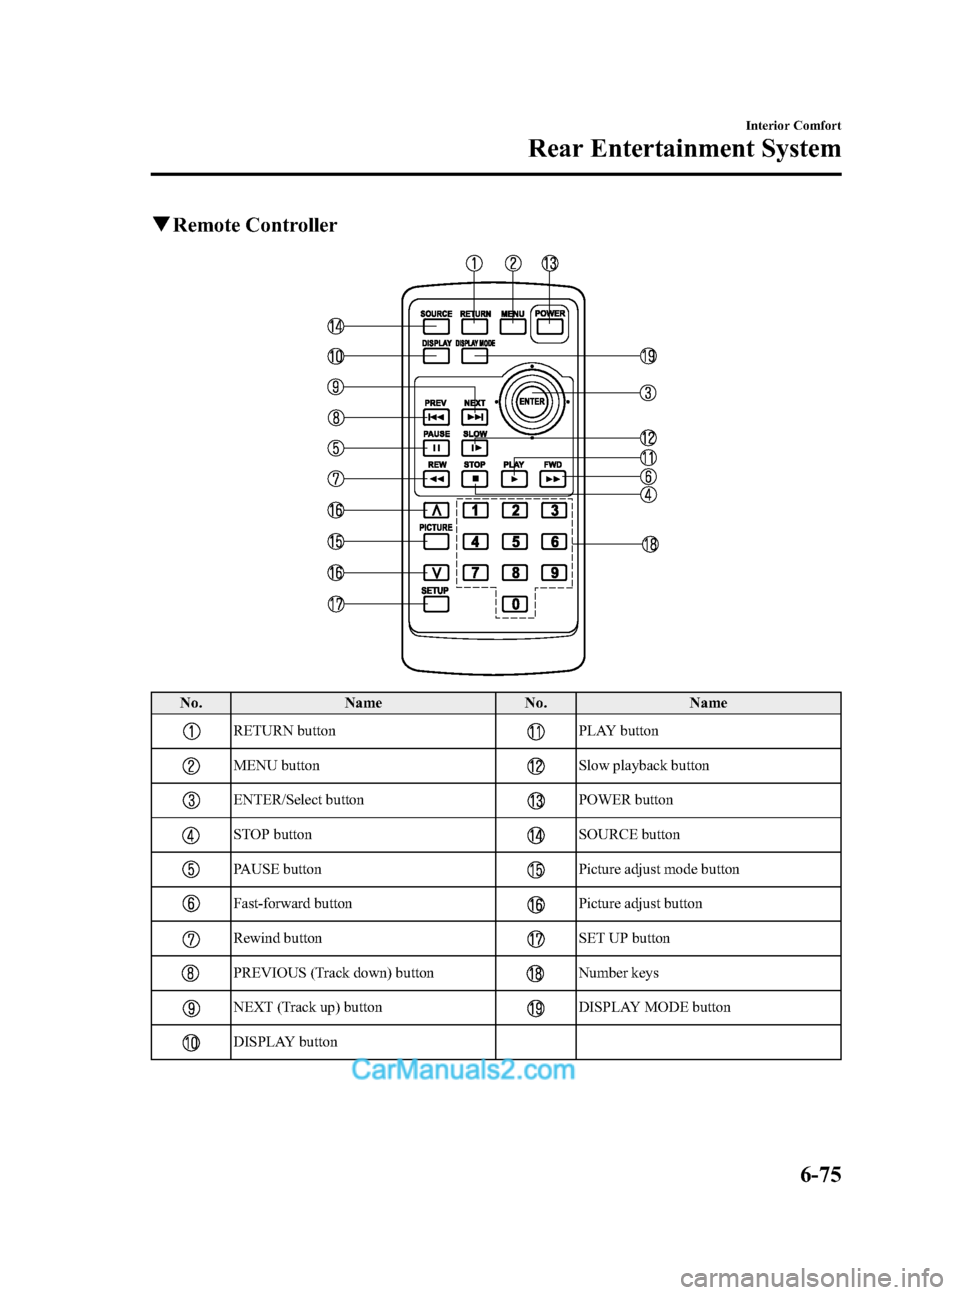
qRemote Controller
No. Name No.Name
RETURN buttonPLAY button
MENU buttonSlow playback button
ENTER/Select buttonPOWER button
STOP buttonSOURCE button
PAUSE buttonPicture adjust mode button
Fast-forward buttonPicture adjust button
Rewind buttonSET UP button
PREVIOUS (Track down) buttonNumber keys
NEXT (Track up) buttonDISPLAY MODE button
DISPLAY button
Interior Comfort
Rear Entertainment System
6-75
CX-9_8DA3-EA-13G_Edition2 Page347
Monday, September 9 2013 4:9 PM
Form No.8DA3-EA-13G
Page 349 of 600
Black plate (349,1)
Before Operation
qDisplay Opening/Closing
CAUTION
Ø Close the display while the Rear
Entertainment System is not in
use. If the display is left open, a
passenger could be injured by
hitting the display, or the display
could be damaged.
Ø Do not press the monitor screen
while opening the display. It may
cause a malfunction.
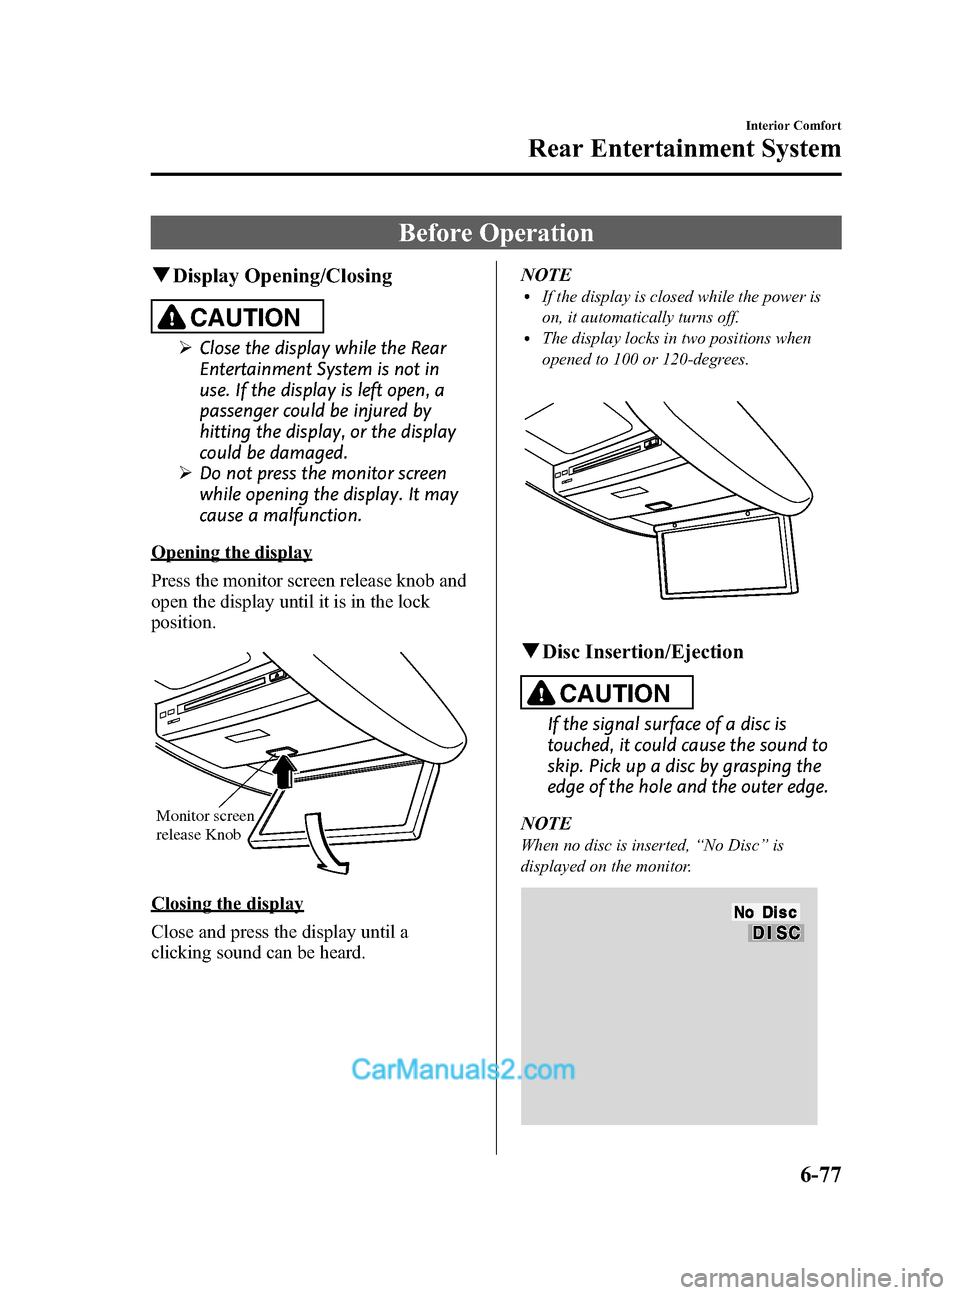
Opening the display
Press the monitor screen release knob and
open the display until it is in the lock
position.
Monitor screen
release Knob
Closing the display
Close and press the display until a
clicking sound can be heard. NOTE
lIf the display is closed while the power is
on, it automatically turns off.
lThe display locks in two positions when
opened to 100 or 120-degrees.
q
Disc Insertion/Ejection
CAUTION
If the signal surface of a disc is
touched, it could cause the sound to
skip. Pick up a disc by grasping the
edge of the hole and the outer edge.
NOTE
When no disc is inserted, “No Disc ”is
displayed on the monitor.
Interior Comfort
Rear Entertainment System
6-77
CX-9_8DA3-EA-13G_Edition2 Page349
Monday, September 9 2013 4:9 PM
Form No.8DA3-EA-13G
Page 350 of 600
Black plate (350,1)
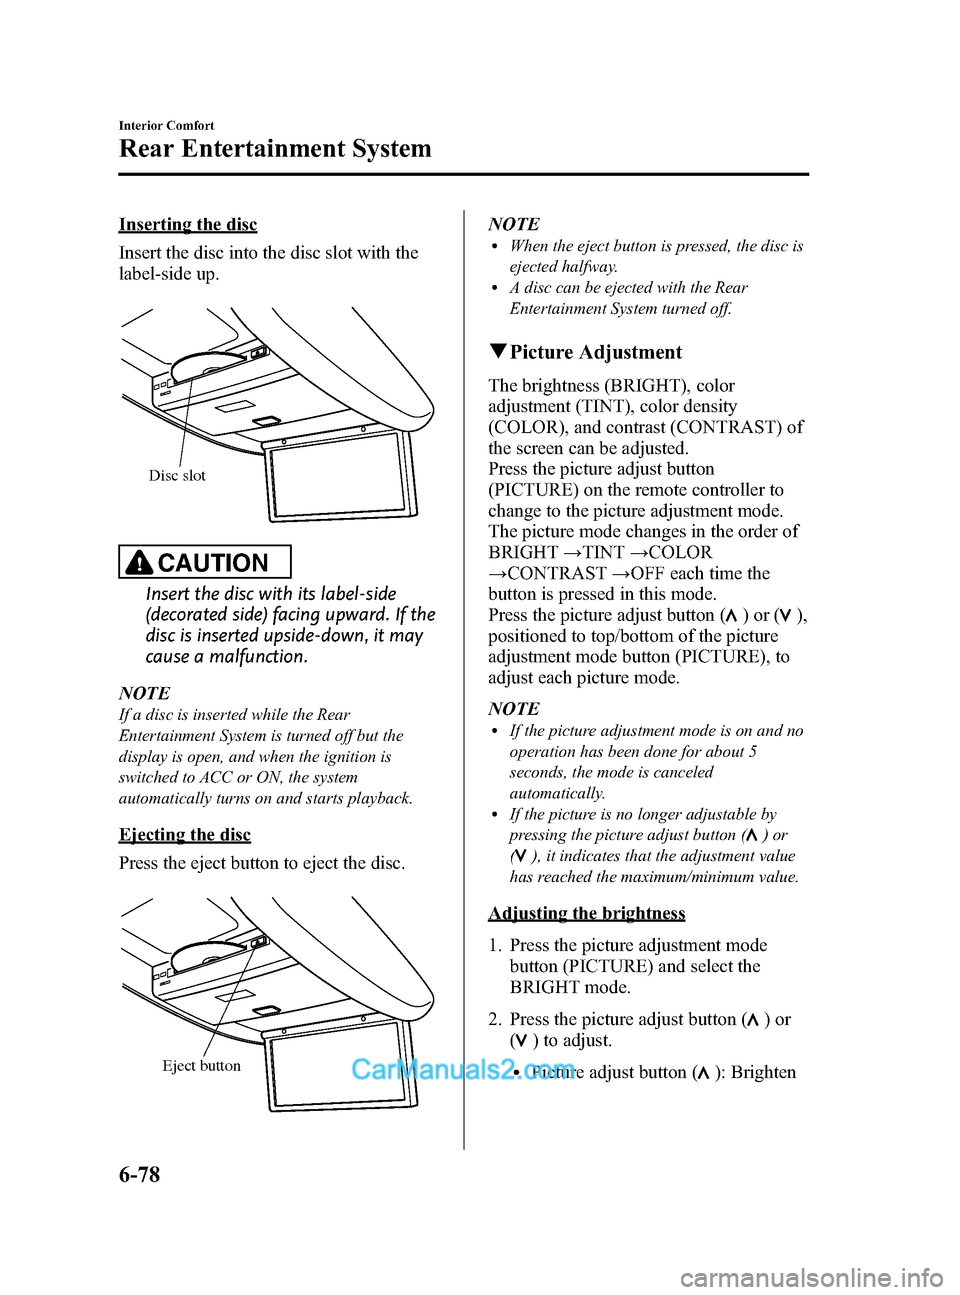
Inserting the disc
Insert the disc into the disc slot with the
label-side up.
Disc slot
CAUTION
Insert the disc with its label-side
(decorated side) facing upward. If the
disc is inserted upside-down, it may
cause a malfunction.
NOTE
If a disc is inserted while the Rear
Entertainment System is turned off but the
display is open, and when the ignition is
switched to ACC or ON, the system
automatically turns on and starts playback.
Ejecting the disc
Press the eject button to eject the disc.
Eject button
NOTElWhen the eject button is pressed, the disc is
ejected halfway.
lA disc can be ejected with the Rear
Entertainment System turned off.
q Picture Adjustment
The brightness (BRIGHT), color
adjustment (TINT), color density
(COLOR), and contrast (CONTRAST) of
the screen can be adjusted.
Press the picture adjust button
(PICTURE) on the remote controller to
change to the picture adjustment mode.
The picture mode changes in the order of
BRIGHT →TINT →COLOR
→ CONTRAST →OFF each time the
button is pressed in this mode.
Press the picture adjust button (
)or(),
positioned to top/bottom of the picture
adjustment mode button (PICTURE), to
adjust each picture mode.
NOTE
lIf the picture adjustment mode is on and no
operation has been done for about 5
seconds, the mode is canceled
automatically.
lIf the picture is no longer adjustable by
pressing the picture adjust button (
)or
(
), it indicates that the adjustment value
has reached the maximum/minimum value.
Adjusting the brightness
1. Press the picture adjustment mode button (PICTURE) and select the
BRIGHT mode.
2. Press the picture adjust button (
)or
(
) to adjust.
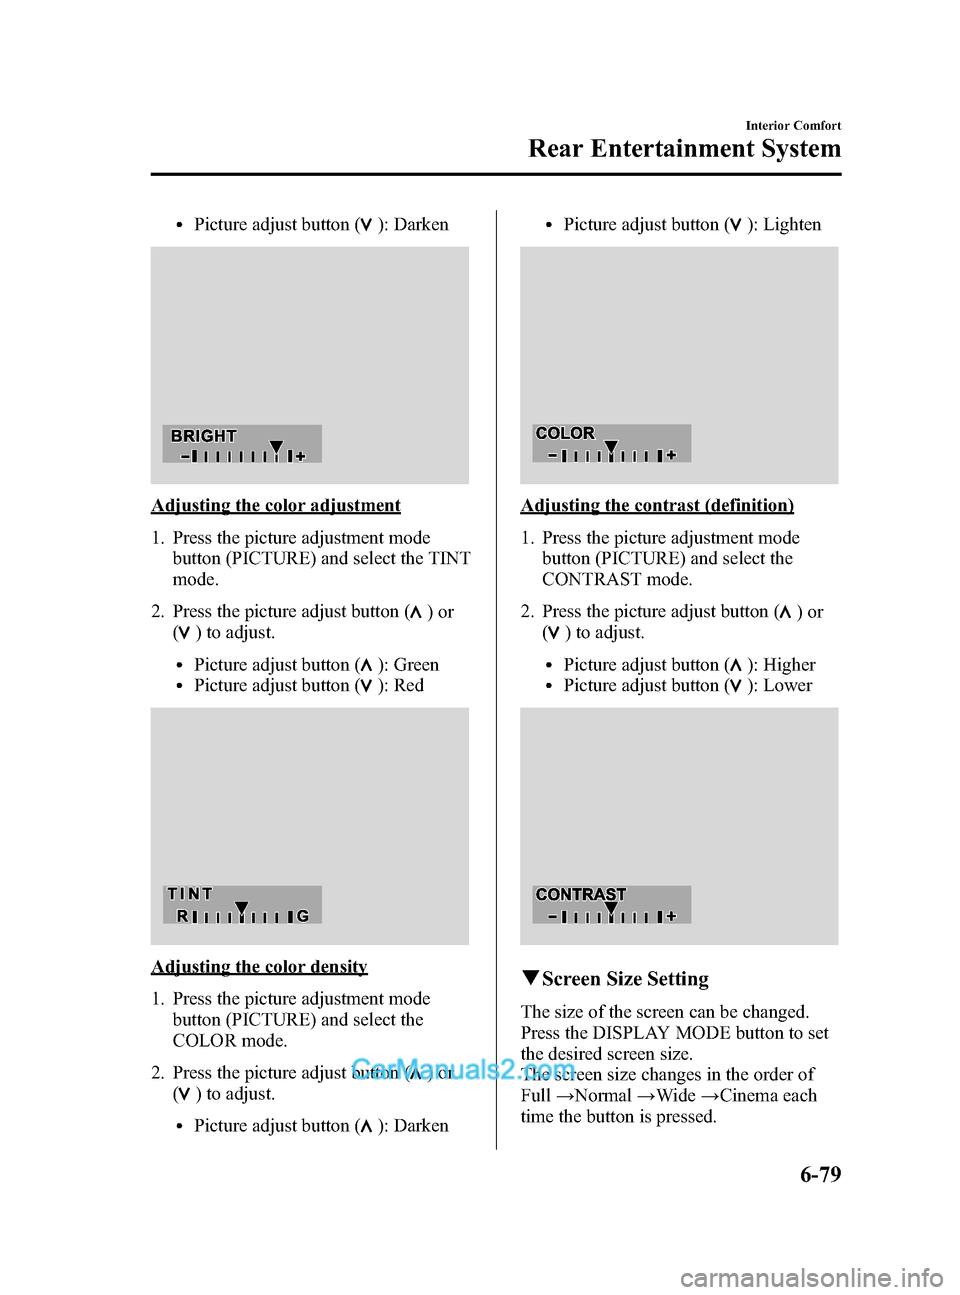
lPicture adjust button (): Brighten
6-78
Interior Comfort
Rear Entertainment System
CX-9_8DA3-EA-13G_Edition2 Page350
Monday, September 9 2013 4:9 PM
Form No.8DA3-EA-13G
Page 351 of 600
Black plate (351,1)
lPicture adjust button (): Darken
Adjusting the color adjustment
1. Press the picture adjustment modebutton (PICTURE) and select the TINT
mode.
2. Press the picture adjust button (
)or
(
) to adjust.
lPicture adjust button (): GreenlPicture adjust button (): Red
Adjusting the color density
1. Press the picture adjustment mode
button (PICTURE) and select the
COLOR mode.
2. Press the picture adjust button (
)or
(
) to adjust.
lPicture adjust button (): Darken
lPicture adjust button (): Lighten
Adjusting the contrast (definition)
1. Press the picture adjustment mode button (PICTURE) and select the
CONTRAST mode.
2. Press the picture adjust button (
)or
(
) to adjust.
lPicture adjust button (): HigherlPicture adjust button (): Lower
q Screen Size Setting
The size of the screen can be changed.
Press the DISPLAY MODE button to set
the desired screen size.
The screen size changes in the order of
Full →Normal →Wide →Cinema each
time the button is pressed.
Interior Comfort
Rear Entertainment System
6-79
CX-9_8DA3-EA-13G_Edition2 Page351
Monday, September 9 2013 4:9 PM
Form No.8DA3-EA-13G