instrument cluster MAZDA MODEL CX-9 2015 Smart Start Guide (in English)
[x] Cancel search | Manufacturer: MAZDA, Model Year: 2015, Model line: MODEL CX-9, Model: MAZDA MODEL CX-9 2015Pages: 18, PDF Size: 5.42 MB
Page 5 of 18

78
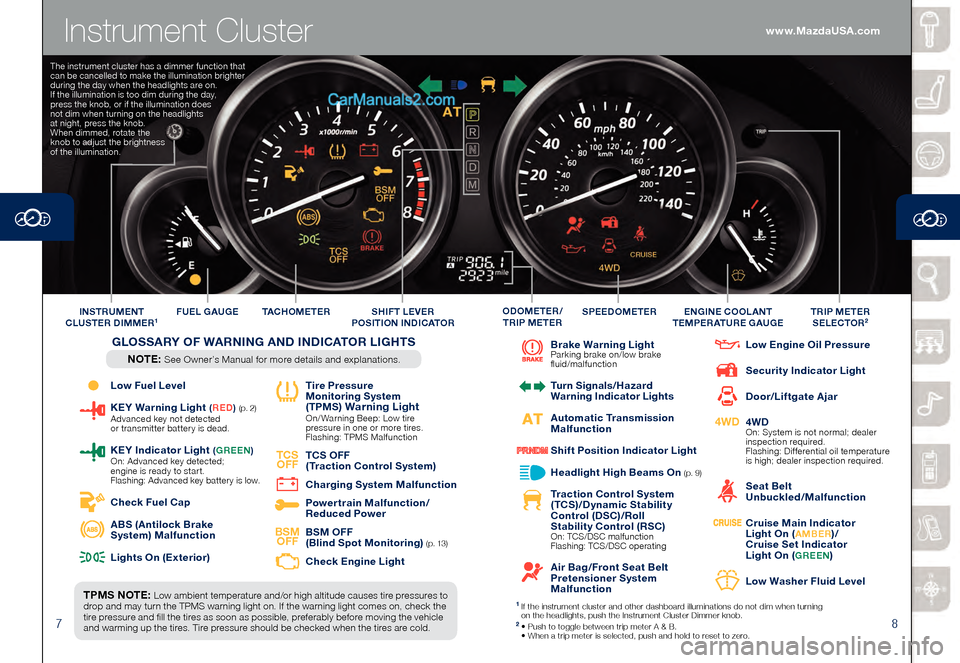
Instrument Cluster
Low Fuel Level
KEY Warning Light (RED ) (p. 2) Advanced key not detected
or transmitter batter y is dead.
KEY Indicator L ight (GREEN ) On: Advanced key detected;
engine is ready to start.
Flashing: Advanced key batter y is low.
Check Fuel Cap
ABS (Antilock Brake
System) Malfunction
Lights On (Exterior)
Tire Pressure
Monitoring System
(TPMS
) Warning Light On/ Warning Beep: Low tire
pressure in one or more tires.
Flashing: TPMS Malfunction
TCS OFF
TCS OFF
(Traction Control System)
Charging System Malfunction
Powertrain Malfunction/
Reduced Power
BSM OFF
BSM OFF
(Blind Spot Monitoring) ( p. 13)
Check Engine Light
Brake Warning Light Parking brake on/low brake
fluid/malfunction
Turn Signals/Hazard
Warning Indicator Lights
Automatic Transmission
Malfunction
Shift Position Indicator Light
Headlight High Beams On (p. 9)
Traction Control System
(TCS)/Dynamic Stability
Control (DSC)/Roll
Stability Control (RSC)
On: TCS/DSC malfunction
Flashing: TCS/DSC operating
Air Bag/Front Seat Belt
Pretensioner System
Malfunction
Low Engine Oil Pressure
Security Indicator Light
Door/Liftgate Ajar
4WD
4WD On: System is not normal; dealer
inspection required.
Flashing: Differential oil temperature
is high; dealer inspection required.
Seat Belt
Unbuckled/Malfunction
Cruise Main Indicator
Light On (AMBER)/
Cruise Set Indicator
Light On (
GREEN)
Low Washer Fluid Level
TPMS NOTE: Low ambient temperature and/or high altitude causes tire pressures to
drop and may turn the TPMS warning light on. If the warning light comes on, check the
tire pressure and fill the tires as soon as possible, preferably before moving the vehicle
and warming up the tires. Tire pressure should be checked when the tires are cold. TAC H O M E T E R
FUEL GAUGE
SPEEDOMETERTRIP METER
SELECTOR2INSTRUMENT
CLUSTER DIMMER1ENGINE COOLANT
TEMPERATURE GAUGEODOMETER/
TRIP METERSHIFT LEVER
POSITION INDICATOR
GLOSSARY OF WARNING AND INDICATOR LIGHTS
NOTE: See Owner’s Manual for more details and explanations.
1 If the instrument cluster and other dashboard illuminations do not dim when tur ning
on the headlights, push the Instrument Cluster Dimmer knob.
2 • Push to toggle between trip meter A & B. • When a trip meter is selected, push and hold to reset to zer o.
The instrument cluster has a dimmer function that
can be cancelled to make the illumination brighter
during the day when the headlights are on.
If the illumination is too dim during the day,
press the knob, or if the illumination does
not dim when turning on the headlights
at night, press the knob.
When dimmed, rotate the
knob to adjust the brightness
of the illumination.
www.MazdaUSA.com
Page 8 of 18

1314
Blind Spot Monitoring
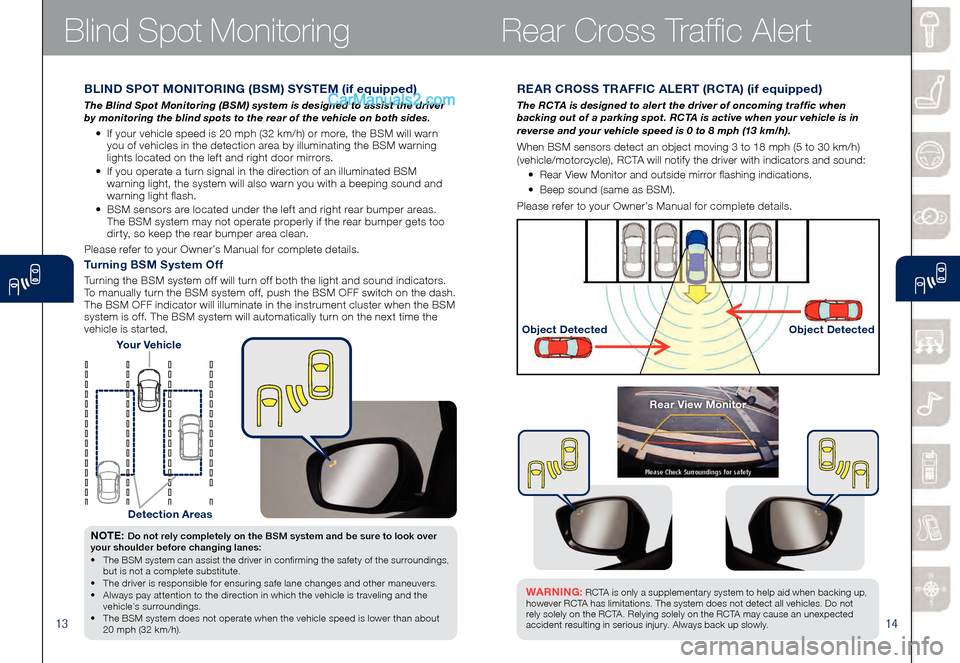
REAR CROSS TRAFFIC ALERT (RCTA) (if equipped)
The RCTA is designed to alert the driver of oncoming traffic when
backing out of a parking spot. RCTA is active when your vehicle is in
reverse and your vehicle speed is 0 to 8 mph (13 km/h).
When BSM sensors detect an object moving 3 to 18 mph (5 to 30 km/h)
(vehicle/motorcycle), RCTA will notify the driver with indicators and sound:
• Rear View Monitor and outside mirror flashing indications.
• Beep sound (same as BSM).
Please refer to your Owner’s Manual for complete details.
Object Detected Object Detected
WARNING: RCTA is only a supplementary system to help aid when backing up ,
however R C TA has limitations. The system does not detect all vehicles. Do not
rely solely on the R C TA . Relying solely on the R C TA may cause an unexpected
accident resulting in serious injury. Always back up slowly.
Rear View Monitor
BLIND SPOT MONITORING (BSM) SYSTEM (if equipped)
The Blind Spot Monitoring (BSM) system is designed to assist the driver
by monitoring the blind spots to the rear of the vehicle on both sides.
• If your vehicle speed is 20 mph (32 km/h) or more, the BSM will warn you of vehicles in the detection area by illuminating the BSM warning
lights located on the left and right door mirrors.
• If you operate a turn signal in the direction of an illuminated BSM
warning light, the system will also warn you with a beeping sound and
warning light flash.
• BSM sensors are located under the left and right rear bumper areas.
The BSM system may not operate properly if the rear bumper gets too
dirty, so keep the rear bumper area clean.
Please refer to your Owner’s Manual for complete details.
Your Vehicle
Detection Areas
NOTE: Do not rely completely on the BSM system and be sure to look over
your shoulder before changing lanes:
• The BSM system can assist the driver in confirming the safety of the surroundings, but is not a complete substitute. • The driver is responsible for ensuring safe lane changes and other maneuvers. • Always pay attention to the direction in which the vehicle is traveling and the vehicle’s surroundings. • The BSM system does not operate when the vehicle speed is lower than about 20 mph (32 km/h).
Turning BSM System Off
Turning the BSM system off will turn off both the light and sound indicators.
To manually turn the BSM system off, push the BSM OFF switch on the dash.
The BSM OFF indicator will illuminate in the instrument cluster when the BSM
system is off. The BSM system will automatically turn on the next time the
vehicle is started.
Rear Cross Traffic Alert
Page 17 of 18

Keyless Entry ...............................1-2 • K
eyless Transmitter • Advanced Key* • Do or Request Switches* • Liftgate Request Switch* • Po wer Door Locks
Starting The Engine .......................2 • Start Knob Ignition (Advanced Key*)
Seats ............................................3-4 • Adjustment • Memory Seat Function*
Rear Seat Access
...........................4 • 2nd and 3rd row seating access
Driver’s View ...............................5-6 • Location of Switches and Controls
Set Clock ........................................6
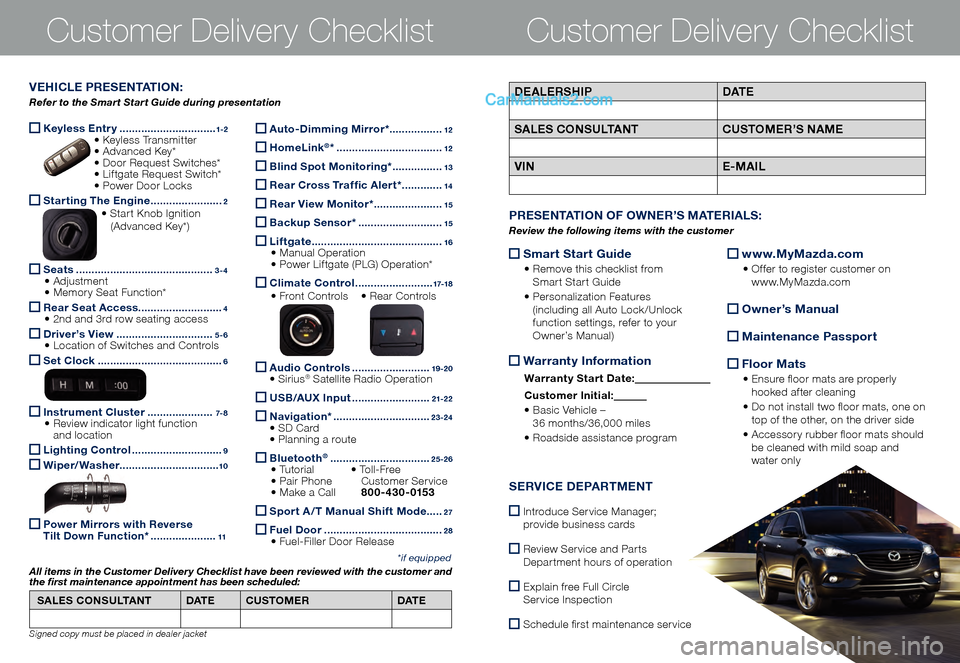
Instrument Cluster .....................7- 8 • Review indicator light function
and location
Lighting Control .............................9
Wiper/Washer
................................10
Power Mirrors with Reverse
Tilt Down Function* .....................11
Customer Delivery ChecklistCustomer Delivery Checklist
*if equipped
DEALERSHIP DAT E
SALES CONSULTANT CUSTOMER’S NAME
VIN E-MAILVEHICLE PRESENTATION:
Refer to the Smart Start Guide during presentation
Auto-Dimming Mirror* .................12
HomeLink®* ..................................12
Blind Spot Monitoring* ................13
Rear Cross Traffic Alert* .............14
Rear View Monitor* ......................15
Backup Sensor* ...........................15
Liftgate ..........................................16 • Manual Operation • Power Liftgate (PLG) Operation*
Climate Control .........................17-18
• Front Controls • Re
ar Controls
Audio Controls .........................19 -2 0 • Sirius® Satellite Radio Operation
USB/AUX Input .........................21-2 2
Navigation* ...............................23-24 • SD Card • Planning a route
Bluetooth® ................................25-26 • Tutorial • To l l - F r e e • Pair Phone
Cu stomer Service • Make a Call 800-430-0153
Sport A /T Manual Shift Mode .....27
Fuel Door ......................................2 8 • Fuel-Filler Door Release
SALES CONSULTANT
DAT ECUSTOMER DAT E
All items in the Customer Deliver y Checklist have been reviewed with the customer and
the first maintenance appointment has been scheduled:
Signed copy must be placed in dealer jacket
Smart Start Guide
• Remove this checklist from
Smart Start Guide
• Personalization Features
(including all Auto Lock/Unlock
function settings, refer to your
Owner’s Manual)
Warranty Information
Warranty Start Date:
Customer Ini tial:
• Basic Vehicle –
36 months/36,000 miles
• Roadside assistance program
www.MyMazda.com
• Offer to register customer on
www.MyMazda.com
Owner’s Manual
Maintenance Passport
Floor Mats
• Ensure floor mats are properly
hooked after cleaning
• Do not install two floor mats, one on
top of the other, on the driver side
• Accessory rubber floor mats should
be cleaned with mild soap and
water only
PRESENTATION OF OWNER’S MATERIALS:
Review the following items with the customer
SERVICE DEPARTMENT
Introduce Service Manager;
provide business cards
Review Service and Parts
Department hours of operation
Explain free Full Circle
Service Inspection
Schedule first maintenance service