keyless MAZDA MODEL CX-9 2015 Smart Start Guide (in English)
[x] Cancel search | Manufacturer: MAZDA, Model Year: 2015, Model line: MODEL CX-9, Model: MAZDA MODEL CX-9 2015Pages: 18, PDF Size: 5.42 MB
Page 2 of 18

12
Key
Auxiliary Key Release
Auxiliary Key
Key (Rear)
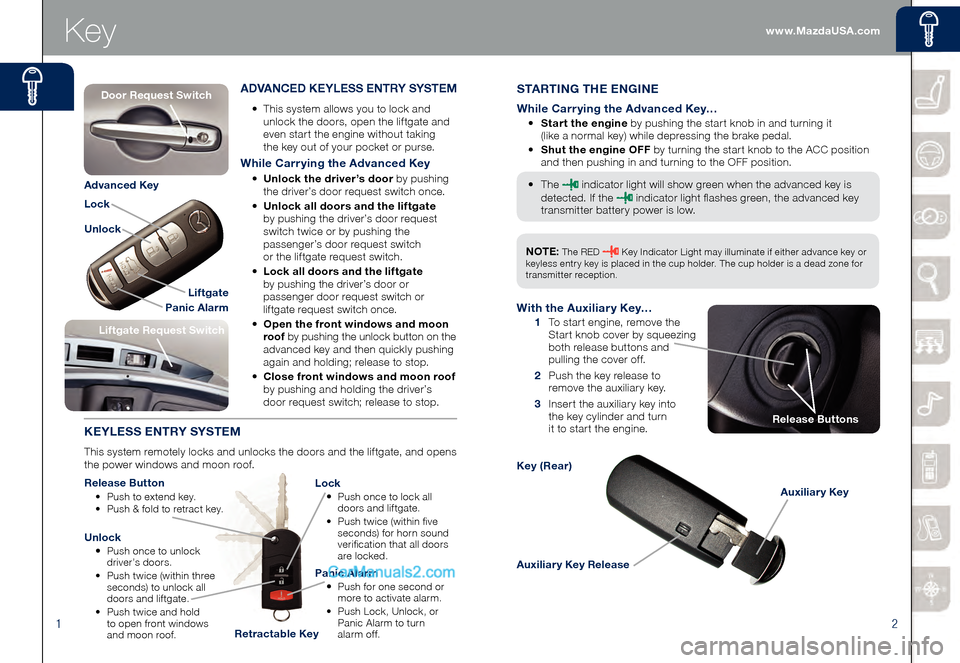
STARTING THE ENGINE
While Carrying the Advanced Key…
• Start the engine by pushing the start knob in and turning it
(like a normal key) while depressing the brake pedal.
• Shut the engine OFF by turning the start knob to the ACC position
and then pushing in and turning to the OFF position.
• The indicator light will show green when the advanced key is
detected. If the indicator light flashes green, the advanced key
transmitter battery power is low.
ADVANCED KEYLESS ENTRY SYSTEM
• This system allows you to lock and
unlock the doors, open the liftgate and
even start the engine without taking
the key out of your pocket or purse.
While Carrying the Advanced Key
• Unlock the driver’s door by pushing
the driver’s door request switch once.
• Unlock all doors and the liftgate
by pushing the driver’s door request
switch twice or by pushing the
passenger’s door request switch
or the liftgate request switch.
• Lock all doors and the liftgate
by pushing the driver’s door or
passenger door request switch or
liftgate request switch once.
• Open the front windows and moon
roof by pushing the unlock button on the
advanced key and then quickly pushing
again and holding; release to stop.
• Close front windows and moon roof
by pushing and holding the driver’s
door request switch; release to stop.
KEYLESS ENTRY SYSTEM
This system remotely locks and unlocks the doors and the liftgate, and opens
the power windows and moon roof.
Release Button
• Push to extend key. • Push & fold to retract key.
Lock
• Push once to lock all
doors and liftgate.
• Push twice (within five
seconds) for horn sound
verification that all doors
are locked.
Unlock
• Push once to unlock
driver’s doors.
• Push twice (within three
seconds) to unlock all
doors and liftgate.
• Push twice and hold
to open front windows
and moon roof.
Panic Alarm
• Push for one second or
more to activate alarm.
• Push Lock, Unlock, or
Panic Alarm to turn
alarm of f.
Liftgate Request Switch
With the Auxiliary Key…
1 To start engine, remove the
Start knob cover by squeezing
both release buttons and
pulling the cover off.
2 Push the key release to
remove the auxiliary key.
3 Insert the auxiliary key into the key cylinder and turn
it to start the engine.
Liftgate
Panic Alarm
Lock
Unlock
Advanced Key
Retractable Key
Release Buttons
NOTE: The RED Key Indicator Light may illuminate if either advance key or
keyless entry key is placed in the cup holder. The cup holder is a dead zone for
transmitter reception.
Door Request Switch
www.MazdaUSA.com
Page 9 of 18

1516
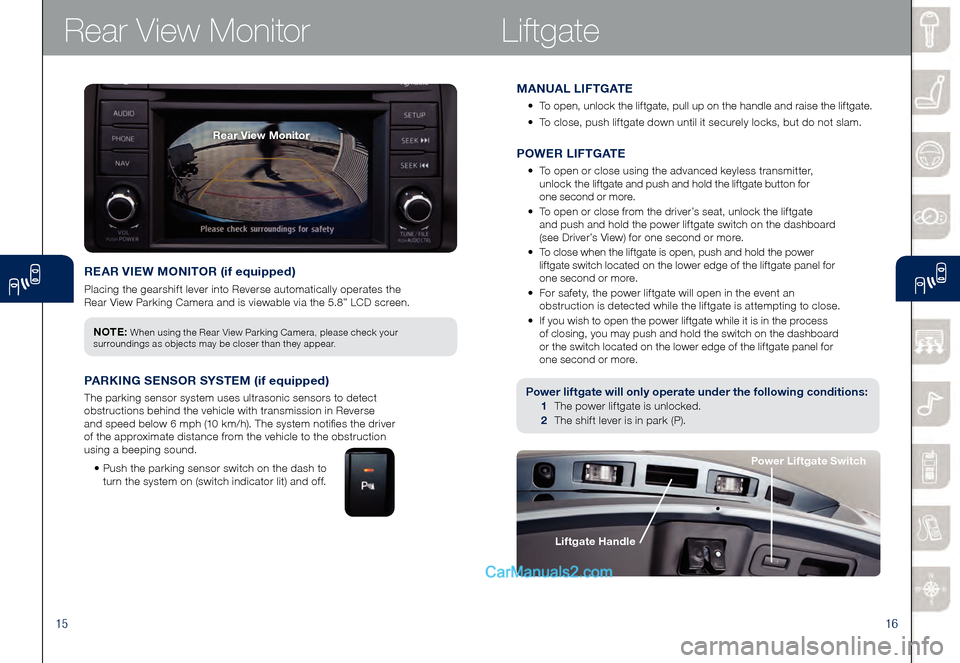
REAR VIEW MONITOR (if equipped)
Placing the gearshift lever into Reverse automatically operates the
Rear View Parking Camera and is viewable via the 5.8” LCD screen.
Rear View MonitorLiftgate
Power liftgate will only operate under the following conditions:
1 The power liftgate is unlocked.
2 The shift lever is in park (P).
NOTE: When using the Rear View Parking Camera, please check your
surroundings as objects may be closer than they appear.
PARKING SENSOR SYSTEM (if equipped)
The parking sensor system uses ultrasonic sensors to detect
obstructions behind the vehicle with transmission in Reverse
and speed below 6 mph (10 km/h). The system notifies the driver
of the approximate distance from the vehicle to the obstruction
using a beeping sound.
• Push the parking sensor switch on the dash to
turn the system on (switch indicator lit) and off.
Liftgate Handle
Power Liftgate Switch
MANUAL LIFTGATE
• To open, unlock the liftgate, pull up on the handle and raise the liftgate.
• To close, push liftgate down until it securely locks, but do not slam.
Rear View Monitor
POWER LIFTGATE
• To open or close using the advanced keyless transmitter,
unlock the liftgate and push and hold the liftgate button for
one second or more.
• To open or close from the driver’s seat, unlock the liftgate
and push and hold the power liftgate switch on the dashboard
(see Driver’s View) for one second or more.
• To close when the liftgate is open, push and hold the power
liftgate switch located on the lower edge of the liftgate panel for
one second or more.
• For safety, the power liftgate will open in the event an
obstruction is detected while the liftgate is attempting to close.
• If you wish to open the power liftgate while it is in the process
of closing, you may push and hold the switch on the dashboard
or the switch located on the lower edge of the liftgate panel for
one second or more.
Page 17 of 18

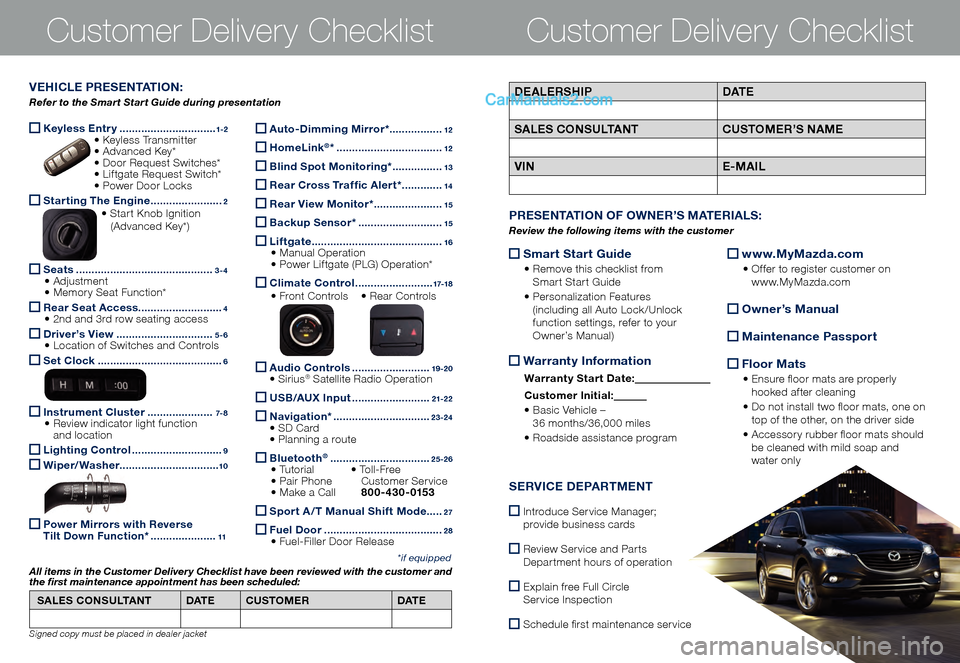
Keyless Entry ...............................1-2 • K
eyless Transmitter • Advanced Key* • Do or Request Switches* • Liftgate Request Switch* • Po wer Door Locks
Starting The Engine .......................2 • Start Knob Ignition (Advanced Key*)
Seats ............................................3-4 • Adjustment • Memory Seat Function*
Rear Seat Access
...........................4 • 2nd and 3rd row seating access
Driver’s View ...............................5-6 • Location of Switches and Controls
Set Clock ........................................6
Instrument Cluster .....................7- 8 • Review indicator light function
and location
Lighting Control .............................9
Wiper/Washer
................................10
Power Mirrors with Reverse
Tilt Down Function* .....................11
Customer Delivery ChecklistCustomer Delivery Checklist
*if equipped
DEALERSHIP DAT E
SALES CONSULTANT CUSTOMER’S NAME
VIN E-MAILVEHICLE PRESENTATION:
Refer to the Smart Start Guide during presentation
Auto-Dimming Mirror* .................12
HomeLink®* ..................................12
Blind Spot Monitoring* ................13
Rear Cross Traffic Alert* .............14
Rear View Monitor* ......................15
Backup Sensor* ...........................15
Liftgate ..........................................16 • Manual Operation • Power Liftgate (PLG) Operation*
Climate Control .........................17-18
• Front Controls • Re
ar Controls
Audio Controls .........................19 -2 0 • Sirius® Satellite Radio Operation
USB/AUX Input .........................21-2 2
Navigation* ...............................23-24 • SD Card • Planning a route
Bluetooth® ................................25-26 • Tutorial • To l l - F r e e • Pair Phone
Cu stomer Service • Make a Call 800-430-0153
Sport A /T Manual Shift Mode .....27
Fuel Door ......................................2 8 • Fuel-Filler Door Release
SALES CONSULTANT
DAT ECUSTOMER DAT E
All items in the Customer Deliver y Checklist have been reviewed with the customer and
the first maintenance appointment has been scheduled:
Signed copy must be placed in dealer jacket
Smart Start Guide
• Remove this checklist from
Smart Start Guide
• Personalization Features
(including all Auto Lock/Unlock
function settings, refer to your
Owner’s Manual)
Warranty Information
Warranty Start Date:
Customer Ini tial:
• Basic Vehicle –
36 months/36,000 miles
• Roadside assistance program
www.MyMazda.com
• Offer to register customer on
www.MyMazda.com
Owner’s Manual
Maintenance Passport
Floor Mats
• Ensure floor mats are properly
hooked after cleaning
• Do not install two floor mats, one on
top of the other, on the driver side
• Accessory rubber floor mats should
be cleaned with mild soap and
water only
PRESENTATION OF OWNER’S MATERIALS:
Review the following items with the customer
SERVICE DEPARTMENT
Introduce Service Manager;
provide business cards
Review Service and Parts
Department hours of operation
Explain free Full Circle
Service Inspection
Schedule first maintenance service