turn signal MAZDA MODEL CX-9 2015 Smart Start Guide (in English)
[x] Cancel search | Manufacturer: MAZDA, Model Year: 2015, Model line: MODEL CX-9, Model: MAZDA MODEL CX-9 2015Pages: 18, PDF Size: 5.42 MB
Page 4 of 18
56
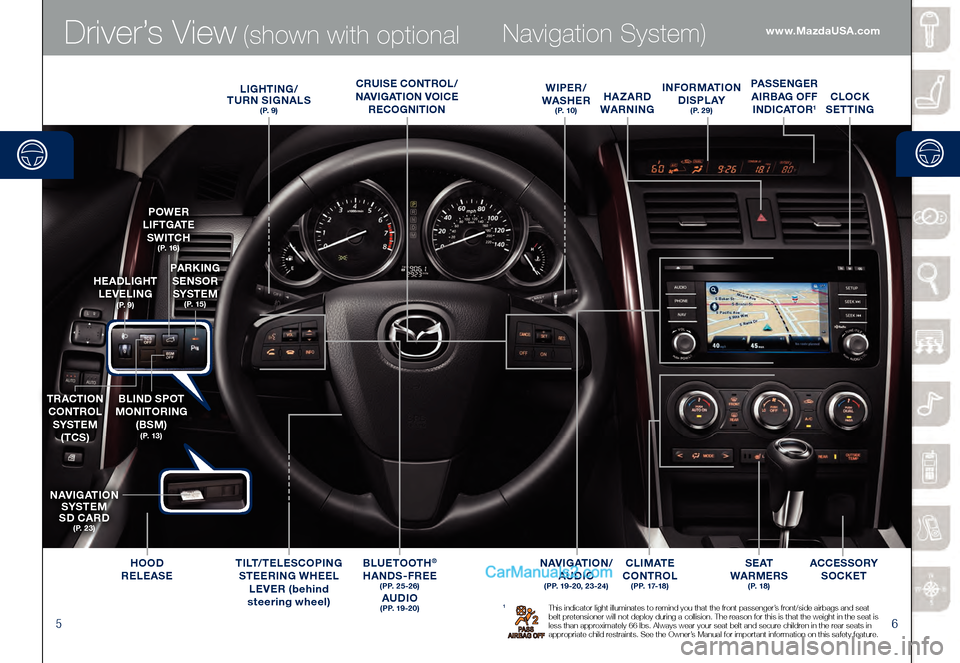
Driver’s View (shown with optional Navigation System)
1 This indicator light illuminates to remind you that the front passenger’s front/side airbags and seat
belt pretensioner will not deploy during a collision. The reason for this is that the weight in the seat is
less than approximately 66 lbs. Always wear your seat belt and secure children in the rear seats in
appropriate child restraints. See the Owner’s Manual for important information on this safety feature.
BLUETOOTH®
HANDS-FREE
( P P. 2 5 - 2 6 )
AUDIO
( P P. 1 9 - 2 0 )
PARKING
SENSOR
SYSTEM
( P. 1 5 )
HEADLIGHT
LEVELING
( P. 9 )
POWER
L I F T G AT E SWITCH
( P. 1 6 )
TRACTION
CONTROL
SYSTEM (TCS)
BLIND SPOT
MONITORING (BSM)
( P. 1 3 )
NAVIGATION SYSTEM
SD CARD
( P. 2 3 )
INFORMATION D I S P L AY
( P. 2 9 )
C L I M AT E
CONTROL
( P P. 17-1 8 )
LIGHTING/
TURN SIGNALS
( P. 9 )
HOOD
RELEASE ACCESSORY
SOCKET
TIL
T/TELESCOPING
STEERING WHEEL LEVER (behind
steering wheel)
HAZARD
WARNING
S E AT
WARMERS
( P. 1 8 )
PASSENGER
AIRBAG OFF INDICATOR
1CLOCK
SETTING
NAVIGATION/ AUDIO
(PP. 19-20, 23-24)
WIPER/
WASHER
( P. 1 0 )
CRUISE CONTROL/
NAVIGATION VOICE RECOGNITION
www.MazdaUSA.com
Page 5 of 18
78
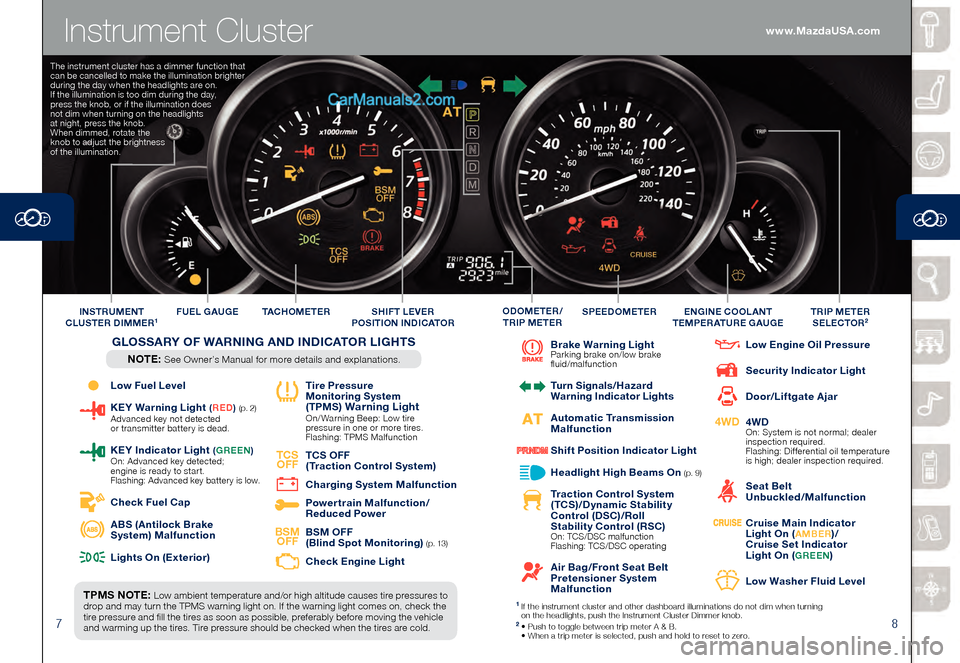
Instrument Cluster
Low Fuel Level
KEY Warning Light (RED ) (p. 2) Advanced key not detected
or transmitter batter y is dead.
KEY Indicator L ight (GREEN ) On: Advanced key detected;
engine is ready to start.
Flashing: Advanced key batter y is low.
Check Fuel Cap
ABS (Antilock Brake
System) Malfunction
Lights On (Exterior)
Tire Pressure
Monitoring System
(TPMS
) Warning Light On/ Warning Beep: Low tire
pressure in one or more tires.
Flashing: TPMS Malfunction
TCS OFF
TCS OFF
(Traction Control System)
Charging System Malfunction
Powertrain Malfunction/
Reduced Power
BSM OFF
BSM OFF
(Blind Spot Monitoring) ( p. 13)
Check Engine Light
Brake Warning Light Parking brake on/low brake
fluid/malfunction
Turn Signals/Hazard
Warning Indicator Lights
Automatic Transmission
Malfunction
Shift Position Indicator Light
Headlight High Beams On (p. 9)
Traction Control System
(TCS)/Dynamic Stability
Control (DSC)/Roll
Stability Control (RSC)
On: TCS/DSC malfunction
Flashing: TCS/DSC operating
Air Bag/Front Seat Belt
Pretensioner System
Malfunction
Low Engine Oil Pressure
Security Indicator Light
Door/Liftgate Ajar
4WD
4WD On: System is not normal; dealer
inspection required.
Flashing: Differential oil temperature
is high; dealer inspection required.
Seat Belt
Unbuckled/Malfunction
Cruise Main Indicator
Light On (AMBER)/
Cruise Set Indicator
Light On (
GREEN)
Low Washer Fluid Level
TPMS NOTE: Low ambient temperature and/or high altitude causes tire pressures to
drop and may turn the TPMS warning light on. If the warning light comes on, check the
tire pressure and fill the tires as soon as possible, preferably before moving the vehicle
and warming up the tires. Tire pressure should be checked when the tires are cold. TAC H O M E T E R
FUEL GAUGE
SPEEDOMETERTRIP METER
SELECTOR2INSTRUMENT
CLUSTER DIMMER1ENGINE COOLANT
TEMPERATURE GAUGEODOMETER/
TRIP METERSHIFT LEVER
POSITION INDICATOR
GLOSSARY OF WARNING AND INDICATOR LIGHTS
NOTE: See Owner’s Manual for more details and explanations.
1 If the instrument cluster and other dashboard illuminations do not dim when tur ning
on the headlights, push the Instrument Cluster Dimmer knob.
2 • Push to toggle between trip meter A & B. • When a trip meter is selected, push and hold to reset to zer o.
The instrument cluster has a dimmer function that
can be cancelled to make the illumination brighter
during the day when the headlights are on.
If the illumination is too dim during the day,
press the knob, or if the illumination does
not dim when turning on the headlights
at night, press the knob.
When dimmed, rotate the
knob to adjust the brightness
of the illumination.
www.MazdaUSA.com
Page 6 of 18
910
Lights
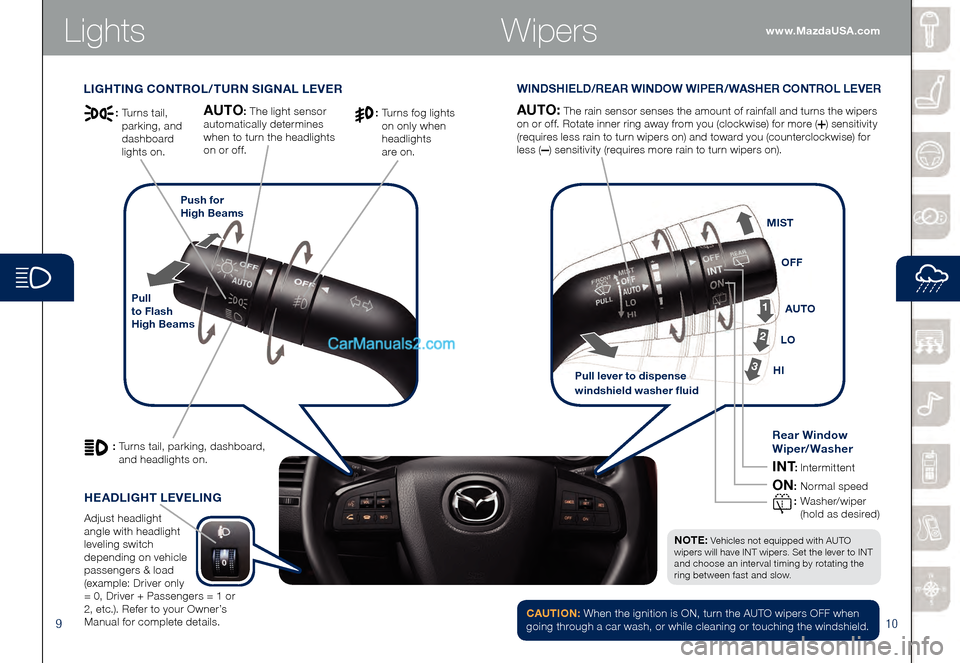
LIGHTING CONTROL/TURN SIGNAL LEVERWINDSHIELD/REAR WINDOW WIPER/WASHER CONTROL LEVER
Pull
to Flash
High BeamsPush for
High Beams
AUTO: The rain sensor senses the amount of rainfall and turns the wipers
on or off. Rotate inner ring away from you (clockwise) for more (
) sensitivity
(requires less rain to turn wipers on) and toward you (counterclockwise) for
less (
) sensitivity (requires more rain to turn wipers on).
AUTO: The light sensor
automatically determines
when to turn the headlights
on or off.
: Turns tail, parking, dashboard,
and headlights on.
: Turns fog lights
on only when
headlights
are on.: Turns tail,
parking, and
dashboard
lights on.
NOTE: Vehicles not e quipped with AUTO
wipers will have INT wipers. Set the lever to INT
and choose an interval timing by rotating the
ring between fast and slow.
HEADLIGHT LEVELING
Adjust headlight
angle with headlight
leveling switch
depending on vehicle
passengers & load
(example: Driver only
= 0, Driver + Passengers = 1 or
2, etc.). Refer to your Owner’s
Manual for complete details.
Pull lever to dispense
windshield washer fluid
1
2
3HI LOAUTO
OFF
MIST
Rear Window
Wiper/Washer
INT: Intermittent
ON: Normal speed
: W ashe r/w ip e r
(hold as desired)
CAUTION: When the ignition is ON, turn the AUTO wipers OFF when
going through a car wash, or while cleaning or touching the windshield.
Wiperswww.MazdaUSA.com
Page 8 of 18
1314
Blind Spot Monitoring
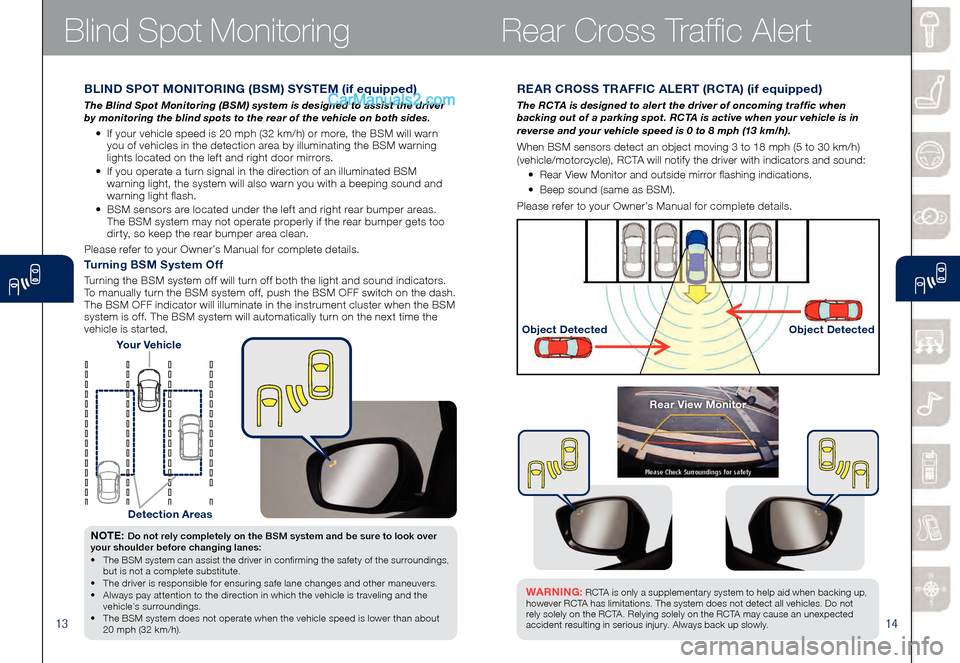
REAR CROSS TRAFFIC ALERT (RCTA) (if equipped)
The RCTA is designed to alert the driver of oncoming traffic when
backing out of a parking spot. RCTA is active when your vehicle is in
reverse and your vehicle speed is 0 to 8 mph (13 km/h).
When BSM sensors detect an object moving 3 to 18 mph (5 to 30 km/h)
(vehicle/motorcycle), RCTA will notify the driver with indicators and sound:
• Rear View Monitor and outside mirror flashing indications.
• Beep sound (same as BSM).
Please refer to your Owner’s Manual for complete details.
Object Detected Object Detected
WARNING: RCTA is only a supplementary system to help aid when backing up ,
however R C TA has limitations. The system does not detect all vehicles. Do not
rely solely on the R C TA . Relying solely on the R C TA may cause an unexpected
accident resulting in serious injury. Always back up slowly.
Rear View Monitor
BLIND SPOT MONITORING (BSM) SYSTEM (if equipped)
The Blind Spot Monitoring (BSM) system is designed to assist the driver
by monitoring the blind spots to the rear of the vehicle on both sides.
• If your vehicle speed is 20 mph (32 km/h) or more, the BSM will warn you of vehicles in the detection area by illuminating the BSM warning
lights located on the left and right door mirrors.
• If you operate a turn signal in the direction of an illuminated BSM
warning light, the system will also warn you with a beeping sound and
warning light flash.
• BSM sensors are located under the left and right rear bumper areas.
The BSM system may not operate properly if the rear bumper gets too
dirty, so keep the rear bumper area clean.
Please refer to your Owner’s Manual for complete details.
Your Vehicle
Detection Areas
NOTE: Do not rely completely on the BSM system and be sure to look over
your shoulder before changing lanes:
• The BSM system can assist the driver in confirming the safety of the surroundings, but is not a complete substitute. • The driver is responsible for ensuring safe lane changes and other maneuvers. • Always pay attention to the direction in which the vehicle is traveling and the vehicle’s surroundings. • The BSM system does not operate when the vehicle speed is lower than about 20 mph (32 km/h).
Turning BSM System Off
Turning the BSM system off will turn off both the light and sound indicators.
To manually turn the BSM system off, push the BSM OFF switch on the dash.
The BSM OFF indicator will illuminate in the instrument cluster when the BSM
system is off. The BSM system will automatically turn on the next time the
vehicle is started.
Rear Cross Traffic Alert
Page 11 of 18
1920
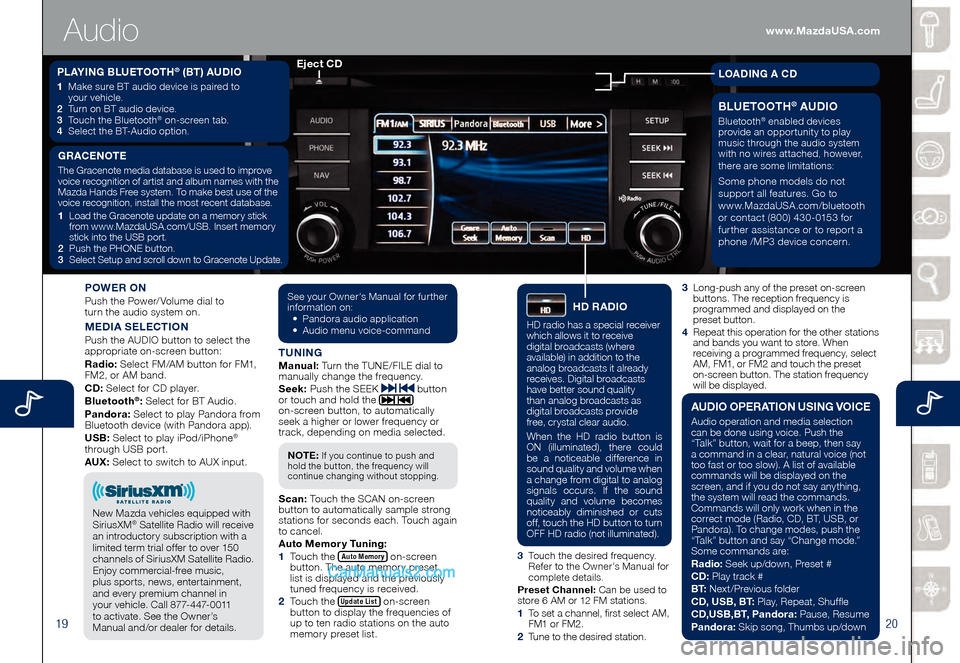
3 Long-push any of the preset on-screen buttons. The reception frequency is
programmed and displayed on the
preset button.
4
Repeat this operation for the other stations and bands you want to store. When
receiving a programmed frequency, select
AM, FM1, or FM2 and touch the preset
on-screen button. The station frequency
will be displayed.
POWER ON
Push the Power/Volume dial to
turn the audio system on.
MEDIA SELECTION
Push the AUDIO button to select the
appropriate on-screen button:
Radio: Select FM/AM button for FM1,
FM2, or AM band.
CD: Select for CD player.
Bluetooth
®: Select for BT Audio.
Pandora: Select to play Pandora from
Bluetooth device (with Pandora app).
USB: Select to play iPod/iPhone
®
through USB port.
AUX: Select to switch to AUX input.
TUNINGManual: Turn the TUNE/FILE dial to
manually change the frequency.
S eek: Push the SEEK
button
or touch and hold the
on-screen button, to automatically
seek a higher or lower frequency or
track, depending on media selected.
S can: Touch the SCAN on-screen
button to automatically sample strong
stations for seconds each. Touch again
to cancel.
Auto Memor y Tuning:
1
Touch the Auto Memory on-screen button. The auto memory preset
list is displayed and the previously
tuned frequency is received.
2
Touch the Update List on-screen button to display the frequencies of
up to ten radio stations on the auto
memory preset list.
See your Owner’s Manual for further information on:• Pandora audio application• Audio menu voice-command
NOTE: If you continue to push and
hold the button, the frequency will
continue changing without stopping.
3 Touch the desired frequency.
Refer to the Owner’s Manual for
complete details.
Preset Channel: Can be used to
store 6 AM or 12 FM stations.
1 To set a channel, first select AM, FM1 or FM2.
2 Tune to the desired station.
PLAYING BLUETOOTH® (BT) AUDIO
1 Make sure BT audio device is paired to
your vehicle.
2
Turn on BT audio device.3 Touch the Bluetooth® on-screen tab.
4 Select the BT-Audio option.
Eject CD
Audio
GRACENOTE
The Gracenote media database is used to improve
voice recognition of artist and album names with the
Mazda Hands Free system. To make best use of the
voice recognition, install the most recent database.
1
Load the Gracenote update on a memory stick
from www.MazdaUSA.com/USB. Insert memory
stick into the USB port.
2
Push the PHONE button.3 Select Setup and scroll down to Gracenote Update.
BLUETOOTH® AUDIO
Bluetooth® enabled devices
provide an opportunity to play
music through the audio system
with no wires attached, however,
there are some limitations:
Some phone models do not
support all features. Go to
www.MazdaUSA.com/bluetooth
or contact (800) 430-0153 for
further assistance or to report a
phone /MP3 device concern.
LOADING A CD
HD RADIO
HD radio has a special receiver
which allows it to receive
digital broadcasts (where
available) in addition to the
analog broadcasts it already
receives. Digital broadcasts
have better sound quality
than analog broadcasts as
digital broadcasts provide
free, crystal clear audio.
When the HD radio button is
ON (illuminated), there could
be a noticeable difference in
sound quality and volume when
a change from digital to analog
signals occurs. If the sound
quality and volume becomes
noticeably diminished or cuts
off, touch the HD button to turn
OFF HD radio (not illuminated).
AUDIO OPERATION USING VOICE
Audio operation and media selection
can be done using voice. Push the
“Talk” button, wait for a beep, then say
a command in a clear, natural voice (not
too fast or too slow). A list of available
commands will be displayed on the
screen, and if you do not say anything,
the system will read the commands.
Commands will only work when in the
correct mode (Radio, CD, BT, USB, or
Pandora). To change modes, push the
“Talk” button and say “Change mode.”
Some commands are:
Radio: Seek up/down, Preset #
CD: Play track #
B T: Next/Previous folder
CD, USB, BT: Play, Repeat, Shuffle
CD,USB,BT, Pandora: Pause, Resume
Pandora: Skip song, Thumbs up/down
New Mazda vehicles equipped with
SiriusXM® Satellite Radio will receive
an introductory subscription with a
limited term trial offer to over 150
channels of SiriusXM Satellite Radio.
Enjoy commercial-free music,
plus sports, news, entertainment,
and every premium channel in
your vehicle. Call 877-447-0011
to activate. See the Owner’s
Manual and/or dealer for details.
www.MazdaUSA.com
Page 14 of 18
2526
Bluetooth
®
PAIRING YOUR BLUETOOTH® PHONE OR AUDIO DEVICE
NOTE:
• For safety reasons, you cannot pair a phone while driving.
• Before pairing your cell phone or audio device, you must manually turn on
the Bluetooth® function on the device. Refer to your device's Bluetooth® for
steps to turn on Bluetooth®.
• For customer service and device compatibility:
Toll-free call: 800-430-0153
Website: www.MazdaUSA.com/bluetooth
• IMPORTANT: Set the volume level on your cell phone or audio device to the highest
level before distortion starts, then adjust the volume on the vehicle's audio system.
• When in range of another Wi-Fi device, the Bluetooth connection between your phone and the system may disconnect for a short time if you have Wi-Fi enabled. Turn off Wi-Fi on your phone if needed.
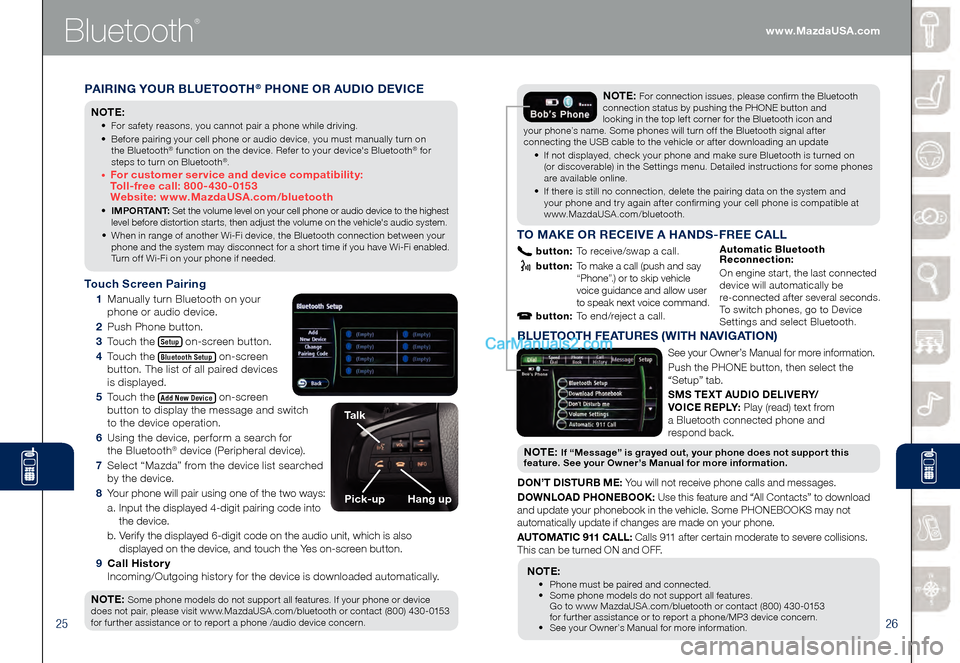
Touch Screen Pairing
1 Manually turn Bluetooth on your
phone or audio device.
2 Push Phone button.
3 Touch the Setup on-screen button.
4 Touch the Bluetooth Setup on-screen
button. The list of all paired devices
is displayed.
5 Touch the Add New Device on-screen
button to display the message and switch
to the device operation.
6 Using the device, perform a search for
the Bluetooth® device (Peripheral device).
7 Select “Mazda” from the device list searched
by the device.
8 Your phone will pair using one of the two ways:
a. Input the displayed 4-digit pairing code into
the device.
b. Verify the displayed 6-digit code on the audio unit, which is also
displayed on the device, and touch the Yes on-screen button.
9 Call History
Incoming/Outgoing history for the device is downloaded automatically.
NOTE:
Some phone models do not support all features. If your phone or device
does not pair, please visit www.MazdaUSA.com/bluetooth or contact (800) 430-0153
for further assistance or to report a phone /audio device concern.
NOTE: For connection issues, please confirm the Bluetooth
connection status by pushing the PHONE button and
looking in the top left corner for the Bluetooth icon and
your phone’s name. Some phones will turn off the Bluetooth signal after
connecting the USB cable to the vehicle or after downloading an update
• If not displayed, check your phone and make sure Bluetooth is turned on (or discoverable) in the Settings menu. Detailed instructions for some phones are available online.
• If there is still no connection, delete the pairing data on the system and your phone and try again after confirming your cell phone is compatible at www.MazdaUSA.com/bluetooth.
Talk
Pick-upHang up
BLUETOOTH FEATURES (WITH NAVIGATION)
See your Owner’s Manual for more information.
Push the PHONE button, then select the
“Setup” tab.
SMS TEXT AUDIO DELIVERY/
VOICE REPLY: Play (read) text from
a Bluetooth connected phone and
respond back.
NOT E: If “Message” is grayed out, your phone does not support this
feature. See your Owner’s Manual for more information.
DON’T DISTURB ME: You will not receive phone calls and messages.
DOWNLOAD PHONEBOOK: Use this feature and “All Contacts” to download
and update your phonebook in the vehicle. Some PHONEBOOKS may not
automatically update if changes are made on your phone.
AUTOMATIC 911 CALL: Calls 911 after certain moderate to severe collisions.
This can be turned ON and OFF.
NOTE:
• Phone must be paired and connected. • Some phone models do not support all features.
Go to www MazdaUSA.com/bluetooth or contact (800) 430-0153
for further assistance or to report a phone/MP3 device concern.
• See your Owner’s Manual for more information.
TO MAKE OR RECEIVE A HANDS-FREE CALL
button: To receive/swap a call.
button: To make a call (push and say “Phone”.) or to skip vehicle
voice guidance and allow user
to speak next voice command.
button: To end/reject a call.
Automatic Bluetooth
Reconnection:
On engine start, the last connected
device will automatically be
re-connected after several seconds.
To switch phones, go to Device
Settings and select Bluetooth.
www.MazdaUSA.com