lock MAZDA MODEL CX-9 2019 (in English) Manual Online
[x] Cancel search | Manufacturer: MAZDA, Model Year: 2019, Model line: MODEL CX-9, Model: MAZDA MODEL CX-9 2019Pages: 692
Page 361 of 692

’éĘVehicle shapes which do not reflect radar waves well such as empty trailers with a low
vehicle height and sports cars.
’éĘVehicles are shipped with the direction of the radar sensors (rear) adjusted for each
vehicle to a loaded vehicle condition so that the radar sensors (rear) detect approaching
vehicles correctly. If the direction of the radar sensors (rear) has deviated for some
reason, have the vehicle inspected at an Authorized Mazda Dealer.
’éĘFor repairs or replacement of the radar sensors (rear), or bumper repairs, paintwork, and
replacement near the radar sensors, consult an Authorized Mazda Dealer.
’éĘTurn off the system while pulling a trailer or while an accessory such as a bicycle carrier
is installed to the rear of the vehicle. Otherwise, the radio waves emitted by the radar will
be blocked causing the system to not operate normally.
’éĘThe radar sensors are regulated by the relevant radio wave laws of the country in which
the vehicle is driven. If the vehicle is driven abroad, authorization from the country in
which the vehicle is driven may be required.
When Driving
i-ACTIVSENSE
4-201
CX-9_8HB2-EA-18G_Edition1 2018-5-11 13:09:27
Page 369 of 692

As an added safety feature, your vehicle has been equipped with a tire pressure monitoring
system (TPMS) that illuminates a low tire pre ssure telltale when one or more of your tires is
significantly under-inflated. Accordingly, when th e low tire pressure telltale illuminates, you
should stop and check your tires as soon as possible, and inflate them to the proper
pressure. Driving on a significantly under-in flated tire causes the tire to overheat and can
lead to tire failure. Under-inflation also reduce s fuel efficiency and tire tread life, and may
affect the vehicle's handling and stopping ability.
Please note that the TPMS is not a substitute for proper tire maintenance, and it is the
driver's responsibility to maintain correct ti re pressure, even if under-inflation has not
reached the level to trigger illumination of the TPMS low tire pressure telltale.
Your vehicle has also been equipped with a TPMS malfunction indicator to indicate when
the system is not operating properly.
The TPMS malfunction indicator is combined with the low tire pressure telltale. When the
system detects a malfunction, the telltale wi ll flash for approximately one minute and then
remain continuously illuminated. This sequence will continue upon subsequent vehicle
start-ups as long as the malfunction exists. When the malfunction indicator is illuminated,
the system may not be able to detect or signal low tire pressure as intended. TPMS
malfunctions may occur for a variety of reasons, including the installation of replacement
or alternate tires or wheels on the vehicle th at prevent the TPMS from functioning properly.
Always check the TPMS malfunction telltale after replacing one or more tires or wheels on
your vehicle to ensure that the replacement or alternate tires and wheels allow the TPMS to
continue to function properly.
’āś To avoid false readings, the system samples for a little while before indicating a problem. As
a result it will not instantaneously regi ster a rapid tire deflation or blow out.
Ō¢╝System Error Activation
When the warning light flashes, there may
be a system malfunction. Consult an
Authorized Mazda Dealer.
A system error activation may occur in the
following cases:
’éĘWhen there is equipment or a device
near the vehicle using the same radio
frequency as that of the tire pressure
sensors.
’éĘWhen a metallic device such as a
non-genuine navigation system is
equipped near the center of the
dashboard, which may block radio
signals from the tire
pressure sensor to
the receiver unit.
’éĘWhen using the following devices in the
vehicle that may cause radio
interference with the receiver unit.
’éĘA digital device such as a personal
computer.
’éĘA current converter device such as a
DC-AC converter.
’éĘWhen excess snow or ice adheres to the
vehicle, especially around the wheels.
’éĘWhen the tire pressu re sensor batteries
are exhausted.
’éĘWhen using a wheel with no tire
pressure sensor installed.
’éĘWhen using tires with steel wire
reinforcement in the sidewalls.
’éĘWhen using tire chains.
When Driving
Tire Pressure Monitoring System
4-209
CX-9_8HB2-EA-18G_Edition1 2018-5-11 13:09:27
Page 395 of 692
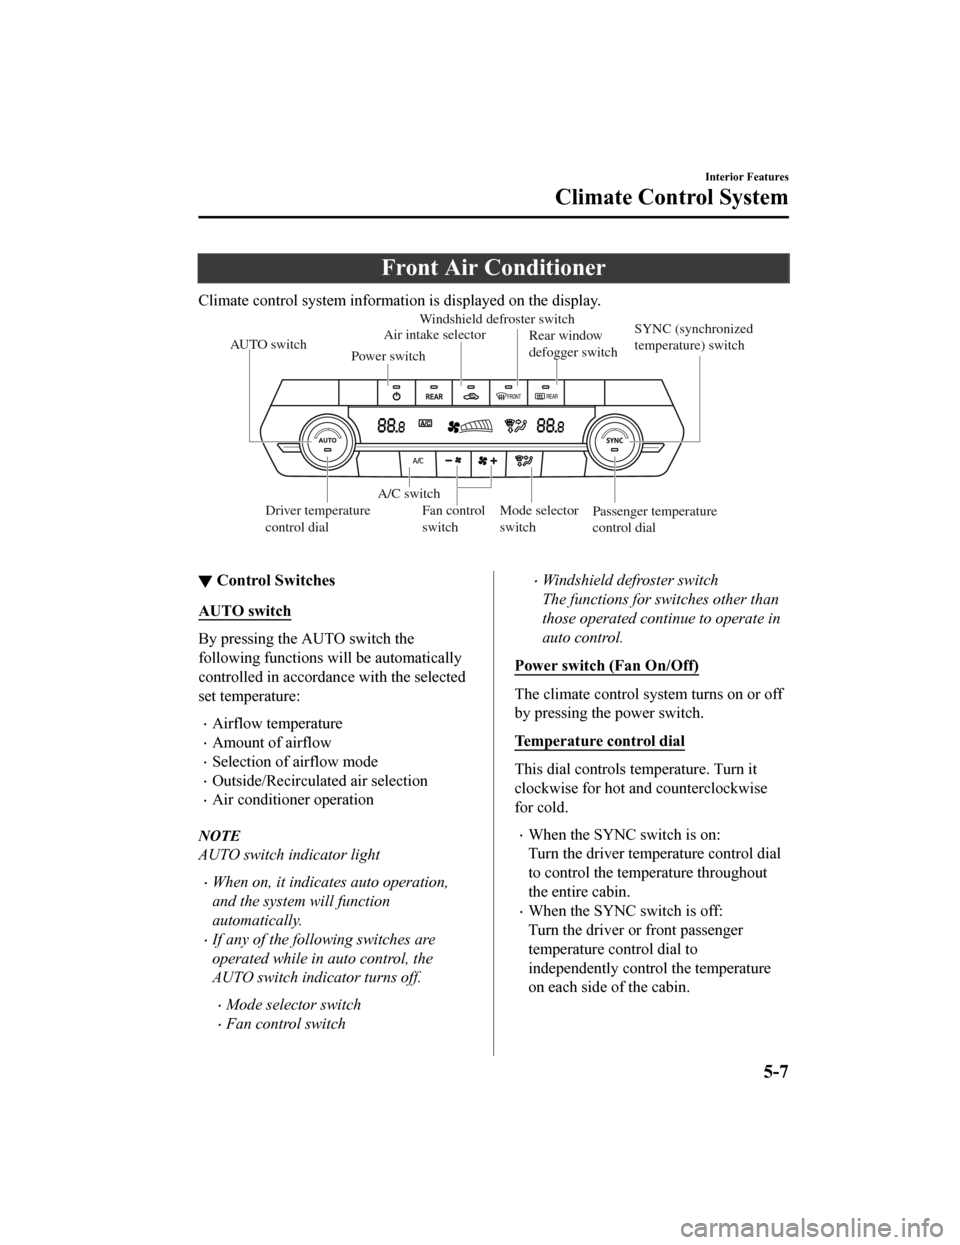
Front Air Conditioner
Climate control system information is displayed on the display.
AUTO switchSYNC (synchronized
temperature) switch
Passenger temperature
control dial
Driver temperature
control dial Rear window
defogger switch
Windshield defroster switch
Air intake selector
A/C switch
Power switch
Mode selector
switch
Fan control
switch
Ō¢╝
Control Switches
AUTO switch
By pressing the AUTO switch the
following functions will be automatically
controlled in accordan
ce with the selected
set temperature:
’éĘAirflow temperature
’éĘAmount of airflow
’éĘSelection of airflow mode
’éĘOutside/Recirculated air selection
’éĘAir conditioner operation
NOTE
AUTO switch indicator light
’éĘWhen on, it indicates auto operation,
and the system will function
automatically.
’éĘIf any of the following switches are
operated while in auto control, the
AUTO switch indicator turns off.
’éĘMode selector switch
’éĘFan control switch
’éĘWindshield defroster switch
The functions for switches other than
those operated continue to operate in
auto control.
Power switch (Fan On/Off)
The climate control system turns on or off
by pressing the power switch.
Temperature control dial
This dial controls t emperature. Turn it
clockwise for hot and counterclockwise
for cold.
’éĘWhen the SYNC switch is on:
Turn the driver temperature control dial
to control the temperature throughout
the entire cabin.
’éĘWhen the SYNC switch is off:
Turn the driver or front passenger
temperature control dial to
independently control the temperature
on each side of the cabin.
Interior Features
Climate Control System
5-7
CX-9_8HB2-EA-18G_Edition1 2018-5-11 13:09:27
Page 407 of 692
Basic Operation Method
NOTE
’éĘThe explanation of functions described in this manual may differ from the actual
operation, and the shapes of screens and buttons and the letters and characters displayed
may also differ from the actual appearance.
Additionally, depending on future software updates, the content may successively change
without notice.
’éĘFor additional information regarding Mazda Connect, please refer to the following
We b s i t e .
http://infotainment.mazdahandsfree.com/
Audio Set has 3 different human interfaces.
’éĘCommander switch
’éĘTouch panel
’éĘVoice recognition with steering switch and microphone
Refer to Voice Recognition on page 5-74.
Ō¢╝ Commander switch operation
NOTE
For safety reasons, some operations are disabled while the vehicle is being driven.
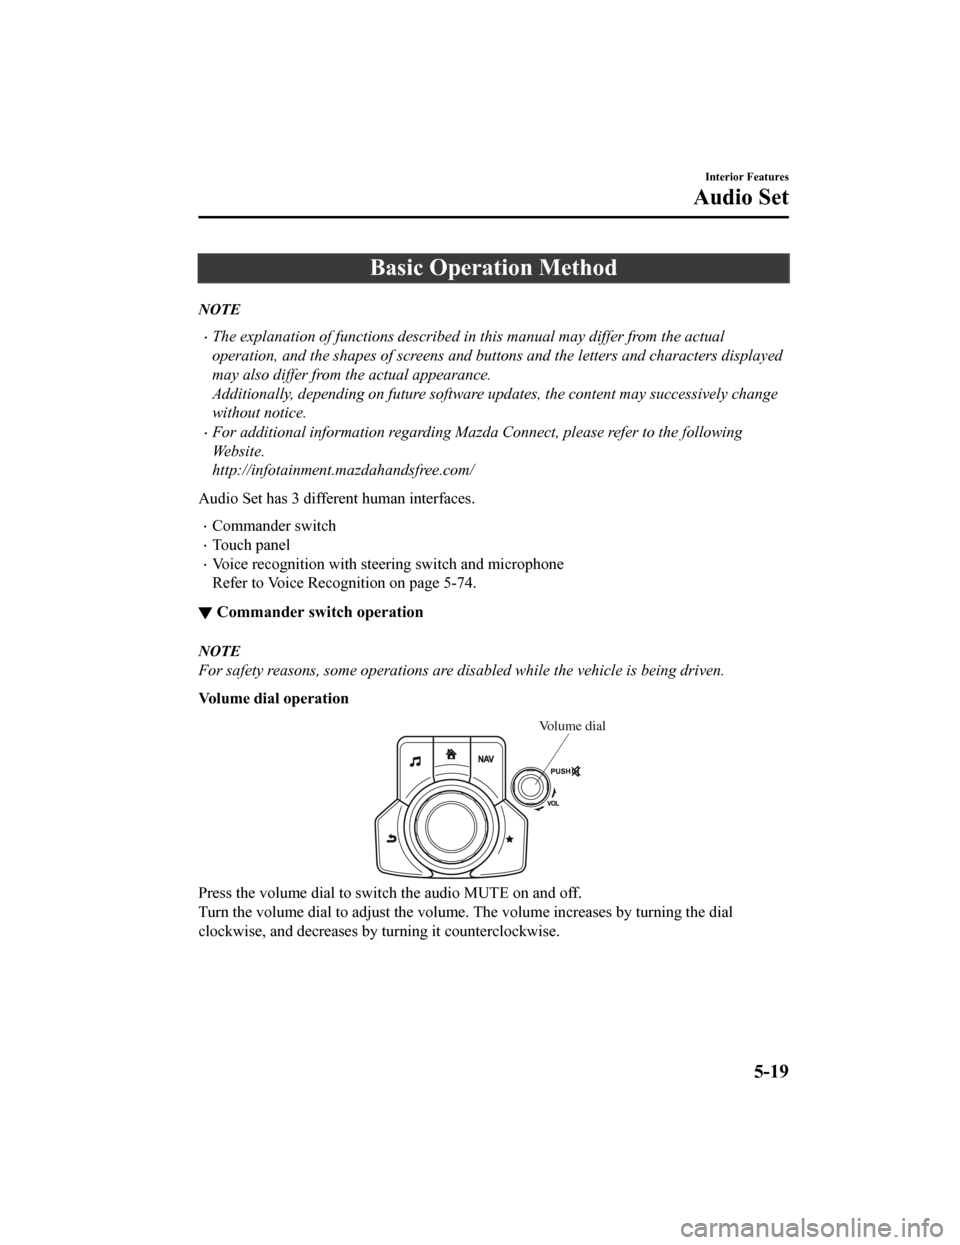
Volume dial operation
Volume dial
Press the volume dial to switch the audio MUTE on and off.
Turn the volume dial to adjust t
he volume. The volume increases by turning the dial
clockwise, and decreases by t urning it counterclockwise.
Interior Features
Audio Set
5-19
CX-9_8HB2-EA-18G_Edition1 2018-5-11 13:09:27
Page 412 of 692
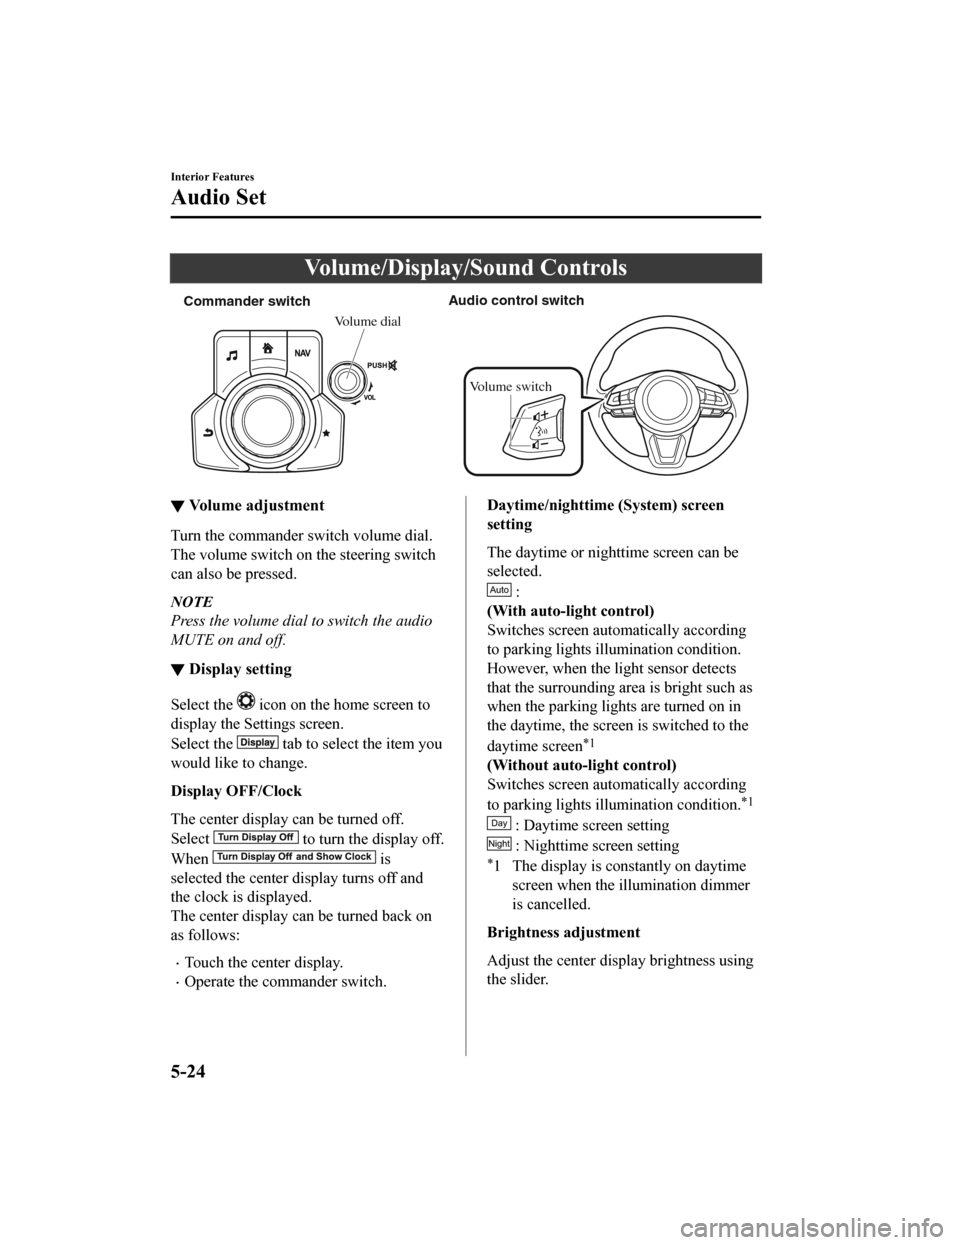
Volume/Display/Sound Controls
Commander switchAudio control switch
Volume dial
Volume switch
Ō¢╝ Volume adjustment
Turn the commander switch volume dial.
The volume switch on the steering switch
can also be pressed.
NOTE
Press the volume dial to switch the audio
MUTE on and off.
Ō¢╝Display setting
Select the icon on the home screen to
display the Settings screen.
Select the
tab to select the item you
would like to change.
Display OFF/Clock
The center display can be turned off.
Select
to turn the display off.
When
is
selected the center di splay turns off and
the clock is displayed.
The center display can be turned back on
as follows:
’éĘTouch the center display.
’éĘOperate the commander switch.
Daytime/nighttime (System) screen
setting
The daytime or nighttime screen can be
selected.
:
(With auto-light control)
Switches screen automatically according
to parking lights illumination condition.
However, when the li ght sensor detects
that the surrounding area is bright such as
when the parking lights are turned on in
the daytime, the screen is switched to the
daytime screen
*1
(Without auto-light control)
Switches screen automatically according
to parking lights illumination condition.
*1
: Daytime screen setting
: Nighttime screen setting
*1 The display is constantly on daytime screen when the il lumination dimmer
is cancelled.
Brightness adjustment
Adjust the center display brightness using
the slider.
Interior Features
Audio Set
5-24
CX-9_8HB2-EA-18G_Edition1 2018-5-11 13:09:27
Page 421 of 692

Selection from channel list
Receivable channels can be displayed on
the channel list screen. You can easily
select the channel you want to listen from
the list. Each category can be also
displayed.
1. Select the
icon to display the
channel list.
2. Select a desired channel.
(Select from category list)
1. Select the
icon to display the
channel list.
2. Select
to display the
category list.
3. Select a desired category.
Creating TuneMixŌäó Channel
The music channels programmed to Smart
Favorite can be programmed to the
TuneMixŌäó Channel.
NOTE
’éĘSmart Favorite can be programmed by
selecting
on the SiriusXM
Settings screen.
’éĘThe TuneMixŌäó Channel cannot be
created unless two or more SiriusXM
music channels have been programmed
to Smart Favorite.
1. Select the
icon to display the
channel list.
2. Select the
tab.
3. Select
.
4. Select
.
5. Select the desired music channel to the
TuneMixŌäó Channel.
6. Select
to register the TuneMixŌäó
Channel.
Ō¢╝ Parental lock
If a channel is locked, the channel is
muted.
To use the parental lock function, the PIN
code must be initialized first.
By using the session lock, the parental
lock can be enabled or disabled during the
current drive cycle (from when the
ignition is switched on to switched off).
When the session lock is on, the parental
lock is available. When the session lock is
off, the parental lock is temporarily
canceled.
When canceling the parental lock or
session lock, or when changing the PIN
code, PIN code input is required.
PIN code reset
If the registered code has been forgotten,
reset the code to the default [0000] code.
1. Select the
icon.
2. Select
.
3. Select
.
4. Input the default code [0000] using the
number buttons.
5. Select
.
6. Input the new PIN code using the
number buttons.
7. Select
.
Interior Features
Audio Set
5-33
CX-9_8HB2-EA-18G_Edition1 2018-5-11 13:09:27
Page 465 of 692
Settings
NOTE
Depending on the grade and specification, the screen display may differ.
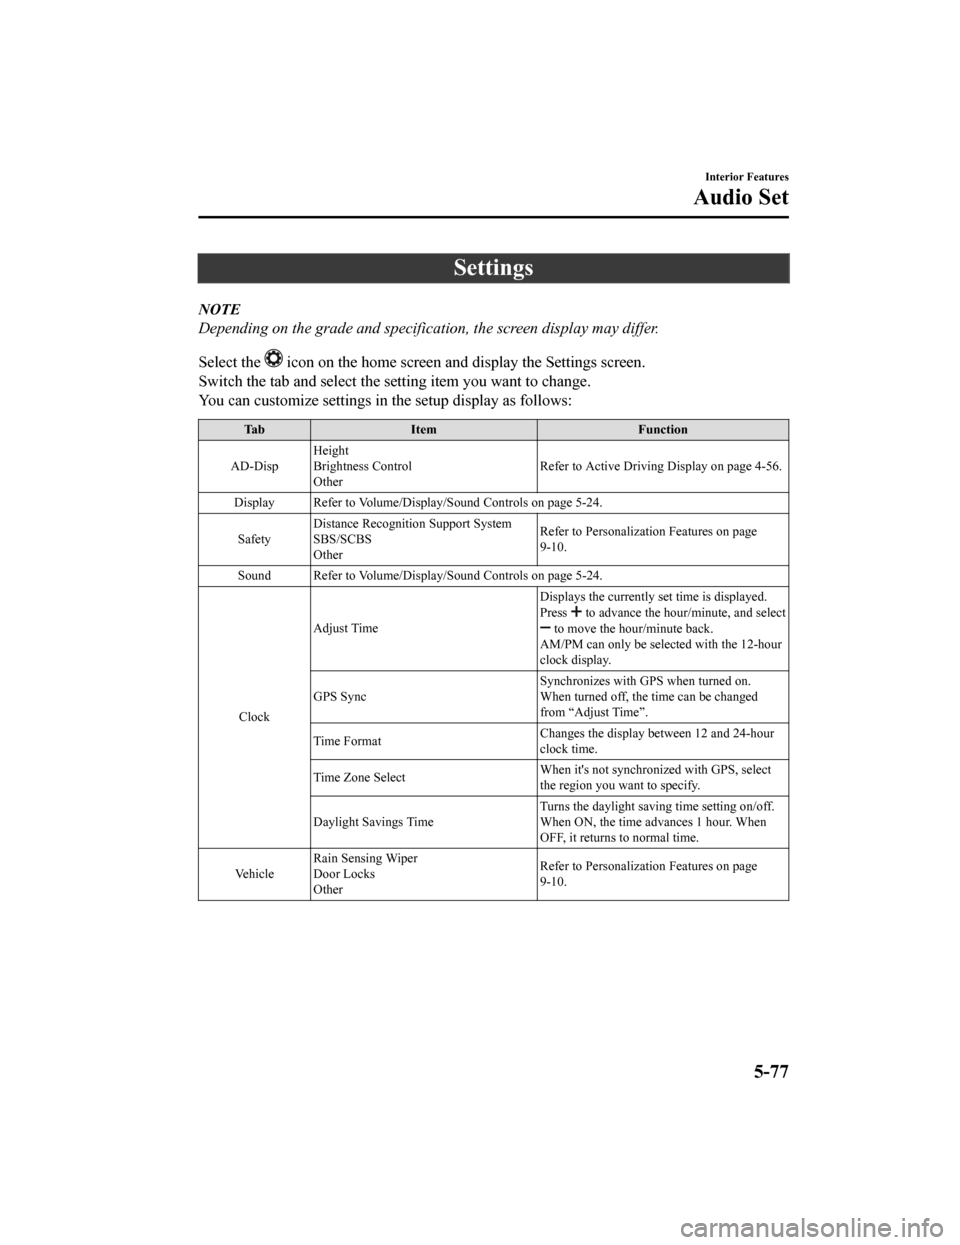
Select the
icon on the home screen and display the Settings screen.
Switch the tab and select the setting item you want to change.
You can customize settings in the setup display as follows:
Ta b I t e m F u n c t i o n
AD-Disp Height
Brightness Control
Other
Refer to Active Driving
Display on page 4-56.
Display Refer to Volume/Display /Sound Controls on page 5-24.
Safety Distance Recognition Support System
SBS/SCBS
Other Refer to Personalization Features on page
9-10.
Sound Refer to Volume/Display/Sound Controls on page 5-24.
Clock Adjust Time
Displays the currently s
et time is displayed.
Press
to advance the hour/minute, and select to move the hour/minute back.
AM/PM can only be selected with the 12-hour
clock display.
GPS Sync Synchronizes with GPS when turned on.
When turned off, the time can be changed
from ŌĆ£Adjust TimeŌĆØ.
Time Format Changes the display between 12 and 24-hour
clock time.
Time Zone Select When it's not synchronized with GPS, select
the region you want to specify.
Daylight Savings Time Turns the daylight saving time setting on/off.
When ON, the time ad
vances 1 hour. When
OFF, it returns to normal time.
Ve h i c l e Rain Sensing Wiper
Door Locks
Other Refer to Personalization Features on page
9-10.
Interior Features
Audio Set
5-77
CX-9_8HB2-EA-18G_Edition1
2018-5-11 13:09:27
Page 484 of 692

Ambient Light*
The ambient lights continuously turn on when the ignition is switched ON.
The ambient lights dim when the parking lights or headlights ar e turned on.
Ambient light
NOTE
’éĘThe ambient lights turn on or off in conjunction with the illuminated entry system when
the ignition is switched OFF.
’éĘThe ambient light illumination level can be ch anged while the parking lights or headlights
are turned on.
Refer to Personalization Features on page 9-10.
Ō¢╝ Illuminated Entry System
The overhead lights turn on when any of
the following operations is done with the
overhead light switch in the DOOR
position.
The ambient lights t
urn on regardless of
the overhead light switch position.
’éĘThe driver's door i s unlocked with the
ignition is switched OFF.
’éĘThe ignition is switched OFF with all
doors closed.
Interior Features
Interior Equipment
5-96*Some models.
CX-9_8HB2-EA-18G_Edition1 2018-5-11 13:09:27
Page 501 of 692
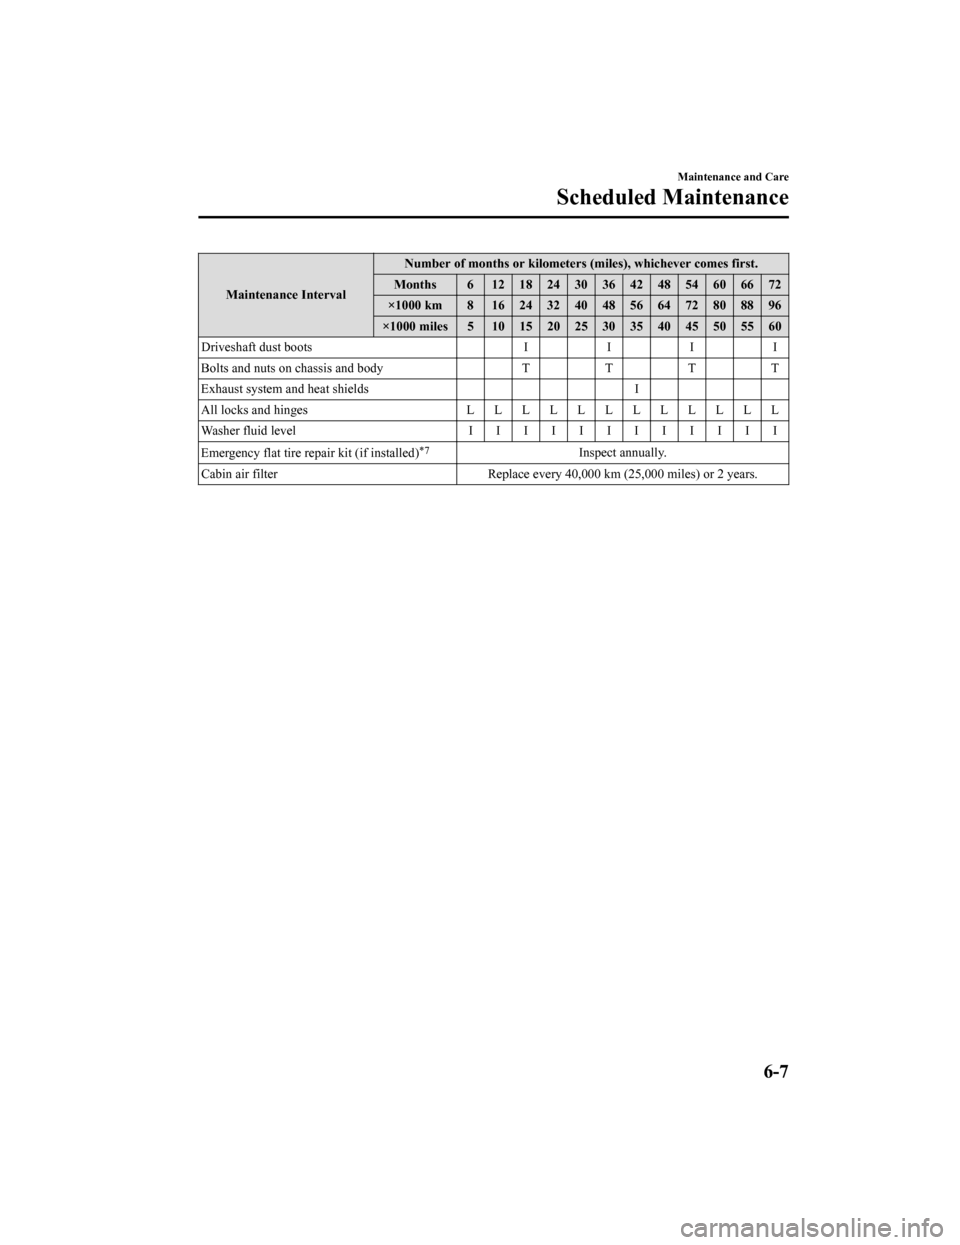
Maintenance IntervalNumber of months or kilometers (miles), whichever comes first.
Months 6 1218243036424854606672
├Ś1000 km 8 1624324048566472808896
├Ś1000 miles 5 10 15 20 25 30 35 40 45 50 55 60
Driveshaft dust boots III I
Bolts and nuts on chassis and body TTTT
Exhaust system and heat shields I
All locks and hinges LLLLLLLLLLLL
Washer fluid level IIIIIIIIIIII
Emergency flat tire repair kit (if installed)
*7Inspect annually.
Cabin air filter Replace every 40,000 km (25,000 miles) or 2 yea rs.
Maintenance and Care
Scheduled Maintenance
6-7
CX-9_8HB2-EA-18G_Edition1 2018-5-11 13:09:27
Page 503 of 692
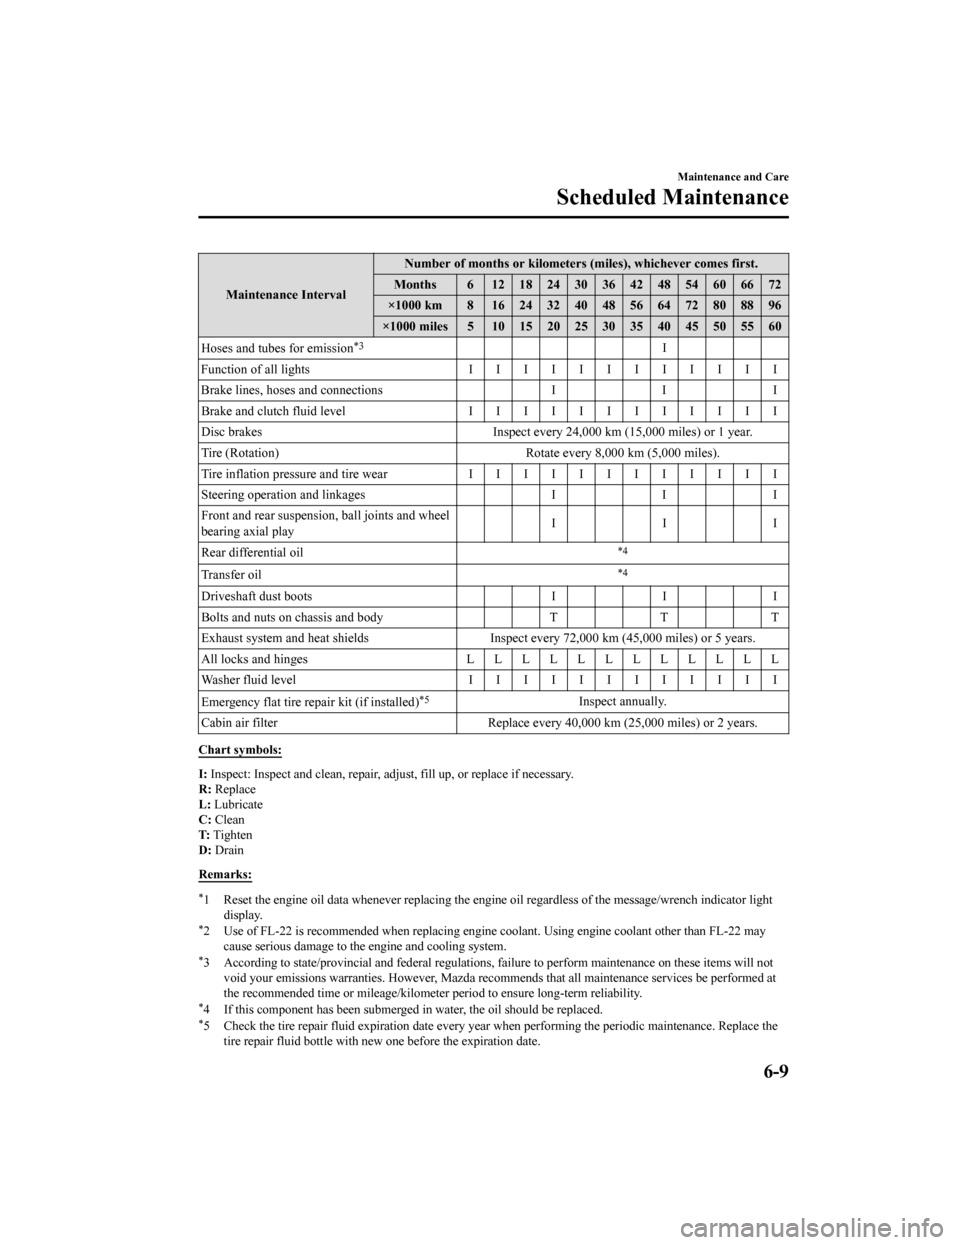
Maintenance IntervalNumber of months or kilometers (miles), whichever comes first.
Months 6 1218243036424854606672
├Ś1000 km 8 1624324048566472808896
├Ś1000 miles 5 10 15 20 25 30 35 40 45 50 55 60
Hoses and tubes for emission
*3I
Function of all lights I I I I I I I I I I I I
Brake lines, hoses and connections III
Brake and clutch fluid level I I I I I I I I I I I I
Disc brakes Inspect every 24,000 km (15,000 miles) or 1 year.
Tire (Rotation) Rotate every 8,000 km (5,000 miles).
Tire inflation pressure and tire wear IIIIIIIIIIII
Steering operation and linkages III
Front and rear suspension, ball joints and wheel
bearing axial play III
Rear differential oil
*4
Transfer oil*4
Driveshaft dust boots III
Bolts and nuts on chassis and body TT T
Exhaust system and heat shields Inspect every 72,000 km (45,000 miles) or 5 years.
All locks and hinges LLLLLLLLLLLL
Washer fluid level IIIIIIIIIIII
Emergency flat tire repair kit (if installed)
*5Inspect annually.
Cabin air filter Replace every 40,000 km (25,000 miles) or 2 yea rs.
Chart symbols:
I: Inspect: Inspect and clean, re pair, adjust, fill up, or replac e if necessary.
R: Replace
L: Lubricate
C: Clean
T: Tighten
D: Drain
Remarks:
*1 Reset the engine oil data whene ver replacing the engine oil regardless of the message/wrench indicator light
display.
*2 Use of FL-22 is recommended wh en replacing engine coolant. Using engine coolant other than FL-22 may
cause serious damage to the engine and cooling system.
*3 According to state/provincial and federal regulations, failure to perform maintenance on these items will not void your emissions warranties. However, Mazda recommends that all maintenance services be performed at
the recommended time or mileage/ kilometer period to ensure long-term reliability.
*4 If this component has been subm erged in water, the oil should be replaced.*5 Check the tire repair fluid exp iration date every year when performing the periodic maintenance. Replace the
tire repair fluid bottle with new one before the expiration date.
Maintenance and Care
Scheduled Maintenance
6-9
CX-9_8HB2-EA-18G_Edition1 2018-5-11 13:09:27