lock MAZDA MODEL CX-9 2019 Owners Manual (in English)
[x] Cancel search | Manufacturer: MAZDA, Model Year: 2019, Model line: MODEL CX-9, Model: MAZDA MODEL CX-9 2019Pages: 692
Page 505 of 692
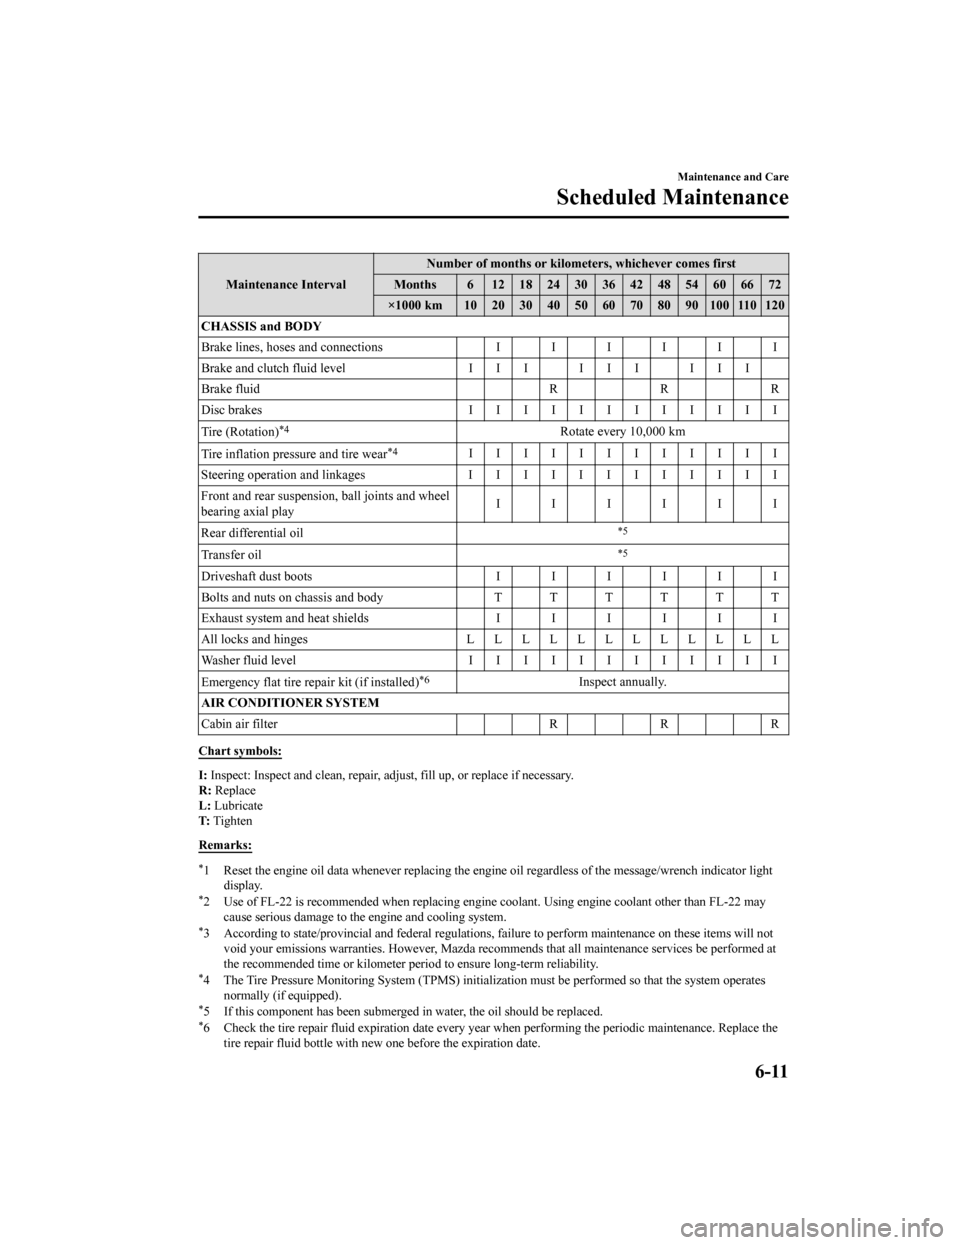
Maintenance IntervalNumber of months or kilometers, whichever comes first
Months 6 1218243036424854606672
├Ś1000 km 10 20 30 40 50 60 70 80 90 100 110 120
CHASSIS and BODY
Brake lines, hoses and connections IIIIII
Brake and clutch fluid level I I I I I I I I I
Brake fluid RRR
Disc brakes IIIIIIIIIIII
Tire (Rotation)
*4Rotate every 10,000 km
Tire inflation pressure and tire wear
*4IIIIIIIIIIII
Steering operation and linkages I I I I I I I I I I I I
Front and rear suspension, ball joints and wheel
bearing axial play IIIIII
Rear differential oil
*5
Transfer oil*5
Driveshaft dust boots IIIIII
Bolts and nuts on chassis and body T T T T T T
Exhaust system and heat shields IIIIII
All locks and hinges LLLLLLLLLLLL
Washer fluid level IIIIIIIIIIII
Emergency flat tire repair kit (if installed)
*6Inspect annually.
AIR CONDITIONER SYSTEM
Cabin air filter R R R
Chart symbols:
I: Inspect: Inspect and clean, re pair, adjust, fill up, or replac e if necessary.
R: Replace
L: Lubricate
T: Tighten
Remarks:
*1 Reset the engine oil data whene ver replacing the engine oil regardless of the message/wrench indicator light
display.
*2 Use of FL-22 is recommended wh en replacing engine coolant. Using engine coolant other than FL-22 may
cause serious damage to the engine and cooling system.
*3 According to state/provincial and federal regulations, failure to perform maintenance on these items will not void your emissions warranties. However, Mazda recommends that all maintenance services be performed at
the recommended time or kilomete r period to ensure long-term reliability.
*4 The Tire Pressure Monitoring Sy stem (TPMS) initialization must be performed so that the system operates
normally (if equipped).
*5 If this component has been subm erged in water, the oil should be replaced.*6 Check the tire repair fluid exp iration date every year when performing the periodic maintenance. Replace the
tire repair fluid bottle with new one before the expiration date.
Maintenance and Care
Scheduled Maintenance
6-11
CX-9_8HB2-EA-18G_Edition1 2018-5-11 13:09:27
Page 506 of 692
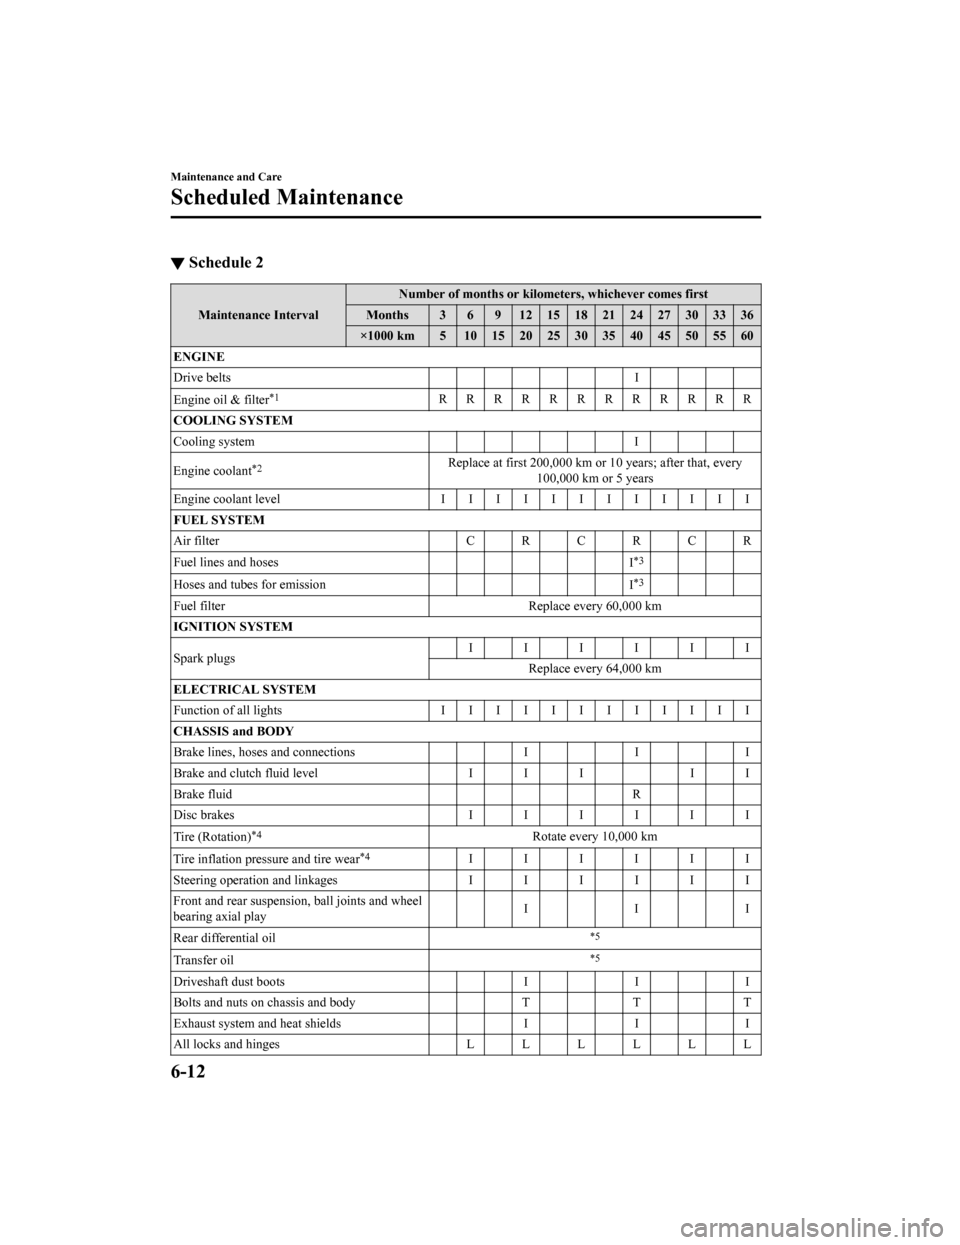
Ō¢╝Schedule 2
Maintenance Interval Number of months or kilometers, whichever comes first
Months 3 6 9 121518212427303336
├Ś1000 km 5 10 15 20 25 30 35 40 45 50 55 60
ENGINE
Drive belts I
Engine oil & filter
*1RRRRRRRRRRRR
COOLING SYSTEM
Cooling system I
Engine coolant
*2Replace at first 200,000 km or 10 years; after that, every 100,000 km or 5 years
Engine coolant level IIIIIIIIIIII
FUEL SYSTEM
Air filter CRCRCR
Fuel lines and hoses I
*3
Hoses and tubes for emissionI*3
Fuel filterReplace every 60,000 km
IGNITION SYSTEM
Spark plugs IIIIII
Replace every 64,000 km
ELECTRICAL SYSTEM
Function of all lights IIIIIIIIIIII
CHASSIS and BODY
Brake lines, hoses and connections II I
Brake and clutch fluid level I I II I
Brake fluid R
Disc brakes IIIIII
Tire (Rotation)
*4Rotate every 10,000 km
Tire inflation pressure and tire wear
*4IIIIII
Steering operation and linkages IIIIII
Front and rear suspensi on, ball joints and wheel
bearing axial play III
Rear differential oil
*5
Transfer oil*5
Driveshaft dust boots II I
Bolts and nuts on chassis and body TTT
Exhaust system and heat shields II I
All locks and hinges LLLLLL
Maintenance and Care
Scheduled Maintenance
6-12
CX-9_8HB2-EA-18G_Edition1 2018-5-11 13:09:27
Page 508 of 692
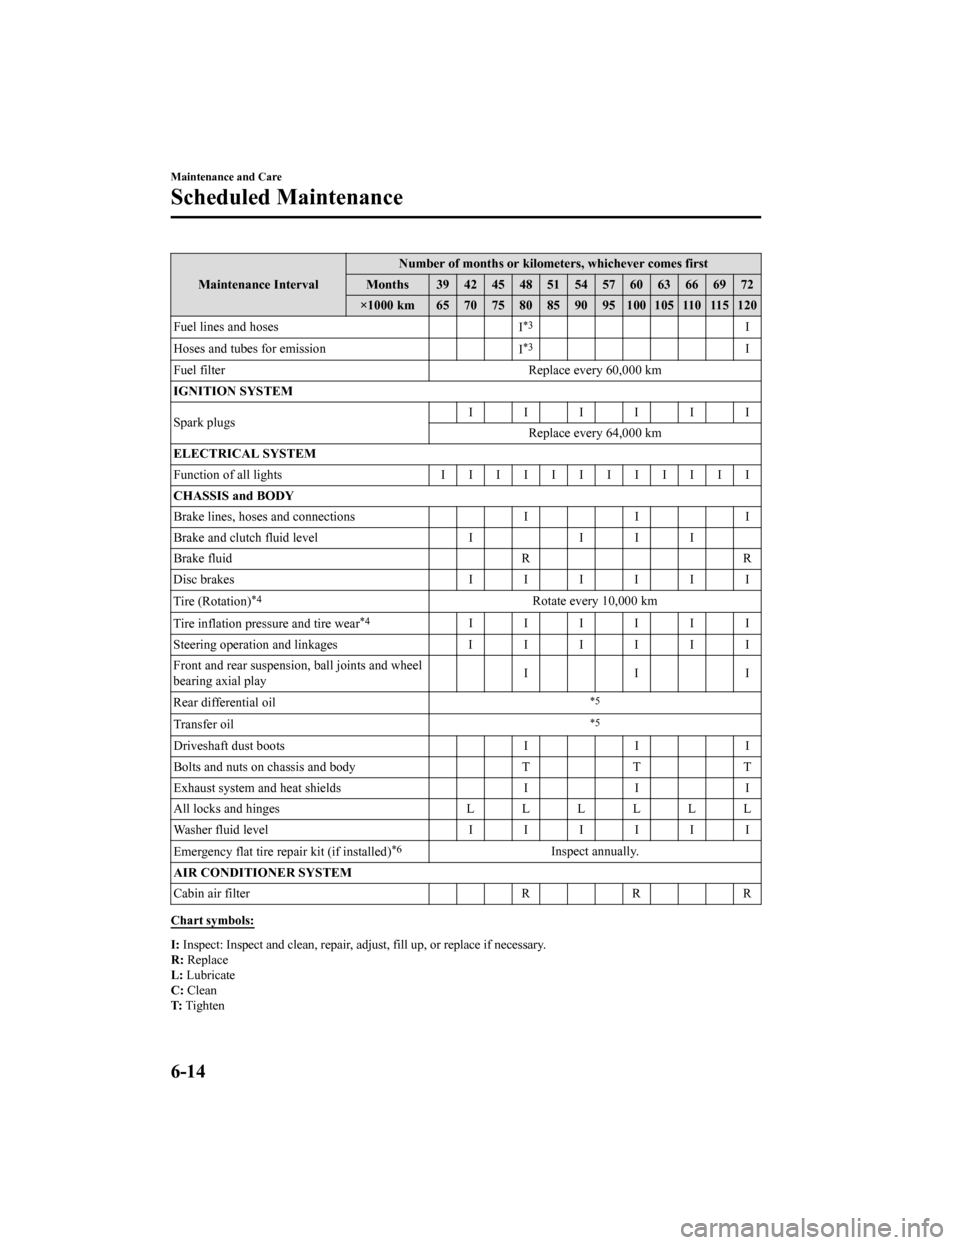
Maintenance IntervalNumber of months or kilometers, whichever comes first
Months 39 42 45 48 51 54 57 60 63 66 69 72
├Ś1000 km 65707580859095100105110115120
Fuel lines and hoses I
*3I
Hoses and tubes for emission I
*3I
Fuel filter Replace every 60,000 km
IGNITION SYSTEM
Spark plugs IIIIII
Replace every 64,000 km
ELECTRICAL SYSTEM
Function of all lights IIIIIIIIIIII
CHASSIS and BODY
Brake lines, hoses and connections II I
Brake and clutch fluid level II I I
Brake fluid RR
Disc brakes IIIIII
Tire (Rotation)
*4Rotate every 10,000 km
Tire inflation pressure and tire wear
*4IIIIII
Steering operation and linkages IIIIII
Front and rear suspensi on, ball joints and wheel
bearing axial play III
Rear differential oil
*5
Transfer oil*5
Driveshaft dust boots II I
Bolts and nuts on chassis and body TTT
Exhaust system and heat shields II I
All locks and hinges LLLLLL
Washer fluid level IIIIII
Emergency flat tire repair kit (if installed)
*6Inspect annually.
AIR CONDITIONER SYSTEM
Cabin air filter R R R
Chart symbols:
I: Inspect: Inspect and clean, r epair, adjust, fill up, or replac e if necessary.
R: Replace
L: Lubricate
C: Clean
T: Tighten
Maintenance and Care
Scheduled Maintenance
6-14
CX-9_8HB2-EA-18G_Edition1 2018-5-11 13:09:27
Page 514 of 692

Hood
WA R N I N G
Always check that the hood is closed and
securely locked:
A hood that is not closed and securely
locked is dangerous as it could fly open
while the vehicle is moving and block the
driver's vision which could result in a
serious accident.
Ō¢╝ Opening the Hood
1. With the vehicle parked, pull the
release handle to unlock the hood.
Release handle
2. Insert your hand into the hood
opening, slide the latch lever to the
right, and lift up the hood.
Lever
3. Grasp the support rod in the padded
area and secure it in the support rod
hole indicated by the arrow to hold the
hood open.
Pad
Support rod
Maintenance and Care
Owner Maintenance
6-20
CX-9_8HB2-EA-18G_Edition1 2018-5-11 13:09:27
Page 516 of 692

Engine Compartment Overview
Engine oil dipstick
Brake fluid reservoir
Engine oil-filler cap
Fuse blockBattery
Cooling system capEngine coolant reservoir
Windshield washer fluid reservoir
Maintenance and Care
Owner Maintenance
6-22
CX-9_8HB2-EA-18G_Edition12018-5-11 13:09:27
Page 522 of 692

Inspect fluid level in the washer fluid
reservoir; add fluid if necessary.
L
Use plain water if washer fluid is
unavailable.
But use only washer fluid in cold weather
to prevent it from freezing.
NOTE
Front and rear washer fluid is supplied
from the same reservoir.
Body Lubrication
All moving points of the body, such as
door and hood hinges and locks, should be
lubricated each time the engine oil is
changed. Use a nonfreezing lubricant on
locks during cold weather.
Make sure the hood's secondary latch
keeps the hood from opening when the
primary latch is released.
Maintenance and Care
Owner Maintenance
6-28
CX-9_8HB2-EA-18G_Edition12018-5-11 13:09:27
Page 526 of 692

9. Align the blade component projectionwith the wiper arm notch.
Projection Notch
10. Slide the blade component and install
it to the wiper arm.
11. Slowly lower the wiper arm onto thewindshield.
Ō¢╝Replacing Rear Window Wiper
Blade
When the wiper no longer cleans well, the
blade is probably worn or cracked.
Replace it.
CAUTION
To prevent damage to the wiper arm and
other components, do not move the wiper
by hand.
1. Remove the cover and raise the wiper
arm.
2. Firmly rotate the wiper blade to theright until it unlocks, then remove the
blade.
CAUTION
To prevent damage to the rear window,
do not let the wiper arm fall on it.
Maintenance and Care
Owner Maintenance
6-32
CX-9_8HB2-EA-18G_Edition1 2018-5-11 13:09:27
Page 538 of 692
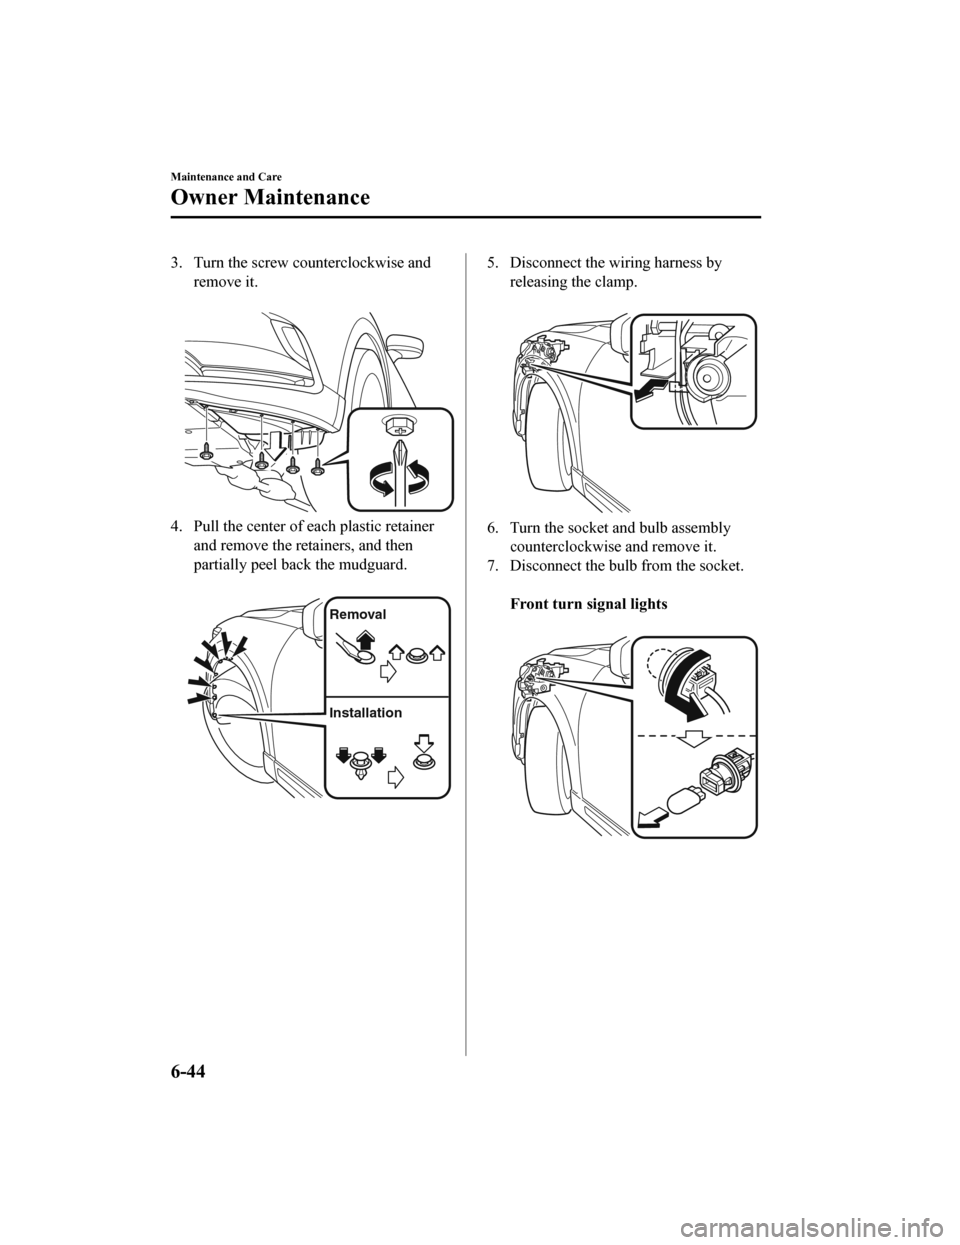
3. Turn the screw counterclockwise andremove it.
4. Pull the center of each plastic retainer
and remove the retainers, and then
partially peel back the mudguard.
Removal
Installation
5. Disconnect the wiring harness by releasing the clamp.
6. Turn the socket and bulb assemblycounterclockwise and remove it.
7. Disconnect the bulb from the socket.
Front turn signal lights
Maintenance and Care
Owner Maintenance
6-44
CX-9_8HB2-EA-18G_Edition1 2018-5-11 13:09:27
Page 539 of 692
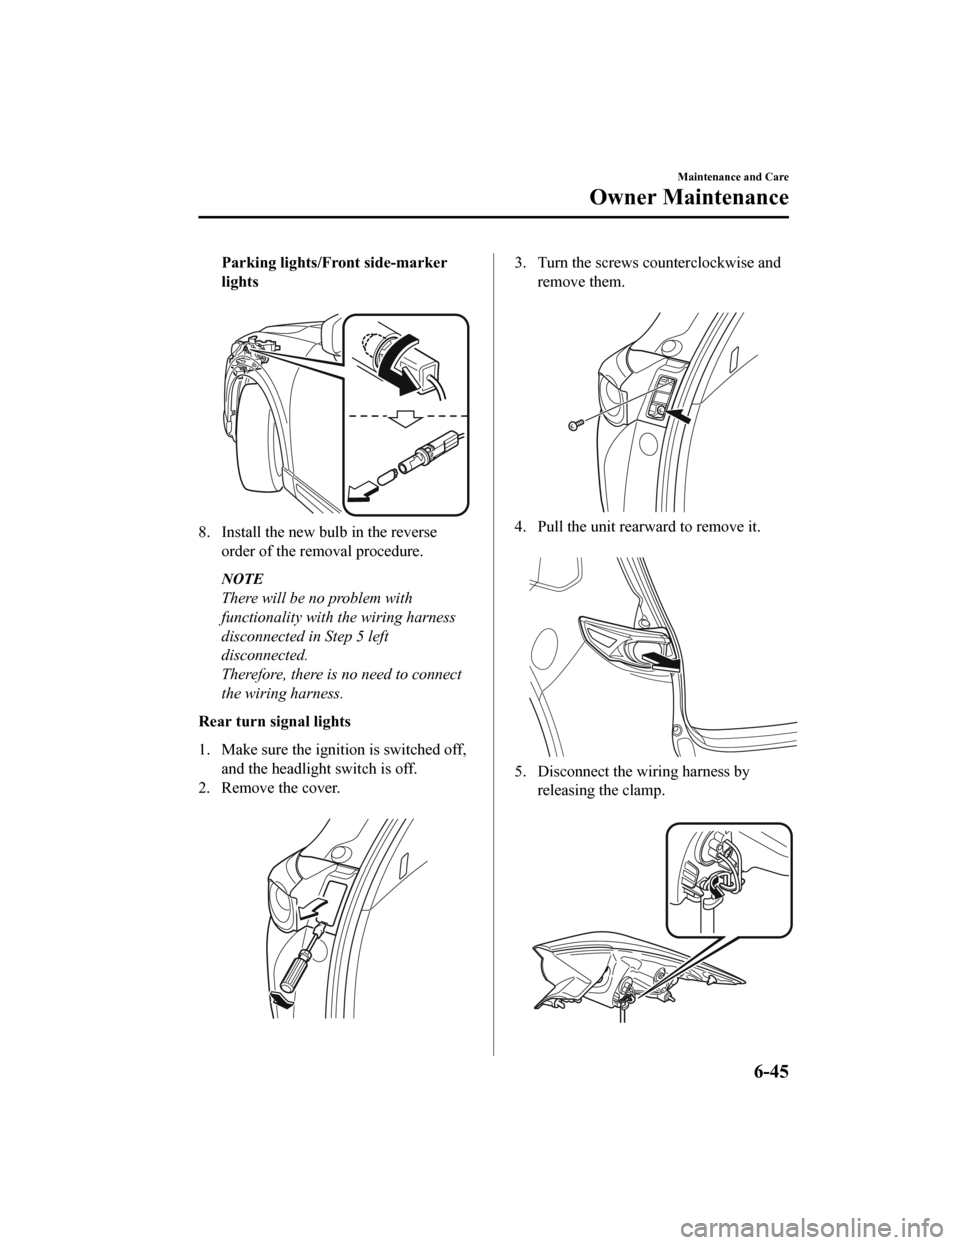
Parking lights/Front side-marker
lights
8. Install the new bulb in the reverseorder of the removal procedure.
NOTE
There will be no problem with
functionality with the wiring harness
disconnected in Step 5 left
disconnected.
Therefore, there is no need to connect
the wiring harness.
Rear turn signal lights
1. Make sure the ignition is switched off, and the headlight switch is off.
2. Remove the cover.
3. Turn the screws counterclockwise andremove them.
4. Pull the unit rearward to remove it.
5. Disconnect the wiring harness byreleasing the clamp.
Maintenance and Care
Owner Maintenance
6-45
CX-9_8HB2-EA-18G_Edition1 2018-5-11 13:09:27
Page 540 of 692
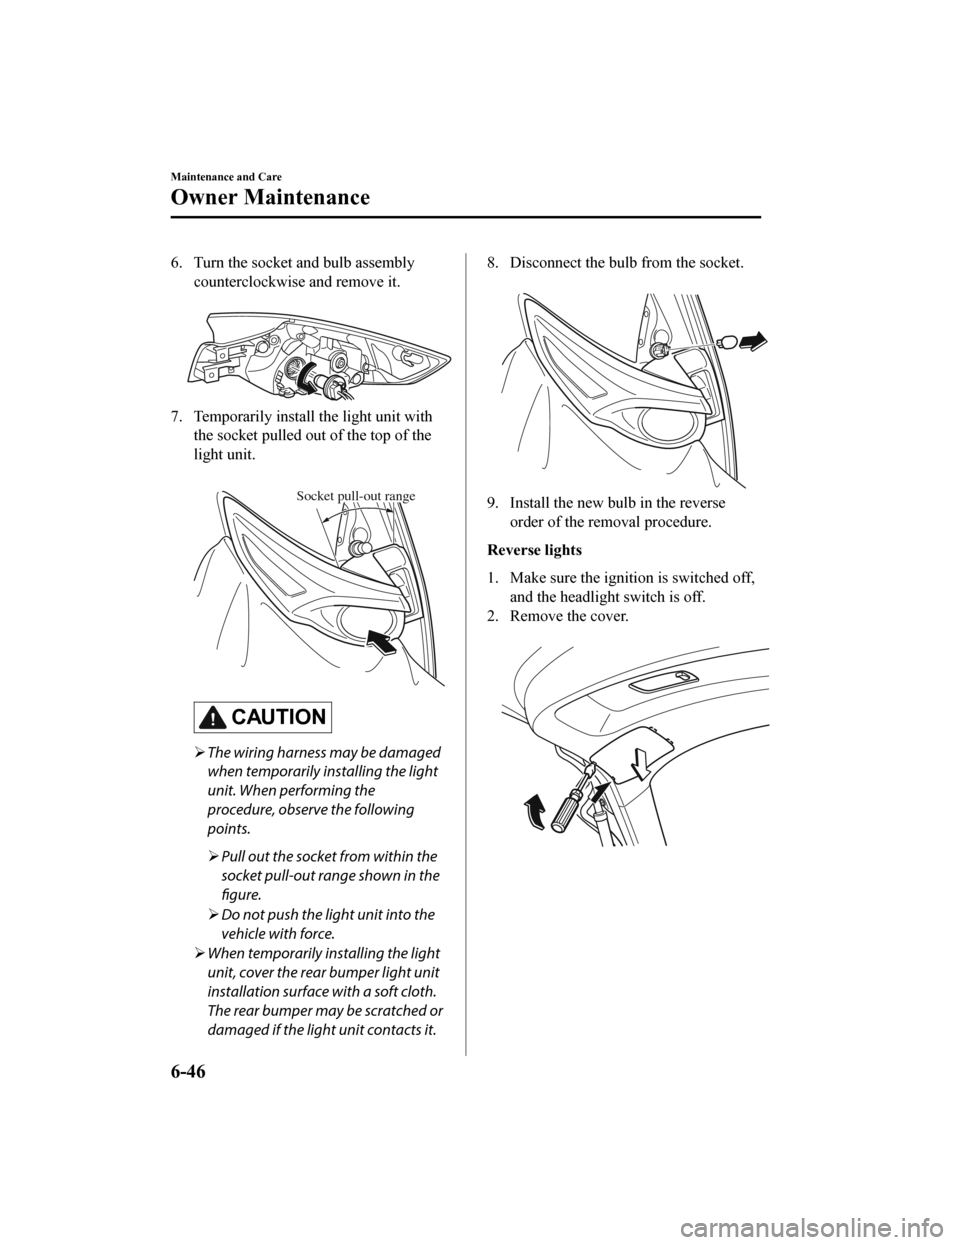
6. Turn the socket and bulb assemblycounterclockwise and remove it.
7. Temporarily install the light unit withthe socket pulled out of the top of the
light unit.
Socket pull-out range
CAUTION
’āśThe wiring harness may be damaged
when temporarily installing the light
unit. When performing the
procedure, observe the following
points.
’āśPull out the socket from within the
socket pull-out range shown in the
figure.
’āś Do not push the light unit into the
vehicle with force.
’āś When temporarily installing the light
unit, cover the rear bumper light unit
installation surface with a soft cloth.
The rear bumper may be scratched or
damaged if the light unit contacts it.
8. Disconnect the bulb from the socket.
9. Install the new bulb in the reverseorder of the removal procedure.
Reverse lights
1. Make sure the ignition is switched off, and the headligh t switch is off.
2. Remove the cover.
Maintenance and Care
Owner Maintenance
6-46
CX-9_8HB2-EA-18G_Edition1 2018-5-11 13:09:27