clock MAZDA MODEL CX-9 2019 Owners Manual (in English)
[x] Cancel search | Manufacturer: MAZDA, Model Year: 2019, Model line: MODEL CX-9, Model: MAZDA MODEL CX-9 2019Pages: 692
Page 126 of 692
Fuel-Filler Lid and Cap
WA R N I N G
When removing the fuel-filler cap, loosen
the cap slightly and wait for any hissing to
stop, then remove it:
Fuel spray is dangerous. Fuel can burn skin
and eyes and cause illness if ingested. Fuel
spray is released when there is pressure in
the fuel tank and the fuel-filler cap is
removed too quickly.
Before refueling, stop the engine, and
always keep sparks and flames away from
the filler neck:
Fuel vapor is dangerous. It could be ignited
by sparks or flames causing serious burns
and injuries.
Additionally, use of the incorrect fuel-filler
cap or not using a fuel-filler cap may result
in a fuel leak, which could result in serious
burns or death in an accident.
Do not continue refueling after the fuel
pump nozzle shuts off automatically:
Continuing to add fuel after the fuel pump
nozzle has shut off automatically is
dangerous because overfilling the fuel tank
may cause fuel overflow or leakage. Fuel
overflow and leakage could damage the
vehicle and if the fuel ignites it could cause
a fire and explosion resulting in serious
injury or death.
CAUTION
Always use only a ge nuine Mazda fuel-filler
cap or an approved equivalent, available
at an Authorized Mazda Dealer. The wrong
cap can result in a serious malfunction of
the fuel and emission control systems.
(U.S.A. and Canada)
It may also cause the check engine light in
the instrument cluster to illuminate.
▼ Refueling
Before refueling, close all the doors,
windows, and the liftgate, and switch the
ignition OFF.
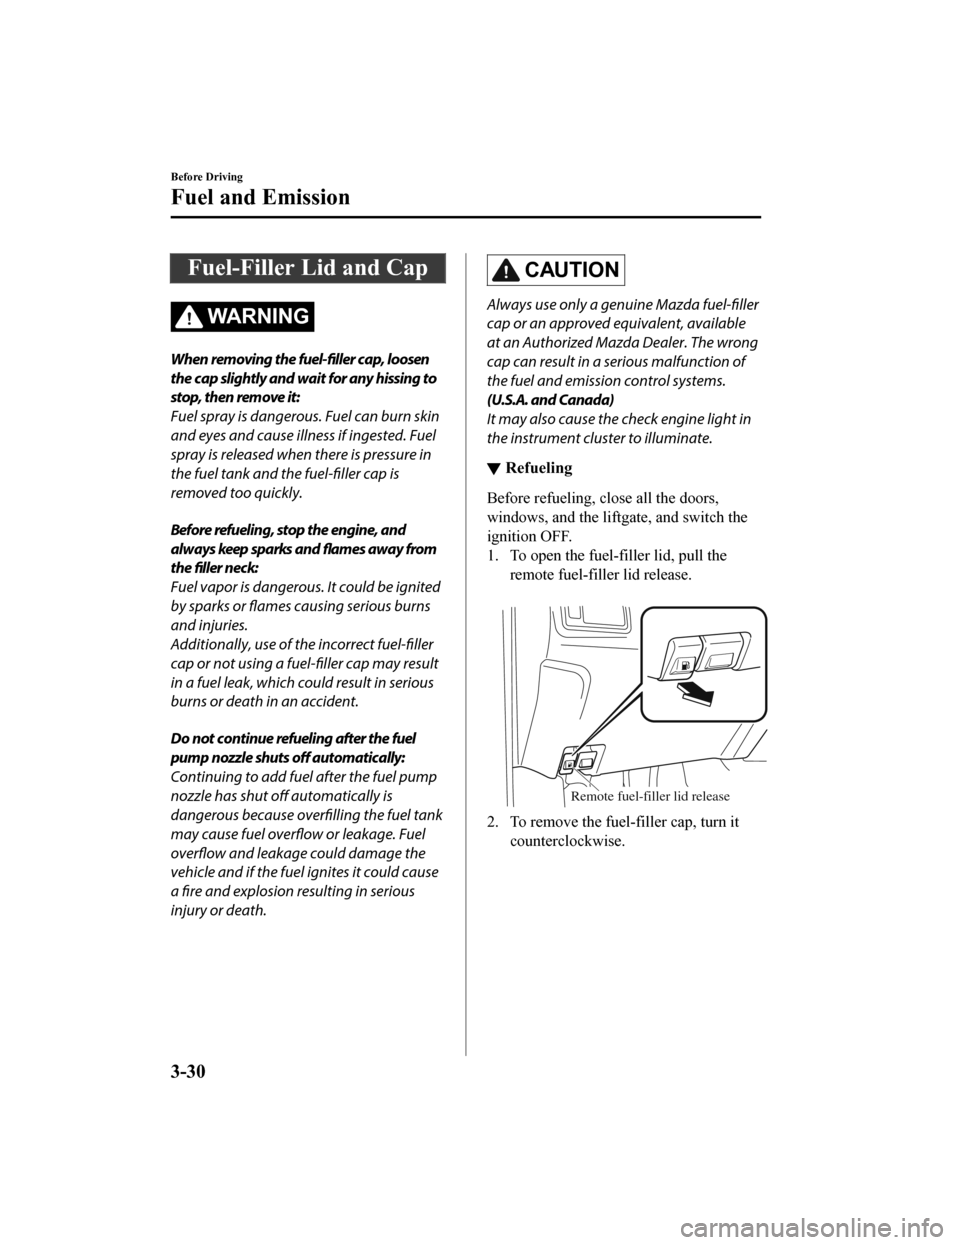
1. To open the fuel-filler lid, pull the
remote fuel-filler lid release.
Remote fuel-filler lid release
2. To remove the fuel-filler cap, turn itcounterclockwise.
Before Driving
Fuel and Emission
3-30
CX-9_8HB2-EA-18G_Edition1 2018-5-11 13:09:27
Page 127 of 692
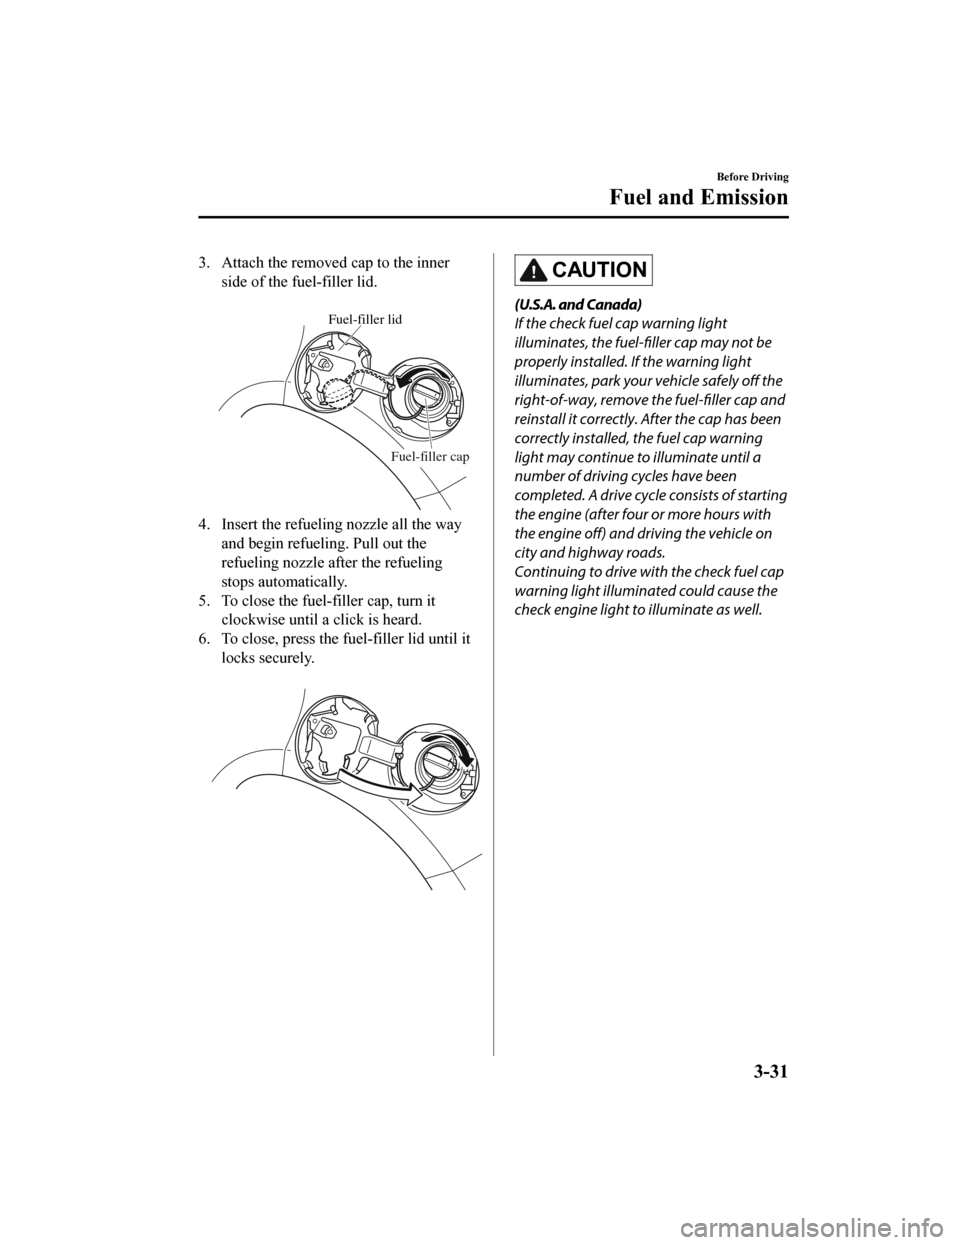
3. Attach the removed cap to the innerside of the fuel-filler lid.
Fuel-filler lid
Fuel-filler cap
4. Insert the refuelin g nozzle all the way
and begin refueling. Pull out the
refueling nozzle after the refueling
stops automatically.
5. To close the fuel-filler cap, turn it clockwise until a click is heard.
6. To close, press the fuel-filler lid until it locks securely.
CAUTION
(U.S.A. and Canada)
If the check fuel cap warning light
illuminates, the fuel-filler cap may not be
properly installed. If the warning light
illuminates, park your vehicle safely off the
right-of-way, remove th e fuel-filler cap and
reinstall it correctly. After the cap has been
correctly installed, the fuel cap warning
light may continue to illuminate until a
number of driving cycles have been
completed. A drive cycle consists of starting
the engine (after four or more hours with
the engine off) and driving the vehicle on
city and highway roads.
Continuing to drive with the check fuel cap
warning light illuminated could cause the
check engine light to illuminate as well.
Before Driving
Fuel and Emission
3-31
CX-9_8HB2-EA-18G_Edition1 2018-5-11 13:09:27
Page 395 of 692
Front Air Conditioner
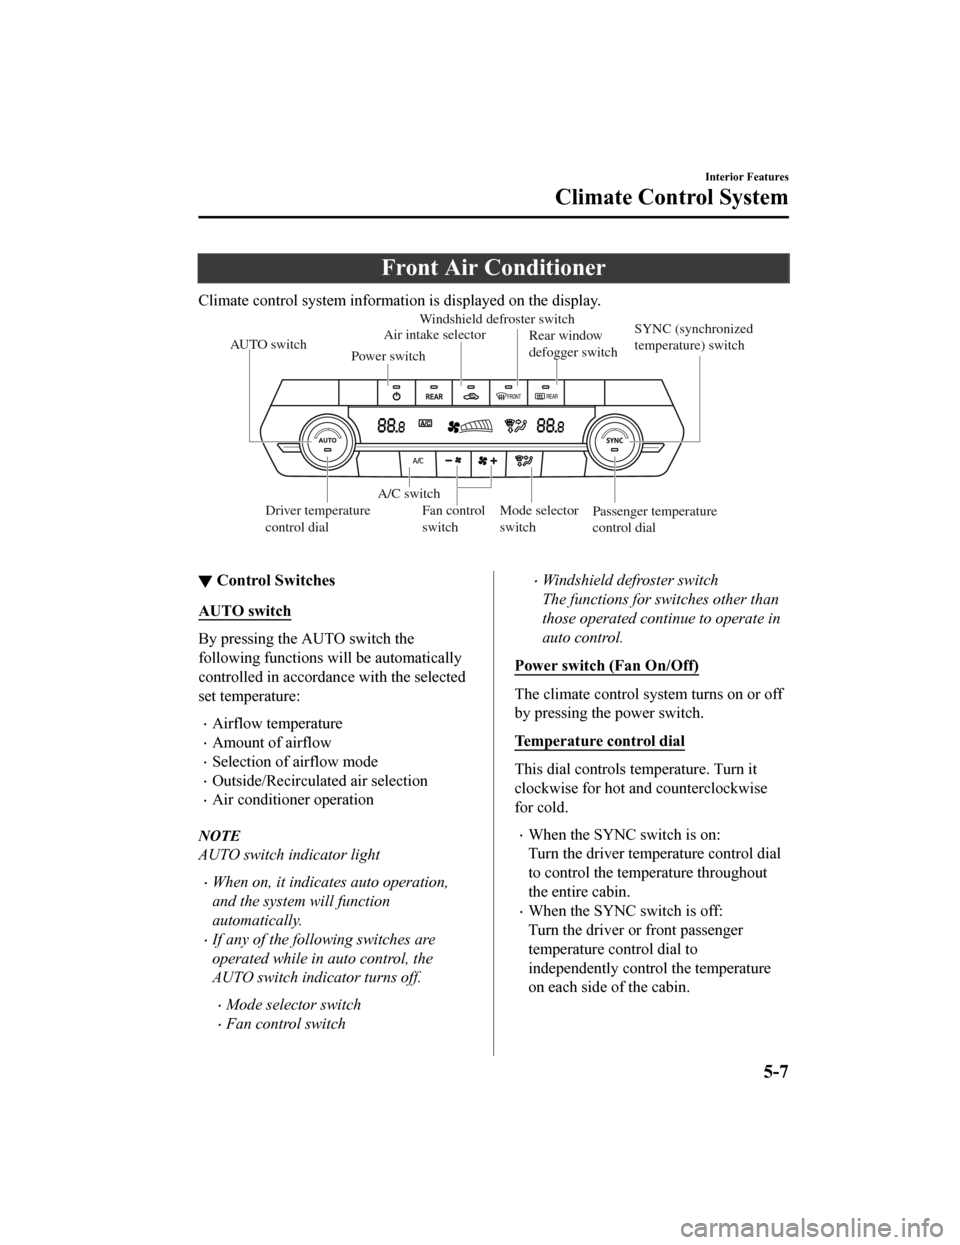
Climate control system information is displayed on the display.
AUTO switchSYNC (synchronized
temperature) switch
Passenger temperature
control dial
Driver temperature
control dial Rear window
defogger switch
Windshield defroster switch
Air intake selector
A/C switch
Power switch
Mode selector
switch
Fan control
switch
▼
Control Switches
AUTO switch
By pressing the AUTO switch the
following functions will be automatically
controlled in accordan
ce with the selected
set temperature:
Airflow temperature
Amount of airflow
Selection of airflow mode
Outside/Recirculated air selection
Air conditioner operation
NOTE
AUTO switch indicator light
When on, it indicates auto operation,
and the system will function
automatically.
If any of the following switches are
operated while in auto control, the
AUTO switch indicator turns off.
Mode selector switch
Fan control switch
Windshield defroster switch
The functions for switches other than
those operated continue to operate in
auto control.
Power switch (Fan On/Off)
The climate control system turns on or off
by pressing the power switch.
Temperature control dial
This dial controls t emperature. Turn it
clockwise for hot and counterclockwise
for cold.
When the SYNC switch is on:
Turn the driver temperature control dial
to control the temperature throughout
the entire cabin.
When the SYNC switch is off:
Turn the driver or front passenger
temperature control dial to
independently control the temperature
on each side of the cabin.
Interior Features
Climate Control System
5-7
CX-9_8HB2-EA-18G_Edition1 2018-5-11 13:09:27
Page 407 of 692
Basic Operation Method
NOTE
The explanation of functions described in this manual may differ from the actual
operation, and the shapes of screens and buttons and the letters and characters displayed
may also differ from the actual appearance.
Additionally, depending on future software updates, the content may successively change
without notice.
For additional information regarding Mazda Connect, please refer to the following
We b s i t e .
http://infotainment.mazdahandsfree.com/
Audio Set has 3 different human interfaces.
Commander switch
Touch panel
Voice recognition with steering switch and microphone
Refer to Voice Recognition on page 5-74.
▼ Commander switch operation
NOTE
For safety reasons, some operations are disabled while the vehicle is being driven.
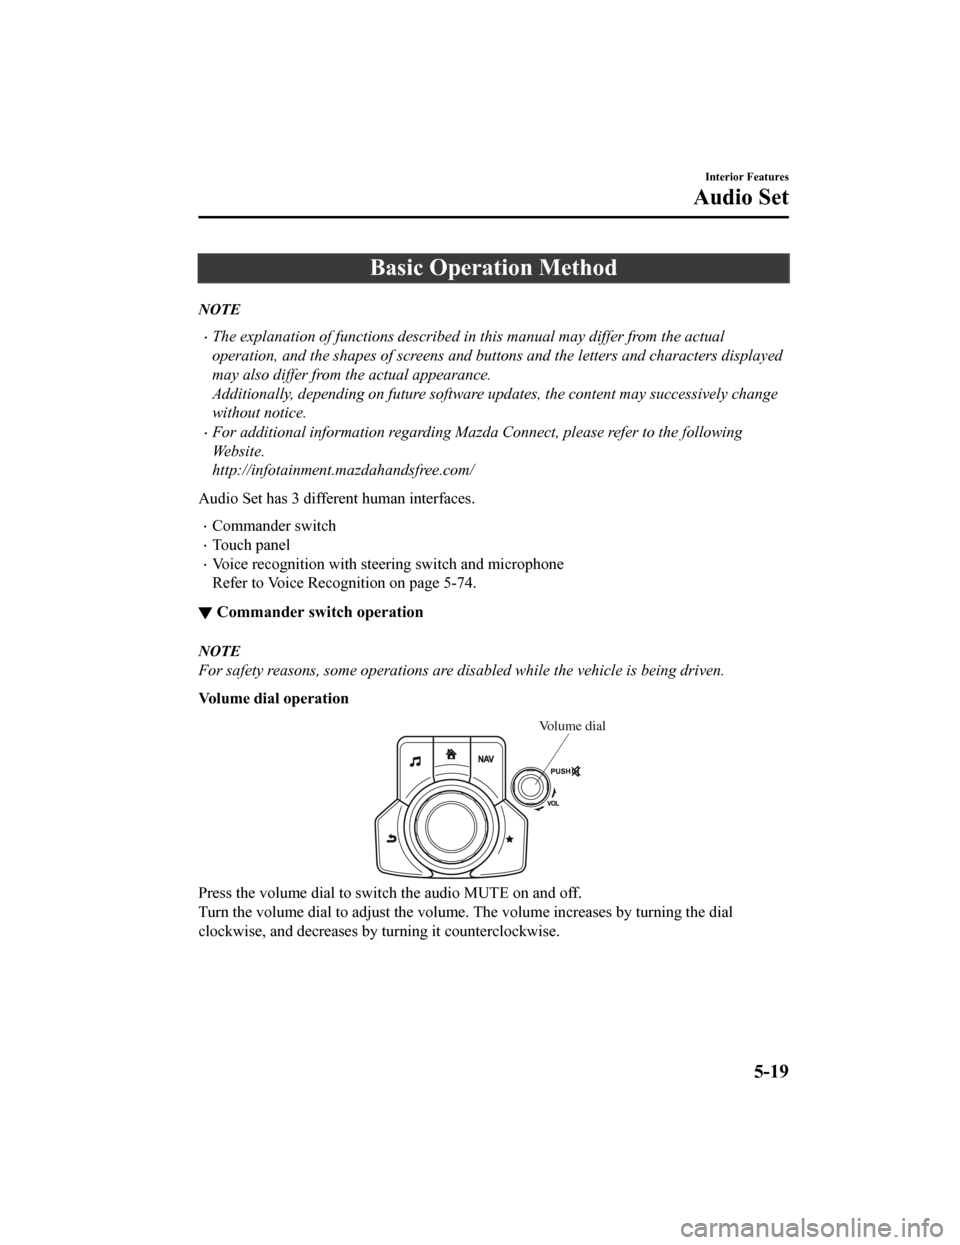
Volume dial operation
Volume dial
Press the volume dial to switch the audio MUTE on and off.
Turn the volume dial to adjust t
he volume. The volume increases by turning the dial
clockwise, and decreases by t urning it counterclockwise.
Interior Features
Audio Set
5-19
CX-9_8HB2-EA-18G_Edition1 2018-5-11 13:09:27
Page 412 of 692
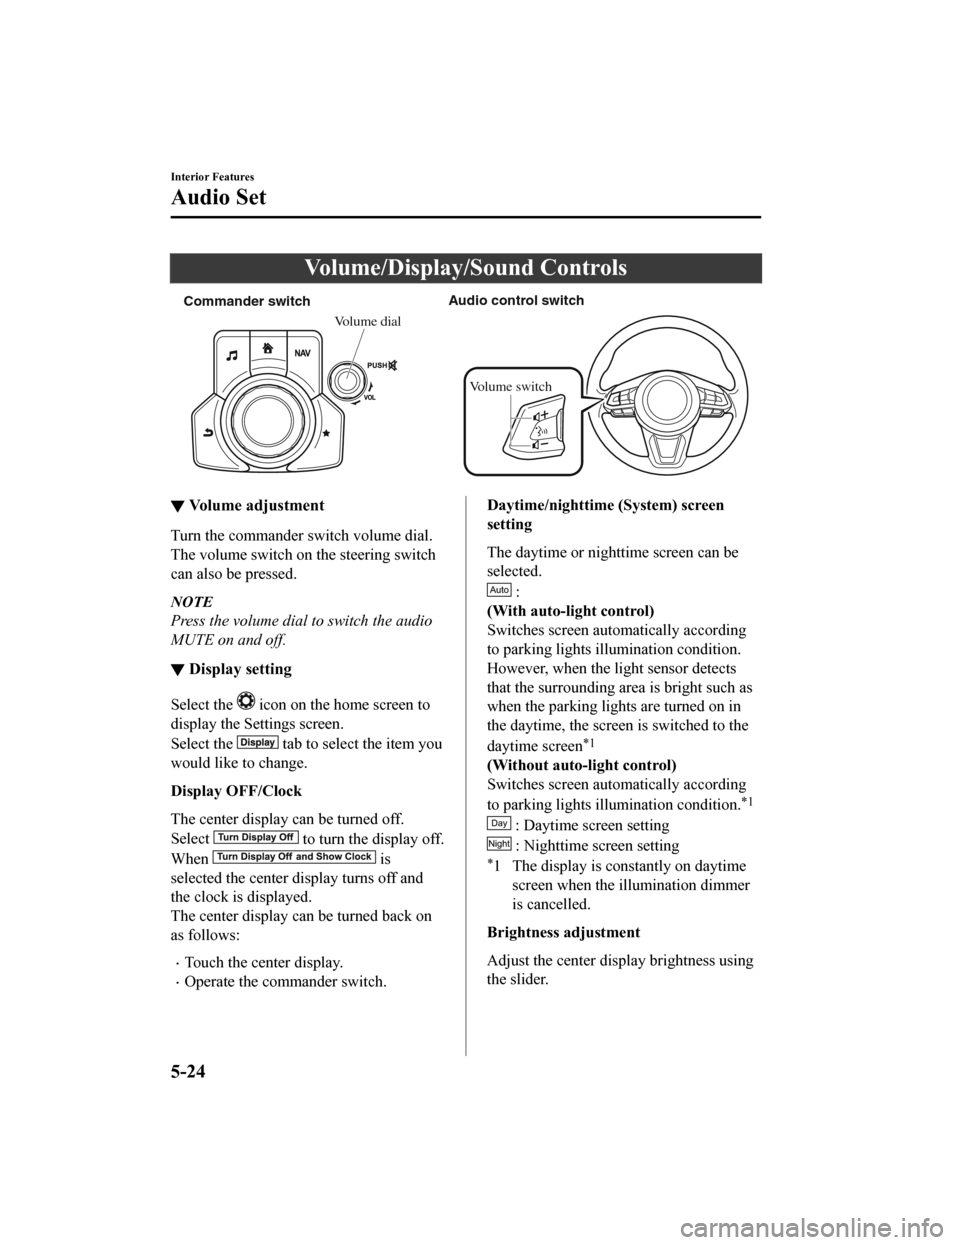
Volume/Display/Sound Controls
Commander switchAudio control switch
Volume dial
Volume switch
▼ Volume adjustment
Turn the commander switch volume dial.
The volume switch on the steering switch
can also be pressed.
NOTE
Press the volume dial to switch the audio
MUTE on and off.
▼Display setting
Select the icon on the home screen to
display the Settings screen.
Select the
tab to select the item you
would like to change.
Display OFF/Clock
The center display can be turned off.
Select
to turn the display off.
When
is
selected the center di splay turns off and
the clock is displayed.
The center display can be turned back on
as follows:
Touch the center display.
Operate the commander switch.
Daytime/nighttime (System) screen
setting
The daytime or nighttime screen can be
selected.
:
(With auto-light control)
Switches screen automatically according
to parking lights illumination condition.
However, when the li ght sensor detects
that the surrounding area is bright such as
when the parking lights are turned on in
the daytime, the screen is switched to the
daytime screen
*1
(Without auto-light control)
Switches screen automatically according
to parking lights illumination condition.
*1
: Daytime screen setting
: Nighttime screen setting
*1 The display is constantly on daytime screen when the il lumination dimmer
is cancelled.
Brightness adjustment
Adjust the center display brightness using
the slider.
Interior Features
Audio Set
5-24
CX-9_8HB2-EA-18G_Edition1 2018-5-11 13:09:27
Page 465 of 692
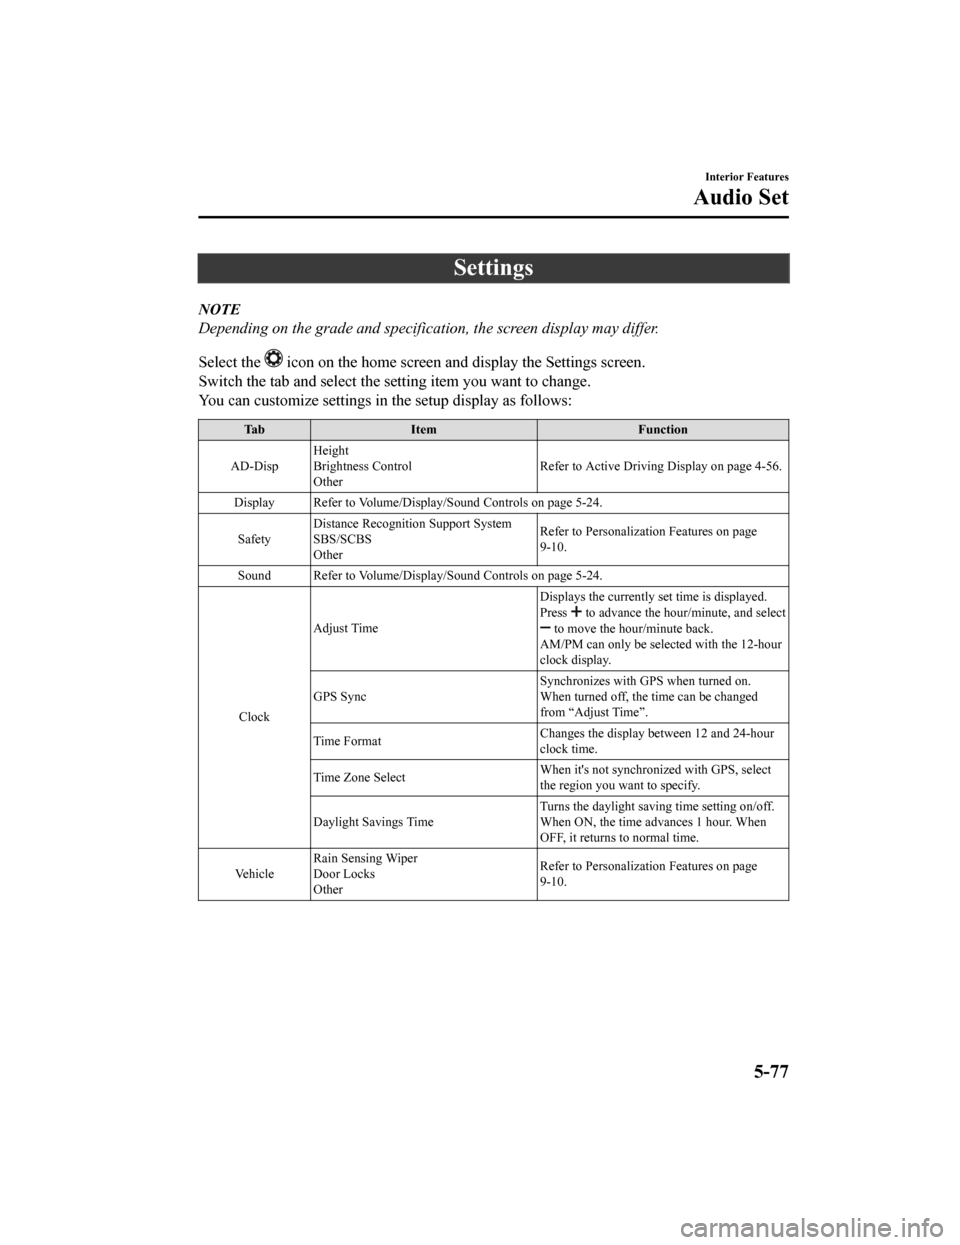
Settings
NOTE
Depending on the grade and specification, the screen display may differ.
Select the
icon on the home screen and display the Settings screen.
Switch the tab and select the setting item you want to change.
You can customize settings in the setup display as follows:
Ta b I t e m F u n c t i o n
AD-Disp Height
Brightness Control
Other
Refer to Active Driving
Display on page 4-56.
Display Refer to Volume/Display /Sound Controls on page 5-24.
Safety Distance Recognition Support System
SBS/SCBS
Other Refer to Personalization Features on page
9-10.
Sound Refer to Volume/Display/Sound Controls on page 5-24.
Clock Adjust Time
Displays the currently s
et time is displayed.
Press
to advance the hour/minute, and select to move the hour/minute back.
AM/PM can only be selected with the 12-hour
clock display.
GPS Sync Synchronizes with GPS when turned on.
When turned off, the time can be changed
from “Adjust Time”.
Time Format Changes the display between 12 and 24-hour
clock time.
Time Zone Select When it's not synchronized with GPS, select
the region you want to specify.
Daylight Savings Time Turns the daylight saving time setting on/off.
When ON, the time ad
vances 1 hour. When
OFF, it returns to normal time.
Ve h i c l e Rain Sensing Wiper
Door Locks
Other Refer to Personalization Features on page
9-10.
Interior Features
Audio Set
5-77
CX-9_8HB2-EA-18G_Edition1
2018-5-11 13:09:27
Page 538 of 692
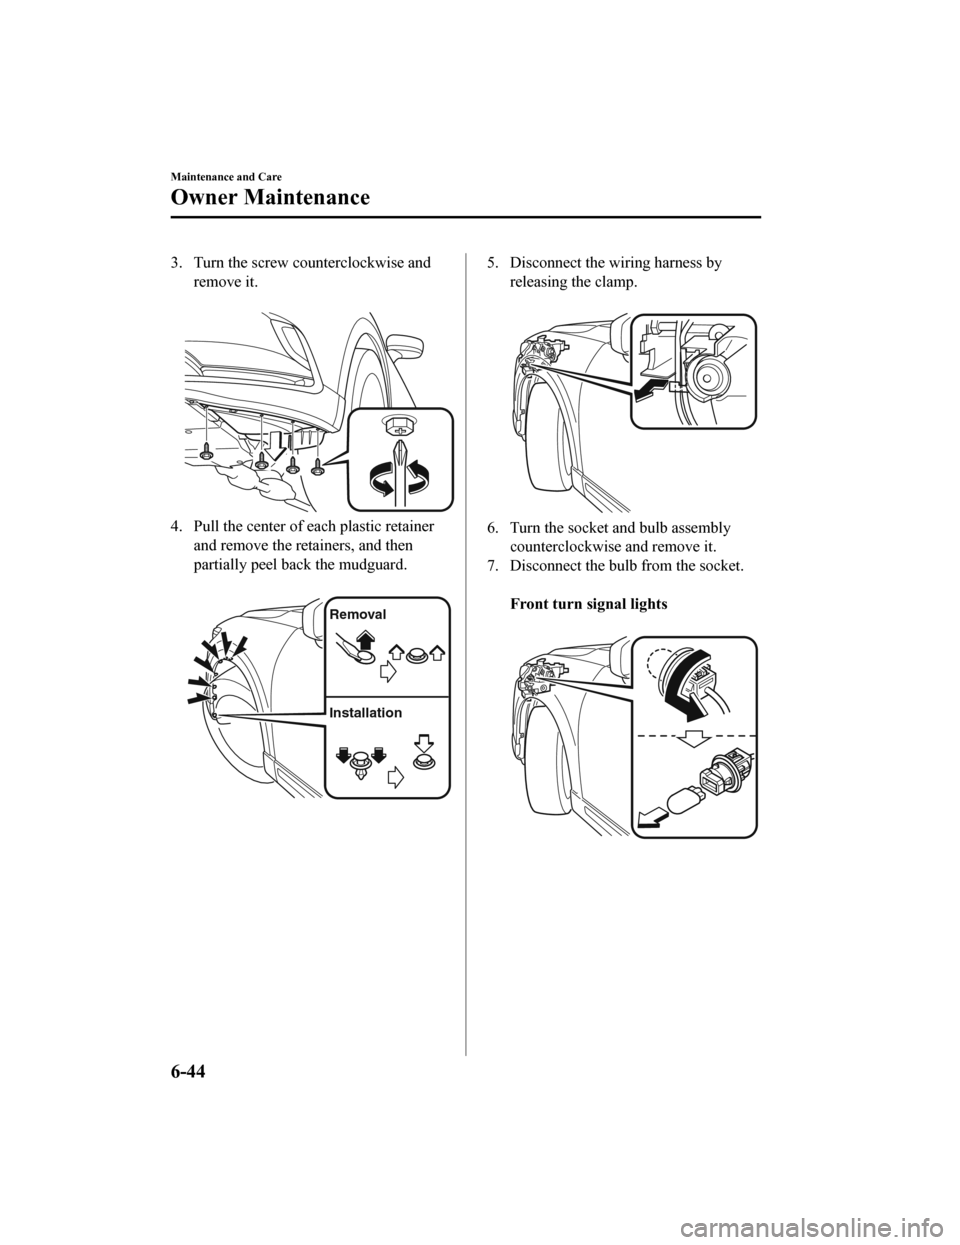
3. Turn the screw counterclockwise andremove it.
4. Pull the center of each plastic retainer
and remove the retainers, and then
partially peel back the mudguard.
Removal
Installation
5. Disconnect the wiring harness by releasing the clamp.
6. Turn the socket and bulb assemblycounterclockwise and remove it.
7. Disconnect the bulb from the socket.
Front turn signal lights
Maintenance and Care
Owner Maintenance
6-44
CX-9_8HB2-EA-18G_Edition1 2018-5-11 13:09:27
Page 539 of 692
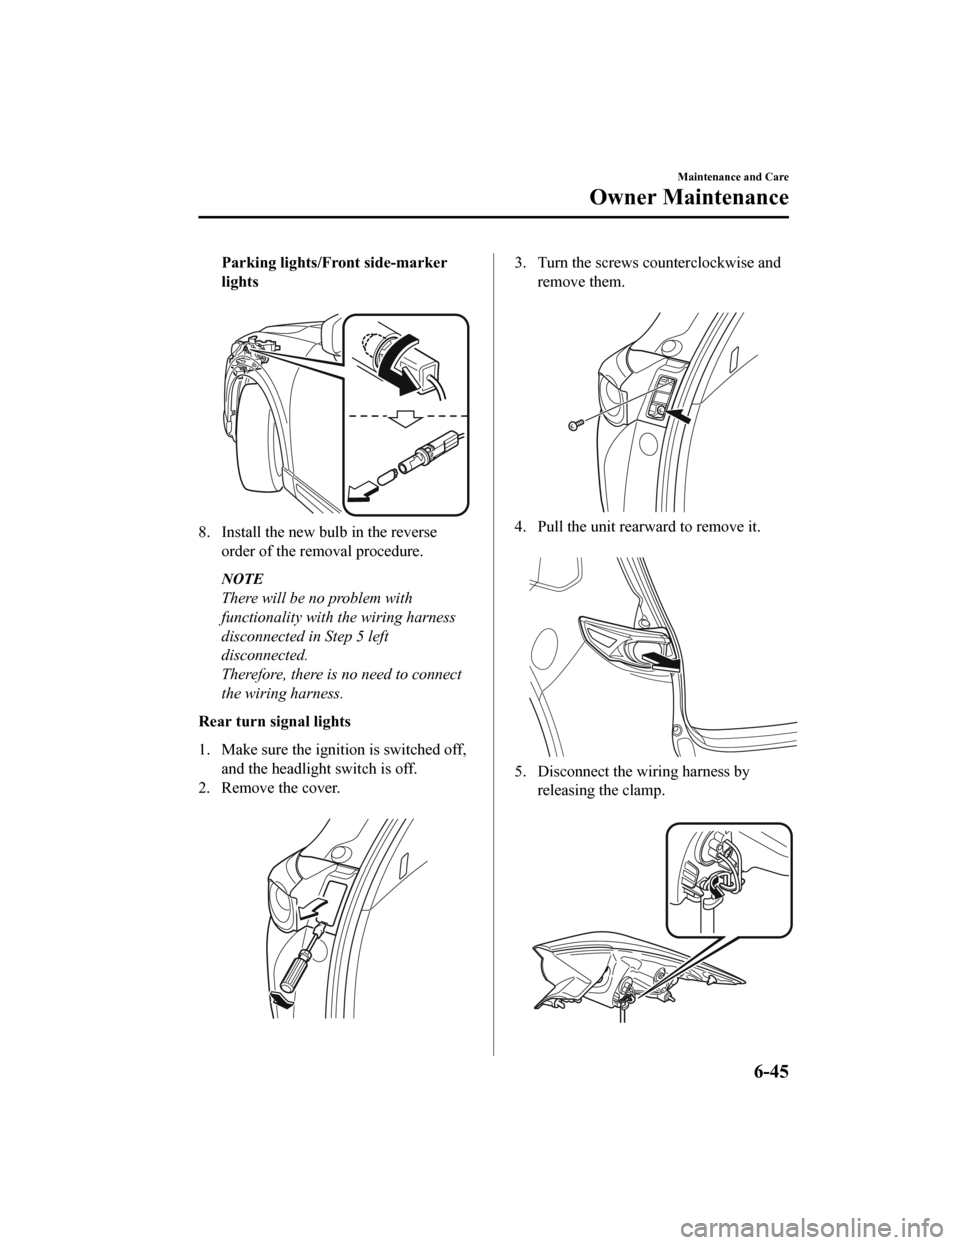
Parking lights/Front side-marker
lights
8. Install the new bulb in the reverseorder of the removal procedure.
NOTE
There will be no problem with
functionality with the wiring harness
disconnected in Step 5 left
disconnected.
Therefore, there is no need to connect
the wiring harness.
Rear turn signal lights
1. Make sure the ignition is switched off, and the headlight switch is off.
2. Remove the cover.
3. Turn the screws counterclockwise andremove them.
4. Pull the unit rearward to remove it.
5. Disconnect the wiring harness byreleasing the clamp.
Maintenance and Care
Owner Maintenance
6-45
CX-9_8HB2-EA-18G_Edition1 2018-5-11 13:09:27
Page 540 of 692
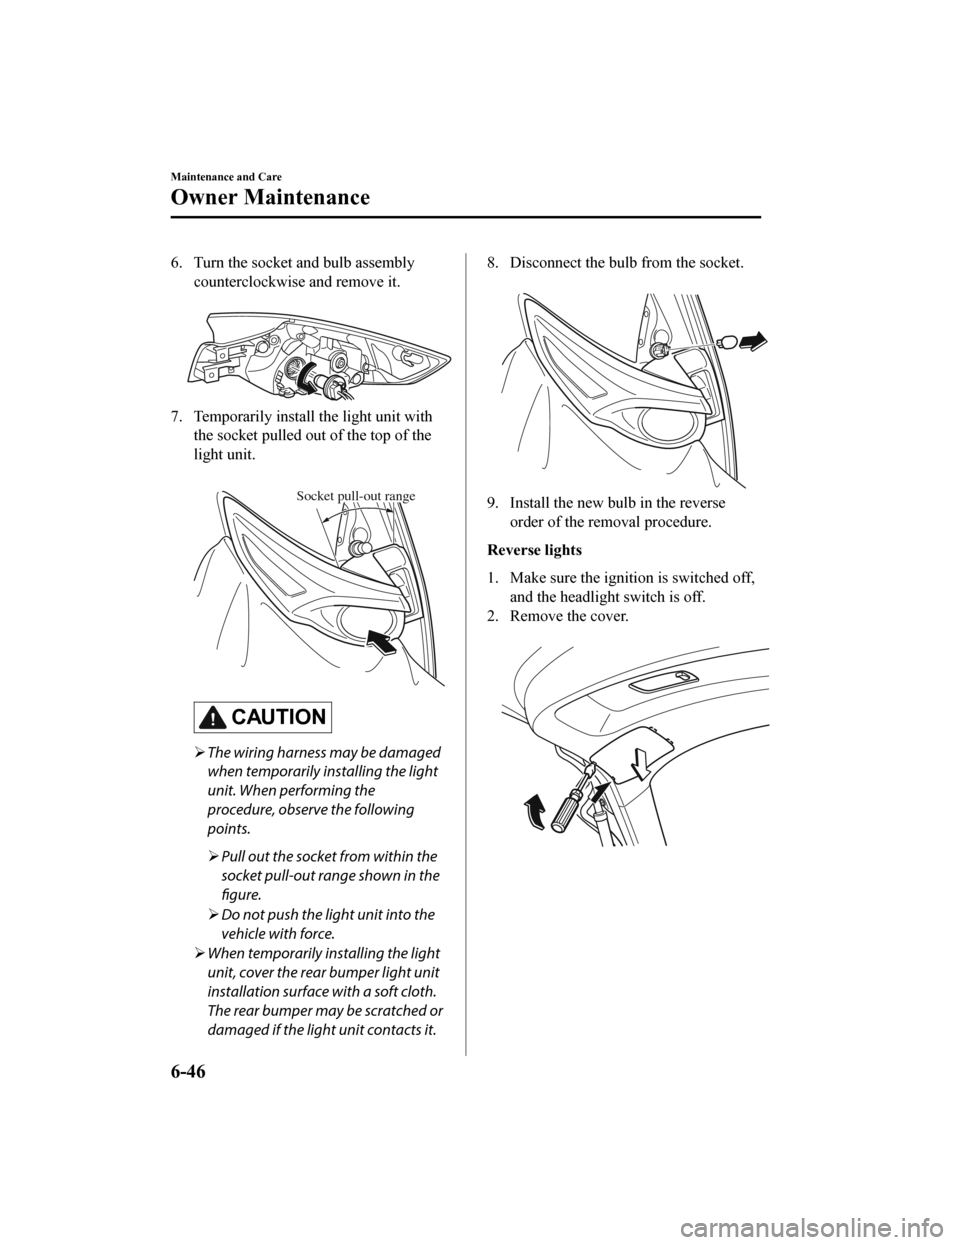
6. Turn the socket and bulb assemblycounterclockwise and remove it.
7. Temporarily install the light unit withthe socket pulled out of the top of the
light unit.
Socket pull-out range
CAUTION
The wiring harness may be damaged
when temporarily installing the light
unit. When performing the
procedure, observe the following
points.
Pull out the socket from within the
socket pull-out range shown in the
figure.
Do not push the light unit into the
vehicle with force.
When temporarily installing the light
unit, cover the rear bumper light unit
installation surface with a soft cloth.
The rear bumper may be scratched or
damaged if the light unit contacts it.
8. Disconnect the bulb from the socket.
9. Install the new bulb in the reverseorder of the removal procedure.
Reverse lights
1. Make sure the ignition is switched off, and the headligh t switch is off.
2. Remove the cover.
Maintenance and Care
Owner Maintenance
6-46
CX-9_8HB2-EA-18G_Edition1 2018-5-11 13:09:27
Page 541 of 692
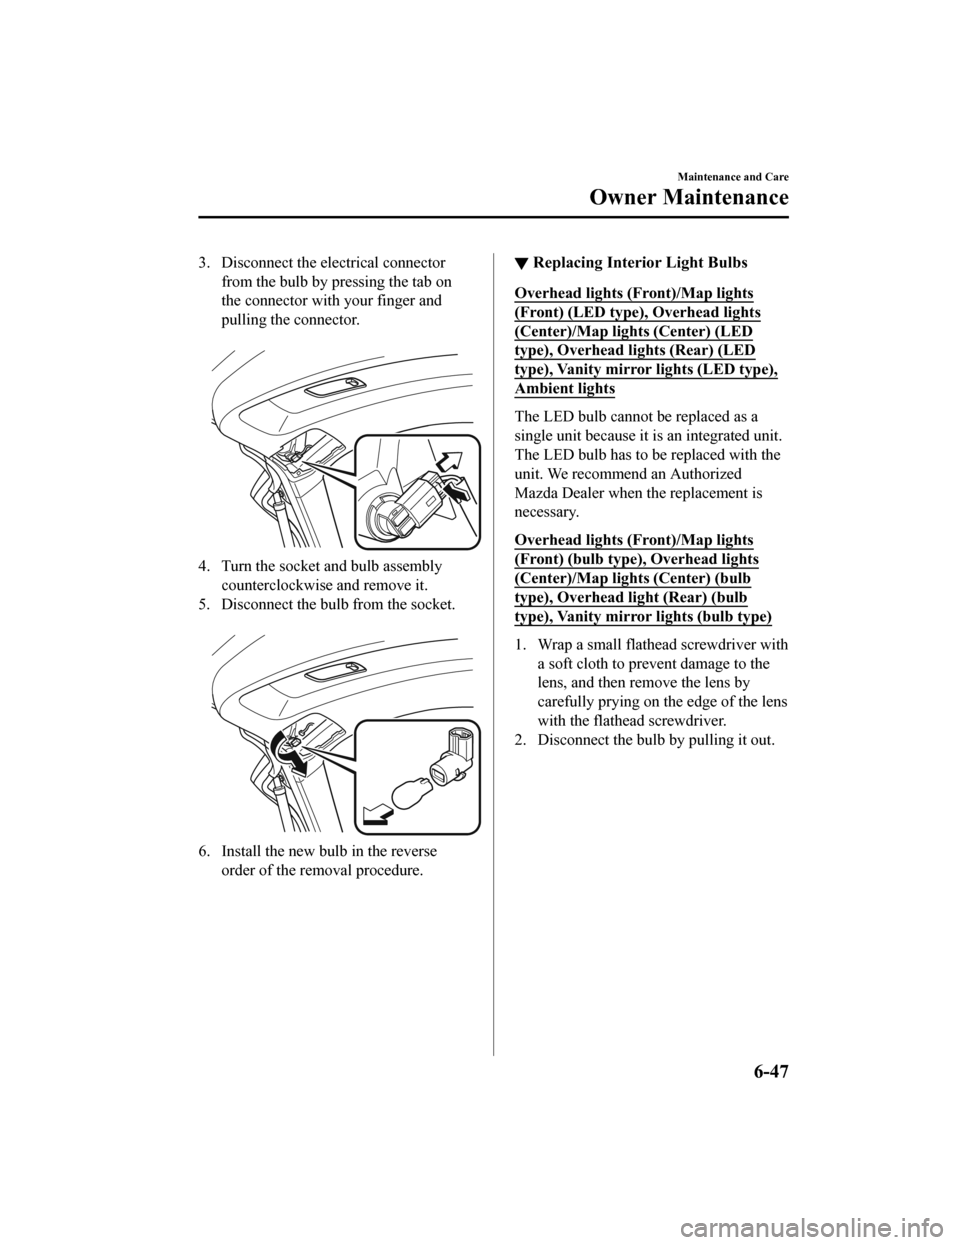
3. Disconnect the electrical connectorfrom the bulb by pressing the tab on
the connector with your finger and
pulling the connector.
4. Turn the socket and bulb assemblycounterclockwise and remove it.
5. Disconnect the bulb from the socket.
6. Install the new bulb in the reverseorder of the removal procedure.
▼Replacing Interior Light Bulbs
Overhead lights (Front)/Map lights
(Front) (LED type), Overhead lights
(Center)/Map lights (Center) (LED
type), Overhead lights (Rear) (LED
type), Vanity mirror lights (LED type),
Ambient lights
The LED bulb cannot be replaced as a
single unit because it is an integrated unit.
The LED bulb has to be replaced with the
unit. We recommend an Authorized
Mazda Dealer when the replacement is
necessary.
Overhead lights (Front)/Map lights
(Front) (bulb type), Overhead lights
(Center)/Map lights (Center) (bulb
type), Overhead light (Rear) (bulb
type), Vanity mirror
lights (bulb type)
1. Wrap a small flathead screwdriver with
a soft cloth to prev ent damage to the
lens, and then remove the lens by
carefully prying on t he edge of the lens
with the flathead screwdriver.
2. Disconnect the bulb by pulling it out.
Maintenance and Care
Owner Maintenance
6-47
CX-9_8HB2-EA-18G_Edition1 2018-5-11 13:09:27