driver seat adjustment MAZDA MODEL CX-9 2020 Owners Manual (in English)
[x] Cancel search | Manufacturer: MAZDA, Model Year: 2020, Model line: MODEL CX-9, Model: MAZDA MODEL CX-9 2020Pages: 706
Page 17 of 706

Front Seat
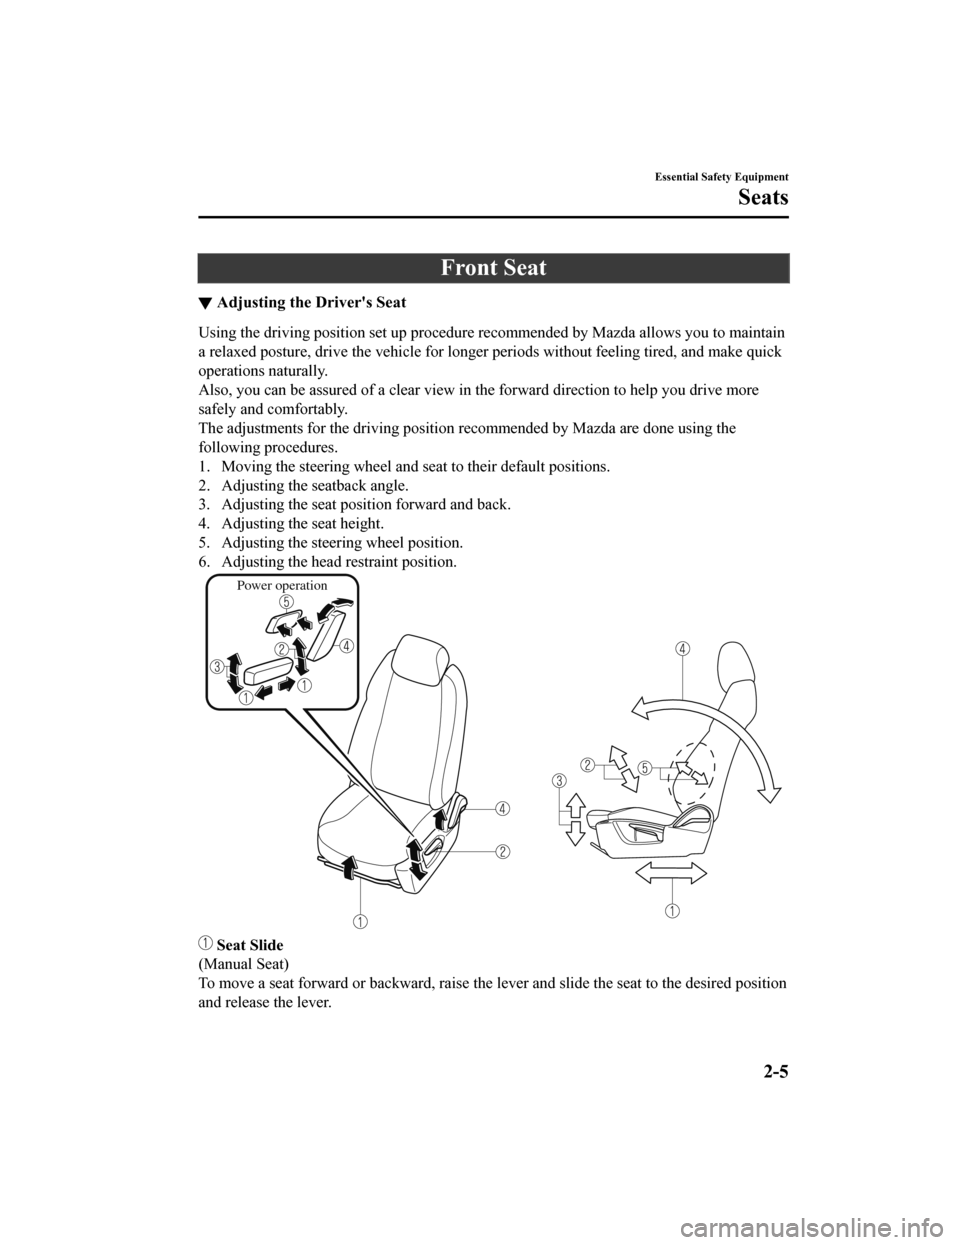
▼Adjusting the Driver's Seat
Using the driving position set up procedure recommended by Mazda allows you to maintain
a relaxed posture, drive the vehicle for longer periods without feeling tired, and make quick
operations naturally.
Also, you can be assured of a clear view in the forward direction to help you drive more
safely and comfortably.
The adjustments for the driving position recommended by Mazda are done using the
following procedures.
1. Moving the steering wheel and s
eat to their default positions.
2. Adjusting the seatback angle.
3. Adjusting the seat position forward and back.
4. Adjusting the seat height.
5. Adjusting the steering wheel position.
6. Adjusting the head restraint position.
Power operation
Seat Slide
(Manual Seat)
To move a seat forward or backward, raise the lever and slide the seat to the desired position
and release the lever.
Essential Safety Equipment
Seats
2-5
CX-9_8HT8-EA-19I_Edition2_old 2019-9-24 13:14:55
Page 18 of 706

Make sure the lever returns to its original position and the seat is locked in place by
attempting to push it forward and backward.
(Power Seat)
To slide the seat, move the slide lifter switch on the outside of the seat to the front or back
and hold it. Release the switch at the desired position.
Height Adjustment
(Manual Seat)
To adjust the seat height, move the lever up or down.
(Power Seat)
To adjust the seat height, move the slide lifter switch up or down.
Height Adjustment for Front Edge of Seat Bottom (Power Seat)*
To adjust the front hei ght of the seat bottom, raise or lower the front of the slide lifter
switch.
Seat Recline
(Manual Seat)
To change the seatback angle, lean forward sl ightly while raising the lever. Then lean back
to the desired position and release the lever.
Make sure the lever returns to its original po sition and the seatback is locked in place by
attempting to push it forward and backward.
(Power Seat)
To change the seatback angle, press the front or rear side of the reclining switch. Release the
switch at the desired position.
Lumbar Support Adju stment (Power Seat)*
To increase the seat firmness, press and hold the front part of the switch to the desired
position, then release it.
Press the rear part of the switch to decrease firmness.
Before making adjustments to the driving position recommended by Mazda
Before making adjustments, move the steerin g wheel and seat to their default positions.
How to move the steering wheel to its default position
WA R N I N G
Never adjust the steering wheel while the vehicle is moving:
Adjusting the steering wheel while the vehicle is moving is dangerous. Moving it can very
easily cause the driver to abruptly turn to the left or right. This can lead to loss of control or an
accident.
Essential Safety Equipment
Seats
2-6*Some models.
CX-9_8HT8-EA-19I_Edition2_old 2019-9-24 13:14:55
Page 19 of 706

After adjusting the steering wheel position, make sure it is securely locked by trying to move it
up and down:
Driving with the steering wheel not securely locked in position is dangerous. If the steering
wheel moves unexpectedly while driving, you coul d lose control of the steering resulting in an
accident.
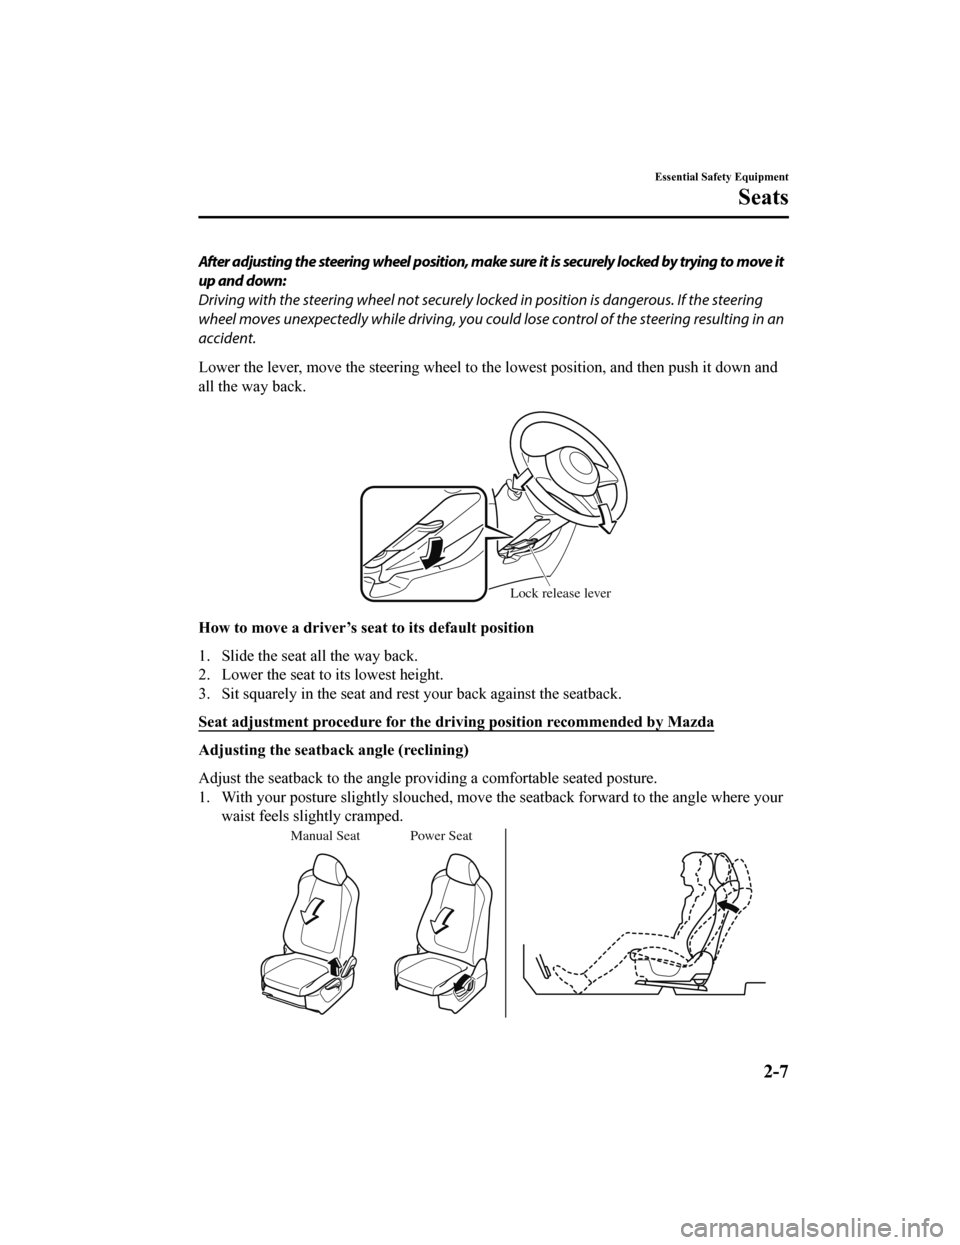
Lower the lever, move the steering wheel to th e lowest position, and then push it down and
all the way back.
Lock release lever
How to move a driver’s se at to its default position
1. Slide the seat all the way back.
2. Lower the seat to its lowest height.
3. Sit squarely in the seat and rest your back against the seatback.
Seat adjustment procedure for the driving position recommended by Mazda
Adjusting the seatba ck angle (reclining)
Adjust the seatback to the angle providing a comfortable seated posture.
1. With your posture slightly slouched, move the seatback forward to the angle where your waist feels slightly cramped.
Manual Seat Power Seat
Essential Safety Equipment
Seats
2-7
CX-9_8HT8-EA-19I_Edition2_old 2019-9-24 13:14:55
Page 23 of 706

▼Driving Position Memory*
The desired driving position can be called
up after programming the position.
The following driving positions can be
programmed.
Driver’s seat position (seat slide, height
adjustment, front edge of seat bottom,
seat recline)
Refer to Adjusting the Driver's Seat on
page 2-5.
Active driving display (display position,
brightness level, display information)
Refer to Active Driving Display on page
4-56.
CAUTION
Do not place fingers or hands around the
bottom of the seat while the seat memory
function is operatin
g. The seat moves
automatically while the seat memory
function is operating and fingers or hands
could get pinched and injured.
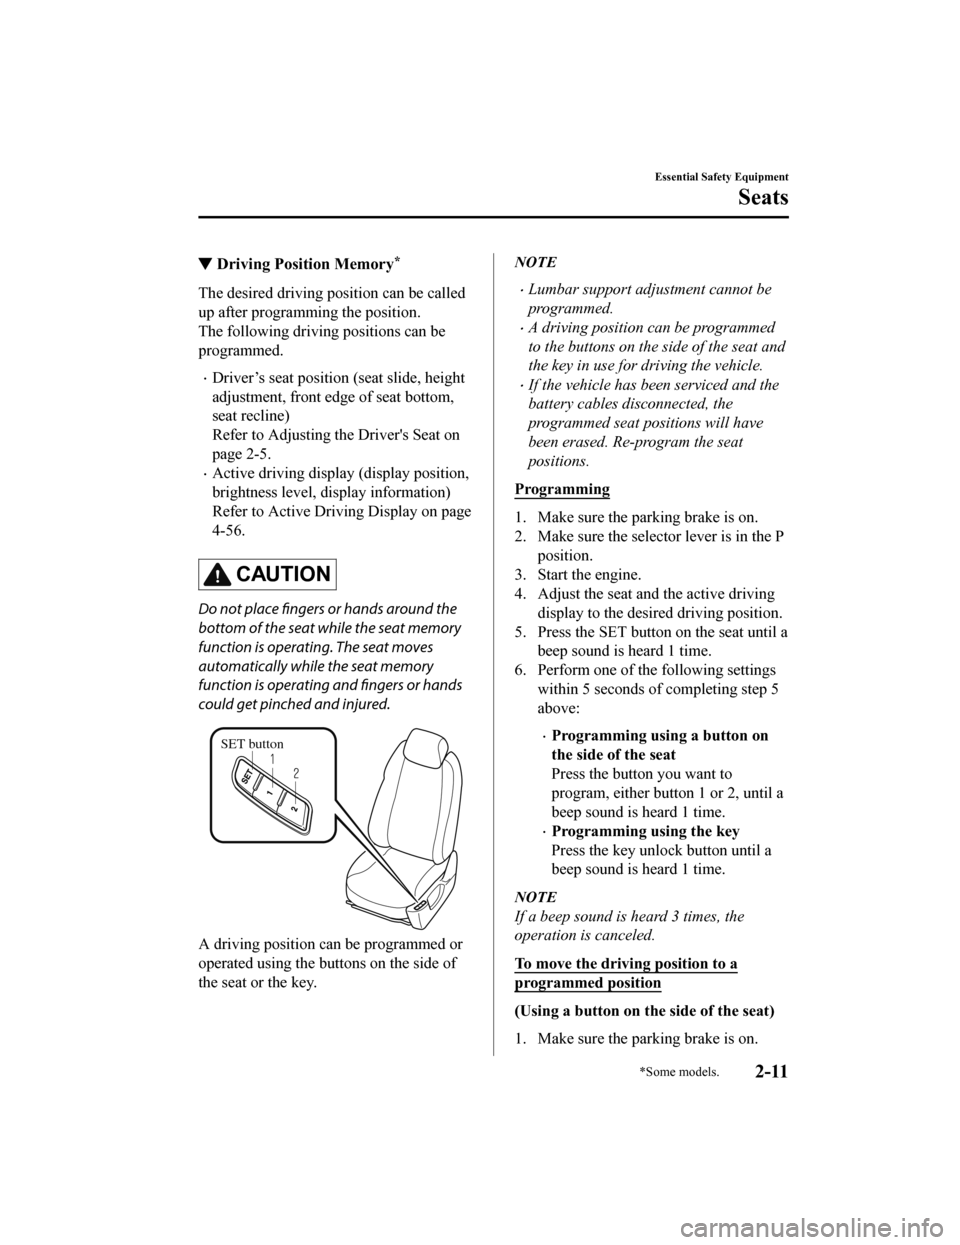
SET button
A driving position can be programmed or
operated using the buttons on the side of
the seat or the key.
NOTE
Lumbar support adjustment cannot be
programmed.
A driving position can be programmed
to the buttons on the side of the seat and
the key in use for driving the vehicle.
If the vehicle has been serviced and the
battery cables disconnected, the
programmed seat positions will have
been erased. Re-program the seat
positions.
Programming
1. Make sure the parking brake is on.
2. Make sure the selector lever is in the P position.
3. Start the engine.
4. Adjust the seat and the active driving display to the desired driving position.
5. Press the SET button on the seat until a beep sound is heard 1 time.
6. Perform one of the following settings within 5 seconds of completing step 5
above:
Programming using a button on
the side of the seat
Press the button you want to
program, either button 1 or 2, until a
beep sound is heard 1 time.
Programming using the key
Press the key unlock button until a
beep sound is heard 1 time.
NOTE
If a beep sound is heard 3 times, the
operation is canceled.
To move the driving position to a
programmed position
(Using a button on the side of the seat)
1. Make sure the parking brake is on.
Essential Safety Equipment
Seats
*Some models.2-11
CX-9_8HT8-EA-19I_Edition2_old 2019-9-24 13:14:55
Page 24 of 706

2. Make sure the selector lever is in the Pposition.
3. Start the engine.
4. Press the programming button for the driving position you want to call up
(button 1 or 2).
5. A beep sound is heard when the driving position adjustment is
completed.
NOTE
If the driving position movement is not
changed, only the beep sounds.
A seat position can be called up even
with the engine not running.
The driving position adjustment is
canceled in the following cases:
Any of the seat adjustment switches is
operated.
The SET button is pressed.
Programming button 1 or 2 is pressed.
The key lock button or unlock button
is operated.
The vehicle starts moving.
The active driving display is adjusted.
(Using a programmed key)
1. Unlock the doors by pressing a request switch or the key unlock button.
2. After unlocking the doors, the seat
position adjustment begins within 40
seconds of opening the driver's door,
and a beep sounds when the operation
is finished.
3. Make sure the parking brake is on.
4. Make sure the selector lever is in the Pposition.
5. Start the engine.
6. The active driving display adjustment begins.
NOTE
If there is no driving position movement,
a beep is not heard.
The driving position adjustment is
canceled in the following cases:
Any of the seat adjustment switches is
operated.
The SET button is pressed.
Programming button 1 or 2 is pressed.
The key lock button or unlock button
is operated.
The vehicle starts moving.
The active driving display is adjusted.
Erasing programmed driving positions
(Erasing the driving positions
programmed to the key)
1. Switch the ignition OFF.
2. Press the SET button on the side of the seat until a beep sound is heard 1 time.
3. After the beep sounds, press the key lock button within 5 seconds until a
beep sound is heard 1 time.
NOTE
If a beep sound is heard 3 times, the
operation is canceled.
Essential Safety Equipment
Seats
2-12
CX-9_8HT8-EA-19I_Edition2_old 2019-9-24 13:14:55
Page 136 of 706

2. If the power window lock switch is inthe unlock position, switch it to the
lock position.
3. Press and hold the front passenger's power window switch and rear left/
right power window switches on the
driver's door at the same time for 3
seconds or longer.
NOTE
The automatic folding function cannot
be canceled if the procedure is not
completed within the specified times, or
the procedure is changed along the way.
To redo the procedure, first switch the
ignition off and proceed from the
beginning.
If you are unable to cancel the function
despite doing the cancellation
procedure, consult an Authorized Mazda
Dealer.
Restoring the au tomatic folding
function
With the automatic fold ing function in the
canceled state, repeat the previous
procedure for canceling the function and it
will be restored.
NOTE
If you are unable to restore the function
despite carrying out the restore procedure,
consult an Authorized Mazda Dealer.
Engine-off outside mirror operation
*
The outside mirrors can be operated for
about 40 seconds after the ignition is
switched from ON to off.
▼ Rearview Mirror
WA R N I N G
Do not stack cargo or objects higher than
the seatbacks:
Cargo stacked higher than the seatbacks is
dangerous. It can block your view in the
rearview mirror, which might cause you to
hit another car when changing lanes.
Rearview mirror adjustment
Before driving, adjust the rearview mirror
to center on the scene through the rear
window.
NOTE
For the manual day/night mirror, perform
the adjustment with the day/night lever in
the day position.
Before Driving
Mirrors
3-36*Some models.
CX-9_8HT8-EA-19I_Edition2_old
2019-9-24 13:14:55