radio controls MAZDA MODEL CX-9 2020 Owners Manual (in English)
[x] Cancel search | Manufacturer: MAZDA, Model Year: 2020, Model line: MODEL CX-9, Model: MAZDA MODEL CX-9 2020Pages: 706
Page 102 of 706
Keys
WA R N I N G
Do not leave the key in your vehicle with
children and keep them in a place where
your children will not find or play with
them:
Leaving children in a vehicle with the key is
dangerous. This could result in someone
being badly injured or even killed. Children
may find these keys to be an interesting toy
to play with and could cause the power
windows or other controls to operate, or
even make the vehicle move.
CAUTION
Because the key (transmitter) uses
low-intensity radio waves, it may not
function correctly under the following
conditions:
The key is carried with communication
devices such as cellular phones.
The key contacts or is covered by a
metal object.
The key is near electronic devices such
as personal computers.
Non-Mazda genuine electronic
equipment is installed in the vehicle.
There is equipment which discharges
radio waves near the vehicle.
The key (transmitter) may consume
battery power excessively if it receives
high-intensity radio waves. Do not place
the key near electronic devices such as
televisions or personal computers.
To avoid damage to the key
(transmitter), DO NOT:
Drop the key.
Get the key wet.
Disassemble the key.
Expose the key to high temperatures
on places such as the dashboard or
hood, under direct sunlight.
Expose the key to any kind of magnetic
field.
Place heavy objects on the key.
Put the key in an ultrasonic cleaner.
Put any magnetized objects close to
the key.
NOTE
The driver must carry the key to ensure the
system functions properly.
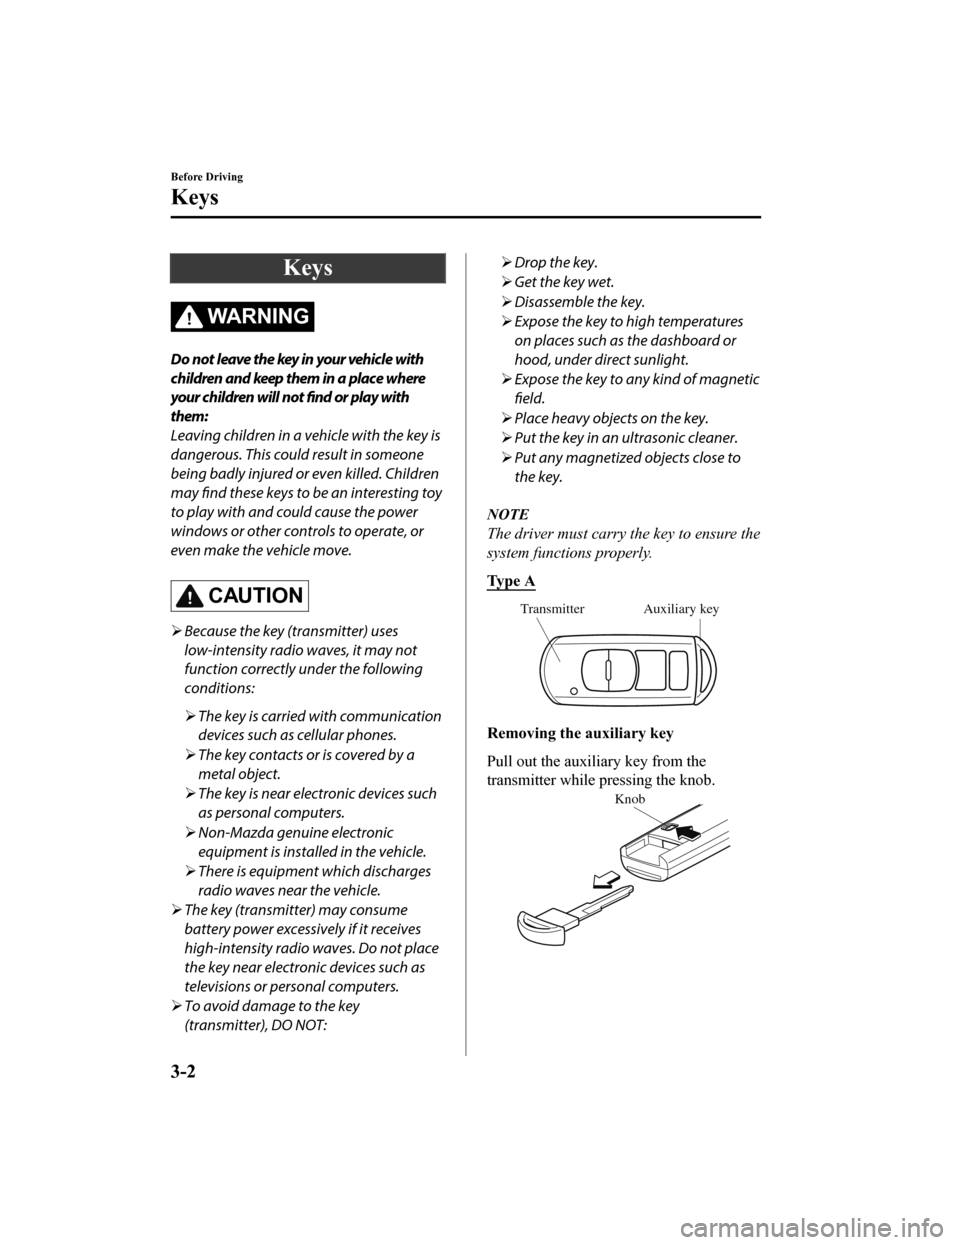
Ty p e A
Auxiliary key
Transmitter
Removing the auxiliary key
Pull out the auxiliary key from the
transmitter while pressing the knob.
Knob
Before Driving
Keys
3-2
CX-9_8HT8-EA-19I_Edition2_old 2019-9-24 13:14:55
Page 172 of 706

Starting the Engine
WA R N I N G
Radio waves from the key may affect
medical devices such as pacemakers:
Before using the key near people who use
medical devices, ask the medical device
manufacturer or your physician if radio
waves from the key will affect the device.
NOTE
The key must be carried because the key
carries an immobilizer chip that must
communicate with the engine controls at
short range.
The engine can be started when the push
button start is pressed from off, ACC, or
ON.
The push button start system functions
(function which can start the engine by
only carrying the key) can be
deactivated to prevent any possible
adverse effect on a user wearing a
pacemaker or other medical device. If
the system is deactivated, you will be
unable to start the engine by carrying
the key. Consult an Authorized Mazda
Dealer for details. If the push button
start system functions have been
deactivated, you can start the engine by
following the procedure indicated when
the key battery goes dead.
Refer to Engine Start Function When
Key Battery is Dead on page 4-8.
After starting a cold engine, the engine
speed increases and a whining sound
from the engine compartment can be
heard.
This is for improved exhaust gas
purification and does not indicate any
parts defect.
Engine-starting is controlled by the
spark ignition system.
This system meets all Canadian
Interference-Causing Equipment
Standard requirements regulating the
impulse electrical field strength of radio
noise.
1. Make sure you are carrying the key.
2. Occupants should fasten their seat belts.
3. Make sure the parking brake is on.
4. Continue to press the brake pedal firmly until the en gine has completely
started.
5. Put the vehicle in park (P). If you must
restart the engine while the vehicle is
moving, shift into neutral (N).
NOTE
The starter will not operate if the
selector lever is not in P or N position
and the brake pedal is not depressed
sufficiently.
6. Verify that the KEY indicator light (green) (if equipped) in the instrument
When Driving
Start/Stop Engine
4-6
CX-9_8HT8-EA-19I_Edition2_old 2019-9-24 13:14:55
Page 247 of 706
HomeLink Wireless
Control System (Type A)
*
NOTE
HomeLink and HomeLink house icon are
registered trademarks of Gentex
Corporation.
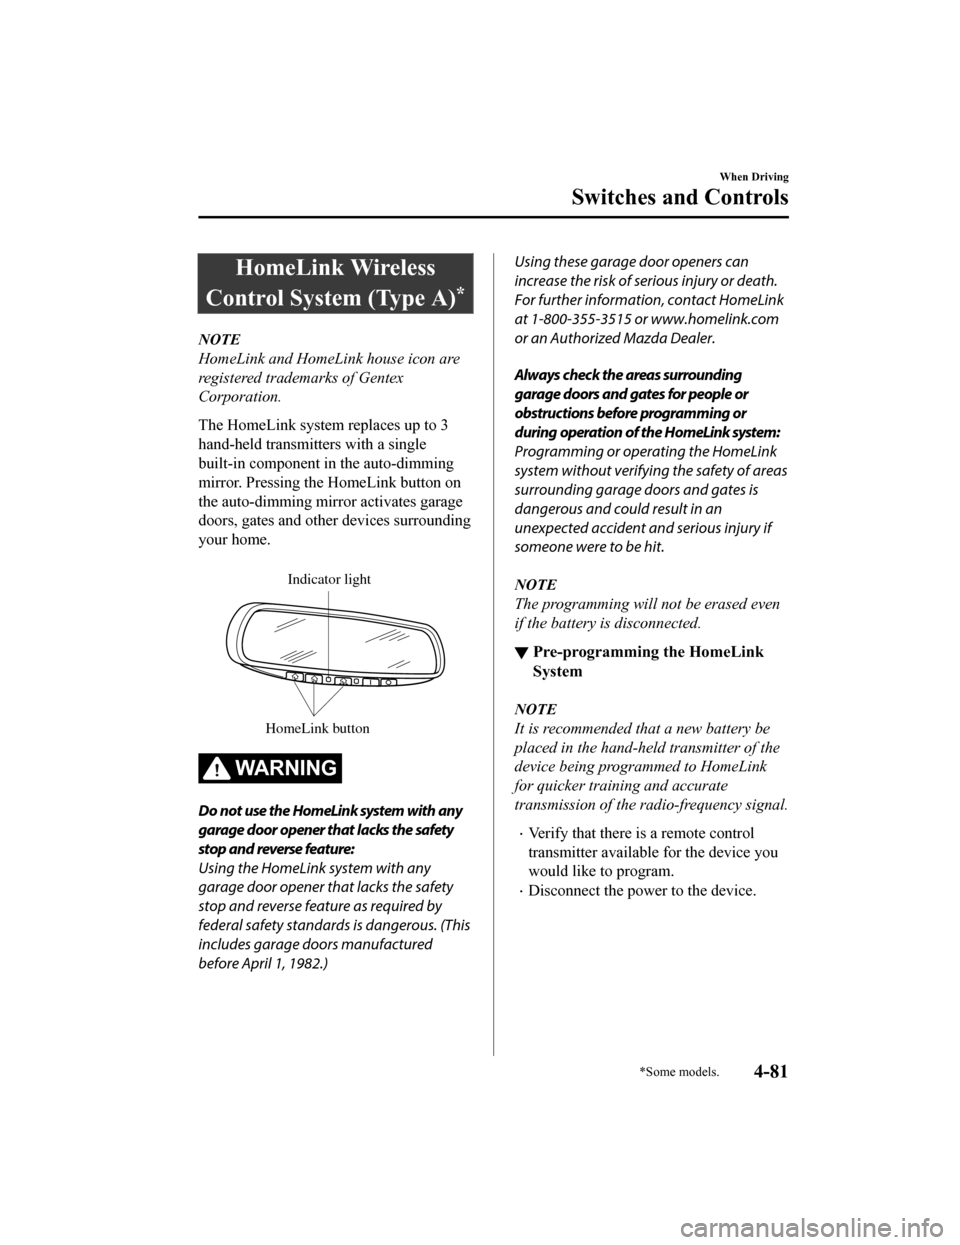
The HomeLink system replaces up to 3
hand-held transmitters with a single
built-in component in the auto-dimming
mirror. Pressing the HomeLink button on
the auto-dimming mirror activates garage
doors, gates and other devices surrounding
your home.
HomeLink b utton
Indicator light
WA R N I N G
Do not use the HomeLink system with any
garage door opener that lacks the safety
stop and reverse feature:
Using the HomeLink system with any
garage door opener that lacks the safety
stop and reverse feature as required by
federal safety standards is dangerous. (This
includes garage doors manufactured
before April 1, 1982.)
Using these garage door openers can
increase the risk of serious injury or death.
For further information, contact HomeLink
at 1-800-355-3515 or www.homelink.com
or an Authorized Mazda Dealer.
Always check the areas surrounding
garage doors and gates for people or
obstructions before programming or
during operation of the HomeLink system:
Programming or operating the HomeLink
system without verifying the safety of areas
surrounding garage doors and gates is
dangerous and could result in an
unexpected accident and serious injury if
someone were to be hit.
NOTE
The programming will not be erased even
if the battery is disconnected.
▼Pre-programming the HomeLink
System
NOTE
It is recommended that a new battery be
placed in the hand-held transmitter of the
device being programmed to HomeLink
for quicker training and accurate
transmission of the radio-frequency signal.
Verify that there is a remote control
transmitter available for the device you
would like to program.
Disconnect the power to the device.
When Driving
Switches and Controls
*Some models.4-81
CX-9_8HT8-EA-19I_Edition2_old
2019-9-24 13:14:55
Page 249 of 706

of the button may vary by
manufacturer.)
NOTE
Complete the programming within 30
seconds.
9. Return to the vehicle and firmly press,
hold for two seconds and release the
programmed HomeLink button. Repeat
the “ press/hold/release ” sequence a
second time, and, depending on the
brand of the garage door opener (or
other rolling code equipped device),
repeat this sequence a third time to
complete the programming process.
HomeLink should now activate your
rolling code equipped device.
NOTE
To program the remaining two HomeLink
buttons, begin with “Programming” ―
step 1
For questions or comments, please contact
HomeLink at www.homelink.com or
1-800-355-3515 .
▼Gate operator/Canadian
Programming
Canadian radio-frequency laws require
transmitter signals to “time-out” (or quit)
after several seconds of transmission
―
which may not be long enough for
HomeLink to pick up the signal during
programming. Similar to this Canadian
law, some U.S. gate operators are designed
to “time-out” in the same manner.
If you live in Canada or you are having
difficulties programming a gate operator
by using the “Programming” procedures
(regardless of where you live), replace
“Programming HomeLink” step 3 with
the following:
NOTE
If programming a garage door opener or
gate operator, it is advised to unplug the
device during the “cycling” process to
prevent possible overheating.
Continue to press and hold the HomeLink
button while you press and release ―
every two seconds (“cycle”) your
hand-held transmitter until the frequency
signal has successfully been accepted by
HomeLink. (The indicator light will flash
slowly and then rapidly.)
Proceed with “Programming” step 4 to
complete.
▼ Operating the HomeLink System
Press the programmed HomeLink button
to operate a programmed device. The code
will continue being transmitted for a
maximum of 20 seconds.
▼Reprogramming the HomeLink
system
To program a device to HomeLink using a
HomeLink button previously trained,
follow these steps:
1. Press and hold the desired HomeLink
button. DO NOT release the button.
2. The indicator light will begin to flash
after 20 seconds. Without releasing the
HomeLink button, proceed with
“Programming” - step 1.
▼ Erasing Programmed HomeLink
Buttons
To erase the existing programming from
all three operating channels, press and
hold the two outside buttons (
, ) on
When Driving
Switches and Controls
4-83
CX-9_8HT8-EA-19I_Edition2_old
2019-9-24 13:14:55
Page 251 of 706
Always check the areas surrounding
garage doors and gates for people or
obstructions before programming or
during operation of the HomeLink system:
Programming or operating the HomeLink
system without verifying the safety of areas
surrounding garage doors and gates is
dangerous and could result in an
unexpected accident and serious injury if
someone were to be hit.
NOTE
The programming will not be erased even
if the battery is disconnected.
▼Pre-programming the HomeLink
System
NOTE
It is recommended that a new battery be
placed in the hand-held transmitter of the
device being programmed to HomeLink
for quicker training and accurate
transmission of the radio-frequency signal.
Verify that there is a remote control
transmitter available for the device you
would like to program.
▼Programming the HomeLink
System
The HomeLink system provides 3 buttons
which can be individually selected and
programmed using the transmitters for
current, on-market devices as follows:
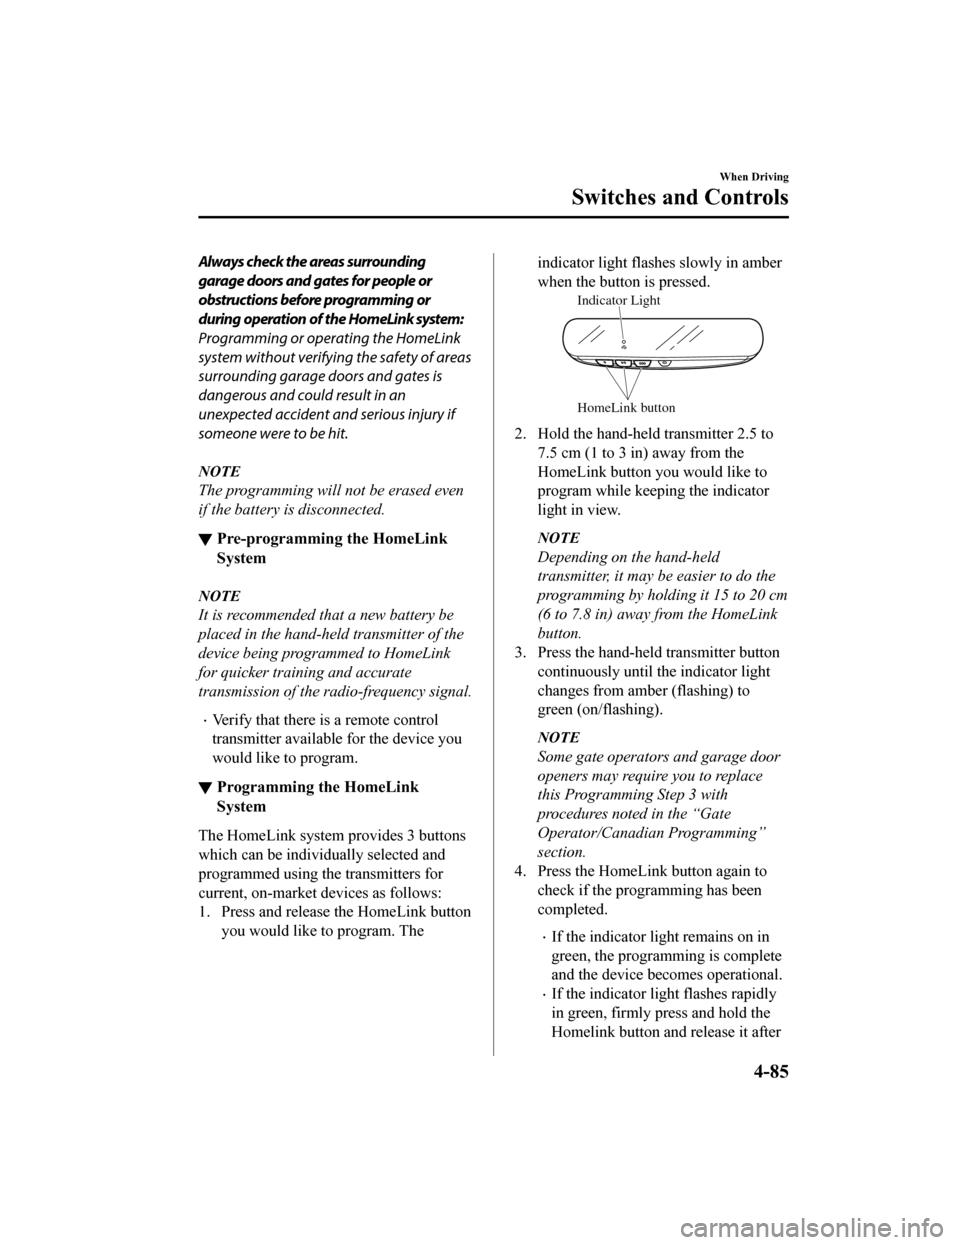
1. Press and release the HomeLink button
you would like to program. The
indicator light flashes slowly in amber
when the button is pressed.
HomeLink button
Indicator Light
2. Hold the hand-held transmitter 2.5 to7.5 cm (1 to 3 in) away from the
HomeLink button you would like to
program while keeping the indicator
light in view.
NOTE
Depending on the hand-held
transmitter, it may be easier to do the
programming by holding it 15 to 20 cm
(6 to 7.8 in) away from the HomeLink
button.
3. Press the hand-held transmitter button continuously until the indicator light
changes from amber (flashing) to
green (on/flashing).
NOTE
Some gate operators and garage door
openers may require you to replace
this Programming Step 3 with
procedures noted in the “Gate
Operator/Canadian Programming”
section.
4. Press the HomeLink button again to check if the programming has been
completed.
If the indicator light remains on in
green, the programming is complete
and the device becomes operational.
If the indicator light flashes rapidly
in green, firmly press and hold the
Homelink button and release it after
When Driving
Switches and Controls
4-85
CX-9_8HT8-EA-19I_Edition2_old 2019-9-24 13:14:55
Page 252 of 706
two seconds have passed. Repeat
this process up to three times to
complete the programming. The
device becomes operational and
programming is complete. If the
device does not operate, go to the
next step.
5. At the garage door opener receiver (motor-head unit) in the garage, locate
the “learn” or “smart” button. This can
usually be found where the hanging
antenna wire is attached to the
motor-head unit.
6. Firmly press and release the “learn” or
“smart” button. (The name and color
of the button may vary by
manufacturer.)
NOTE
Complete the programming within 30
seconds.
7. Return to the vehicle and firmly press
and hold the Homelink button, and
then release it after two seconds have
passed. Repeat the “ press/hold/
release ” sequence a second time, and,
depending on the brand of the garage
door opener (or other rolling code
equipped device), repeat this sequence
a third time to complete the
programming process.
Press the programmed HomeLink
button and make sure that the
HomeLink System operates.
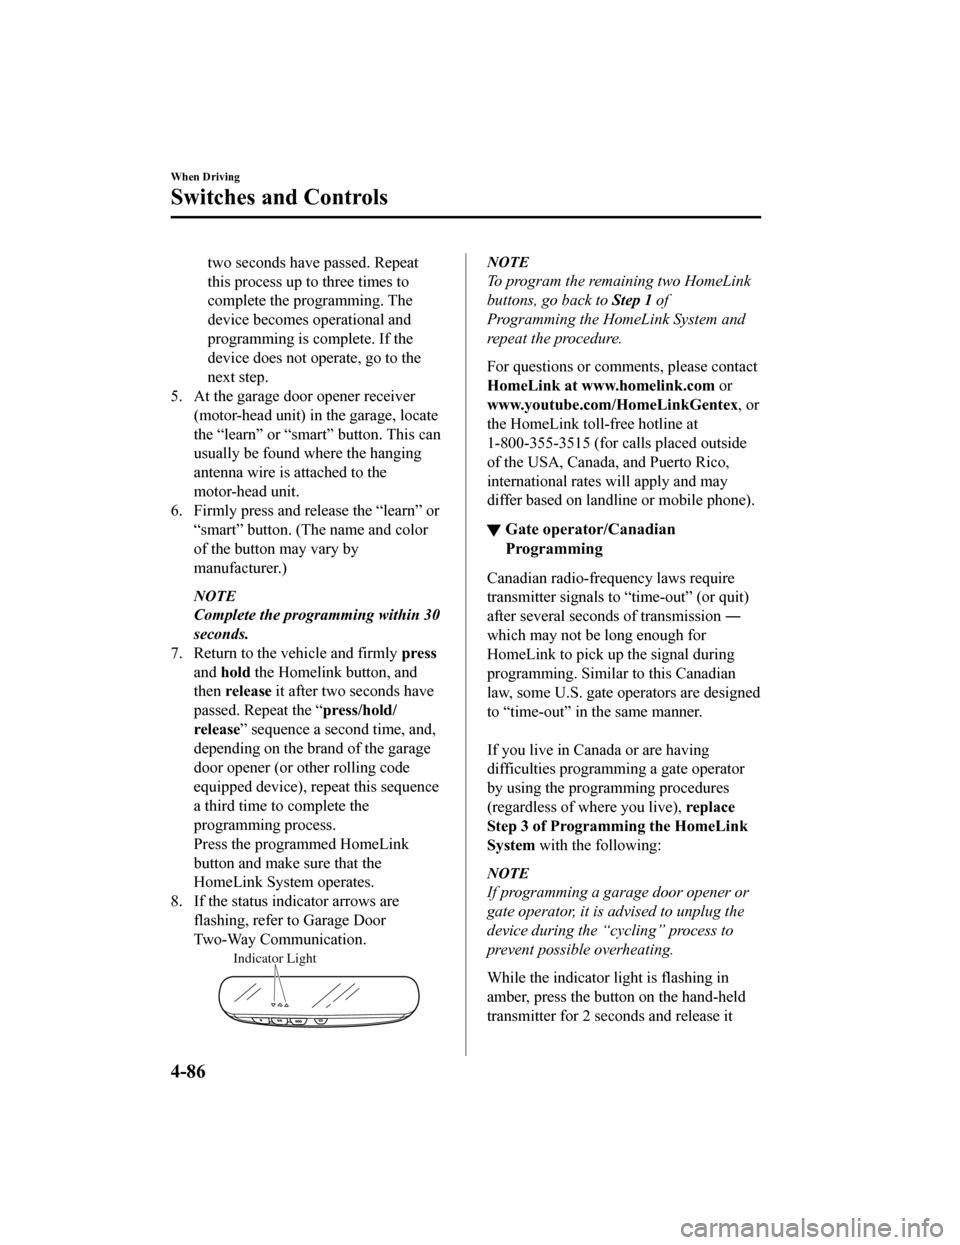
8. If the status indicator arrows are flashing, refer to Garage Door
Two-Way Communication.
Indicator Light
NOTE
To program the remaining two HomeLink
buttons, go back to Step 1 of
Programming the HomeLink System and
repeat the procedure.
For questions or comments, please contact
HomeLink at www.homelink.com or
www.youtube.com/HomeLinkGentex , or
the HomeLink toll-free hotline at
1-800-355-3515 (for calls placed outside
of the USA, Canada, and Puerto Rico,
international rates will apply and may
differ based on landline or mobile phone).
▼ Gate operator/Canadian
Programming
Canadian radio-frequency laws require
transmitter signals to “time-out” (or quit)
after several seconds of transmission
―
which may not be long enough for
HomeLink to pick up the signal during
programming. Similar to this Canadian
law, some U.S. gate operators are designed
to “time-out” in the same manner.
If you live in Canada or are having
difficulties program ming a gate operator
by using the programming procedures
(regardless of where you live), replace
Step 3 of Programming the HomeLink
System with the following:
NOTE
If programming a garage door opener or
gate operator, it is advised to unplug the
device during the “cycling” process to
prevent possible overheating.
While the indicator light is flashing in
amber, press the button on the hand-held
transmitter for 2 seconds and release it
When Driving
Switches and Controls
4-86
CX-9_8HT8-EA-19I_Edition2_old 2019-9-24 13:14:55
Page 405 of 706

5Interior Features
Use of various features for ride comfort, including air-conditioning and
audio system.
Climate Control System.................... 5-4 Operating Tips.............................. 5-4
Vent Operation (Front)................. 5-5
Front Air Conditione r................... 5-7
Vent Operation (Rear).................5-11
Rear Air Conditione r.................. 5-13
Before Using the Audio System...... 5-16 Audio Control Swit ch................. 5-16
AUX/USB...................................5-17
Antenna.......................................5-19
Audio Set.......................................... 5-20
Basic Operation Method............. 5-20
Home screen............................... 5-24
Volume/Display/Sound
Controls...................................... 5-25
Operating the Radio....................5-28
Operating the Satellite Radio
*...........
.................................................... 5-32
How to use AUX mode.............. 5-36
How to use USB mode............... 5-37
How to use Apple CarPlay™
*...........
.................................................... 5-42
How to use Android Auto™
mode
*..........................................5-45
Bluetooth
®.................................. 5-49
Bluetooth
® Preparation.............. 5-52
Available Language.. .................. 5-54
Bluetooth
® Audio....................... 5-55
How to Use Pandora
®................ 5-58
How to Use Aha™..................... 5-60
How to Use Stitcher™ Radio..... 5-63
Bluetooth
® Hands-Free.............. 5-65
Voice Recognition... ....................5-75
Settings....................................... 5-78
Applications................................5-80
Troubleshooting.......................... 5-81
Appendix.......................................... 5-87 Things You Need to Know......... 5-87
*Some models.5-1
CX-9_8HT8-EA-19I_Edition2_old 2019-9-24 13:14:55
Page 429 of 706
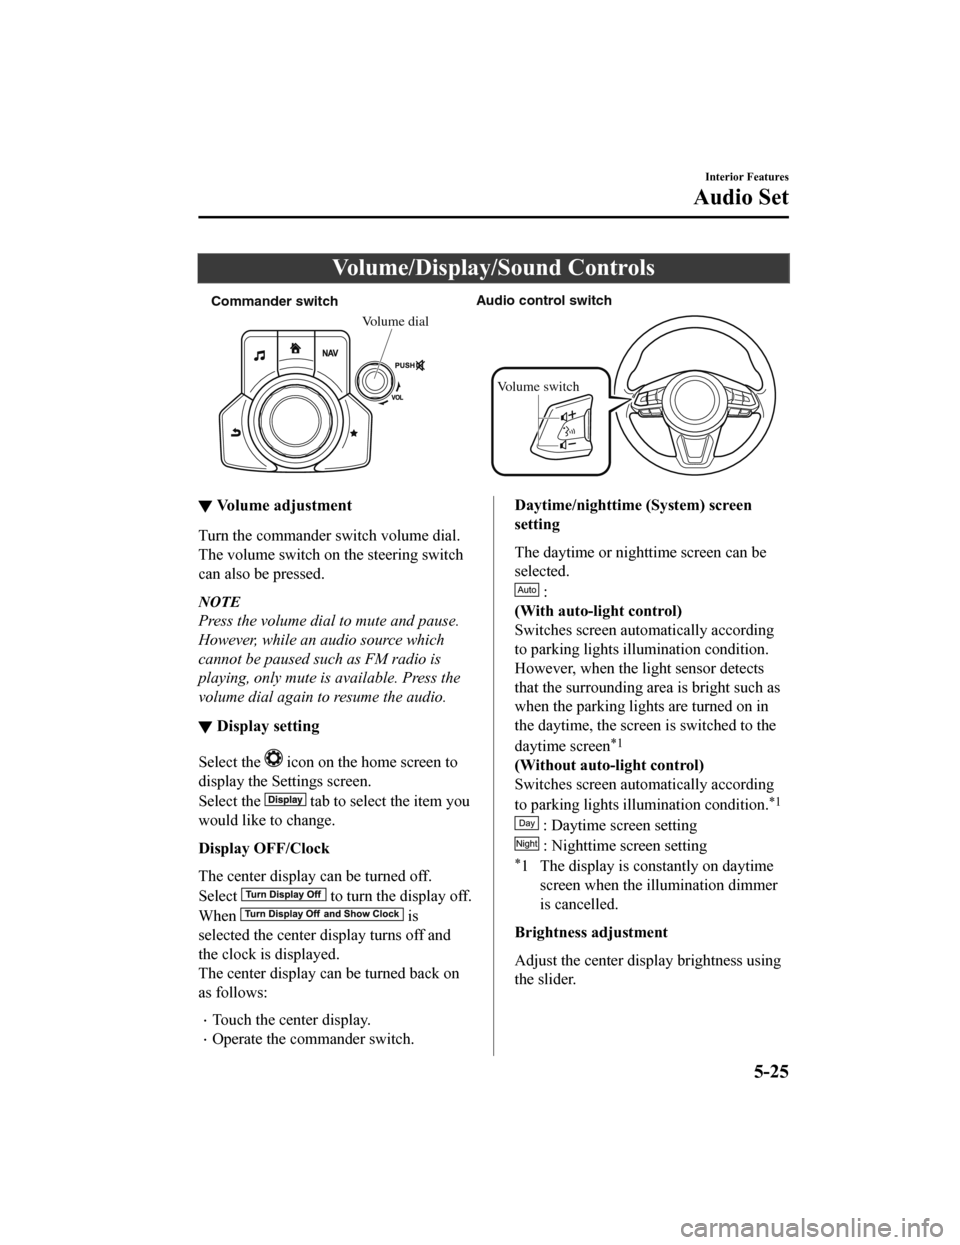
Volume/Display/Sound Controls
Commander switchAudio control switch
Volume dial
Volume switch
▼ Vo l u m e a d j u s t m e n t
Turn the commander switch volume dial.
The volume switch on the steering switch
can also be pressed.
NOTE
Press the volume dial to mute and pause.
However, while an audio source which
cannot be paused such as FM radio is
playing, only mute is available. Press the
volume dial again to resume the audio.
▼Display setting
Select the icon on the home screen to
display the Settings screen.
Select the
tab to select the item you
would like to change.
Display OFF/Clock
The center display can be turned off.
Select
to turn the display off.
When
is
selected the center display turns off and
the clock is displayed.
The center display can be turned back on
as follows:
Touch the center display.
Operate the commander switch.
Daytime/nighttime (System) screen
setting
The daytime or night time screen can be
selected.
:
(With auto-light control)
Switches screen auto matically according
to parking lights il lumination condition.
However, when the light sensor detects
that the surrounding area is bright such as
when the parking lights are turned on in
the daytime, the screen is switched to the
daytime screen
*1
(Without auto-light control)
Switches screen auto matically according
to parking lights il lumination condition.
*1
: Daytime screen setting
: Nighttime screen setting
*1 The display is constantly on daytime
screen when the illumination dimmer
is cancelled.
Brightness adjustment
Adjust the center disp lay brightness using
the slider.
Interior Features
Audio Set
5-25
CX-9_8HT8-EA-19I_Edition2_old 2019-9-24 13:14:55
Page 432 of 706
Operating the Radio
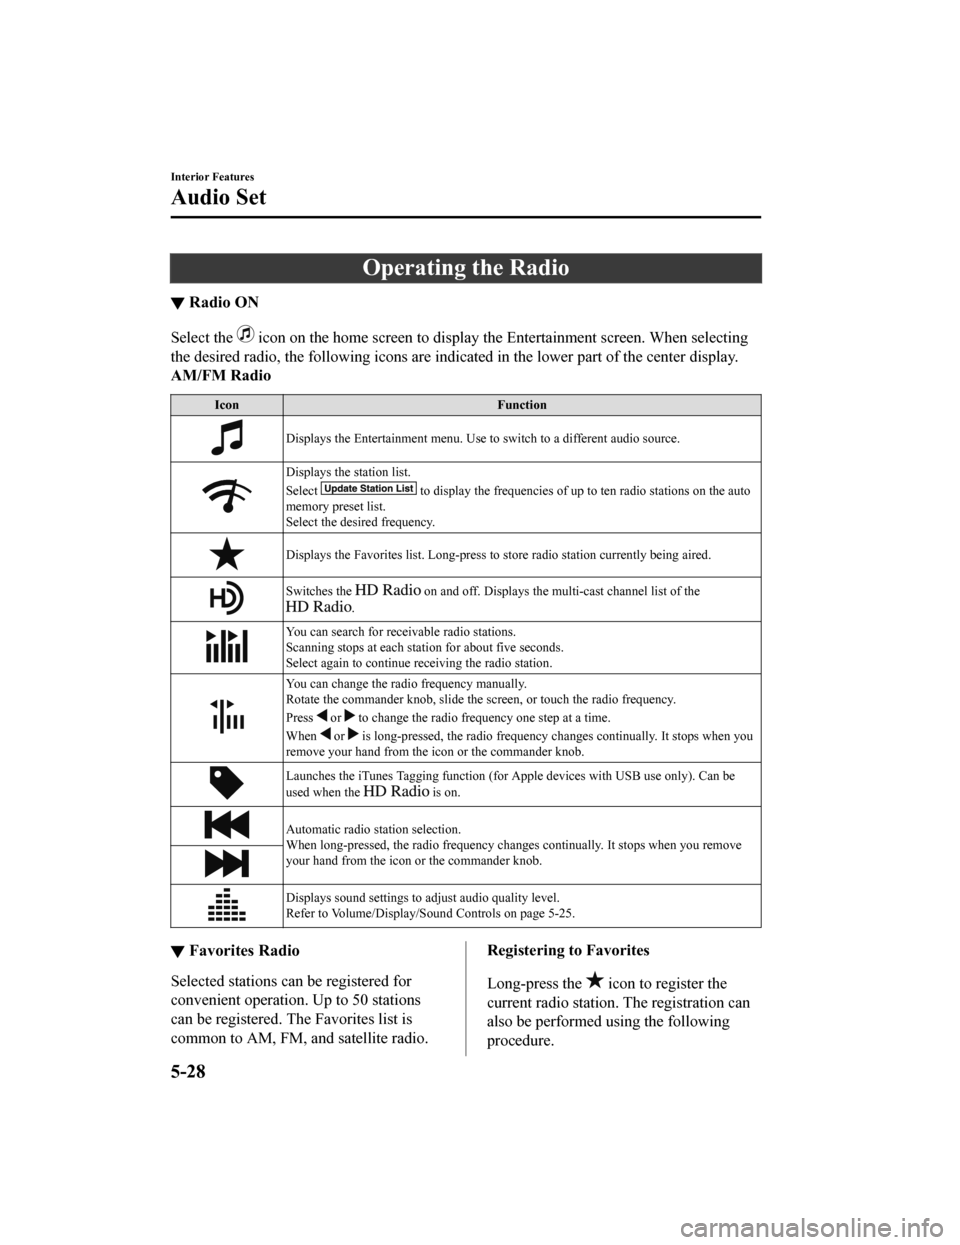
▼Radio ON
Select the icon on the home screen to display th
e Entertainment screen. When selecting
the desired radio, the following icons are indica ted in the lower part of the center display.
AM/FM Radio
Icon Function
Displays the Entertainment menu. Use to switch to a different audio source.
Displays the station list.
Select
to display the frequencies of up to ten radio stations on the auto
memory preset list.
Select the desired frequency.
Displays the Favorites list. Long-press to store radio st ation currently being aired.
Switches the on and off. Displays the multi-cast channel list of the
.
You can search for receivable radio stations.
Scanning stops at each station for about five seconds.
Select again to continue receiving the radio station.
You can change the radio frequency manually.
Rotate the commander knob, slide the screen, or touch the radio frequency.
Press
or to change the radio frequency one step at a time.
When
or is long-pressed, the radio frequency changes continually. It stops when you
remove your hand from the icon or the commander knob.
Launches the iTunes Tagging function (for Apple devices with USB use only). Can be
used when the
is on.
Automatic radio station selection.
When long-pressed, the radio frequency cha nges continually. It stops when you remove
your hand from the icon or the commander knob.
Displays sound settings to adjust audio quality level.
Refer to Volume/Display/Sound Controls on page 5-25.
▼ Favorites Radio
Selected stations can be registered for
convenient operation. Up to 50 stations
can be registered. The Favorites list is
common to AM, FM, and satellite radio.
Registering to Favorites
Long-press the
icon to register the
current radio station. The registration can
also be performed using the following
procedure.
Interior Features
Audio Set
5-28
CX-9_8HT8-EA-19I_Edition2_old 2019-9-24 13:14:55
Page 437 of 706

▼SiriusXM® operation
Select the icon on the home screen to display the Entertainment screen. When is
selected, the following icons are indicated in the bottom part of the center display.
Icon Function
Displays the Entertainment menu. Use to switch to a different audio source.
Displays the channel list of the current category.
Displays the favorites list. Long-press to store the channel currently being aired.
Refer to Operating the Radio on page 5-28.
Plays each channel in the curr ent channel list for 6 seconds.
Select again to continue receiving the channel.
The function can be selected when th e Tune Scan™ setting is turned off.
Each channel programmed to Smart Favorite is played for 6 seconds.
The function can be selected when all of the following conditions are met.
Two or more music channels have been programmed to Smart FavoriteThe Tune Scan™ setting is ON
Displays in red while a station in a TuneMix™ channel is being broadcast.
The TuneMix™ broadcast ends when the icon is pressed.
(During TuneMix™ broadcast/Tune Scan™ operation)
Returns to the beginning of the previous song.
Plays a radio. When selected again, playback is temporarily stopped.
(During TuneMix™ broadcast/Tune Scan™ operation)
Advances to the beginning of the next song.
(When in a mode other than TuneMix™/Tune Scan™)
Plays the previous channel.
(When in a mode other than TuneMix™/Tune Scan™)
Plays the next channel.
Displays the setting screen.
Displays sound settings to adjust audio quality level.
Refer to Volume/Display/Sound Controls on page 5-25.
Selection from channel list
Receivable channels can be displayed on
the channel list screen. You can easily
select the channel you want to listen fromthe list. Each category can be also
displayed.
1. Select the
icon to display the
channel list.
Interior Features
Audio Set
5-33
CX-9_8HT8-EA-19I_Edition2_old 2019-9-24 13:14:55