brake light MAZDA MODEL CX-9 2022 Owners Manual
[x] Cancel search | Manufacturer: MAZDA, Model Year: 2022, Model line: MODEL CX-9, Model: MAZDA MODEL CX-9 2022Pages: 715, PDF Size: 81.06 MB
Page 21 of 715

2. Move the seatback backward to a comfortable seated posture without any feeling of
cramping in your waist.
Manual Seat Power Seat
Adjusting the seat position forward and back (sliding)
Adjust the seat to the position best for operating the accelera tor and brake pedals.
1. Place your left foot on the fo otrest, your right foot between the accelerator and brake
pedals, and position your heel to the position allowing easy sw itching between the
pedals.
2. With your heel set on the fl oor, set your right foot on the b rake pedal and move the seat
forward as far as possible until you feel a slight cramping in your ankle.
Manual Seat Power Seat
3. With your right foot set on the brake pedal, move the seat ba ck until you no longer feel
cramping in your ankle.
4. With your heel set on the floor, make sure you can move your foot between the brake
pedal and accelerator pedal smoothly.
Essential Safety Equipment
Seats
2-8
CX-9_8KH5-EA-21K_Edition2_old 2021-9-16 14:11:22
Page 32 of 715

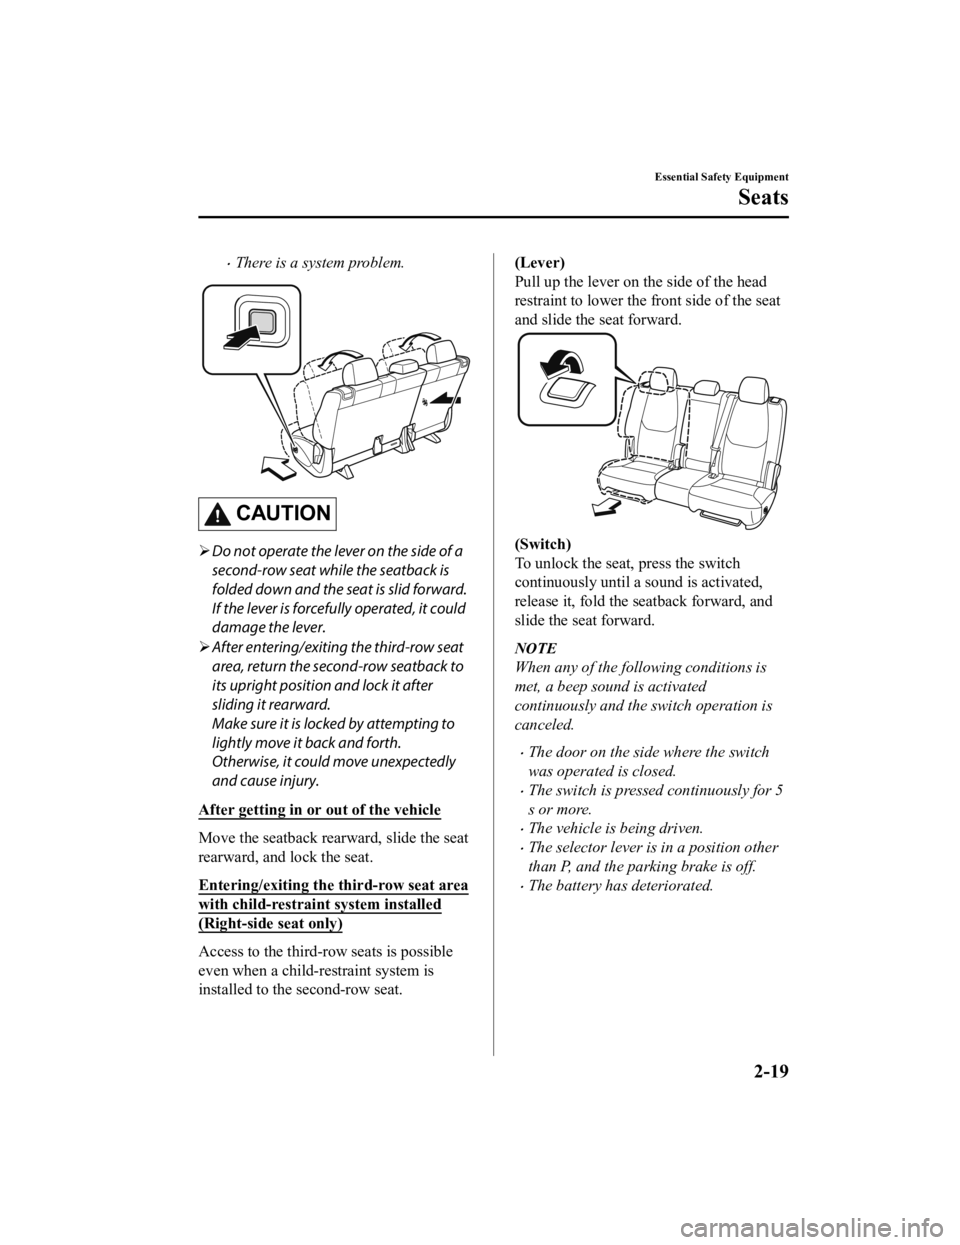
There is a system problem.
CAUTION
Do not operate the lever on the side of a
second-row seat while the seatback is
folded down and the se at is slid forward.
If the lever is forcefully operated, it could
damage the lever.
After entering/exiting the third-row seat
area, return the second-row seatback to
its upright position and lock it after
sliding it rearward.
Make sure it is locked by attempting to
lightly move it back and forth.
Otherwise, it could move unexpectedly
and cause injury.
After getting in or out of the vehicle
Move the seatback rearward, slide the seat
rearward, and lock the seat.
Entering/exiting the third-row seat area
with child-restraint system installed
(Right-side seat only)
Access to the third-row seats is possible
even when a child-restraint system is
installed to the second-row seat.
(Lever)
Pull up the lever on the side of the head
restraint to lower the front side of the seat
and slide the seat forward.
(Switch)
To unlock the seat, press the switch
continuously until a sound is activated,
release it, fold the seatback forward, and
slide the seat forward.
NOTE
When any of the following conditions is
met, a beep sound is activated
continuously and the switch operation is
canceled.
The door on the side where the switch
was operated is closed.
The switch is pressed continuously for 5
s or more.
The vehicle is being driven.
The selector lever is in a position other
than P, and the parking brake is off.
The battery has deteriorated.
Essential Safety Equipment
Seats
2-19
CX-9_8KH5-EA-21K_Edition2_old 2021-9-16 14:11:22
Page 152 of 715

Floor Mat
We recommend the use of Genuine
Mazda floor mats.
WARNING
Make sure the floor mats are hooked on the
retention pins to prevent them from
bunching up under the foot pedals:
Using a floor mat that is not secured is
dangerous as it will interfere with the
accelerator and brake pedal operation,
which could result in an accident.
Do not install two floor mats, one on top of
the other, on the driver's side:
Installing two floor mats, one on top of the
other, on the driver's side is dangerous as
the retention pins can only keep one floor
mat from sliding forward.
Loose floor mat(s) will interfere with the
foot pedals and could result in an accident.
If using an all-weather mat for winter use
always remove the original floor mat.
When setting a floor mat, position the
floor mat so that its g rommets are inserted
over the pointed end of the retention posts.
Rocking the Vehicle
WA R N I N G
Do not spin the wheels at more than 56
km/h (35 mph), and do not allow anyone
to stand behind a wheel when pushing the
vehicle:
When the vehicle is stuck, spinning the
wheels at high speed is dangerous. The
spinning tire could overheat and explode.
This could cause serious injuries.
CAUTION
Too much rocking may cause engine
overheating, transaxle failure, and tire
damage.
If you must rock the vehicle to free it from
snow, sand or mud, depress the accelerator
slightly and slowly move the selector lever
from D to R position.
Before Driving
Driving Tips
3-49
CX-9_8KH5-EA-21K_Edition2_old 2021-9-16 14:11:22
Page 153 of 715

Winter Driving
Carry emergency gear, including tire
chains, window scraper, flares, a small
shovel, jumper cables, and a small bag of
sand or salt.
Ask an Authorized Mazda Dealer to check
the following:
Have the proper ratio of antifreeze in the
radiator.
Refer to Engine Coolant on page 6-22.
Inspect the battery and its cables. Cold
reduces battery capacity.
Use an engine oil appropriate for the
lowest ambient temperatures that the
vehicle will be driven in (page 6-20).
Inspect the ignition system for damage
and loose connections.
Use washer fluid made with
antifreeze―but do not use engine
coolant antifreeze for washer fluid (page
6-24).
NOTE
Remove snow before driving. Snow left
on the windshield is dangerous as it
could obstruct vision.
Do not apply excessive force to a
window scraper when removing ice or
frozen snow on the mirror glass and
windshield.
Never use warm or hot water for
removing snow or ice from windows and
mirrors as it could result in the glass
cracking.
Drive slowly. Braking performance can
be adversely affected if snow or ice
adheres to the brake components. If this
situation occurs, drive the vehicle
slowly, releasing the accelerator pedal
and lightly applying the brakes several
times until the brake performance
returns to normal.
▼ Snow Tires
Use snow tires on all 4 wheels
Do not go faster than 120 km/h (75 mph)
while driving with sno
w tires. Inflate snow
tires 30 kPa (0.3 kgf/cm
2, 4.3 psi) more
than recommended on the tire pressure
label (driver's door frame), but never more
than the maximum c old-tire pressure
shown on the tires.
The vehicle is originally equipped with all
season radials designed to be used all year
around. In some extreme climates you
may find it necessary t o replace them with
snow tires during the winter months to
further improve traction on snow and ice
covered roads.
WA R N I N G
Use only the same size and type tires (snow,
radial, or non-radial) on all 4 wheels:
Using tires different in size or type is
dangerous. Your vehi cle's handling could
be greatly affected and result in an
accident.
CAUTION
Check local regulations before using
studded tires.
Before Driving
Driving Tips
3-50
CX-9_8KH5-EA-21K_Edition2_old 2021-9-16 14:11:22
Page 155 of 715

Driving In Flooded Area
WA R N I N G
Dry off brakes that have become wet by
driving slowly, releasing the accelerator
pedal and lightly applying the brakes
several times until the brake performance
returns to normal:
Driving with wet brakes is dangerous.
Increased stopping distance or the vehicle
pulling to one side when braking could
result in a serious accident. Light braking
will indicate whether the brakes have been
affected.
CAUTION
Do not drive the vehicle on flooded roads
as it could cause short circuiting of
electrical/electronic parts, or engine
damage or stalling from water absorption.
If the vehicle has been immersed in water,
consult an Authorized Mazda Dealer.
Overloading
WA R N I N G
Be careful not to overload your vehicle:
The gross axle weight rating (GAWR) and
the gross vehicle weight rating (GVWR) of
the vehicle are on the Motor Vehicle Safety
Standard Label on the driver's door frame.
Exceeding these ratings can cause an
accident or vehicle damage. You can
estimate the weight of the load by
weighing the items (or people) before
putting them in the vehicle.
Before Driving
Driving Tips
3-52
CX-9_8KH5-EA-21K_Edition2_old2021-9-16 14:11:22
Page 162 of 715

CAUTION
Do not connect a trailer lighting system directly to the lighting system of your Mazda. This
may damage your vehicle's electrical system an d lighting systems. Have a recreational vehicle
dealer or trailer rental agency connect the system, and inspect the brake lights and turn
signals yourself before each trip.
▼ Trailer Brakes
If the total trailer weight exc
eeds 450 kg (1,000 lb), trailer brakes are required. If your trailer
has brakes, make sure they compl y with all federal, state, and local regulations.
WARNING
Do not connect a hydraulic trailer-brake system to your vehicle's brake system:
Connecting a hydraulic trailer-brake system direc tly to the vehicle brake system is dangerous
and will result in inadequate braking and possible injury.
▼ Trailer Towing Tips
Verify that your Mazda
maintains a near-normal attitude when a loaded or unloaded trailer
is connected. Do not d rive if it has an abnormal front-up or fr ont-down position. Inspect
for incorrect tongue load, worn suspension parts, and trailer o verloading.
Make sure the trailer is properly loaded and the cargo is secur e to prevent it from shifting.
Make sure the mirrors conform to all government regulations. If they do not, install
required rear view mirrors appr opriate for towing purposes.
The three main causes of vehicle-trailer accidents are driver e rror, excessive speed, and
improper trailer loading.
Before driving
Have your cooling and braking system checked by an Authorized M azda Dealer.
Before starting out, inspect the operation of all vehicle and trailer lights and all
vehicle-to-trailer connections. S top and re-inspect all lights and connections after driving
a short distance.
Driving
Your Mazda will handle differe ntly with a trailer in tow, so practice turning, backing, and
stopping in a traffic-free area.
Take time to get accustomed to the extra weight and length.
Allow more room between your vehicle and the one in front becau se braking distance
increases with a trailer. For eac h 16 km/h (10 mph) of speed, a llow at least one vehicle
and trailer length between your Mazda and the vehicle ahead.
Before Driving
To w i n g
3-59
CX-9_8KH5-EA-21K_Edition2_old 2021-9-16 14:11:22
Page 168 of 715

4When Driving
Information concerning safer driving and stopping.
Start/Stop Engine.............................. 4-4 Ignition Switch........ ..................... 4-4
Starting the Engine....................... 4-5
Turning the Engine Off...............4-10
Instrument Cluster and Display ............
........................................................... 4-11 Instrument Cluster and
Display........................................ 4-11
Instrument Cluster (Type A)....... 4-12
Instrument Cluster (Type B)....... 4-29
Active Driving Display
*............. 4-45
Automatic Transaxle....................... 4-47 Automatic Transaxle
Controls...................................... 4-47
Shift-Lock System...................... 4-48
Transaxle Ranges........................4-48
Manual Shift Mode..................... 4-50
Direct Mode
*.............................. 4-56
Driving Tips................................4-57
Switches and Controls..................... 4-58 Lighting Control......................... 4-58
Fog Lights
*................................. 4-64
Turn and Lane-Change
Signals........................................ 4-65
Windshield Wipers and
Washer........................................ 4-66
Rear Window Wiper and
Washer........................................ 4-69
Rear Window Defogg er.............. 4-70
Horn............................................ 4-71
Hazard Warning Flasher............. 4-72
HomeLink Wireless Control System
(Type A)
*.................................... 4-72
HomeLink Wireless Control System
(Type B)
*.................................... 4-76
Brake................................................ 4-80 Brake System.............................. 4-80
AUTOHOLD.............................. 4-84
Hill Launch Assist (HLA).......... 4-88
ABS/TCS/DSC/Trailer Stability
Control (TSC)/Off-Road Traction
Assist................................................. 4-90 Antilock Brake System
(ABS)..........................................4-90
Traction Control System
(TCS).......................................... 4-91
Dynamic Stability Control
(DSC)..........................................4-93
Trailer Stability Control
(TSC).......................................... 4-94
Off-Road Traction Assist
*.......... 4-95
Drive Selection................................. 4-97 Drive Selection........................... 4-97
i-ACTIV AWD................................. 4-99 i-ACTIV AWD Operation
*.........4-99
Power Steering...............................4-101 Power Steering......................... 4-101
*Some models.4-1
CX-9_8KH5-EA-21K_Edition2_old 2021-9-16 14:11:22
Page 169 of 715

i-ACTIVSENSE............................. 4-102i-ACTIVSENSE
*......................4-102
Adaptive Front Lighting System
(AFS)
*...................................... 4-105
High Beam Control System
(HBC)
*......................................4-106
Blind Spot Monitoring (BSM)
*.........
.................................................. 4-109
Traffic Sign Recognition System
(TSR)
*.......................................4-115
Distance Recognition Support
System (DRSS)
*....................... 4-121
Driver Attenti on Alert (DAA)
*..........
.................................................. 4-125
Rear Cross Traffic Alert (RCTA)
*.....
.................................................. 4-127
Mazda Radar Cruise Control with
Stop & Go function (MRCC with
Stop & Go function)
*............... 4-131
Lane-keep Assist System (LAS) &
Lane Departure Warning System
(LDWS)
*.................................. 4-146
Advanced Smart City Brake Support
(Advanced SCBS)
*...................4-157
Smart City Brake Support [Forward]
(SCBS F)
*.................................4-160
Smart City Brake Support [Reverse]
(SCBS R)
*................................ 4-163
Smart Brake Support (SBS)
*.... 4-167
360° View Monitor (Mazda Connect
(Type A))
*................................ 4-169
360° View Monitor (Mazda Connect
(Type B))
*.................................4-195
Forward Sensing Camera (FSC)
*......
.................................................. 4-223
Radar Sensor (Front)*.............. 4-228
Radar Sensors (Rear)
*.............. 4-231
Ultrasonic Sensor (Rear)
*.........4-233
Front Camera/Side Cameras/Rear
Camera
*.................................... 4-234
Cruise Control............................... 4-235 Cruise Control
*.........................4-235
Tire Pressure Monitoring
System.............................................4-240 Tire Pressure Monitoring
System...................................... 4-240
Rear View Monitor (Mazda Connect
(Type A))........................................ 4-244 Rear View Monitor (Mazda Connect
(Type A))
*................................ 4-244
Rear View Monitor (Mazda Connect
(Type B)).........................................4-252 Rear View Monitor (Mazda Connect
(Type B))
*.................................4-252
Parking Sensor System (Mazda
Connect (Type A))......................... 4-260 Parking Sensor System (Mazda
Connect (Type A))
*.................. 4-260
Parking Sensor System (Mazda
Connect (Type B))......................... 4-270 Parking Sensor System (Mazda
Connect (Type B))
*.................. 4-270
4-2*Some models.
CX-9_8KH5-EA-21K_Edition2_old 2021-9-16 14:11:22
Page 171 of 715

Ignition Switch
▼Push Button Start Positions
The system operates only when the key is
within operational range.
Each time the push button start is pressed,
the ignition switches
in the order of off,
ACC, and ON. Pressing the push button
start again from ON switches the ignition
off.
Indicator light
NOTE
The engine starts by pressing the push
button start while depressing the brake
pedal. To switch the ignition position,
press the push button start without
depressing the pedal.
Do not leave the ignition switched ON
while the engine is not running. Doing
so could result in the battery going
dead. If the selector lever is in the P
position, and the ignition is in ACC, the
ignition switches off automatically after
about 25 minutes.
Off
The power supply to electrical devices
turns off and the push button start
indicator light (amber) also turns off.
WA R N I N G
Before leaving the driver's seat, always
switch the ignition off, set the parking
brake, and make sure the selector lever is in
P position:
Leaving the driver's seat without switching
the ignition off, setting the parking brake,
and shifting the selector lever to P position
is dangerous. Unexpected vehicle
movement could occur which could result
in an accident.
In addition, if your intention is to leave the
vehicle for even a short period, it is
important to switch the ignition off, as
leaving it in another position will disable
some of the vehicle's security systems and
run the battery down.
ACC (Accessory)
Some electrical accessories will operate
and the indicator light (amber) illuminates.
NOTE
The keyless entry system does not function
while the push button start has been
pressed to ACC, and the doors will not
lock/unlock even if they have been locked
manually.
ON
This is the normal running position after
the engine is started. The indicator light
(amber) turns off. (The indicator light
(amber) illuminates when the ignition is
switched ON and the engine is not
running.)
Some indicator lights/warning lights
should be inspected before the engine is
started (page 4-11).
When Driving
Start/Stop Engine
4-4
CX-9_8KH5-EA-21K_Edition2_old 2021-9-16 14:11:22
Page 173 of 715

This is for improved exhaust gas
purification and does not indicate any
parts defect.
Engine-starting is controlled by the
spark ignition system.
This system meets all Canadian
Interference-Causing Equipment
Standard requirements regulating the
impulse electrical field strength of radio
noise.
1. Make sure you are carrying the key.
2. Occupants should fasten their seat belts.
3. Make sure the parking brake is on.
4. Continue to press the brake pedal firmly until the engine has completely
started.
5. Put the vehicle in park (P). If you must
restart the engine while the vehicle is
moving, shift into neutral (N).
NOTE
The starter will not operate if the
selector lever is not in P or N position
and the brake pedal is not depressed
sufficiently.
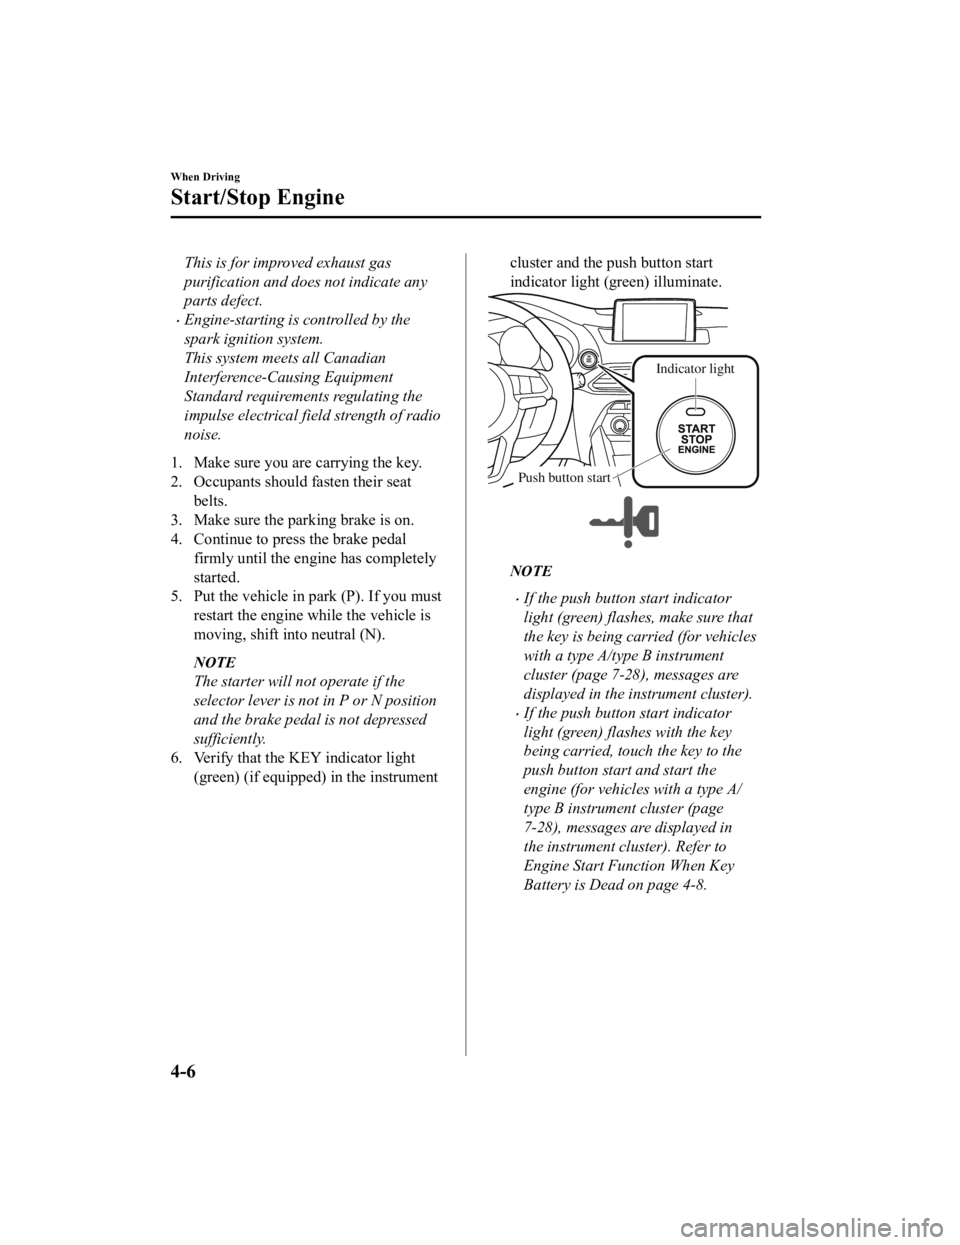
6. Verify that the KEY indicator light (green) (if equipped) in the instrument
cluster and the push button start
indicator light (green) illuminate.
Indicator light
Push button start
NOTE
If the push button start indicator
light (green) flashes, make sure that
the key is being carried (for vehicles
with a type A/type B instrument
cluster (page 7-28), messages are
displayed in the instrument cluster).
If the push button start indicator
light (green) flashes with the key
being carried, touch the key to the
push button start and start the
engine (for vehicles with a type A/
type B instrument cluster (page
7-28), messages are displayed in
the instrument cluster). Refer to
Engine Start Function When Key
Battery is Dead on page 4-8.
When Driving
Start/Stop Engine
4-6
CX-9_8KH5-EA-21K_Edition2_old 2021-9-16 14:11:22