warning MAZDA MODEL MPV 2001 Quick Tips (in English)
[x] Cancel search | Manufacturer: MAZDA, Model Year: 2001, Model line: MODEL MPV, Model: MAZDA MODEL MPV 2001Pages: 10, PDF Size: 0.94 MB
Page 2 of 10
DRIVER’S VIEW
Always check the Owner’s Manual for more operating information and safety features
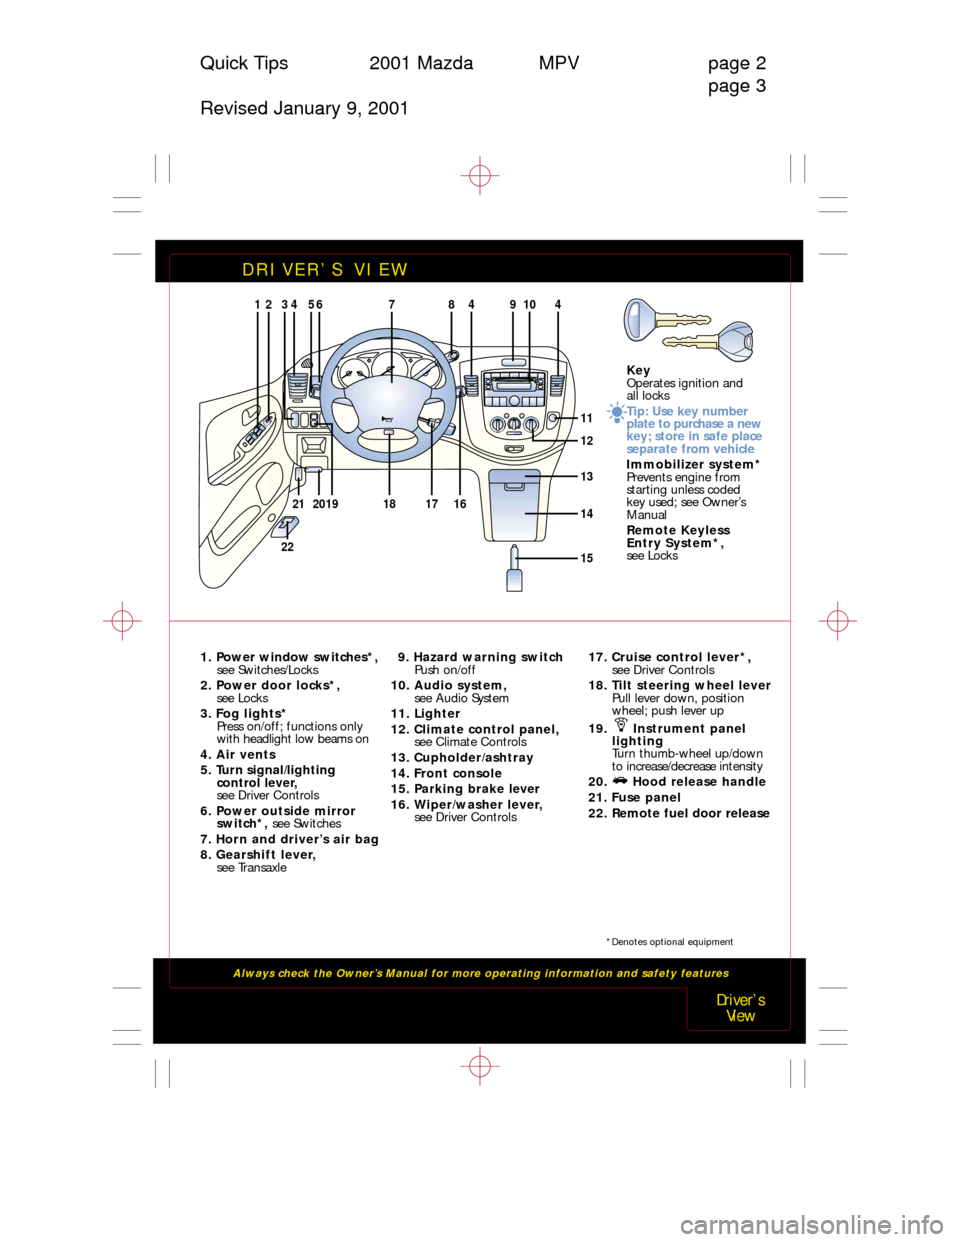
1. Power window switches*,
see Switches/Locks
2. Power door locks*,
see Locks
3. Fog lights*
Press on/off; functions only
with headlight low beams on
4. Air vents
5. Turn signal/lighting
control lever,
see Driver Controls
6. Power outside mirror
switch*, see Switches
7. Horn and driver’s air bag
8. Gearshift lever,
see Transaxle9. Hazard warning switch
Push on/off
10. Audio system,
see Audio System
11. Lighter
12. Climate control panel,
see Climate Controls
13. Cupholder/ashtray
14. Front console
15. Parking brake lever
16. Wiper/washer lever,
see Driver Controls17. Cruise control lever*,
see Driver Controls
18. Tilt steering wheel lever
Pull lever down, position
wheel; push lever up
19. Instrument panel
lighting
Turn thumb-wheel up/down
to increase/decrease intensity
20. Hood release handle
21. Fuse panel
22. Remote fuel door release
Driver’s
View
Quick Tips 2001 Mazda MPV page 2
page 3
Revised January 9, 2001
Key
Operates ignition and
all locks
Tip: Use key number
plate to purchase a new
key; store in safe place
separate from vehicle
Immobilizer system*
Prevents engine from
starting unless coded
key used; see Owner’s
Manual
Remote Keyless
Entry System*,
see Locks
21
1243567
17
1618
449108
12
11
13
141920
1522
*Denotes optional equipment
Page 3 of 10
INSTRUMENT CLUSTER
Always check the Owner’s Manual for more operating information and safety features
GAUGES
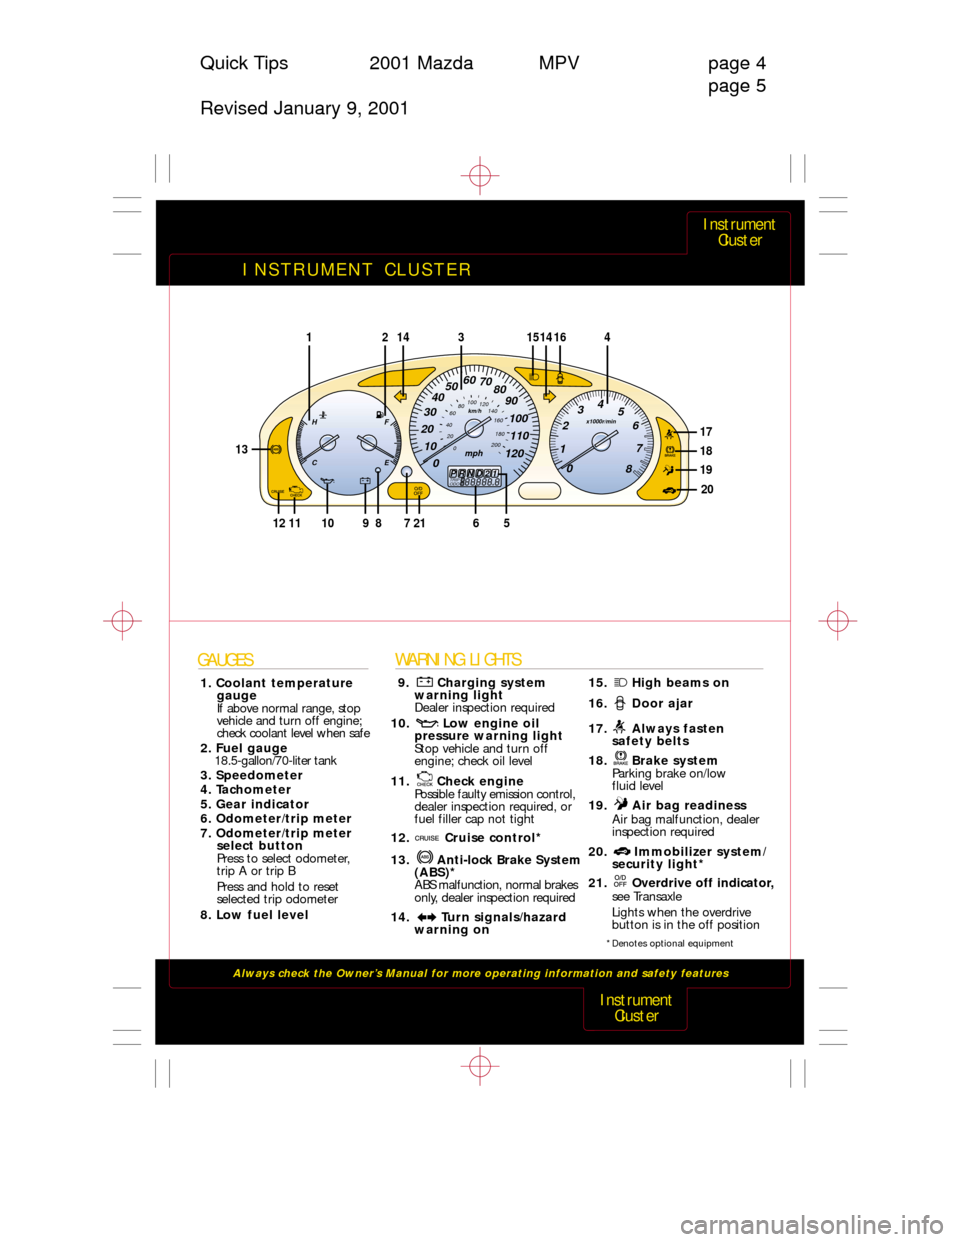
1. Coolant temperature
gauge
If above normal range, stop
vehicle and turn off engine;
check coolant level when safe
2. Fuel gauge
18.5-gallon/70-liter tank
3. Speedometer
4. Tachometer
5. Gear indicator
6. Odometer/trip meter
7. Odometer/trip meter
select button
Press to select odometer,
trip A or trip B
Press and hold to reset
selected trip odometer
8. Low fuel level
WARNING LIGHTS
9. Charging system
warning light
Dealer inspection required
10. Low engine oil
pressure warning light
Stop vehicle and turn off
engine; check oil level
11. Check engine
Possible faulty emission control,
dealer inspection required, or
fuel filler cap not tight
12. Cruise control*
13. Anti-lock Brake System
(ABS)*
ABS malfunction, normal brakes
only, dealer inspection required
14. Turn signals/hazard
warning on15. High beams on
16. Door ajar
17. Always fasten
safety belts
18. Brake system
Parking brake on/low
fluid level
19. Air bag readiness
Air bag malfunction, dealer
inspection required
20. Immobilizer system/
security light*
21. Overdrive off indicator,
see Transaxle
Lights when the overdrive
button is in the off position
Instrument
Cluster
Instrument
Cluster
Quick Tips 2001 Mazda MPV page 4
page 5
Revised January 9, 2001
x1000r/min
0 1 234
5
6
7
8
H
CF
E
10911127218
14144121516
13
17
18
19
20
0 10 20 30405060
70
80
90
100
110
120
200
0 20 406080100
120
140
160
180mph
km/h
3
TRIP
ODOA88888.8BPRND21
65
*Denotes optional equipment
Page 5 of 10
SWITCHES/LOCKS
Always check the Owner’s Manual for more operating information and safety features
Switches/
Locks
Locks
Quick Tips 2001 Mazda MPV page 8
page 9
Revised January 9, 2001
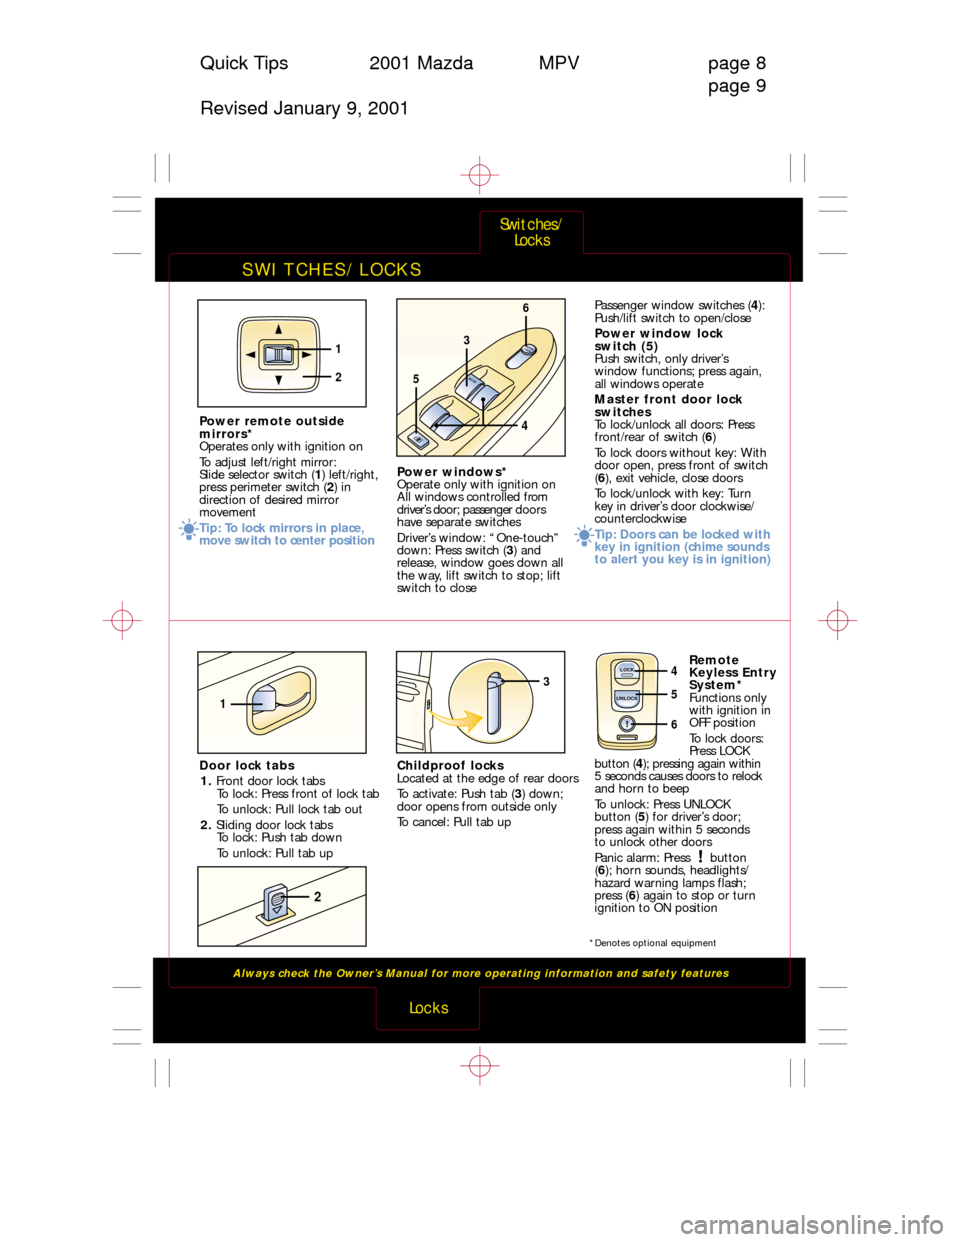
Childproof locks
Located at the edge of rear doors
To activate: Push tab (3) down;
door opens from outside only
To cancel: Pull tab upRemote
Keyless Entry
System*
Functions only
with ignition in
OFF position
To lock doors:
Press LOCK
button (4); pressing again within
5 seconds causes doors to relock
and horn to beep
To unlock: Press UNLOCK
button (5) for driver’s door;
press again within 5 seconds
to unlock other doors
Panic alarm: Press button
(6); horn sounds, headlights/
hazard warning lamps flash;
press (6) again to stop or turn
ignition to ON position
1
2
1
2
AUTO
DOOR
LOCK3
5
4
6
Power windows*
Operate only with ignition on
All windows controlled from
driver’s door; passenger doors
have separate switches
Driver’s window: “One-touch”
down: Press switch (3) and
release, window goes down all
the way, lift switch to stop; lift
switch to closePassenger window switches (4):
Push/lift switch to open/close
Power window lock
switch (5)
Push switch, only driver’s
window functions; press again,
all windows operate
Master front door lock
switches
To lock/unlock all doors: Press
front/rear of switch (6)
To lock doors without key: With
door open, press front of switch
(6), exit vehicle, close doors
To lock/unlock with key: Turn
key in driver’s door clockwise/
counterclockwise
Tip: Doors can be locked with
key in ignition (chime sounds
to alert you key is in ignition) Power remote outside
mirrors*
Operates only with ignition on
To adjust left/right mirror:
Slide selector switch (1) left/right,
press perimeter switch (2) in
direction of desired mirror
movement
Tip: To lock mirrors in place,
move switch to center position
Door lock tabs
1. Front door lock tabs
To lock: Press front of lock tab
To unlock: Pull lock tab out
2. Sliding door lock tabs
To lock: Push tab down
To unlock: Pull tab up
3LOCK
UNLOCK
6
4
5
*Denotes optional equipment
Page 6 of 10
SEATS
Always check the Owner’s Manual for more operating information and safety features
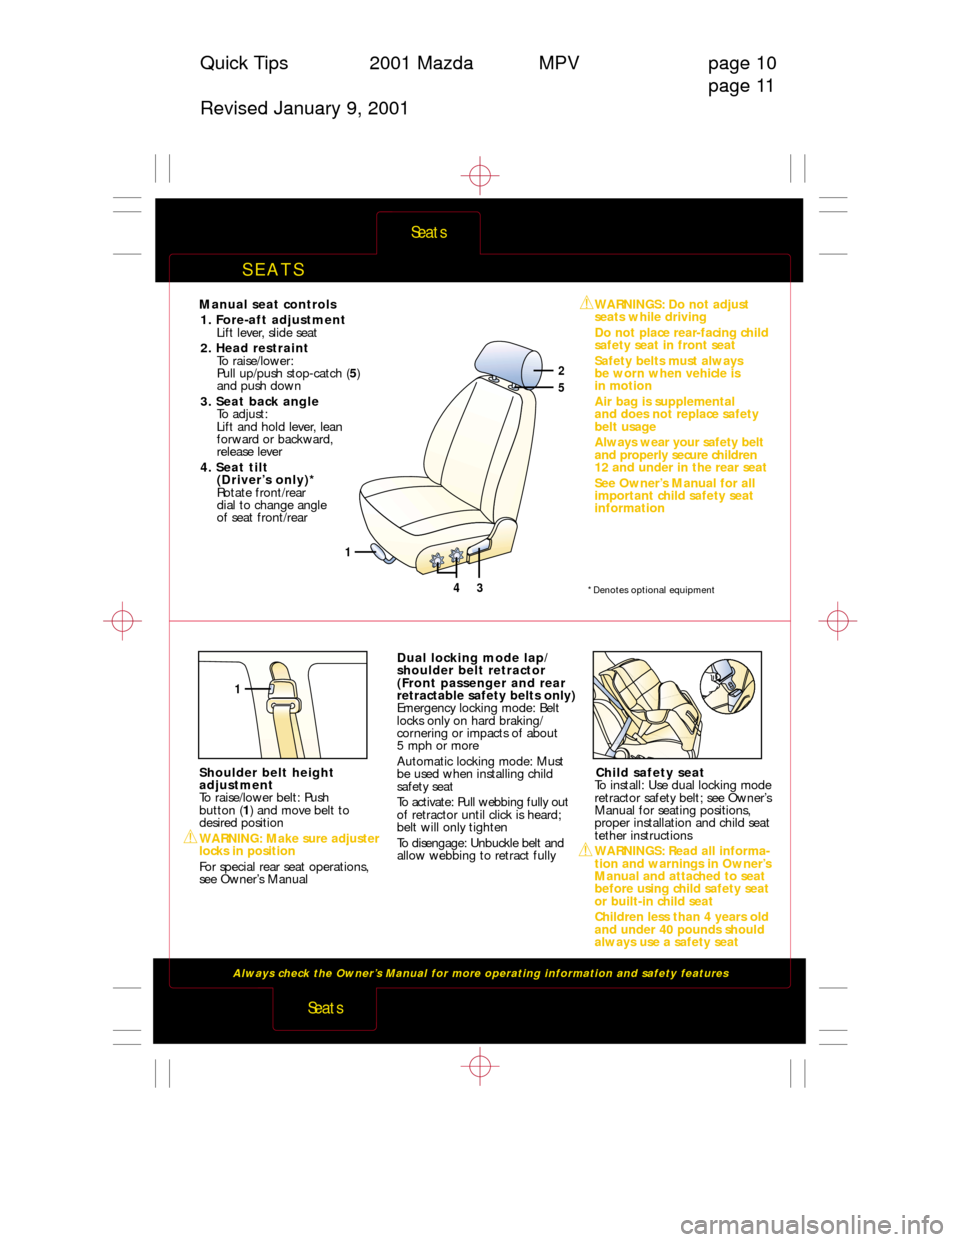
Manual seat controls
1. Fore-aft adjustment
Lift lever, slide seat
2. Head restraint
To raise/lower:
Pull up/push stop-catch (5)
and push down
3. Seat back angle
To adjust:
Lift and hold lever, lean
forward or backward,
release lever
4. Seat tilt
(Driver’s only)*
Rotate front/rear
dial to change angle
of seat front/rearWARNINGS: Do not adjust
seats while driving
Do not place rear-facing child
safety seat in front seat
Safety belts must always
be worn when vehicle is
in motion
Air bag is supplemental
and does not replace safety
belt usage
Always wear your safety belt
and properly secure children
12 and under in the rear seat
See Owner’s Manual for all
important child safety seat
information
Shoulder belt height
adjustment
To raise/lower belt: Push
button (1) and move belt to
desired position
WARNING: Make sure adjuster
locks in position
For special rear seat operations,
see Owner’s ManualDual locking mode lap/
shoulder belt retractor
(Front passenger and rear
retractable safety belts only)
Emergency locking mode: Belt
locks only on hard braking/
cornering or impacts of about
5 mph or more
Automatic locking mode: Must
be used when installing child
safety seat
To activate: Pull webbing fully out
of retractor until click is heard;
belt will only tighten
To disengage: Unbuckle belt and
allow webbing to retract fullyChild safety seat
To install: Use dual locking mode
retractor safety belt; see Owner’s
Manual for seating positions,
proper installation and child seat
tether instructions
WARNINGS: Read all informa-
tion and warnings in Owner’s
Manual and attached to seat
before using child safety seat
or built-in child seat
Children less than 4 years old
and under 40 pounds should
always use a safety seat
Seats
Seats
Quick Tips 2001 Mazda MPV page 10
page 11
Revised January 9, 2001
1
43
2
5
1
*Denotes optional equipment
Page 10 of 10
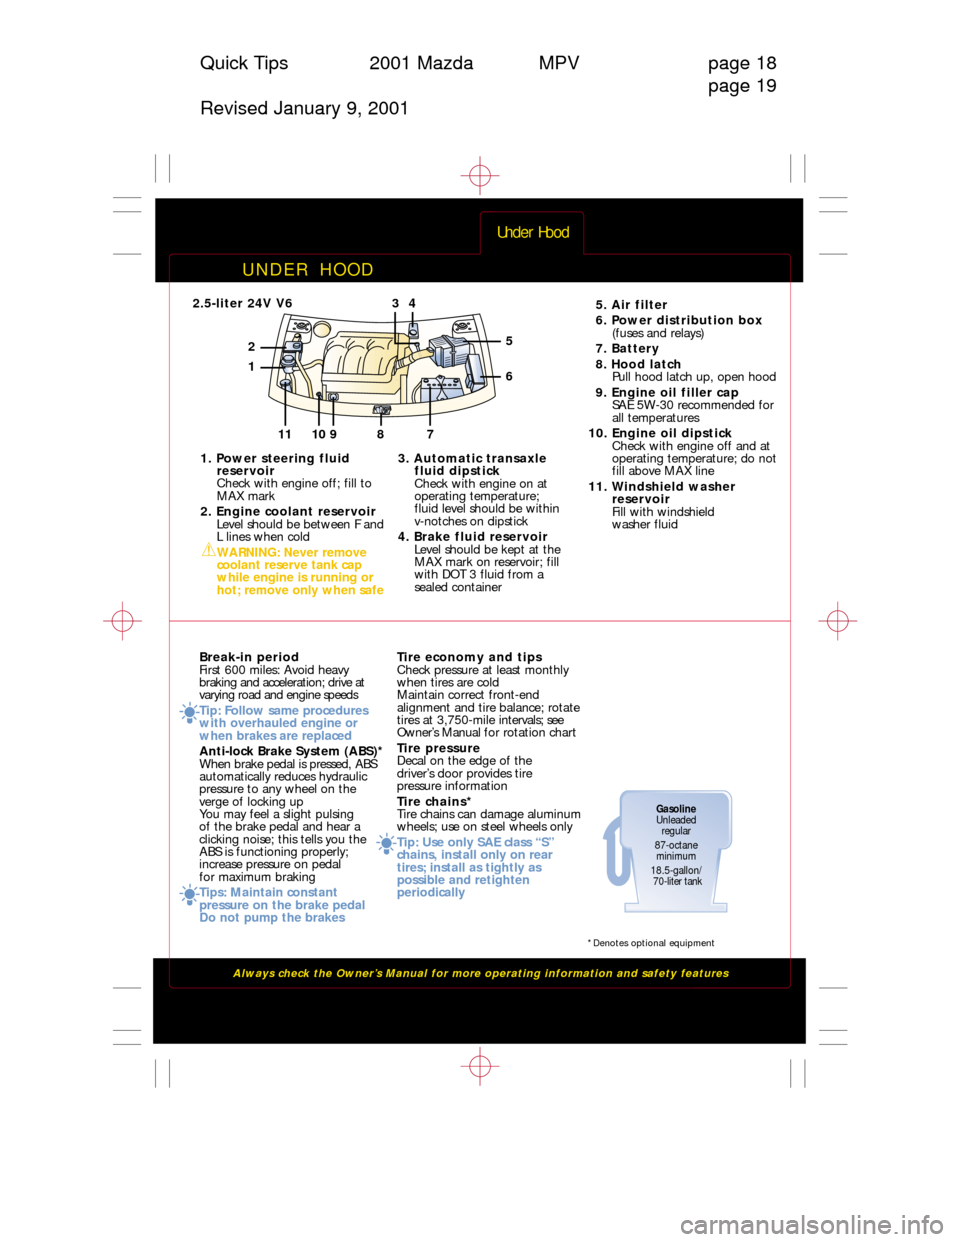
UNDER HOOD
Always check the Owner’s Manual for more operating information and safety features
Under Hood
Quick Tips 2001 Mazda MPV page 18
page 19
Revised January 9, 2001
1. Power steering fluid
reservoir
Check with engine off; fill to
MAX mark
2. Engine coolant reservoir
Level should be between F and
L lines when cold
WARNING: Never remove
coolant reserve tank cap
while engine is running or
hot; remove only when safe
Break-in period
First 600 miles: Avoid heavy
braking and acceleration; drive at
varying road and engine speeds
Tip: Follow same procedures
with overhauled engine or
when brakes are replaced
Anti-lock Brake System (ABS)*
When brake pedal is pressed, ABS
automatically reduces hydraulic
pressure to any wheel on the
verge of locking up
You may feel a slight pulsing
of the brake pedal and hear a
clicking noise; this tells you the
ABS is functioning properly;
increase pressure on pedal
for maximum braking
Tips: Maintain constant
pressure on the brake pedal
Do not pump the brakesTire economy and tips
Check pressure at least monthly
when tires are cold
Maintain correct front-end
alignment and tire balance; rotate
tires at 3,750-mile intervals; see
Owner’s Manual for rotation chart
Tire pressure
Decal on the edge of the
driver’s door provides tire
pressure information
Tire chains*
Tire chains can damage aluminum
wheels; use on steel wheels only
Tip: Use only SAE class “S”
chains, install only on rear
tires; install as tightly as
possible and retighten
periodically3. Automatic transaxle
fluid dipstick
Check with engine on at
operating temperature;
fluid level should be within
v-notches on dipstick
4. Brake fluid reservoir
Level should be kept at the
MAX mark on reservoir; fill
with DOT 3 fluid from a
sealed container 5. Air filter
6. Power distribution box
(fuses and relays)
7. Battery
8. Hood latch
Pull hood latch up, open hood
9. Engine oil filler cap
SAE 5W-30 recommended for
all temperatures
10. Engine oil dipstick
Check with engine off and at
operating temperature; do not
fill above MAX line
11. Windshield washer
reservoir
Fill with windshield
washer fluid
8971011
1
2
6
5
432.5-liter 24V V6
Gasoline
Unleaded
regular
87-octane
minimum
18.5-gallon/
70-liter tank
*Denotes optional equipment