wheel MAZDA MODEL MPV 2004 Quick Tips (in English)
[x] Cancel search | Manufacturer: MAZDA, Model Year: 2004, Model line: MODEL MPV, Model: MAZDA MODEL MPV 2004Pages: 14, PDF Size: 1.25 MB
Page 2 of 14

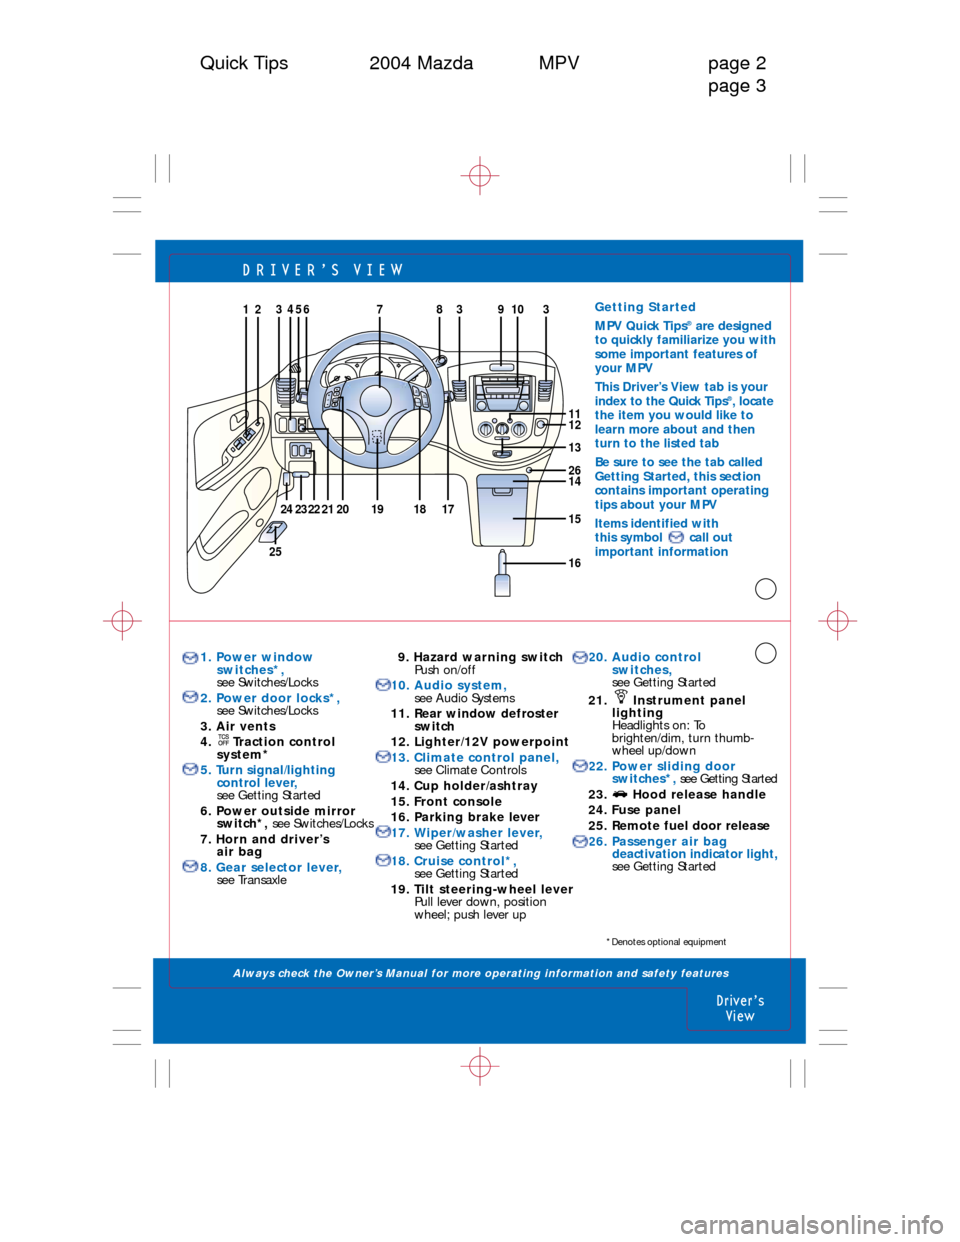
DRIVER’\b VIEW
Always check the Owner’s Manual for more operating information and safety features
1. Power window switches*,
see Switches/Locks
2. Power door locks*, see Switches/Locks
3. Air vents
4. Traction control system*
5. Turn signal/lighting control lever,
see Getting Started
6. Power outside mirror switch*, see Switches/Locks
7. Horn and driver’s air bag
8. Gear selector lever, see Transaxle9. Hazard warning switchPush on/off
10. Audio system, see Audio Systems
11. Rear window defroster
switch
12. Lighter/12V powerpoint
13. Climate control panel, see Climate Controls
14. Cup holder/ashtray
15. Front console
16. Parking brake lever
17. Wiper/washer lever, see Getting Started
18. Cruise control*, see Getting Started
19. Tilt steering-wheel lever Pull lever down, position
wheel; push lever up 20. Audio control
switches,
see Getting Started
21. Instrument panel lighting
Headlights on: To
brighten/dim, turn thumb-
wheel up/down
22. Power sliding door switches*, see Getting Started
23. Hood release handle
24. Fuse panel
25. Remote fuel door release
26. Passenger air bag deactivation indicator light,
see Getting Started
Driver’sView
Quick Tips 2004 Mazda MPV page 2
page 3
24
1
13
1211
14
26
15
1625
231722
23456383109
SE
T
A CCE
L
O
N
O F
F
C A
NC ELMODEVOLS
ET
COA ST
18192021
7
*Denotes optional equipment
Getting Started
MPV Quick Tips®are designed
to quickly familiarize you with
some important features of
your MPV
This Driver’s View tab is your
index to the Quick Tips
®, locate
the item you would like to
learn more about and then
turn to the listed tab
Be sure to see the tab called
Getting Started, this section
contains important operating
tips about your MPV
Items identified with
this symbol call out
important information
Page 4 of 14

GETTING \bTARTED
Always check the Owner’s Manual for more operating information and safety features
Getting
\btarted
Getting
\btarted
Quick Tips 2004 Mazda MPV page 6 page 7
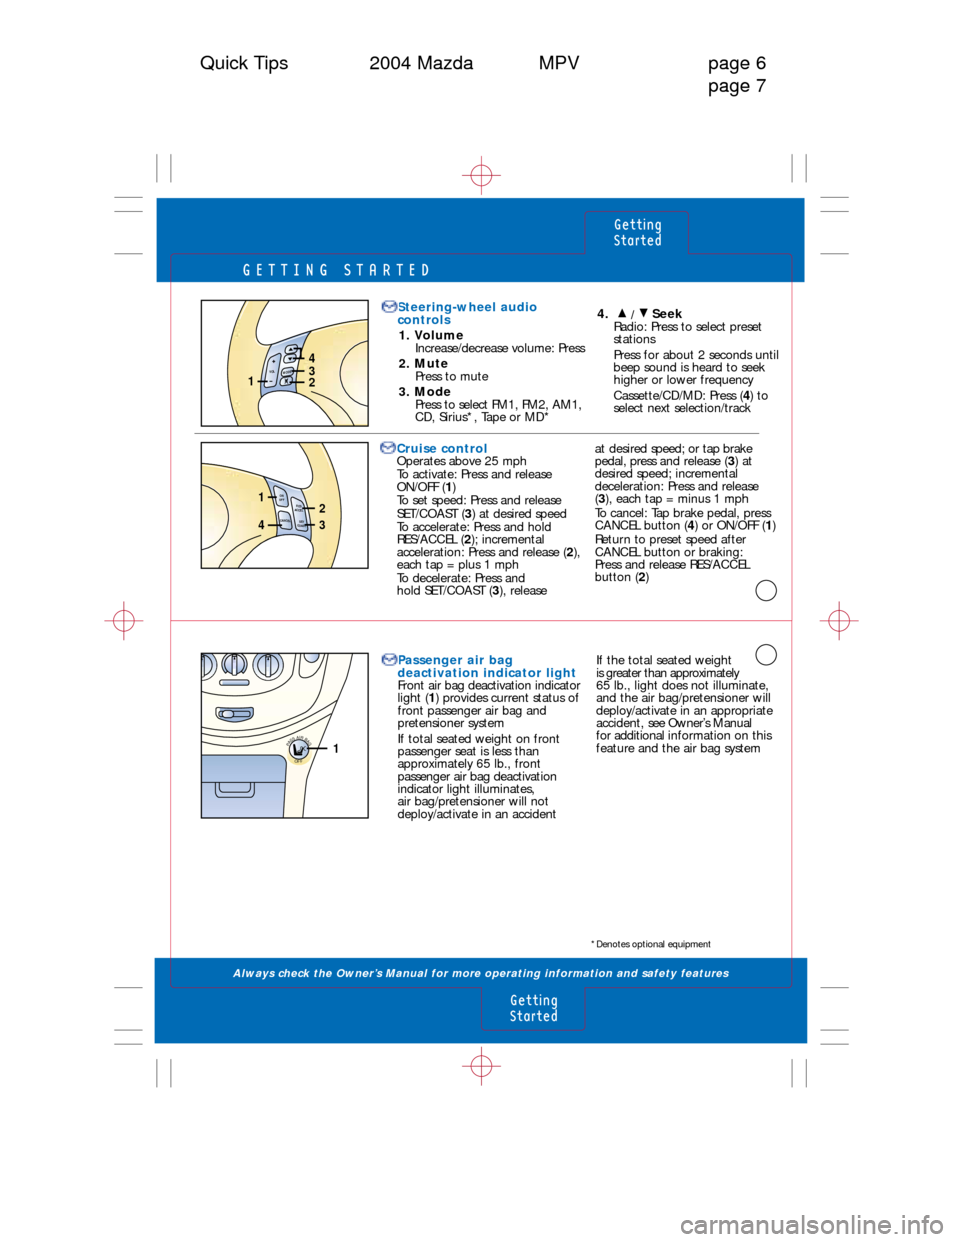
at desired speed; or tap brake
pedal, press and release ( 3) at
desired speed; incremental
deceleration: Press and release
( 3 ), each tap = minus 1 mph
To cancel: Tap brake pedal, press
CANCEL button ( 4) or ON/OFF ( 1)
Return to preset speed after
CANCEL button or braking:
Press and release RES/ACCEL
button ( 2)
Cruise control
Operates above 25 mph
To activate: Press and release
ON/OFF (
1)
To set speed: Press and release
SET/COAST ( 3) at desired speed
To accelerate: Press and hold
RES/ACCEL ( 2); incremental
acceleration: Press and release ( 2),
each tap = plus 1 mph
To decelerate: Press and
hold SET/COAST ( 3), release
R ES
ACC EL
ON
O FF
CANCELS E
T
CO AS
T43
12
Steering-wheel audio
controls
1. Volume Increase/decrease volume: Press
2. Mute Press to mute
3. Mode Press to select FM1, FM2, AM1,
CD, Sirius*, Tape or MD* 4.
/Seek
Radio: Press to select preset
stations
Press for about 2 seconds until
beep sound is heard to seek
higher or lower frequency
Cassette/CD/MD: Press ( 4) to
select next selection/track
MODEVOL1
432
Passenger air bag
deactivation indicator light
Front air bag deactivation indicator
light ( 1) provides current status of
front passenger air bag and
pretensioner system
If total seated weight on front
passenger seat is less than
approximately 65 lb., front
passenger air bag deactivation
indicator light illuminates,
air bag/pretensioner will not
deploy/activate in an accident If the total seated weight
is greater than approximately
65 lb., light does not illuminate,
and the air bag/pretensioner will
deploy/activate in an appropriate
accident,
see Owner’s Manual
for additional information on this
feature and the air bag system
PASSAIRBAG
OFF1
*Denotes optional equipment
Page 7 of 14

INTERIOR LIGHT\b
Always check the Owner’s Manual for more operating information and safety features
Interior Lights
Transaxle
Quick Tips 2004 Mazda MPV page 12 page 13
*Denotes optional equipment
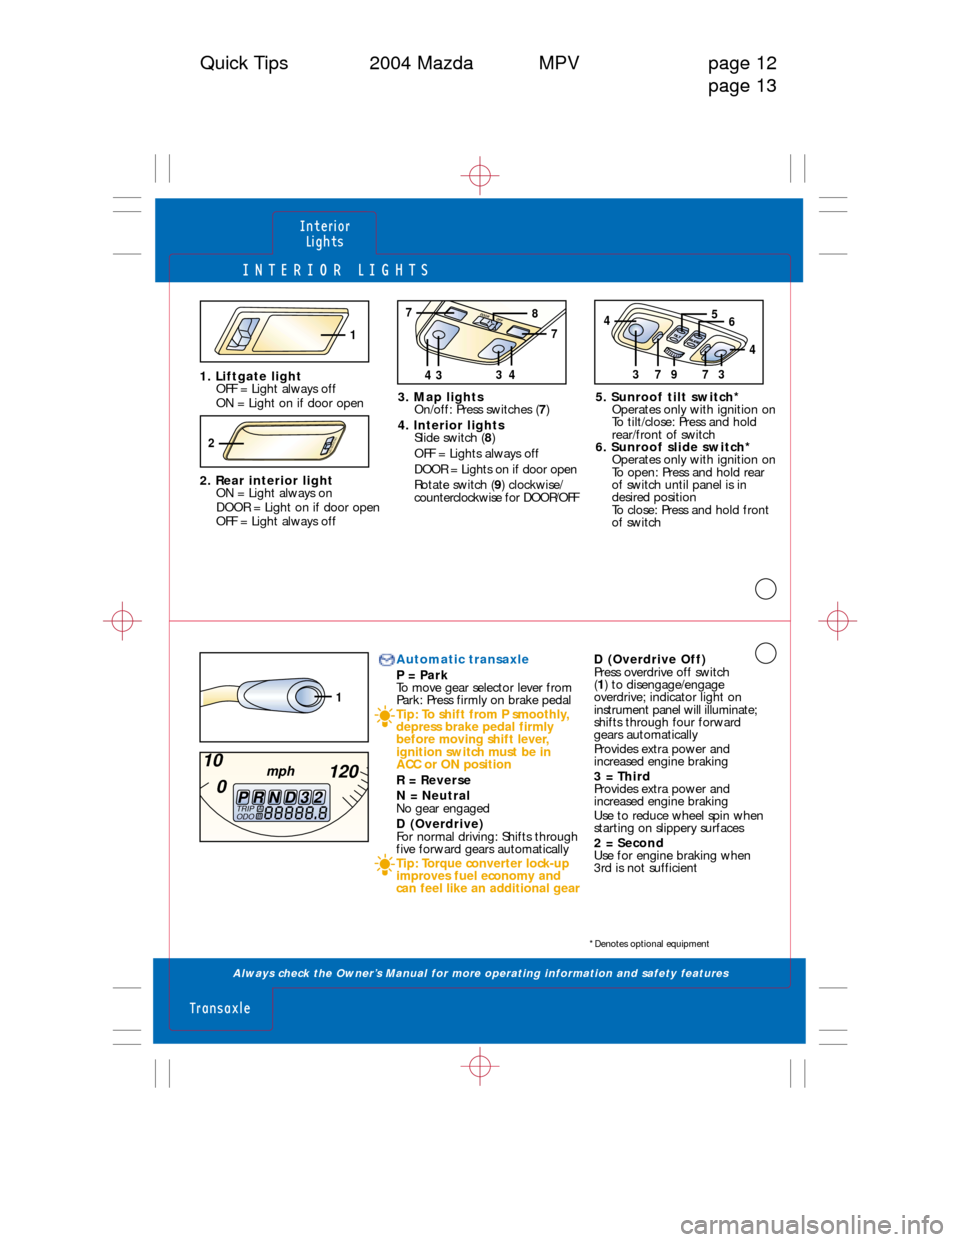
1. Liftgate lightOFF = Light always off
ON = Light on if door open
2. Rear interior light ON = Light always on
DOOR = Light on if door open
OFF = Light always off 3. Map lights
On/off: Press switches ( 7)
4. Interior lights Slide switch ( 8)
OFF = Lights always off
DOOR = Lights on if door open
Rotate switch ( 9) clockwise/
counterclockwise for DOOR/OFF 5. Sunroof tilt switch*
Operates only with ignition on
To tilt/close: Press and hold
rear/front of switch
6. Sunroof slide switch* Operates only with ignition on
To open: Press and hold rear
of switch until panel is in
desired position
To close: Press and hold front
of switch
1
ON DOOR OFF2
97373
4
4
65DO OR O
FF
3443
7
7
8
1
TRIP
ODOA88888.8BPRND320
10
120
mph
Automatic transaxle
P = Park
To move gear selector lever from
Park: Press firmly on brake pedal
Tip: To shift from P smoothly,
depress brake pedal firmly
before moving shift lever,
ignition switch must be in
ACC or ON position
R = Reverse
N = Neutral
No gear engaged
D (Overdrive)
For normal driving: Shifts through
five forward gears automatically
Tip: Torque converter lock-up
improves fuel economy and
can feel like an additional gear D (Overdrive Off)
Press overdrive off switch
(
1 ) to disengage/engage
overdrive; indicator light on
instrument panel will illuminate;
shifts through four forward
gears automatically
Provides extra power and
increased engine braking
3 = Third
Provides extra power and
increased engine braking
Use to reduce wheel spin when
starting on slippery surfaces
2 = Second
Use for engine braking when
3rd is not sufficient
Page 12 of 14

RADIO/CA\b\bETTE/COMPACT DI\bC/MD
Always check the Owner’s Manual for more operating information and safety features
Audio
\bystems
Audio
\bystems
Quick Tips 2004 Mazda MPV page 22
page 23
3. SEEK/TRACK/APCRadio: Press to
automatically seek higher/
lower frequency
CD: Press to select
next/previous track
Tape: Press to
automatically advance tape to
beginning of next selection/
replay selection; to stop this
operation, press button again
4. FM1/2/AM Press to select between FM1/FM2/
AM station preset buttons ( 2)
5. SAT* If equipped with a separately sold
Sirius digital satellite radio, refer to
Sirius digital satellite radio manual
6. CD Press to play CD
7. MD*/Tape* Press to play Mini-disc Player/
cassette tape
Steering-wheel audio
controls, see Getting Started
Audio Systems
1. Power/Volume Press to turn on/off; rotate
to increase/decrease volume
2. Memory preset buttons To set: Tune to station, press and
hold until beep sound is heard
Press H (10) to set hour; then
press (CLOCK) button; Min
ADJ will be displayed next
with minutes flashing; press
M ( 10) to set minutes; then
press (CLOCK) to complete
9. CD eject button
10. Scan/Auto-Memory Press to briefly sample next
listenable selections
Radio: Press and hold until a
beep sound is heard; system auto-
matically scans and temporarily
stores six strong stations in each
band; pr ess again to cancel
11. Tuning/Audio Control Tune: Rotate counterclock-
wise/clockwise for lower
frequency/higher frequency
Audio control: Press to select
BASS/MID/TREBLE/FADE/
BALANCE/BEEP; rotate right/left
to adjust selected feature
8. Clock
To set: With ignition in ACC
or ON position, press (CLOCK)
and hold until beep sounds,
12 Hr/24 Hr will be displayed;
rotate Audio Control dial ( 11)to
switch between 12 Hr/24 Hr,
selection will flash; press (CLOCK)
again; Hr ADJ will be displayed
next with hour flashing
19. LOAD*To load multiple discs:
Press and hold LOAD ( 19)
until beep sound is heard; insert
CD when “In” is displayed
To eject disc: Press Eject ( 9)
To eject specific disc: Press and
hold Eject ( 9) until beep sound is
heard; within five seconds press
the desired tray number 1-6 ( 2)
20. Mini Disc slot*
21. DISP* Press: Changes display during
MD play
22. Mini Disc display*
23. Dolby
®Noise Reduction*
Reduces tape noise and hiss,
press to activate/deactivate
24. Cassette door*
25. Eject button*
26. Display Text dial: Use for MP3 CD
Player* or Sirius Radio*
Tips: Rotate (11) to display
complete song titles
Some song titles will not
display, see Owner
’s Manual
12. Fast forward Press to fast forward through a track
13. Reverse Press to reverse through a track
14. Program Random
†Press to enable/cancel random play
15. Repeat Press to replay current CD/
tape selection
16. Disc up
†
Press to skip forward to
beginning of next CD
17. Disc down
†
Press to skip back to
beginning of previous CD
18. CD slot*
SEEK
TRACK
APC
1 DISC 2 DISC 3 RPT 4 PROG RDM56
FM/AM SAT CD MD/TAPE
TEXT
CLOCKH SCAN
M AUTO-MDISP/ESN
DSP
. . . . . . . . . . . . .
14151713161211120222125
232425
4567891019
3
2
DISC INLOAD
TUNE PUSH AUDIO CONT
VOL PUSH POWER
18
26
*Denotes optional equipment†For use with cassette tape player,
MD player, or CD changer*
Page 14 of 14

DRIVING TIP\b
Always check the Owner’s Manual for more operating information and safety features
DrivingTips
Quick Tips 2004 Mazda MPV page 26
page 27
Break-in period
First 600 miles: Avoid heavy
braking and acceleration; drive at
varying road and engine speeds
Anti-lock Brake System (ABS)*
When brake pedal is pressed, ABS
automatically reduces hydraulic
pressure to any wheel on the
verge of locking up
You may feel a slight pulsing of the
brake pedal and hear a clicking noise;
this tells you the ABS is functioning
properly; increase pressure on pedal
for maximum braking
Tips: Maintain constant
pressure on the brake pedal
Do not pump the brakes
Unique driving conditions
†Every 5,000 miles change oil/
filter, inspect coolant level,
lights, brake/clutch fluid, tire
pressure/wear, power steering
fluid, locks/hinges, washer fluid
and rotate tires
Maintenance notes:
Rotate tires every 7,500 miles
or sooner if needed
Replace cabin air filter once
every 2 years or 25,000 miles
†
Replace spark plugs every
100,000 miles (or 60,000 miles
if following the Unique driving
conditions
†)Traction Control System*
Automatically applies and releases
brakes to prevent excessive wheel
spin at all speeds, especially
when accelerating on
slippery surfaces
Tire economy and tips
Check pressure at least monthly
when tires are cold
Maintain correct front-end
alignment and tire balance; rotate
tires at 7,500-mile
intervals; see
Owner’s Manual for rotation chart
Tire pressure
Decal on the edge of the
driver’s door provides tire
pressure information
A.Change: Engine oil/
replace filter
Lubricate: All locks and hinges
B. Inspect: Disc brakes
C. Inspect: Drive belts, fuel lines
and hoses, cooling system,
brake lines, hoses and
connections, drum brakes,
steering operation and
linkages, front suspension
ball joints, driveshaft
dust boots
D. Replace: Air filter
E. Inspect: Exhaust system and
heat shields
F. Inspect: PCV valve
Change: Engine coolant
Tire chains*
†Tire chains can damage aluminum
wheels; use on steel wheels only
Tips: Use only SAE class
“S ”
chains, install only on front
tires; install as tightly as
possible and retighten
after driving 1/4 -1/2 miles;
chains may affect handling
Never exceed 30 mph with
tire chains
*Denotes optional equipment†See Owner’s Manual
NORMAL \bERVICE INTERVAL\b\0
7,500 miles
15,000 miles
22,500 miles 30,000 miles
37,500 miles
45,000 miles
52,500 miles 60,000 miles
67,500 miles
75,000 miles 82,500 miles
90,000 miles
A B C E
A
A B D
A
A B C F
A
A B E
A D
A B C
A
A B
A