stop start MAZDA MODEL MX-30 EV 2022 Owners Manual
[x] Cancel search | Manufacturer: MAZDA, Model Year: 2022, Model line: MODEL MX-30 EV, Model: MAZDA MODEL MX-30 EV 2022Pages: 547, PDF Size: 79.35 MB
Page 39 of 547

3. Mid
4. Low
NOTE
When the , is swiped upward,
the temperature changes to high.
When it is swiped downward, the
seat warmer changes to OFF.
The seat warmer does not operate
when the EV system is stopped even
if the
or is touched or swiped.
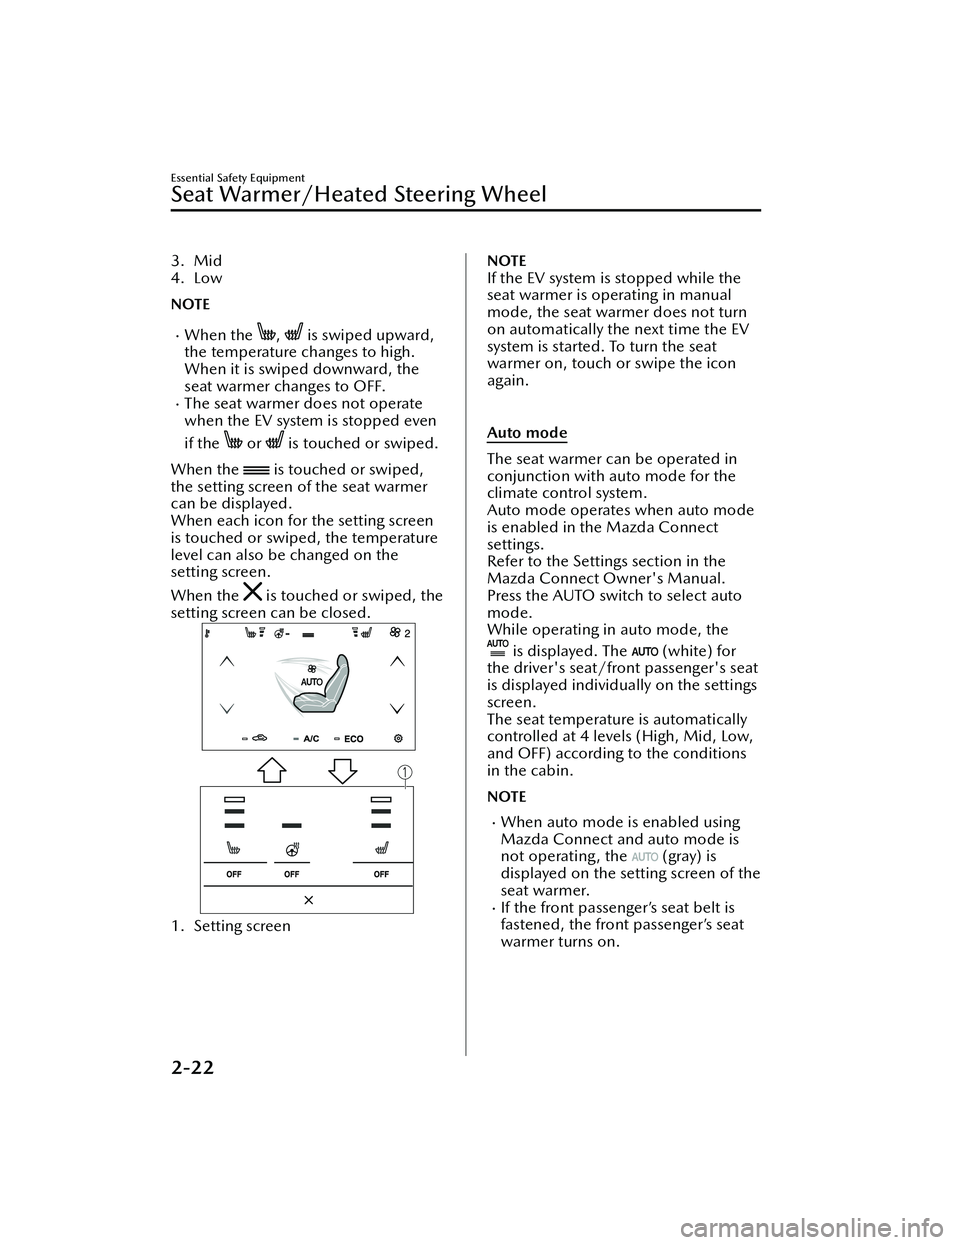
When the
is touched or swiped,
the setting screen of the seat warmer
can be displayed.
When each icon for the setting screen
is touched or swiped, the temperature
level can also be changed on the
setting screen.
When the
is touched or swiped, the
setting screen can be closed.
1. Setting screen
NOTE
If the EV system is stopped while the
seat warmer is operating in manual
mode, the seat warmer does not turn
on automatically the next time the EV
system is started. To turn the seat
warmer on, touch or swipe the icon
again.
Auto mode
The seat warmer can be operated in
conjunction with auto mode for the
climate control system.
Auto mode operates when auto mode
is enabled in the Mazda Connect
settings.
Refer to the Settings section in the
Mazda Connect Owner's Manual.
Press the AUTO switch to select auto
mode.
While operating in auto mode, the
is displayed. The (white) for
the driver's seat/front passenger's seat
is displayed individually on the settings
screen.
The seat temperature is automatically
controlled at 4 levels (High, Mid, Low,
and OFF) according to the conditions
in the cabin.
NOTE
When auto mode is enabled using
Mazda Connect and auto mode is
not operating, the
(gray) is
displayed on the setting screen of the
seat warmer.
If the front passenger’s seat belt is
fastened, the front passenger’s seat
warmer turns on.
Essential Safety Equipment
Seat Warmer/Heated Steering Wheel
2-22
MX -30_8JD4-EA -21G_Edition2_new 2021-5-18 14:38:07
Page 92 of 547

cooperate in ensuring that the vehicle's
high voltage battery is collected.
WARNING
Appropriate disposal of the high
voltage battery:
If the high voltage battery is not
collected and disposed of
appropriately, such as by leaving it
unattended or illegally abandoning it,
some other person may touch it which
could cause an electrical shock
accident leading to serious injury.
▼Accident Occurs
If the vehicle receives an impact of a
certain level or greater in a collision,
the EV system stops. In this case, the
EV system malfunction warning
indication/warning light displays/turns
on and the EV system may not start.
Contact an Authorized Mazda Dealer
immediately.
WARNING
Never touch electrical wiring that may
be protruding into or outside of the
cabin:
Otherwise, it could result in electrical
shock and serious injury.
Never touch any area where
electrolyte is visible or electrolyte is
leaking from the area:
If any electrolyte from the high voltage
battery gets in the eyes or on the skin,
it could cause loss
of vision or skin
reactions. In the unlikely event that
electrolyte comes into contact with the
eyes or skin, flush with large quantities
of water immediately and seek
immediate medical attention.
Never approach objects that are on
fi re or extremely hot:
Electrolyte in the high voltage battery
may cause a fire.
If the vehicle catches fire, extinguish
the fire using a fire extinguisher (type
ABC, BC, or C).
Only extinguish a fire with water when
a large amount of water is available
such as from a fire hydrant. Otherwise,
it could lead to an accident.
▼ Advice for Using Electric Vehicles
Unique sound and vibration occurring
with electric vehicles
Electric vehicles have a unique sound
and vibration which di
ffer from
non-electric vehicles. The following
sounds or vibration may occur,
however, this is unique to electric
vehicles and it does not indicate a
problem.
Motor operation sound.Operation sound of coolant pump
and cooling fan while charging.
Operation sound of regenerative
braking.
Relay operation sound when EV
system is started or stopped.
Brake system operation sound and
vibration.
Operation sound of brake system
Sound can be heard from the front of
the vehicle under the following
conditions:
The driver's door is opened.The power switch is switched ON.The brake pedal is operated.The brake system operates
automatically.
Several minutes have passed since
the EV system was stopped.
Vibration of brake pedal
Before Driving
Electric Vehicles
3-5
MX -30_8JD4-EA -21G_Edition2_new 2021-5-18 14:38:07
Page 109 of 547

Immediately after switching to
daylight savings, charging may occur
at the charging timer time set before
the switch to daylight savings until
the power switch is switched ON.
Edit
Function Available setting
changes
Start Time
Select the desired charging
start time. Time
(10-minute inter- vals)
End Time
Select the desired charging
end time. Time
(10-minute inter- vals)
Repeat
Select the day(s) of the
week to repeat. Monday
― Sun-
day
Charge Limit
Select the desired charge
limit method. According to Bat-
tery Charge Level, According to Esti- mated Range
Battery Charge Level
*1
Select the desired maxi-
mum charge level. 100%
― 10%
(10 levels)
Estimated Range
*2
Select the desired estimat-
ed range. In 10 km incre-
ments
*1 Can be changed when According to Battery
Charge Level is selected for Charge Limit.
Use when you want to charge only the
amount of charging you need. This helps you
save power and prevent high voltage battery
deterioration.
*2 Can be changed when According toEstimated Range is selected for Charge
Limit.
Use when you want to charge according to
your planned driving distance.
The distance-to-full discharge changes
depending on the driving conditions and
surrounding environment. Check the actual
remaining distance-to-full discharge.
If you change the distance unit after setting
the Estimated Range, the Estimated Range
will be calculated in the unit after the
change. (If you change the units to miles
after setting the estimated range to 100 km,
the charge distance will be for 60 miles.)
NOTE
A charging day is set using Repeat
If 1 repeat day is set, charging is
repeated every week on the set day
of the week.
Depending on the set days of the
week, the Repeat indication is
displayed as Weekdays, Weekends,
and Daily. Otherwise, it is displayed
as Custom.
Setting example
Function Available setting
changes
Start Time 21 : 00
End Time 6 : 00
Repeat Friday
Charge Limit According to Bat-
tery Charge Level
Battery Charge Level 80 %
In this case, charging is done every
week from Friday at 21 : 00 hours to
Saturday at 6:00 hours. However, if
the Battery Charge Level reaches
80%, the charging is stopped even if
it is before the End Time.
No day is set using Repeat
If no Repeat day is designated,
charging is done only 1 time at the
set hours.
Before Driving
Electric Vehicles
3-22
MX -30_8JD4-EA -21G_Edition2_new 2021-5-18 14:38:07
Page 110 of 547

Setting example (if settings below are
made at 13 : 00 hours)
FunctionAvailable setting
changes
Start Time 12 : 00
End Time 18 : 00
Repeat Once
Charge Limit According to Esti-
mated Range
Estimated Range 50 km
In this case, when the charge
connector is connected, charging
starts immediately for charging to
18 : 00 hours on the same day.
However, if a charging amount
allowing a 50 km trip is reached, the
charging is stopped even if it is
before the end time.
Setting example (if settings below are
made at 13 : 00 hours)
Function Available setting
changes
Start Time 1 : 00
End Time 8 : 00
Repeat Once
Charge Limit According to Bat-
tery Charge Level
Battery Charge Level 100 %
In this case, charging is done from
the next day at 1 : 00 hours to 8 : 00
hours. However, if the Battery
Charge Level reaches 100% is
reached, the charging is stopped
even if it is before the End Time.
Charge Limit for AC Charging
Sets the charge limit when using an AC
charger.
Available setting changes
100% ― 10% (10 levels)
NOTE
For normal charge, set the maximum
charge limit of the high voltage battery.
Set the Battery Charge Level of the
charging timer for each charging timer
setting.
Charge Limit for DC Fast Charging
Sets the charge limit when using a DC
Fast charger.
Available setting changes
100% ― 10% (10 levels)
Charge Connector Lock
Con figures when the charge connector
is locked.
Available setting changes
Locked When Charging
Unlocks connector when charging is complete
or vehicle is unlocked.
Locked When Connected
Unlocks connector only when vehicle is un-
locked.
Before Driving
Electric Vehicles
3-23
MX -30_8JD4-EA -21G_Edition2_new 2021-5-18 14:38:07
Page 114 of 547

Keyless Entry System
▼Keyless Entry System
This system uses the key buttons to
remotely lock and unlock the doors,
liftgate, and charge lid.
The system can start the EV system
without having to take the key out of
your purse or pocket.
It can also help you signal for attention
or help.
System malfunctions or warnings are
indicated by the following warning
lights or beeps.
Check the displayed message for more
information and, if necessary, have the
vehicle inspected at an Authorized
Mazda Dealer, according to the
indication.
KEY Warning Indication/Warning
Light (Red)
Refer to KEY Warning Indication/
Warning Light (Red) on page 7-28.
Power switch Not Switched O
ff
(STOP) Warning Beep
Refer to Power switch Not Switched
O ff (STOP) Warning Beep on page
7-37.
Key Removed from Vehicle Warning
Beep
Refer to Key Removed from Vehicle
Warning Beep on page 7-37.
If you have a problem with the key,
consult an Authorized Mazda Dealer.
If your key is lost or stolen, consult an
Authorized Mazda Dealer as soon as
possible for a replacement and to
make the lost or stolen key inoperative.
CAUTION
Radio equipment like this is governed
by laws in the United States.
Changes or modi fications not expressly
approved by the party responsible for
compliance could void the user's
authority to operate the equipment.
NOTE
The keyless entry system operation
may vary due to local conditions.
The keyless entry system is fully
operational when the power switch
is switched o ff. The system does not
operate if the power switch is
switched to any position other than
o ff.
If the key does not operate when
pressing a button or the operational
range becomes too small, the battery
may be weak. To install a new
battery, refer to Key Battery
Replacement (page 6-21).
Battery life is about 1 year. Replace
the battery with a new one if the
messages are displayed in the
instrument cluster. Replacing the
battery about once a year is
recommended because the KEY
warning indication may not display
depending on the rate of battery
depletion.
Additional keys can be obtained at
an Authorized Mazda Dealer. Up to
6 keys can be used with the keyless
functions per vehicle. Bring all keys
to an Authorized Mazda Dealer
when additional keys are required.
Before Driving
Keys
3-27
MX -30_8JD4-EA -21G_Edition2_new 2021-5-18 14:38:07
Page 143 of 547

Break-In Period
▼Break-In Period
No special break-in is necessary, but if
unnecessary hard stops are avoided in
the
first 1,000 km (600 miles), it may
add to the performance, economy,
and life of the vehicle.
Hazardous Driving
▼ Hazardous Driving
WARNING
Be careful when applying sudden
regenerative braking on slippery
surfaces:
The sudden change in tire speed could
cause the tires to skid. This could lead
to loss of vehicle control and an
accident.
When driving on ice or in water, snow,
mud, sand, or similar hazards:
Be cautious and allow extra distance
for braking.
Avoid sudden braking and sudden
maneuvering.
Do not pump the brakes. Continue
to press down on the brake pedal.
Refer to Antilock Brake System (ABS)
on page 4-63.
For more traction in starting on
slippery surfaces such as ice or
packed snow, use sand, rock salt,
chains, carpeting,
or other nonslip
material under the front wheels.
NOTE
Use snow chains only on the front
wheels.
Before Driving
Driving Tips
3-56
MX -30_8JD4-EA -21G_Edition2_new 2021-5-18 14:38:07
Page 150 of 547

4When Driving
Information concerning safer driving and stopping.
Starting and Stopping the EV
System.....................................4-4 Power Switch Position............ 4-4
Starting the EV System............ 4-5
Stopping the EV System.......... 4-8
Instrument Cluster and
Display.................................... 4-9 Instrument Cluster and
Display................................. 4-9
Instrument Cluster................. 4-9
Active Driving Display.......... 4-24
Selector Lever Position
Functions............................... 4-26 Selector Lever Position
Functions............................ 4-26
Selector Lever Operation...... 4-28
Shift-Lock System................. 4-32
Driving Tips......................... 4-32
Switches and Controls............. 4-35 Lighting Control................... 4-35
Turn and Lane-Change
Signals................................ 4-39
Windshield Wipers and
Washer............................... 4-40
Rear Window Wiper and
Washer............................... 4-44
Rear Window Defogger........ 4-45
Horn................................... 4-46
Hazard Warning Flasher....... 4-47
HomeLink Wireless Control
System
*............................... 4-47
Brake.....................................4-52Brake System....................... 4-52
AUTOHOLD........................ 4-57
Emergency Stop Signal
System................................ 4-61
Hill Launch Assist (HLA)........4-61
ABS/TCS/DSC....................... 4-63 Antilock Brake System
(ABS).................................. 4-63
Tra c t i o n C o n t r o l Sy s t e m
(TCS).................................. 4-64
Dynamic Stability Control
(DSC)................................. 4-66
Power Steering....................... 4-67 Power Steering.....................4-67
i-ACTIVSENSE......................... 4-68 i-ACTIVSENSE......................4-68
Forward Sensing Camera
(FSC)
*................................. 4-71
Front Radar Sensor
*.............. 4-75
Front Side Radar Sensor
*.......4-77
Rear Side Radar Sensor
*....... 4-79
Rear Ultrasonic Sensor
*........ 4-80
Front Camera/Side Cameras/
Rear Camera
*...................... 4-81
Driver Monitoring Camera
*..........
.......................................... 4-81
Adaptive Front Lighting System
(AFS)
*................................. 4-82
High Beam Control System
(HBC)
*................................ 4-83
*Some models.4-1
MX -30_8JD4-EA -21G_Edition2_new 2021-5-18 14:38:07
Page 153 of 547

Powe r Sw i tc h Po s i t i o n
▼Function of Each Power Switch
Po s i t io n
The power switch is switched in the
order of OFF, ACC, and ON each time
the power switch is pressed with the
brake pedal not depressed. When
pressing the power switch again from
ON, it returns to OFF.
1. Indicator light
2. Power switch
Po we r
switch Function
OFF The power is switched OFF. The
power switch indicator light (am-
ber) turns o
ff.
ACC Some electrical accessories such as
the audio can be used while the
EV system is stopped (READY indi-
cation is not displayed). The pow-
er switch indicator light (amber)
turns on.
ON All electrical accessories can be
operated while the EV system is
stopped (READY indication is not
displayed). The power switch indi-
cator light (amber) turns on. (The
power switch indicator light turns
o
ff while the EV system is operat-
ing (READY indication is dis-
played).
NOTE
The READY indication is displayed in
the instrument cluster when the EV
system is activated. The READY
indication remains displayed while
the EV system is operating.
1. READY indicationIf the power switch is left in the ACC
position, the power switch switches
OFF after about 25 minutes.
The EV system starts by pressing the
power switch with the brake pedal
completely depressed. To switch the
power switch position, press the
power switch without depressing the
pedal.
The power switch is not switched
OFF when the power switch
indicator light turns o ff while the EV
system is stopping. Before leaving the
vehicle, always switch the power
switch OFF (power switch indicator
light o ff).
When Driving
Starting and Stopping the EV System
4-4
MX -30_8JD4-EA -21G_Edition2_new 2021-5-18 14:38:07
Page 154 of 547

Starting the EV System
▼Before Starting the EV System
1. Make sure that the parking brake is
applied.
2. Make sure that the selector lever is
in the P position.
NOTE
The EV system cannot be started
when the selector lever is in a
position other than P.
Shift the selector lever to the P
position.
3. Assume the correct driving posture
to make sure that the accelerator
pedal and the brake pedal can be
firmly depressed with the right foot.
Check the pedal positions to make
sure that one cannot be depressed
for the other by mistake.
▼ Starting the EV System
WARNING
Radio waves from the key may a
ffect
medical devices such as pacemakers:
Before using the key near people who
use medical devices, ask the medical
device manufacturer or your physician
if radio waves from the key will aff ect
the device.
NOTE
The EV system can be started
regardless of the power switch
position (OFF, ACC, ON).
The key must be carried by the
driver.
If this function is disabled, the EV
system cannot be started even if the
key is carried. Consult an Authorized
Mazda Dealer for details.
If the function to start the EV system
only by carrying the key is disabled,
the EV system can be started using
the procedure for starting the EV
system when the key battery is dead.
When the charge connector is
connected to the charge port or
during charging, the EV system
cannot be started.
The vehicle can be driven while the
READY indication is displayed in the
instrument cluster.
1. Make sure you are carrying the key.
2. Continue to depress the brake pedal firmly.
3. Make sure that the KEY indicator
light in the instrument cluster and
power switch indicator light (green)
turn on.
When the power switch indicator
light (green) is flashing, the key
battery might be depleted.
Refer to Starting the EV System
When the Key Battery is Dead on
page 4-6.
1. Indicator light
2. Power switch
4. Press the power switch with the power switch indicator light (green)
turned on.
When Driving
Starting and Stopping the EV System
4-5
MX -30_8JD4-EA -21G_Edition2_new 2021-5-18 14:38:07
Page 155 of 547

CAUTION
If there is a problem with the power
switch, the power switch indicator
light (amber) flashes. In this case,
the EV system could be started,
however, consult an Authorized
Mazda Dealer as soon as possible.
NOTE
Under the following conditions,
the KEY warning light (red) flashes
in the instrument cluster or the
KEY warning indication is
displayed on the
multi-information display and the
EV system will not start:
The key battery is dead.The key is out of operational
range.
The key is placed in areas where
it is di fficult for the system to
detect the signal.
A key from another
manufacturer similar to the key
is in the operational range.
If the power switch indicator light
(amber) flashes, the EV system
may no longer be able to start
using the usual starting method.
Depress the brake pedal
completely and continue to press
the power switch until the EV
system is started completely. After
the EV system has started, the
power switch indicator light
(green) turns o ff and the power
switch is switched ON.
If you attempt to start the EV
system while the selector lever is
in a position other than P, a
message is displayed on the
multi-information display to urge
you to shift the selector lever to
the P position.
Shift the selector lever to the P
position and then start the EV
system.
The function to start the EV
system only by carrying the key
can be disabled, preventing
people using a heart pacemaker
or other medical device from
being negatively a ffected.
5. Make sure that the READY indication is displayed in the
instrument cluster.
▼Starting the EV System When the
Key Battery is Dead
CAUTION
Key operation
Do not allow the fo
llowing conditions.
Otherwise, the vehicle will not receive
the signal from the key correctly and
the EV system may not start.
Metal parts of other keys or metal
objects touch the key.
When Driving
Starting and Stopping the EV System
4-6
MX -30_8JD4-EA -21G_Edition2_new 2021-5-18 14:38:07