check engine MAZDA MODEL MX-5 2006 Quick Tips (in English)
[x] Cancel search | Manufacturer: MAZDA, Model Year: 2006, Model line: MODEL MX-5, Model: MAZDA MODEL MX-5 2006Pages: 14, PDF Size: 1.62 MB
Page 4 of 14
GETTING STARTED
Always check the Owner’s Manual for more operating information and safety features
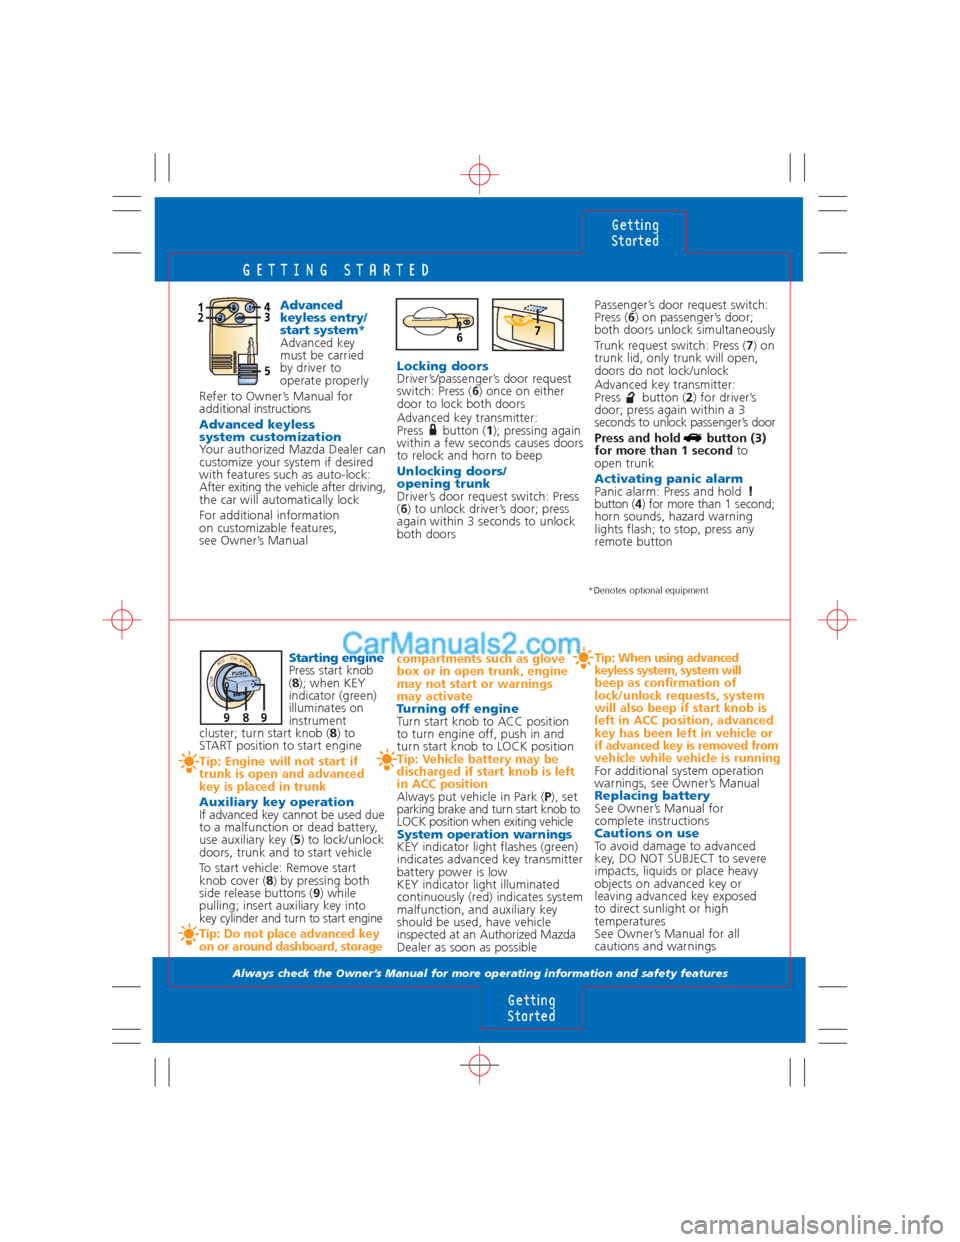
Advanced
keyless entry/
start system*
Advanced key
must be carried
by driver to
operate properly
Refer to Owner’s Manual for
additional instructions
Advanced keyless
system customization
Your authorized Mazda Dealer can
customize your system if desired
with features such as auto-lock:
After exiting the vehicle after driving,
the car will automatically lock
For additional information
on customizable features,
see Owner’s ManualPassenger’s door request switch:
Press (6) on passenger’s door;
both doors unlock simultaneously
Trunk request switch: Press (7) on
trunk lid, only trunk will open,
doors do not lock/unlock
Advanced key transmitter:
Press button (2) for driver’s
door; press again within a 3
seconds to unlock passenger’s door
Press and hold button (3)
for more than 1 secondto
open trunk
Activating panic alarmPanic alarm: Press and hold
button (4) for more than 1 second;
horn sounds, hazard warning
lights flash; to stop, press any
remote button
compartments such as glove
box or in open trunk, engine
may not start or warnings
may activate
Turning off engine
Turn start knob to ACC position
to turn engine off, push in and
turn start knob to LOCK position
Tip: Vehicle battery may be
discharged if start knob is left
in ACC position
Always put vehicle in Park (P), set
parking brake and turn start knob to
LOCK position when exiting vehicle
System operation warningsKEY indicator light flashes (green)
indicates advanced key transmitter
battery power is low
KEY indicator light illuminated
continuously (red) indicates system
malfunction, and auxiliary key
should be used, have vehicle
inspected at an Authorized Mazda
Dealer as soon as possible
Tip: When using advanced
keyless system, system will
beep as confirmation of
lock/unlock requests, system
will also beep if start knob is
left in ACC position, advanced
key has been left in vehicle or
if advanced key is removed from
vehicle while vehicle is running
For additional system operation
warnings, see Owner’s Manual
Replacing batterySee Owner’s Manual for
complete instructions
Cautions on useTo avoid damage to advanced
key, DO NOT SUBJECT to severe
impacts, liquids or place heavy
objects on advanced key or
leaving advanced key exposed
to direct sunlight or high
temperatures
See Owner’s Manual for all
cautions and warnings
Getting
Started
Getting
Started
124
5
3
*Denotes optional equipment
Starting enginePress start knob
(8); when KEY
indicator (green)
illuminates on
instrument
cluster; turn start knob (8) to
START position to start engine
Tip: Engine will not start if
trunk is open and advanced
key is placed in trunk
Auxiliary key operation
If advanced key cannot be used due
to a malfunction or dead battery,
use auxiliary key (5) to lock/unlock
doors, trunk and to start vehicle
To start vehicle: Remove start
knob cover (8) by pressing both
side release buttons (9) while
pulling; insert auxiliary key into
key cylinder and turn to start engine
Tip: Do not place advanced key
on or around dashboard, storageLocking doors
Driver’s/passenger’s door request
switch: Press (6) once on either
door to lock both doors
Advanced key transmitter:
Press button (1); pressing again
within a few seconds causes doors
to relock and horn to beep
Unlocking doors/
opening trunk
Driver’s door request switch: Press
(6) to unlock driver’s door; press
again within 3 seconds to unlock
both doors
LOCK ACC ON STARTPUSH
989
67
Page 6 of 14
INSTRUMENT CLUSTER
Always check the Owner’s Manual for more operating information and safety features
Instrument
Cluster
Instrument
Cluster
CHE F
LF
A0.08
781011
433
16x1000r/min
P
80 1 2 345
6
7
R
N
D
M
9
2
0 20 406080100
120
140
240 80
60
40
20
0220 100200 120180 140160
km/hmph
5
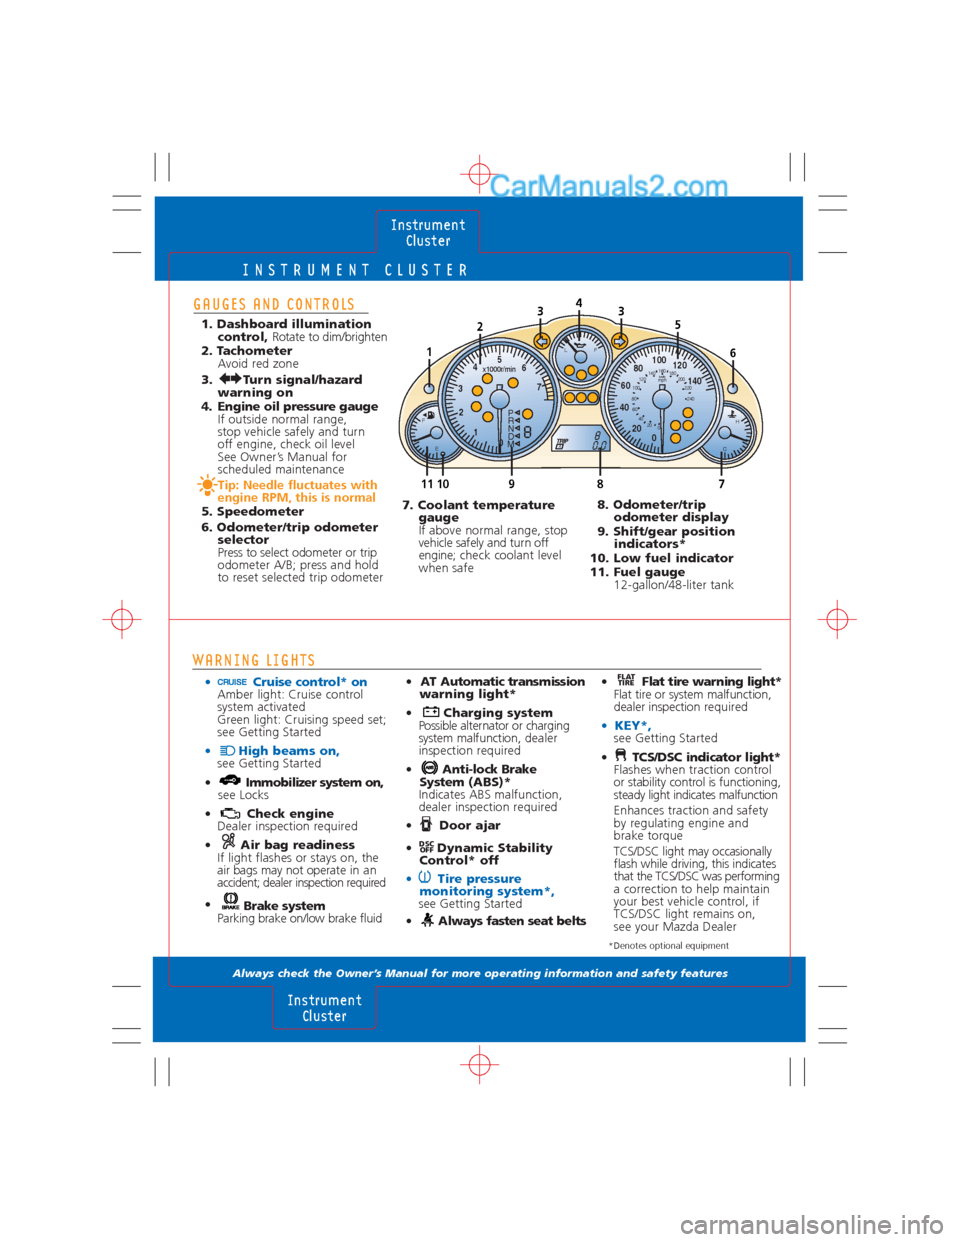
GAUGES AND CONTROLS
1. Dashboard illumination
control, Rotate to dim/brighten
2. Tachometer
Avoid red zone
3. Turn signal/hazard
warning on
4. Engine oil pressure gauge
If outside normal range,
stop vehicle safely and turn
off engine, check oil level
See Owner’s Manual for
scheduled maintenance
Tip: Needle fluctuates with
engine RPM, this is normal
5. Speedometer
6. Odometer/trip odometer
selector
Press to select odometer or trip
odometer A/B; press and hold
to reset selected trip odometer
• Cruise control* onAmber light: Cruise control
system activated
Green light: Cruising speed set;
see Getting Started
• High beams on,see Getting Started
• Immobilizer system on,
see Locks
• Check engine
Dealer inspection required
• Air bag readiness
If light flashes or stays on, the
air bags may not operate in an
accident; dealer inspection required
•
Brake system
Parking brake on/low brake fluid
• AT Automatic transmission
warning light*
• Charging system
Possible alternator or charging
system malfunction,dealer
inspection required
• Anti-lock Brake
System (ABS)*
Indicates ABS malfunction,
dealer inspection required
• Door ajar
• Dynamic Stability
Control* off
• Tire pressure
monitoring system*,
see Getting Started
• Always fasten seat belts
DSC
OFF
*Denotes optional equipment
WARNING LIGHTS
7. Coolant temperature
gauge
If above normal range, stop
vehicle safely and turn off
engine;check coolant level
when safe 8. Odometer/trip
odometer display
9. Shift/gear position
indicators*
10. Low fuel indicator
11. Fuel gauge
12-gallon/48-liter tank
• Flat tire warning light*
Flat tire or system malfunction,
dealer inspection required
• KEY*,see Getting Started
• TCS/DSC indicator light*
Flashes when traction control
or stability control is functioning,
steady light indicates malfunction
Enhances traction and safety
by regulating engine and
brake torque
TCS/DSC light may occasionally
flash while driving, this indicates
that the TCS/DSC was performing
a correction to help maintain
your best vehicle control, if
TCS/DSC light remains on,
see your Mazda Dealer
FLAT
TIRE
Page 7 of 14
OFF ON
TRUNK OPENER
LOCKS
Always check the Owner’s Manual for more operating information and safety features
Locks
Locks
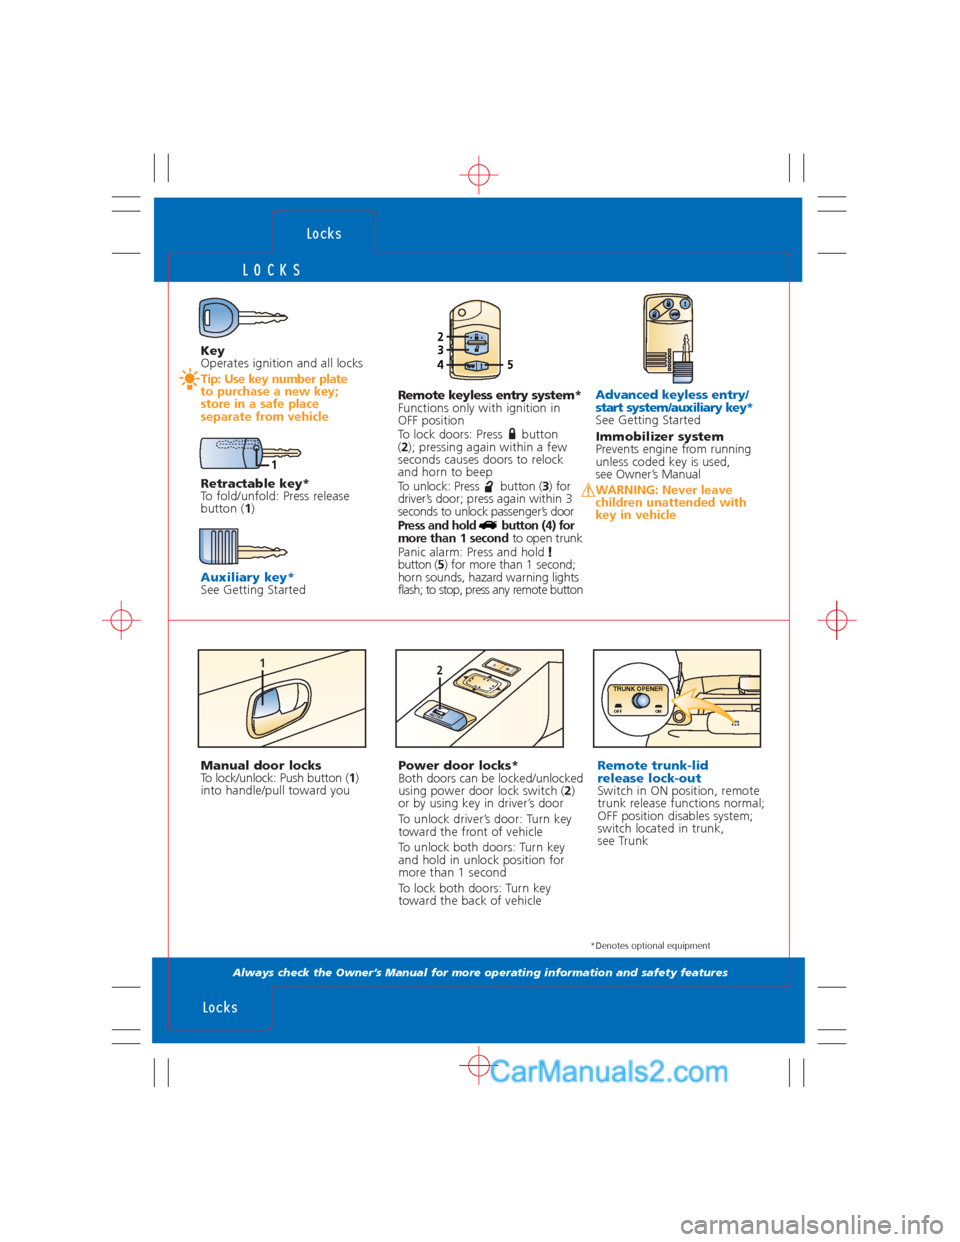
Key
Operates ignition and all locks
Tip: Use key number plate
to purchase a new key;
store in a safe place
separate from vehicleAdvanced keyless entry/
start system/auxiliary key*
See Getting Started
Immobilizer system
Prevents engine from running
unless coded key is used,
see Owner’s Manual
WARNING: Never leave
children unattended with
key in vehicle
*Denotes optional equipment
1
Remote keyless entry system*
Functions only with ignition in
OFF position
To lock doors: Press button
(2); pressing again within a few
seconds causes doors to relock
and horn to beep
To unlock: Press button (3) for
driver’s door; press again within 3
seconds to unlock passenger’s door
Press and hold button (4) for
more than 1 second to open trunk
Panic alarm: Press and hold
button (5) for more than 1 second;
horn sounds, hazard warning lights
flash; to stop, press any remote button
Power door locks*
Both doors can be locked/unlocked
using power door lock switch (2)
or by using key in driver’s door
To unlock driver’s door: Turn key
toward the front of vehicle
To unlock both doors: Turn key
and hold in unlock position for
more than 1 second
To lock both doors: Turn key
toward the back of vehicleRemote trunk-lid
release lock-out
Switch in ON position, remote
trunk release functions normal;
OFF position disables system;
switch located in trunk,
see Trunk
1
AUTO
2L
R
Manual door locks
To lock/unlock: Push button (1)
into handle/pull toward you
2345
Retractable key*
To fold/unfold: Press release
button (1)
Auxiliary key*See Getting Started
Page 8 of 14
ONO
FF
DOORAUTO
LR
2
1
SWITCHES/INTERIOR LIGHTS
Always check the Owner’s Manual for more operating information and safety features
Switches/
Interior Lights
Transmission
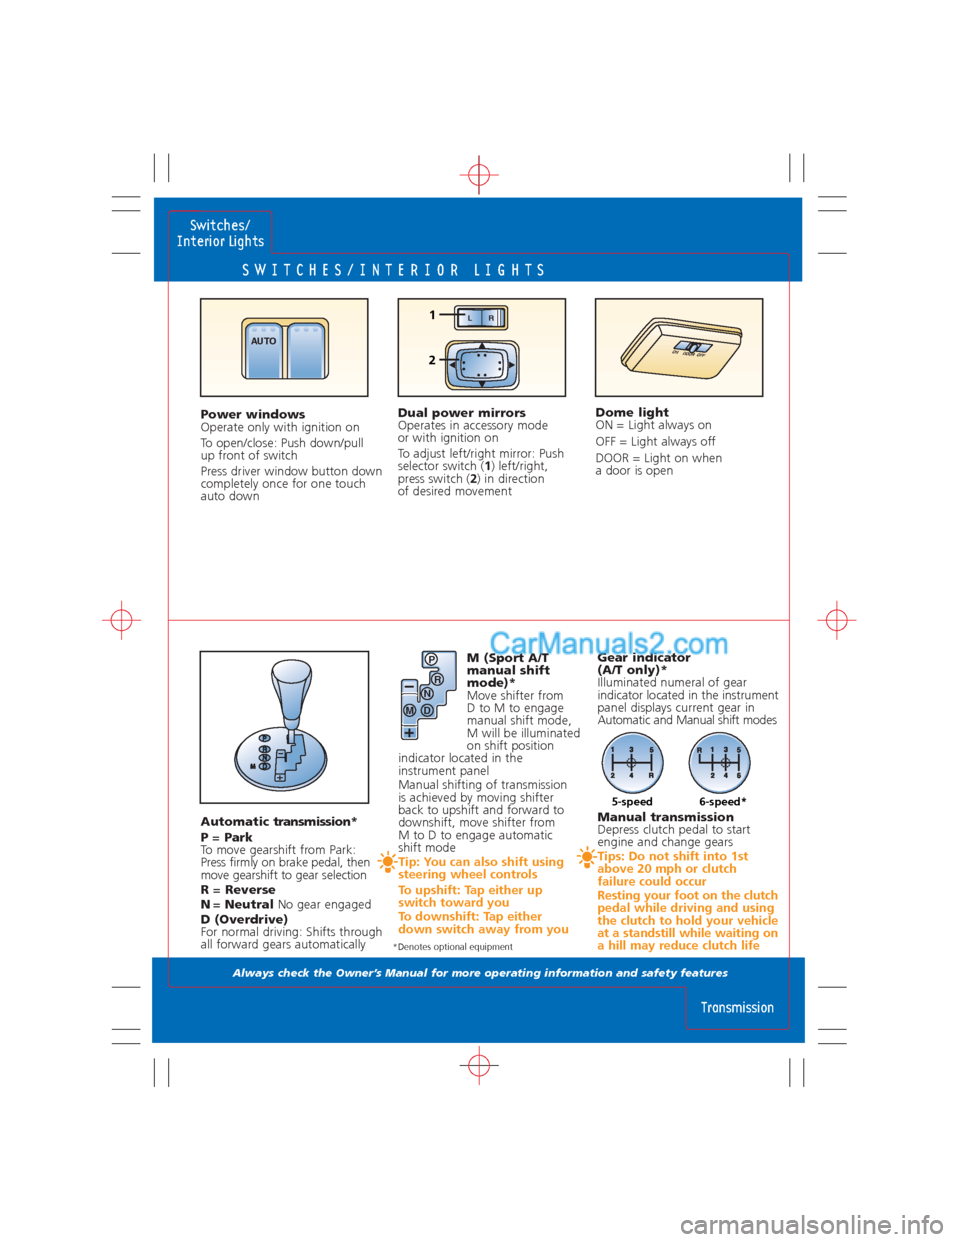
Power windows
Operate only with ignition on
To open/close: Push down/pull
up front of switch
Press driver window button down
completely once for one touch
auto downDome light
ON = Light always on
OFF = Light always off
DOOR = Light on when
a door is open
*Denotes optional equipment
Dual power mirrors
Operates in accessory mode
or with ignition on
To adjust left/right mirror: Push
selector switch (1) left/right,
press switch (2) in direction
of desired movement
M (Sport A/T
manual shift
mode)*
Move shifter from
D to M to engage
manual shift mode,
M will be illuminated
on shift position
indicator located in the
instrument panel
Manual shifting of transmission
is achieved by moving shifter
back to upshift and forward to
downshift, move shifter from
M to D to engage automatic
shift mode
Tip: You can also shift using
steering wheel controls
To upshift: Tap either up
switch toward you
To downshift: Tap either
down switch away from you
Manual transmission
Depress clutch pedal to start
engine and change gears
Tips: Do not shift into 1st
above 20 mph or clutch
failure could occur
Resting your foot on the clutch
pedal while driving and using
the clutch to hold your vehicle
at a standstill while waiting on
a hill may reduce clutch life
Gear indicator
(A/T only)*
Illuminated numeral of gear
indicator located in the instrument
panel displays current gear in
Automatic and Manual shift modes
Automatic transmission*
P =Park
To move gearshift from Park:
Press firmly on brake pedal, then
move gearshift to gear selection
R =Reverse
N=Neutral No gear engaged
D (Overdrive)
For normal driving: Shifts through
all forward gears automaticallyP
R
N
D M
5-speed6-speed*
Page 13 of 14
TRUNK
Always check the Owner’s Manual for more operating information and safety features
Trunk
Driving Tips
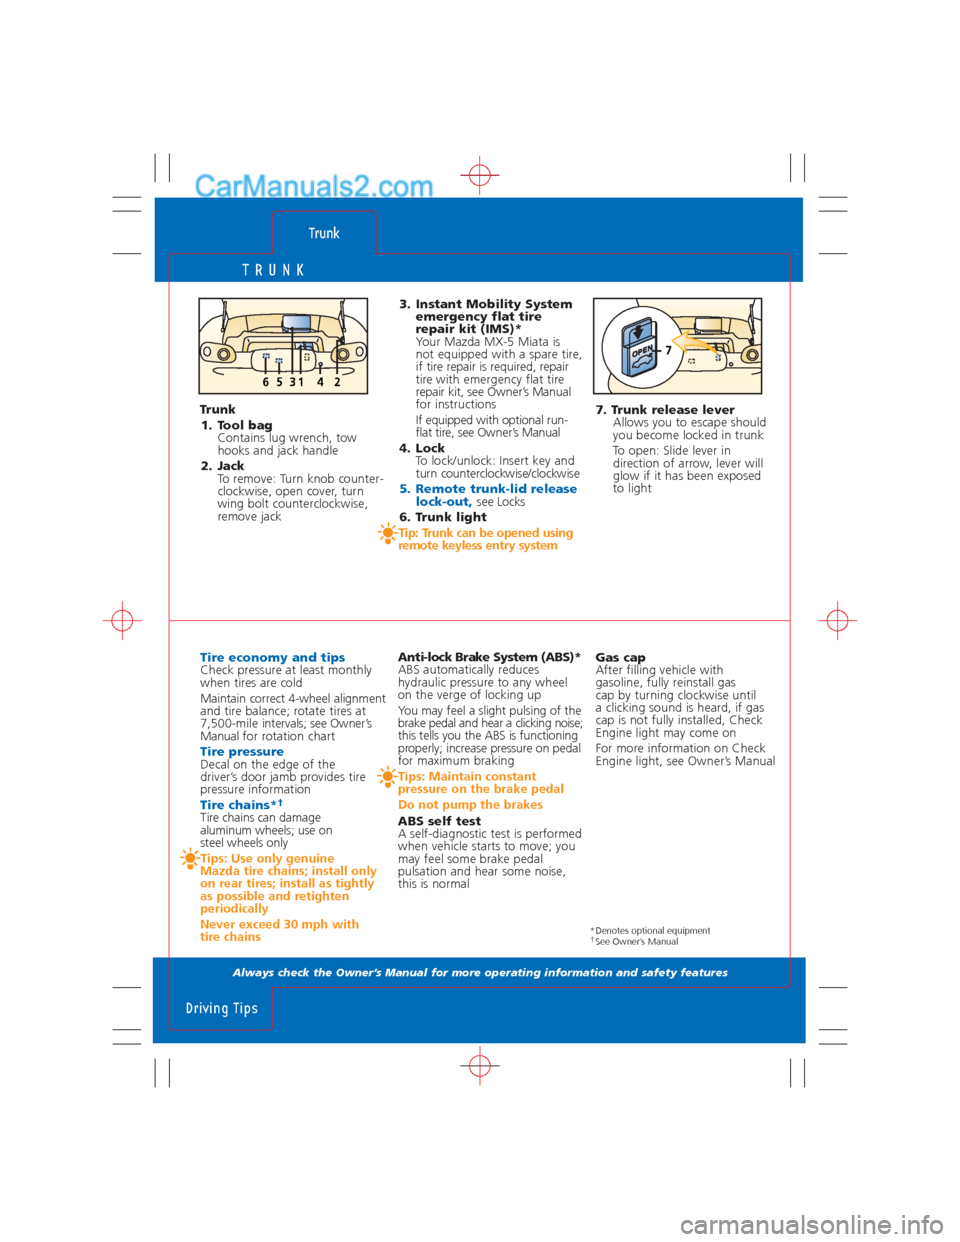
3. Instant Mobility System
emergency flat tire
repair kit (IMS)*
Your Mazda MX-5 Miata is
not equipped with a spare tire,
if tire repair is required, repair
tire with emergency flat tire
repair kit, see Owner’s Manual
for instructions
If equipped with optional run-
flat tire, see Owner’s Manual
4. Lock
To lock/unlock: Insert key and
turn counterclockwise/clockwise
5. Remote trunk-lid release
lock-out,see Locks
6. Trunk light
Tip: Trunk can be opened using
remote keyless entry system
7. Trunk release lever
Allows you to escape should
you become locked in trunk
To open: Slide lever in
direction of arrow, lever will
glow if it has been exposed
to lightTrunk
1. Tool bag
Contains lug wrench, tow
hooks and jack handle
2. Jack
To remove: Turn knob counter-
clockwise, open cover, turn
wing bolt counterclockwise,
remove jack
Anti-lock Brake System (ABS)*
ABS automatically reduces
hydraulic pressure to any wheel
on the verge of locking up
You may feel a slight pulsing of the
brake pedal and hear a clicking noise;
this tells you the ABS is functioning
properly; increase pressure on pedal
for maximum braking
Tips: Maintain constant
pressure on the brake pedal
Do not pump the brakes
ABS self test
A self-diagnostic test is performed
when vehicle starts to move; you
may feel some brake pedal
pulsation and hear some noise,
this is normal
7
245631
Tire economy and tipsCheck pressure at least monthly
when tires are cold
Maintain correct 4-wheel alignment
and tire balance; rotate tires at
7,500-mile intervals; see Owner’s
Manual for rotation chart
Tire pressureDecal on the edge of the
driver’s door jamb provides tire
pressure information
Tire chains*†Tire chains can damage
aluminum wheels; use on
steel wheels only
Tips: Use only genuine
Mazda tire chains; install only
on rear tires; install as tightly
as possible and retighten
periodically
Never exceed 30 mph with
tire chains
*Denotes optional equipment†See Owner’s Manual
Gas cap
After filling vehicle with
gasoline, fully reinstall gas
cap by turning clockwise until
a clicking sound is heard, if gas
cap is not fully installed, Check
Engine light may come on
For more information on Check
Engine light, see Owner’s Manual
Page 14 of 14
UNDER HOOD
Always check the Owner’s Manual for more operating information and safety features
Under
Hood
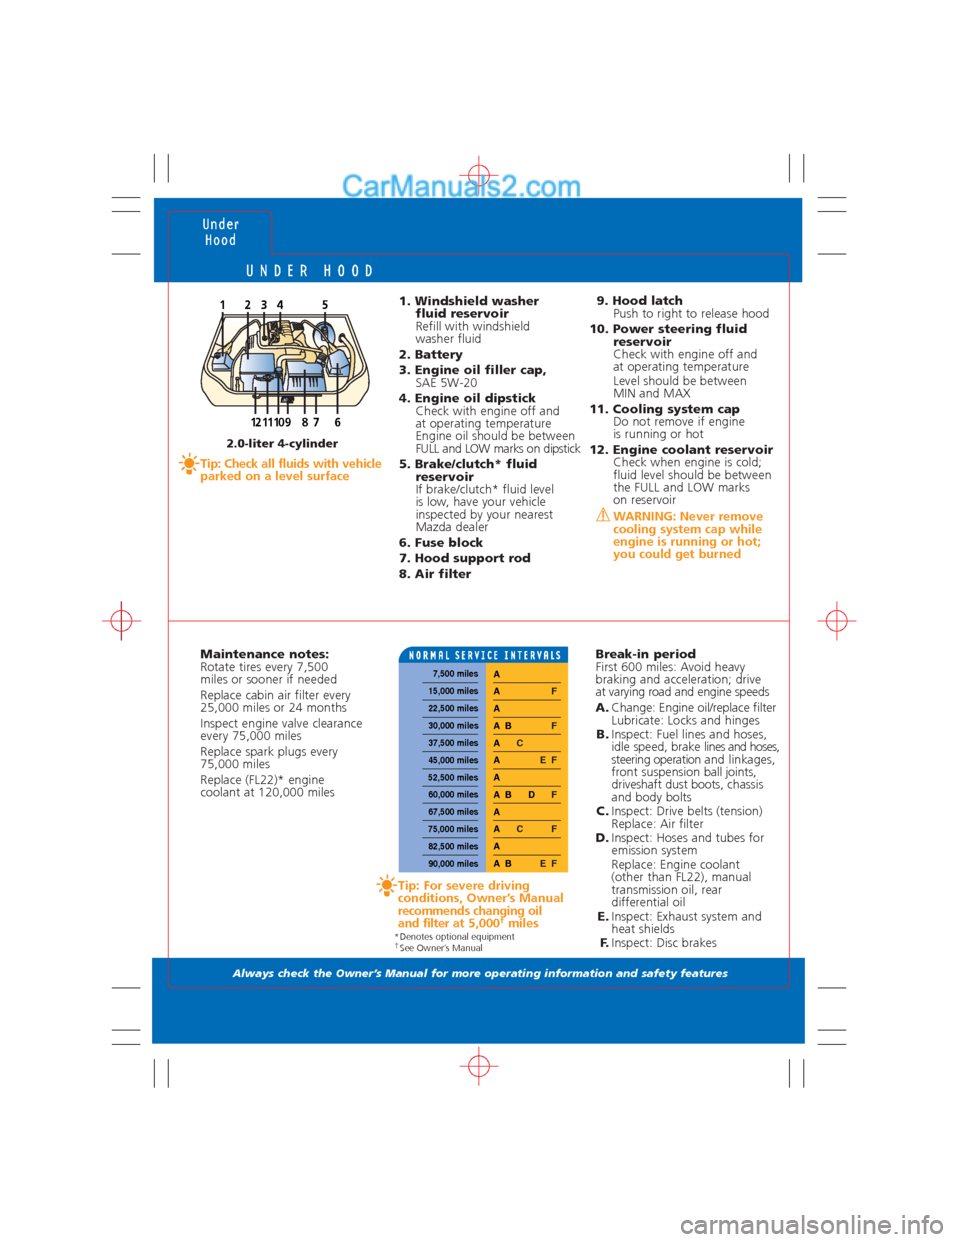
Tip: Check all fluids with vehicle
parked on a level surface
1. Windshield washer
fluid reservoir
Refill with windshield
washer fluid
2. Battery
3. Engine oil filler cap,
SAE 5W-20
4. Engine oil dipstick
Check with engine off and
at operating temperature
Engine oil should be between
FULL and LOW marks on dipstick
5. Brake/clutch* fluid
reservoir
If brake/clutch* fluid level
is low, have your vehicle
inspected by your nearest
Mazda dealer
6. Fuse block
7. Hood support rod
8. Air filter9. Hood latch
Push to right to release hood
10. Power steering fluid
reservoir
Check with engine off and
at operating temperature
Level should be between
MIN and MAX
11. Cooling system cap
Do not remove if engine
is running or hot
12. Engine coolant reservoir
Check when engine is cold;
fluid level should be between
the FULL and LOW marks
on reservoir
WARNING: Never remove
cooling system cap while
engine is running or hot;
you could get burned
54312
9127118610
Maintenance notes:
Rotate tires every 7,500
miles or sooner if needed
Replace cabin air filter every
25,000 miles or 24 months
Inspect engine valve clearance
every 75,000 miles
Replace spark plugs every
75,000 miles
Replace (FL22)* engine
coolant at 120,000 miles
Tip: For severe driving
conditions, Owner’s Manual
recommends changing oil
and filter at 5,000
†miles
Break-in period
First 600 miles: Avoid heavy
braking and acceleration; drive
at varying road and engine speeds
A.Change: Engine oil/replace filter
Lubricate: Locks and hinges
B.Inspect: Fuel lines and hoses,
idle speed, brake lines and hoses,
steering operationand linkages,
front suspension ball joints,
driveshaft dust boots,chassis
and body bolts
C.Inspect: Drive belts (tension)
Replace: Air filter
D.Inspect: Hoses and tubes for
emission system
Replace: Engine coolant
(other than FL22), manual
transmission oil, rear
differential oil
E.Inspect: Exhaust system and
heat shields
F.Inspect: Disc brakes
2.0-liter 4-cylinder
7,500 miles
15,000 miles
22,500 miles
30,000 miles
37,500 miles
45,000 miles
52,500 miles
60,000 miles
67,500 miles
75,000 miles
82,500 miles
90,000 miles
A BE F
A A
C F
A A B D
F
A A
EF
A C
A BF
A
A
F
A
*Denotes optional equipment†See Owner’s Manual