ignition MAZDA MODEL MX-5 2006 Quick Tips (in English)
[x] Cancel search | Manufacturer: MAZDA, Model Year: 2006, Model line: MODEL MX-5, Model: MAZDA MODEL MX-5 2006Pages: 14, PDF Size: 1.62 MB
Page 3 of 14

GETTING STARTED
Always check the Owner’s Manual for more operating information and safety features
Getting Started
Mazda MX-5 Miata Quick
Tips
®are designed to quickly
familiarize you with some
important features of your
Mazda MX-5 Miata
The Driver’s View tab is your
index to the Quick Tips
®, locate
the item you would like to
learn more about and then
turn to the listed tab
This Getting Started section
contains important operating
tips about your Mazda
MX-5 Miata
Items identified in blue text
call out important informationTire Pressure Monitoring
System (TPMS)*
Warning light illuminates on
instrument cluster for a few
seconds with ignition on
If tire pressure is low, warning
light illuminates with audible
beep sound, adjust tire pressure
to correct specifications, perform
tire pressure adjustment before
driving, a digital tire pressure
gauge is recommended
Flashing warning light may
indicate malfunction, dealer
inspection required
WARNINGS: When using
a rear-facing infant-safety
seat always set the passenger
seat air bag deactivation
switch to OFF position
An infant is in serious danger
of being injured or killed if front
passenger air bag is deployed
If you must install a forward-
facing child-safety seat in the
front seating position, move
vehicle seat as far back as possible
and set air bag deactivation
switch to OFF positionPassenger air bag
deactivation
indicator light
Front air bag deactivation indicator
light provides current status of
front passenger air bag and
pretensioner system
If total seated weight on front
passenger seat is less than
approximately 66 lb., front
passenger air bag deactivation
indicator light illuminates,
air bag/pretensioner will not
deploy/activate in an accident
If the total seated weight is greater
than approximately 93 lb., light does
not illuminate, and the air bag/
pretensioner will deploy/activate
in an appropriate accident,
see Owner’s Manual
Getting
Started
Getting
Started
*Denotes optional equipment†For other rare circumstances when
passenger air bag can be shut off,
refer to NHTSA guidelines
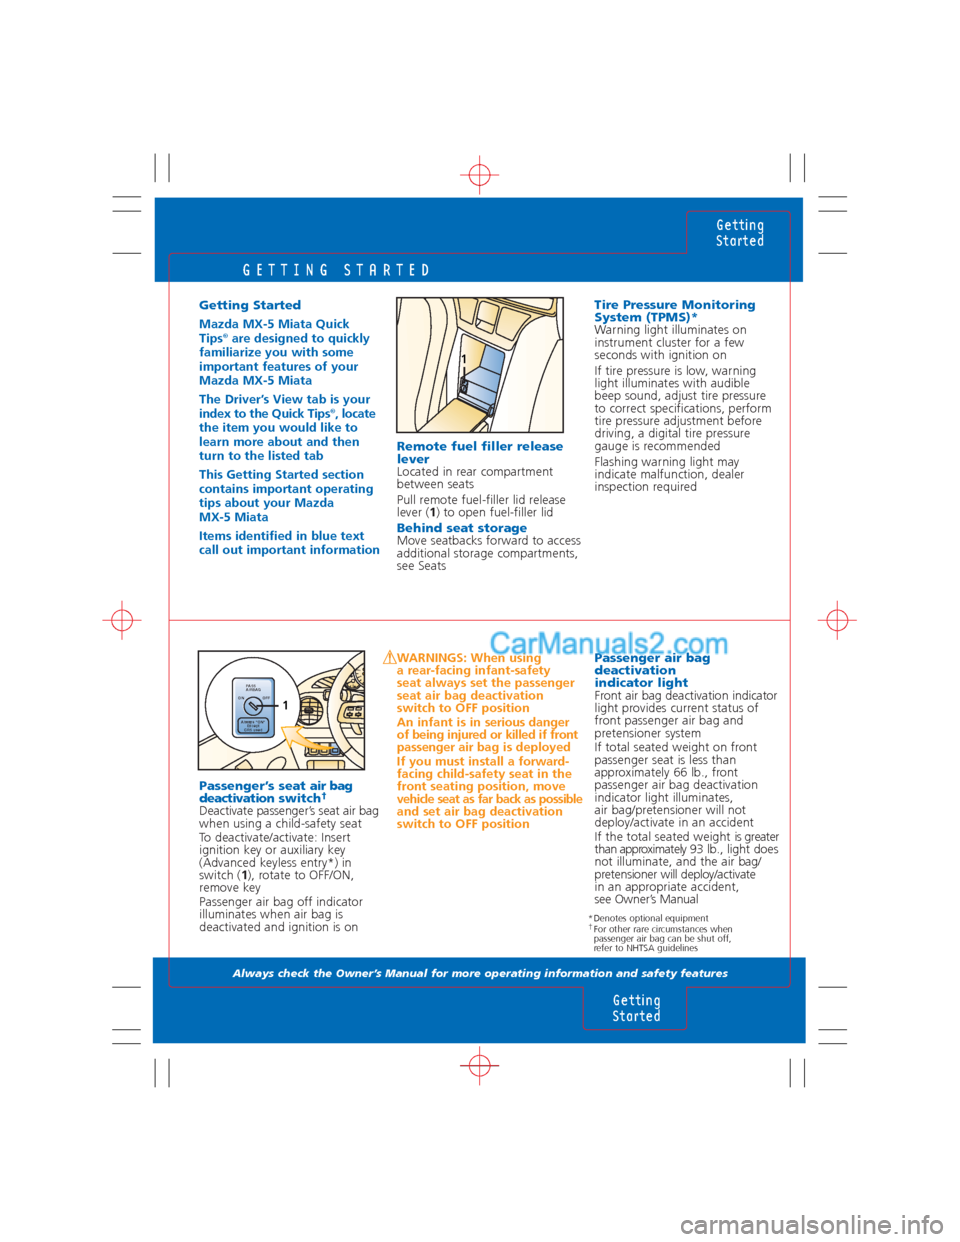
Passenger’s seat air bag
deactivationswitch†
Deactivate passenger’s seat air bag
when using a child-safety seat
To deactivate/activate: Insert
ignition key or auxiliary key
(Advanced keyless entry*) in
switch (1), rotate to OFF/ON,
remove key
Passenger air bag off indicator
illuminates when air bag is
deactivated and ignition is on
Remote fuel filler release
lever
Located in rear compartment
between seats
Pull remote fuel-filler lid release
lever (1) to open fuel-filler lid
Behind seat storageMove seatbacks forward to access
additional storage compartments,
see Seats
1
E F2341
PA S S
AIRBAG
PA S S
AIRBAG
Always “ON”
Except
CRS used ON OFF
1
Page 7 of 14

OFF ON
TRUNK OPENER
LOCKS
Always check the Owner’s Manual for more operating information and safety features
Locks
Locks
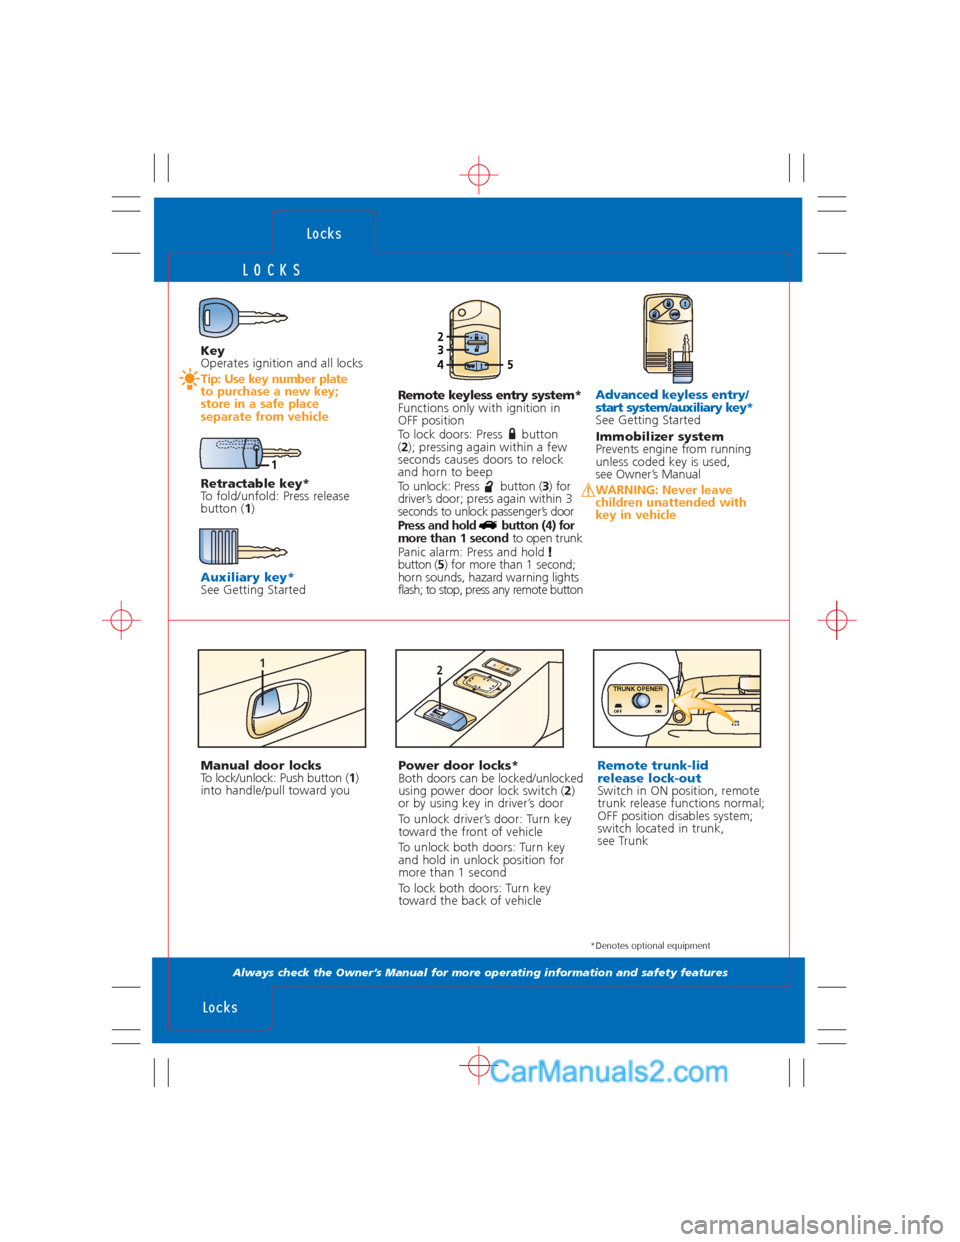
Key
Operates ignition and all locks
Tip: Use key number plate
to purchase a new key;
store in a safe place
separate from vehicleAdvanced keyless entry/
start system/auxiliary key*
See Getting Started
Immobilizer system
Prevents engine from running
unless coded key is used,
see Owner’s Manual
WARNING: Never leave
children unattended with
key in vehicle
*Denotes optional equipment
1
Remote keyless entry system*
Functions only with ignition in
OFF position
To lock doors: Press button
(2); pressing again within a few
seconds causes doors to relock
and horn to beep
To unlock: Press button (3) for
driver’s door; press again within 3
seconds to unlock passenger’s door
Press and hold button (4) for
more than 1 second to open trunk
Panic alarm: Press and hold
button (5) for more than 1 second;
horn sounds, hazard warning lights
flash; to stop, press any remote button
Power door locks*
Both doors can be locked/unlocked
using power door lock switch (2)
or by using key in driver’s door
To unlock driver’s door: Turn key
toward the front of vehicle
To unlock both doors: Turn key
and hold in unlock position for
more than 1 second
To lock both doors: Turn key
toward the back of vehicleRemote trunk-lid
release lock-out
Switch in ON position, remote
trunk release functions normal;
OFF position disables system;
switch located in trunk,
see Trunk
1
AUTO
2L
R
Manual door locks
To lock/unlock: Push button (1)
into handle/pull toward you
2345
Retractable key*
To fold/unfold: Press release
button (1)
Auxiliary key*See Getting Started
Page 8 of 14

ONO
FF
DOORAUTO
LR
2
1
SWITCHES/INTERIOR LIGHTS
Always check the Owner’s Manual for more operating information and safety features
Switches/
Interior Lights
Transmission
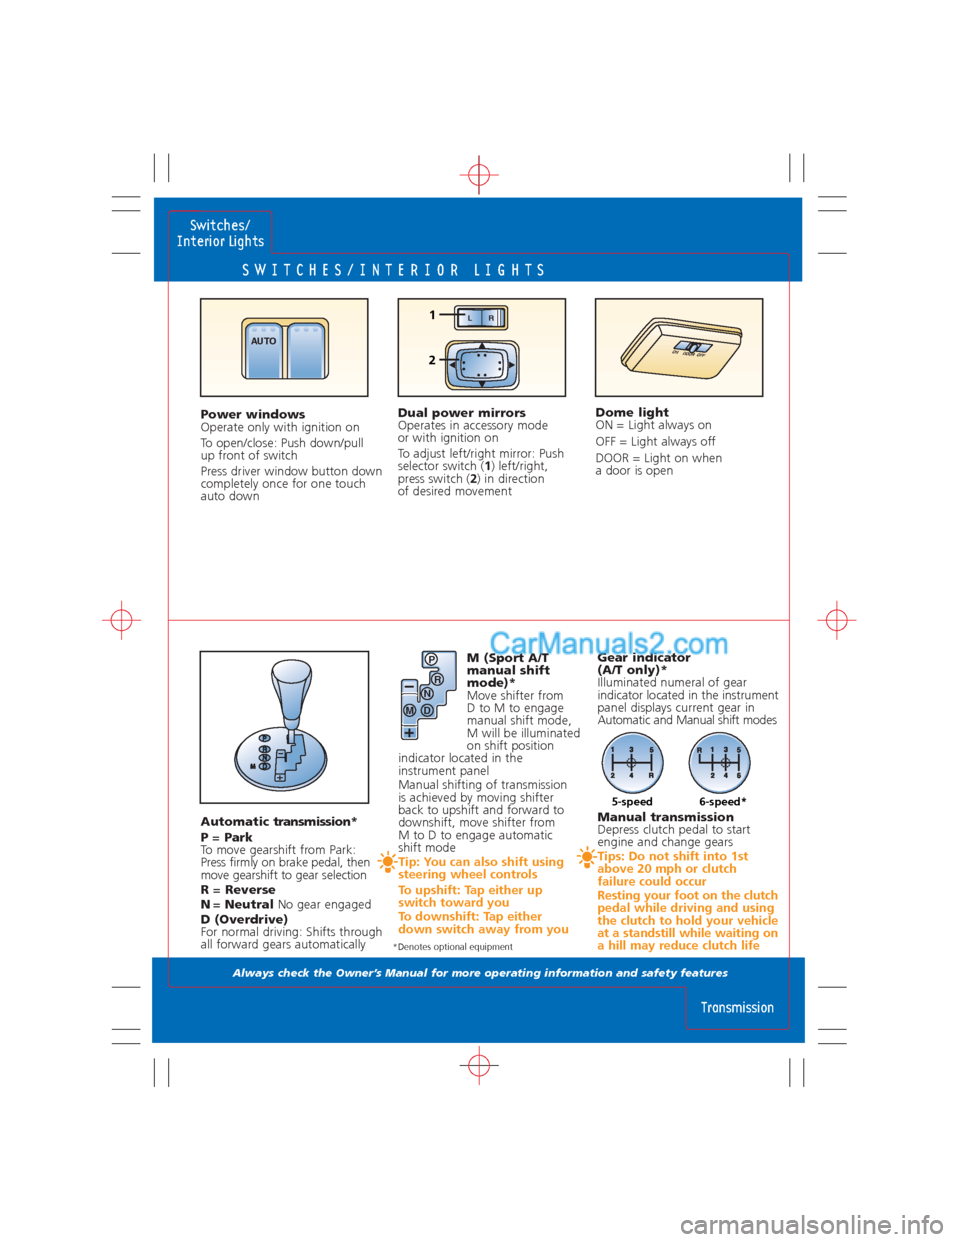
Power windows
Operate only with ignition on
To open/close: Push down/pull
up front of switch
Press driver window button down
completely once for one touch
auto downDome light
ON = Light always on
OFF = Light always off
DOOR = Light on when
a door is open
*Denotes optional equipment
Dual power mirrors
Operates in accessory mode
or with ignition on
To adjust left/right mirror: Push
selector switch (1) left/right,
press switch (2) in direction
of desired movement
M (Sport A/T
manual shift
mode)*
Move shifter from
D to M to engage
manual shift mode,
M will be illuminated
on shift position
indicator located in the
instrument panel
Manual shifting of transmission
is achieved by moving shifter
back to upshift and forward to
downshift, move shifter from
M to D to engage automatic
shift mode
Tip: You can also shift using
steering wheel controls
To upshift: Tap either up
switch toward you
To downshift: Tap either
down switch away from you
Manual transmission
Depress clutch pedal to start
engine and change gears
Tips: Do not shift into 1st
above 20 mph or clutch
failure could occur
Resting your foot on the clutch
pedal while driving and using
the clutch to hold your vehicle
at a standstill while waiting on
a hill may reduce clutch life
Gear indicator
(A/T only)*
Illuminated numeral of gear
indicator located in the instrument
panel displays current gear in
Automatic and Manual shift modes
Automatic transmission*
P =Park
To move gearshift from Park:
Press firmly on brake pedal, then
move gearshift to gear selection
R =Reverse
N=Neutral No gear engaged
D (Overdrive)
For normal driving: Shifts through
all forward gears automaticallyP
R
N
D M
5-speed6-speed*
Page 11 of 14

AM/FM STEREO/CD/MP3
Always check the Owner’s Manual for more operating information and safety features
Audio
Systems
Audio
Systems
1. Power/Volume
Press to turn on/off; rotate
to increase/decrease volume
2. LOAD
CD: When LOAD button is
pressed, CD will load and play
even if CD eject button has
been previously pressed
CD changer*: To load multiple
discs: Press and hold LOAD (2)
until beep sound is heard; insert
CD when “In” is displayed
To eject disc: Press Eject (8)
To eject specific disc: Press and
hold Eject (8) until beep sound is
heard; within five seconds press
the desired tray number 1-6 (10)
3. FM/AM
Press to turn radio on and
select between FM1/FM2/AM
station preset buttons (10)
4. CD slot
5. SAT*, Satellite ready capability
11. Reverse /Fast forward
Press to reverse/fast forward
through a track
12. Auto-Memory
Press and hold until a beep
sound is heard; system auto-
matically scans and temporarily
stores six strong stations in each
band; press again to switch to
another preset station
13. Scan
Radio: Press to sample strong
stations, press again to stop at
current station
CD/MP3: Press to play first few
seconds of each selection, press
again to stop at current selection
14. Random*
Press toplay CD/MP3selections
in random order
15. RPT
Press to replay current
CD/MP3 selection
1 DISC 2 DISC 3 RPT 4 PROG/RDM 5 6
SEEK
TRACK
APCCLOCK
DISP
ESNAUTO-MSCAN
FM/AM MEDIASAT CD
VOL PUSH POWER TUNE PUSH AUDIO CONT.
TEXT1
19
9
10
1217141513181116
356
LOAD28
47
6. CD
Press to play CD
7. Display
8. CD eject button
9. Tune/Audio/Text Control
Radio: Rotate counter-
clockwise/clockwise for lower/
higher frequency
Audio: Press to select ALC or
AudioPLT*/BASS/TREB/FADE/
BAL/BEEP
Rotate right/left to adjust
selected feature
Text*(MP3): Rotate right/left
to display titles
Tip: Automatic Level Control
(ALC) automatically adjusts
audio volume depending
on vehicle speed
10. Memory preset buttons
To set: Tune to station, press and
hold until beep sound is heard
16. DISP
CD/MP3: Press repeatedly
to scroll through displays
17. Clock
To set: With ignition
in ACC or ON position,
press top of switch (17) until
beeper sounds and time flashes;
press top of switch (18) to set
hour, press bottom of switch
(18) to set minutes, press top
of switch (17) to start clock
18. SEEK/TRACK/APC
Radio: Press to
automatically seek higher/
lower frequency
CD/MP3: Press to
select next track/beginning
of current track
19. Disc *
Press to skip to next/previous CD
/
/
*Denotes optional equipment
Tip: Insert single CD into slot, auto-loading function will
set CD and begin play without pressing LOAD button