display MAZDA MODEL MX-5 MIATA 2021 Workshop Manual
[x] Cancel search | Manufacturer: MAZDA, Model Year: 2021, Model line: MODEL MX-5 MIATA, Model: MAZDA MODEL MX-5 MIATA 2021Pages: 499, PDF Size: 6.83 MB
Page 248 of 499
▼Viewing the Display
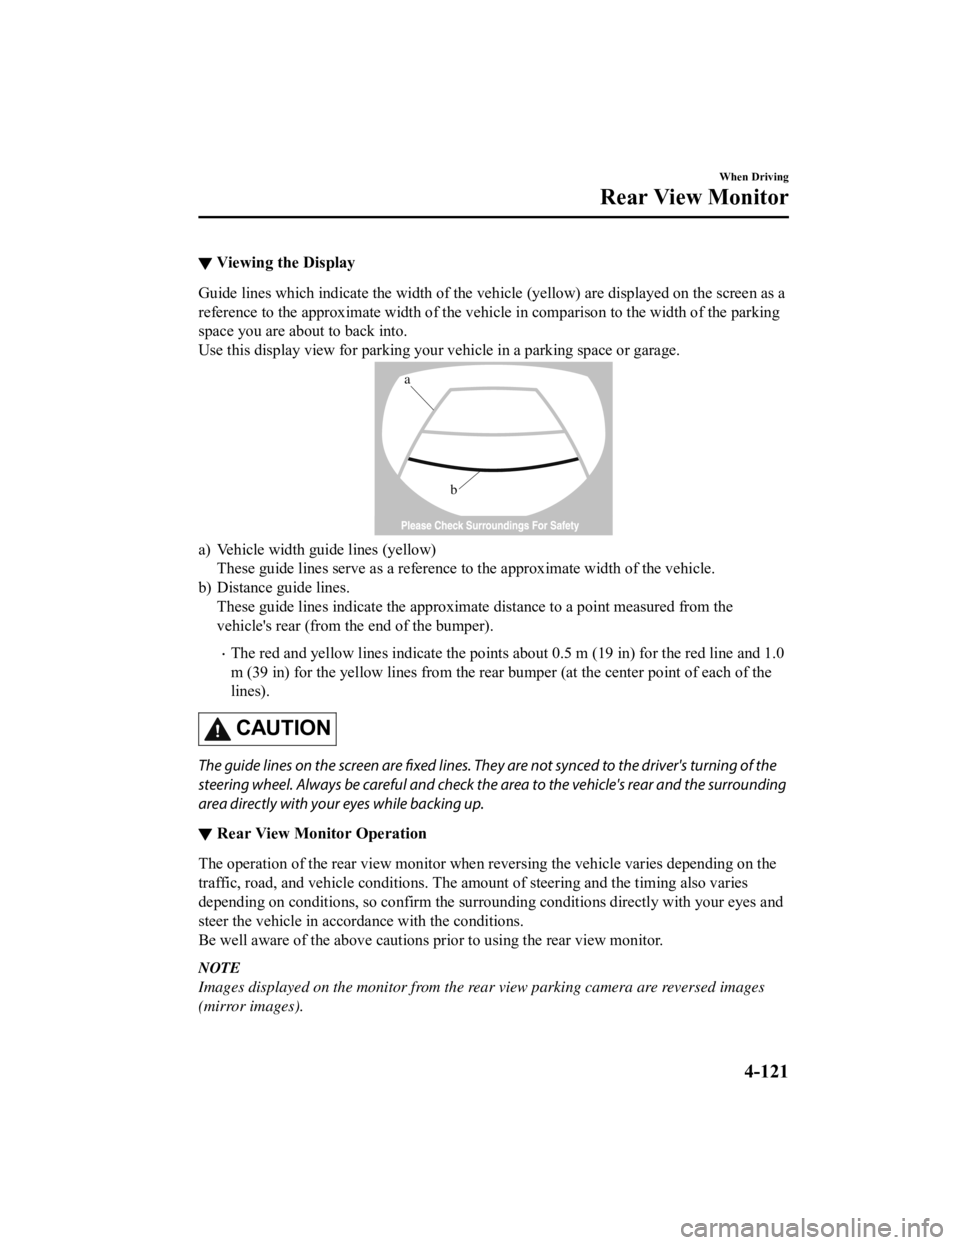
Guide lines which indicate the wid
th of the vehicle (yellow) are displayed on the screen as a
reference to the approximate width of the vehicle in comparison to the width of the parking
space you are about to back into.
Use this display view for parking your vehicle in a parking spa ce or garage.
b
a
a) Vehicle width guide lines (yellow)
These guide lines serve as a reference to the approximate width of the vehicle.
b) Distance guide lines. These guide lines indicate the approximate distance to a point measured from the
vehicle's rear (from the end of the bumper).
The red and yellow lines indicate the points about 0.5 m (19 in ) for the red line and 1.0
m (39 in) for the yellow lines f rom the rear bumper (at the cen ter point of each of the
lines).
CAUTION
The guide lines on the screen are fixed lines. They are not synced to the driver's turning of the
steering wheel. Always be careful and check the area to the vehicle's rear and the surrounding
area directly with your eyes while backing up.
▼ Rear View Monitor Operation
The operation of the rear view monitor when reversing the vehic
le varies depending on the
traffic, road, and vehicle conditions. The amount of steering a nd the timing also varies
depending on conditions, so conf irm the surrounding conditions directly with your eyes and
steer the vehicle in accordance with the conditions.
Be well aware of the above cautions prior to using the rear vie w monitor.
NOTE
Images displayed on the monitor from the rear view parking camera are reversed images
(mirror images).
When Driving
Rear View Monitor
4-121
MX-5_8JS9-EA-20K_Edition1_old 2020-8-28 13:50:01
Page 249 of 499
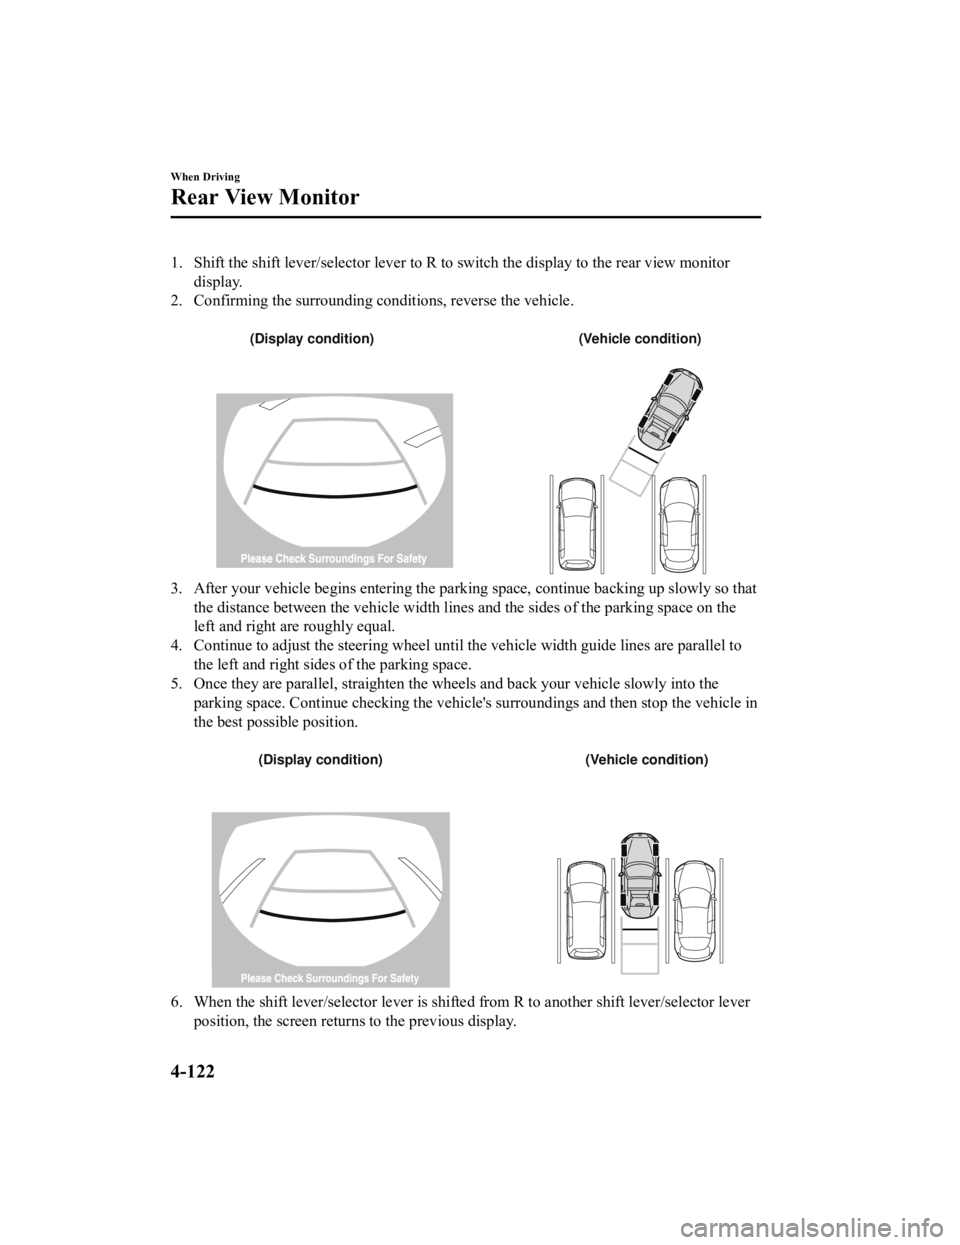
1. Shift the shift lever/selector lever to R to switch the display to the rear view monitor
display.
2. Confirming the surrounding conditions, reverse the vehicle.
(Display condition) (Vehicle condition)
3. After your vehicle begins entering the parking space, continue backing up slowly so that
the distance between the vehicle w idth lines and the sides of the parking space on the
left and right are roughly equal.
4. Continue to adjust the steering wheel until the vehicle width guide lines are parallel to
the left and right sides of the parking space.
5. Once they are parallel, straighten the wheels and back your v ehicle slowly into the
parking space. Continue checking the vehicle's surroundings and then stop the vehicle in
the best possible position.
(Display condition) (Vehicle condition)
6. When the shift lever/selector lever is shifted from R to anot her shift lever/selector lever
position, the screen returns to the previous display.
When Driving
Rear View Monitor
4-122
MX-5_8JS9-EA-20K_Edition1_old 2020-8-28 13:50:01
Page 250 of 499
NOTE
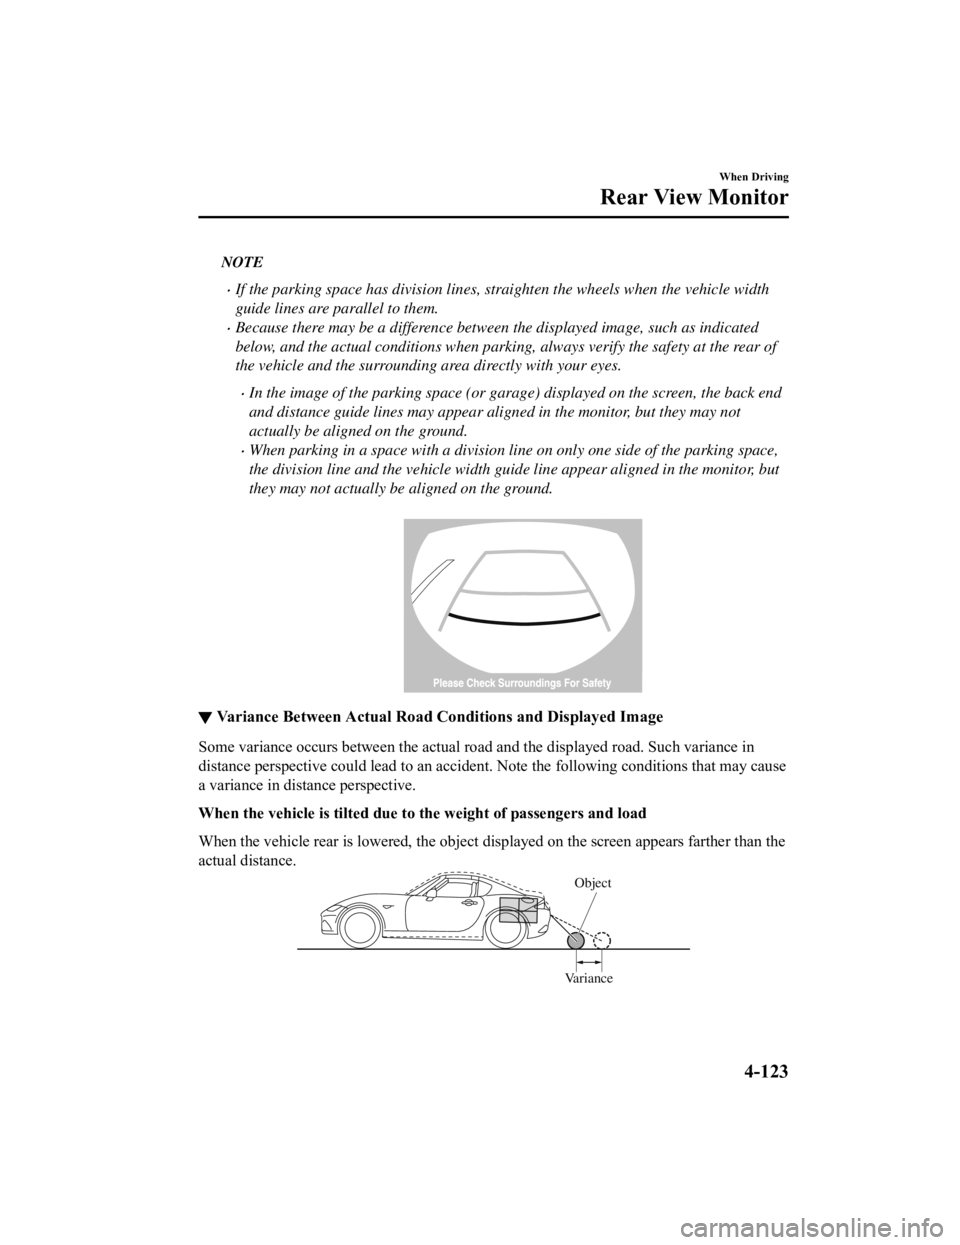
If the parking space has division lines, straighten the wheels when the vehicle width
guide lines are parallel to them.
Because there may be a difference between the displayed image, such as indicated
below, and the actual conditions when parking, always verify the safety at the rear of
the vehicle and the surrounding area directly with your eyes.
In the image of the parking space (or garage) displayed on the screen, the back end
and distance guide lines may appear aligned in the monitor, but they may not
actually be aligned on the ground.
When parking in a space with a division li ne on only one side of the parking space,
the division line and the vehicle width guide line appear aligned in the monitor, but
they may not actually be aligned on the ground.
▼ Variance Between Actual Road Con
ditions and Displayed Image
Some variance occurs between the actual road and the displayed road. Such variance in
distance perspective could lead to an accident. Note the following conditions that may cause
a variance in distance perspective.
When the vehicle is tilted due to the weight of passengers and load
When the vehicle rear is lowered, the object displayed on the s creen appears farther than the
actual distance.
Variance Object
When Driving
Rear View Monitor
4-123
MX-5_8JS9-EA-20K_Edition1_old
2020-8-28 13:50:01
Page 251 of 499
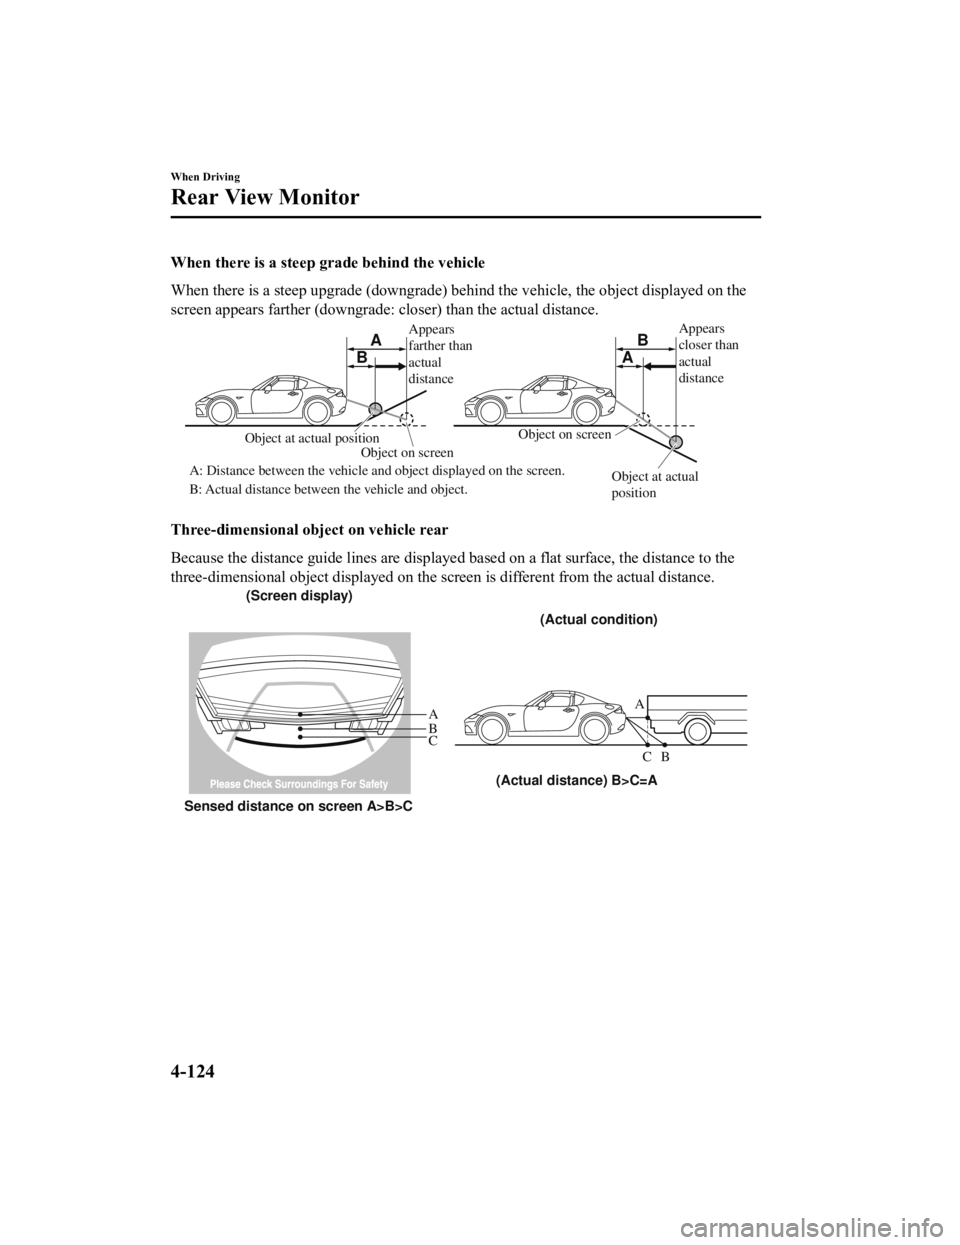
When there is a steep grade behind the vehicle
When there is a steep upgrade (downgrade) behind the vehicle, the object displayed on the
screen appears farther (downgrade: closer) than the actual dist ance.
Appears
farther than
actual
distanceAppears
closer than
actual
distance
Object at actual
position
Object at actual position
Object on screen
A: Distance between the vehicle and object displayed on the screen.
B: Actual distance between the vehicle and object. Object on screen
A
AB
B
Three-dimensional object on vehicle rear
Because the distance guide lines are displayed based on a flat surface, the distance to the
three-dimensional object displayed on the screen is different f rom the actual distance.
A
A
C B
CB
(Actual distance) B>C=A
Sensed distance on screen A>B>C (Screen display)
(Actual condition)
When Driving
Rear View Monitor
4-124
MX-5_8JS9-EA-20K_Edition1_old 2020-8-28 13:50:01
Page 252 of 499

▼Picture Quality Adjustment
WARNING
Always adjust the picture quality of the rear view monitor while the vehicle is stopped:
Do not adjust the picture quality of the rear vi
ew monitor while driving the vehicle. Adjusting
the picture quality of the rear view monitor such as brightness, contrast, color, and tint while
driving the vehicle is dangerous as it could dist ract your attention from the vehicle operation
which could lead to an accident.
Picture quality adjustment must be done while the shift lever/s elector lever is in reverse (R).
There are four settings which ca n be adjusted including, brightness, contrast, tint, and color.
When adjusting, pay sufficient attention to the vehicle surroun dings.
1. Select the
icon on the screen to display the tabs.
2. Select the desired tab item.
3. Adjust the brightness, contrast, tint, and color using the sl ider.
If you need to reset, press the reset button.
4. Select the
icon on the screen to close the tab.
When Driving
Rear View Monitor
4-125
MX-5_8JS9-EA-20K_Edition1_old 2020-8-28 13:50:01
Page 268 of 499
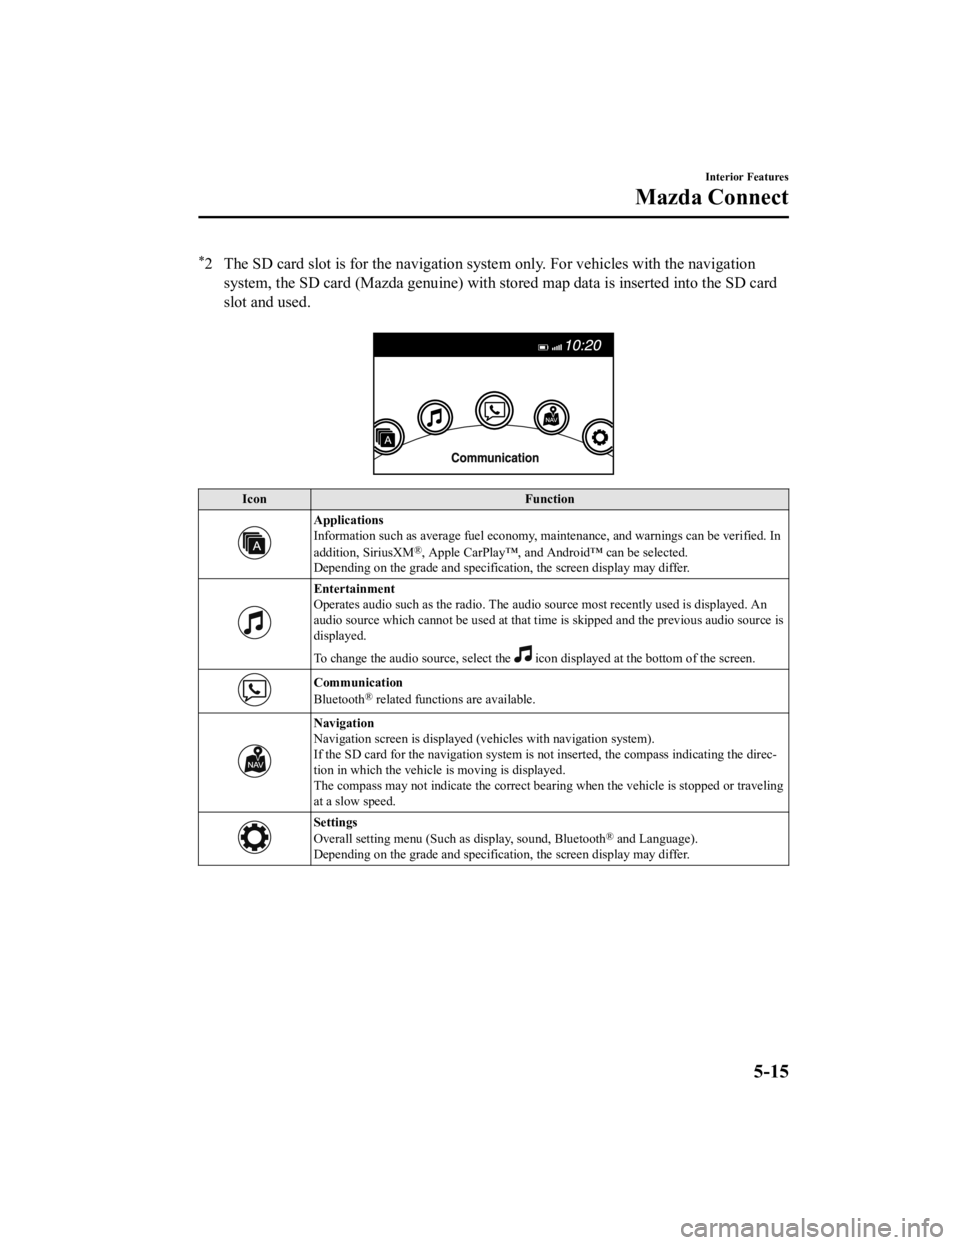
*2 The SD card slot is for the navigation system only. For vehicles with the navigationsystem, the SD card (Mazda genuine) with stored map data is ins erted into the SD card
slot and used.
Icon Function
Applications
Information such as average fuel economy, maintenance, and warn ings can be verified. In
addition, SiriusXM
®, Apple CarPlay™, and Android™ can be selected.
Depending on the grade and specification, the screen display ma y differ.
Entertainment
Operates audio such as the radio. The audio source most recentl y used is displayed. An
audio source which cannot be used at that time is skipped and t he previous audio source is
displayed.
To change the audio source, select the
icon displayed at the bottom of the screen.
Communication
Bluetooth® related functions are available.
Navigation
Navigation screen is displayed (v ehicles with navigation system).
If the SD card for the navigation system is not inserted, the compass indicating the direc‐
tion in which the vehicle is moving is displayed.
The compass may not indicate th e correct bearing when the vehicle is stopped or traveling
at a slow speed.
Settings
Overall setting menu (Such a s display, sound, Bluetooth® and Language).
Depending on the grade and specification, the screen display ma y differ.
Interior Features
Mazda Connect
5-15
MX-5_8JS9-EA-20K_Edition1_old 2020-8-28 13:50:01
Page 270 of 499

Mazda Connect Basic Operations
▼Mazda Connect Basic Operations
NOTE
The explanation of functions described in this
manual may differ from the actual operation,
and the shapes of screens and buttons and the letters and characters displayed may also
differ from the actual appearance.
Additionally, depending on future software updates, the content may successively change
without notice.
▼ Touch Panel Operation
CAUTION
Do not press the screen strongly or press it wi
th a sharp-pointed object. Otherwise, the screen
could be damaged.
NOTE
For safety reasons, operation of the center di splay is disabled while the vehicle is being
driven. However, items not displayed in gray can be operated using the commander switch
while the vehicle is being driven.
Interior Features
Mazda Connect
5-17
MX-5_8JS9-EA-20K_Edition1_old 2020-8-28 13:50:01
Page 271 of 499
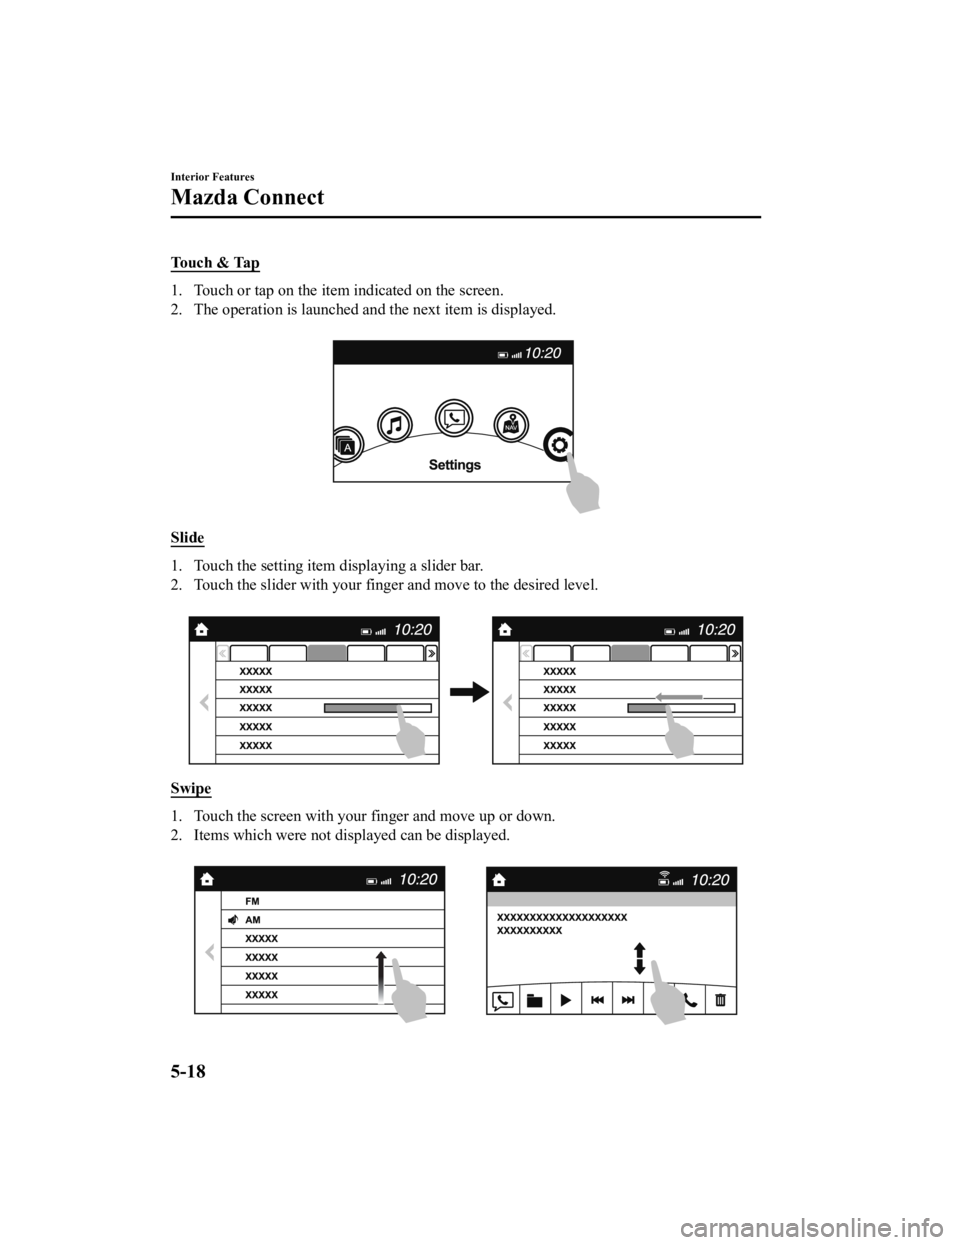
Touch & Tap
1. Touch or tap on the item indicated on the screen.
2. The operation is launched and the next item is displayed.
Slide
1. Touch the setting item displaying a slider bar.
2. Touch the slider with your finger and move to the desired lev el.
Swipe
1. Touch the screen with your finger and move up or down.
2. Items which were not displayed can be displayed.
Interior Features
Mazda Connect
5-18
MX-5_8JS9-EA-20K_Edition1_old 2020-8-28 13:50:01
Page 272 of 499
Return to previous screen
1. Touch the
.
Displaying the home screen
1. Touch the
.
▼ Commander Switch Operation
NOTE
For safety reasons, some operations are disabled while the vehicle is being driven.
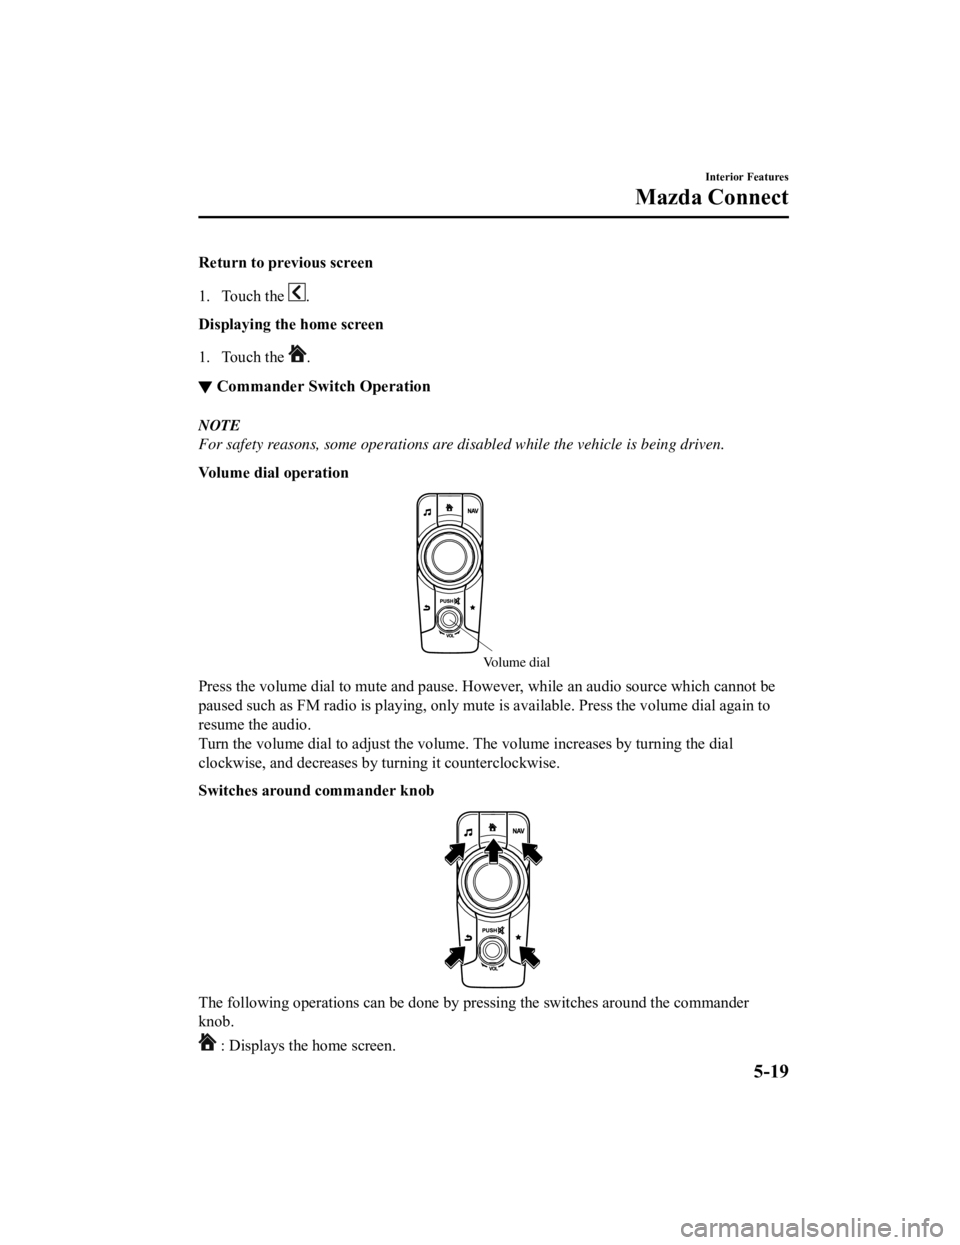
Volume dial operation
Volume dial
Press the volume dial to mute and pause. However, while an audi
o source which cannot be
paused such as FM radio is playing, only mute is available. Pre ss the volume dial again to
resume the audio.
Turn the volume dial to adjust t he volume. The volume increases by turning the dial
clockwise, and decreases by t urning it counterclockwise.
Switches around commander knob
The following operations can be done by pressing the switches a round the commander
knob.
: Displays the home screen.
Interior Features
Mazda Connect
5-19
MX-5_8JS9-EA-20K_Edition1_old 2020-8-28 13:50:01
Page 273 of 499

: Displays the Entertainment screen.
: Displays the Navigation screen (Only navigation-equipped veh icles). For operation
of the Navigation screen, refer to the navigation system manual . If the SD card for the
navigation system is not inserted, the compass indicating the d irection in which the vehicle
is moving is displayed.
: Displays the Favorites screen. Long-press to store particula r items in Favorites. (Radio,
phonebook and destination of the navigation system can be progr ammed.)
: Returns to previous screen.
Commander knob operation
(Selection of icons on screen)
1. Tilt or turn the commander knob and move the cursor to the de sired icon.
2. Press the commander knob and select the icon.
NOTE
Long-press operation of the commander knob is also possible for some functions.
Interior Features
Mazda Connect
5-20
MX-5_8JS9-EA-20K_Edition1_old 2020-8-28 13:50:01