lock MAZDA MODEL MX-5 MIATA POWER RETRACTABLE HARDTOP 2008 Owners Manual
[x] Cancel search | Manufacturer: MAZDA, Model Year: 2008, Model line: MODEL MX-5 MIATA POWER RETRACTABLE HARDTOP, Model: MAZDA MODEL MX-5 MIATA POWER RETRACTABLE HARDTOP 2008Pages: 400, PDF Size: 4.99 MB
Page 230 of 400

Black plate (230,1)
The following seven modes are available.
Select the desired mode according to use.
ModeUseVolume
change
ALC does
not operate. No change
Use when
the roof is closed.
Three levels are
available. Minimum
Medium
Maximum
Use when
the roof is open.
Three levels are
available. Minimum
Medium
Maximum
Turn the audio control dial to select the
desired mode. The selected mode will be
indicated.
*AudioPilot®(Bose®Sound System-
equipped model)
AudioPilot automatically adjusts audio
volume and sound quality in accordance
with the level of noise entering the vehicle
interior while driving. When AudioPilot is
turned ON, the system automatically
calculates the conditions for optimum
hearing of sound which may be difficult
to hear depending on exterior noise.
The system is also equipped to optimally
adjust the acoustic characteristics
automatically while the roof is open or
closed. The acoustic adjustment occurs
with the lock/unlock operation of the top
latch on the roof, and while the
adjustment is being done, the audio is
muted for about 1.5 sec, and then fades in.
* AudioPilot
®is a registered trademark
of Bose Corporation.
BEEP setting
The beep-sound when operating the audio
system can be set on or off.
6-22
Interior Comfort
Audio System
MX-5_8X49-EA-07F_Edition5 Page230
Thursday, February 21 2008 12:51 AM
Form No.8X49-EA-07F
Page 232 of 400

Black plate (232,1)
qClock
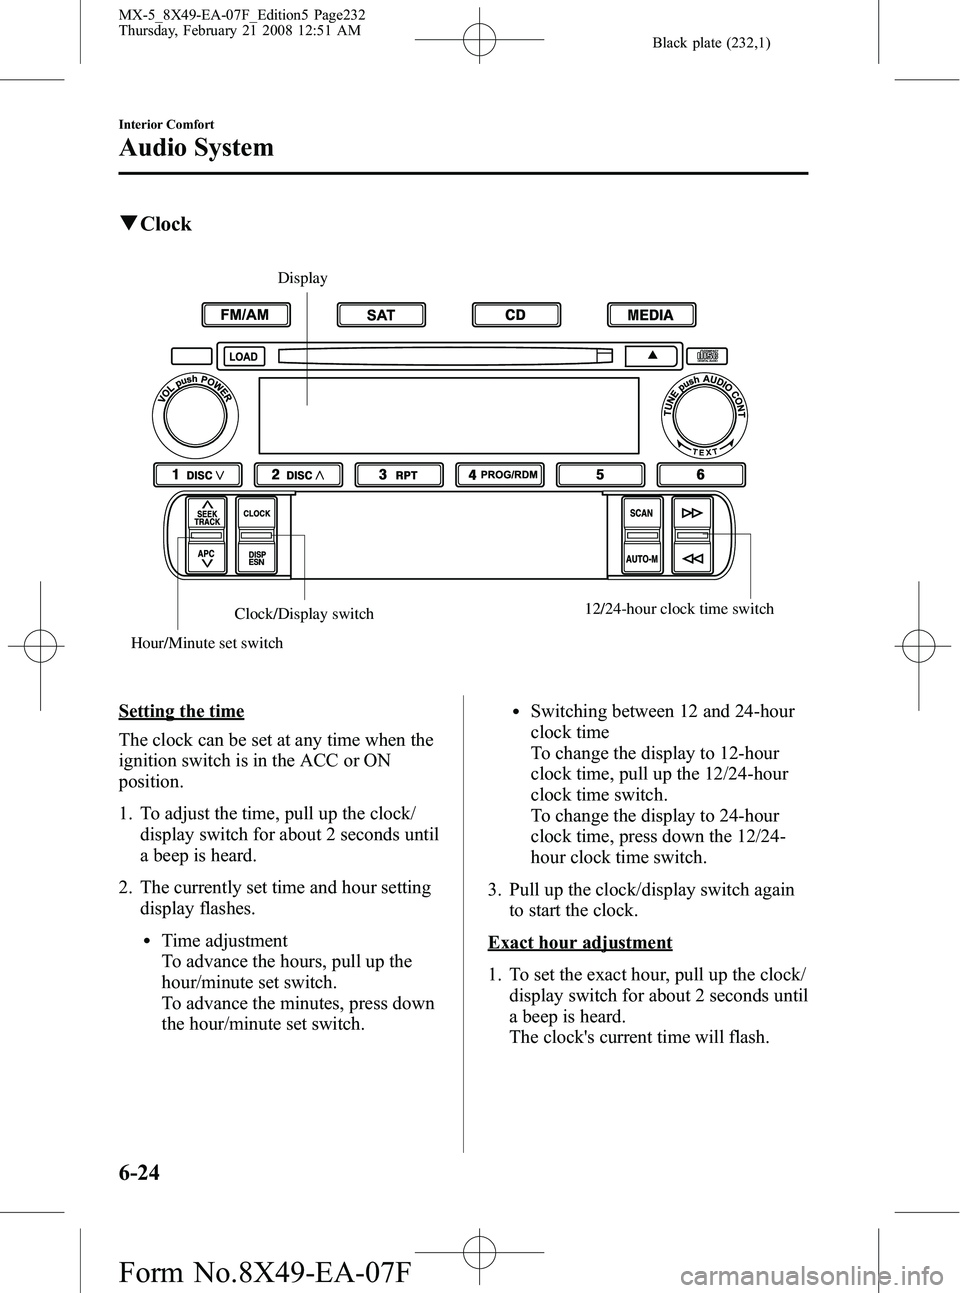
Hour/Minute set switch Clock/Display switch
12/24-hour clock time switch
Display
Setting the time
The clock can be set at any time when the
ignition switch is in the ACC or ON
position.
1. To adjust the time, pull up the clock/
display switch for about 2 seconds until
a beep is heard.
2. The currently set time and hour setting display flashes.
lTime adjustment
To advance the hours, pull up the
hour/minute set switch.
To advance the minutes, press down
the hour/minute set switch.
lSwitching between 12 and 24-hour
clock time
To change the display to 12-hour
clock time, pull up the 12/24-hour
clock time switch.
To change the display to 24-hour
clock time, press down the 12/24-
hour clock time switch.
3. Pull up the clock/display switch again to start the clock.
Exact hour adjustment
1. To set the exact hour, pull up the clock/display switch for about 2 seconds until
a beep is heard.
The clock's current time will flash.
6-24
Interior Comfort
Audio System
MX-5_8X49-EA-07F_Edition5 Page232
Thursday, February 21 2008 12:51 AM
Form No.8X49-EA-07F
Page 233 of 400

Black plate (233,1)
2. Pull up the clock/display switch againand the time will be adjusted as
follows:
(Example)
12:01 ―12:29 →12:00
12:30 ―12:59 →1:00
NOTE
lWhen the clock/display switch is released,
the seconds are reset to “00 ”.
lIf the power supply to the unit is interrupted
(if the fuse blows or the vehicle's battery is
disconnected), the clock will need to be
reset.
Interior Comfort
Audio System
6-25
MX-5_8X49-EA-07F_Edition5 Page233
Thursday, February 21 2008 12:51 AM
Form No.8X49-EA-07F
Page 240 of 400

Black plate (240,1)
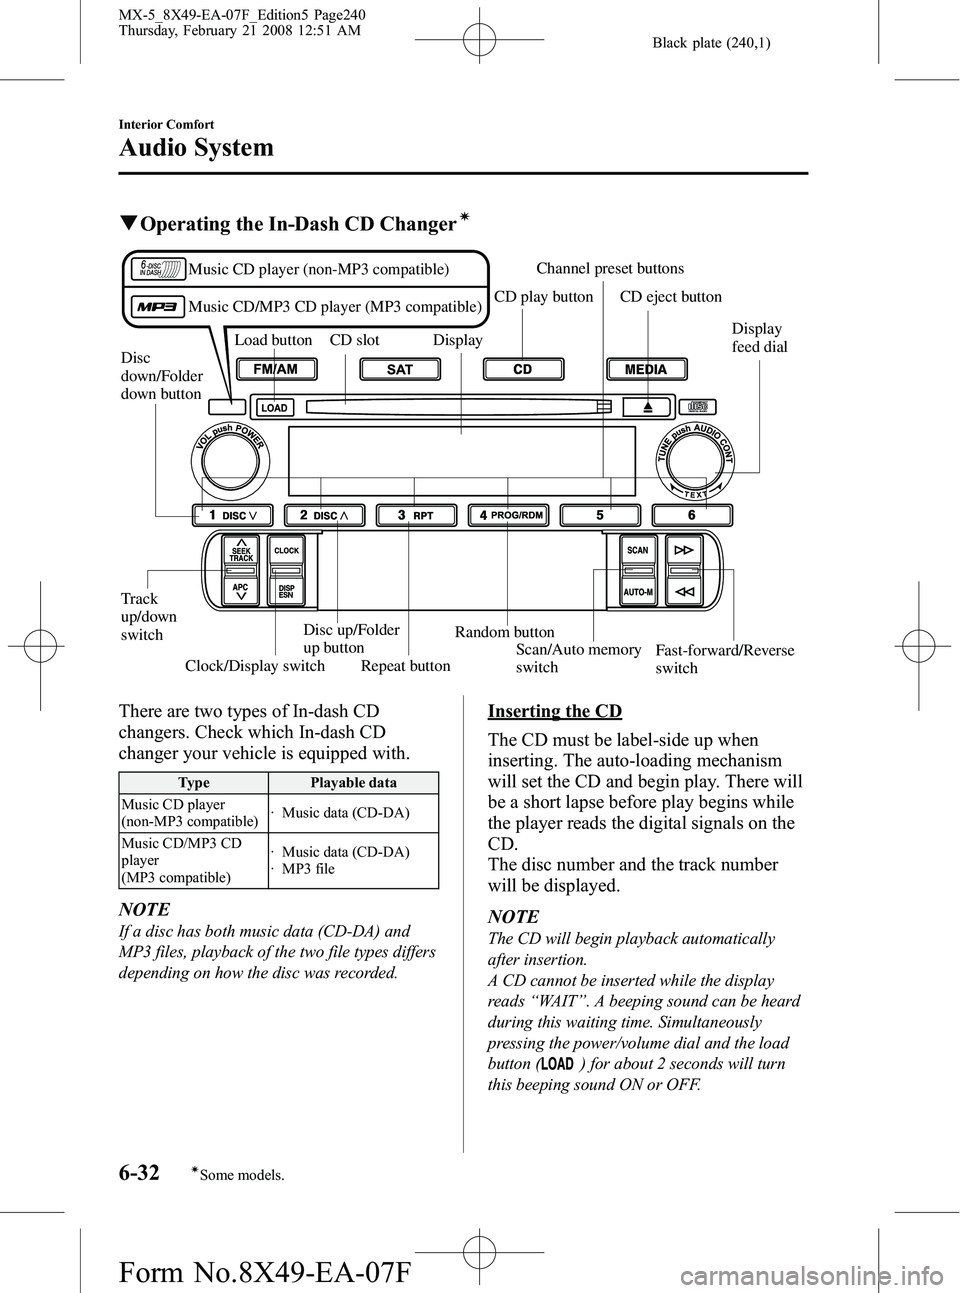
qOperating the In-Dash CD Changerí
Disc
down/Folder
down button Load button CD slot Display
CD play button
Channel preset buttons
CD eject button
Track
up/down
switch
Clock/Display switch Disc up/Folder
up button
Repeat button Random button
Scan/Auto memory
switch Fast-forward/Reverse
switch
Music CD player (non-MP3 compatible)
Music CD/MP3 CD player (MP3 compatible)
Display
feed dial
There are two types of In-dash CD
changers. Check which In-dash CD
changer your vehicle is equipped with.
Type
Playable data
Music CD player
(non-MP3 compatible) · Music data (CD-DA)
Music CD/MP3 CD
player
(MP3 compatible) · Music data (CD-DA)
· MP3 file
NOTE
If a disc has both music data (CD-DA) and
MP3 files, playback of the two file types differs
depending on how the disc was recorded.
Inserting the CD
The CD must be label-side up when
inserting. The auto-loading mechanism
will set the CD and begin play. There will
be a short lapse before play begins while
the player reads the digital signals on the
CD.
The disc number and the track number
will be displayed.
NOTE
The CD will begin playback automatically
after insertion.
A CD cannot be inserted while the display
reads
“WAIT ”. A beeping sound can be heard
during this waiting time. Simultaneously
pressing the power/volume dial and the load
button (
) for about 2 seconds will turn
this beeping sound ON or OFF.
6-32
Interior Comfort
íSome models.
Audio System
MX-5_8X49-EA-07F_Edition5 Page240
Thursday, February 21 2008 12:51 AM
Form No.8X49-EA-07F
Page 241 of 400

Black plate (241,1)
Normal insertion
1. Press the load button (
).
2. When “IN ”is displayed, insert the CD.
Inserting CDs into desired tray number
1. Press and hold the load button (
)
for about 2 seconds until a beep sound
is heard.
2. Press the channel preset button for the desired tray number while “WAIT ”is
displayed.
3. When “IN ”is displayed, insert the CD.
NOTE
The CD cannot be inserted to the desired tray
number if the number is already occupied.
Multiple insertion
1. Press and hold the load button (
)
for about 2 seconds until a beep sound
is heard.
2. When “IN ”is displayed, insert the CD.
3. When “IN ”is displayed again, insert
the next CD.
NOTE
The first-inserted CD will be played
automatically when:
lNo other CD is inserted within 15 seconds
after “IN ”is displayed.
lThe CD trays are full.
Displaying the CD-inserted tray
number
When you want to know the number for a
CD-inserted tray, press down the clock/
display switch. The tray number will be
displayed for 5 seconds.
Ejecting the CD
Normal ejection
1. Press the CD eject button (
). The
disc number and “DISC OUT ”will be
displayed.
2. Pull out the CD.
NOTE
When the CD is ejected during play, the next
CD will be played automatically.
Ejecting CDs from desired tray number
1. Press and hold the CD eject button (
)
for about 2 seconds until a beep sound
is heard.
The “DISC OUT ”display flashes.
2. Press the channel preset button for the desired CD number for less than 5
seconds after the beep sound is heard.
3. Pull out the CD.
Multiple ejection
1. Press and hold the CD eject button (
)
for about 2 seconds until a beep sound
is heard.
The “DISC OUT ”display flashes.
2. Pull out the CD, then the next CD will be ejected.
NOTE
lCDs will be ejected starting with the one
with the lowest number.
lAll CDs in the tray will be ejected
continuously.
lCDs can be ejected when the ignition
switch is off. Press and hold the CD eject
button (
) for about 2 seconds and all
CDs will eject.
Interior Comfort
Audio System
6-33
MX-5_8X49-EA-07F_Edition5 Page241
Thursday, February 21 2008 12:51 AM
Form No.8X49-EA-07F
Page 243 of 400

Black plate (243,1)
Random playback
Tracks are randomly selected and played.
During music CD playback
1. Press the random button (
) during
playback to play the tracks in the CD
randomly. “RDM ”is displayed.
2. Press the button again to cancel the random playback.
During MP3 CD playback
(Folder random)
1. Press the random button (
) during
playback to play the tracks in the folder
randomly. “RDM ”is displayed.
2. To cancel the random playback, press the button again after 3 seconds.
(CD random)
1. Press the random button (
) during
playback, and then press the button
again within 3 seconds to play the
tracks on the CD randomly. “RDM ”is
displayed.
2. Press the button again to cancel the random playback.
Switching the display (MP3 compatible
type)
Each time the clock/display switch is
pressed down during playback, the
display will switch in the following order. Music CD
Track number/Elapsed
time display
Disc tray number
File name display
Album name display Artist name display
MP3 CD
Folder number/Track
number Disc number/File
number/Elapsed
time display
Disc tray number
File name
Folder name
Album name (ID3 Tag) Song name (ID3 Tag)
Artist name (ID3 Tag)
NOTE
(MP3 CD)
This unit can only read English (including
numerals) one-byte characters. Depending on
the CD writing software used, proper display
may not be possible.
Interior Comfort
Audio System
6-35
MX-5_8X49-EA-07F_Edition5 Page243
Thursday, February 21 2008 12:51 AM
Form No.8X49-EA-07F
Page 246 of 400

Black plate (246,1)
Audio Control Switch
Operation (Steering Wheel)
í
When the audio unit is turned on,
operation of the audio unit from the
steering wheel is possible.
NOTE
Because the audio unit will be turned off under
the following conditions, the switches will be
inoperable.
lWhen the ignition switch is turned to the
LOCK position.
lWhen the power button on the audio unit is
pressed and the audio unit is turned off.
lWhen all CDs are ejected.
qAdjusting the Volume
To increase the volume, pull up the
volume switch.
To decrease the volume, press down the
volume switch.
qChanging the Source
Press the mode switch () to change
the audio source (FM1 radio> FM2 radio>
AM radio> CD player or CD changer>
SIRIUS1> SIRIUS2> SIRIUS3>
cyclical).
6-38
Interior Comfort
íSome models.
Audio System
MX-5_8X49-EA-07F_Edition5 Page246
Thursday, February 21 2008 12:51 AM
Form No.8X49-EA-07F
Page 247 of 400

Black plate (247,1)
NOTE
CD, CD changer, and SIRIUS digital satellite
radio modes cannot be selected in the
following cases:
lSIRIUS digital satellite radio unit is not
equipped on the audio system.
lCD has not been inserted.
qSeek Switch
When listening to the radio
Pull up or press down the seek switch, the
radio switches to the next/previous stored
station in the order that it was stored
(1― 6).
Pull up or press down the seek switch for
about 2 seconds until a beep sound is
heard to seek all usable stations at a
higher or lower frequency whether
programmed or not.
When playing a CD
Pull up the seek switch to skip to the next
track.
Press down the seek switch to repeat the
current track.
q Mute Switch
Press the mute switch () once to mute
audio, press it again to resume audio
output.
NOTE
lThe mute will be canceled in the following
cases:
lThe ignition switch is turned to the LOCK
position.
lThe power/volume dial is turned to ON.lThe mode switch is pressed to change to
another source.
lThe volume switch is operated.
Interior Comfort
Audio System
6-39
MX-5_8X49-EA-07F_Edition5 Page247
Thursday, February 21 2008 12:51 AM
Form No.8X49-EA-07F
Page 251 of 400

Black plate (251,1)
Storage Compartments
WARNING
Keep storage boxes closed when
driving:Driving with the storage boxes open
is dangerous. To reduce the
possibility of injury in an accident or
a sudden stop, keep the storage
boxes closed when driving.
CAUTION
Do not leave lighters or eyeglasses in
the storage boxes while parked under
the sun. A lighter could explode or
the plastic material in eyeglasses
could deform and crack from high
temperature.
qGlove Box
To open the glove box, pull the latch
toward you.
Insert the key (auxiliary key
*) and turn it
clockwise to lock, counterclockwise to
unlock.
* Advanced key equipped vehicle
Lock
Unlock
q Seat Side Box
To open, pull the release catch.
Insert the key and turn it clockwise to
lock, counterclockwise to unlock.
Lock
Unlock
qBack Trim Storage Boxí
Small items can be stored in the back trim
storage box.
With the lid Without the lid
To use the back trim storage box
1. To use the desired storage box, slide
the seat in front of it all the way
forward.
Refer to Seat Slide on page 2-2.
2. Fold the seatback forward all the way down.
Refer to Seat Recline on page 2-2.
Interior Comfort
Interior Equipment
6-43íSome models.
MX-5_8X49-EA-07F_Edition5 Page251
Thursday, February 21 2008 12:51 AM
Form No.8X49-EA-07F
Page 253 of 400

Black plate (253,1)
Windblocker
This windblocker reduces rear wind blast
into the cabin when driving with the
convertible top down.
To use the windblocker, lift it upright.
Interior Comfort
Interior Equipment
6-45
MX-5_8X49-EA-07F_Edition5 Page253
Thursday, February 21 2008 12:51 AM
Form No.8X49-EA-07F