MAZDA MODEL MX-5 MIATA RF 2022 Owners Manual
Manufacturer: MAZDA, Model Year: 2022, Model line: MODEL MX-5 MIATA RF, Model: MAZDA MODEL MX-5 MIATA RF 2022Pages: 503, PDF Size: 42.06 MB
Page 331 of 503

Tires
For reasons of proper performance, safety,
and better fuel economy, always maintain
recommended tire inflation pressures and
stay within the recommended load limits
and weight distribution.
WA R N I N G
Using Different Tire Types:
Driving your vehicle with different types of
tires is dangerous. It could cause poor
handling and poor braking; leading to loss
of control.
Except for the limited use of the temporary
spare tire, use only the same type tires
(radial, bias-belted, bias-type) on all four
wheels.
Using Wrong-Sized Tires:
Using any other tire size than what is
specified for the vehicle (page 9-9) is
dangerous. It could seriously affect ride,
handling, ground clearance, tire clearance,
and speedometer calibration. This could
cause you to have an accident. Use only
tires that are the correct size specified for
the vehicle.
▼ Tire Inflation Pressure
WA R N I N G
Always inflate the tires to the correct
pressure:
Overinflation or underinflation of tires is
dangerous. Adverse handling or
unexpected tire failure could result in a
serious accident.
Refer to Tires on page 9-9.
Use only a Mazda-genuine tire valve cap:
Use of a non-genuine part is dangerous as
the correct tire air pressure cannot be
maintained if the tire valve becomes
damaged. If the vehicle is driven under this
condition, the tire air pressure will decrease
which could result in a serious accident. Do
not use any part for the tire valve cap that
is not a Mazda-genuine part.
Inspect all tire pressures monthly when the
tires are cold. Maintain recommended
pressures for the best ride, handling, and
minimum tire wear.
Refer to the specification charts (page
9-9).
NOTE
Always check tire pressure when tires
are cold.
Warm tires normally exceed
recommended pressures. Do not release
air from warm tires to adjust the
pressure.
Underinflation can cause reduced fuel
economy, uneven and accelerated tire
wear, and poor sealing of the tire bead,
which will deform the wheel and cause
separation of tire from rim.
Overinflation can produce a harsh ride,
uneven and accelerated tire wear, and a
greater possibility of damage from road
hazards.
Keep your tire pressure at the correct
levels. If one frequen
tly needs inflating,
have it inspected.
Maintenance and Care
Owner Maintenance
6-34
MX-5_8KH8-EA-21K_Edition3_old 2021-11-10 13:10:56
Page 332 of 503

▼Tire Rotation
WARNING
Rotate tires periodically:
Irregular tire wear is dangerous. To
equalize tread wear for maintaining good
performance in handling and braking,
rotate the tires every 12,000 km (7,500
miles). However Mazda recommends to
rotate every 8,000 km (5,000 miles) to help
increase tire life and distribute wear more
evenly.
Refer to Scheduled Maintenance on page
6-4.
During rotation, inspect them for correct
balance.
Do not include (TEMPORARY USE ONLY)
spare tire in rotation.Forward
Also, inspect them for uneven wear and
damage. Abnormal wear is usually caused
by one or a combination of the following:
Incorrect tire pressure
Improper wheel alignment
Out-of-balance wheel
Severe braking
After rotation, inflate all tire pressures to
specification (page 9-9) and inspect the
lug nuts for tightness.
CAUTION
Rotate unidirectional tires and radial tires
that have an asymmetrical tread pattern or
studs only from front to rear, not from side
to side. Tire performance will be reduced if
rotated from side to side.
(With limited-slip differential)
Do not use the following:
Tires not of the designated size
Tires of different sizes or types at the
same time
Tires not sufficiently inflated
If these instructions are not followed, the
rotation of the left and right wheels will be
different and will thus apply a constant
load on the limited-slip differential.
This will cause a malfunction.
Maintenance and Care
Owner Maintenance
6-35
MX-5_8KH8-EA-21K_Edition3_old 2021-11-10 13:10:56
Page 333 of 503

▼Replacing a Tire
WA R N I N G
Always use tires that are in good condition:
Driving with worn tires is dangerous.
Reduced braking, steering, and traction
could result in an accident.
Replace all four tires at the same time:
Replacing just one ti
re is dangerous. It
could cause poor handling and poor
braking resulting in loss of vehicle control.
Mazda strongly recommends that you
replace all four tires at the same time.
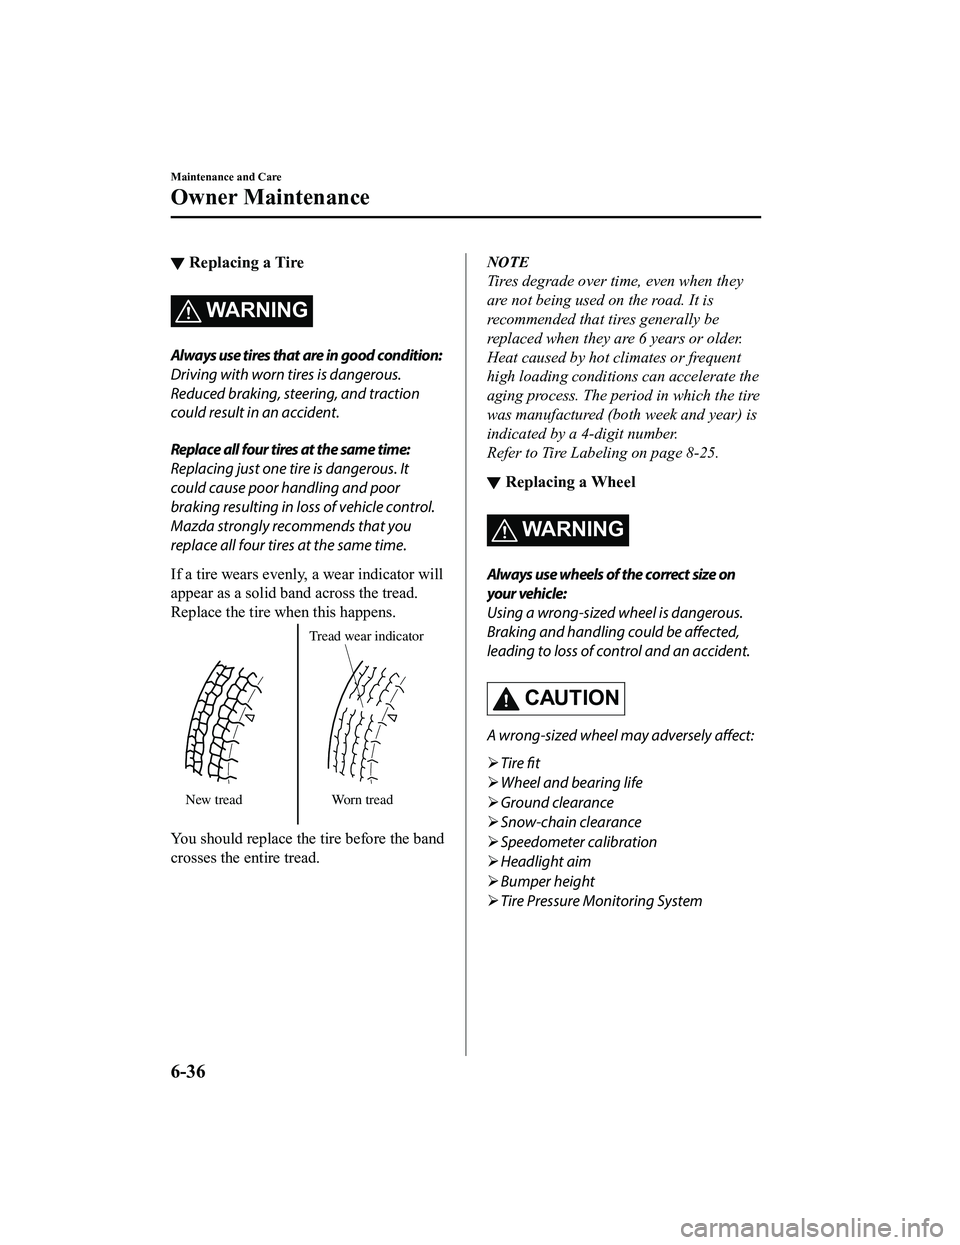
If a tire wears evenly, a wear indicator will
appear as a solid band across the tread.
Replace the tire when this happens.
New tread Tread wear indicator
Worn tread
You should replace the tire before the band
crosses the entire tread.
NOTE
Tires degrade over time, even when they
are not being used on the road. It is
recommended that tires generally be
replaced when they are 6 years or older.
Heat caused by hot climates or frequent
high loading conditions can accelerate the
aging process. The period in which the tire
was manufactured (both week and year) is
indicated by a 4-digit number.
Refer to Tire Labeling on page 8-25.
▼Replacing a Wheel
WA R N I N G
Always use wheels of the correct size on
your vehicle:
Using a wrong-sized wheel is dangerous.
Braking and handling could be
affected,
leading to loss of control and an accident.
CAUTION
A wrong-sized wheel may adversely affect:
Tire fit
Wheel and bearing life
Ground clearance
Snow-chain clearance
Speedometer calibration
Headlight aim
Bumper height
Tire Pressure Monitoring System
Maintenance and Care
Owner Maintenance
6-36
MX-5_8KH8-EA-21K_Edition3_old 2021-11-10 13:10:56
Page 334 of 503

NOTE
When replacing a wheel, make sure the
new one is the same as the original
factory wheel in diameter, rim width,
and offset (inset/outset).
For details, contact an Authorized
Mazda Dealer.
Proper tire balancing provides the best
riding comfort and helps reduce tread
wear. Out-of-balance tires can cause
vibration and uneven wear, such as
cupping and flat spots.
Maintenance and Care
Owner Maintenance
6-37
MX-5_8KH8-EA-21K_Edition3_old 2021-11-10 13:10:56
Page 335 of 503

Light Bulbs
Overhead lightSide turn signal lights
High-mount brake light
Trunk light
Front side-marker lights
Front turn signal lights
Headlights (Low/High beam)
Parking lights
Daytime running lights
License plate lights
Brake lights
Taillights
Rear side-marker lights
Reverse lights
Rear turn signal lights
Maintenance and Care
Owner Maintenance
6-38
MX-5_8KH8-EA-21K_Edition3_old
2021-11-10 13:10:56
Page 336 of 503

CAUTION
When removing the lens or lamp unit using a flathead screwdriver, make sure that the
flathead screwdriver does not contact the int erior terminal. If the flathead screwdriver
contacts the terminal, a short circuit may occur.
NOTE
To replace the bulb, contact an Authorized Mazda Dealer.
Use the protective cover and carton for the re placement bulb to dispose of the old bulb
promptly and out of the reach of children.
▼ Replacing Exterior Light Bulbs
Headlights, Daytime running lights
(LED type), Parkin
g lights, High-mount
brake light, Brake lights, Taillights
The LED bulb cannot be replaced as a
single unit because it is an integrated unit.
The LED bulb has to be replaced with the
unit. We recommend an Authorized
Mazda Dealer when the replacement is
necessary.
Daytime running lights (Bulb type)
1. Make sure the ignition is switched off,
and the headlight switch is off.
2. Pull the center of each plastic retainer
and remove the retainers.
Removal
Installation
3. Turn the screw counterclockwise andremove it, and then partially peel back
the mudguard.
4. Turn the socket and bulb assemblycounterclockwise and remove it.
5. Disconnect the bulb from the socket.
6. Install the new bulb in the reverseorder of the removal procedure.
Maintenance and Care
Owner Maintenance
6-39
MX-5_8KH8-EA-21K_Edition3_old 2021-11-10 13:10:56
Page 337 of 503

Front side-marker lights
1. Make sure the ignition is switched off,and the headlight switch is off.
2. If you are changing the right bulb, start the engine, turn the steering wheel all
the way to the right, and turn off
engine. If you are changing the left
bulb, turn the steering wheel to the left.
3. Pull the center of each plastic retainer and remove the retainers, and then
partially peel back the mudguard.
Removal
Installation
4. Turn the socket and bulb assemblycounterclockwise and remove it.
5. Disconnect the bulb from the socket.
6. Install the new bulb in the reverseorder of the removal procedure.
Front turn signal lights
1. Make sure the igniti on is switched off,
and the headlight switch is off.
2. If you are changing the right bulb, start the engine, turn the steering wheel all
the way to the right, and turn off
engine. If you are changing the left
bulb, turn the steering wheel to the left.
3. Pull the center of each plastic retainer and remove the retainers, and then
partially peel back the mudguard.
Removal
Installation
4. Disconnect the connector from the unitby pressing the tab on the connector
with your finger and pulling the
connector rearward.
Maintenance and Care
Owner Maintenance
6-40
MX-5_8KH8-EA-21K_Edition3_old 2021-11-10 13:10:56
Page 338 of 503

5. Turn the socket and bulb assemblycounterclockwise and remove it.
6. Disconnect the bulb from the socket.
7. Install the new bulb in the reverseorder of the removal procedure.
Side turn signal lights
1. Make sure the ignition is switched off, and the headlight switch is off.
2. If you are changing the right bulb, start the engine, turn the steering wheel all
the way to the right, and turn off
engine. If you are changing the left
bulb, turn the steering wheel to the left.
3. Pull the center of each plastic retainer
and remove the retainers, and then
partially peel back the mudguard.
Removal
Installation
4. Remove the unit by pressing the tab onthe unit with your finger and pulling
the unit forward.
5. Detach the electrical connector from
the unit by pulling it to the rear.
Maintenance and Care
Owner Maintenance
6-41
MX-5_8KH8-EA-21K_Edition3_old 2021-11-10 13:10:56
Page 339 of 503

6. Install the new side turn signal unit inthe reverse order of the removal
procedure.
Rear turn signal lights
1. Make sure the ignition is switched off, and the headlight switch is off.
2. Pull the center of each plastic retainer
and remove the retainers and the trunk
end trim.
Removal
Installation
3. Disconnect the connector from the unitby pressing the tab on the connector
with your finger and pulling the
connector downward.
4. Pull the center of each plastic retainerand remove the retainers, and then
partially peel back the trunk side trim.
Removal
Installation
Maintenance and Care
Owner Maintenance
6-42
MX-5_8KH8-EA-21K_Edition3_old 2021-11-10 13:10:56
Page 340 of 503

5. To provide a hole for inserting a fingerto remove the rear combination lamp
unit later in the procedure, pinch the
top and bottom of the grommet shown
in the figure and press it out of the hole
in the direction of the rear combination
lamp unit.
Grommet
Rear combination lamp
unit
Grommet
Body
6. Apply protective tape as shown in the
figure. Otherwise, the rear combination
lamp unit will contact the body and
may scratch or damage it.
Always apply three layers of protective
tape to the area indicated in the figure.
Protective tape
Rear combination
lamp unit
Area specifically in need
of protection
CAUTION
Do not use tape with strong adhesive
strength. Otherwise, the vehicle paint
may peel
off.
Always apply three layers of
protective tape to the area indicated
in the figure. Otherwise, the body
may become scratched or damaged
when pulling out the rear
combination lamp unit.
Maintenance and Care
Owner Maintenance
6-43
MX-5_8KH8-EA-21K_Edition3_old 2021-11-10 13:10:56