light MAZDA MODEL PROTÉGÉ 2001 (in English) Workshop Manual
[x] Cancel search | Manufacturer: MAZDA, Model Year: 2001, Model line: MODEL PROTÉGÉ, Model: MAZDA MODEL PROTÉGÉ 2001Pages: 290, PDF Size: 5.53 MB
Page 216 of 290

V Waxing
Your vehicle needs to be waxed when
water no longer beads on the finish.
Always wash and dry lhe v€hicle before
waxiog it.In addition to dre yehicle body,
wax ihe metal trim to mainrain ils lusier.
1 . Us€ wax whicb contains no abrasives.
waxes containing abrasive will
remove paint and could damage bright
metal parts.
2. Use a good grade of natural wax for
metallic. mica. and solid colors.
3- When waxing. coatevenly with the
sponge supplied ora soft cloth.
4. Wipe off lhe wax wilh a sofl cloih.
NOTE
A spoa remover to remove oil, tar. and
similar materials will usually also take
off the wax, Rewax these areas even if
the rest of the vehicle doesn't need it.
A wanlsnsc
Diyins dth Wet Brakes:
Driving with wet brukes is
dang e rc us. I nc rc a s e d s topping
distance or the vehicle pulling to one
sLle rhe btukittg coud rcsultin a
serious a.cilent. Light braki g N)iIL
indicate whether the brukes hat e
been alIe.ted. Dry the brakes bt
diving very slovlr and applying the
brakes Eshtlr until brake
peforntnce ir nornat.
7-6
Page 218 of 290

Appearance Care
I Aluminum Wheel Mainr€nance
A protective coating is provided over the
aluminun wheets. Special care is needed
to prot€ct this coating.
A waRlrnrc
Dn inr flith Wet Brukes:
Drhing with wet brukes is
dang e rcus. I nc rc a s e.l s topping
dbtance or the l'ehicle p IIi gtoo e
sde vhen brukins couA result in a
serinus accident. Light bruking wil
indicate whether the b&kes haye
bee allected- Dry the brakes br
diring w.r slowlr and appbing the
btukes ligh r u til bruke
perlomance k notnaL
NOTE
Don't use a wire brush or any
abrasive clear,er. poiishing
compound. or solvent on aluminum
wheeh. They may damage tbe
coanng,
only use a mild soap or neutral
detergent and always use a sponge
or soft cloth to ciean the wheels.
Rinse $oroughly with lukewarm
or cold water. Also, be sure to
clean ihe whe€ls after driving on
dusty or salted roads. This helps
Avoid washing your vehicle in an
automatic car wash that uses
high-speed or hard bnrshes.
If your aluminum whe€ls lose
lustet wax lhe wheels.
7-8
Page 231 of 290

Maintenance
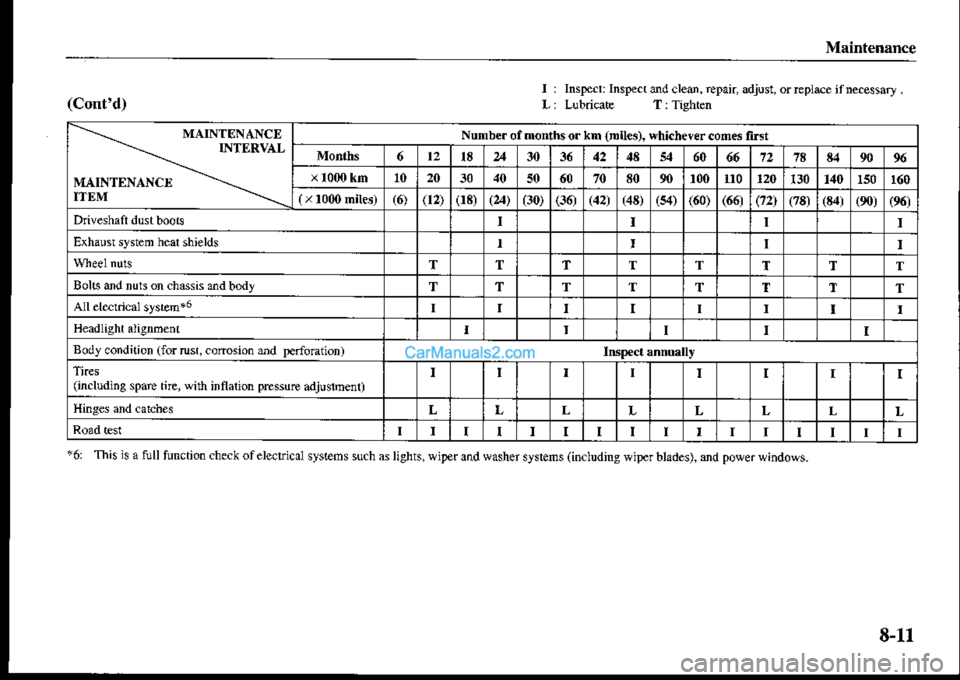
(cont'd)I:
L:
Inspccr: Inspect @d cled. epair, adjust, or replee ir necessary .LubricaF T: Tighten
"6i This h a full function check ofelcctrical sts|eds such as lights, qiper and washer sysGns (including riper bladet, md poser*indows.
MAINTENANCDINTERVAL
MAINTENANCI]ITEM
Nnmbe. of months or km lnlles). whichever con6 fNt
6t2l8u30425460667a8il9096
1020305070801001101201J0140150160
o2)(13)(a)(30)(36)(12)(48)(s4)(60)(66)o2J(78)(84)(901(96)
II
Exhaust sy$en hcar shieldsII
TTTTTTTT
Bults eJ nuL on chsesrd bftltTTTTTT1T
IIII
IIIII
Body condition (for rust, corcsion bd Frioniion)
(including spae dE, *idl inflation pEsue adjusmenoIIIIT
LLLLLLLL
IIIIIIITI
8-ll
Page 256 of 290

Maintenance
V Temporary spsre tire
Insp€cl the temporary spare tire at least
monthly to make sure it's properly
inflated and stored.
The temporary spare tirc js easier to
handte because of its constuction. lt is
lighter and smaller than a conventional
tire and should be used only for an
em€rgency and onty for a short distance.
Use ihe lemporary only until the
conventional tire is repaired, which
shouldbe as soon as possible.
Maintain its pressure at,120 kPa (60 psi).
A wanlsnrc
WornTires:
D6'ing vith won tires isdangercus.
Reduc e d b rukins, stee ins, and
truction could rcsult in M accident
Ali'ars L\e tires thal are in good
AcaurroN
. Don'tuse your temporary spare
tire rim with a snow tire or a
conventional tire. Neither will
properly fit and could drmage both
iire and rim.
. The temporary spare tire has a
tread life of up to 4,8tJo km (3,000
niles), depending on road
conditions and driving habits.
. Wlen the tread wear solid-band
indicator appears, replace the tire
wilh the sarne type of temporary
spare.
Page 257 of 290

Maini€nance
AclurroN
A wrong sized wheel may adYersely
affect
. Tire fit
. wleel and bearing life
. Ground clearance
. Snow chainclearance
. Speedometer calibration
. Headlight aim
V Replacing a wheel
When replacing a wheel, male sure the
new one is the same as the original
Iactory wheel in diameter, rim width, and
oflsel.
Proper tire balancing provides the best
riding comfort and helps reduce tread
wear. Oul of'balance tires can cause
vibration and uneven wear, such as
cupping and flat spots.
Do nol louch tne glass surface
I Replacing a Headlight Bulb
Your Mazda's headlights have
replaceabl€ halogen bulbs.A wamrnrc
asinr a wrcns-Sized Wheel:
Asing a turong-si&d wheel is
dangem s. Brakw and hantrline
couu be aflected,leani g to loss of
contrcl and an accuent. Alwars ute
wheels of the coftect ske on rour
Page 258 of 290

Maintenance
A IyARNING
ChiUrc and Halogen B lbs:
Plati tg 'a'ith a halogen bulb i
dansenus. Serious Aunes couu be
ctused br dnpping o halogen bulb
or brcakine i.t sone other war.
Afuals kzep halogen bulbs out of the
Awz.nuntc
H a n d li n g H ato eLg-!!lbt;
When a halogen bulb breaks, it is
dangerous. These bulbs contain
pftssunaed gas. If o eisbrok.n,it
wi explode and seious injuries
could be caused bt the lbittg glars.
If the glass pottion is touched vith
baft hands, bod| oil coua cause the
bulbtoow eat and explode when
Iit. Net,et touch the glass pottion of
the bulb if ith jou. ba.e hon.ls and
alpaJs wear ete pmtection whe
handlins ot workins anund halosen
bulbs.
\
r>.t
L Make sure $e headlight switch is off.
2. Lift the hood and find the bulb in lhe
rear ofthe headtight body.
3. Detach the electsical connector from
the bulb by squeezing the tabs and
pulling it to the rear.
Page 260 of 290

Maintenance
I Replacing a Bulb (Front)
Fmnt-turn signal lights/
--'9:
To replace the fog light bulbs, contact an Authorized Mazda Dealer
The number in ( ) shows the bulb number
8-40
Page 261 of 290

Maintenance
I Replacing a Bulb (Interior)
O Interior light (Type B) 8w (-)
@ Map light (t'pe B) sw (-)
Page 262 of 290

Maintenance
*ffi)ffi
ffivW
uffi+ffi
ffi+W
I Rear Bulb Acc€ss
To replace the tun-signal light,brake
lighytaillight, side-marker light or
back-up ligbt bulb, the trunk end trim
must be removed and ihe insid€ cover
must be partially opened.
1. Pull the center section of tle plastic
reiainer and remove rhe retainers and
the trunk end trim.
2. Remove the inside cover's plastic
retainers and partially open the inside
a-42
Page 263 of 290

I Replacing a Bulb (Rear)
O Brske lightvTaillights 2r6w (7u3)
@ Rear-side marker lights 3.8W (194)@ ReaFtum signal lights 21W (-)
2rw (1uo)
O,W
!?*
*ffi
2-
Th€ numb€r in ( ) shows fie buib number.