MAZDA MODEL RX 8 2009 Owners Manual (in English)
Manufacturer: MAZDA, Model Year: 2009, Model line: MODEL RX 8, Model: MAZDA MODEL RX 8 2009Pages: 430, PDF Size: 4.9 MB
Page 251 of 430
Black plate (251,1)
(How to clear the message)lPress any of the following FM/AM,
SAT, CD, MEDIA, CAT, ESN/DISP,
Instant replay, POWER buttons.
lTurn the ACC off or insert a CD.
NOTE
lIf an ID code is not input for 10 seconds,
“ Err ”is displayed and it returns to the
former display.
lChannel preset buttons 1, 2, 3, 4 and the
auto memory button are used for input of
the ID code. Buttons 5 and 6 cannot be
used.
Individual channel locking
If a channel is locked, the channel is
muted.
NOTE
If the registered ID code is forgotten, return
the ID code to the default [0000]. (See
“ INTIALIZATION OF ID CODE” section)
(Locking a channel)
1. Select a channel to be locked by
pressing the tune button.Example:
Select channel 100
(Registered ID code input preparation)
2. Hold the auto memory button, then press channel preset button 6, hold
both buttons together for 1.5 seconds.
3. “ENTER PIN ”appears for 2 seconds
which indicates that it is in code input
mode.
4. “SR1 - - - - ”appears which indicates
that it is ready for code input. (Registered ID code input)
5. Input the registered ID code using
channel preset buttons 1-4. Example: If
the registered ID code is “2323 ”, input
“ 2323 ”. At this time “SR1 2323 ”is
displayed. Press the auto memory
button after the code is input.
(Registered ID code input
determination)
6. Determine the code which has been input by pressing the auto memory
button briefly.
7. If it does not match the registered code, “SR1 Err ”is displayed and then it
returns to “SR1 - - - - ”.
8. If it matches the registered code, “SR1 LOCK ”appears for 3 seconds
which indicates that the code input has
been completed.
9. “SR1 LOCK 100 ”appears which
indicates that the parental lock is
activated. At this time, mute is on and
no sound is heard.
(How to clear the message)
lPress any of the following FM/AM,
SAT, CD, MEDIA, CAT, ESN/DISP,
Instant replay, POWER buttons.
lTurn the ACC off or insert a CD.
NOTE
lIf an ID code is not input for 10 seconds,
“ Err ”is displayed and it returns to the
former display.
lChannel preset buttons 1, 2, 3, 4 and the
auto memory button are used for input of
the ID code. Buttons 5 and 6 cannot be
used.
Lock cancellation
Setting condition: SAT mode
Interior Comfort
Audio System
6-43
RX-8_8Z09-EA-08C_Edition3 Page251
Thursday, July 3 2008 2:23 PM
Form No.8Z09-EA-08C
Page 252 of 430
Black plate (252,1)
(Releasing a locked channel)
1. Select a channel to be released bypressing the tune button. Example:
Select the locked channel (i.e. 100). At
this time, “SR1 LOCK 100 ”is
displayed.
(Registered ID code input preparation)
2. Hold the auto memory button, then press channel preset button 6, hold
both buttons together for 1.5 seconds.
3. “ENTER PIN ”appears for 2 seconds
which indicates that it is in code input
mode.
4. “SR1 - - - - ”appears, which indicates
that it is ready for code input.
(Registered ID code input)
5. Input the registered ID code using channel preset buttons 1-4. Example:
When the registered ID code is “2323 ”,
input “2323 ”. At this time “SR1 2323 ”
is displayed. Press the auto memory
button after the code is input.
NOTE
If “Err ”is displayed, go to the
“ INITIALIZATION OF ID CODE” section to
reset the ID code to [0000].
(Registered ID code input
determination)
6. Determine the input code by pressing the auto memory button briefly.
7. If it does not match the registered code, “SR1 Err ”is displayed and then it
returns to “SR1 - - - - ”.
8. If it matches the registered code, “SR1 UNLOCK ”appears for 3
seconds which indicates that the code
input has been completed. 9.
“SR1 100 ”appears which indicates that
the parental lock is off. At this time,
sound is heard.
(How to clear the message)
lPress any of the following FM/AM,
SAT, CD, MEDIA, CAT, ESN/DISP,
Instant replay, POWER buttons.
lTurn the ACC off or insert a CD.
NOTE
lIf an ID code is not input for 10 seconds,
“ Err ”is displayed and it returns to the
former display.
lChannel preset buttons 1, 2, 3, 4 and the
auto memory button are used for input of
the ID code. Buttons 5 and 6 cannot be
used.
Error signs
(1) Depending on the surrounding conditions (such as large trees,
buildings, or tunnels) and special
weather conditions, the reception of
SIRIUS radio waves may be
decreased or temporarily interrupted.
“ACQUIRING SIGNAL” may
appear.
(2) In case of an antenna malfunction, “ANTENNA FAIL” is displayed.
Check the satellite radio antenna,
antenna cable and DLP antenna
connector.
NOTE
If a broken DLP* unit is replaced with a new
unit, cancel the license for the broken unit and
make sure to carry out new registration for the
replaced unit. If the license for the broken unit
is not canceled, you will be charged a
reception fee for both units.
* DLP: Down Link Processor (SATELLITE RADIO Module)
6-44
Interior Comfort
Audio System
RX-8_8Z09-EA-08C_Edition3 Page252
Thursday, July 3 2008 2:23 PM
Form No.8Z09-EA-08C
Page 253 of 430
Black plate (253,1)
MEMO
6-45
RX-8_8Z09-EA-08C_Edition3 Page253
Thursday, July 3 2008 2:23 PM
Form No.8Z09-EA-08C
Page 254 of 430
Black plate (254,1)
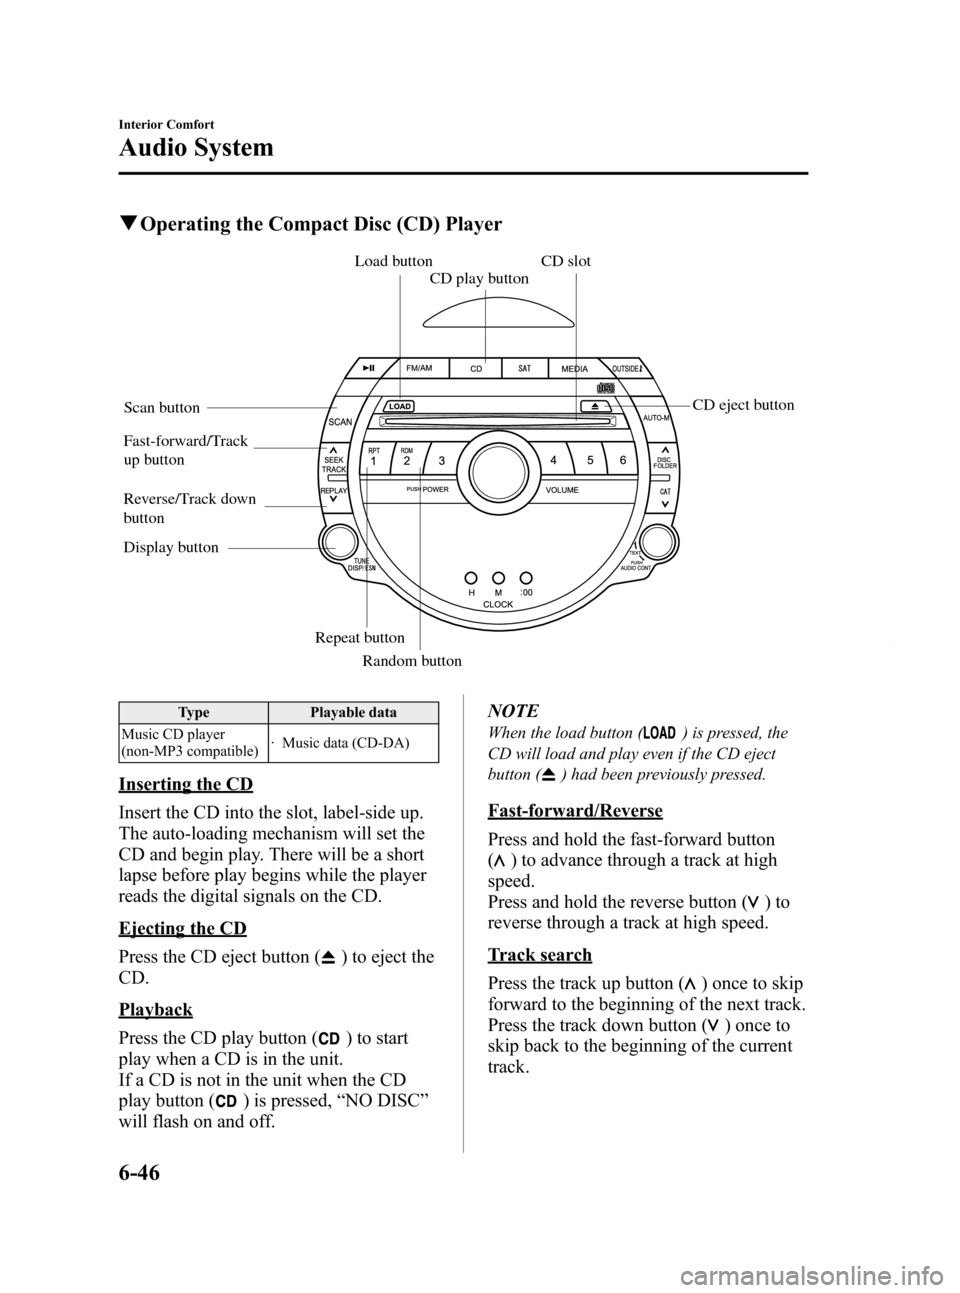
qOperating the Compact Disc (CD) Player
Fast-forward/Track
up button
Reverse/Track down
button Load button
CD slot
CD play button
Display button Repeat buttonRandom button
Scan button
CD eject button
Type
Playable data
Music CD player
(non-MP3 compatible) · Music data (CD-DA)
Inserting the CD
Insert the CD into the slot, label-side up.
The auto-loading mechanism will set the
CD and begin play. There will be a short
lapse before play begins while the player
reads the digital signals on the CD.
Ejecting the CD
Press the CD eject button (
) to eject the
CD.
Playback
Press the CD play button (
) to start
play when a CD is in the unit.
If a CD is not in the unit when the CD
play button (
) is pressed, “NO DISC ”
will flash on and off. NOTE
When the load button () is pressed, the
CD will load and play even if the CD eject
button (
) had been previously pressed.
Fast-forward/Reverse
Press and hold the fast-forward button
(
) to advance through a track at high
speed.
Press and hold the reverse button (
)to
reverse through a track at high speed.
Track search
Press the track up button (
) once to skip
forward to the beginning of the next track.
Press the track down button (
)onceto
skip back to the beginning of the current
track.
6-46
Interior Comfort
Audio System
RX-8_8Z09-EA-08C_Edition3 Page254
Thursday, July 3 2008 2:23 PM
Form No.8Z09-EA-08C
Page 255 of 430
Black plate (255,1)
Music scan
This feature helps to find a program by
playing about the first 10 seconds of each
track.
Press the scan button (
) during
playback to start the scan play operation
(the track number will flash).
Press the scan button (
) again to
cancel scan playback.
NOTE
If the unit is left in scan, normal playback will
resume where scan was selected.
Repeat playback
This feature makes it possible to listen to
a selection repeatedly.
Press the repeat button (
) during
playback. The current selection will be
repeated ( “RPT ”will be displayed).
Press the repeat button (
) once again
to cancel repeat playback.
Random playback
This feature allows the CD player to
randomly select the order of the songs.
Press the random button (
) during
playback. The next selection will be
randomly selected ( “RDM ”will be
displayed).
Press the random button (
) once
again to cancel random playback.
Message display
If “CHECK CD ”is displayed, it means
that there is some CD malfunction. Check
the CD for damage, dirt, or smudges, and
then properly reinsert. If the message
appears again, take the unit to an
Authorized Mazda Dealer for service.
Interior Comfort
Audio System
6-47
RX-8_8Z09-EA-08C_Edition3 Page255
Thursday, July 3 2008 2:23 PM
Form No.8Z09-EA-08C
Page 256 of 430
Black plate (256,1)
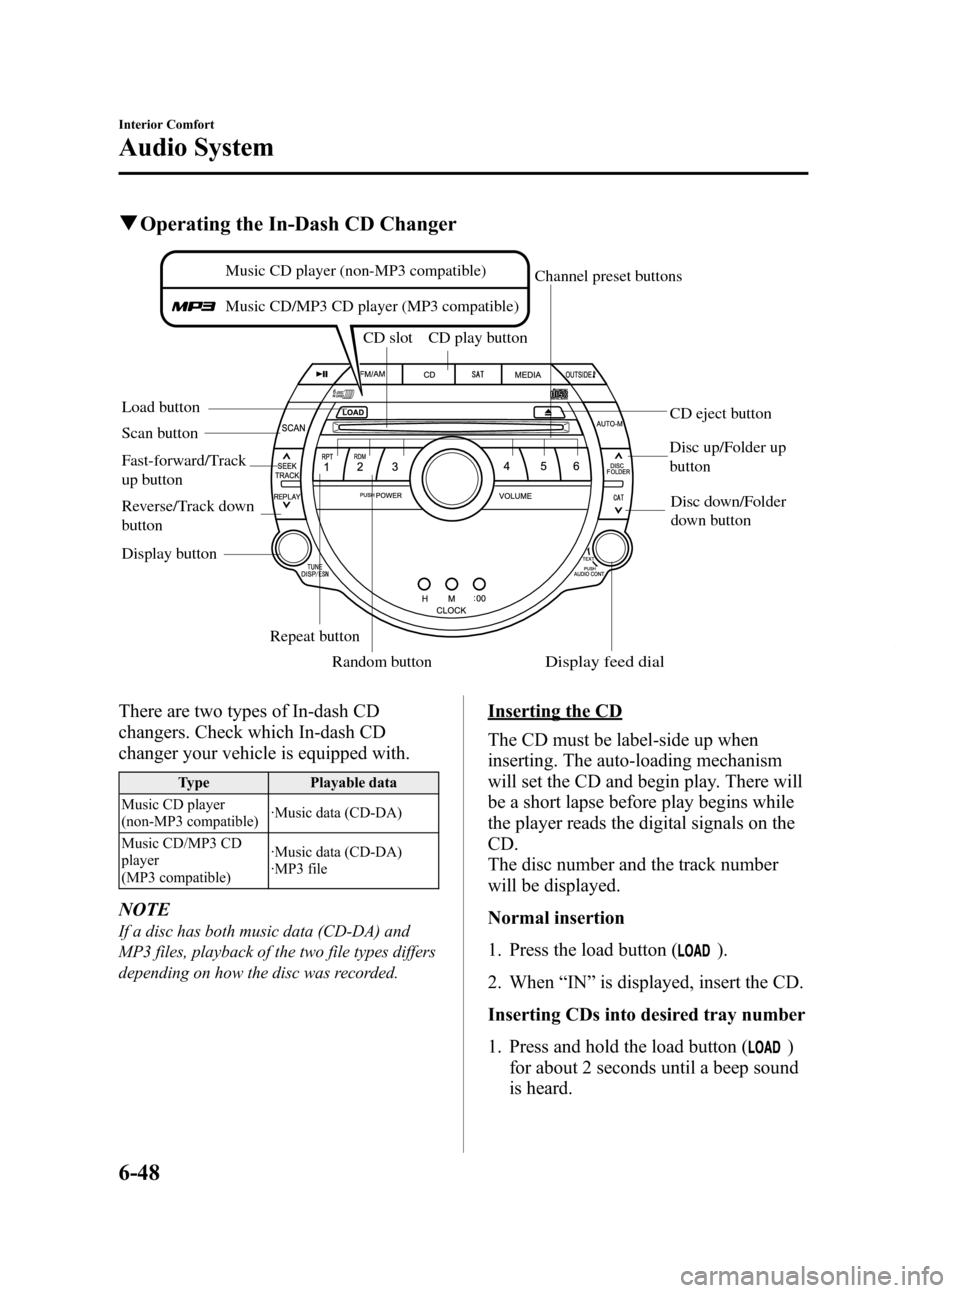
qOperating the In-Dash CD Changer
Load button CD slot CD play button
Display button Repeat buttonRandom button
Scan button
CD eject button
Channel preset buttons
Disc down/Folder
down button
Disc up/Folder up
button
Music CD player (non-MP3 compatible)
Music CD/MP3 CD player (MP3 compatible)
Fast-forward/Track
up button
Reverse/Track down
button
Display feed dial
There are two types of In-dash CD
changers. Check which In-dash CD
changer your vehicle is equipped with.
Type Playable data
Music CD player
(non-MP3 compatible) ·Music data (CD-DA)
Music CD/MP3 CD
player
(MP3 compatible) ·Music data (CD-DA)
·MP3 file
NOTE
If a disc has both music data (CD-DA) and
MP3 files, playback of the two file types differs
depending on how the disc was recorded.
Inserting the CD
The CD must be label-side up when
inserting. The auto-loading mechanism
will set the CD and begin play. There will
be a short lapse before play begins while
the player reads the digital signals on the
CD.
The disc number and the track number
will be displayed.
Normal insertion
1. Press the load button (
).
2. When “IN ”is displayed, insert the CD.
Inserting CDs into desired tray number
1. Press and hold the load button (
)
for about 2 seconds until a beep sound
is heard.
6-48
Interior Comfort
Audio System
RX-8_8Z09-EA-08C_Edition3 Page256
Thursday, July 3 2008 2:23 PM
Form No.8Z09-EA-08C
Page 257 of 430
Black plate (257,1)
2. Press the channel preset button for thedesired tray number while “WAIT ”is
displayed.
3. When “IN ”is displayed, insert the CD.
NOTE
The CD cannot be inserted to the desired tray
number if the number is already occupied.
Multiple insertion
1. Press and hold the load button (
)
for about 2 seconds until a beep sound
is heard.
2. When “IN ”is displayed, insert the CD.
3. When “IN ”is displayed again, insert
the next CD.
NOTE
The first-inserted CD will be played
automatically when:
lNo other CD is inserted within 15 seconds
after “IN ”is displayed.
lThe CD trays are full.
Displaying the CD-inserted tray
number
When you want to know the number for a
CD-inserted tray, press the display button
(
). The tray number will be displayed
for 5 seconds.
Ejecting the CD
Normal ejection
1. Press the CD eject button (
). The
disc number and “DISC OUT ”will be
displayed.
2. Pull out the CD.
NOTE
When the CD is ejected during play, the next
CD will be played automatically.
Ejecting CDs from desired tray number
1. Press and hold the CD eject button (
)
for about 2 seconds until a beep sound
is heard.
The “DISC OUT ”display flashes.
2. Press the channel preset button for the desired CD number for less than 5
seconds after the beep sound is heard.
3. Pull out the CD.
Multiple ejection
1. Press and hold the CD eject button (
)
for about 2 seconds until a beep sound
is heard.
The “DISC OUT ”display flashes.
2. Press the CD eject button (
) again
for less than 5 seconds after the beep
sound is heard.
NOTE
If the button is not pressed and about 5
seconds have elapsed while “DISC OUT ”is
flashing, CDs are automatically ejected.
3. Pull out the CD, then the next CD will be ejected.
NOTE
lCDs will be ejected starting with the one
with the lowest number.
lAll CDs in the tray will be ejected
continuously.
lCDs can be ejected when the ignition
switch is off. Press and hold the CD eject
button (
) for about 2 seconds and all
CDs will eject.
Playback
Press the CD play button (
) to start
play when a CD is in the unit.
If a CD is not in the unit when the CD
play button (
) is pressed, “NO DISC ”
will flash on and off.
Interior Comfort
Audio System
6-49
RX-8_8Z09-EA-08C_Edition3 Page257
Thursday, July 3 2008 2:23 PM
Form No.8Z09-EA-08C
Page 258 of 430
Black plate (258,1)
Fast-forward/Reverse
Press and hold the fast-forward button
(
) to advance through a track at high
speed.
Press and hold the reverse button (
)to
reverse through a track at high speed.
Track search
Press the track up button (
) once to skip
forward to the beginning of the next track.
Press the track down button (
)onceto
skip back to the beginning of the current
track.
Disc search
During music CD playback
To change the disc, press the DISC button
(
or) during playback.
During MP3 CD playback
To change the disc, press the DISC button
(
or) for 1.5 seconds or more during
playback.
Folder search (during MP3 CD
playback)
To change to the previous folder, press the
folder down button (
) for less than 1.5
seconds, or press the folder up button (
)
for less than 1.5 seconds to advance to the
next folder.
Music scan
This feature helps to find a program by
playing about the first 10 seconds of each
track.
Press the scan button (
) during
playback to start the scan play operation
(the track number will flash).
Press the scan button (
) again to
cancel scan playback. NOTE
If the unit is left in scan, normal playback will
resume where scan was selected.
Repeat playback
During music CD playback
1. Press the repeat button (
) during
playback to play the current track
repeatedly. “RPT ”is displayed.
2. Press the button again to cancel the repeat playback.
During MP3 CD playback
(Track repeat)
1. Press the repeat button (
) during
playback to play the current track
repeatedly. “TRACK RPT ”is
displayed.
2. To cancel the repeat playback, press the button again after 3 seconds.
(Folder repeat)
1. Press the repeat button (
) during
playback, and then press the button
again within 3 seconds to play the
tracks in the current folder repeatedly.
“ FOLDER RPT ”is displayed.
2. Press the button again to cancel the repeat playback.
Random playback
Tracks are randomly selected and played.
During music CD playback
1. Press the random button (
) during
playback to play the tracks in the CD
randomly. “RDM ”is displayed.
2. Press the button again to cancel the random playback.
6-50
Interior Comfort
Audio System
RX-8_8Z09-EA-08C_Edition3 Page258
Thursday, July 3 2008 2:23 PM
Form No.8Z09-EA-08C
Page 259 of 430
Black plate (259,1)
During MP3 CD playback
(Folder random)
1. Press the random button (
) during
playback to play the tracks in the folder
randomly. “FOLDER RDM ”is
displayed.
2. To cancel the random playback, press the button again after 3 seconds.
(CD random)
1. Press the random button (
) during
playback, and then press the button
again within 3 seconds to play the
tracks on the CD randomly.
“ DISC RDM ”is displayed.
2. Press the button again to cancel the random playback.
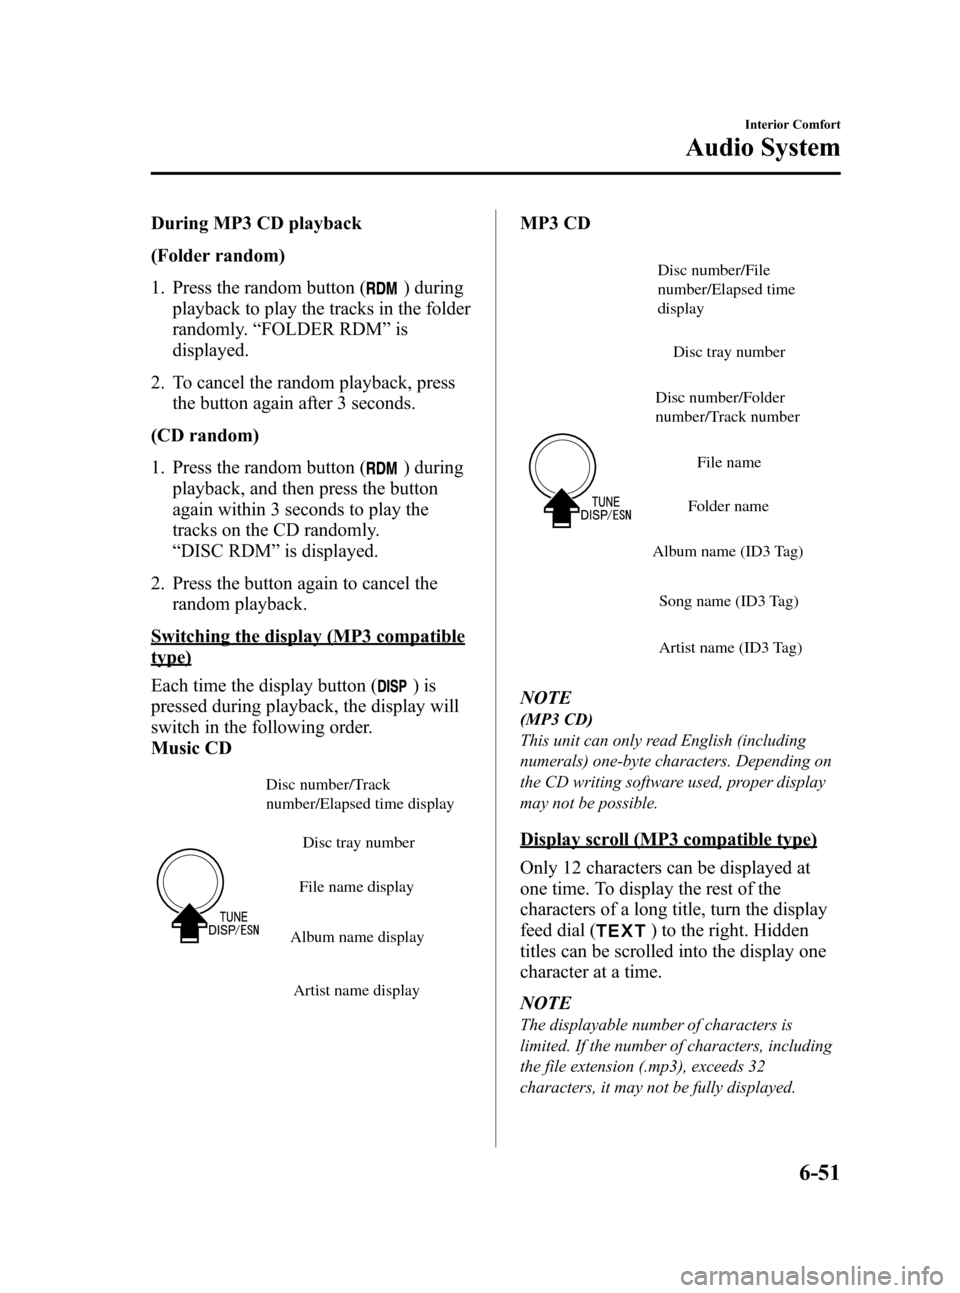
Switching the display (MP3 compatible
type)
Each time the display button (
)is
pressed during playback, the display will
switch in the following order.
Music CD
Disc number/Track
number/Elapsed time display
Disc tray number
File name display
Album name display
Artist name display
MP3 CD
Disc number/Folder
number/Track numberDisc number/File
number/Elapsed time
display
Disc tray number
File name
Folder name
Album name (ID3 Tag)
Song name (ID3 Tag)
Artist name (ID3 Tag)
NOTE
(MP3 CD)
This unit can only read English (including
numerals) one-byte characters. Depending on
the CD writing software used, proper display
may not be possible.
Display scroll (MP3 compatible type)
Only 12 characters can be displayed at
one time. To display the rest of the
characters of a long title, turn the display
feed dial (
) to the right. Hidden
titles can be scrolled into the display one
character at a time.
NOTE
The displayable number of characters is
limited. If the number of characters, including
the file extension (.mp3), exceeds 32
characters, it may not be fully displayed.
Interior Comfort
Audio System
6-51
RX-8_8Z09-EA-08C_Edition3 Page259
Thursday, July 3 2008 2:23 PM
Form No.8Z09-EA-08C
Page 260 of 430
Black plate (260,1)
Message display
If“CHECK CD ”is displayed, it means
that there is some CD malfunction. Check
the CD for damage, dirt, or smudges, and
then properly reinsert. If the message
appears again, take the unit to an
Authorized Mazda Dealer for service.
q Operating the Auxiliary jack
You can connect portable audio units or
similar products on the market to the
auxiliary jack to listen to music or audio
over the vehicle's speakers, refer to
Auxiliary Input (page 6-56).
6-52
Interior Comfort
Audio System
RX-8_8Z09-EA-08C_Edition3 Page260
Thursday, July 3 2008 2:23 PM
Form No.8Z09-EA-08C