lights MAZDA MODEL RX 8 2010 (in English) Service Manual
[x] Cancel search | Manufacturer: MAZDA, Model Year: 2010, Model line: MODEL RX 8, Model: MAZDA MODEL RX 8 2010Pages: 438, PDF Size: 7.02 MB
Page 209 of 438

Black plate (209,1)
Horn
To sound the horn, press themark on
the steering wheel.
Hazard Warning Flasher
The hazard warning lights should always
be used when you stop on or near a
roadway in an emergency.
The hazard warning lights warn other
drivers that your vehicle is a traffic hazard
and that they must take extreme caution
when near it.
Hazard warning flasher
Depress the hazard warning flasher and all
the turn signals will flash.
NOTE
lThe turn signals do not work when the
hazard warning lights are on.
lCheck local regulations about the use of
hazard warning lights while the vehicle is
being towed to verify that it is not in
violation of the law.
Driving Your Mazda
Switches and Controls
5-67
RX-8_8AT5-EA-09E_Edition1 Page209
Wednesday, April 15 2009 10:33 AM
Form No.8AT5-EA-09E
Page 212 of 438
Black plate (212,1)
5. Press and hold the just-trained
HomeLink button and observe the
indicator light.
If the indicator lightstays on constantly,
programming is completeand your
device should activate when the
HomeLink button is pressed and released.
NOTE
To program the remaining two HomeLink
buttons, begin with“Programming”―step 2.
Do not repeat step 1.
If the indicator light blinksrapidly for
two seconds and then turns to a
constant light, continue with
“Programming”steps 6―8to complete
the programming of a rolling code
equipped device (most commonly a
garage door opener).
6. At the garage door opener receiver
(motor-head unit) in the garage, locate
the“learn”or“smart”button. This can
usually be found where the hanging
antenna wire is attached to the motor-
head unit.
7. Firmly press and release the“learn”or
“smart”button. (The name and color of
the button may vary by manufacturer.)
NOTE
There are 30 seconds in which to initiate step
8.
8. Return to the vehicle and firmlypress,
hold for two seconds and releasethe
programmed HomeLink button. Repeat
the“press/hold/release”sequence a
second time, and, depending on the
brand of the garage door opener (or
other rolling code equipped device),
repeat this sequence a third time to
complete the programming process.HomeLink should now activate your
rolling code equipped device.
NOTE
To program the remaining two HomeLink
buttons, begin with“Programming”―step 2.
Do not repeat step 1.
For questions or comments, please contact
HomeLink atwww.homelink.comor1-
800-355-3515.
qGate operator/Canadian
Programming
Canadian radio-frequency laws require
transmitter signals to“time-out”(or quit)
after several seconds of transmission―
which may not be long enough for
HomeLink to pick up the signal during
programming. Similar to this Canadian
law, some U.S. gate operators are
designed to“time-out”in the same
manner.
If you live in Canada or you are having
difficulties programming a gate operator
by using the“Programming”procedures
(regardless of where you live),replace
“Programming HomeLink”step 3with
the following:
NOTE
If programming a garage door opener or gate
operator, it is advised to unplug the device
during the“cycling”process to prevent
possible overheating.
5-70
Driving Your Mazda
Switches and Controls
RX-8_8AT5-EA-09E_Edition1 Page212
Wednesday, April 15 2009 10:33 AM
Form No.8AT5-EA-09E
Page 215 of 438
Black plate (215,1)
6Interior Comfort
Use of various features for drive comfort, including air-conditioning and audio
system.
Climate Control System ............................................................... 6-2
Operating Tips ........................................................................... 6-2
Vent Operation .......................................................................... 6-3
Types of the Climate Control System ....................................... 6-5
Manual Type ............................................................................. 6-6
Fully Automatic Type ............................................................. 6-11
Audio System ............................................................................... 6-15
Antenna ................................................................................... 6-15
Operating Tips for Audio System ........................................... 6-15
Audio Set ................................................................................ 6-25
Audio Control Switch Operation ............................................ 6-52
AUX Mode (Auxiliary input) ................................................. 6-54
Safety Certification ................................................................. 6-56
Bluetooth Hands-Free ................................................................. 6-57
Bluetooth Hands-Free
í.......................................................... 6-57
Basic Bluetooth Hands-Free Operation ................................... 6-61
Convenient Use of the Hands-Free System ............................. 6-65
Hands-Free Telephone Setting ................................................ 6-70
When Bluetooth Hands-Free cannot be used .......................... 6-75
Safety Certification ................................................................. 6-76
Mazda Bluetooth Hands-Free Customer Service .................... 6-76
Interior Equipment ..................................................................... 6-77
Sunvisors ................................................................................. 6-77
Interior Lights ......................................................................... 6-77
Information Display ................................................................ 6-79
Lighter ..................................................................................... 6-81
Ashtray .................................................................................... 6-82
Cup Holder .............................................................................. 6-83
Storage Compartments ............................................................ 6-84
Accessory Socket .................................................................... 6-87
6-1íSome models.
RX-8_8AT5-EA-09E_Edition1 Page215
Wednesday, April 15 2009 10:33 AM
Form No.8AT5-EA-09E
Page 291 of 438

Black plate (291,1)
Sunvisors
When you need a sunvisor, lower it for
use in front or swing it to the side.
Sunvisor
qVanity Mirrors
To use the vanity mirror, lower the
sunvisor.
The vanity mirror light will illuminate
when you open the cover.
Interior Lights
qIlluminated Entry System
When the illuminated entry system
operates, the overhead light (switch is in
the DOOR position) and the courtesy
lights turn on for:
lAbout 30 seconds after the driver's
door is unlocked and the ignition
switch is in the LOCK position (with
the ignition key removed).
lAbout 15 seconds after all doors are
closed.
(With Advanced key)
About 5 seconds after all doors are
closed when the advanced key is
outside of the vehicle.
lAbout 15 seconds after the ignition
switch is in the LOCK position (with
the ignition key removed) with all
doors closed.
The light also turns off when:
lThe ignition switch is turned to the ON
position and all doors are closed.
lThe driver's door is locked.
NOTE
Battery saver
If any door is left opened, the light turns off
after about 30 minutes to save the battery.
The light turns on again when the ignition
switch is turned to the ON position, or when
any door is opened after all doors have been
closed.
Interior Comfort
Interior Equipment
6-77
RX-8_8AT5-EA-09E_Edition1 Page291
Wednesday, April 15 2009 10:34 AM
Form No.8AT5-EA-09E
Page 292 of 438
Black plate (292,1)
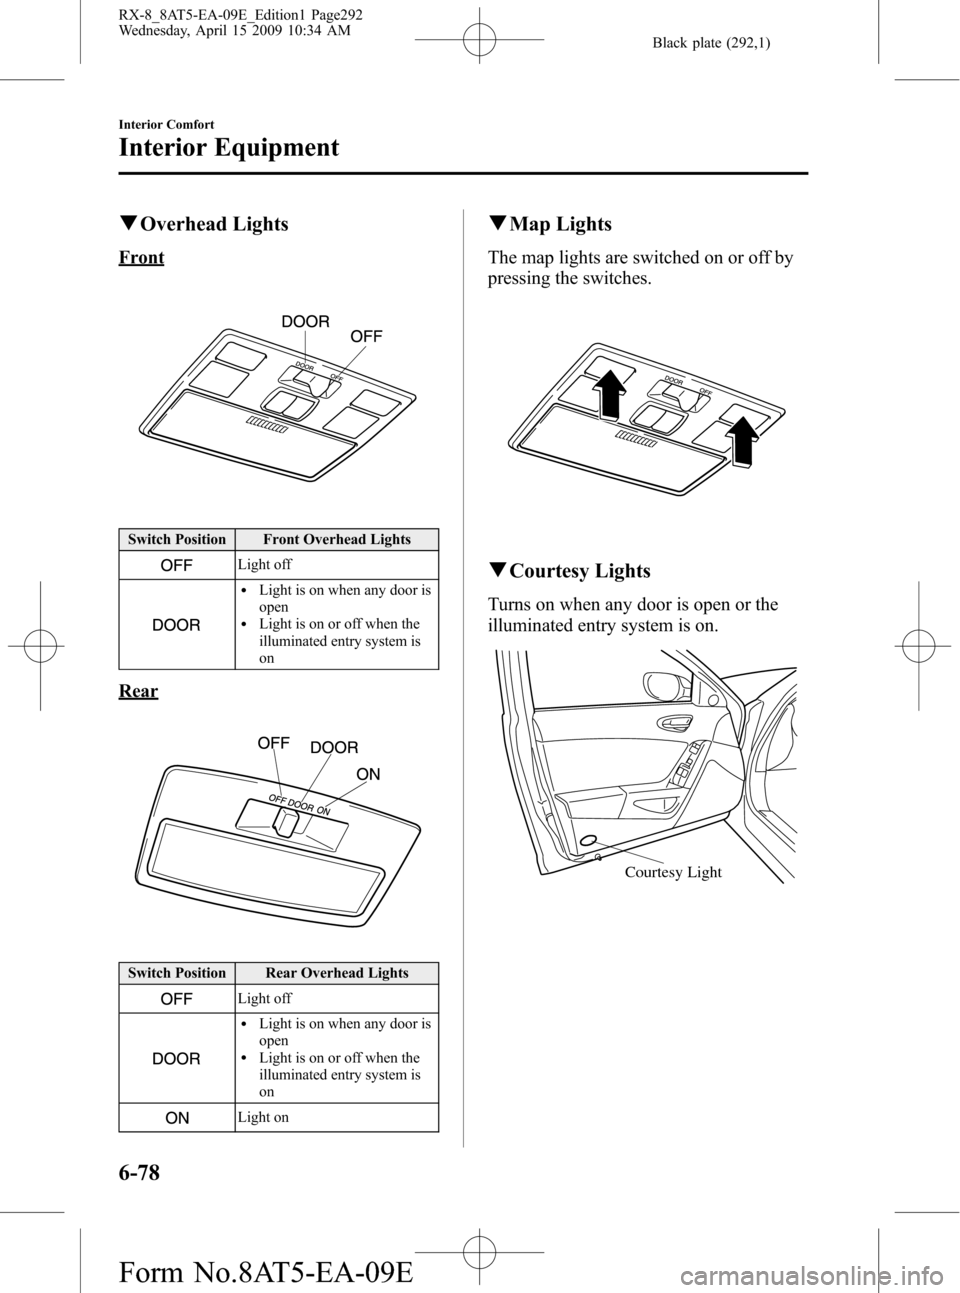
qOverhead Lights
Front
Switch Position Front Overhead Lights
Light off
lLight is on when any door is
open
lLight is on or off when the
illuminated entry system is
on
Rear
Switch Position Rear Overhead Lights
Light off
lLight is on when any door is
open
lLight is on or off when the
illuminated entry system is
on
Light on
qMap Lights
The map lights are switched on or off by
pressing the switches.
qCourtesy Lights
Turns on when any door is open or the
illuminated entry system is on.
Courtesy Light
6-78
Interior Comfort
Interior Equipment
RX-8_8AT5-EA-09E_Edition1 Page292
Wednesday, April 15 2009 10:34 AM
Form No.8AT5-EA-09E
Page 304 of 438

Black plate (304,1)
Parking in an Emergency
The hazard warning lights should always
be used when you stop on or near a
roadway in an emergency.
The hazard warning lights warn other
drivers that your vehicle is a traffic hazard
and that they must take extreme caution
when near it.
Depress the hazard warning flasher and all
the turn signals will flash.
NOTE
lThe turn signals do not work when the
hazard warning lights are on.
lCheck local regulations about the use of
hazard warning lights while the vehicle is
being towed to verify that it is not in
violation of the law.
7-2
In Case of an Emergency
Parking in an Emergency
RX-8_8AT5-EA-09E_Edition1 Page304
Wednesday, April 15 2009 10:34 AM
Form No.8AT5-EA-09E
Page 336 of 438

Black plate (336,1)
qSchedule 2
Maintenance IntervalNumber of months or kilometers (miles), whichever comes first
Months 4 8 12 16 20 24 28 32 36 40 44 48
×1000 km 8 16 24 32 40 48 56 64 72 80 88 96
×1000 miles 5 10 15 20 25 30 35 40 45 50 55 60
ENGINE
Engine oilPuerto Rico Replace every 5,000 km (3,000 miles) or 3 months
OthersRRRRRRRRRRRR
Engine oil filterRRRRRRRRRRRR
Drive belts I I
COOLING SYSTEM
Engine coolantFL22 type
*1Replace at first 192,000 km (120,000 miles) or 10 years; after
that, every 96,000 km (60,000 miles) or 5 years
OthersReplace at first 96,000 km (60,000 miles) or 4 years; after that,
every 2 years
Engine coolant levelIIIIIIIIIIII
FUEL SYSTEM
Air filter R
Fuel lines and hoses
*2II
Hoses and tubes for emission*2I
IGNITION SYSTEM
Spark plugs R
ELECTRICAL SYSTEM
Function of all lightsIIIIIIIIIIII
8-6
Maintenance and Care
Scheduled Maintenance
RX-8_8AT5-EA-09E_Edition1 Page336
Wednesday, April 15 2009 10:34 AM
Form No.8AT5-EA-09E
Page 358 of 438
Black plate (358,1)
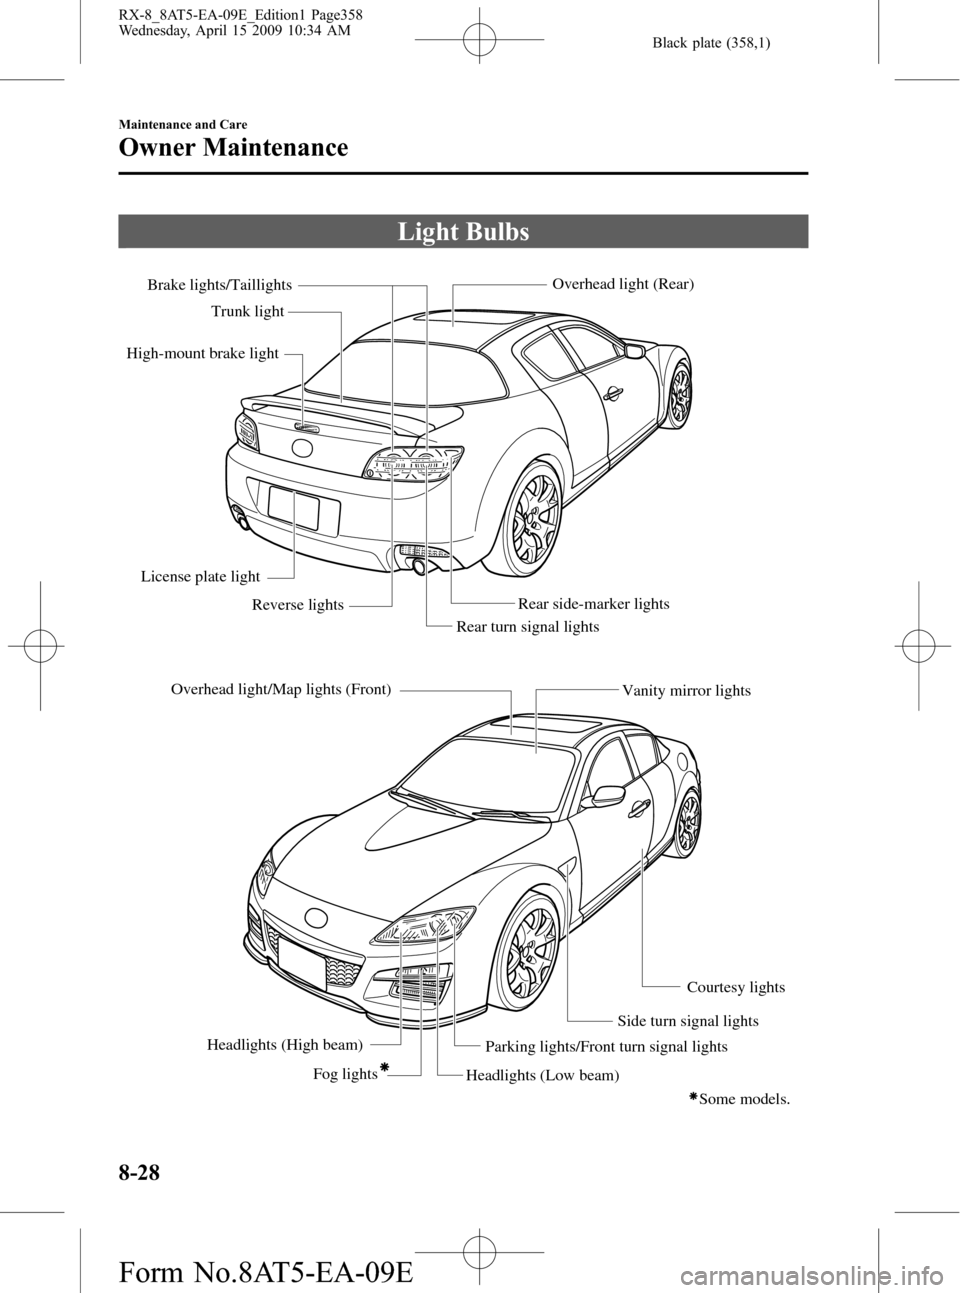
Light Bulbs
Overhead light/Map lights (Front)
Headlights (High beam)
Fog lights
Headlights (Low beam)Parking lights/Front turn signal lightsSide turn signal lightsCourtesy lights Vanity mirror lights Rear turn signal lightsRear side-marker lightsOverhead light (Rear)
Brake lights/Taillights
Trunk light
High-mount brake light
License plate light
Reverse lights
Some models.
8-28
Maintenance and Care
Owner Maintenance
RX-8_8AT5-EA-09E_Edition1 Page358
Wednesday, April 15 2009 10:34 AM
Form No.8AT5-EA-09E
Page 361 of 438
Black plate (361,1)
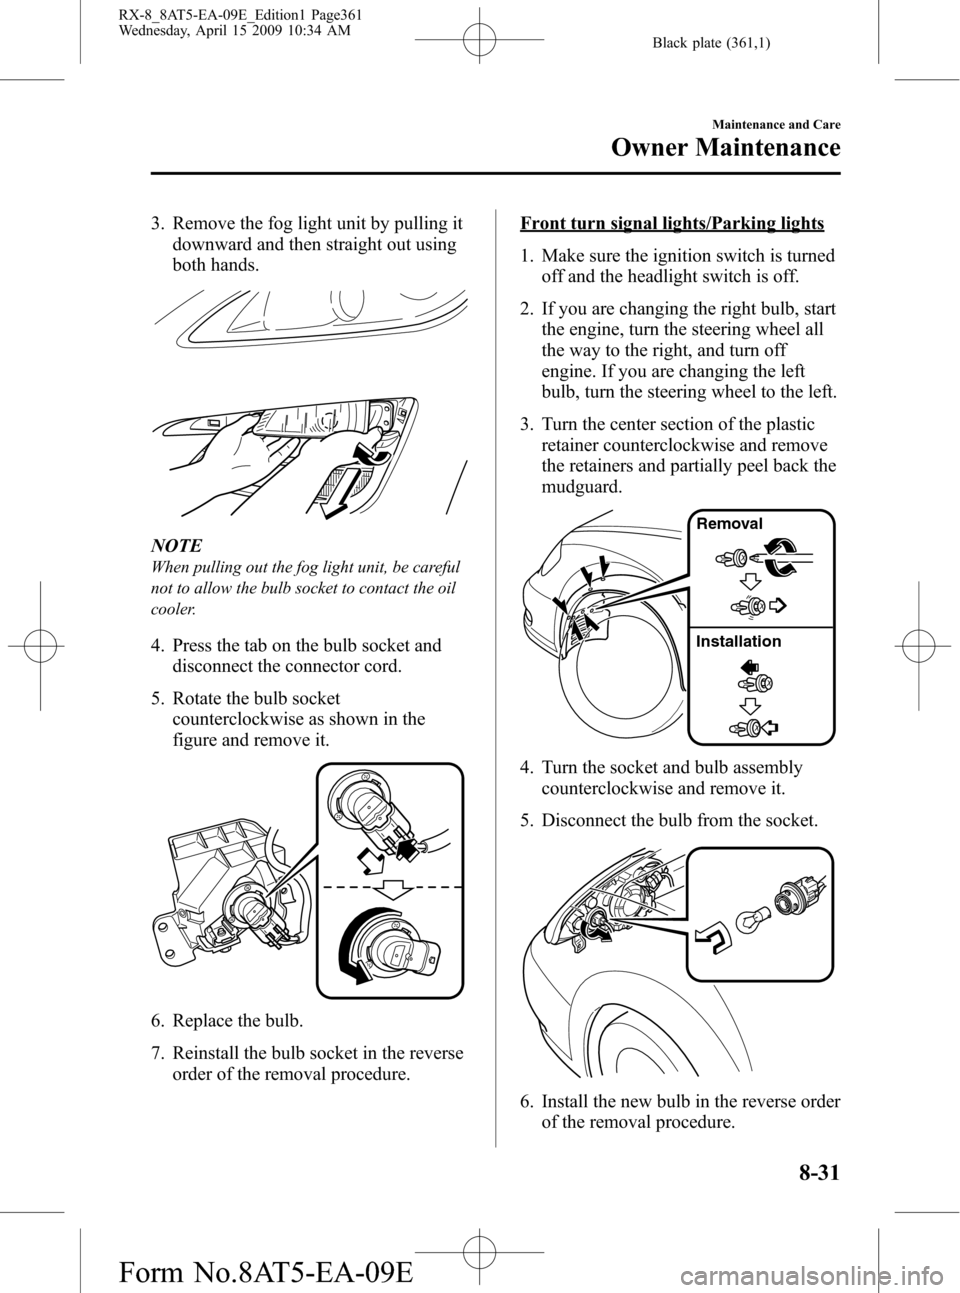
3. Remove the fog light unit by pulling it
downward and then straight out using
both hands.
NOTE
When pulling out the fog light unit, be careful
not to allow the bulb socket to contact the oil
cooler.
4. Press the tab on the bulb socket and
disconnect the connector cord.
5. Rotate the bulb socket
counterclockwise as shown in the
figure and remove it.
6. Replace the bulb.
7. Reinstall the bulb socket in the reverse
order of the removal procedure.
Front turn signal lights/Parking lights
1. Make sure the ignition switch is turned
off and the headlight switch is off.
2. If you are changing the right bulb, start
the engine, turn the steering wheel all
the way to the right, and turn off
engine. If you are changing the left
bulb, turn the steering wheel to the left.
3. Turn the center section of the plastic
retainer counterclockwise and remove
the retainers and partially peel back the
mudguard.
Removal
Installation
4. Turn the socket and bulb assembly
counterclockwise and remove it.
5. Disconnect the bulb from the socket.
6. Install the new bulb in the reverse order
of the removal procedure.
Maintenance and Care
Owner Maintenance
8-31
RX-8_8AT5-EA-09E_Edition1 Page361
Wednesday, April 15 2009 10:34 AM
Form No.8AT5-EA-09E
Page 362 of 438

Black plate (362,1)
Side-turn signal lights
1. Slide the light unit rearward.
2. Rotate the light unit clockwise as
shown in the figure and pull it out.
3. Press the tab on the bulb socket and
disconnect the connector cord.
4. Replace with a new light unit and
install it in the reverse order of the
removal procedure.
NOTE
The side-turn signal light bulb cannot be
replaced. The entire light unit itself has to be
replaced, therefore consult an Authorized
Mazda Dealer for a replacement light unit.
Brake lights/Taillights
Due to the complexity and difficulty of
the procedure, the LED bulbs should be
replaced by an expert repairer, we
recommend an Authorized Mazda Dealer.
Rear turn signal lights, Reverse lights,
Rear side marker lights
1. Pull the center section of the plastic
retainer and remove the retainers and
partially open the trunk side trim.
Removal
Installation
2. Turn the socket and bulb assembly
counterclockwise and remove it.
3. Disconnect the bulb from the socket.
Rear turn signal lights
8-32
Maintenance and Care
Owner Maintenance
RX-8_8AT5-EA-09E_Edition1 Page362
Wednesday, April 15 2009 10:34 AM
Form No.8AT5-EA-09E