height MAZDA MODEL RX 8 2010 Owners Manual (in English)
[x] Cancel search | Manufacturer: MAZDA, Model Year: 2010, Model line: MODEL RX 8, Model: MAZDA MODEL RX 8 2010Pages: 438, PDF Size: 7.02 MB
Page 16 of 438

Black plate (16,1)
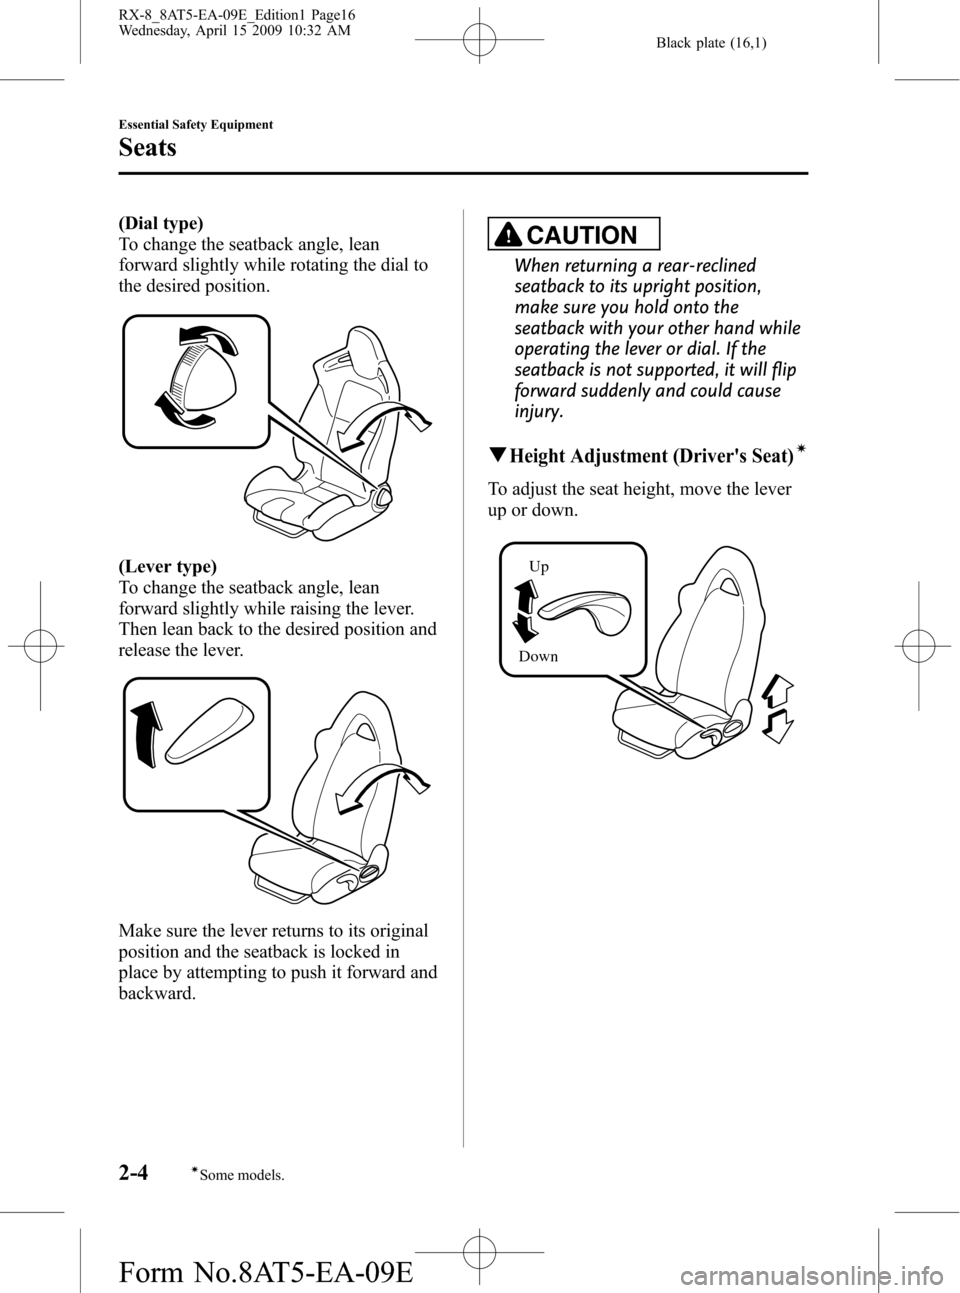
(Dial type)
To change the seatback angle, lean
forward slightly while rotating the dial to
the desired position.
(Lever type)
To change the seatback angle, lean
forward slightly while raising the lever.
Then lean back to the desired position and
release the lever.
Make sure the lever returns to its original
position and the seatback is locked in
place by attempting to push it forward and
backward.
CAUTION
When returning a rear-reclined
seatback to its upright position,
make sure you hold onto the
seatback with your other hand while
operating the lever or dial. If the
seatback is not supported, it will flip
forward suddenly and could cause
injury.
qHeight Adjustment (Driver's Seat)í
To adjust the seat height, move the lever
up or down.
Up
Down
2-4
Essential Safety Equipment
íSome models.
Seats
RX-8_8AT5-EA-09E_Edition1 Page16
Wednesday, April 15 2009 10:32 AM
Form No.8AT5-EA-09E
Page 20 of 438

Black plate (20,1)
qSeat Recline
WARNING
Do not drive with either front seat
reclined:
Sitting in a reclined position while the
vehicle is moving is dangerous
because you do not get the full
protection from seat belts. During
sudden braking or a collision, you
can slide under the lap belt and
suffer serious internal injuries. For
maximum protection, sit well back
and upright.
Always sit in the front passenger seat
properly with the seatback upright and
feet on the floor:
Your front passenger seat has weight
sensors, sitting in the front passenger
seat improperly out of position or
with the seatback reclined too far
while the vehicle is moving is
dangerous as it can take off weight
from the seat bottom and affect the
weight determination of the front
passenger sensing system. As a result
the front passenger will not have the
supplementary protection of the air
bag and seat belt pretensioner, which
could result in serious injury. Always
sit upright against the seatback with
your feet on the floor.To change the seatback angle, press the
front or rear side of the reclining switch.
Release the switch at the desired position.
qHeight Adjustment
To adjust the seat height, move the switch
up or down.
2-8
Essential Safety Equipment
Seats
RX-8_8AT5-EA-09E_Edition1 Page20
Wednesday, April 15 2009 10:32 AM
Form No.8AT5-EA-09E
Page 21 of 438

Black plate (21,1)
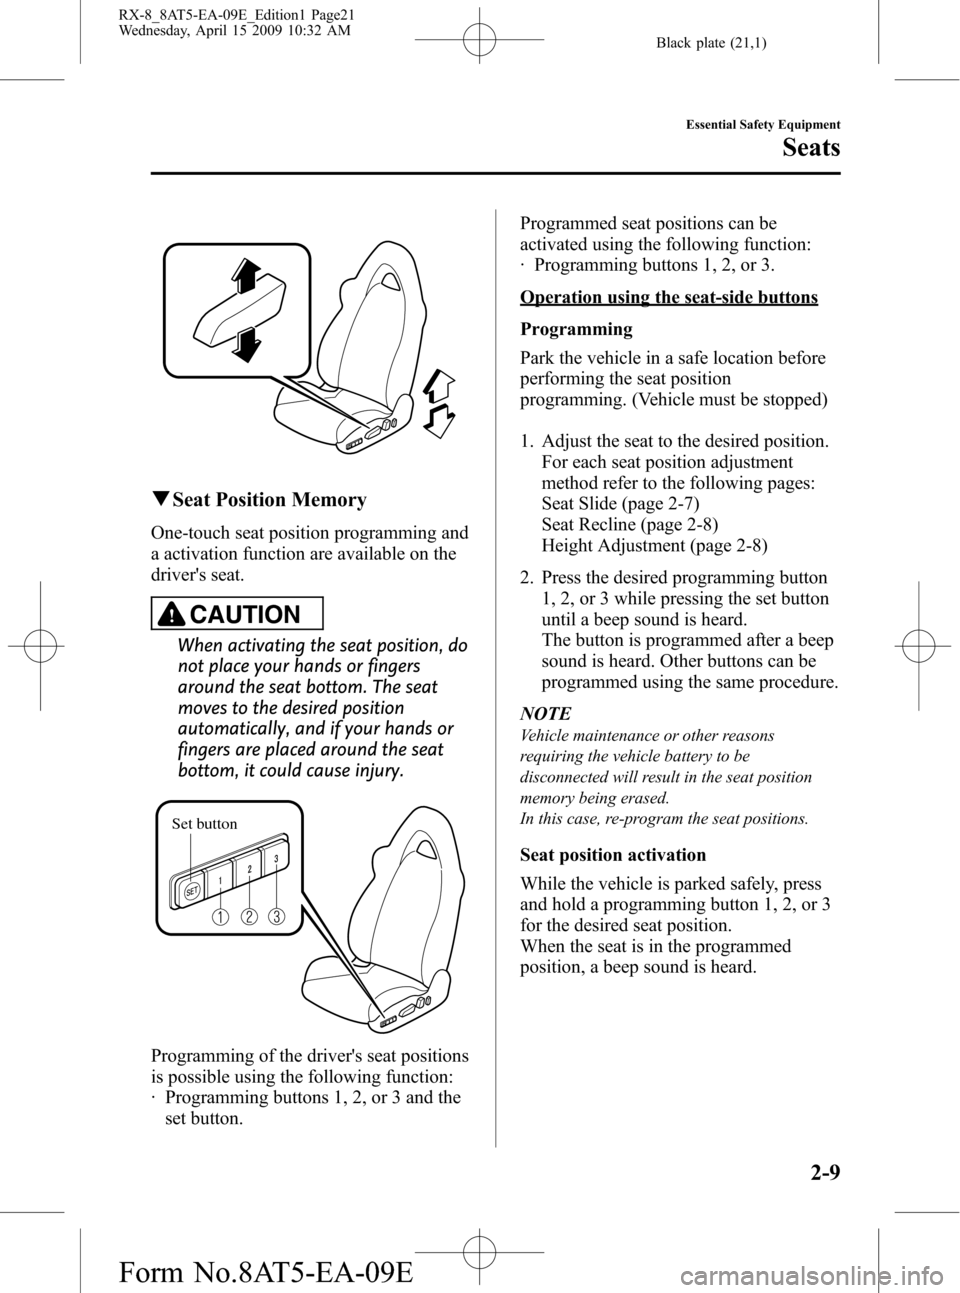
qSeat Position Memory
One-touch seat position programming and
a activation function are available on the
driver's seat.
CAUTION
When activating the seat position, do
not place your hands or fingers
around the seat bottom. The seat
moves to the desired position
automatically, and if your hands or
fingers are placed around the seat
bottom, it could cause injury.
Set button
Programming of the driver's seat positions
is possible using the following function:
· Programming buttons 1, 2, or 3 and the
set button.Programmed seat positions can be
activated using the following function:
· Programming buttons 1, 2, or 3.
Operation using the seat-side buttons
Programming
Park the vehicle in a safe location before
performing the seat position
programming. (Vehicle must be stopped)
1. Adjust the seat to the desired position.
For each seat position adjustment
method refer to the following pages:
Seat Slide (page 2-7)
Seat Recline (page 2-8)
Height Adjustment (page 2-8)
2. Press the desired programming button
1, 2, or 3 while pressing the set button
until a beep sound is heard.
The button is programmed after a beep
sound is heard. Other buttons can be
programmed using the same procedure.
NOTE
Vehicle maintenance or other reasons
requiring the vehicle battery to be
disconnected will result in the seat position
memory being erased.
In this case, re-program the seat positions.
Seat position activation
While the vehicle is parked safely, press
and hold a programming button 1, 2, or 3
for the desired seat position.
When the seat is in the programmed
position, a beep sound is heard.
Essential Safety Equipment
Seats
2-9
RX-8_8AT5-EA-09E_Edition1 Page21
Wednesday, April 15 2009 10:32 AM
Form No.8AT5-EA-09E
Page 53 of 438

Black plate (53,1)
Do not touch the components of the supplemental restraint system after the air bags
have inflated:
Touching the components of the supplemental restraint system after the air bags
have inflated is dangerous. Immediately after inflation, they are very hot. You could
get burned.
Never install any front-end equipment to your vehicle:
Installation of front-end equipment, such as frontal protection bar (kangaroo bar,
bull bar, push bar, or other similar devices), snowplow, or winches, is dangerous. The
air bag crash sensor system could be affected. This could cause air bags to inflate
unexpectedly, or it could prevent the air bags from inflating during an accident.
Front occupants could be seriously injured.
Do not modify the suspension:
Modifying the vehicle suspension is dangerous. If the vehicle's height or the
suspension is modified, the vehicle will be unable to accurately detect a collision
resulting in incorrect or unexpected air bag deployment and the possibility of serious
injuries.
Do not modify the supplemental restraint system:
Modifying the components or wiring of the supplemental restraint system is
dangerous. You could accidentally activate it or make it inoperable. Do not make
any modifications to the supplemental restraint system. This includes installing trim,
badges, or anything else over the air bag modules. It also includes installing extra
electrical equipment on or near system components or wiring. An Authorized Mazda
Dealer can provide the special care needed in the removal and installation of front
seats. It is important to protect the air bag wiring and connections to assure that the
bags do not accidentally deploy, the driver seat slide position sensor and front
passenger seat weight sensors are not damaged and that the seats retain an
undamaged air bag connection.
NOTE
lWhen an air bag deploys, a loud inflation noise can be heard and some smoke will be released.
Neither is likely to cause injury, however, the texture of the air bags may cause light skin injuries
on body parts not covered with clothing through friction.
lShould you sell your Mazda, we urge you to tell the new owner of its air bag systems and that
familiarization with all instructions about them, from the Owner's Manual, is important.
Essential Safety Equipment
SRS Air Bags
2-41
RX-8_8AT5-EA-09E_Edition1 Page53
Wednesday, April 15 2009 10:32 AM
Form No.8AT5-EA-09E
Page 357 of 438

Black plate (357,1)
CAUTION
ØA wrong-sized wheel may
adversely affect:
ØTire fit
ØWheel and bearing life
ØGround clearance
ØSnow-chain clearance
ØSpeedometer calibration
ØHeadlight aim
ØBumper height
ØTire Pressure Monitoring
System
ØLimited-Slip Differential System
Ø(With Tire Pressure Monitoring
System)
ØWhen replacing/repairing the
tires or wheels or both, have the
work done by an Authorized
Mazda Dealer, or the tire
pressure sensors may be
damaged.
ØThe wheels equipped on your
Mazda are specially designed
for installation of the tire
pressure sensors. Do not use
non-genuine wheels, otherwise
it may not be possible to install
the tire pressure sensors.
NOTE
Be sure to install the tire pressure sensors
whenever tires or wheels are replaced. Refer to
Tires and Wheels on page 5-33.
When replacing a wheel, make sure the
new one is the same as the original factory
wheel in diameter, rim width, and offset.
Proper tire balancing provides the best
riding comfort and helps reduce tread
wear. Out-of-balance tires can cause
vibration and uneven wear, such as
cupping and flat spots.
Maintenance and Care
Owner Maintenance
8-27
RX-8_8AT5-EA-09E_Edition1 Page357
Wednesday, April 15 2009 10:34 AM
Form No.8AT5-EA-09E
Page 399 of 438

Black plate (399,1)
Tire Labeling
Federal law requires tire manufacturers to place standardized information on the sidewall of
all tires. This information identifies and describes the fundamental characteristics of the tire
and also provides a tire identification number for safety standard certification and in case of
a recall.
qInformation on Passenger Vehicle Tires
Please refer to the diagram below.
1. TIN: U.S. DOT tire identification number
2. Passenger car tire
3. Nominal width of tire in millimeters
4. Ratio of height to width (aspect ratio)
5. Radial
6. Rim diameter code
7. Load index & speed symbol
8. Severe snow conditions
9. Tire ply composition and materials used
10. Max. load rating
Customer Information and Reporting Safety Defects
Tire Information (U.S.A.)
9-21
RX-8_8AT5-EA-09E_Edition1 Page399
Wednesday, April 15 2009 10:34 AM
Form No.8AT5-EA-09E
Page 400 of 438

Black plate (400,1)
11. Tread wear, traction and temperature grades
12. Max. permissible inflation pressure
13. SAFETY WARNING
P215/65R15 95H is an example of a tire size and load index rating. Here is an explanation
of the various components of that tire size and load index rating. Note that the tire size and
load index rating may be different from the example.
P
Indicates a tire that may be installed on cars, SUVs, minivans and light trucks as designated
by the Tire and Rim Association (T&RA).
NOTE
If your tire size does not begin with a letter this may mean it is designated by either ETRTO
(European Tire and Rim Technical Organization) or JATMA (Japan Tire Manufacturing Association).
215
“215”is the nominal width of the tire in millimeters. This three-digit number gives the
width in millimeters of the tire from sidewall edge to sidewall edge. In general, the larger
the number, the wider the tire.
65
“65”is the aspect ratio. This two-digit number indicates the tire's ratio of height to width.
R
“R”is the tire construction symbol. R indicates“Radial ply construction”.
15
“15”is the wheel rim diameter in inches.
95
“95”is the Load Index. This two-or three-digit number indicates how much weight each
tire can support.
9-22
Customer Information and Reporting Safety Defects
Tire Information (U.S.A.)
RX-8_8AT5-EA-09E_Edition1 Page400
Wednesday, April 15 2009 10:34 AM
Form No.8AT5-EA-09E
Page 403 of 438

Black plate (403,1)
qInformation on Temporary Tires
Please refer to the diagram below.
1. Temporary tires
2. Nominal width of tire in millimeters
3. Ratio of height to width (aspect ratio)
4. Diagonal
5. Rim diameter code
6. Load index&speed symbol
T115/70D 16 90M is an example of a tire size and load index rating. Here is an explanation
of the various components of that tire size and load index rating. Note that the tire size and
load index rating may be different from the example.
T
Indicates a tire that may be installed on cars, SUVs, minivans and light trucks as designated
by the Tire and Rim Association (T&RA).
11 5
“115”is the nominal width of the tire in millimeters. This three-digit number gives the
width in millimeters of the tire from sidewall edge to sidewall edge. In general, the larger
the number, the wider the tire.
Customer Information and Reporting Safety Defects
Tire Information (U.S.A.)
9-25
RX-8_8AT5-EA-09E_Edition1 Page403
Wednesday, April 15 2009 10:34 AM
Form No.8AT5-EA-09E
Page 404 of 438

Black plate (404,1)
70
“70”is the aspect ratio. This two-digit number indicates the tire's ratio of height to width.
D
“D”is the tire construction symbol. D indicates“diagonal ply construction”.
16
“16”is the wheel rim diameter in inches.
90
“90”is the Load Index. This two-or three-digit number indicates how much weight each
tire can support.
M
“M”is the speed rating. The speed rating denotes the maximum speed for which the use of
the tire is rated.
Letter Rating Speed Rating
M 81 mph
9-26
Customer Information and Reporting Safety Defects
Tire Information (U.S.A.)
RX-8_8AT5-EA-09E_Edition1 Page404
Wednesday, April 15 2009 10:34 AM
Form No.8AT5-EA-09E
Page 427 of 438

Black plate (427,1)
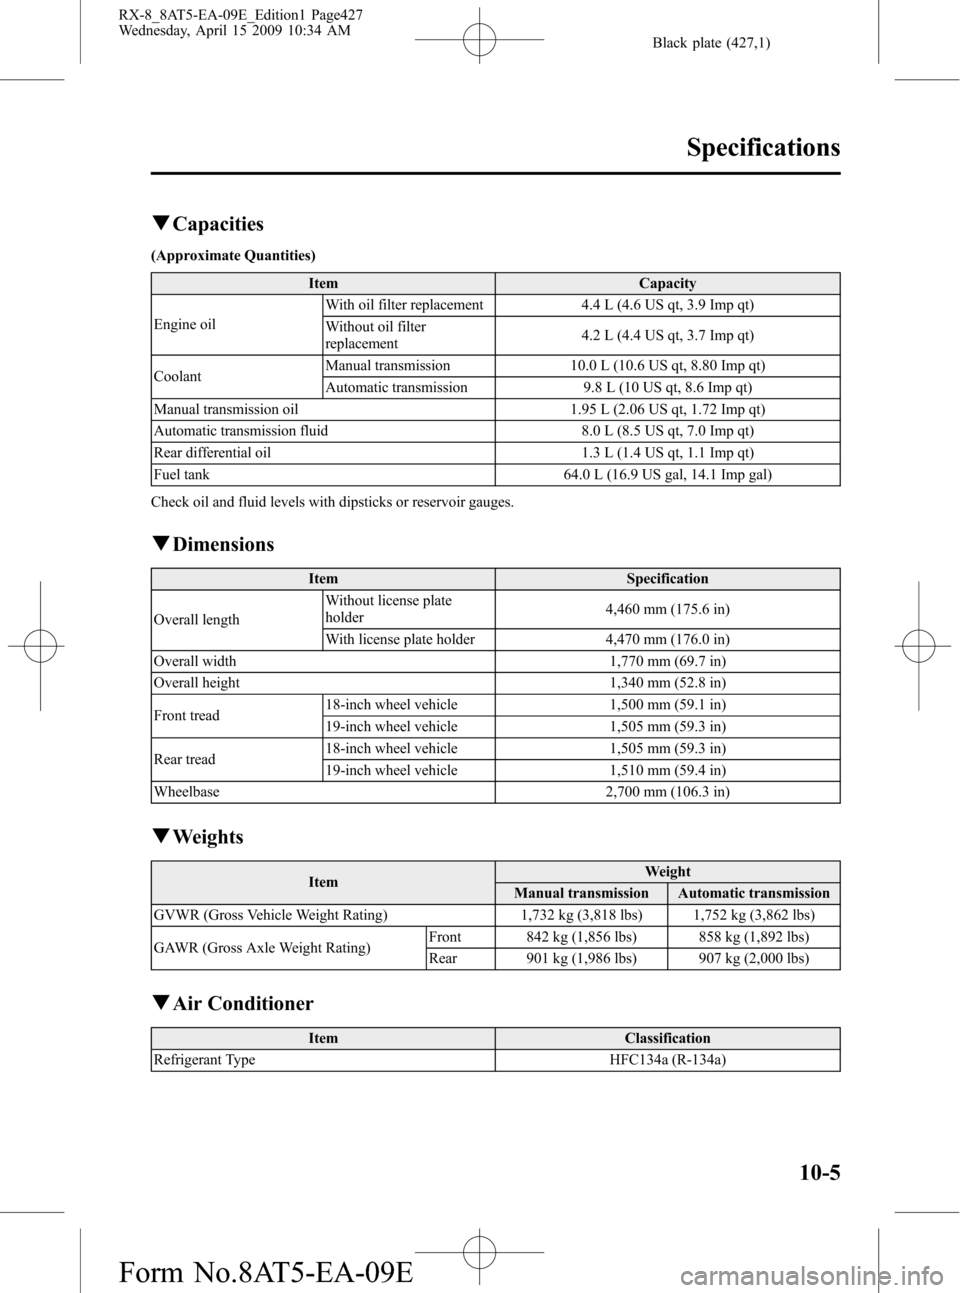
qCapacities
(Approximate Quantities)
Item Capacity
Engine oilWith oil filter replacement 4.4 L (4.6 US qt, 3.9 Imp qt)
Without oil filter
replacement4.2 L (4.4 US qt, 3.7 Imp qt)
CoolantManual transmission 10.0 L (10.6 US qt, 8.80 Imp qt)
Automatic transmission 9.8 L (10 US qt, 8.6 Imp qt)
Manual transmission oil 1.95 L (2.06 US qt, 1.72 Imp qt)
Automatic transmission fluid 8.0 L (8.5 US qt, 7.0 Imp qt)
Rear differential oil 1.3 L (1.4 US qt, 1.1 Imp qt)
Fuel tank 64.0 L (16.9 US gal, 14.1 Imp gal)
Check oil and fluid levels with dipsticks or reservoir gauges.
qDimensions
Item Specification
Overall lengthWithout license plate
holder4,460 mm (175.6 in)
With license plate holder 4,470 mm (176.0 in)
Overall width 1,770 mm (69.7 in)
Overall height 1,340 mm (52.8 in)
Front tread18-inch wheel vehicle 1,500 mm (59.1 in)
19-inch wheel vehicle 1,505 mm (59.3 in)
Rear tread18-inch wheel vehicle 1,505 mm (59.3 in)
19-inch wheel vehicle 1,510 mm (59.4 in)
Wheelbase 2,700 mm (106.3 in)
qWeights
ItemWeight
Manual transmission Automatic transmission
GVWR (Gross Vehicle Weight Rating) 1,732 kg (3,818 lbs) 1,752 kg (3,862 lbs)
GAWR (Gross Axle Weight Rating)Front 842 kg (1,856 lbs) 858 kg (1,892 lbs)
Rear 901 kg (1,986 lbs) 907 kg (2,000 lbs)
qAir Conditioner
Item Classification
Refrigerant Type HFC134a (R-134a)
Specifications
10-5
RX-8_8AT5-EA-09E_Edition1 Page427
Wednesday, April 15 2009 10:34 AM
Form No.8AT5-EA-09E