set clock MAZDA MODEL SPEED MX-5 MIATA 2005 Owners Manual
[x] Cancel search | Manufacturer: MAZDA, Model Year: 2005, Model line: MODEL SPEED MX-5 MIATA, Model: MAZDA MODEL SPEED MX-5 MIATA 2005Pages: 298, PDF Size: 3.03 MB
Page 145 of 298
Black plate (145,1)
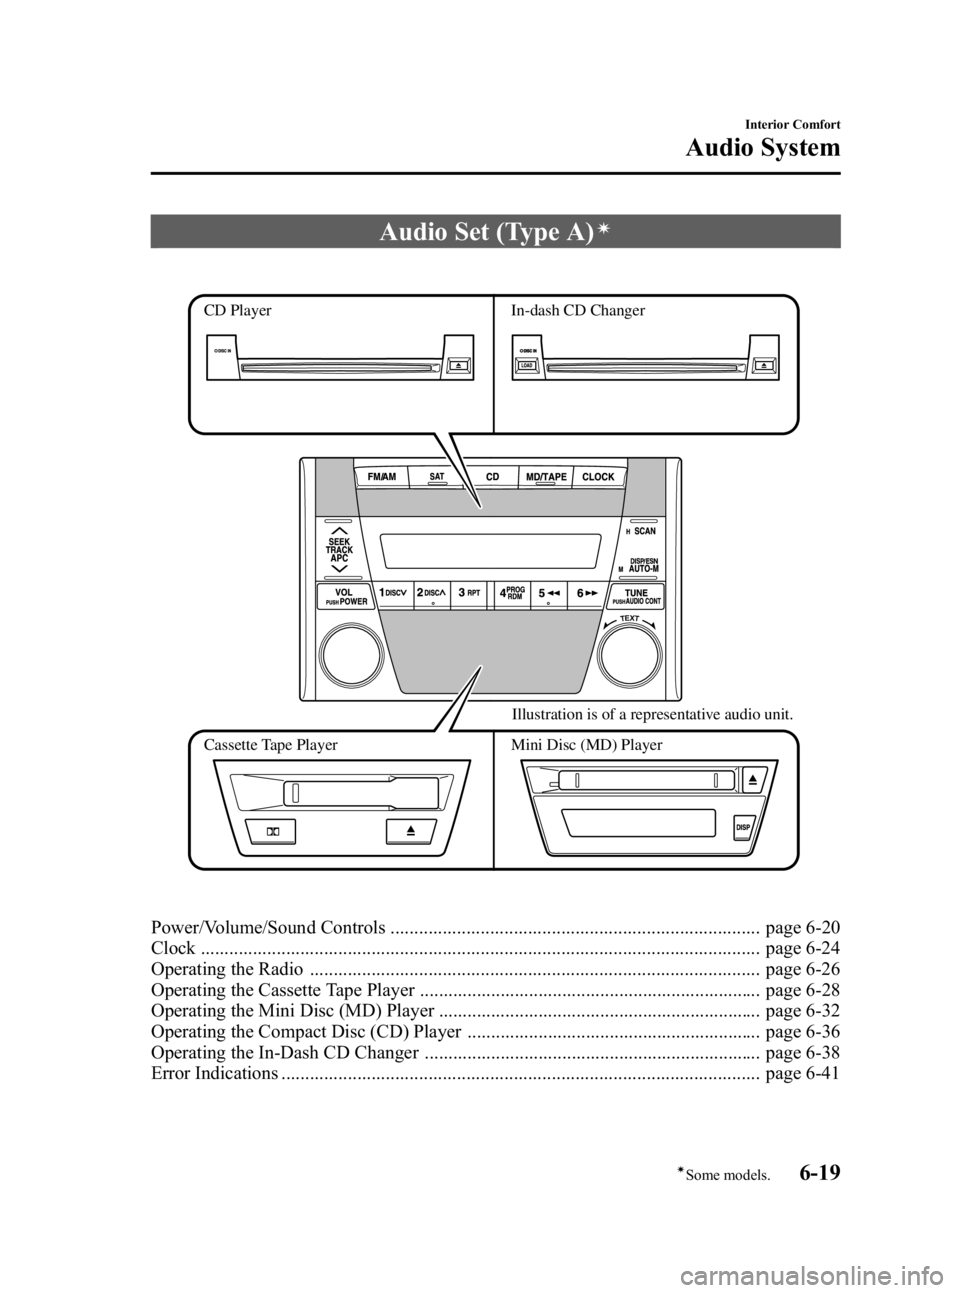
Audio Set (Type A)í
CD Player In-dash CD Changer
Cassette Tape Player Mini Disc (MD) Player Illustration is of a representative audio unit.
Power/Volume/Sound Controls .............................................................................. page 6-20
Clock ...................................................................................................................... page 6-24
Operating the Radio ............................................................................................... page 6-26
Operating the Cassette Tape Player ........................................................................ page 6-28
Operating the Mini Disc (MD) Player .................................................................... page 6-32
Operating the Compact Disc (CD) Player .............................................................. page 6-36
Operating the In-Dash CD Changer ....................................................................... page 6-38
Error Indications ..................................................................................................... page 6-41
Interior Comfort
Audio System
6-19íSome models.
MX-5 Miata_8T72-EA-04G_Edition2 Page145
Tuesday, August 31 2004 11:24 AM
Form No.8T72-EA-04G
Page 150 of 298
Black plate (150,1)
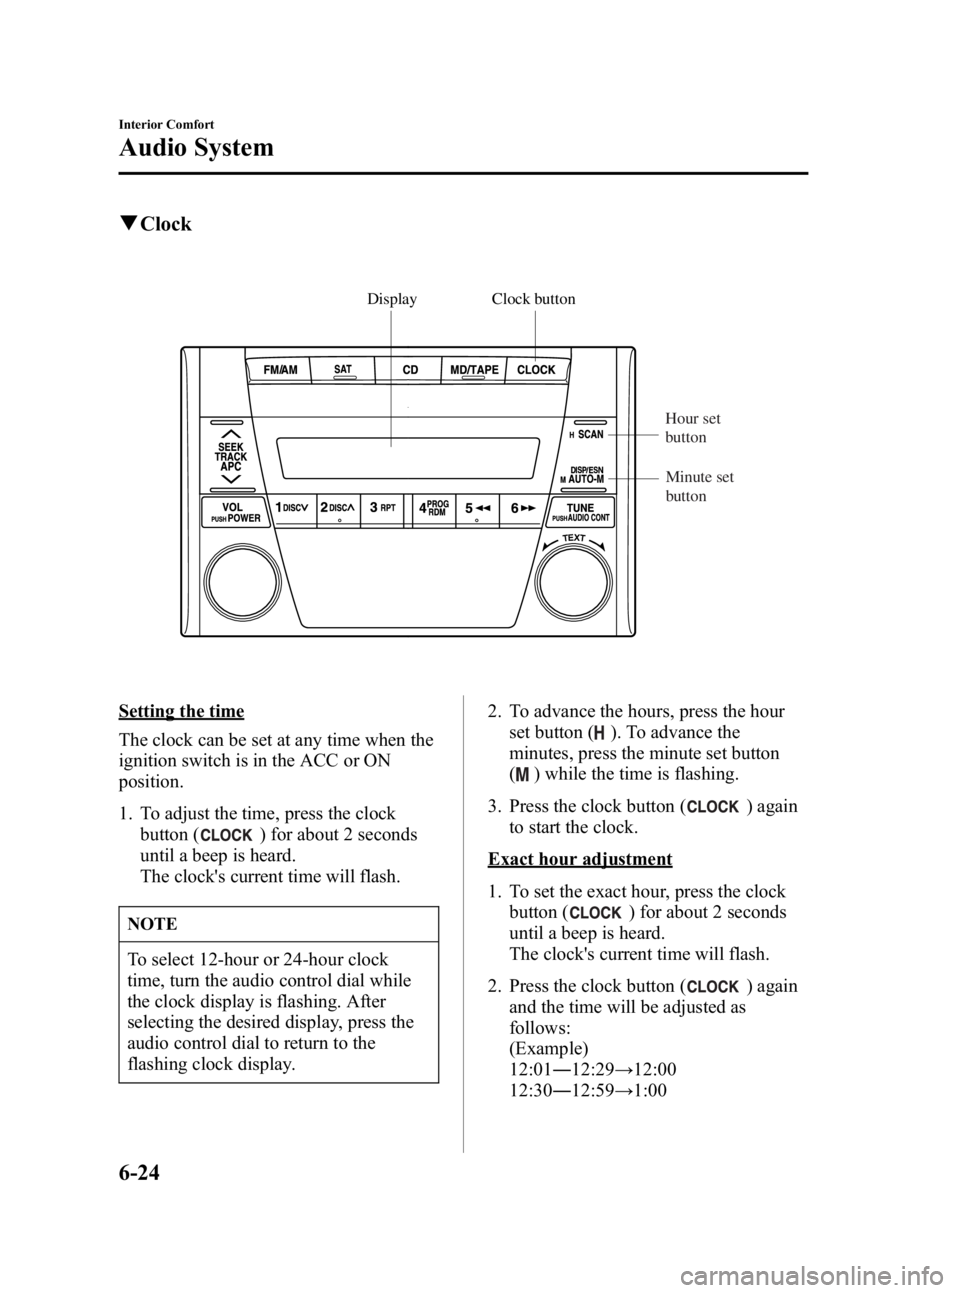
qClock
Display Clock button
Hour set
button
Minute set
button
Setting the time
The clock can be set at any time when the
ignition switch is in the ACC or ON
position.
1. To adjust the time, press the clock button (
) for about 2 seconds
until a beep is heard.
The clock's current time will flash.
NOTE
To select 12-hour or 24-hour clock
time, turn the audio control dial while
the clock display is flashing. After
selecting the desired display, press the
audio control dial to return to the
flashing clock display. 2. To advance the hours, press the hour
set button (
). To advance the
minutes, press the minute set button
(
) while the time is flashing.
3. Press the clock button (
) again
to start the clock.
Exact hour adjustment
1. To set the exact hour, press the clock
button (
) for about 2 seconds
until a beep is heard.
The clock's current time will flash.
2. Press the clock button (
) again
and the time will be adjusted as
follows:
(Example)
12:01 ―12:29 →12:00
12:30 ―12:59 →1:00
6-24
Interior Comfort
Audio System
MX-5 Miata_8T72-EA-04G_Edition2 Page150
Tuesday, August 31 2004 11:24 AM
Form No.8T72-EA-04G
Page 151 of 298
Black plate (151,1)
NOTE
lWhen the clock button ()is
released, the seconds are reset to
“ 00 ”.
lIf the power supply to the unit is
interrupted (if the fuse blows or the
vehicle's battery is disconnected), the
clock will need to be reset.
Changing the display mode
The display on the unit can be changed by
pressing the clock button (
). This
alternates the display between clock mode
and normal mode. When the clock mode
has been selected, the time will be
displayed.
NOTE
The displays when using the audio
differ in clock mode and normal mode.
Interior Comfort
Audio System
6-25
MX-5 Miata_8T72-EA-04G_Edition2 Page151
Tuesday, August 31 2004 11:24 AM
Form No.8T72-EA-04G
Page 153 of 298
Black plate (153,1)
Seek tuning
Pressing the seek tuning button (
,)
will cause the tuner to seek a higher or
lower frequency automatically.
NOTE
If you continue to press and hold the
button, the frequency will continue
changing without stopping.
Scan tuning
Press the scan button (
)to
automatically sample strong stations.
Scanning stops at each station for about 5
seconds. To hold a station, merely press
the scan button (
) again during this
interval.
Preset channel tuning
The 6 preset channels can be used to store
6 AM and 12 FM stations.
1. To set a channel first select AM, FM1, or FM2. Tune to the station you want.
2. Depress a channel preset button for about 2 seconds until a beep is heard.
The preset channel number and station
frequency will be displayed. The
station is now held in the memory.
NOTE
When the clock is displayed, the preset
channel number will not be displayed.
3. Repeat this operation for the other stations and bands you want to store.
To tune one in the memory, select AM,
FM1, or FM2 and then press its
channel preset button. The station
frequency and the channel number will
be displayed.
NOTE
If the power supply is interrupted (fuse
blows or the battery is disconnected),
the preset channels will be canceled.
Auto memory tuning
This is especially useful when driving in
an area where the local stations are not
known. Additional AM/FM stations can
be stored without disturbing the
previously set channels.
Press and hold the auto memory button
(
) for about 2 seconds until a beep
is heard; the system will automatically
scan and temporarily store up to 6 stations
with the strongest frequencies in each
selected band in that area.
After scanning is completed, the station
with the strongest frequency will be tuned
and its frequency displayed.
Press and release the auto memory button
(
) to recall stations from the auto-
stored stations. One stored station will be
selected each time; its frequency and
channel number will be displayed.
NOTE
lWhen the clock is displayed, the
preset channel number will not be
displayed.
lIf no stations can be tuned after
scanning operations, “A ”will be
displayed.
Interior Comfort
Audio System
6-27
MX-5 Miata_8T72-EA-04G_Edition2 Page153
Tuesday, August 31 2004 11:24 AM
Form No.8T72-EA-04G
Page 158 of 298
Black plate (158,1)
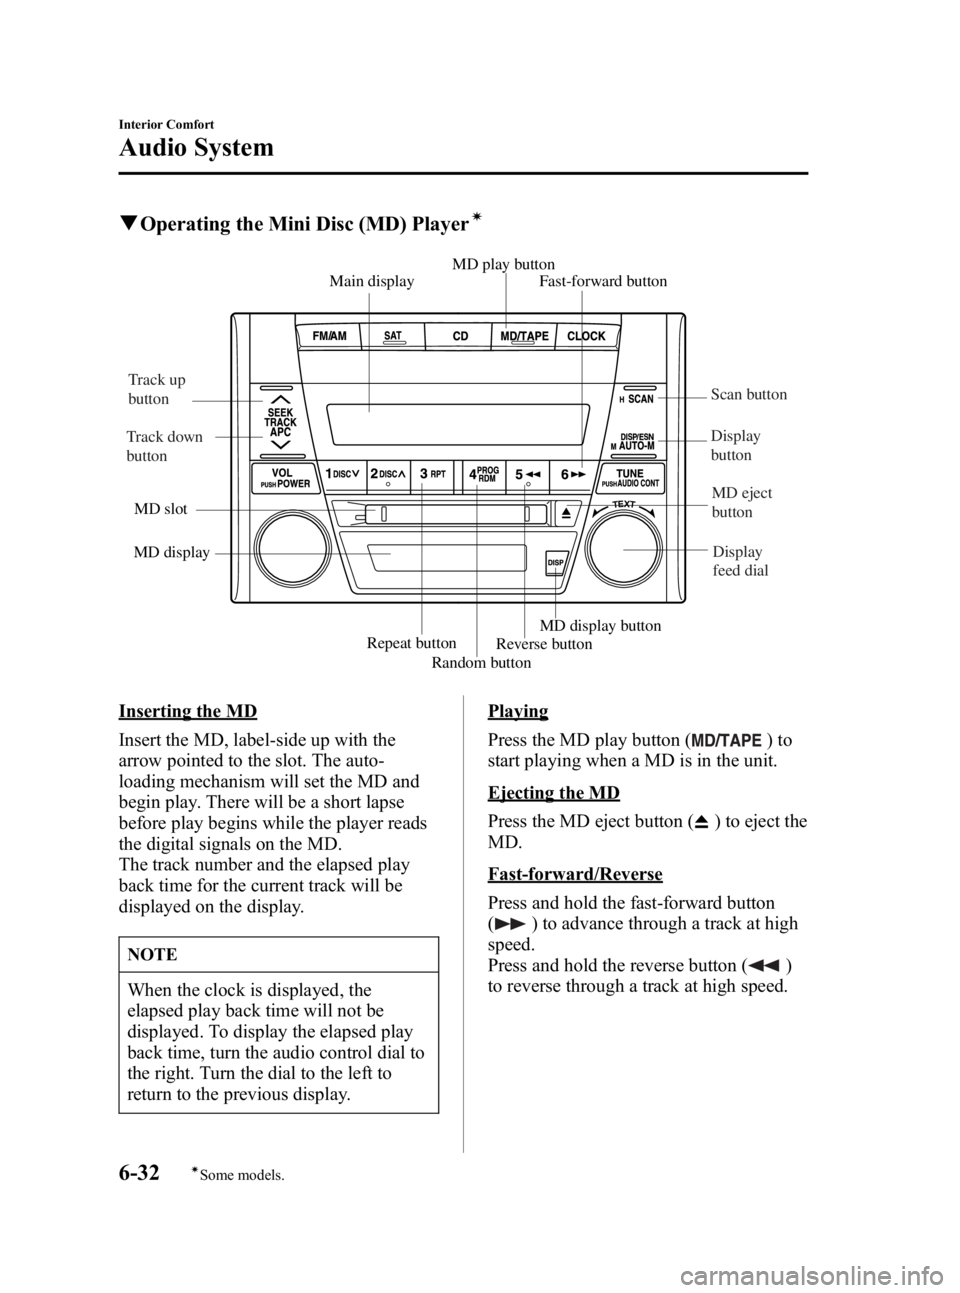
qOperating the Mini Disc (MD) Playerí
Main display Fast-forward button
MD play button
Reverse button
Repeat button
MD display
MD slot
Random buttonMD display button
Track up
button
Track down
button Scan button
Display
button MD eject
button
Display
feed dial
Inserting the MD
Insert the MD, label-side up with the
arrow pointed to the slot. The auto-
loading mechanism will set the MD and
begin play. There will be a short lapse
before play begins while the player reads
the digital signals on the MD.
The track number and the elapsed play
back time for the current track will be
displayed on the display.
NOTE
When the clock is displayed, the
elapsed play back time will not be
displayed. To display the elapsed play
back time, turn the audio control dial to
the right. Turn the dial to the left to
return to the previous display.
Playing
Press the MD play button (
)to
start playing when a MD is in the unit.
Ejecting the MD
Press the MD eject button (
) to eject the
MD.
Fast-forward/Reverse
Press and hold the fast-forward button
(
) to advance through a track at high
speed.
Press and hold the reverse button (
)
to reverse through a track at high speed.
6-32
Interior Comfort
íSome models.
Audio System
MX-5 Miata_8T72-EA-04G_Edition2 Page158
Tuesday, August 31 2004 11:24 AM
Form No.8T72-EA-04G
Page 162 of 298
Black plate (162,1)
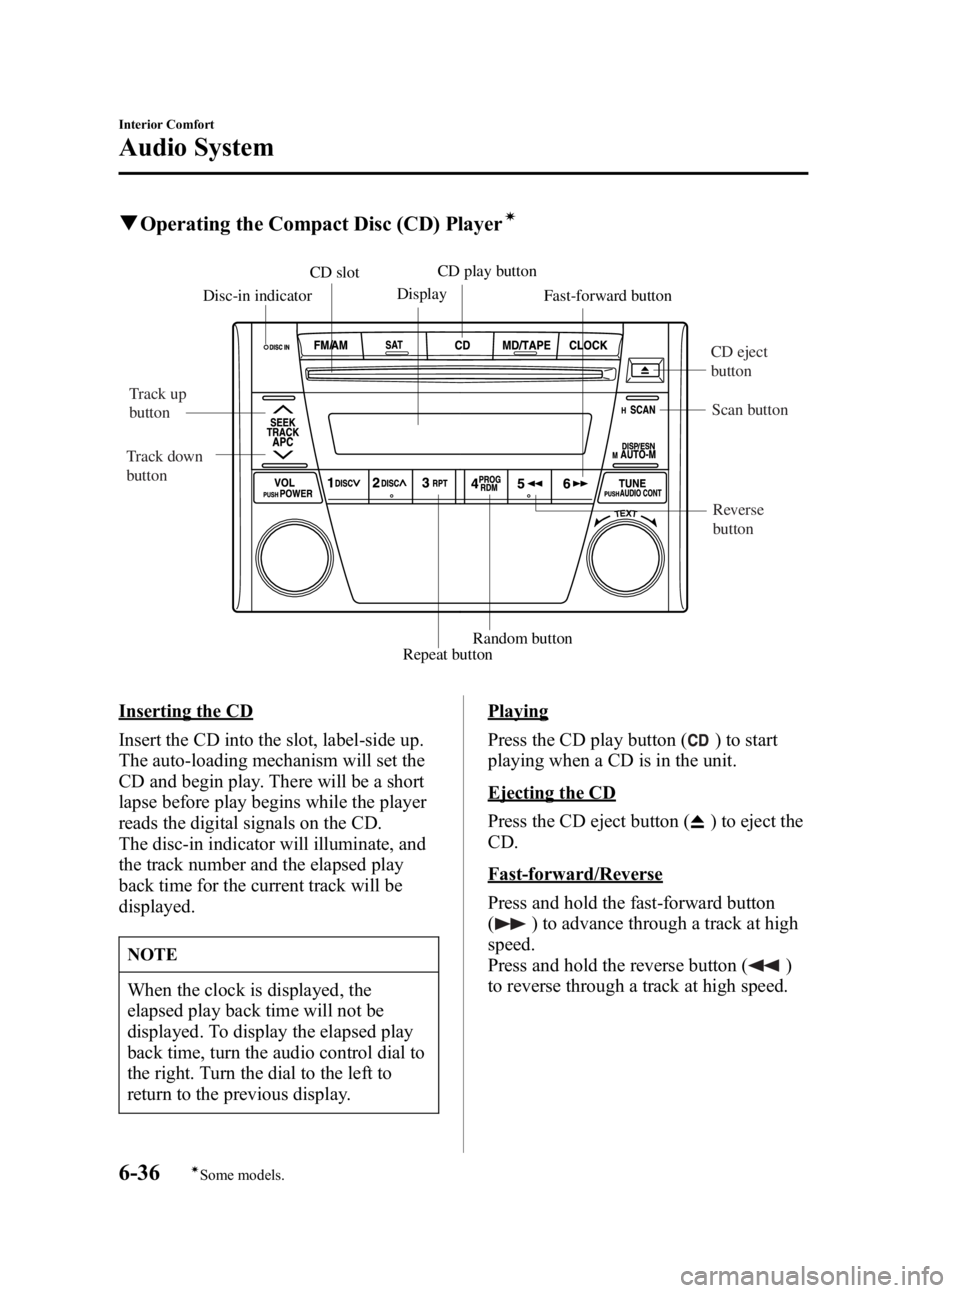
qOperating the Compact Disc (CD) Playerí
Display
CD slot
Disc-in indicator CD play button
Random button
Repeat button Fast-forward button
CD eject
button
Scan button
Reverse
button
Track up
button
Track down
button
Inserting the CD
Insert the CD into the slot, label-side up.
The auto-loading mechanism will set the
CD and begin play. There will be a short
lapse before play begins while the player
reads the digital signals on the CD.
The disc-in indicator will illuminate, and
the track number and the elapsed play
back time for the current track will be
displayed.
NOTE
When the clock is displayed, the
elapsed play back time will not be
displayed. To display the elapsed play
back time, turn the audio control dial to
the right. Turn the dial to the left to
return to the previous display.
Playing
Press the CD play button (
) to start
playing when a CD is in the unit.
Ejecting the CD
Press the CD eject button (
) to eject the
CD.
Fast-forward/Reverse
Press and hold the fast-forward button
(
) to advance through a track at high
speed.
Press and hold the reverse button (
)
to reverse through a track at high speed.
6-36
Interior Comfort
íSome models.
Audio System
MX-5 Miata_8T72-EA-04G_Edition2 Page162
Tuesday, August 31 2004 11:24 AM
Form No.8T72-EA-04G
Page 164 of 298
Black plate (164,1)
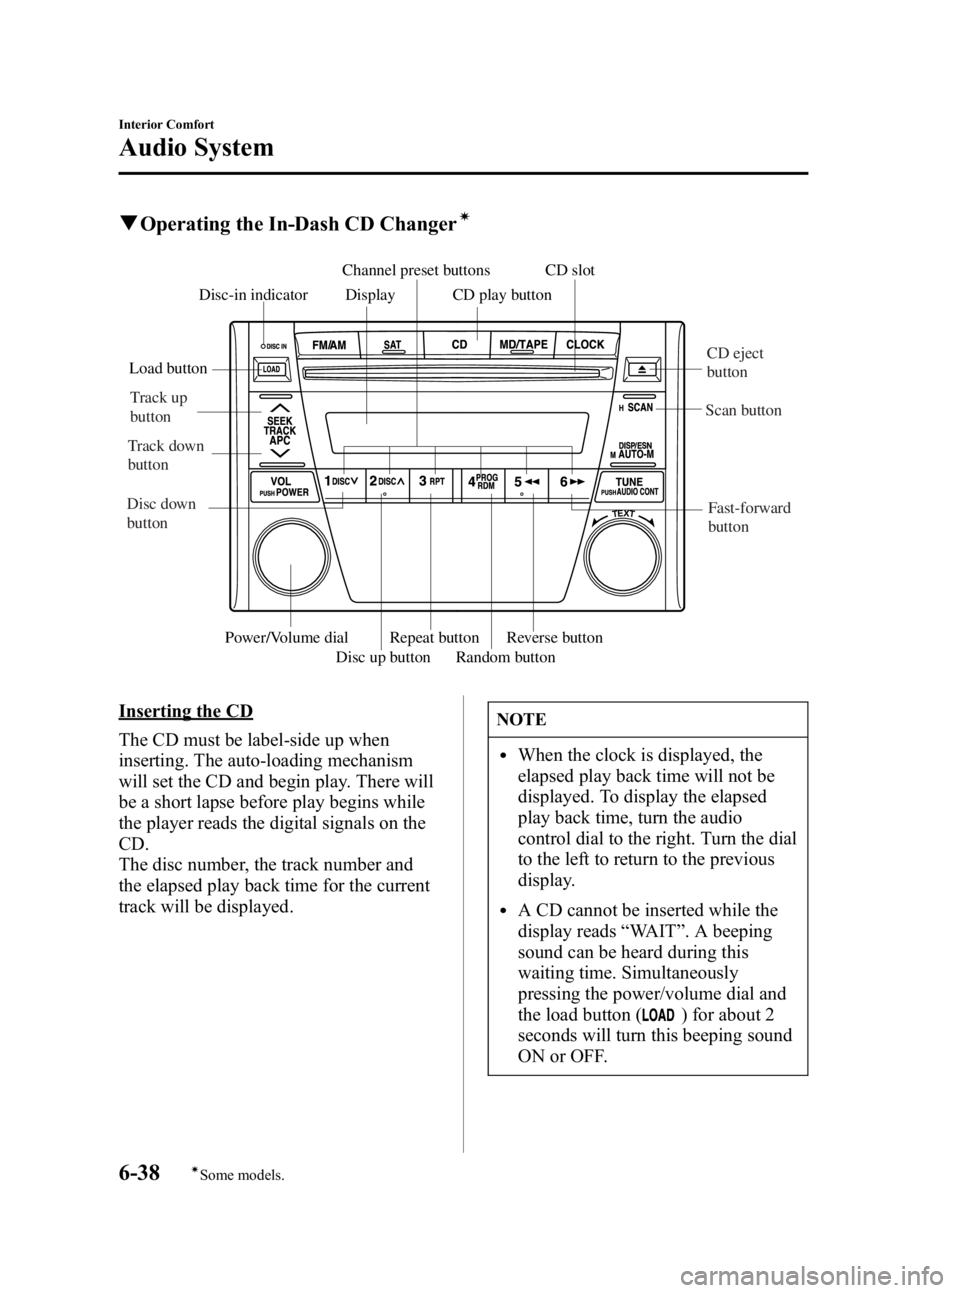
qOperating the In-Dash CD Changerí
Display CD slot
Disc-in indicator CD play button
Random button
Repeat button
Disc up button Reverse button
Load button
Power/Volume dial
Channel preset buttons
CD eject
button
Scan button
Fast-forward
button
Track up
button
Track down
button
Disc down
button
Inserting the CD
The CD must be label-side up when
inserting. The auto-loading mechanism
will set the CD and begin play. There will
be a short lapse before play begins while
the player reads the digital signals on the
CD.
The disc number, the track number and
the elapsed play back time for the current
track will be displayed.NOTE
lWhen the clock is displayed, the
elapsed play back time will not be
displayed. To display the elapsed
play back time, turn the audio
control dial to the right. Turn the dial
to the left to return to the previous
display.
lA CD cannot be inserted while the
display reads “WAIT ”. A beeping
sound can be heard during this
waiting time. Simultaneously
pressing the power/volume dial and
the load button (
) for about 2
seconds will turn this beeping sound
ON or OFF.
6-38
Interior Comfort
íSome models.
Audio System
MX-5 Miata_8T72-EA-04G_Edition2 Page164
Tuesday, August 31 2004 11:24 AM
Form No.8T72-EA-04G
Page 169 of 298
Black plate (169,1)
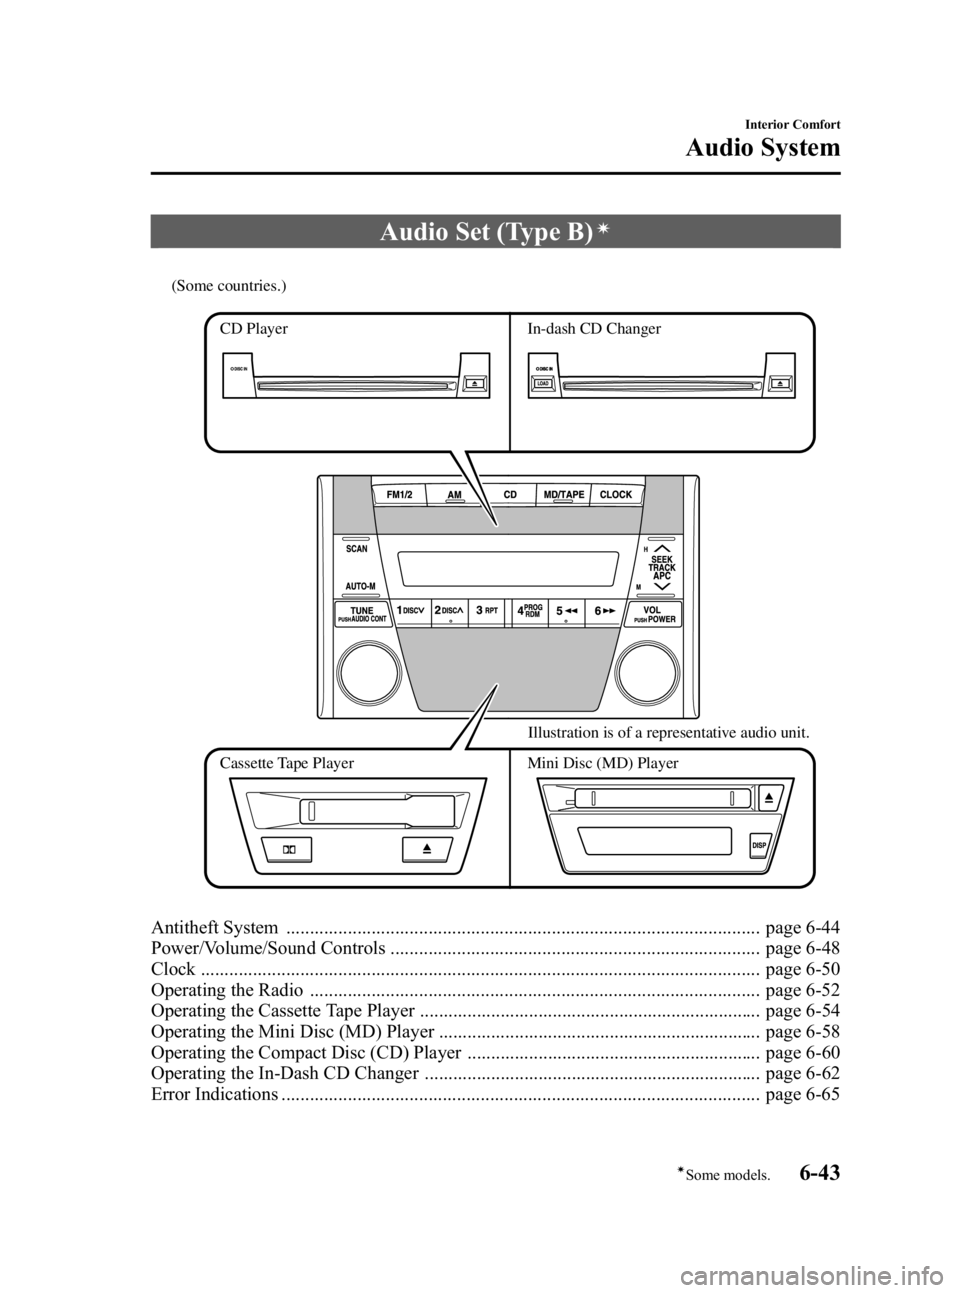
Audio Set (Type B)í
CD Player In-dash CD Changer
Cassette Tape Player Mini Disc (MD) Player Illustration is of a representative audio unit.
(Some countries.)
Antitheft System .................................................................................................... page 6-44
Power/Volume/Sound Controls .............................................................................. page 6-48
Clock ...................................................................................................................... page 6-50
Operating the Radio ............................................................................................... page 6-52
Operating the Cassette Tape Player ........................................................................ page 6-54
Operating the Mini Disc (MD) Player .................................................................... page 6-58
Operating the Compact Disc (CD) Player .............................................................. page 6-60
Operating the In-Dash CD Changer ....................................................................... page 6-62
Error Indications ..................................................................................................... page 6-65
Interior Comfort
Audio System
6-43íSome models.
MX-5 Miata_8T72-EA-04G_Edition2 Page169
Tuesday, August 31 2004 11:24 AM
Form No.8T72-EA-04G
Page 176 of 298
Black plate (176,1)
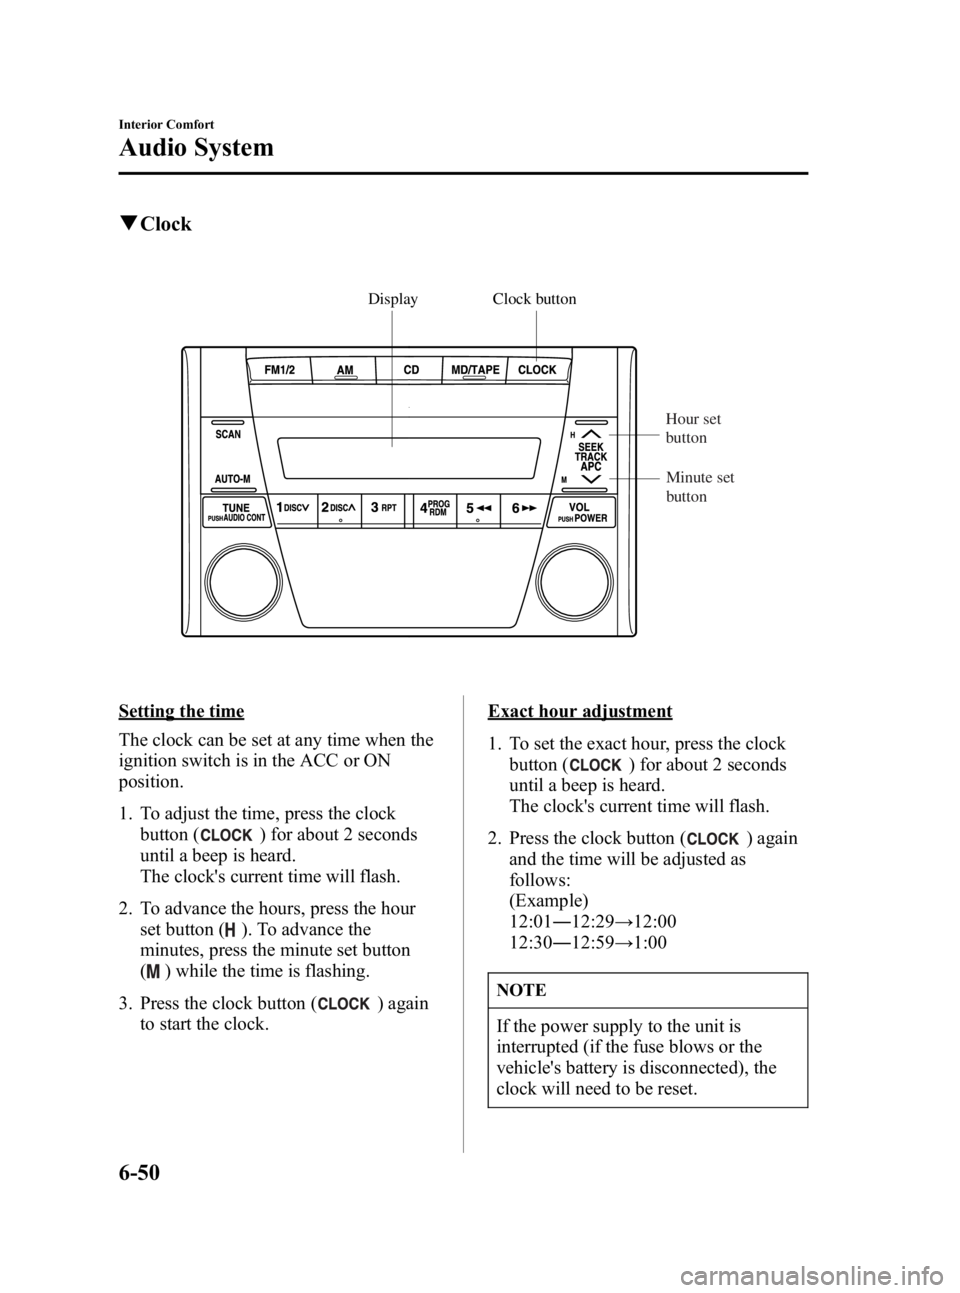
qClock
Display Clock button
Hour set
button
Minute set
button
Setting the time
The clock can be set at any time when the
ignition switch is in the ACC or ON
position.
1. To adjust the time, press the clock button (
) for about 2 seconds
until a beep is heard.
The clock's current time will flash.
2. To advance the hours, press the hour set button (
). To advance the
minutes, press the minute set button
(
) while the time is flashing.
3. Press the clock button (
) again
to start the clock.
Exact hour adjustment
1. To set the exact hour, press the clock button (
) for about 2 seconds
until a beep is heard.
The clock's current time will flash.
2. Press the clock button (
) again
and the time will be adjusted as
follows:
(Example)
12:01 ―12:29 →12:00
12:30 ―12:59 →1:00
NOTE
If the power supply to the unit is
interrupted (if the fuse blows or the
vehicle's battery is disconnected), the
clock will need to be reset.
6-50
Interior Comfort
Audio System
MX-5 Miata_8T72-EA-04G_Edition2 Page176
Tuesday, August 31 2004 11:24 AM
Form No.8T72-EA-04G
Page 204 of 298
Black plate (204,1)
1. Park on a level surface off the right-of-way and firmly set the parking brake.
2. Put a vehicle with an automatic transmission in Park (P), a manual
transmission in Reverse (R) or 1, and
turn off the engine.
3. Turn on the hazard warning flasher.
4. Have everyone get out of the vehicle and away from the vehicle and traffic.
5. Remove the jack, tool, and spare tire (page 7-3).
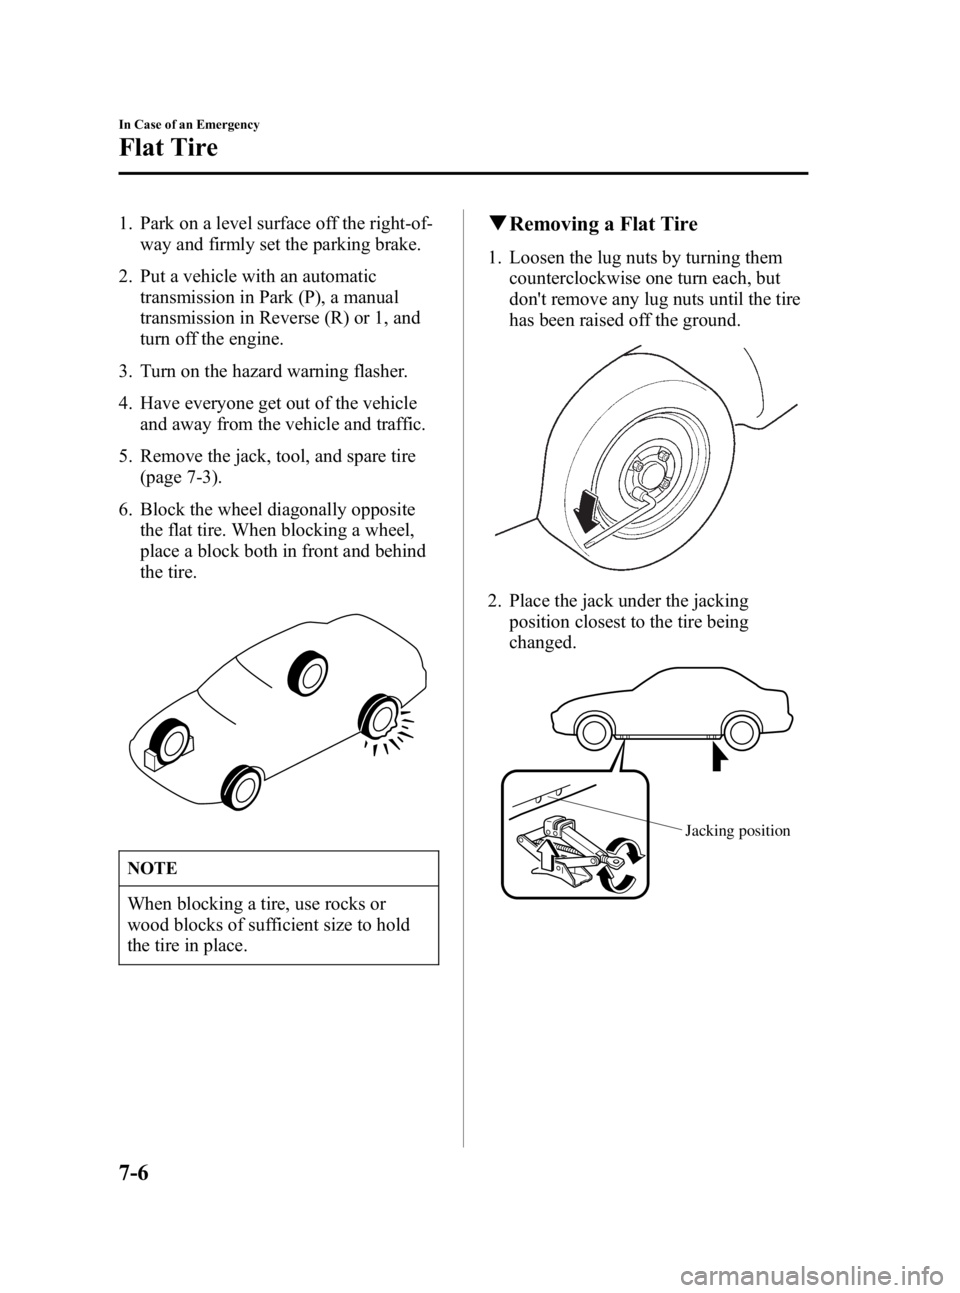
6. Block the wheel diagonally opposite the flat tire. When blocking a wheel,
place a block both in front and behind
the tire.
NOTE
When blocking a tire, use rocks or
wood blocks of sufficient size to hold
the tire in place.
qRemoving a Flat Tire
1. Loosen the lug nuts by turning them
counterclockwise one turn each, but
don't remove any lug nuts until the tire
has been raised off the ground.
2. Place the jack under the jacking
position closest to the tire being
changed.
Jacking position
7-6
In Case of an Emergency
Flat Tire
MX-5 Miata_8T72-EA-04G_Edition2 Page204
Tuesday, August 31 2004 11:25 AM
Form No.8T72-EA-04G