fuel MAZDA MODEL TRIBUTE 2002 (in English) Owner's Manual
[x] Cancel search | Manufacturer: MAZDA, Model Year: 2002, Model line: MODEL TRIBUTE, Model: MAZDA MODEL TRIBUTE 2002Pages: 256, PDF Size: 2.66 MB
Page 168 of 256

2. Check the fuel system for leaks.
3. If no fuel leak is apparent, reset the fuel pump shut-off switch by
pushing in on the reset button.
4. Turn the ignition to the ON position. Pause for a few seconds and
return the key to the LOCK/OFF position.
5. Make a further check for leaks in the fuel system.
FUSES AND RELAYS
Fuses
If electrical components in the
vehicle are not working, a fuse may
have blown. Blown fuses are
identified by a broken wire within
the fuse. Check the appropriate
fuses before replacing any electrical
components.
Note:Always replace a fuse with one that has the specified amperage
rating. Using a fuse with a higher amperage rating can cause severe wire
damage and could start a fire.
Standard fuse amperage rating and color
COLOR
Fuse
ratingMini
fusesStandard
fusesMaxi
fusesCartridge
maxi
fusesFuse link
cartridge
2A Grey Grey Ð Ð Ð
3A Violet Violet Ð Ð Ð
4A Pink Pink Ð Ð Ð
5A Tan Tan Ð Ð Ð
7.5A Brown Brown Ð Ð Ð
10A Red Red Ð Ð Ð
15A Blue Blue Ð Ð Ð
20A Yellow Yellow Yellow Blue Blue
25A Natural Natural Ð Ð Ð
30A Green Green Green Pink Pink
15
Roadside Emergencies
168
Page 172 of 256
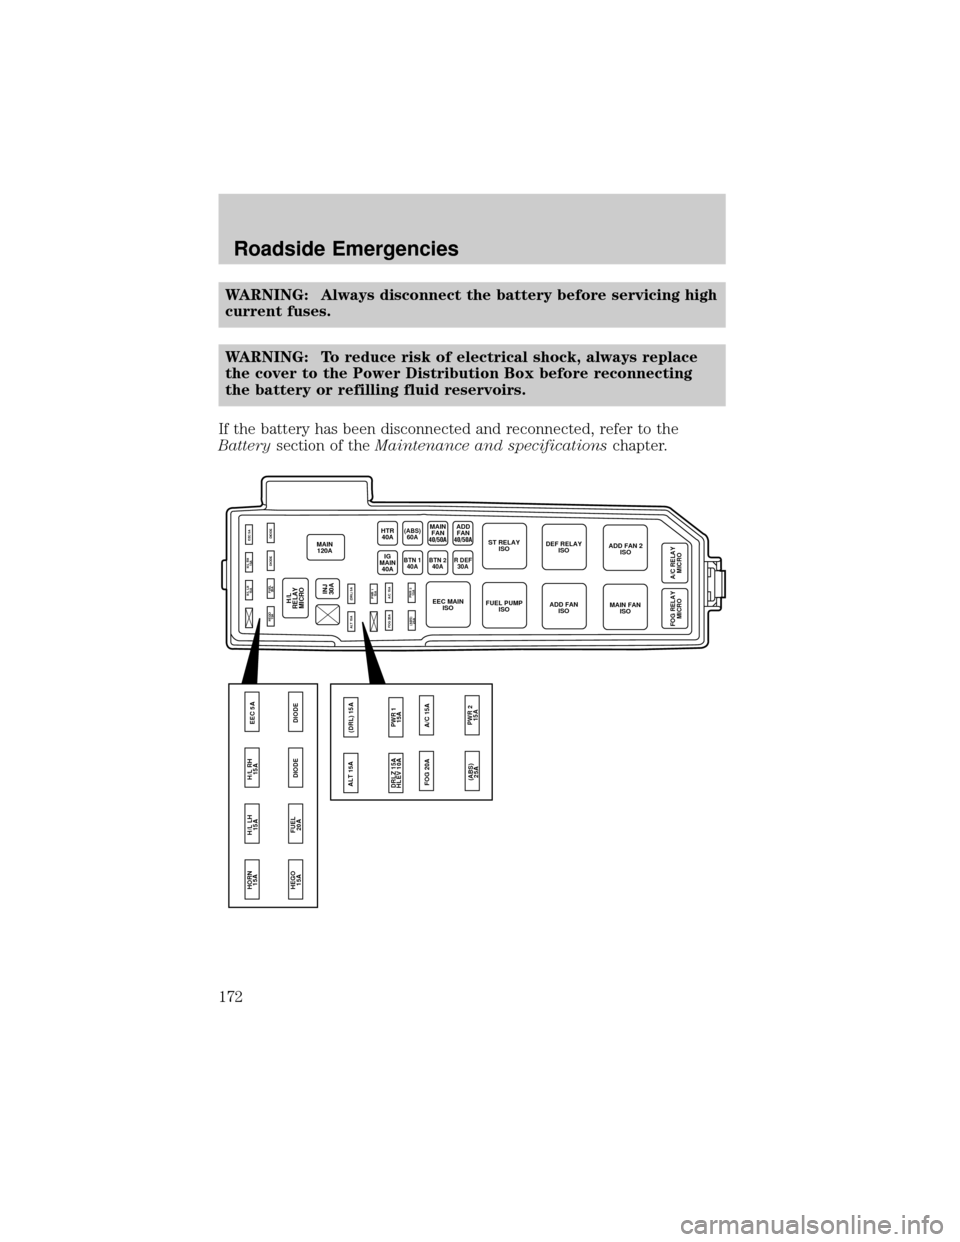
WARNING: Always disconnect the battery before servicing high
current fuses.
WARNING: To reduce risk of electrical shock, always replace
the cover to the Power Distribution Box before reconnecting
the battery or refilling fluid reservoirs.
If the battery has been disconnected and reconnected, refer to the
Batterysection of theMaintenance and specificationschapter.
MAIN
120A
HEGO
15A
ALT 15A
FOG 20A(DRL) 5A
PWR 1
15A
(ABS)
25APWR 2
15A A/C 15AFUEL
20ADIODE DIODE H/L LH
15AH/L RH
15AEEC 5A
HEGO
15A HORN
15A
FUEL
20ADIODE DIODE H/L LH
15AH/L RH
15AEEC 5A
INJ
30A
HTR
40A
BTN 1
40ABTN 240AR DEF30AIG
MAIN
40A
H/L
RELAY
MICRO
MAIN
FAN(ABS)
60AST RELAY
ISODEF RELAY
ISOADD FAN 2
ISO
A/C RELAY
MICRO FOG RELAY
MICRO
MAIN FAN
ISO ADD FAN
ISO EEC MAIN
ISOFUEL PUMP
ISO
ALT 15A
FOG 20A(DRL) 15A
PWR 1
15A DRLZ 15A
HLEV 10A
(ABS)
25APWR 2
15A A/C 15A
40/50AADD
FAN
40/50A
Roadside Emergencies
172
Page 173 of 256

The high-current fuses are coded as follows.
Fuse/Relay
LocationFuse Amp
RatingPower Distribution Box
Description
Horn 15A Horn
H/L LH 15A* Headlamp (high/low left, High
beams)
H/L RH 15A* Headlamp (high/low right, High
beams)
EEC 5A* EEC (KPWR)
HEGO 15A* HEGO 1,2, CMS 1,2, VMV
FUEL 20A* Fuel Pump, EEC (FPM)
DIODE Ð Ð
DIODE Ð Ð
H/L RELAY
MICROÐ Headlamp (high/low, right/left
relay)
ÐÐÐ
INJ 30A** EEC (VPWR), EVR, MAF, IAC,
Bulkhead
MAIN 120A Main
ALT 15A* Alternator/ Regulator
(DRL) 15A* Daytime Running Lamps (DRL)
unit (feed), DRL relay
(DRLZ) (HELV)15A*(DRLZ)
10A(HLEV)DRL module, HLEV
PWR 1 15A* Auxiliary power point
FOG 20A* Foglamps, Foglamp indicator
A/C 15A* A/C clutch
(ABS) 25A* Anti-lock Brake System (ABS)
SOL
PWR 2 15A* Auxiliary power point
IG MAIN 40A** Starter
HTR 40A** Blower motor, Blower motor relay
Roadside Emergencies
173
Page 174 of 256

Fuse/Relay
LocationFuse Amp
RatingPower Distribution Box
Description
BTN 1 40A** JB - Accessory relay, Radio, Cigar
lighter, Cluster, Power mirror,
GEM, Electronic flasher control
(ABS) 60A** ABS motor
BTN 2 40A** JB - Radio, Cluster, Dome lamps,
Map lamps, Cargo lamps, Cruise
control, Power seat, Horn
MAIN FAN 40A** (2.0L)
50A(3.0L)Main fan
R DEF 30A** Rear defroster
ADD FAN 40A**(2.0L)
50A(3.0L)Add fan
EEC MAIN ISO Ð EEC relay
FUEL PUMP ISO Ð Fuel pump relay
MAIN FAN ISO Ð Low-speed fan control relay (2.0L
engine)
High-speed fan control relay 1
(3.0L engine)
ADD FAN ISO Ð High-speed fan control relay 1
(2.0L engine)
Low-speed fan control relay (3.0L
engine)
DEF RELAY ISO Ð Rear defroster relay
ST RELAY ISO Ð Starter relay
ADD FAN 2 ISO Ð High-speed fan control relay 2
(3.0L engine)
Medium-speed fan control relay
(2.0L engine)
FOG RELAY
MICROÐ Foglamp relay
A/C RELAY
MICROÐ A/C clutch relay
Roadside Emergencies
174
Page 183 of 256

4. Make the final connection of the negative (-) cable to an exposed
metal part of the disabled vehicle's engine, away from the battery
and the fuel injection system.NOTE: Do notuse fuel lines, engine
rocker covers or the intake manifold asgroundingpoints.
WARNING: Do not connect the end of the second cable to the
negative (-) terminal of the battery to be jumped. A spark may
cause an explosion of the gases that surround the battery.
5. Ensure that the cables are clear of fan blades, belts, moving parts of
both engines, or any fuel delivery system parts.
Jump starting
1. Start the engine of the booster vehicle and run the engine at
moderately increased speed.
2. Start the engine of the disabled vehicle.
3. Once the disabled vehicle has been started, run both engines for an
additional three minutes before disconnecting the jumper cables.
+–+–
Roadside Emergencies
183
Page 195 of 256

vehicles built for use in the United States, its territories, and Canada may
differ from those sold in other countries.
The differences may make it difficult or even impossible for your vehicle
to receive satisfactory servicing in other countries. We strongly
recommend that you NOT take your Mazda outside these areas.
You may have these problems if you do:
²Recommended fuel may be unavailable. Any kind of leaded fuel or
low-octane fuel will affect vehicle performance and damage the
emission controls and engine.
²Proper repair facilities, tools, testing equipment, and replacement
parts may not be available.
The manufacturer's warranty applies only to Mazda vehicles registered
and normally operated in the United States, its territories, and Canada.
REPORTING SAFETY DEFECTS
If you believe that your vehicle has a defect which could cause a crash or
could cause injury or death, you should immediately inform the National
Highway Traffic Safety Administration (NHTSA) in addition to notifying
Mazda Motor Corporation (Your Mazda Importer/Distributor).
If NHTSA receives similar complaints, it may open an investigation, and
if it finds that a safety defect exists in a group of vehicles, it may order a
recall and remedy campaign. However NHTSA cannot become involved in
individual problems between you, your dealer, or Mazda Motor
Corporation (Your Mazda Importer/Distributor).
To contact NHTSA, you may either call the Auto Safety Hotline toll-free
at 1 (800) 424±9393 (or 366±0123 in Washington, D.C. area) or write to:
NHTSA, U.S. Department of Transportation. Washington, D.C. 20590. You
can also obtain other information about motor vehicle safety from the
Hotline.
(Note)
If you live in the U.S.A., all correspondence to Mazda Motor Corporation
should be forwarded to:
Mazda North American Operations
7755, Irvine Center Drive
Irvine, California 92618±2922
P.O. Box 19734
Irvine, CA 92623±9734
Customer Assistance Center
or toll free at 1 (800) 222±5500
Customer Assistance
195
Page 198 of 256
WASHING THE EXTERIOR
Wash your vehicle regularly with cool or lukewarm water and a neutral
Ph shampoo, such as Detail Wash (ZC-3±A), which is available from your
dealer.
²Never use strong household detergents or soap, such as dish washing
or laundry liquid. These products can discolor and spot painted
surfaces.
²Never wash a vehicle that is ªhot to the touchº or during exposure to
strong, direct sunlight.
²Always use a clean sponge or carwash mitt with plenty of water for
best results.
²Dry the vehicle with a chamois or soft terry cloth towel in order to
eliminate water spotting.
²It is especially important to wash the vehicle regularly during the
winter months, as dirt and road salt are difficult to remove and cause
damage to the vehicle.
²Immediately remove items such as gasoline, diesel fuel, bird droppings
and insect deposits because they can cause damage to the vehicle's
paintwork and trim over time.
²Remove any exterior accessories, such as antennas, before entering a
car wash.
²Suntan lotions and insect repellents can damage any painted
surface; if these substances come in contact with your vehicle,
wash off as soon as possible.
WAXING
Applying a polymer paint sealant to your vehicle every six months will
assist in reducing minor scratches and paint damage.
²Wash the vehicle first.
²Do not use waxes that contain abrasives.
²Do not allow paint sealant to come in contact with any non-body
(low-gloss black) colored trim, such as grained door handles, roof
racks, bumpers, side moldings, mirror housings or the windshield cowl
area. The paint sealant will ªgrayº or stain the parts over time.
Cleaning
198
Page 199 of 256

PAINT CHIPS
Your dealer has touch-up paint to match your vehicle's color. Touch-up
paint can be used to repair minor scratches to painted surfaces.
²Remove particles such as bird droppings, tree sap, insect deposits, tar
spots, road salt and industrial fallout before repairing paint chips.
²Always read the instructions before using the products.
ALUMINUM WHEELS AND COVERS
Aluminum wheel rims or covers are coated with a clearcoat paint finish.
In order to maintain their shine:
²Clean with One Step Wash and Wax Concentrate, which is available
from your local Mazda dealer.
²Never apply any cleaning chemical to hot or warm wheel rims or
covers.
²Some automatic car washes may cause damage to the finish on your
wheel rims or covers. Chemical-strength cleaners, or cleaning
chemicals, in combination with brush agitation to remove brake dust
and dirt, could wear away the clearcoat finish over time.
²Do not use hydrofluoric acid-based or high caustic-based wheel
cleaners, steel wool, fuels or strong household detergent.
²To remove tar and grease, use Extra Strength Tar and Road Oil
Removal, available from your local Mazda dealer.
ENGINE
Engines are more efficient when they are clean because grease and dirt
buildup keep the engine warmer than normal. When washing:
²Take care when using a power washer to clean the engine. The
high-pressure fluid could penetrate the sealed parts and cause
damage.
²Never spray the engine or other engine components with water. Water
will damage the engine or other engine components.
²Spray Engine Shampoo and Degreaser, available at your local Mazda
dealer, on all parts that require cleaning and pressure rinse clean.
²Cover the highlighted areas to prevent water damage when cleaning
the engine.
Cleaning
199
Page 201 of 256

windshield, rear window or the wiper blades may be the cause. These
may include hot wax treatments used by commercial car washes, tree
sap, or other organic contamination. To clean these items, please follow
these tips:
²The windshield or rear window may be cleaned with a non-abrasive
cleaner such as Ultra Clear Spray Glass Cleaner, available from your
local Mazda dealer.
²Do not use abrasives, as they may cause scratches.
²Do not use fuel, kerosene, or paint thinner to clean any parts.
²Wiper blades can be cleaned with isopropyl (rubbing) alcohol or
windshield washer solution. Be sure to replace wiper blades when they
appear worn or do not function properly.
INSTRUMENT PANEL AND CLUSTER LENS
Clean the instrument panel with a damp cloth, then dry with a dry cloth.
²Avoid cleaners or polish that increase the gloss of the upper portion of
the instrument panel. The dull finish in this area helps protect the
driver from undesirable windshield reflection.
WARNING: Do not use chemical solvents or strong detergents
when cleaning the steering wheel or instrument panel to avoid
contamination of the air bag system.
²Be certain to wash or wipe your hands clean if you have been in
contact with certain products such as insect repellent and suntan
lotion in order to avoid possible damage to the painted surfaces.
WOOD-TONE TRIM
²Clean the area with a damp cloth, then dry by wiping with a dry, soft,
clean cloth.
²Do not use household or glass cleaners as these may damage the
finish.
INTERIOR
For fabric, carpets, cloth seats, safety belts and seats equipped with side
air bags:
²Remove dust and loose dirt with a vacuum cleaner.
²Remove light stains and soil with Extra Strength Upholstery Cleaner,
available at your local Mazda dealer.
Cleaning
201
Page 204 of 256

SCHEDULE 1
I: Inspect and repair, clean, adjust, or replace if necessary
(Oil-permeated air filter cannot be cleaned using the air-blow method)
R: Replace
L: Lubricate
Maintenance ItemMaintenance Interval (Number of months or km (miles),
whichever comes first)
Months 6 12 18 24 30 36 42 48 54 60 66 72
x 1000 Km 12 24 36 48 60 72 84 96 108 120 132 144
(x 1000 Miles) (7.5) (15) (22.5) (30) (37.5) (45) (52.5) (60) (67.5) (75) (82.5) (95)
ENGINE
Engine valve clearance (for
2.0L engine)I
Engine timing belt (for 2.0L
engine)Replace every 144,000 km (90,000 miles)
Engine oilRRRRRRRRRRR R
Oil filterRRRRRRRRRRR R
Drive belts I I I
PCV valve (for
2.0L engine)*1 Replace every 96,000 km (60,000 miles
PCV valve (for
3.0L engine)*1 Replace every 160,000 km (100,000 miles)
Hoses and tubes
for emission*1 I
IGNITION SYSTEM
Spark plugs
(PLATINUM-TIPPED type)Replace every 160,000 km (100,000 miles)
FUEL SYSTEM
Air cleaner filter R R R
Fuel filter *1 R R R
Fuel lines and
hoses*1 I I I
COOLING SYSTEM
Cooling system I I I
Maintenance and Specifications
204