parking brake MAZDA MODEL TRIBUTE 2009 (in English) User Guide
[x] Cancel search | Manufacturer: MAZDA, Model Year: 2009, Model line: MODEL TRIBUTE, Model: MAZDA MODEL TRIBUTE 2009Pages: 304, PDF Size: 1.97 MB
Page 180 of 304

•Make sure the gearshift is in P
(Park).
If starting a vehicle with a manual
transmission:
• Make sure the parking brake is
set.
• Push the clutch pedal to the
floor.
3. Turn the key to 3 (on) without turning the key to 4 (start).
2009 Tribute (j14)
Owners Guide, 1st Printing
USA (fus)
Driving
180
Page 185 of 304

The ABS operates by detecting the
onset of wheel lockup during brake
applications and compensates for
this tendency. The wheels are
prevented from locking even when
the brakes are firmly applied. The
accompanying illustration depicts
the advantage of an ABS equipped
vehicle (on bottom) to a non-ABS
equipped vehicle (on top) during hard braking with loss of front braking
traction.
WARNING:The Anti-Lock system does not decrease the time
necessary to apply the brakes or always reduce stopping
distance. Always leave enough room between your vehicle and the
vehicle in front of you to stop.
Using ABS
When hard braking is required, apply continuous force on the brake
pedal; do not pump the brake pedal since this will reduce the
effectiveness of the ABS and will increase your vehicle’s stopping
distance. The ABS will be activated immediately, allowing you to retain
steering control during hard braking and on slippery surfaces. However,
the ABS does not decrease stopping distance.
ABS warning lamp
The ABS lamp in the instrument
cluster momentarily illuminates
when the ignition is turned on. If
the light does not illuminate during
start up, remains on or flashes, the
ABS may be disabled and may need to be serviced.
Even when the ABS is disabled,
normal braking is still effective. If
your BRAKE warning lamp
illuminates with the parking brake
released, have your brake system
serviced immediately by an authorized dealer.
ABS
P!
BRAKE
2009 Tribute (j14)
Owners Guide, 1st Printing
USA (fus)
Driving
185
Page 186 of 304
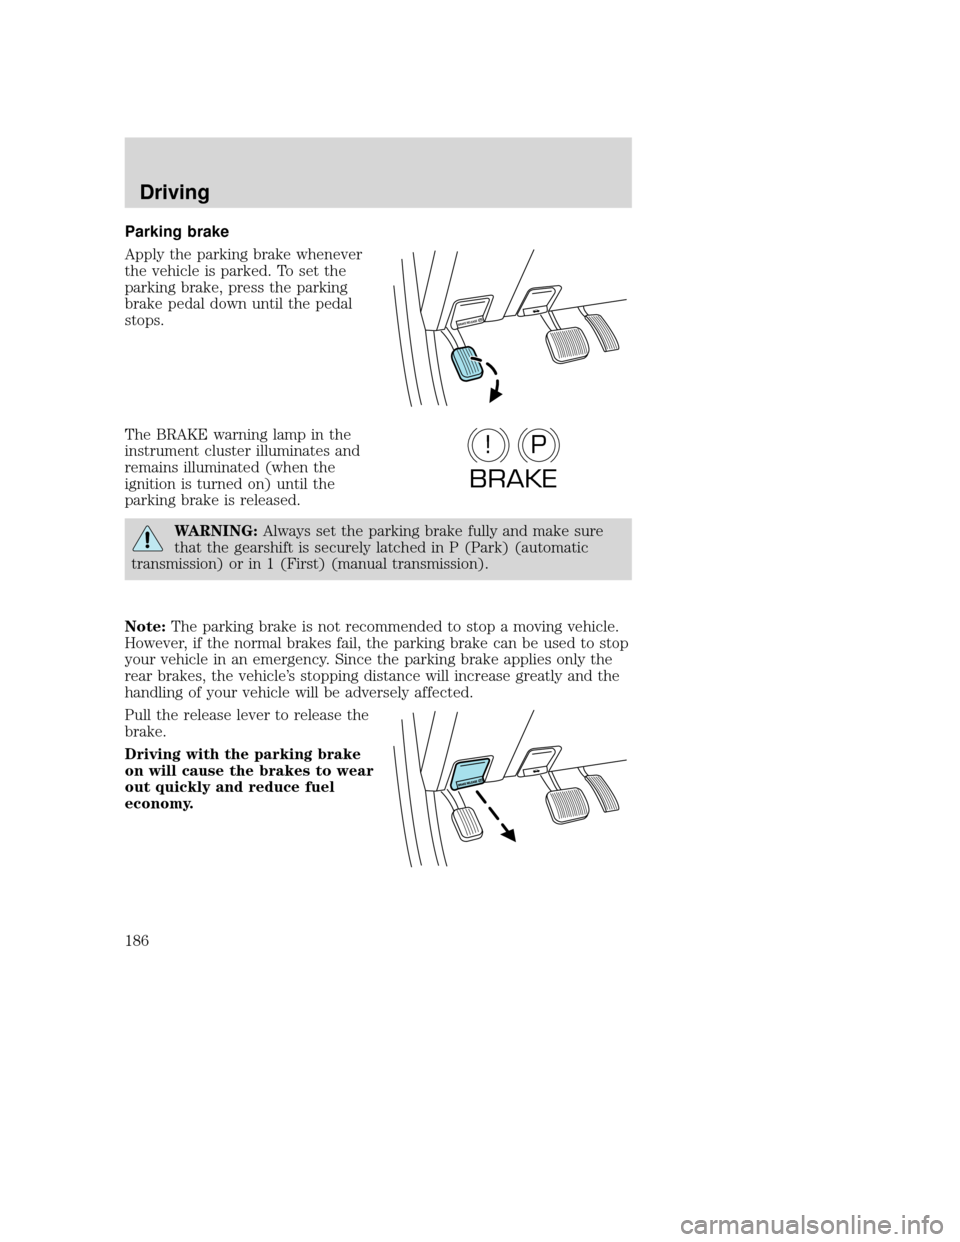
Parking brake
Apply the parking brake whenever
the vehicle is parked. To set the
parking brake, press the parking
brake pedal down until the pedal
stops.
The BRAKE warning lamp in the
instrument cluster illuminates and
remains illuminated (when the
ignition is turned on) until the
parking brake is released.
WARNING:Always set the parking brake fully and make sure
that the gearshift is securely latched in P (Park) (automatic
transmission) or in 1 (First) (manual transmission).
Note: The parking brake is not recommended to stop a moving vehicle.
However, if the normal brakes fail, the parking brake can be used to stop
your vehicle in an emergency. Since the parking brake applies only the
rear brakes, the vehicle’s stopping distance will increase greatly and the
handling of your vehicle will be adversely affected.
Pull the release lever to release the
brake.
Driving with the parking brake
on will cause the brakes to wear
out quickly and reduce fuel
economy.
BRAKE RELEASE P
P!
BRAKE
2009 Tribute (j14)
Owners Guide, 1st Printing
USA (fus)
Driving
186
Page 194 of 304

If you cannot move the gearshift lever out of P (Park) with ignition in
the on position and the brake pedal depressed, it is possible that a fuse
has blown or the vehicle’s brakelamps are not operating properly. Refer
toFuses and relays in theRoadside Emergencies chapter.
If the fuse is not blown, perform the following procedure: 1. Apply the parking brake, turn the ignition to off, then remove the key.
2. Using a screwdriver or similar tool, carefully pry out the small
Brake Transmission Shift
Interlock (BTSI) cover cap
located to the right of the
gearshift lever.
3. Insert a screwdriver or similar tool straight down into the
access hole and press downward
while pulling the gearshift lever
out of the P (Park) position and
into the N (Neutral) position.
4. Remove tool and reinstall the BTSI cover cap.
5. Start the vehicle and release the parking brake.
WARNING: Do not drive your vehicle until you verify that the
brakelamps are working.
WARNING: Always set the parking brake fully and make sure
the gearshift is latched in P (Park). Turn the ignition to the off
position and remove the key whenever you leave your vehicle.
WARNING: If the parking brake is fully released, but the brake
warning lamp remains illuminated, the brakes may not be
working properly. Drive slowly and carefully to your authorized dealer.
2009 Tribute (j14)
Owners Guide, 1st Printing
USA (fus)
Driving
194
Page 196 of 304

WARNING:Always set the parking brake fully and make sure
the gearshift is latched in P (Park). Turn the ignition to the
LOCK position and remove the key whenever you leave your vehicle.
R (Reverse)
With the gearshift lever in R (Reverse), the vehicle will move backward.
Always come to a complete stop before shifting into and out of R
(Reverse).
N (Neutral)
With the gearshift lever in N (Neutral), the vehicle can be started and is
free to roll. Hold the brake pedal down while in this position.
D (Drive) with Overdrive
The normal driving position for the best fuel economy. Transmission
operates in gears one through six.
D (Drive) with Overdrive Cancel and Grade Assist
Pressing the transmission control
switch on the side of the gearshift
lever activates two features at the
same time: Overdrive Cancel and
Grade Assist.
1. Overdrive Cancel
• Overdrive is deactivated.
• The transmission operates in gears one through five.
2009 Tribute (j14)
Owners Guide, 1st Printing
USA (fus)
Driving
196
Page 198 of 304

MANUAL TRANSMISSION OPERATION (IF EQUIPPED)
Using the clutch
Manual transmission vehicles have a starter interlock that prevents
cranking the engine unless the clutch pedal is fully depressed.
To start the vehicle:1. Make sure the parking brake is fully set.
2. Press the clutch pedal to the floor, then put the gearshift
lever in the neutral position.
3. Start the engine.
4. Press the brake pedal and move the gearshift lever to the desired gear; 1 (First) or R (Reverse).
5. Release the parking brake, then slowly release the clutch pedal while slowly pressing on the accelerator.
During each shift, the clutch pedal must be fully depressed to the floor.
Make sure the floor mat is properly positioned so it doesn’t interfere with
the full extension of the clutch pedal.
Failure to fully depress the clutch pedal to the floor may cause
increased shift efforts, prematurely wear transmission
components or damage the transmission.
Do not drive with your foot resting on the clutch pedal or use the
clutch pedal to hold your vehicle at a standstill while waiting on a
hill. These actions will severely reduce the life of the clutch and
could nullify a clutch warranty claim.
1 35
24 R
1
24R3
5
2009 Tribute
(j14)
Owners Guide, 1st Printing
USA (fus)
Driving
198
Page 199 of 304

Recommended shift speeds
Upshift according to the following charts for best fuel economy:
Upshifts during light to moderate accelerations and cruises (forbest fuel economy)
Shift from:
1-2 10 mph (16 km/h)
2-3 20 mph (32 km/h)
3-4 32 mph (52 km/h)
4-5 37 mph (60 km/h)
Reverse
Make sure that your vehicle is at a complete stop before you shift
into R (Reverse). Failure to do so may damage the transmission. 1. Hold the clutch pedal down and move the gearshift lever into
the neutral position.
2. From the neutral position, move the gearshift lever all the way to the right, then move it down into the R (Reverse) position.
Note: The gearshift lever can only be moved into R (Reverse) by moving
it from left of 3 (Third) and 4 (Fourth) before shifting into R (Reverse).
This is a lockout feature that protects the transmission from accidentally
being shifted into R (Reverse) from 5 (Fifth).
If R (Reverse) is not fully engaged, press the clutch pedal down and
return the gearshift to the neutral position. Release the clutch pedal for
a moment, then press it down and shift to R (Reverse) again.
Parking your vehicle
1. Apply the brake and shift into the neutral position.
2. Fully apply the parking brake, then shift into 1 (First).
3. Turn the ignition off.
1
24R 3
5
2009 Tribute
(j14)
Owners Guide, 1st Printing
USA (fus)
Driving
199
Page 200 of 304

WARNING:Do not park your vehicle in Neutral, it may move
unexpectedly and injure someone. Use 1 (First) gear and set the
parking brake fully.
FOUR WHEEL DRIVE (4WD) SYSTEM (IF EQUIPPED)
WARNING: For important information regarding safe operation
of this type of vehicle, see Preparing to drive your vehicle in
this chapter.
Your vehicle is equipped with an intelligent 4WD System that
continuously monitors vehicle conditions and automatically adjusts the
power distribution between the front and rear wheels. It combines
transparent all-surface operation with highly capable four-wheel drive.
The 4WD system is always active and requires no driver input. It is
capable of handling all road conditions, including street and highway
driving as well as off-road and winter driving.
Driving off-road with truck and utility vehicles
4WD vehicles are specially equipped for driving on sand, snow, mud and
rough terrain and have operating characteristics that are somewhat
different from conventional vehicles, both on and off the road.
How your vehicle differs from other vehicles
Truck and utility vehicles can differ from some other vehicles. Your
vehicle may be higher to allow it to travel over rough terrain without
getting hung up or damaging underbody components.
The differences that make your vehicle so versatile also make it handle
differently than an ordinary passenger car.
Maintain steering wheel control at all times, especially in rough
terrain. Since sudden changes in terrain can result in abrupt
steering wheel motion, make sure you grip the steering wheel
from the outside. Do not grip the spokes.
Drive cautiously to avoid vehicle damage from concealed objects
such as rocks and stumps.
You should either know the terrain or examine maps of the area before
driving. Map out your route before driving in the area. To maintain
steering and braking control of your vehicle, you must have all four
wheels on the ground and they must be rolling, not sliding or spinning.
2009 Tribute (j14)
Owners Guide, 1st Printing
USA (fus)
Driving
200
Page 202 of 304

WARNING:Always set the parking brake fully and make sure
the gearshift is latched in 1st gear or R (Reverse) (manual
transmissions) or P (Park) (automatic transmissions). Turn the ignition
to the off position and remove the key whenever you leave your
vehicle.
WARNING: If the parking brake is fully released, but the brake
warning lamp remains illuminated, the brakes may not be
working properly. See your authorized dealer.
Do not rock the vehicle if the engine is not at normal operating
temperature or damage to the transmission may occur.
WARNING: Do not spin the wheels at over 35 mph (56 km/h).
The tires may fail and injure a passenger or bystander.
Emergency maneuvers
• In an unavoidable emergency situation where a sudden sharp turn
must be made, remember to avoid “over-driving” your vehicle, i.e.,
turn the steering wheel only as rapidly and as far as required to avoid
the emergency. Excessive steering will result in less vehicle control,
not more. Additionally, smooth variations of the accelerator and/or
brake pedal pressure should be utilized if changes in vehicle speed are
called for. Avoid abrupt steering, acceleration or braking which could
result in an increased risk of loss of vehicle control, vehicle rollover
and/or personal injury. Use all available road surface to return the
vehicle to a safe direction of travel.
• In the event of an emergency stop, avoid skidding the tires and do not
attempt any sharp steering wheel movements.
WARNING: Vehicles with a higher center of gravity such as
utility and four-wheel drive vehicles handle differently than
vehicles with a lower center of gravity. Utility and four-wheel drive
vehicles are not designed for cornering at speeds as high as passenger
cars any more than low-slung sports cars are designed to perform
satisfactorily under off-road conditions. Avoid sharp turns, excessive
speed and abrupt maneuvers in these vehicles. Failure to drive
cautiously could result in an increased risk of loss of vehicle control,
vehicle rollover, personal injury and death.
2009 Tribute (j14)
Owners Guide, 1st Printing
USA (fus)
Driving
202
Page 213 of 304

The high-current fuses are coded as follows.
Fuse/RelayLocation Fuse Amp
Rating Protected Circuits
A 80A Midi Electronic power steering module (EPAS)
B 125A Midi SPDJB 1 15A* Heated mirror
2 30A** Rear defroster
3 20A** Rear power point (center console)
4 — Not used
5 10A* Powertrain Control Module (PCM) Keep Alive power, PCM relay,
Canister vent
6 15A* Alternator
7 15A* Liftgate latch
8 20A* Trailer tow parking lamps
9 50A** Anti-lock Brake System (ABS)
10 30A** Front wipers
11 30A** Starter
12 40A** Blower motor
13 10A* A/C clutch
14 15A* Trailer tow turn lamps
2009 Tribute (j14)
Owners Guide, 1st Printing
USA (fus)
Roadside Emergencies
213