spare tire MAZDA MODEL TRIBUTE 4WD 2001 Owners Manual
[x] Cancel search | Manufacturer: MAZDA, Model Year: 2001, Model line: MODEL TRIBUTE 4WD, Model: MAZDA MODEL TRIBUTE 4WD 2001Pages: 232, PDF Size: 1.74 MB
Page 63 of 232
If your keys are lost or stolen you
will need to do the following:
²Use your spare key to start the
vehicle. or
² Have your vehicle towed to an
authorized Mazda dealership. .
The key codes will need to be
erased from your vehicle and new key codes will need to be re-coded.
Replacing coded key can be very costly and you may want to store an
extra programmed key away from the vehicle in a safe place to prevent
an unforeseen inconvenience.
WARNING: If an unprogrammed key is used in the ignition it
will cause a ªNO STARTº condition.
Programming spare keys
A maximum of eight keys can be coded to your vehicle. Only
SecuriLock ykeys can be used. To program a coded keyyourself, you
will need two previously programmed coded keys(keys that already
operate your vehicle's engine) and the new unprogrammed key(s) readily
accessible for timely implementation of each step in the procedure.
If two previously programmed coded keys are not available, you must
bring your vehicle to your authorized Mazda dealership to have the spare
coded key(s) programmed.
NOTE: Please read and understand the entire procedure before you
begin.
NOTE: This procedure must be completed within the specified times. If
not completed within the specified time period, the reprogramming
procedure must be restarted from the beginning.
Controls and features
63
Page 121 of 232
²The vehicle should not be operated in the 4x4 ON mode on dry
or merely wet pavement. Doing so will produce excessive noise,
increase tire wear and may damage driveline components. The
4x4 ON mode is intended for use only on consistently slippery
or loose surfaces.
² If your vehicle is equipped with this 4x4 system, a spare tire of
a different diameter than the road tires should never be used.
Such a tire could result in damage to driveline components and
make the vehicle difficult to control.
WARNING: Utility and four-wheel drive vehicles are not
designed for cornering at speeds as high as passenger cars any
more than low-slung sports cars are designed to perform
satisfactorily under off-road conditions. Avoid sharp turns or
abrupt maneuvers in these vehicles.
4x4 system indicator lights
The 4x4 mode indicator light illuminates only under the following
conditions. If the indicator light illuminates when driving in the 4x4
AUTO mode, contact your Mazda dealer as soon as possible.
The indicator light illuminates when the 4x4 ON mode is engaged.
Shifting between 4x4 Auto and ON modes
Press the four-wheel drive control to
apply power to both axles. When
you activate the control, the
indicator light will illuminate in the
instrument cluster.
When you press the control again,
4x4 AUTO is activated and, the indicator light will turn off.
Either shift can be done at a stop or while driving at any speed.
Driving off-road with 4x4 Auto
Your vehicle is specially equipped for driving on sand, snow, mud and
rough terrain and has operating characteristics that are somewhat
different from conventional vehicles, both on and off the road.
LOCK
Driving
121
Page 142 of 232
Fuse/RelayLocation Fuse Amp
Rating Power Distribution Box Description
FUEL
PUMP ISO Ð Fuel Pump Relay
MAIN FAN ISO Ð Low Speed Fan Control Relay
(2.0L Engine)
High Speed Fan Control Relay 1
(3.0L Engine)
ADD FAN ISO Ð High Speed Fan Control Relay 1
(2.0L Engine)
Low Speed Fan Control Relay
(3.0L Engine)
DEF RELAY ISO Ð Rear Defroster Relay
ST RELAY ISO Ð Starter Relay
ADD FAN 2 ISO Ð High Speed Fan Control Relay 2
(3.0L Engine)
Medium Speed Fan Control Relay
(2.0L Engine)
FOG RELAY MICRO Ð Foglamp Relay
A/C RELAY MICRO Ð A/C Clutch Relay
CHANGING THE TIRES
If you get a flat tire while driving, do not apply the brake heavily.
Instead, gradually decrease your speed. Hold the steering wheel firmly
and slowly move to a safe place on the side of the road.
Temporary spare tire information
Your vehicle may have a temporary or conventional spare tire. The
temporary spare tire for your vehicle is labeled as such. It is smaller than
a regular tire and is designed for emergency use only. Replace this tire
with a full-size tire as soon as possible.
Roadside emergencies
142
Page 143 of 232
It is not recommended that the vehicle be operated in 4WD modes with
a temporary spare. If 4WD operation is necessary, do not operate above
speeds of 16 km/h (10 mph) or for distances above 80 km (50 miles).WARNING: If you use the temporary spare tire continuously or
do not follow these precautions, the tire could fail, causing you
to lose control of the vehicle, possibly injuring yourself or
others.
When driving with the temporary spare tire do not:
² exceed 80 km/h (50 mph) under any circumstances
² load the vehicle beyond maximum vehicle load rating listed on the
Safety Compliance Label
² tow a trailer
² use tire chains
² drive through an automatic car wash, because of the vehicle's reduced
ground clearance
² try to repair the temporary spare tire or remove it from its wheel rim
² use the wheel for any other type of vehicle
Tire change procedure WARNING: When one of the front wheels is off the ground, the
transmission alone will not prevent the vehicle from moving or
slipping off the jack, even if the vehicle is in P (Park)
(automatic transaxle) or R (Reverse) (manual transaxle).
WARNING: To prevent the vehicle from moving when you
change a tire, be sure the parking brake is set, then block (in
both directions) the wheel that is diagonally opposite (other
side and end of the vehicle) to the tire being changed.
WARNING: If the vehicle slips off the jack, you or someone
else could be seriously injured.
Roadside emergencies
143
Page 144 of 232
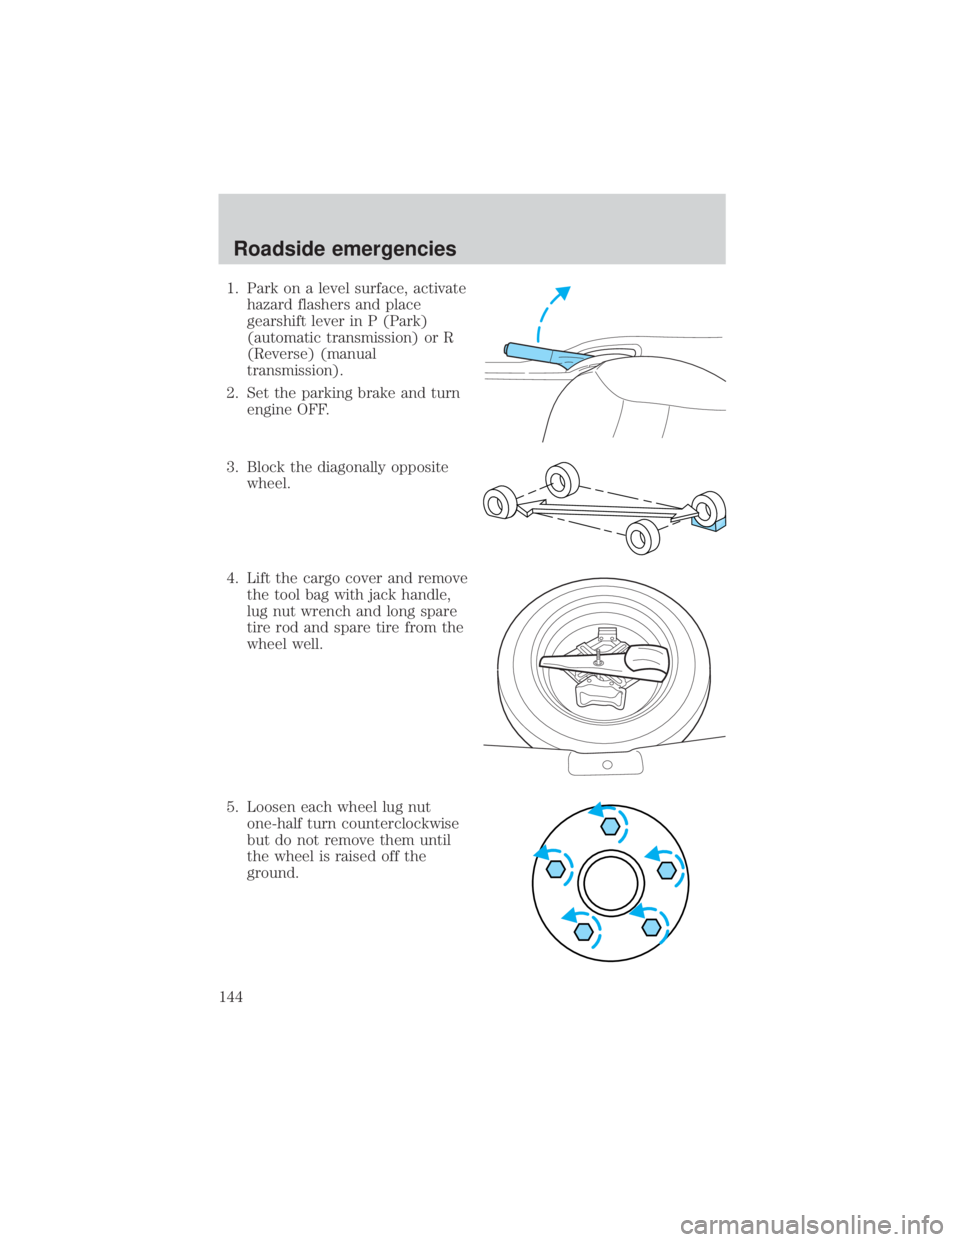
1. Park on a level surface, activatehazard flashers and place
gearshift lever in P (Park)
(automatic transmission) or R
(Reverse) (manual
transmission).
2. Set the parking brake and turn engine OFF.
3. Block the diagonally opposite wheel.
4. Lift the cargo cover and remove the tool bag with jack handle,
lug nut wrench and long spare
tire rod and spare tire from the
wheel well.
5. Loosen each wheel lug nut one-half turn counterclockwise
but do not remove them until
the wheel is raised off the
ground.
Roadside emergencies
144
Page 146 of 232
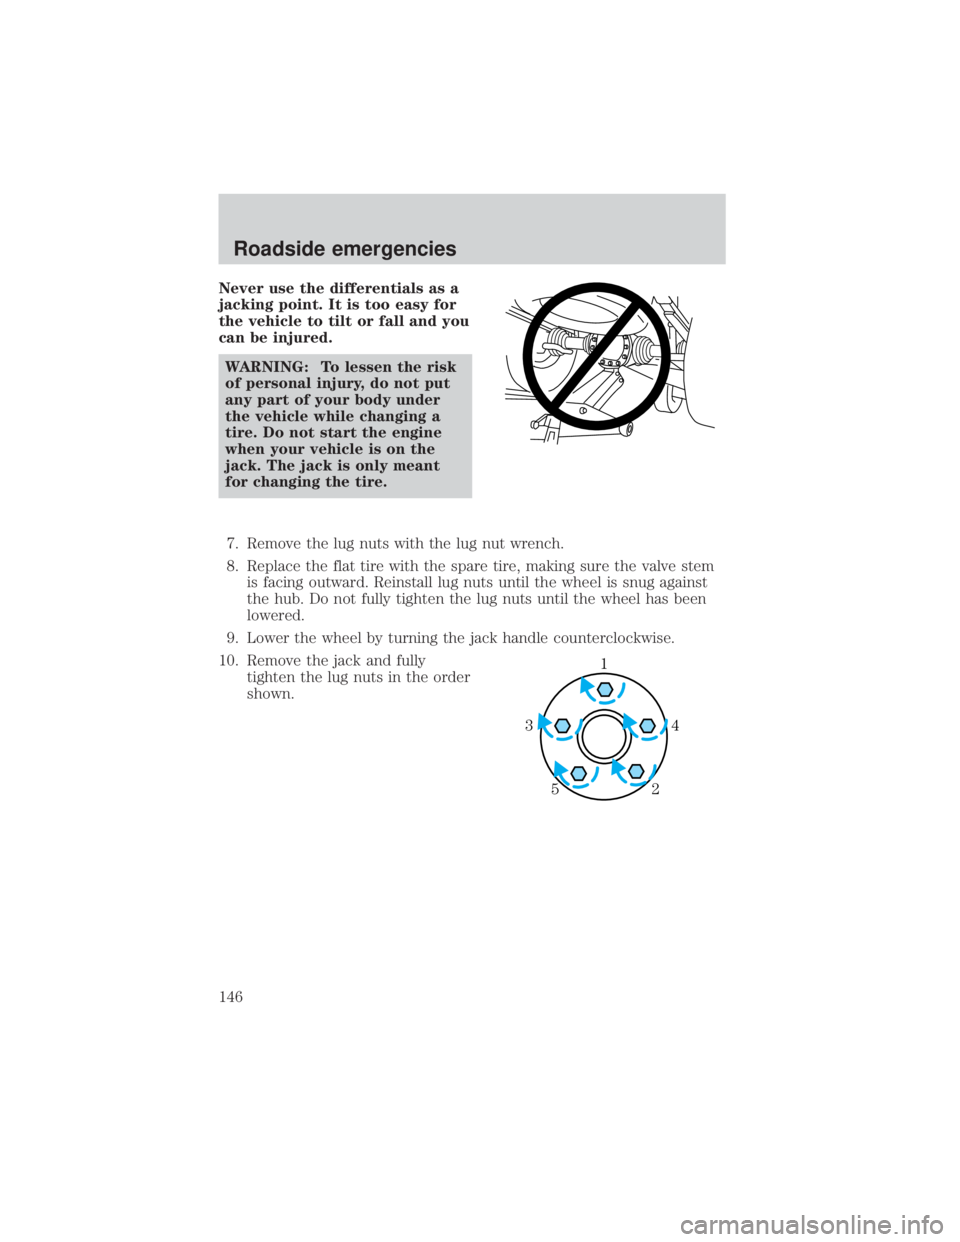
Never use the differentials as a
jacking point. It is too easy for
the vehicle to tilt or fall and you
can be injured.WARNING: To lessen the risk
of personal injury, do not put
any part of your body under
the vehicle while changing a
tire. Do not start the engine
when your vehicle is on the
jack. The jack is only meant
for changing the tire.
7. Remove the lug nuts with the lug nut wrench.
8. Replace the flat tire with the spare tire, making sure the valve stem is facing outward. Reinstall lug nuts until the wheel is snug against
the hub. Do not fully tighten the lug nuts until the wheel has been
lowered.
9. Lower the wheel by turning the jack handle counterclockwise.
10. Remove the jack and fully tighten the lug nuts in the order
shown.
1
4
3
2
5
Roadside emergencies
146
Page 147 of 232
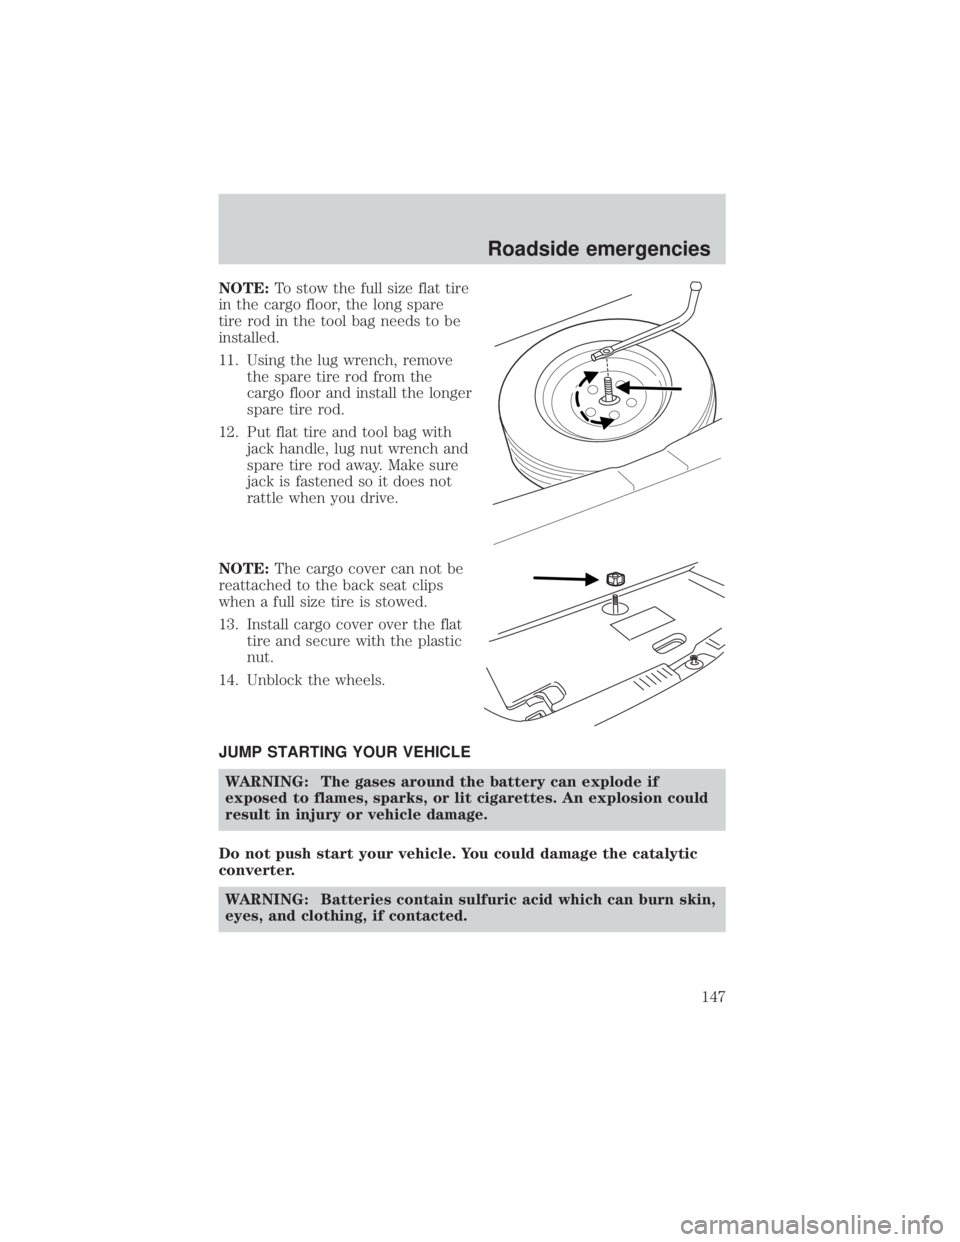
NOTE:To stow the full size flat tire
in the cargo floor, the long spare
tire rod in the tool bag needs to be
installed.
11. Using the lug wrench, remove the spare tire rod from the
cargo floor and install the longer
spare tire rod.
12. Put flat tire and tool bag with jack handle, lug nut wrench and
spare tire rod away. Make sure
jack is fastened so it does not
rattle when you drive.
NOTE: The cargo cover can not be
reattached to the back seat clips
when a full size tire is stowed.
13. Install cargo cover over the flat tire and secure with the plastic
nut.
14. Unblock the wheels.
JUMP STARTING YOUR VEHICLE
WARNING: The gases around the battery can explode if
exposed to flames, sparks, or lit cigarettes. An explosion could
result in injury or vehicle damage.
Do not push start your vehicle. You could damage the catalytic
converter. WARNING: Batteries contain sulfuric acid which can burn skin,
eyes, and clothing, if contacted.
Roadside emergencies
147
Page 184 of 232
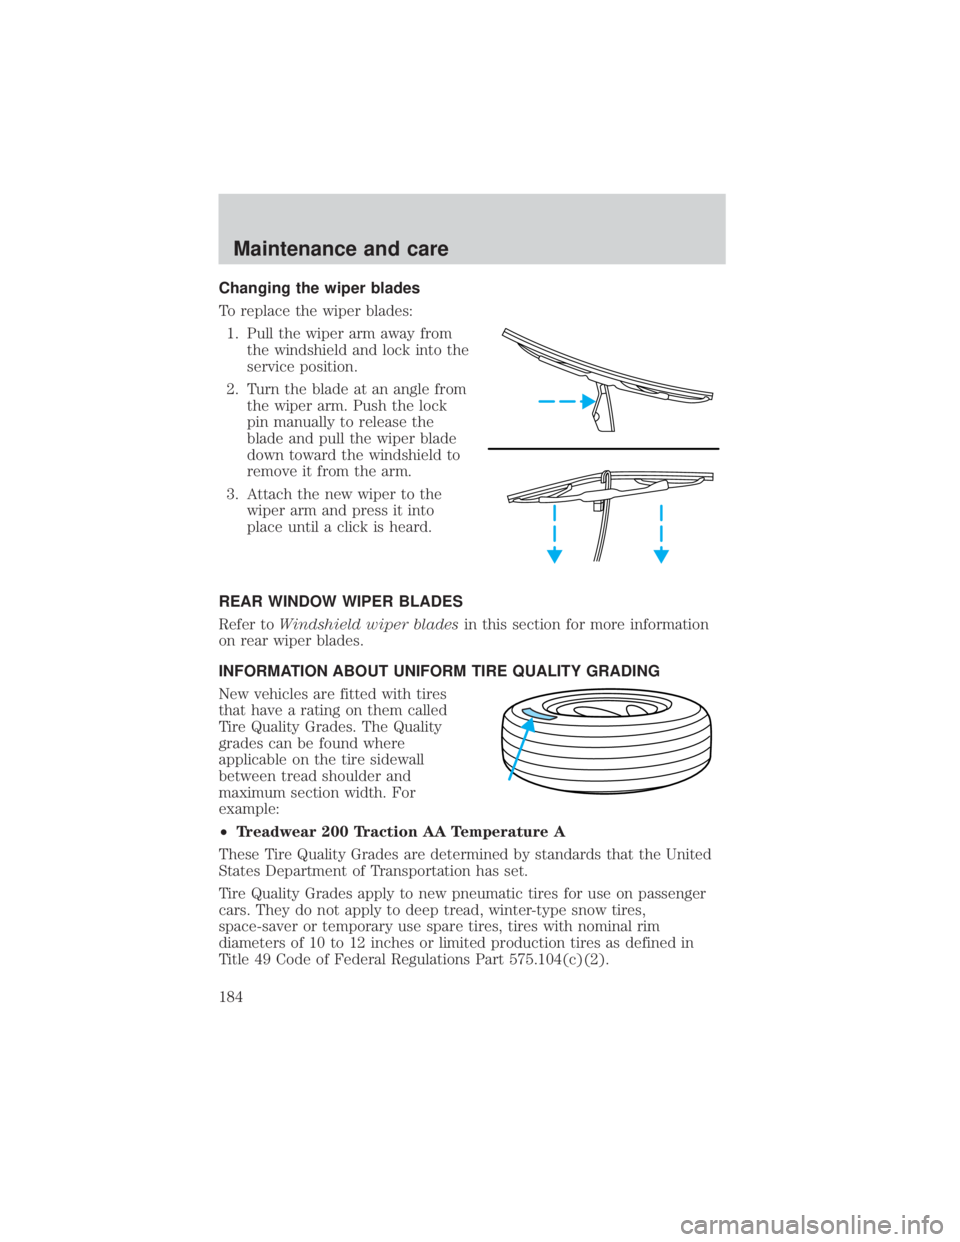
Changing the wiper blades
To replace the wiper blades:1. Pull the wiper arm away from the windshield and lock into the
service position.
2. Turn the blade at an angle from the wiper arm. Push the lock
pin manually to release the
blade and pull the wiper blade
down toward the windshield to
remove it from the arm.
3. Attach the new wiper to the wiper arm and press it into
place until a click is heard.
REAR WINDOW WIPER BLADES
Refer to Windshield wiper blades in this section for more information
on rear wiper blades.
INFORMATION ABOUT UNIFORM TIRE QUALITY GRADING
New vehicles are fitted with tires
that have a rating on them called
Tire Quality Grades. The Quality
grades can be found where
applicable on the tire sidewall
between tread shoulder and
maximum section width. For
example:
² Treadwear 200 Traction AA Temperature A
These Tire Quality Grades are determined by standards that the United
States Department of Transportation has set.
Tire Quality Grades apply to new pneumatic tires for use on passenger
cars. They do not apply to deep tread, winter-type snow tires,
space-saver or temporary use spare tires, tires with nominal rim
diameters of 10 to 12 inches or limited production tires as defined in
Title 49 Code of Federal Regulations Part 575.104(c)(2).
Maintenance and care
184
Page 214 of 232
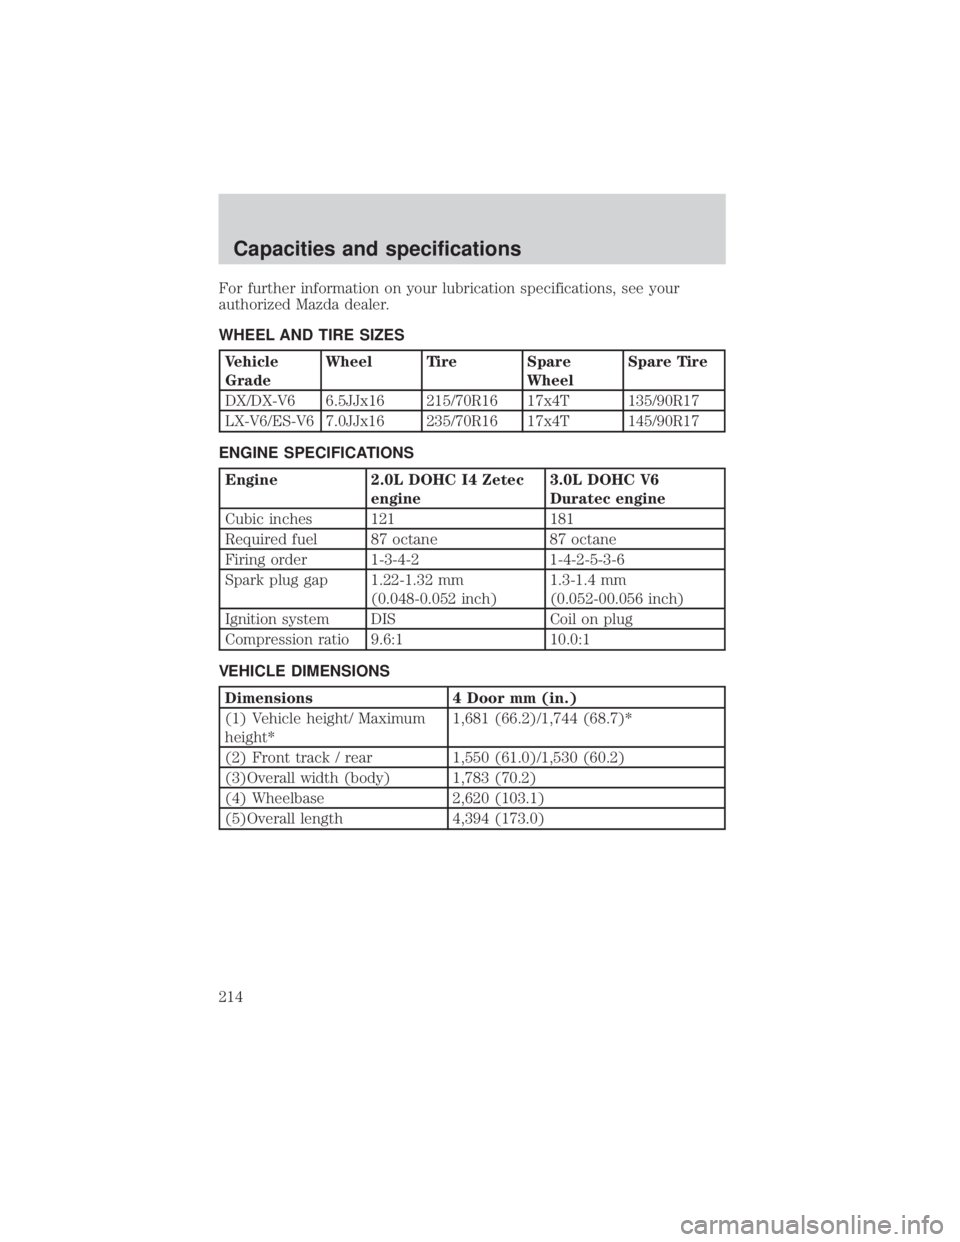
For further information on your lubrication specifications, see your
authorized Mazda dealer.
WHEEL AND TIRE SIZES
Vehicle
GradeWheel Tire Spare
WheelSpare Tire
DX/DX-V6 6.5JJx16 215/70R16 17x4T 135/90R17
LX-V6/ES-V6 7.0JJx16 235/70R16 17x4T 145/90R17
ENGINE SPECIFICATIONS
Engine 2.0L DOHC I4 Zetec
engine 3.0L DOHC V6
Duratec engine
Cubic inches 121 181
Required fuel 87 octane 87 octane
Firing order 1-3-4-2 1-4-2-5-3-6
Spark plug gap 1.22-1.32 mm (0.048-0.052 inch) 1.3-1.4 mm
(0.052-00.056 inch)
Ignition system DIS Coil on plug
Compression ratio 9.6:1 10.0:1
VEHICLE DIMENSIONS
Dimensions 4 Door mm (in.)
(1) Vehicle height/ Maximum
height* 1,681 (66.2)/1,744 (68.7)*
(2) Front track / rear 1,550 (61.0)/1,530 (60.2)
(3)Overall width (body) 1,783 (70.2)
(4) Wheelbase 2,620 (103.1)
(5)Overall length 4,394 (173.0)
Capacities and specifications
214