lock MAZDA MX-5 1994 Workshop Manual
[x] Cancel search | Manufacturer: MAZDA, Model Year: 1994, Model line: MX-5, Model: MAZDA MX-5 1994Pages: 1708, PDF Size: 82.34 MB
Page 4 of 1708
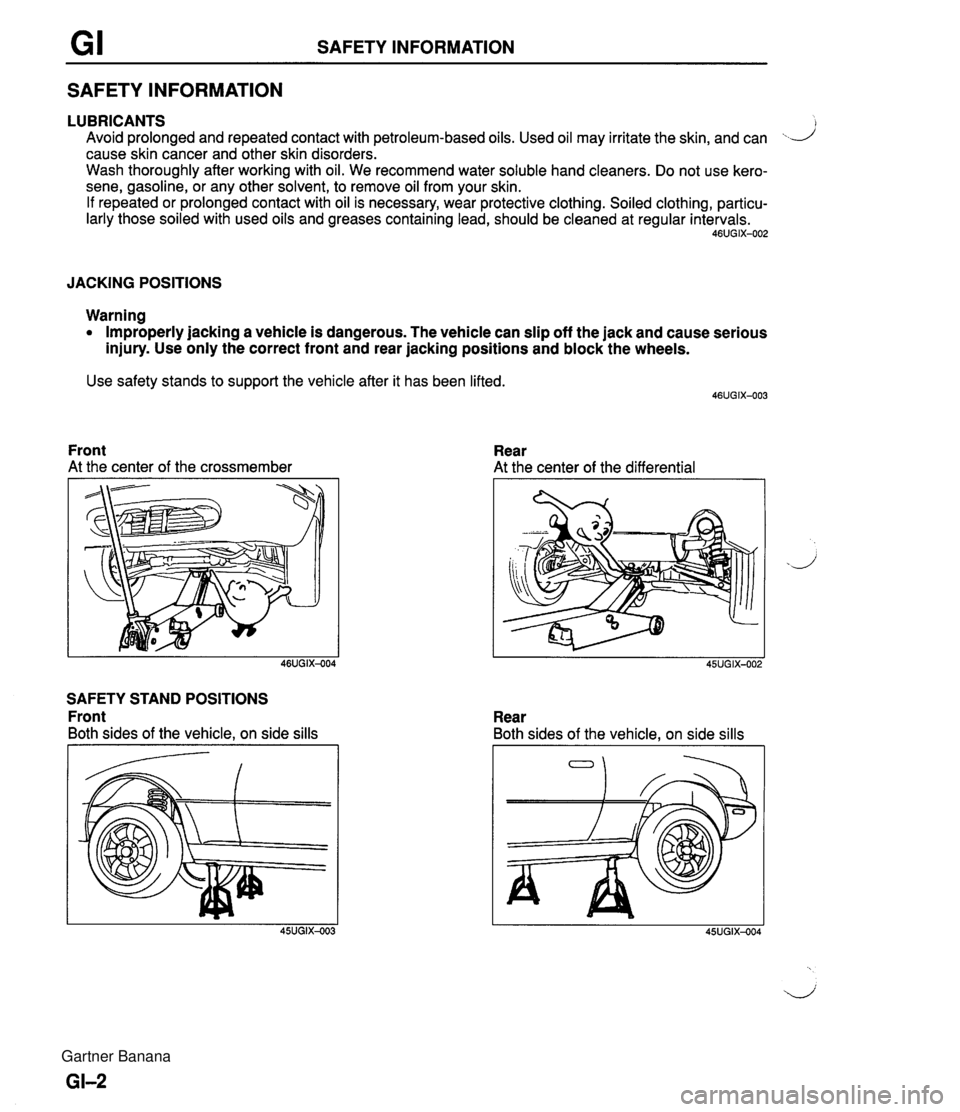
SAFETY INFORMATION SAFETY INFORMATION LUBRICANTS ) Avoid prolonged and repeated contact with petroleum-based oils. Used oil may irritate the skin, and can ...--/ cause skin cancer and other skin disorders. Wash thoroughly after working with oil. We recommend water soluble hand cleaners. Do not use kero- sene, gasoline, or any other solvent, to remove oil from your skin. If repeated or prolonged contact with oil is necessary, wear protective clothing. Soiled clothing, particu- larly those soiled with used oils and greases containing lead, should be cleaned at regular intervals. 46UGIX-002 JACKING POSITIONS Warning Improperly jacking a vehicle is dangerous. The vehicle can slip off the jack and cause serious injury. Use only the correct front and rear jacking positions and block the wheels. Use safety stands to support the vehicle after it has been lifted. Front At the center of the crossmember SAFETY STAND POSITIONS Front Both sides of the vehicle, on side sills Rear At the center of the differential Rear Both sides of the vehicle, on side sills Gartner Banana
Page 7 of 1708
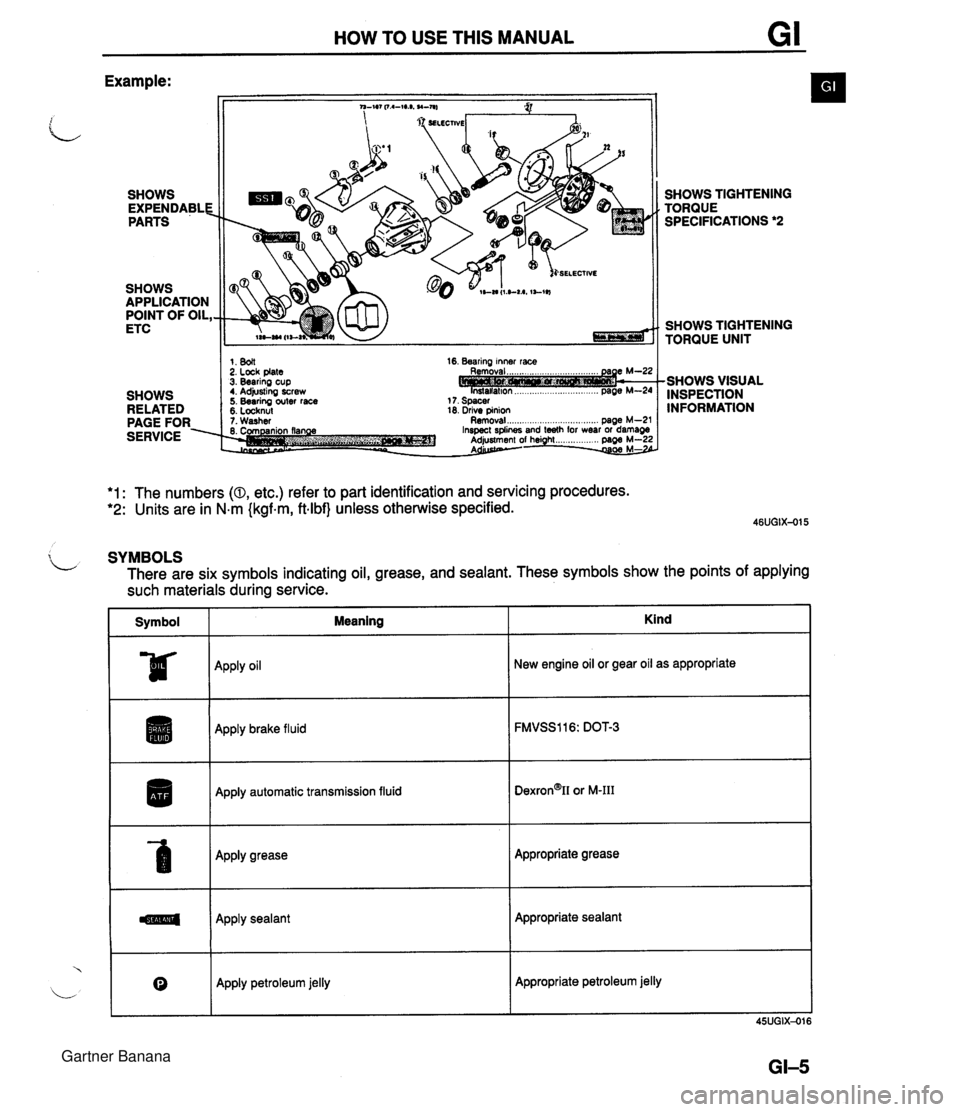
HOW TO USE THIS MANUAL Example: SHOWS EXPENDABLE PARTS SHOWS APPLICATION POINT OF OIL, ETC SHOWS RELATED PAGE FOR. SERVICE SELECTIVE 1. 8011 2. Lock plate 3. Bearing cup t. Adjusting screw 5. Bearing outer race 5. Locknul 16. Bearing inner race 18. drive pinion 1. Washer Removal ..................... .. .... page M-2' SHOWS TIGHTENING TORQUE SPECIFICATIONS *2 SHOWS TIGHTENING TORQUE UNIT -SHOWS VISUAL INSPECTION INFORMATION *1: The numbers (0, etc.) refer to part identification and servicing procedures. *2: Units are in N.m {kgf.m, ftlbf} unless otherwise specified. $ L SYMBOLS There are six symbols indicating oil, grease, and sealant. These symbols show the points of applying such materials during service. Symbol I Meaning ~pp~y oil Apply brake fluid I Apply automatic transmission fluid Apply grease Apply sealant Kind 0 New engine oil or gear oil as appropriate Apply petroleum jelly Appropriate grease Appropriate sealant Appropriate petroleum jelly Gartner Banana
Page 9 of 1708
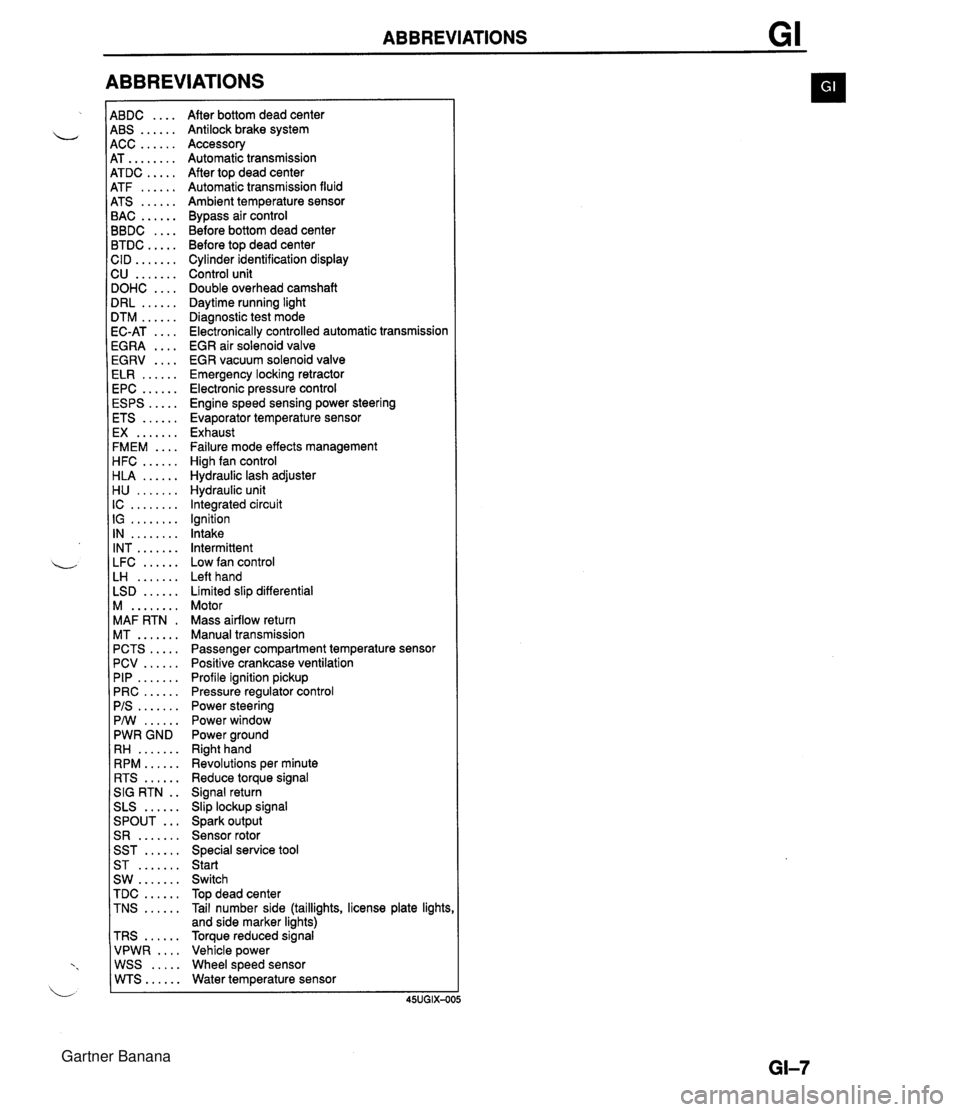
ABBREVIATIONS 4BDC .... 4BS ...... 4CC ...... 4T ........ 4TDC ..... 4TF ...... 4TS ...... 3AC ...... 3BDC .... 3TDC ..... :ID ....... 2U ....... IOHC .... IRL ...... ITM ...... IC-AT .... iGRA .... EGRV .... ELR ...... EPC ...... ESPS ..... ETS ...... EX ....... FMEM .... HFC ...... HLA ...... H U ....... IC ........ IG ........ IN ........ INT ....... LFC ...... LH ....... LSD ...... M ........ MAF RTN . MT ....... PCTS ..... PCV ...... PIP ....... PRC ...... PIS ....... PMI ...... PWR GND RH ....... RPM ...... RTS ...... SIG RTN . . SLS ...... ... SPOUT S R ....... SST ...... ST ....... SW ....... TDC ...... TNS ...... TRS ...... VPWR .... WSS ..... WTS...... After bottom dead center Antilock brake system Accessory Automatic transmission After top dead center Automatic transmission fluid Ambient temperature sensor Bypass air control Before bottom dead center Before top dead center Cylinder identification display Control unit Double overhead camshaft Daytime running light Diagnostic test mode Electronically controlled automatic transmission EGR air solenoid valve EGR vacuum solenoid valve Emergency locking retractor Electronic pressure control Engine speed sensing power steering Evaporator temperature sensor Exhaust Failure mode effects management High fan control Hydraulic lash adjuster Hydraulic unit Integrated circuit Ignition Intake Intermittent Low fan control Left hand Limited slip differential Motor Mass airflow return Manual transmission Passenger compartment temperature sensor Positive crankcase ventilation Profile ignition pickup Pressure regulator control Power steering Power window Power ground Right hand Revolutions per minute Reduce torque signal Signal return Slip lockup signal Spark output Sensor rotor Special service tool Start Switch Top dead center Tail number side (taillights, license plate lights and side marker lights) Torque reduced signal Vehicle power Wheel speed sensor Water temperature sensor Gartner Banana
Page 11 of 1708
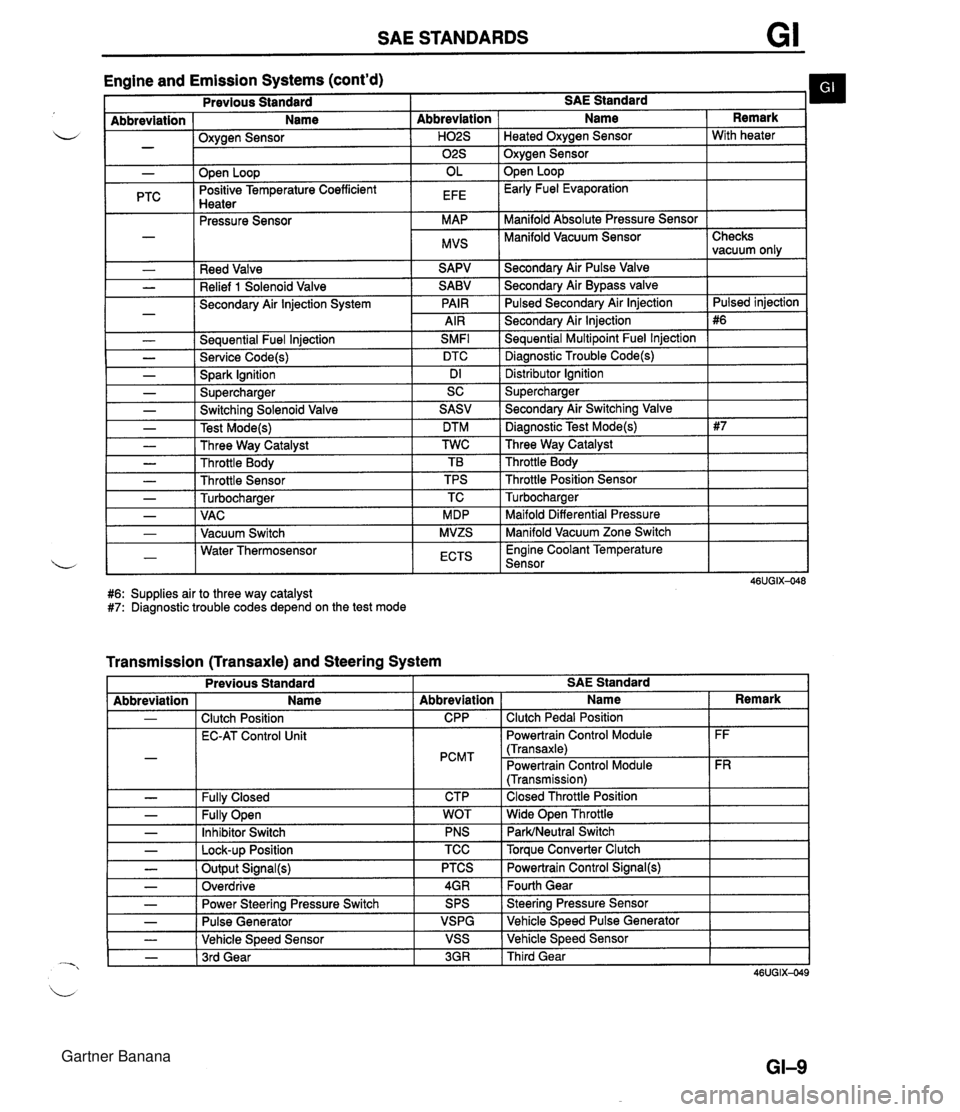
SAE STANDARDS Engine and Emission Systems (cont'd) I Previous Standard I SAE Standard b I - Abbreviation ( Name I Oxvaen Sensor - .w- - I I ." I 02s I Oxygen Sensor I - PTC Reed Valve Relief 1 Solenoid Valve Secondary Air lnjection System - Seauential Fuel lniection SMFl L - Service Code(s) DTC - Spark Ignition Dl - Supercharger SC Abbreviation I Name Open Loop Positive Temperature Coefficient Hnatar Secondarv Air Pulse Valve Remark . .--.-. Pressure Sensor Secondary Air Bypass valve Pulsed Secondarv Air lniection H02S I Heated Oxvaen Sensor I With heater OL EFE Secondary Air lnjection Sequential Multipoint Fuel lnjection Diagnostic Trouble Code(s) Open Loop Early Fuel Evaporation MAP MVS Distributor lgnition Supercharger Manifold Absolute Pressure Sensor Manifold Vacuum Sensor I - - - - - - Checks vacuum only Pulsed iniection - Switching Solenoid Valve Test Mode(s) Three Way Catalyst Throttle Body Throttle Sensor Turbocharaer .. Maifold Differential Pressure Manifold Vacuum Zone Switch , - I - 1 VAC I MDP 1-1 Water Thermosensor L - I Vacuum Switch I ECTS I Engine Coolant Temperature Sensor I SASV DTM TWC TB TPS TC MVZS #6: Supplies air to three way catalyst #7: Diagnostic trouble codes depend on the test mode - Secondary Air Switching Valve Diagnostic Test Mode(s) Three Way Catalyst Throttle Body Throttle Position Sensor Turbocharaer Transmission (Transaxle) and Steering System L - - Previous Standard I I I I Abbreviation - - - SAE Standard Fully Open Inhibitor Switch - I Lock-up Position - - Name Clutch Position EC-AT Control Unit Fullv Closed Abbreviation CPP PCMT CTP TCC I Torque Converter Clutch - - - WOT PNS Output Signal(s) Overdrive I Name Clutch Pedal Position Powertrain Control Module (Transaxle) Powertrain Control Module (Transmission) Closed Throttle Position Wide Open Throttle ParWNeutral Switch Power Steering Pressure Switch Pulse Generator Vehicle Speed Sensor - 1 3rd Gear Remark FF FR PTCS 4GR 3GR I Third Gear Powertrain Control Signal(@ Fourth Gear SPS VSPG VSS Steering Pressure Sensor Vehicle Speed Pulse Generator Vehicle Speed Sensor Gartner Banana
Page 14 of 1708
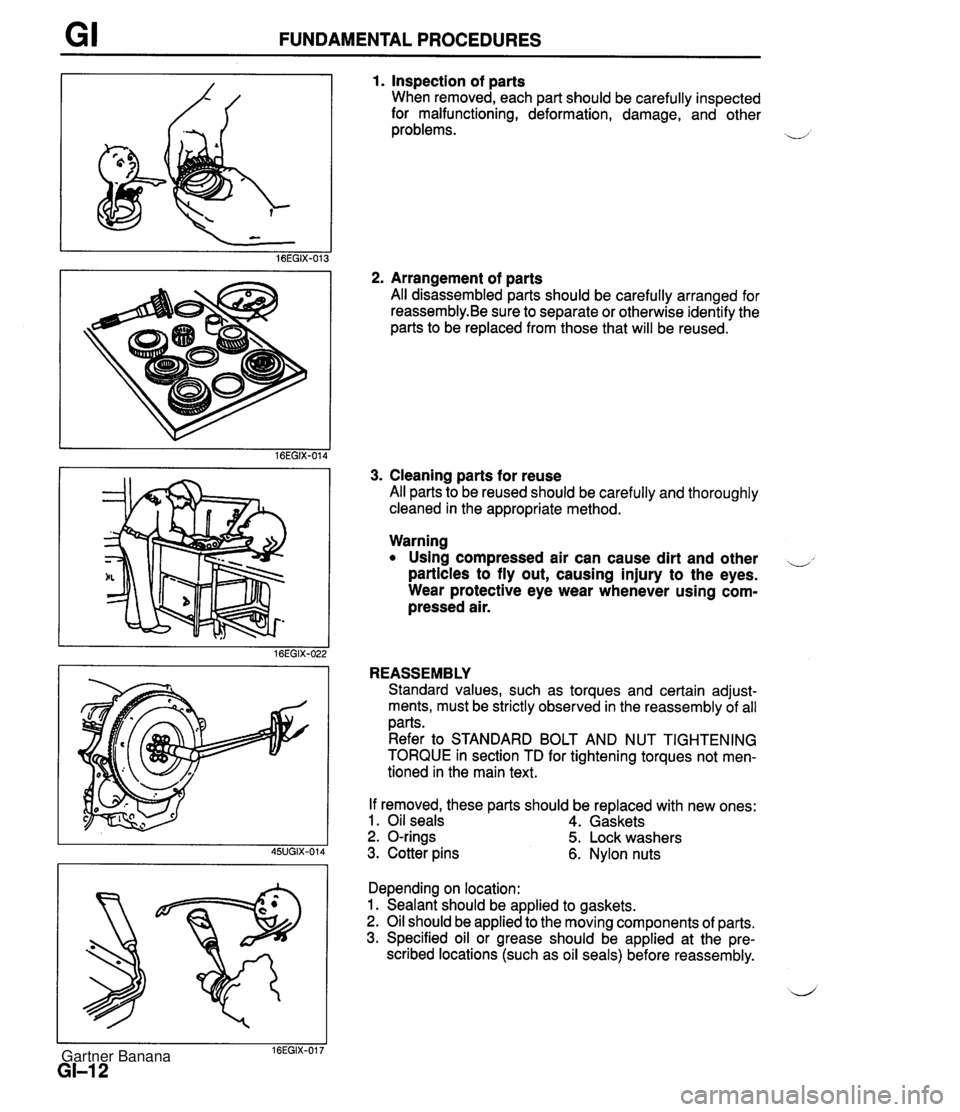
FUNDAMENTAL PROCEDURES 1. Inspection of parts When removed, each part should be carefully inspected for malfunctioning, deformation, damage, and other problems. 2. Arrangement of parts All disassembled parts should be carefully arranged for reassembly.Be sure to separate or otherwise identify the parts to be replaced from those that will be reused. 3. Cleaning parts for reuse All parts to be reused should be carefully and thoroughly cleaned in the appropriate method. Warning Using compressed air can cause dirt and other ,, particles to fly out, causing injury to the eyes. Wear protective eye wear whenever using com- pressed air. REASSEMBLY Standard values, such as torques and certain adjust- ments, must be strictly observed in the reassembly of all parts. Refer to STANDARD BOLT AND NUT TIGHTENING TORQUE in section TD for tightening torques not men- tioned in the main text. If removed, these parts should be replaced with new ones: 1. Oil seals 4. Gaskets 2. O-rings 5. Lock washers 3. Cotter pins 6. Nylon nuts Depending on location: 1. Sealant should be applied to gaskets. 2. Oil should be applied to the moving components of parts. 3. Specified oil or grease should be applied at the pre- scribed locations (such as oil seals) before reassembly. Gartner Banana
Page 17 of 1708
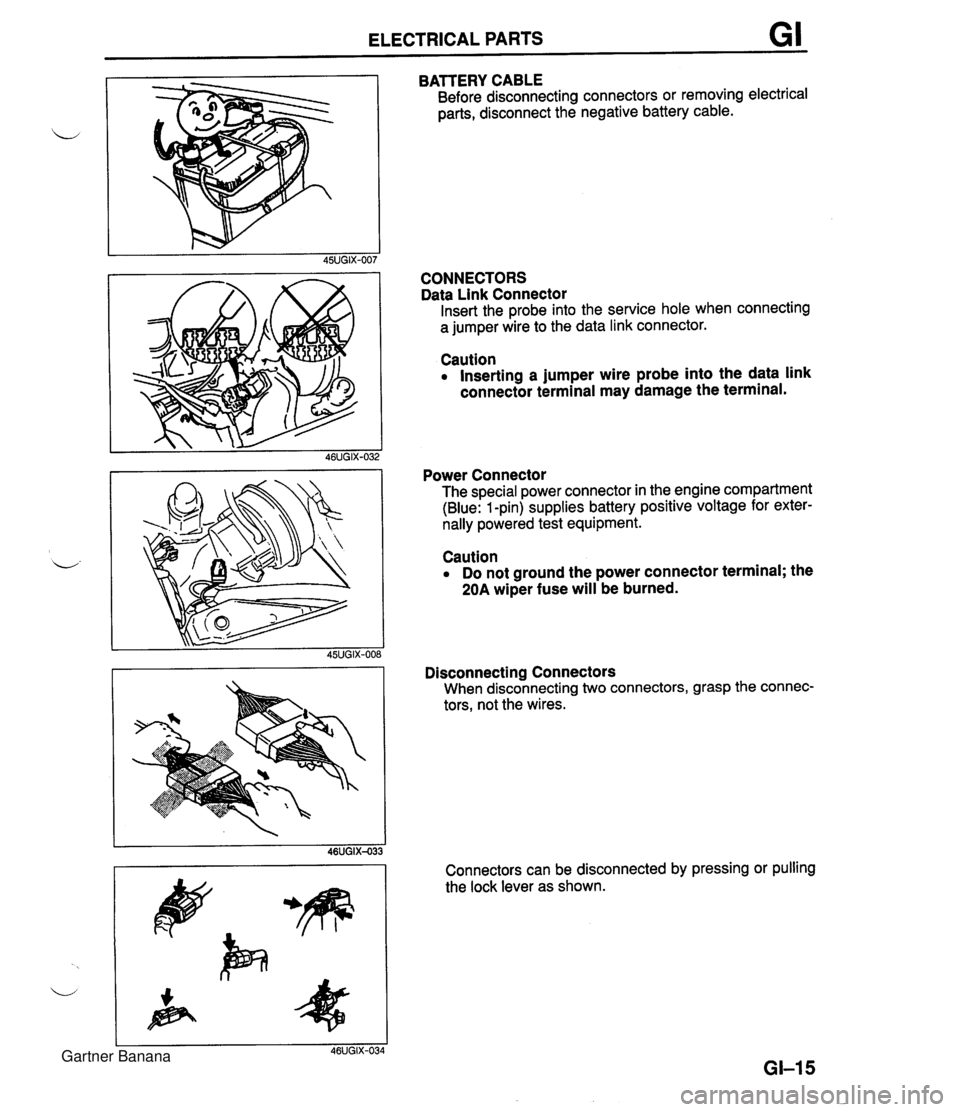
ELECTRICAL PARTS GI BATTERY CABLE Before disconnecting connectors or removing electrical parts, disconnect the negative battery cable. CONNECTORS Data Link Connector Insert the probe into the service hole when connecting a jumper wire to the data link connector. Caution Inserting a jumper wire probe into the data link connector terminal may damage the terminal. Power Connector The special power connector in the engine compartment (Blue: 1 -pin) supplies battery positive voltage for exter- nally powered test equipment. Caution Do not ground the power connector terminal; the 20A wiper fuse will be burned. Disconnecting Connectors When disconnecting two connectors, grasp the connec- tors, not the wires. Connectors can be disconnected by pressing or pulling the lock lever as shown. Gartner Banana
Page 18 of 1708
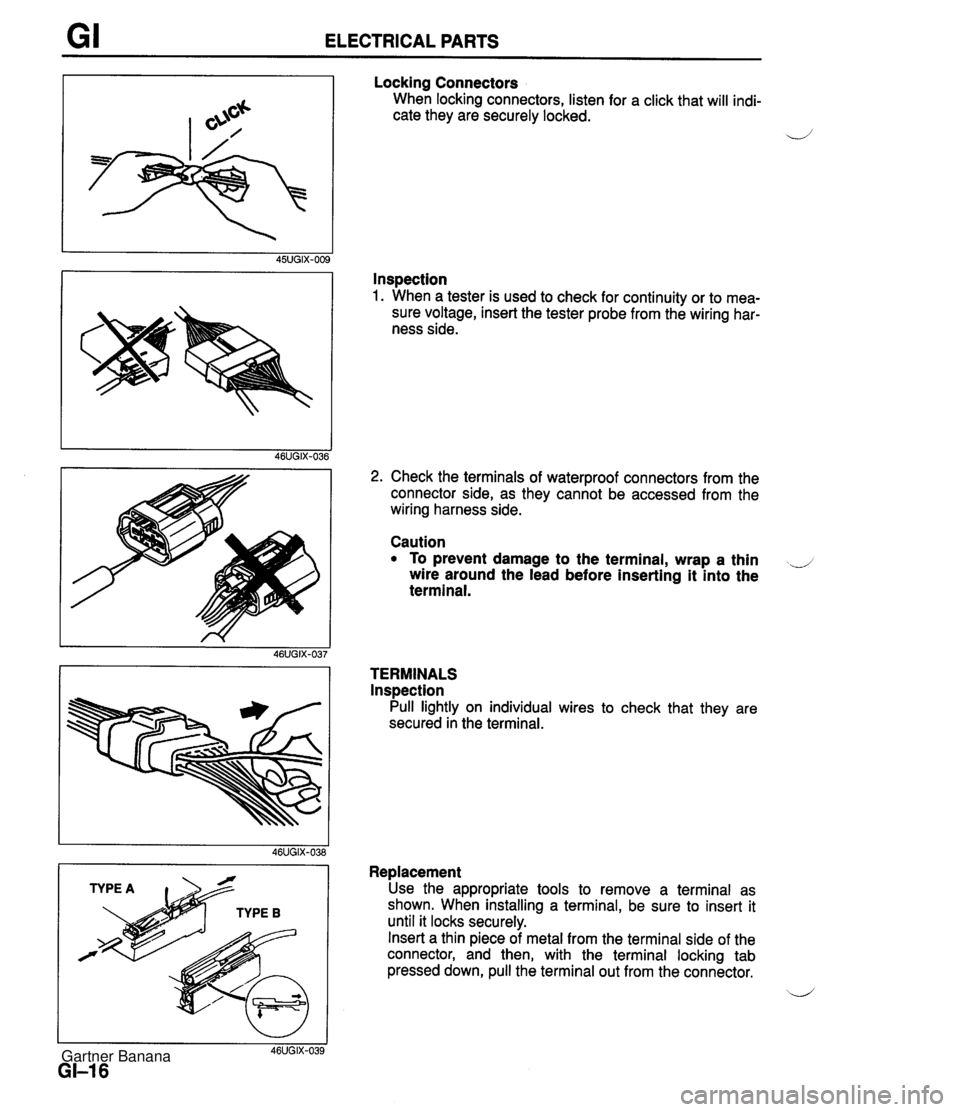
GI ELECTRICAL PARTS Locking Connectors When locking connectors, listen for a click that will indi- cate they are securely locked. 4' Inspection 1. When a tester is used to check for continuity or to mea- sure voltage, insert the tester probe from the wiring har- ness side. I I 46UGIX-039 GI-I 6 2. Check the terminals of waterproof connectors from the connector side, as they cannot be accessed from the wiring harness side. Caution To prevent damage to the terminal, wrap a thin ..J wire around the lead before inserting it into the terminal. TERMINALS lnspection Pull lightly on individual wires to check that they are secured in the terminal. Replacement Use the appropriate tools to remove a terminal as shown. When installing a terminal, be sure to insert it until it locks securely. Insert a thin piece of metal from the terminal side of the connector, and then, with the terminal locking tab pressed down, pull the terminal out from the connector. b' Gartner Banana
Page 23 of 1708
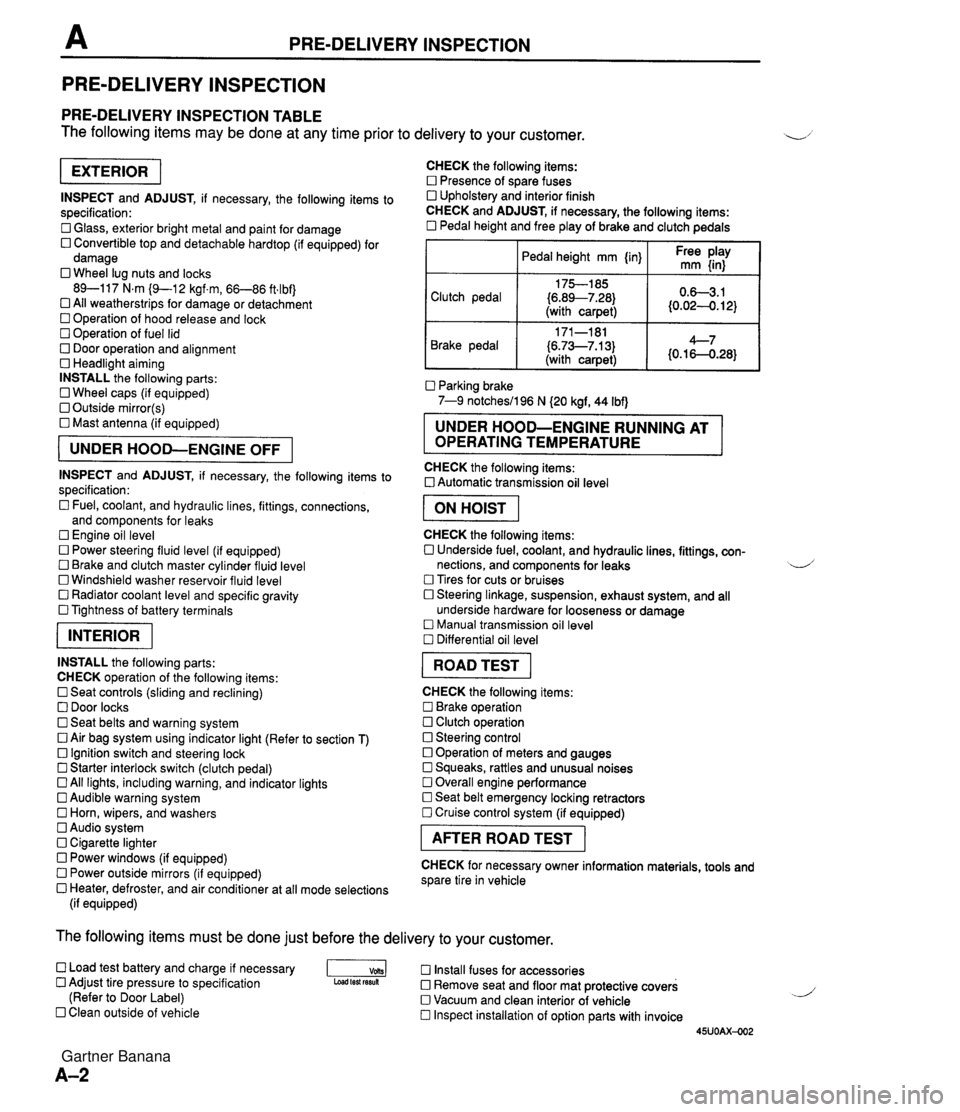
PRE-DELIVERY INSPECTION PRE-DELIVERY INSPECTION PRE-DELIVERY INSPECTION TABLE The following items may be done at any time prior to delivery to your customer. INSPECT and ADJUST, if necessary, the following items to specification: 0 Glass, exterior bright metal and paint for damage 0 Convertible top and detachable hardtop (if equipped) for damage 0 Wheel lug nuts and locks 89-117 N.m (9-1 2 kgf.m, 66-86 ft4bf) 0 All weatherstrips for damage or detachment Operation of hood release and lock Operation of fuel lid 0 Door operation and alignment Headlight aiming INSTALL the following parts: Wheel caps (if equipped) 0 Outside mirror(s) 0 Mast antenna (if equipped) UNDER HOOD-ENGINE OFF INSPECT and ADJUST, if necessary, the following items to specification : Fuel, coolant, and hydraulic lines, fittings, connections, and components for leaks Engine oil level 0 Power steering fluid level (if equipped) Brake and clutch master cylinder fluid level 0 Windshield washer reservoir fluid level 0 Radiator coolant level and specific gravity 0 Tightness of battery terminals pKiq INSTALL the following parts: CHECK operation of the following items: 0 Seat controls (sliding and reclining) 0 Door locks 0 Seat belts and warning system 0 Air bag system using indicator light (Refer to section T) Ignition switch and steering lock 0 Starter interlock switch (clutch pedal) All lights, including warning, and indicator lights 0 Audible warning system 0 Horn, wipers, and washers Audio system 0 Cigarette lighter Power windows (if equipped) 0 Power outside mirrors (if equipped) 0 Heater, defroster, and air conditioner at all mode selections (if equipped) CHECK the following items: Presence of spare fuses 0 Upholstery and interior finish CHECK and ADJUST, if necessary, the following items: 0 Pedal height and free play of brake and clutch pedals I Pedal height mm {in} I Ft: $iy I Clutch pedal {6.89--7.28) (with carpet) Parking brake 7-9 notchesil96 N (20 kgf, 44 Ibf) 0.63.1 (0.024. 12) Brake pedal RUNNING AT OPERATING TEMPERATURE CHECK the following items: 0 Automatic transmission oil level 171-181 (6.73--7.13) (with carpet) I ON HOIST I 4--7 {0.16-0.28} CHECK the following items: 0 Underside fuel, coolant, and hydraulic lines, fittings, con- nections, and components for leaks 4 Tires for cuts or bruises 0 Steering linkage, suspension, exhaust system, and all underside hardware for looseness or damage Manual transmission oil level Differential oil level I ROAD TEST I CHECK the following items: Brake operation Clutch operation 0 Steering control 0 Operation of meters and gauges Squeaks, rattles and unusual noises 0 Overall engine performance Seat belt emergency locking retractors 0 Cruise control system (if equipped) I AFTER ROAD TEST I CHECK for necessary owner information materials, tools and spare tire in vehicle The following items must be done just before the delivery to your customer. 0 Load test battery and charge if necessary -1 Install fuses for accessories Adjust tire pressure to specification Load test fesuk 0 Remove seat and floor mat protective covers (Refer to Door Label) 0 Vacuum and clean interior of vehicle Clean outside of vehicle Inspect installation of option parts with invoice 45UOAX-002 Gartner Banana
Page 26 of 1708
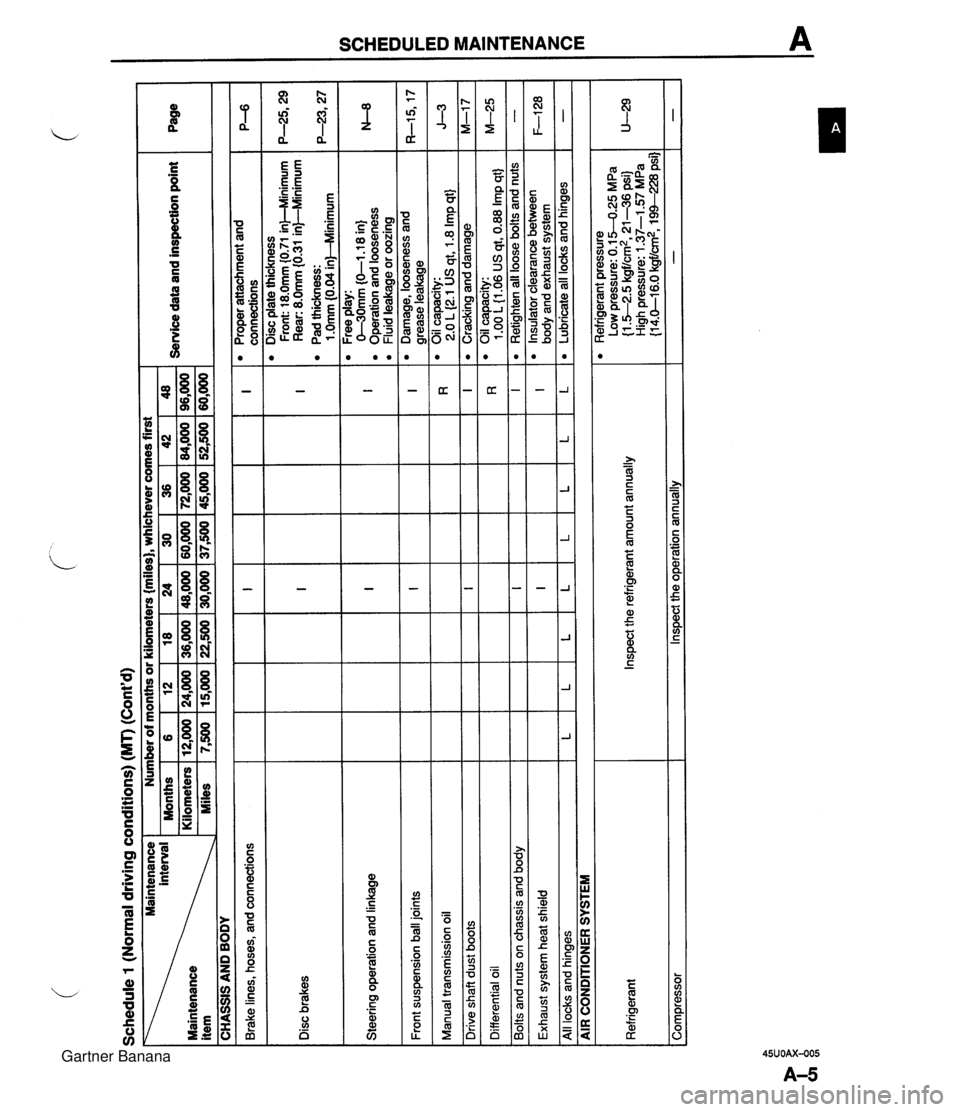
Schedule 1 (Normal driving conditions) (MT) (Cont'd) Maintenance 1 Number of months or kilometers {miles), whichever comes first I I 1 Months 1 6 18 124 130 136 142148 Service data and inspection point 36,000 1 48,000 1 60,000 1 72,000 1 84,000 1 96,000 Maintenance item I CHASSIS AND BODY Brake lines, hoses, and connections Disc plate thickness Front: 18.0mm (0.71 in)--Minimum I I 1 near: 8.0mm {o31 inFMnimum P-6 I Disc brakes I Pad thickness: I I I I I ~10mrn~0.04inMlinimum I Proper attachment and connections Steering operation and linkage I I I I I I I 0-3'0mm (0-1.1 8 in) Operation and looseness Fluid leakaae or oozina I I Front suspension ball joints I I Free play: I I I I I I I - - Manual transmission oil I I I I I , I Damage, looseness and I grease leakage Oil capacity: 2.0 L (2.1 US at. 1.8 Imp qtJ Ill I I I I I Cracking and damage I , I Oil capacity: I I I Differential oil I Drive shaft dust boots I Bolts and nuts on chassis and body I I I n I 1 .OO L {I .06 US qt, 0.88 Imp qt} Ill Exhaust system heat shield I I I I 1 Retiahten all loose bolts and nuts L All locks and hinges lLlLl - AIR CONDITIONER SYSTEM I L Refrigerant pressure Low pressure: 0.1 5-0.25 MPa {I -52.5 kgf/cm2, 21-36 psi) High pressure: 1.37-1 -57 MPa {I 4.0-1 6.0 kgf/cm2, 1 XI-228 psi] - L Corn~ressor I lnswct the o~eration annuallv Refrigerant L Inspect the refrigerant amount annually L I L " Insulator clearance between body and exhaust system Lubricate all locks and hinges F-128 - Gartner Banana
Page 28 of 1708
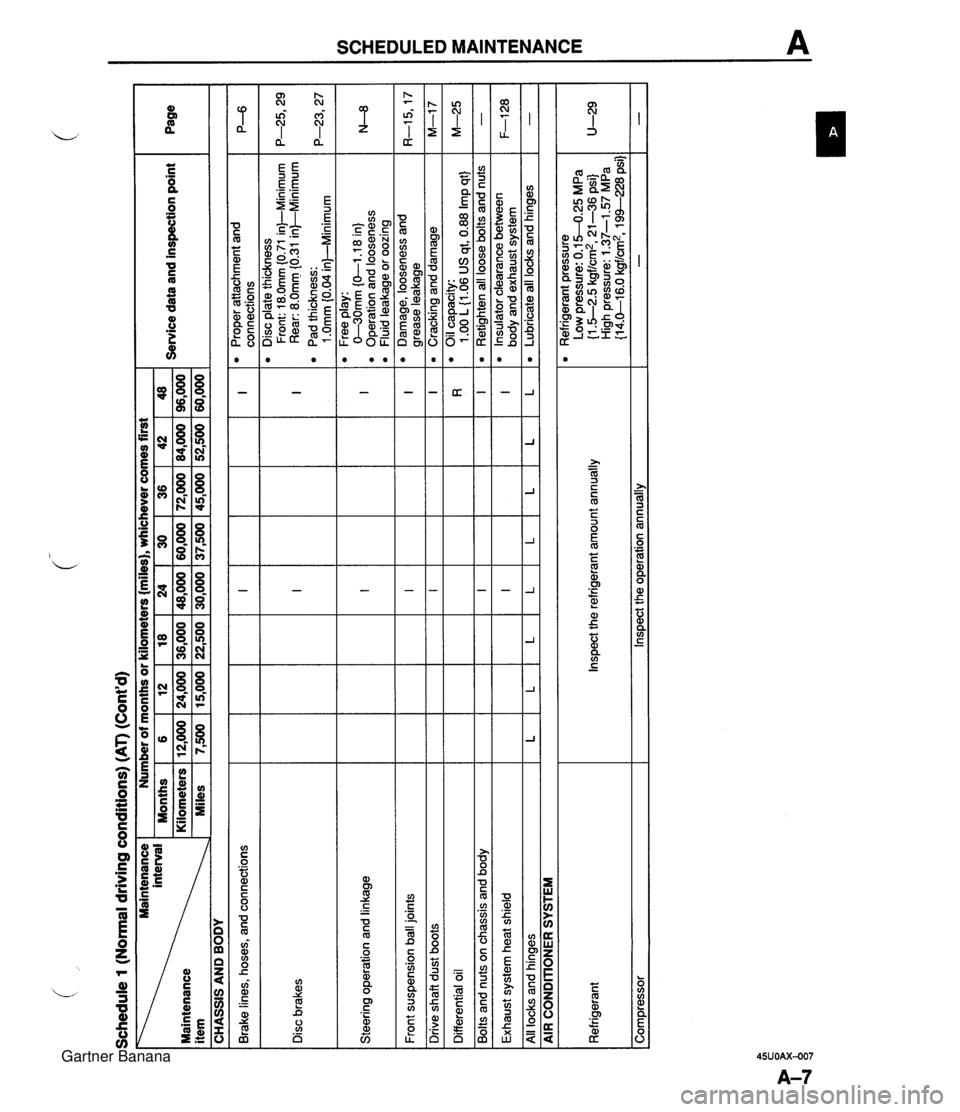
Schedule 1 (Normal driving conditions) (AT) (Cont'd) - .. .. Brake lines, hoses, and connections -- Front suspension ball joints Page I Disc brakes Steering operation and linkage I I 1 I I I I Drive shaft dust boots Ill CHASSIS AND BODY Service data and inspection point Maintenance Number of months or kilometers {miles), whichever comes first I I Differential oil I interval Months Maintenance Kilometers item Miles Exhaust system heat shield I 36 72,000 45,000 I I I I I I I I I 1 I I I I All locks and hinaes lLlLlLlLlLlLlL 6 12,000 7,500 Bolts and nuts on chassis and body - AIR CONDIIONER SYSTEM 42 84,000 52,500 I Ill 12 24,000 15,000 96,000 60,000 Proper attachment and connections Disc plate thickness Front: 18.0mm (0.71 in)-Minimum Rear: 8.0mm f0.31 in)--Minimum Pad thickness: 1 .Omm 10.04 inl-Minimum .-- Free play: C-30mm (0-1 .I 8 in) Operation and looseness Fluid leakage or oozing 18 36,000 22,500 Refrigerant Compressor Damage, looseness and arease leakaae Inspect the refrigerant amount annually Inspect the operation annually 24 48,000 30,000 30 60,000 37,500 Cracking and damage Oil capacity: 1 .OO L 11.06 US at. 0.88 Irn~ at} M-17 M-25 Retighten all loose bolts and nuts Insulator clearance between bodv and exhaust system Refrigerant pressure Low pressure: 0.1 5-0.25 MPa (1 .5-2.5 kgf/:, 21-36 psi) 1 LJ: High pressure: 1.37-1.57 MPa {I 4.0-1 6.0 kgf/cm2, 194--228 psi) - F-128 Lubricate all locks and hinges - Gartner Banana