ignition MAZDA MX-5 1997 Factory Repair Manual
[x] Cancel search | Manufacturer: MAZDA, Model Year: 1997, Model line: MX-5, Model: MAZDA MX-5 1997Pages: 514, PDF Size: 17.89 MB
Page 2 of 514
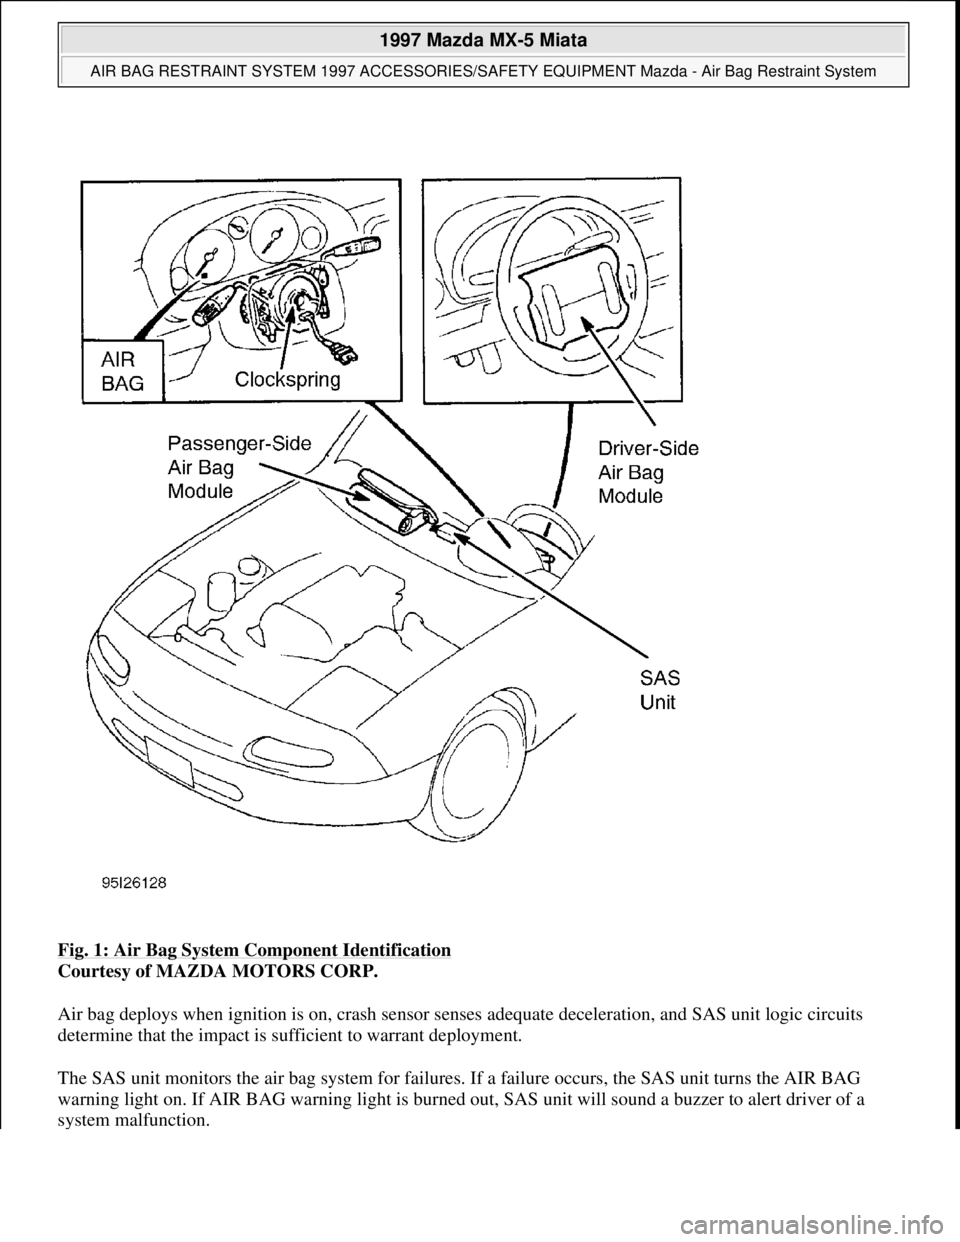
Fig. 1: Air Bag System Component Identification
Courtesy of MAZDA MOTORS CORP.
Air bag deploys when ignition is on, crash sensor senses adequate deceleration, and SAS unit logic circuits
determine that the impact is sufficient to warrant deployment.
The SAS unit monitors the air bag system for failures. If a failure occurs, the SAS unit turns the AIR BAG
warning light on. If AIR BAG warning light is burned out, SAS unit will sound a buzzer to alert driver of a
system malfunction.
1997 Mazda MX-5 Miata
AIR BAG RESTRAINT SYSTEM 1997 ACCESSORIES/SAFETY EQUIPMENT Mazda - Air Bag Restraint System
Microsoft
Sunday, July 05, 2009 1:40:47 PMPage 2 © 2005 Mitchell Repair Information Company, LLC.
Page 3 of 514
SYSTEM OPERATION CHECK
Turn ignition on. AIR BAG warning light in instrument cluster should glow for 6 seconds and then turn off. If
AIR BAG warning light does not function as described, a failure has occurred in Supplemental Restraint
System (SRS). Repair malfunctioning SRS. See DIAGNOSIS
. Also, see SERVICE PRECAUTIONS .
SERVICE PRECAUTIONS
The following precautions should be observed when working with air bag systems:
Disable air bag before servicing any air bag system/steering column component. See DISABLING &
ACTIVATING AIR BAG SYSTEM .
Because of critical system operating requirements, DO NOT service any air bag system component or
wiring harness. Corrections are made by replacement only.
DO NOT use an ohmmeter to check resistance of air bag module, as it may cause air bag deployment.
When carrying a live (undeployed) module, ensure trim cover is pointed away from your body. This
minimizes chance of injury in event of accidental air bag deployment.
When placing a live air bag module on any surface, always face trim cover upward to reduce motion of
module if it is accidentally deployed.
SAS unit must always be installed with arrow facing the front of the vehicle.
DO NOT disconnect SAS unit until unit is firmly mounted in vehicle.
Disconnecting or removing SAS unit with ignition switch in ON position can cause accidental
deployment and serious personal injury. Before disconnecting or removing SAS unit connector or
removing SAS unit, turn ignition to LOCK position.
Air bag system clockspring MUST be aligned in neutral position, since its rotation ability is limited. DO
NOT turn steering wheel or column after removal of steering gear.
A double-lock mechanism is used on clockspring connectors. DO NOT use excessive force when
disconnecting connectors, as damage to connector may occur.
ADJUSTMENTS
CLOCKSPRING CENTERING
Turn clockspring clockwise until it stops, then turn clockspring counterclockwise 2.75 turns. Align marks on
clocksprin
g with marks on outer housing. See Fig. 2.
1997 Mazda MX-5 Miata
AIR BAG RESTRAINT SYSTEM 1997 ACCESSORIES/SAFETY EQUIPMENT Mazda - Air Bag Restraint System
Microsoft
Sunday, July 05, 2009 1:40:47 PMPage 3 © 2005 Mitchell Repair Information Company, LLC.
Page 10 of 514
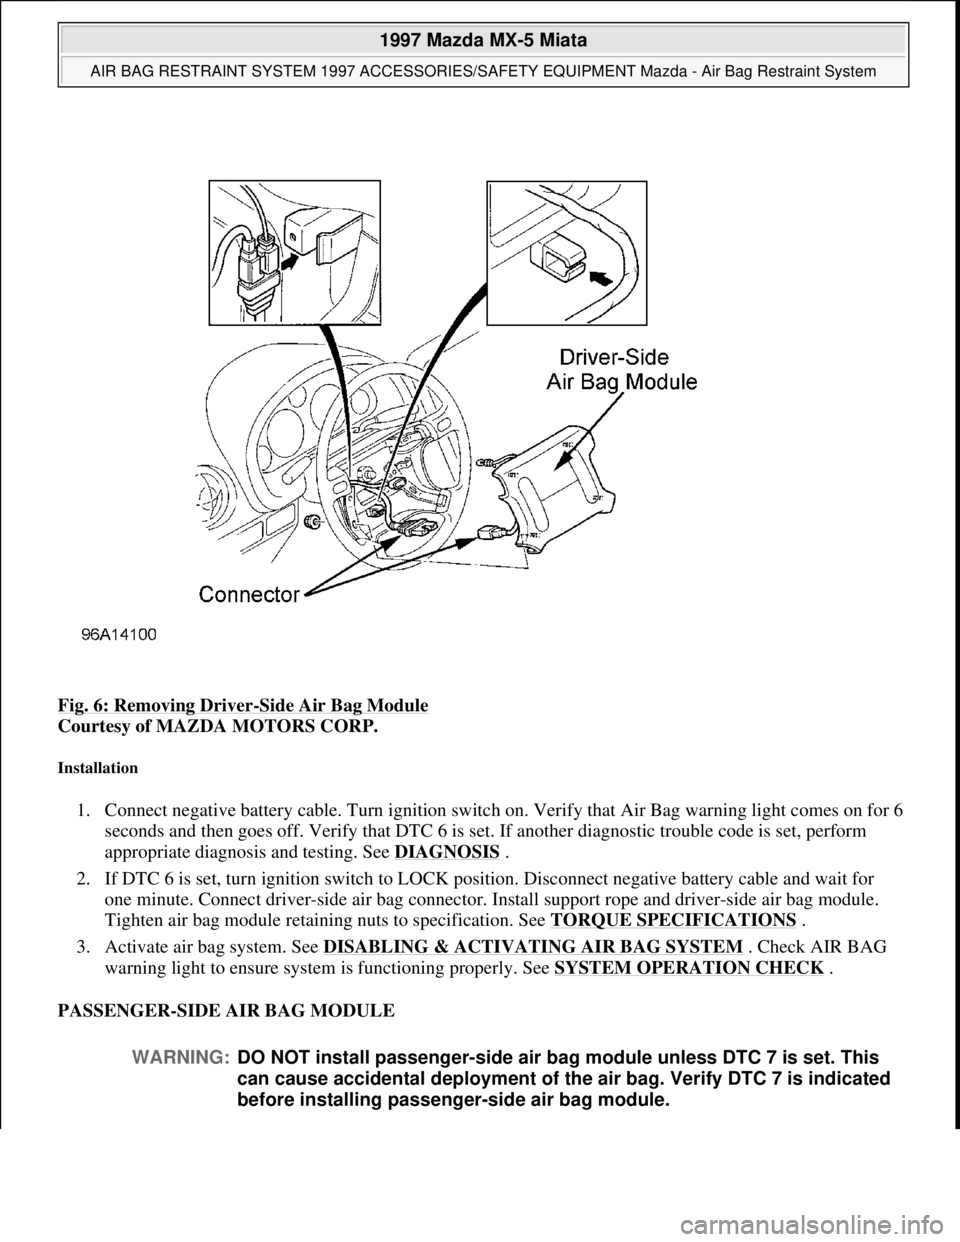
Fig. 6: Removing Driver-Side Air Bag Module
Courtesy of MAZDA MOTORS CORP.
Installation
1. Connect negative battery cable. Turn ignition switch on. Verify that Air Bag warning light comes on for 6
seconds and then goes off. Verify that DTC 6 is set. If another diagnostic trouble code is set, perform
appropriate diagnosis and testing. See DIAGNOSIS
.
2. If DTC 6 is set, turn ignition switch to LOCK position. Disconnect negative battery cable and wait for
one minute. Connect driver-side air bag connector. Install support rope and driver-side air bag module.
Tighten air bag module retaining nuts to specification. See TORQUE SPECIFICATIONS
.
3. Activate air bag system. See DISABLING & ACTIVATING AIR BAG SYSTEM
. Check AIR BAG
warning light to ensure system is functioning properly. See SYSTEM OPERATION CHECK
.
PASSENGER-SIDE AIR BAG MODULE
WARNING:DO NOT install passenger-side air bag module unless DTC 7 is set. This
can cause accidental deployment of the air bag. Verify DTC 7 is indicated
before installing passenger-side air bag module.
1997 Mazda MX-5 Miata
AIR BAG RESTRAINT SYSTEM 1997 ACCESSORIES/SAFETY EQUIPMENT Mazda - Air Bag Restraint System
Microsoft
Sunday, July 05, 2009 1:40:47 PMPage 10 © 2005 Mitchell Repair Information Company, LLC.
Page 12 of 514
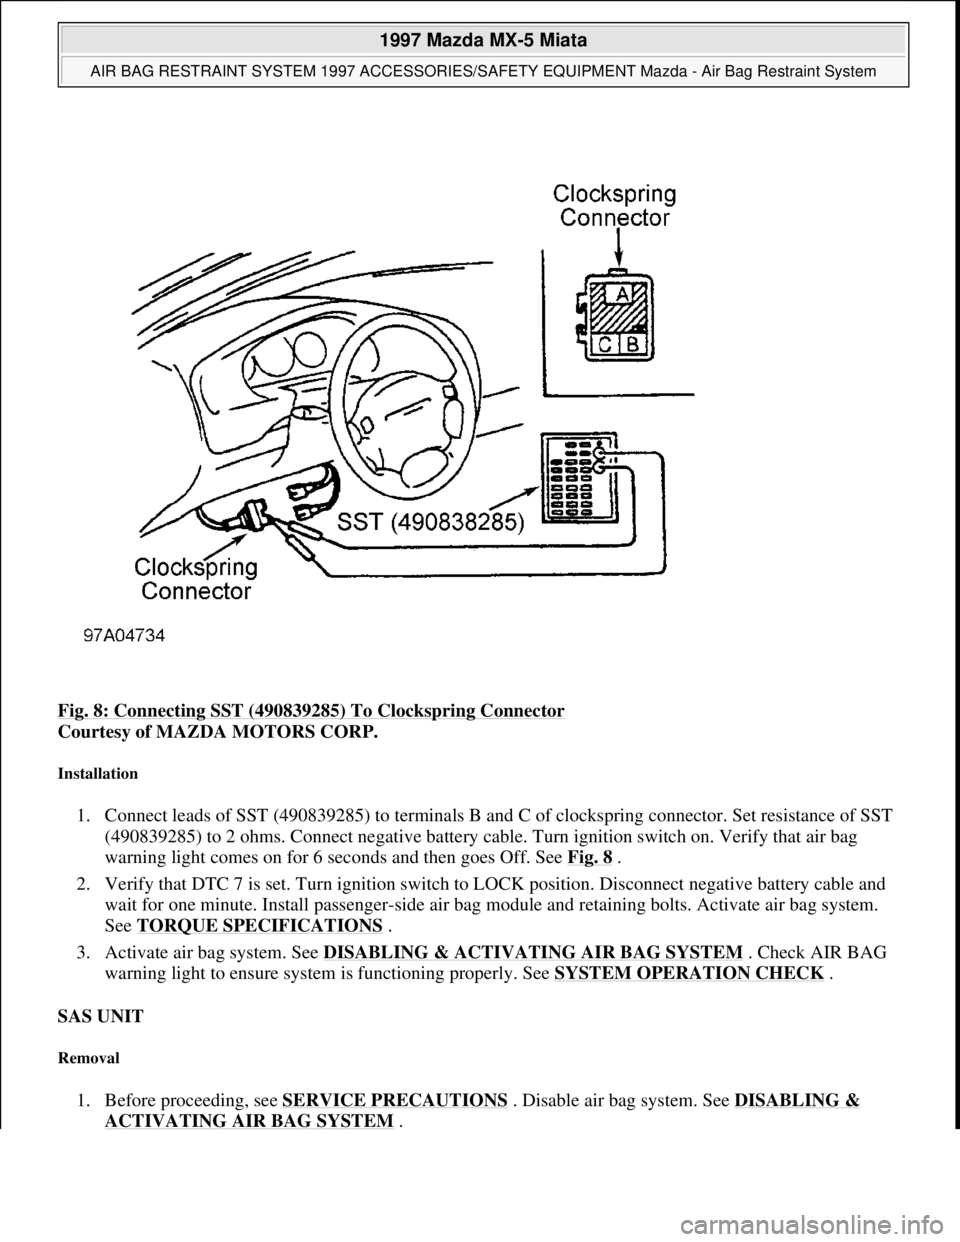
Fig. 8: Connecting SST (490839285) To Clockspring Connector
Courtesy of MAZDA MOTORS CORP.
Installation
1. Connect leads of SST (490839285) to terminals B and C of clockspring connector. Set resistance of SST
(490839285) to 2 ohms. Connect negative battery cable. Turn ignition switch on. Verify that air bag
warning light comes on for 6 seconds and then goes Off. See Fig. 8
.
2. Verify that DTC 7 is set. Turn ignition switch to LOCK position. Disconnect negative battery cable and
wait for one minute. Install passenger-side air bag module and retaining bolts. Activate air bag system.
See TORQUE SPECIFICATIONS
.
3. Activate air bag system. See DISABLING & ACTIVATING AIR BAG SYSTEM
. Check AIR BAG
warning light to ensure system is functioning properly. See SYSTEM OPERATION CHECK
.
SAS UNIT
Removal
1. Before proceeding, see SERVICE PRECAUTIONS . Disable air bag system. See DISABLING &
ACTIVATING AIR BAG SYSTEM.
1997 Mazda MX-5 Miata
AIR BAG RESTRAINT SYSTEM 1997 ACCESSORIES/SAFETY EQUIPMENT Mazda - Air Bag Restraint System
Microsoft
Sunday, July 05, 2009 1:40:47 PMPage 12 © 2005 Mitchell Repair Information Company, LLC.
Page 14 of 514
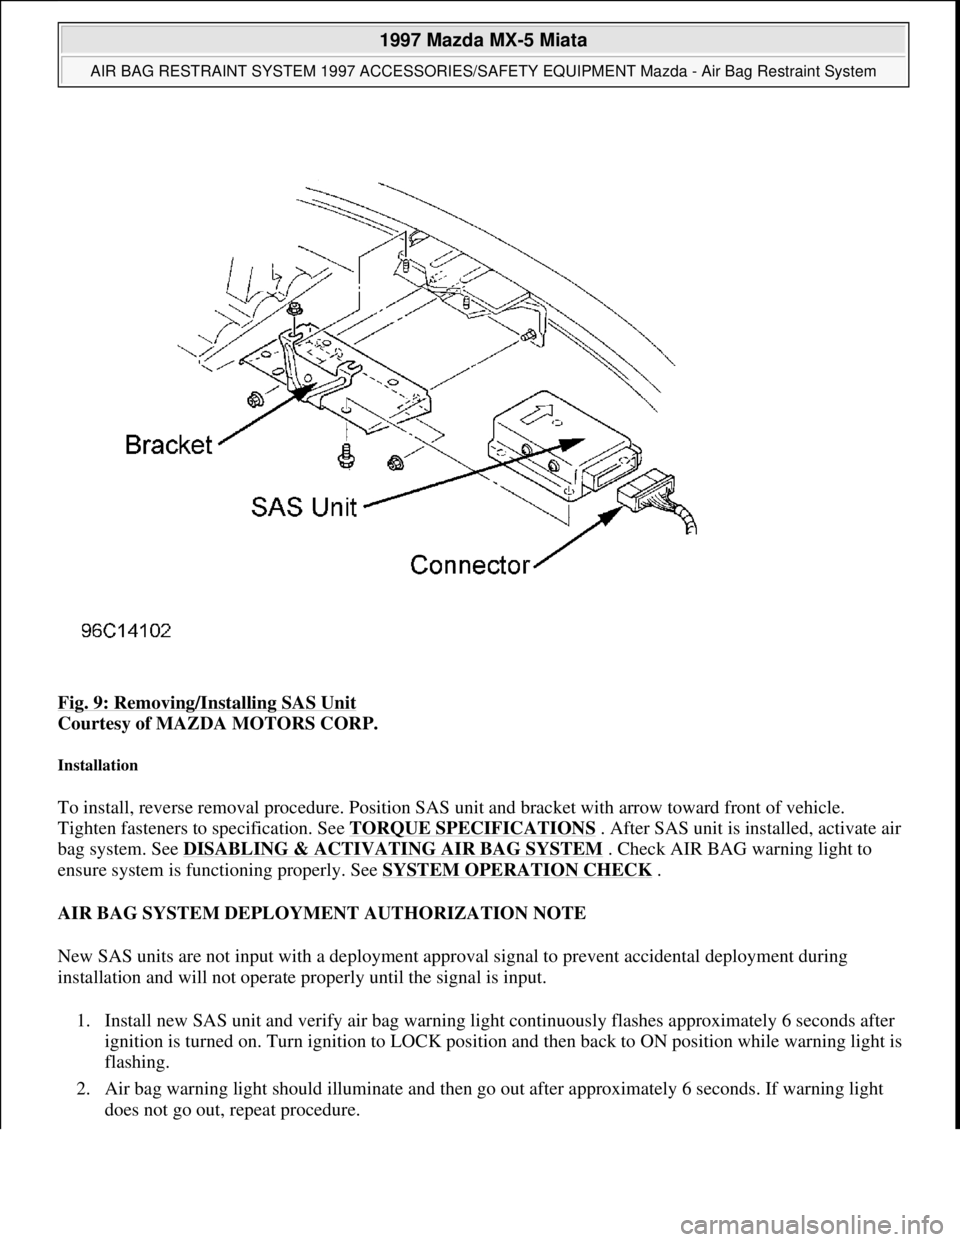
Fig. 9: Removing/Installing SAS Unit
Courtesy of MAZDA MOTORS CORP.
Installation
To install, reverse removal procedure. Position SAS unit and bracket with arrow toward front of vehicle.
Tighten fasteners to specification. See TORQUE SPECIFICATIONS
. After SAS unit is installed, activate air
bag system. See DISABLING & ACTIVATING AIR BAG SYSTEM
. Check AIR BAG warning light to
ensure system is functioning properly. See SYSTEM OPERATION CHECK
.
AIR BAG SYSTEM DEPLOYMENT AUTHORIZATION NOTE
New SAS units are not input with a deployment approval signal to prevent accidental deployment during
installation and will not operate properly until the signal is input.
1. Install new SAS unit and verify air bag warning light continuously flashes approximately 6 seconds after
ignition is turned on. Turn ignition to LOCK position and then back to ON position while warning light is
flashing.
2. Air bag warning light should illuminate and then go out after approximately 6 seconds. If warning light
does not go out, repeat procedure.
1997 Mazda MX-5 Miata
AIR BAG RESTRAINT SYSTEM 1997 ACCESSORIES/SAFETY EQUIPMENT Mazda - Air Bag Restraint System
Microsoft
Sunday, July 05, 2009 1:40:47 PMPage 14 © 2005 Mitchell Repair Information Company, LLC.
Page 15 of 514
DIAGNOSIS
SELF-DIAGNOSTIC SYSTEM
SAS unit will only display one code at a time. SAS unit will always display highest priority code first. After
repairing system, perform SYSTEM OPERATION CHECK
. If AIR BAG warning light is still flashing
during SYSTEM OPERATION CHECK, record code displayed. Repair system as necessary.
Retrieving & Clearing Codes
If codes are stored, AIR BAG warning light will flash or remain on when ignition is turned on. Codes are
automatically cleared when fault is corrected.
AIR BAG Warning Light Flashes
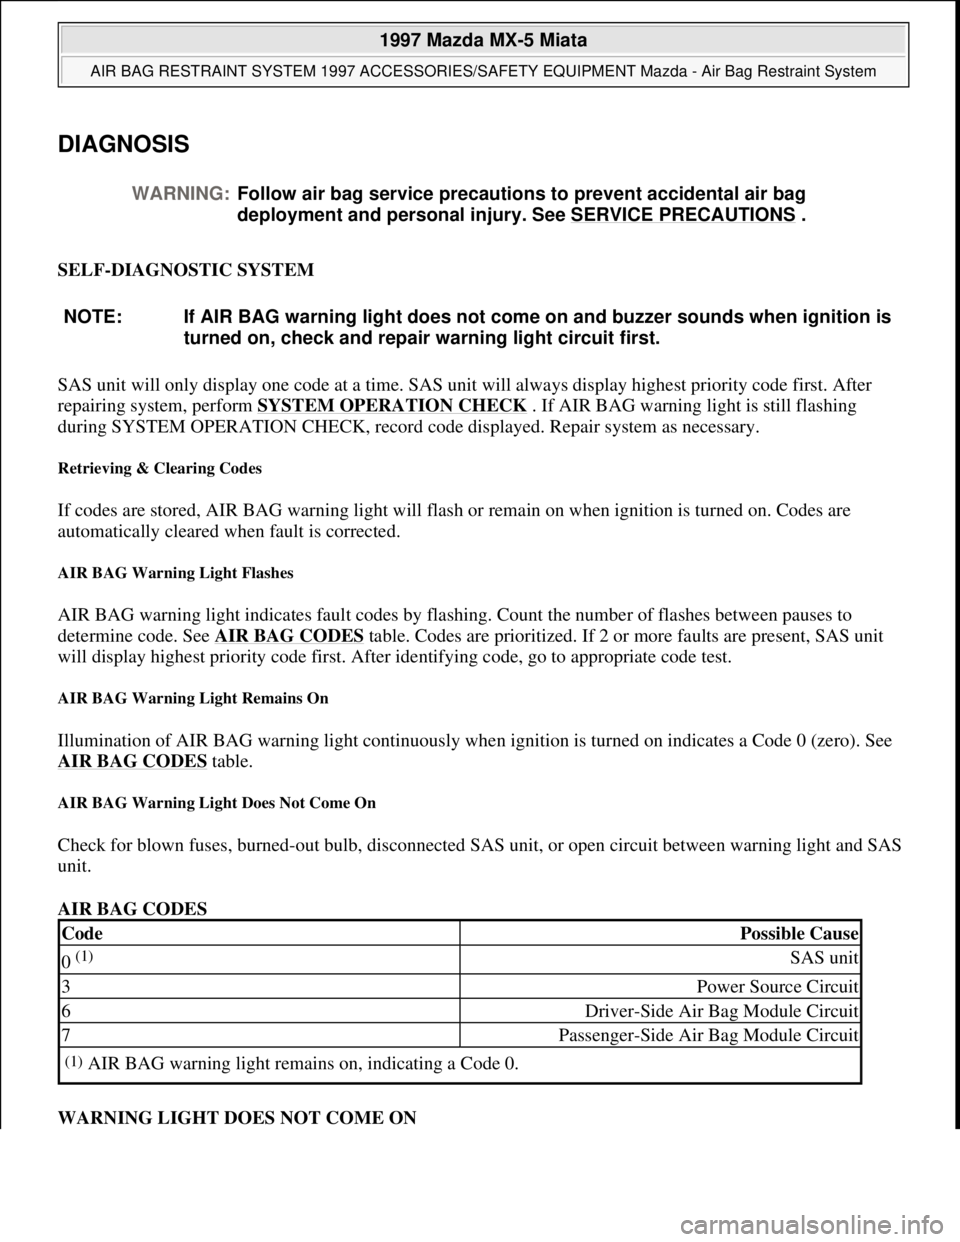
AIR BAG warning light indicates fault codes by flashing. Count the number of flashes between pauses to
determine code. See AIR BAG CODES
table. Codes are prioritized. If 2 or more faults are present, SAS unit
will display highest priority code first. After identifying code, go to appropriate code test.
AIR BAG Warning Light Remains On
Illumination of AIR BAG warning light continuously when ignition is turned on indicates a Code 0 (zero). See
AIR BAG CODES
table.
AIR BAG Warning Light Does Not Come On
Check for blown fuses, burned-out bulb, disconnected SAS unit, or open circuit between warning light and SAS
unit.
AIR BAG CODES
WARNING LIGHT DOES NOT COME ON WARNING:Follow air bag service precautions to prevent accidental air bag
deployment and personal injury. See SERVICE PRECAUTIONS
.
NOTE: If AIR BAG warning light does not come on and buzzer sounds when ignition is
turned on, check and repair warning light circuit first.
CodePossible Cause
0 (1) SAS unit
3Power Source Circuit
6Driver-Side Air Bag Module Circuit
7Passenger-Side Air Bag Module Circuit
(1)AIR BAG warning light remains on, indicating a Code 0.
1997 Mazda MX-5 Miata
AIR BAG RESTRAINT SYSTEM 1997 ACCESSORIES/SAFETY EQUIPMENT Mazda - Air Bag Restraint System
Microsoft
Sunday, July 05, 2009 1:40:47 PMPage 15 © 2005 Mitchell Repair Information Company, LLC.
Page 17 of 514
5. Check continuity between terminal No. Q and ground. If continuity exists, replace or repair wiring
harness between instrument cluster and SAS unit. If no continuity exists, replace SAS unit. See SAS
UNIT under REMOVAL & INSTALLATION.
6. Activate air bag system and perform SYSTEM OPERATION CHECK
. Check that AIR BAG warning
light is operating properly. If not, reconfirm malfunction symptoms.
DTC 0 - SAS UNIT
1. Disable system. See DISABLING & ACTIVATING AIR BAG SYSTEM
. Remove dashboard.
Remove heater unit. Check if SAS unit connector is securely connected. If not, reconnect connector and
go next step. If ok, go to next step.
2. Disconnect SAS unit connector and check for continuity between terminal No. V and terminal No. Y of
SAS unit connector. If there is continuity, replace SAS unit. If there is no continuity, replace wiring
harness. Perform SYSTEM OPERATION CHECK
.
DTC 3 - BATTERY
1. Check that battery voltage is at least 8 volts. If not, check battery and/or charging system. Turn ignition
on and check voltage at joint connector terminals A or E (X-33).
2. If voltage is over 8 volts, replace SAS unit. See SAS UNIT
under REMOVAL & INSTALLATION. If
voltage is not over 8 volts, replace wiring harness from battery to fuse box. Perform SYSTEM
OPERATION CHECK .
DTC 6 - DRIVER-SIDE AIR BAG MODULE
1. Disable air ba
g system. See procedures under DISABLING & ACTIVATING AIR BAG SYSTEM. NOTE: When air bag warning light remains on, it can indicate a DTC 0 caused by no
continuity between terminal No. V and terminal No. Y of SAS unit This can be
due to a damaged SAS unit, an open or short circuit in wiring harness or poor
connections.
NOTE: For connector terminal identification, see WIRING DIAGRAM
.
NOTE: When voltage supplied to SAS unit is less than 1 volt due to weak battery, open
or short in wiring harness, poor connection of connector or damaged SAS unit,
DTC 3 will set
NOTE: For connector terminal identification, see WIRING DIAGRAM
.
NOTE: When resistance Is detected between terminals M-O of SAS unit is NOT 2 ohms,
DTC 6 will set.
NOTE: For connector terminal identification, see WIRING DIAGRAM
.
1997 Mazda MX-5 Miata
AIR BAG RESTRAINT SYSTEM 1997 ACCESSORIES/SAFETY EQUIPMENT Mazda - Air Bag Restraint System
Microsoft
Sunday, July 05, 2009 1:40:48 PMPage 17 © 2005 Mitchell Repair Information Company, LLC.
Page 18 of 514
Remove driver-side air bag module. See DRIVER-SIDE AIR BAG MODULE under REMOVAL &
INSTALLATION.
2. Inspect clockspring connectors for damage. If connectors are okay, go to next step. If connectors are
damaged, replace clockspring. Perform SYSTEM OPERATION CHECK
.
3. Connect Special Service Tool (49 0839 285) to terminal No. 3B and terminal No. 3C of clockspring. Set
SST resistance to 2 ohms. Connect clockspring connector. Connect negative battery cable. Turn ignition
switch to ON position and cheek for codes. If CODE 6 is displayed, go to next step. If CODE 6 is not
present, replace driver-side air bag module. Perform SYSTEM OPERATION CHECK
.
4. Turn ignition switch to LOCK position. Disconnect negative battery cable and wait for 1 minute.
Disconnect clockspring connector and inspect. If pins are ok go next step. If pins are damaged, replace
wiring harness from clockspring to SAS unit.
5. Connect Special Service Tool (49 0839 285) to terminal No. A and terminal No. B of clockspring
connector. Set SST resistance to 2 ohms. Connect clockspring connector and connect negative battery
cable. Turn ignition switch to ON position and cheek for codes. If CODE 6 is displayed, go to next step.
If CODE 6 is not present, replace clockspring. See CLOCKSPRING
under REMOVAL &
INSTALLATION. Perform SYSTEM OPERATION CHECK
.
6. Turn ignition switch to LOCK position. Disconnect negative battery cable. Wait for 1 minute. Remove
dashboard and heater unit. Disconnect SAS unit connector.
7. Check wiring harness between terminal No. O of SAS unit connector and between terminal No. A of
clockspring connector. Also check between terminal No. M of SAS unit connector and terminal No. B of
clockspring connector. Check for short to ground, short to power or open circuit. If wiring is OK, replace
SAS unit. See SAS UNIT
under REMOVAL & INSTALLATION.If wiring is not OK, replace wiring
harness from clockspring to SAS unit. Perform SYSTEM OPERATION CHECK
.
DTC 7 - PASSENGER-SIDE AIR BAG MODULE
1. Disable air bag system. See DISABLING & ACTIVATING AIR BAG SYSTEM
. Inspect passenger-
side air bag module connectors for damage. If connectors are okay, go to next step. If connectors are
damaged, replace wiring harness from passenger-side air bag module to SAS unit. Perform SYSTEM
OPERATION CHECK .
2. Connect Special Service Tool (49 0839 285) to terminal No A and terminal No. B of passenger-side air
bag module connector. Set Special Service Tool resistance to 2 ohms. Connect clockspring connector.
Connect negative battery cable. Turn ignition switch to ON position and check for codes. If DTC 7 is
displayed, go to next step. If CODE 7 is not present replace passenger-side air bag module. See
PASSENGER
-SIDE AIR BAG MODULE under REMOVAL & INSTALLATION. Perform SYSTEM
OPERATION CHECK .
3. Turn ignition switch to LOCK position. Disconnect negative battery cable and wait 1 minute. Disconnect
clocksprin
g connector. Remove dashboard and heater unit. NOTE: For connector terminal identification, see WIRING DIAGRAM
.
NOTE: When resistance is detected between terminals l-K of SAS unit is NOT 2 ohms
and/or there is no continuity between terminal No. E of SAS unit and ground,
DTC 7 will set
1997 Mazda MX-5 Miata
AIR BAG RESTRAINT SYSTEM 1997 ACCESSORIES/SAFETY EQUIPMENT Mazda - Air Bag Restraint System
Microsoft
Sunday, July 05, 2009 1:40:48 PMPage 18 © 2005 Mitchell Repair Information Company, LLC.
Page 23 of 514
BLEEDING BRAKE SYSTEM
1. Raise and support vehicle. Ensure brake fluid reservoir remains at least half full during bleeding
procedure. When bleeding brake system, start with longest brakeline first. Remove bleed screw cap.
Connect one end of transparent vinyl tube to bleed screw. Submerge other end of tube in a container half
filled with clean brake fluid.
2. Have an assistant depress brake pedal several times and hold in depressed position. Loosen bleed screw
and drain fluid into container. Tighten bleed screw.
3. Refill brake fluid reservoir if necessary. Repeat step 2) until air is no longer discharged. Tighten bleed
screw to 52-78 INCH lbs. (5.9-8.8 N.m). Ensure fluid leakage is not present. Add fluid to reservoir.
Repeat procedure for remaining wheels.
TROUBLE SHOOTING
Before attempting to diagnose vehicle, ensure ABS warning light is functioning properly. ABS warning light
will not illuminate and ABS will not operate if battery voltage is insufficient. Perform trouble shooting
procedures on ABS warning light to eliminate unnecessary repairs and/or component replacement.
ABS WARNING LIGHT DOES NOT ILLUMINATE WHEN IGNITION IS TURNED ON
1. Turn ignition on. Check if other warning lights illuminate. If other warning lights do not illuminate, check
METER fuse. Replace as necessary. If other warning lights illuminate, check for possible malfunction
and repair as necessary. Go to next step.
2. Turn ignition off. Disconnect ABS Control Module (ABS CM) connector. See COMPONENT
LOCATIONS . Turn ignition on. Check if ABS warning light illuminates. If ABS warning light
illuminates, go to next step. If ABS warning light does not illuminate, go to step 5).
3. Reconnect ABS CM connector. Turn ignition on. Check if ABS warning light illuminates. If ABS
warning light does not illuminate, go to next step. If ABS warning light illuminates, a temporary poor
contact in wiring may have occurred and ABS is now functioning properly.
4. Check if terminal AD of ABS CM harness connector is damaged or deformed. See Fig. 3
. If terminal AD
is damaged or deformed, replace wiring harness connector. If terminal AD is okay, replace ABS CM.
5. With ABS CM connector disconnected, use a jumper wire and ground terminal AD of ABS CM harness
connector. Check if ABS warning light illuminates. If ABS warning light illuminates, go to next step. If
ABS warning light does not illuminate, go to step 7).
6. With ABS CM disconnected, check continuity between terminal AB of ABS CM harness connector and
ground. Also, check continuity between terminal AC of ABS CM harness connector and ground, and CAUTION: DO NOT allow reservoir to run dry during brake bleeding procedure. If
brake fluid is spilled, clean surface immediately with alcohol, as brake
fluid will damage painted surfaces. Use only DOT 3 brake fluid and DO
NOT mix with any other types.
NOTE: Ensure brake pedal remains depressed until bleed screw is tightened.
1997 Mazda MX-5 Miata
ANTI-LOCK BRAKE SYSTEM 1997 BRAKES Mazda - Anti-Lock
Microsoft
Sunday, July 05, 2009 1:48:48 PMPage 2 © 2005 Mitchell Repair Information Company, LLC.
Page 24 of 514
between terminal AM of ABS CM harness connector and ground. If continuity exists, replace wiring
harness connector. If continuity does not exist, repair wiring harness.
7. Check ABS warning light bulb. Replace bulb as necessary. If bulb is okay, go to next step.
8. Check continuity between terminal AD of ABS CM harness connector and terminal 1K of instrument
cluster connector. See WIRING DIAGRAMS
. If continuity exists, check ABS warning light. See ABS
WARNING LIGHT under COMPONENT TESTING
. If continuity does not exist, repair wiring
harness.
ABS WARNING LIGHT REMAINS ILLUMINATED
1. Ensure battery is fully charged. Charge or replace as necessary. If battery is fully charged, go to next step.
2. Check ABS Control Module (ABS CM) connector for poor connection. Turn ignition on. Check if ABS
warning light goes out. If ABS warning light does not go out, go to next step. If ABS warning light goes
out, a temporary poor contact in wiring may have occurred and ABS is now functioning properly.
3. Turn ignition off. Disconnect ABS CM connector. See COMPONENT LOCATIONS
. Measure voltage
between terminals "A" and AB of ABS CM harness connector. See Fig. 3
. Also, measure voltage
between terminals "A" and AC of ABS CM harness connector, and between terminals "A" and AM of
ABS CM harness connector. If battery voltage is present, go to next step. If battery voltage is not present,
repair wiring harness.
4. Connect ABS CM connector. Check for ABS DTCs. See RETRIEVING DIAGNOSTIC TROUBLE
CODES under DIAGNOSIS & TESTING. If no DTCs are present, go to next step.
5. Turn ignition off. Disconnect ABS CM connector. Connect Harness Adapter (49-F066-022). Turn
ignition on. Check if ABS warning light goes out. If ABS warning light does not go out, repair short in
ABS warning light drive harness or instrument cluster. If ABS warning light goes out, replace ABS CM.
ABS WARNING LIGHT FLASHES WITH VEHICLE STOPPED
1. Ensure battery is fully charged. Charge or replace as necessary. If battery is fully charged, go to next step.
2. Check if a jumper wire is installed between terminals TBS and GND of Data Link Connector (DLC). See
Fig. 1
. If jumper wire is installed, remove jumper wire from DLC. If jumper wire is not installed, go to
next step.
3. Turn ignition off. Disconnect ABS Control Module (ABS CM) connector. See COMPONENT
LOCATIONS . Check continuity between terminal "P" of ABS CM harness connector and ground. See
Fig. 3
. If continuity exists, repair short to ground in DLC wiring harness. If continuity does not exist,
replace ABS CM. NOTE: ABS warning light will illuminate if voltage between terminal "A" (voltage
supply) of ABS CM harness connector and ground is less than about 10
volts.
1997 Mazda MX-5 Miata
ANTI-LOCK BRAKE SYSTEM 1997 BRAKES Mazda - Anti-Lock
Microsoft
Sunday, July 05, 2009 1:48:48 PMPage 3 © 2005 Mitchell Repair Information Company, LLC.