stop start MAZDA MX5 MIATA 2017 Owner's Manual
[x] Cancel search | Manufacturer: MAZDA, Model Year: 2017, Model line: MX5 MIATA, Model: MAZDA MX5 MIATA 2017Pages: 568, PDF Size: 16.58 MB
Page 250 of 568
5 –28 Interior Features
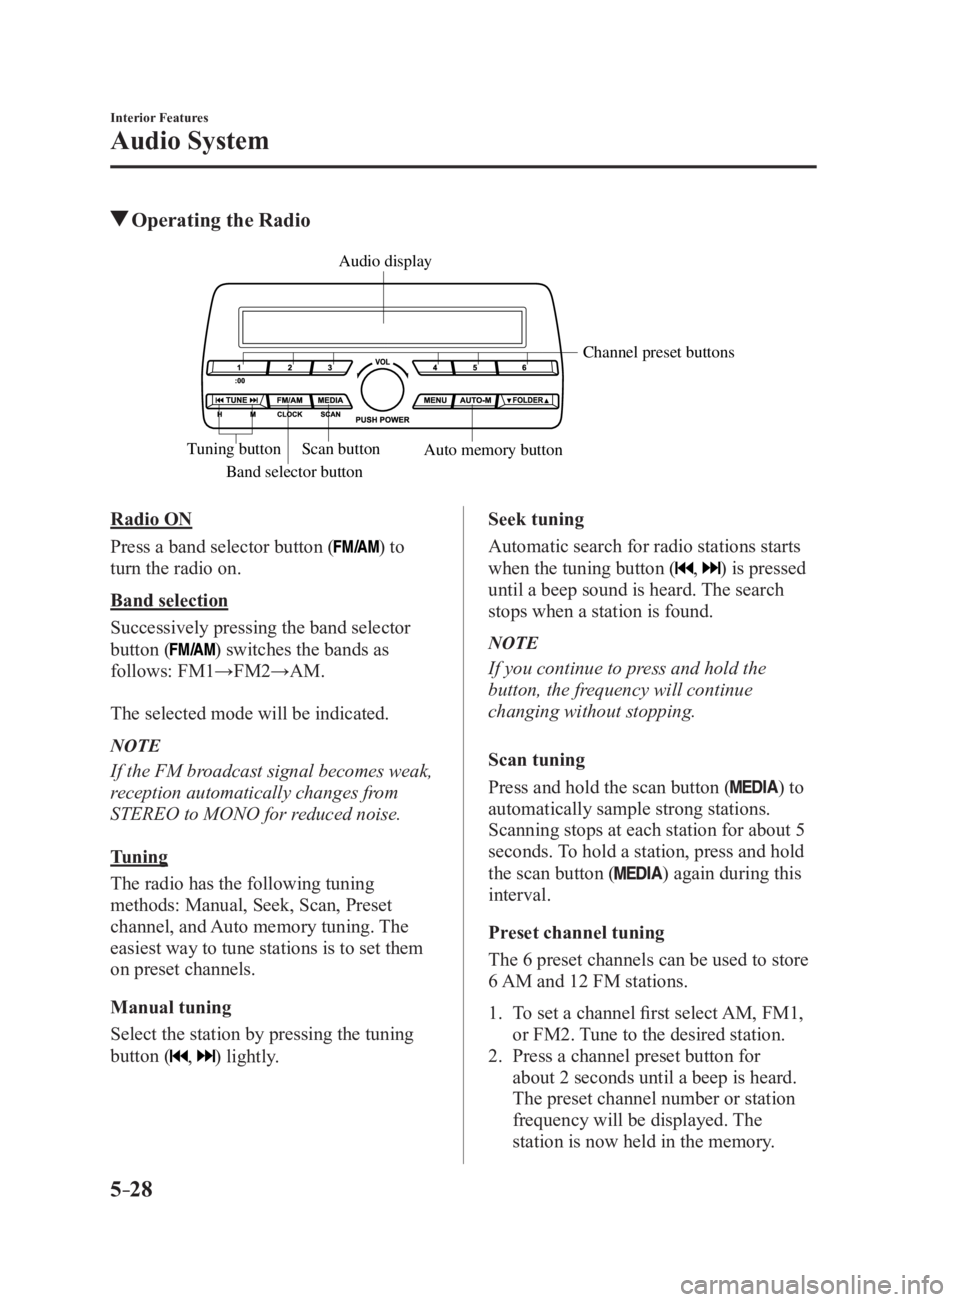
Audio System Operating the Radio
Band selector button Channel preset buttons
Scan button
Auto memory buttonTuning button Audio display
Radio ON
Press a band selector button (
) to
turn the radio on.
Band selection
Successively pressing the band selector
button (
) switches the bands as
follows: FM1→FM2→AM.
The selected mode will be indicated.
NOTE
If the FM broadcast signal becomes weak,
reception automatically changes from
STEREO to MONO for reduced noise.
Tuning
The radio has the following tuning
methods: Manual, Seek, Scan, Preset
channel, and Auto memory tuning. The
easiest way to tune stations is to set them
on preset channels.
Manual tuning
Select the station by pressing the tuning
button (
, ) lightly. Seek tuning
Automatic search for radio stations starts
when the tuning button (
, ) is pressed
until a beep sound is heard. The search
stops when a station is found.
NOTE
If you continue to press and hold the
button, the frequency will continue
changing without stopping.
Scan tuning
Press and hold the scan button (
) to
automatically sample strong stations.
Scanning stops at each station for about 5
seconds. To hold a station, press and hold
the scan button (
) again during this
interval.
Preset channel tuning
The 6 preset channels can be used to store
6 AM and 12 FM stations.
1. To set a channel first select AM, FM1,
or FM2. Tune to the desired station.
2. Press a channel preset button for
about 2 seconds until a beep is heard.
The preset channel number or station
frequency will be displayed. The
station is now held in the memory.
MX-5_8FR4-EA-16J_Edition1.indb 28 2016/08/11 20:29:12
Page 252 of 568
5 –30 Interior Features
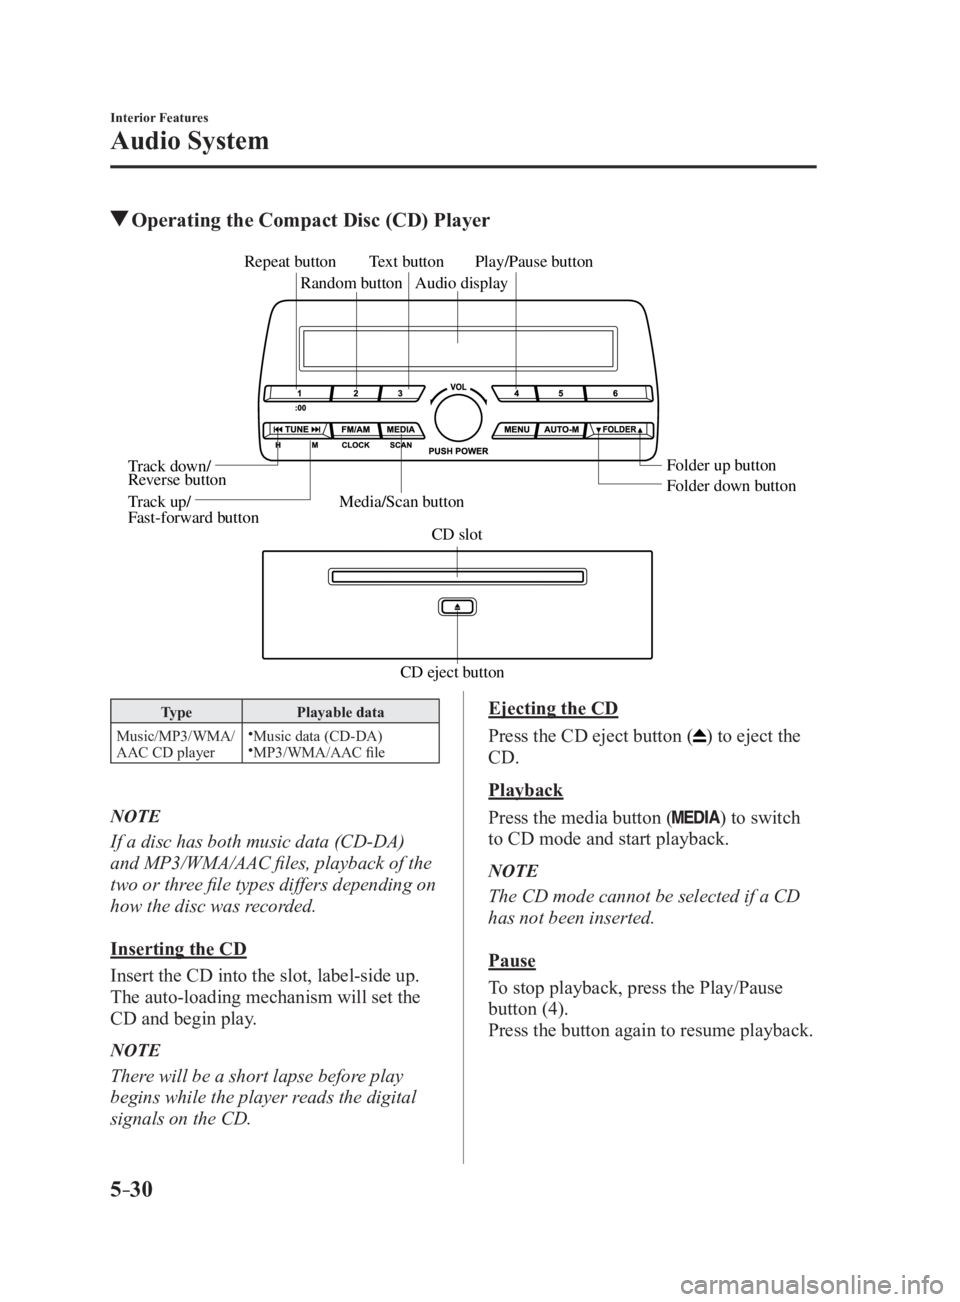
Audio System Operating the Compact Disc (CD) Player
CD eject button CD slotMedia/Scan button Folder down buttonFolder up buttonPlay/Pause button
Random buttonRepeat button
Audio displayTe xt button
T rack down/
Re verse button
T rack up/
F ast-forward button
Type Playable data
Music/MP3/WMA/
AAC CD player
Music data (CD-DA)
MP3/WMA/AAC file
NOTE
If a disc has both music data (CD-DA)
and MP3/WMA/AAC files, playback of the
two or three file types differs depending on
how the disc was recorded.
Inserting the CD
Insert the CD into the slot, label-side up.
The auto-loading mechanism will set the
CD and begin play.
NOTE
There will be a short lapse before play
begins while the player reads the digital
signals on the CD. Ejecting the CD
Press the CD eject button (
) to eject the
CD.
Playback
Press the media button (
) to switch
to CD mode and start playback.
NOTE
The CD mode cannot be selected if a CD
has not been inserted.
Pause
To stop playback, press the Play/Pause
button (4).
Press the button again to resume playback.
MX-5_8FR4-EA-16J_Edition1.indb 30 2016/08/11 20:29:13
Page 274 of 568

5 –52 Interior Features
Audio System Icon Function
If selected within a few seconds of a song which has started to play, the previous song is
selected.
If more than a few seconds have elapsed after a song has begun to play, the song currently
being played is replayed from the beginning.
Long-press to fast reverse. It stops when you remove your hand from the icon or the
commander knob.
Plays a CD. When selected again, playback is temporarily stopped.
Advances to the beginning of the next song.
Long-press to fast forward. It stops when you remove your hand from the icon or the
commander knob.
Displays sound settings to adjust audio quality level.
Refer to Volume/Display/Sound Controls on page 5-40 .
Example of use (When searching for
a song from the top level of an MP3/
WMA/AAC CD)
1. Select the icon to display the
folder/file list at the top level.
2. When the folder is selected, folders/file
lists in the folder are displayed.
3. Select the desired song. NOTE
Select to move to a folder one level
higher.
The appearance of the repeat and
shuffle icons changes depending on the
type of operation in which the function
is used.
How to use Auxiliary jack/USB
port Audio can be heard from the vehicle's
speakers by connecting a commercially-
available portable audio unit to the
auxiliary jack.
Use a commercially-available, non-
impedance (3.5
) stereo mini plug cable.
In addition, audio can be played from the
vehicle audio device by connecting a USB
device to the USB port.
Refer to AUX/USB mode on page 5-57 .
MX-5_8FR4-EA-16J_Edition1.indb 52 2016/08/11 20:29:17
Page 282 of 568

5 –60 Interior Features
Audio System How to use USB mode (Type A)
Media/Scan button
Folder down buttonFolder up buttonPlay/Pause buttonRandom button
Repeat button Audio display
Text button
Track down/Reverse button
Track up/Fast-forward button Type Playable data
USB mode MP3/WMA/AAC file
This unit does not support a USB 3.0
device. In addition, other devices may not
be supported depending on the model or
OS version.
Playback
1. Switch the ignition to ACC or ON.
2. Press the power/volume dial to turn the
audio system on.
3. Press the media button ( ) to
switch to the USB mode and start
playback.
NOTE
Some devices such as smart phones
may require a setting change to allow
operation using a USB connection.
When the USB device is not connected,
the mode does not switch to USB mode.
When there is no playable data in the
USB device, “NO CONTENTS”is
flashed.
Playback of the USB device is in the
order of the folder numbers. Folders
which have no MP3/WMA/AAC files are
skipped.
Do not remove the USB device while
in the USB mode. The data may be
damaged.
Pause
To stop playback, press the play/pause
button (4).
Press the button again to resume playback.
Fast-forward/Reverse
Press and hold the fast-forward button (
)
to advance through a track at high speed.
Press and hold the reverse button (
) to
reverse through a track at high speed.
Track search
Press the track up button ( ) once to skip
forward to the beginning of the next track.
Press the track down button (
) within a
few seconds after playback begins to track
down to the beginning of the previous
track.
Press the track down button (
) after a
few seconds have elapsed to start playback
from the beginning of the current track.
MX-5_8FR4-EA-16J_Edition1.indb 60 2016/08/11 20:29:19
Page 286 of 568

5 –64 Interior Features
Audio System How to use iPod mode (Type A)
Media/Scan button List down buttonList up buttonPlay/Pause button
Random button
Repeat button Audio display
Text button
Track down/Reverse button
Track up/Fast-forward button Category down button
Category up button
An iPod may not be compatible depending
on the model or OS version. In this case,
an error message is displayed.
NOTE
The iPod functions on the iPod cannot
be operated while it is connected to the
unit because the unit controls the iPod
functions.
Playback
1. Switch the ignition to ACC or ON.
2. Press the power/volume dial to turn the
audio system on.
3. Press the media button ( ) to
switch to the iPod mode and start
playback.
NOTE
When an iPod is not connected, the
mode does not switch to the iPod mode.
When there is no playable data in the
iPod, “NO CONTENTS” is flashed.
Do not remove the iPod while in the
iPod mode. Otherwise, the data could
be damaged. Pause
To stop playback, press the play/pause
button (4).
Press the button again to resume playback.
Fast-forward/Reverse
Press and hold the fast-forward button (
)
to advance through a track at high speed.
Press and hold the reverse button (
) to
reverse through a track at high speed.
Track search
Press the track up button (
) once to skip
forward to the beginning of the next track.
Press the track down button (
) within a
few seconds (depends on iPod software
version) after playback begins to track
down to the beginning of the previous
track.
Press the track down button (
) after a
few seconds (depends on iPod software
version) have elapsed to start playback
from the beginning of the current track.
Category search
Press the category down button (5) to
select the previous category and press the
category up button (6) to select the next
category.
MX-5_8FR4-EA-16J_Edition1.indb 64 2016/08/11 20:29:19
Page 290 of 568
5 –68 Interior Features
Audio System Playback
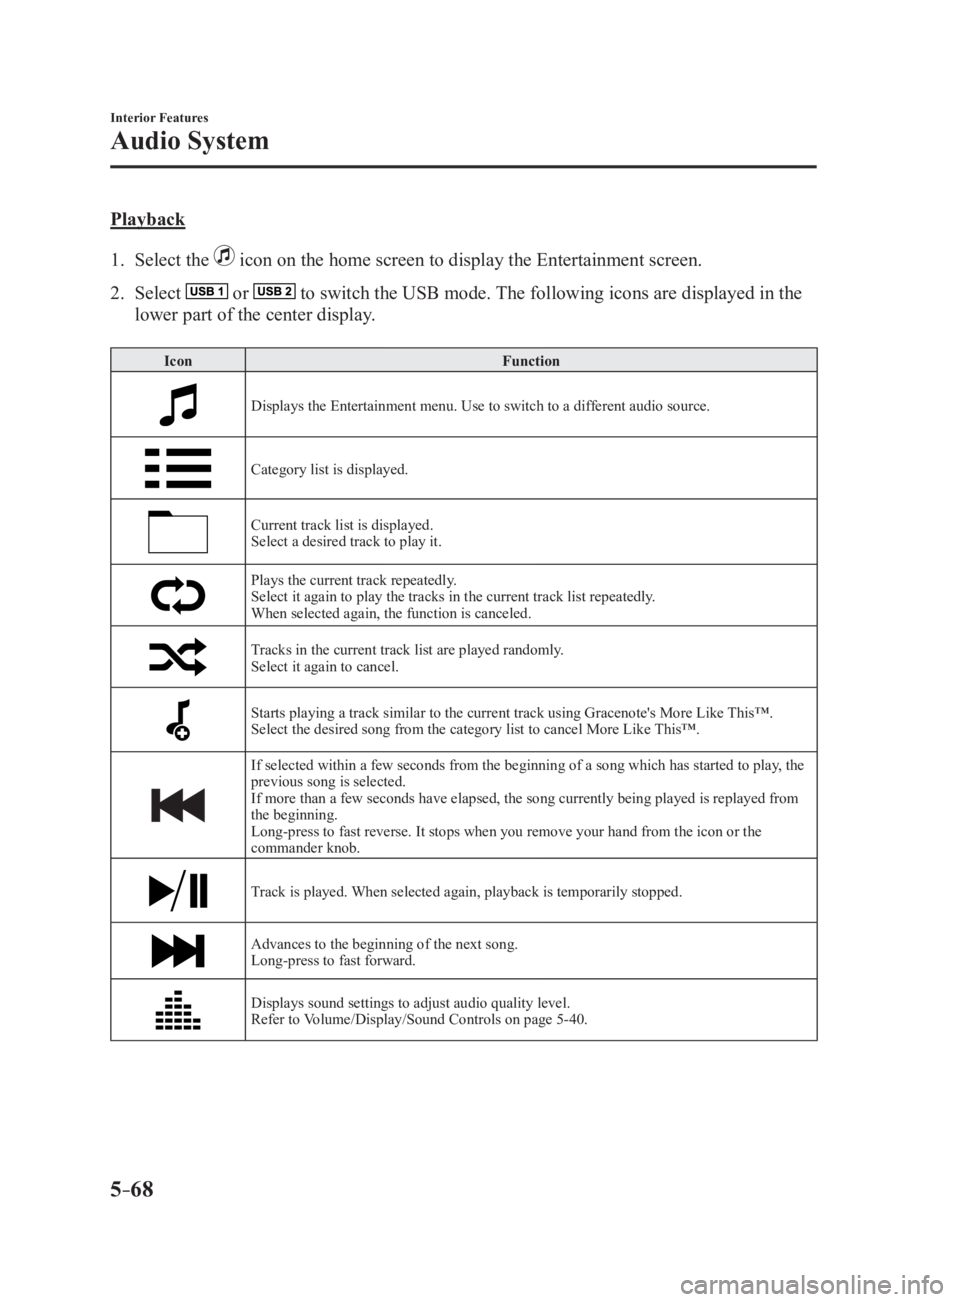
1. Select the icon on the home screen to display the Entertainment screen.
2. Select or to switch the USB mode. The following icons are displayed in the
lower part of the center display. Icon Function
Displays the Entertainment menu. Use to switch to a different audio source.
Category list is displayed.
Current track list is displayed.
Select a desired track to play it.
Plays the current track repeatedly.
Select it again to play the tracks in the current track list repeatedly.
When selected again, the function is canceled.
Tracks in the current track list are played randomly.
Select it again to cancel.
Starts playing a track similar to the current track using Grace note's More Like This™.
Select the desired song from the category list to cancel More L ike This™.
If selected within a few seconds from the beginning of a song which has started to play, the
previous song is selected.
If more than a few seconds have elapsed, the song currently being played is replayed from
the beginning.
Long-press to fast reverse. It stops when you remove your hand from the icon or the
commander knob.
Track is played. When selected again, playback is temporarily stopped.
Advances to the beginning of the next song.
Long-press to fast forward.
Displays sound settings to adjust audio quality level.
Refer to Volume/Display/Sound Controls on page 5-40 .
MX-5_8FR4-EA-16J_Edition1.indb 68 2016/08/11 20:29:20
Page 296 of 568
5 –74 Interior Features
Bluetooth ®
Bluetooth ®
Bluetooth ®
Hands-Free outline
When a Bluetooth ®
device (mobile phone) is connected to the vehicle's Bluetooth ®
unit via
radio wave transmission, a call can be made or received by pressing the talk button, pick-
up button, or hang-up button on the audio remote control switch, or by operating the center
display. For example, even if a device (mobile phone) is in your coat pocket, a call can be
made without taking the device (mobile phone) out and operating it directly.
Bluetooth ®
audio outline
When a portable audio unit equipped with the Bluetooth ®
communication function is paired
to the vehicle, you can listen to music stored on the paired portable audio device from the
vehicle's speakers. It is not necessary to connect the portable audio device to the vehicle's
external input terminal. After programming, operate the vehicle audio control panel to play/
stop the audio.
NOTE
For your safety, a device can be paired only when the vehicle is parked. If the vehicle
starts to move, the pairing procedure will end. Park the vehicle in a safe place before
pairing.
The communication range of a Bluetooth ®
equipped device is about 10 meters (32 ft) or
less.
Basic audio operation is available using voice commands even if Bluetooth ®
is not
connected.
For safety reasons, operation of the center display is disabled while the vehicle is being
driven. However, items not displayed in gray can be operated using the commander
switch while the vehicle is being driven.
MX-5_8FR4-EA-16J_Edition1.indb 74 2016/08/11 20:29:21
Page 336 of 568
5 –114 Interior Features
Bluetooth ®
3. Press the media button ( ) to switch to the Bluetooth ®
audio mode
and start playback.
If the current device version is lower
than AVRCP Ver. 1.3: “BT Audio” is
displayed.
If the current device is AVRCP Ver. 1.3:
The playback time is displayed.
NOTE
If the Bluetooth ®
audio device does not
begin playback, press the Play/Pause
button (4).
If a call is received on a hands-free
mobile phone during playback from the
Bluetooth ®
audio device, the playback is
stopped. Playback from the Bluetooth ®
audio device resumes after the call
ends.
Playback
1. To listen to a Bluetooth ®
audio device
over the vehicle's speaker system,
switch the mode to Bluetooth ®
audio mode. (Refer to “Switching to
Bluetooth ®
audio mode”)
2. To stop playback, press the Play/Pause
button (4).
3. Press the button again to resume
playback.
Selecting a file (track)
Selects the next file (track)
Short-press the track up button ( ).
Selects the beginning of the current file
(track)
Short-press the track down button ( ). Fast-forward/Reverse (AVRCP Ver. 1.3)
Fast-forward
Press and hold the fast-forward button
( ).
Reverse
Press and hold the reverse down button
( ).
Switching the display (only AVRCP Ver.
1.3)
The information displayed on the audio
display changes as follows each time the
text button (3) is pressed during playback. Button Information displayed
on audio display
Elapsed time
Album name
Song name
Artist name
NOTE
If title information is not available, “NO
TITLE” is displayed.
This unit cannot display some
characters. Characters which cannot be
displayed are indicated by an asterisk
(
).
Display scroll
Only 13 characters can be displayed at one
time. To display the rest of the characters
of a long title, press and hold the text
button (3). The display scrolls the next 13
characters. Press and hold the text button
(3) again after the last 13 characters have
been displayed to return to the beginning
of the title.
MX-5_8FR4-EA-16J_Edition1.indb 114 2016/08/11 20:29:30
Page 347 of 568

5 –125 Interior Features
Bluetooth ®
Example of use (Location Based
Services)
1. Select the desired station from the
“Nearby” tab on the main menu.
The destination name or address
playback starts in the order of the
destination name list.
2. When the icon is selected, the
currently displayed destination is
displayed on the navigation system
(vehicles with navigation system).
3. When the icon is selected, a phone
call is placed to the currently displayed
destination.
4. Select the icon to display the
content list.
Selection of other destinations from the
list can be made. Shout
Some social stations, such as Facebook or
Caraoke, support the ability to record and
share voice messages using the “Shout”
function.
1. Select the icon and start the
countdown (3, 2, 1, 0). Recording starts
when the countdown reaches zero.
2. Records voice.
3. Select and store/post the
recording.
NOTE
Recordable time varies depending on
the station (Max. 30 seconds).
Recording stops automatically when the
recordable time has elapsed. You can
then post or delete the recording.
MX-5_8FR4-EA-16J_Edition1.indb 125 2016/08/11 20:29:33
Page 444 of 568

7 –10 If Trouble Arises
Flat Tire 16. Remove the air compressor hose from
the injection valve of the bottle. After
that, install the injection hose to the
injection valve of the bottle to prevent
leakage of any remaining sealant.
CAUTION The remaining sealant in the hose may
spray out when the hose is removed.
Remove the hose carefully because you
may not be able to remove the sealant
contacting clothing or other objects.
17. Install the tire valve cap.
18. Put the emergency flat tire repair kit
into the trunk.
19. Start driving immediately to spread the
sealant in the tire.
CAUTION Carefully drive the vehicle at a speed of
80 km/h (50 mph) or less. If the vehicle
is driven at a speed of 80 km/h (50
mph) or more, the vehicle may vibrate.
NOTE
(With Tire Pressure Monitoring System)
If the tire is not properly inflated, the tire
pressure monitoring system warning light
will illuminate (page 4-18 ). 20. After driving the vehicle for about 10
minutes or 5 km (3 miles), connect the
air compressor to the tire using Step
9 of the procedure, and check the tire
inflation pressure using the tire pressure
gauge on the air compressor. If the
tire inflation pressure is lower than the
specified tire inflation pressure, turn
the air compressor on and wait until
it reaches the specified tire inflation
pressure.
WARNING If the tire inflation pressure has
decreased below 130 kPa (1.3 kgf/cm 2
or
bar, 18.9 psi), stop driving and contact
an Authorized Mazda Dealer:
The repair using the emergency flat tire
repair kit was not successful.
If you see a decrease in the tire inflation
pressure, even if Steps 9 to 20 of the
procedure are performed repeatedly,
stop driving:
Contact an Authorized Mazda Dealer.
CAUTION Before checking the tire inflation
pressure using the tire pressure gauge,
turn the air compressor switch off.
21. The emergency flat tire repair is
completed successfully if the tire
inflation pressure does not decrease.
Carefully drive the vehicle to the
nearest Authorized Mazda Dealer
immediately and have the flat tire
replaced. Replacement with a new
tire is recommended. If the tire is
to be repaired or reused, consult an
Authorized Mazda Dealer.
MX-5_8FR4-EA-16J_Edition1.indb 10 2016/08/11 20:29:57