sensor MERCEDES-BENZ A CLASS 2012 Owner's Manual
[x] Cancel search | Manufacturer: MERCEDES-BENZ, Model Year: 2012, Model line: A CLASS, Model: MERCEDES-BENZ A CLASS 2012Pages: 356, PDF Size: 4.96 MB
Page 107 of 356
Setting the exterior lighting
Setting options Exterior lighting can be set using the:
R
light switch
R headlamp range control (vehicles with hal-
ogen headlamps only)
(Y page 107)
R combination switch (Y page 107)
R on-board computer (Y page 221)
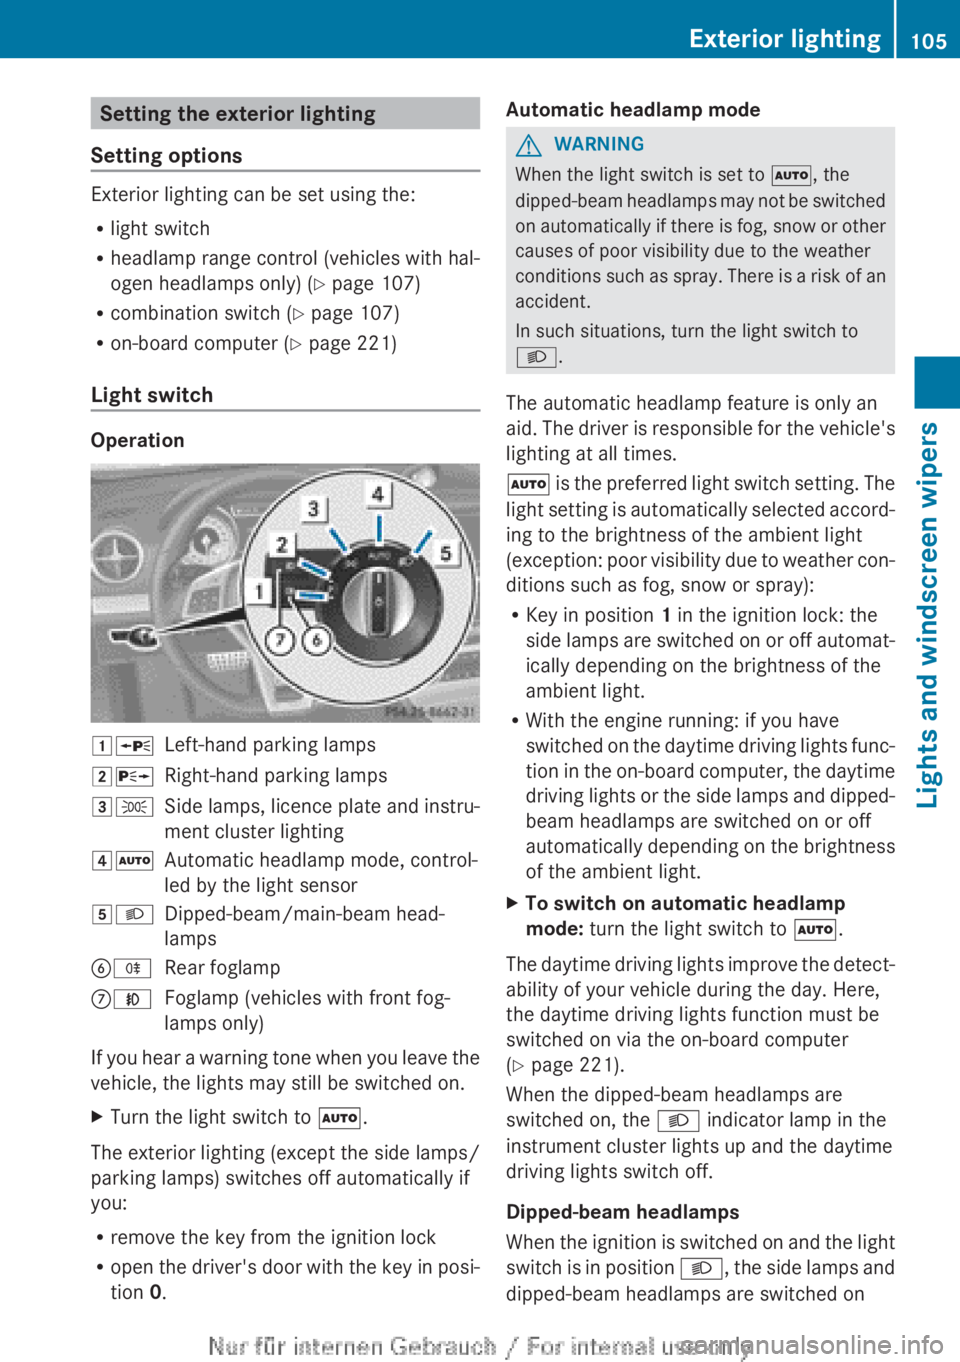
Light switch Operation
1W
Left-hand parking lamps
2X Right-hand parking lamps
3T Side lamps, licence plate and instru-
ment cluster lighting
4Ã Automatic headlamp mode, control-
led by the light sensor
5L Dipped-beam/main-beam head-
lamps
BR Rear foglamp
CN Foglamp (vehicles with front fog-
lamps only)
If you hear a warning tone when you leave the
vehicle, the lights may still be switched on.
X Turn the light switch to Ã.
The exterior lighting (except the side lamps/
parking lamps) switches off automatically if
you:
R remove the key from the ignition lock
R open
the driver's door with the key in posi-
tion 0. Automatic headlamp mode G
WARNING
When the light switch is set to Ã, the
dipped-beam
headlamps may not be switched
on automatically if there is fog, snow or other
causes of poor visibility due to the weather
conditions such as spray. There is a risk of an
accident.
In such situations, turn the light switch to
L.
The automatic headlamp feature is only an
aid. The driver is responsible for the vehicle's
lighting at all times.
à is the preferred light switch setting. The
light setting is automatically selected accord-
ing to the brightness of the ambient light
(exception: poor visibility due to weather con-
ditions such as fog, snow or spray):
R Key in position 1 in the ignition lock: the
side lamps are switched on or off automat-
ically depending on the brightness of the
ambient light.
R With the engine running: if you have
switched on the daytime driving lights func-
tion in the on-board computer, the daytime
driving lights or the side lamps and dipped-
beam headlamps are switched on or off
automatically depending on the brightness
of the ambient light.
X To switch on automatic headlamp
mode: turn the light switch to Ã.
The daytime driving lights improve the detect-
ability of your vehicle during the day. Here,
the daytime driving lights function must be
switched on via the on-board computer
(Y page 221).
When the dipped-beam headlamps are
switched on, the L indicator lamp in the
instrument cluster lights up and the daytime
driving lights switch off.
Dipped-beam headlamps
When
the ignition is switched on and the light
switch is in position L, the side lamps and
dipped-beam headlamps are switched on Exterior lighting
105
Lights and windscreen wipers Z
Page 108 of 356
even if the light sensor does not sense dark
ambient light conditions. This is advanta-
geous when there is fog or rain.
X
To switch on the dipped-beam head-
lamps: turn the key in the ignition lock to
position 2 or start the engine.
X Turn the light switch to L.
The green L indicator lamp in the instru-
ment cluster lights up.
Foglamps
In conditions where visibility is poor due to
fog, snow or rain, the foglamps improve visi-
bility
as well as making it easier for other road
users to see you. They can be operated
together with the side lamps or together with
the side lamps and dipped-beam headlamps.
X To switch on the foglamps: turn the key
in
the ignition lock to position 2 or start the
engine.
X Turn the light switch to L or Ã.
X Press the N button.
The
green N indicator lamp in the instru-
ment cluster lights up.
X To switch off the front foglamps: press
the N button.
The
green N indicator lamp in the instru-
ment cluster goes out.
Only vehicles with front foglamps are equip-
ped with the "Foglamp" function; for how to
operate the foglamps on vehicles with the
Intelligent Light System
(Y page 109).
Rear foglamp
The rear foglamp improves the visibility of
your vehicle in heavy fog for the following
traffic. Please observe the country-specific
laws on the use of rear foglamps.
X To switch on the rear foglamp: turn the
key
in the ignition lock to position 2 or start
the engine.
X Turn the light switch to L or Ã.X
Press the R button.
The yellow R indicator lamp in the
instrument cluster lights up.
X To switch off the rear foglamp:
press the
R button.
The yellow R indicator lamp in the
instrument cluster goes out.
i Vehicles with bi-xenon headlamps or the
Intelligent
Light System: when the rear fog-
lamp is switched on, the lower 15 LEDs of
the brake lamp in the tail lamp switch off
due to a legal requirement: for right-hand
traffic only in the left-hand tail lamp and for
left-hand traffic only in the right-hand tail
lamp.
Side lamps
! If the battery has been excessively dis-
charged, the side lamps or parking lamps
are automatically switched off to enable
the next engine start. Always park your
vehicle safely and sufficiently lit according
to legal standards. Avoid the continuous
use of the T side lamps for several
hours. If possible, switch on the X right
or the W left parking lamp.
X To switch on: turn the light switch to
T.
Depending on the equipment level, the
green indicator lamp or the scale illumina-
tion in the instrument cluster light up.
Parking lamps
Switching on the parking lamps ensures the
corresponding side of the vehicle is illumina-
ted.
X To switch on the parking lamps: the key
is not in the ignition lock or it is in posi-
tion 0.
X Turn the light switch to W
(left-hand side
of the vehicle) or X (right-hand side of
the vehicle). 106
Exterior lighting
Lights and windscreen wipers
Page 112 of 356
the illumination of the edge of the carriage-
way.
Active:
if you are driving at speeds below
70
km/h and you switch on the rear foglamp.
Not active: if you are driving at speeds above
100 km/h or if you switch off the rear foglamp
following activation. Adaptive Highbeam Assist
G
WARNING
Adaptive Highbeam Assist does not recognise
road users:
R who have no lights, e.g. pedestrians
R who have poor lighting, e.g. cyclists
R whose lighting is blocked, e.g. by a barrier
In
very rare cases, Adaptive Highbeam Assist
recognises road users too late or not at all. In
this, or in similar situations, the automatic
main-beam headlamps will not be deactivated
or activated regardless. There is a risk of an
accident.
Always carefully observe the traffic conditions
and switch off the main-beam headlamps in
good time.
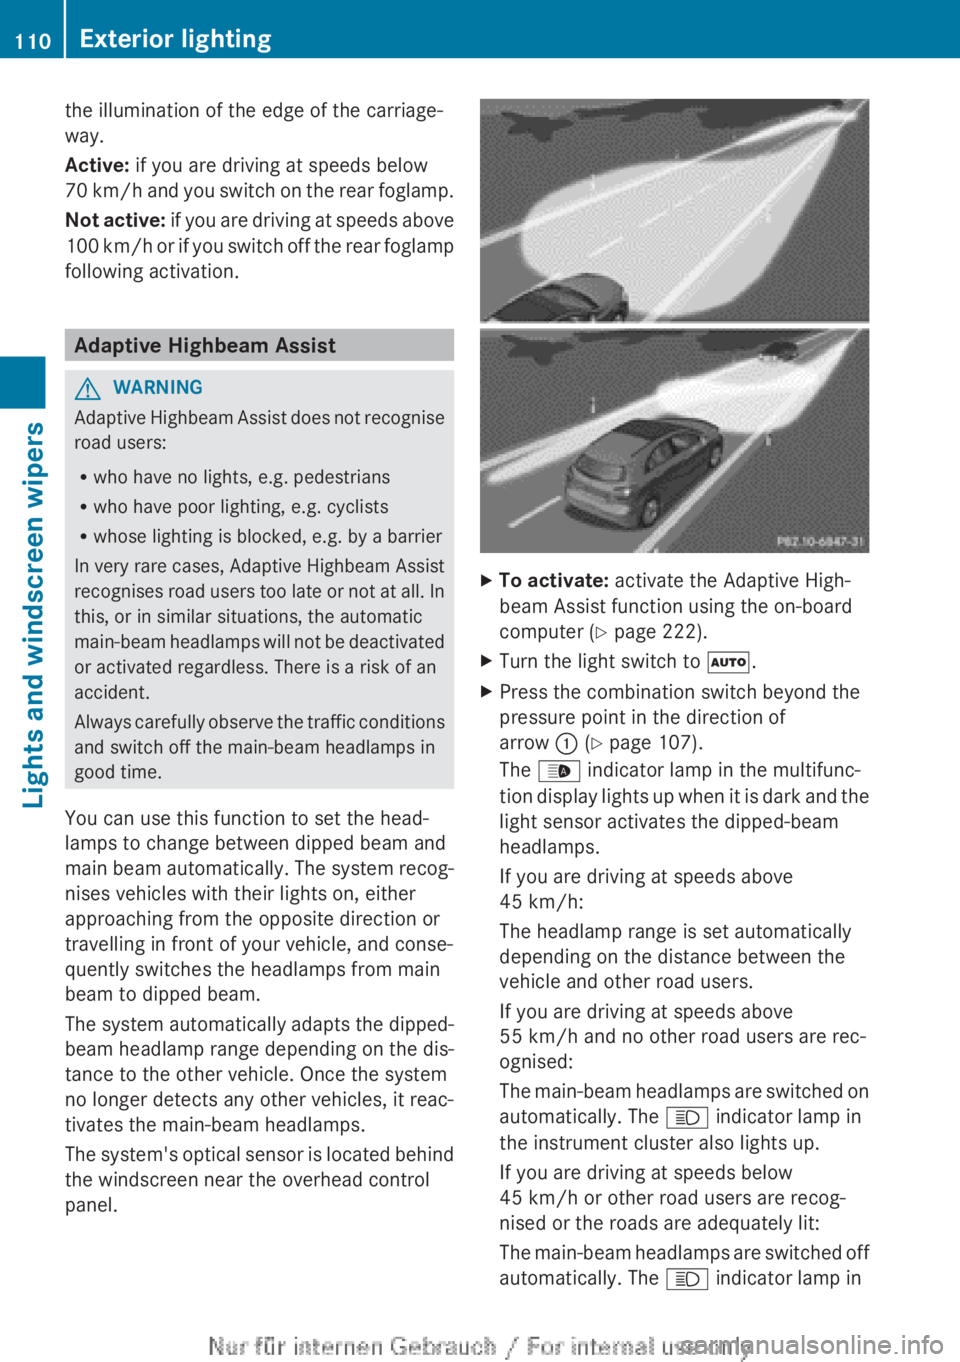
You can use this function to set the head-
lamps to change between dipped beam and
main beam automatically. The system recog-
nises vehicles with their lights on, either
approaching from the opposite direction or
travelling in front of your vehicle, and conse-
quently switches the headlamps from main
beam to dipped beam.
The system automatically adapts the dipped-
beam headlamp range depending on the dis-
tance to the other vehicle. Once the system
no longer detects any other vehicles, it reac-
tivates the main-beam headlamps.
The system's optical sensor is located behind
the windscreen near the overhead control
panel. X
To activate: activate the Adaptive High-
beam Assist function using the on-board
computer (Y page 222).
X Turn the light switch to Ã.
X Press the combination switch beyond the
pressure point in the direction of
arrow : (Y page 107).
The _ indicator lamp in the multifunc-
tion
display lights up when it is dark and the
light sensor activates the dipped-beam
headlamps.
If you are driving at speeds above
45 km/h:
The headlamp range is set automatically
depending on the distance between the
vehicle and other road users.
If you are driving at speeds above
55 km/h and no other road users are rec-
ognised:
The main-beam headlamps are switched on
automatically. The K indicator lamp in
the instrument cluster also lights up.
If you are driving at speeds below
45 km/h or other road users are recog-
nised or the roads are adequately lit:
The main-beam headlamps are switched off
automatically. The K indicator lamp in110
Exterior lighting
Lights and windscreen wipers
Page 119 of 356
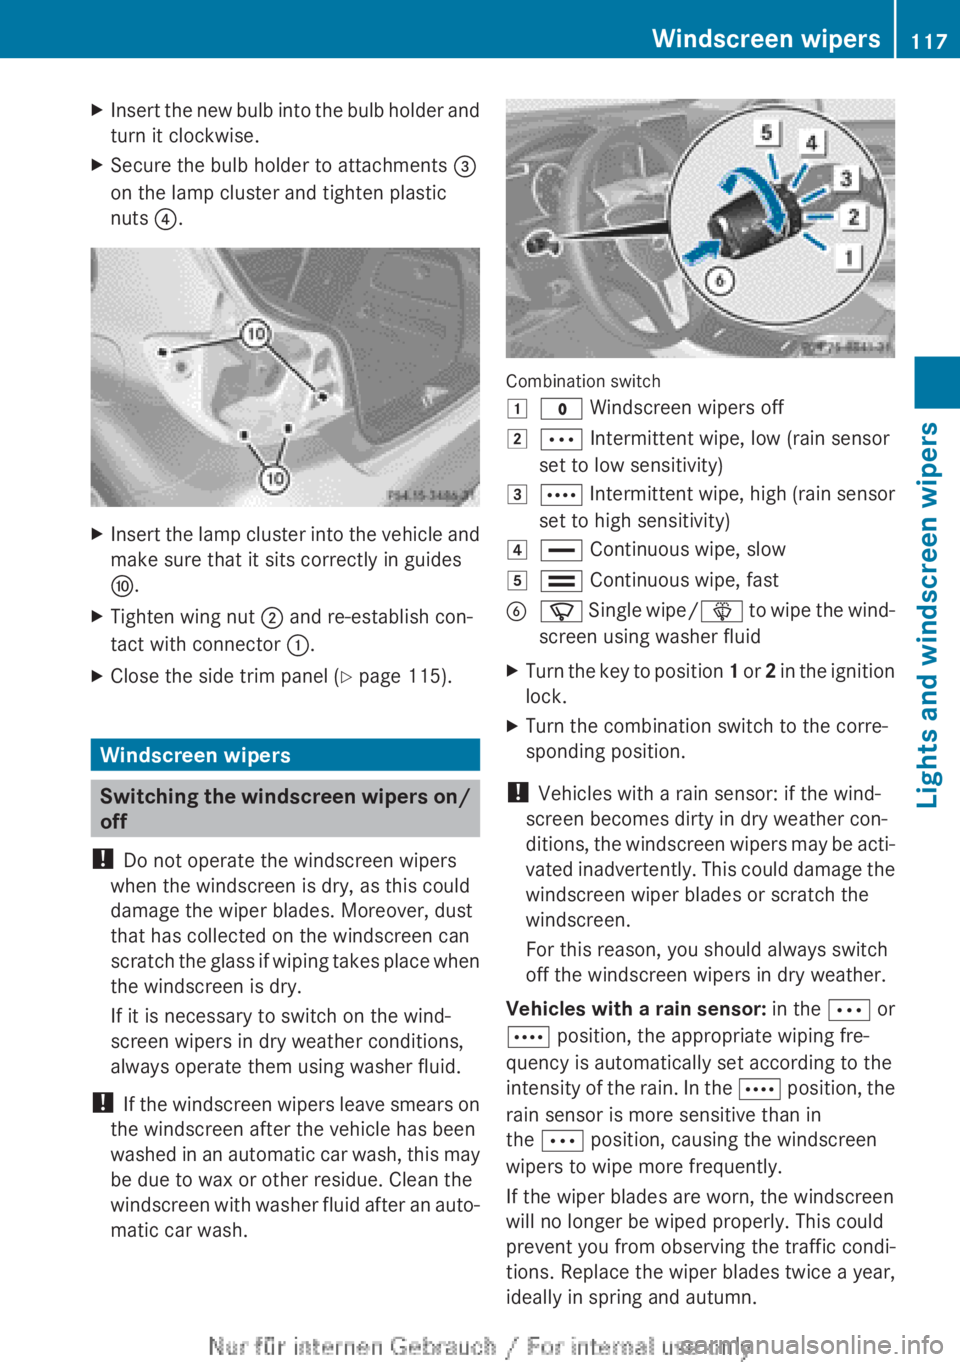
X
Insert the new bulb into the bulb holder and
turn it clockwise.
X Secure the bulb holder to attachments =
on the lamp cluster and tighten plastic
nuts ?. X
Insert the lamp cluster into the vehicle and
make sure that it sits correctly in guides
F.
X Tighten wing nut ; and re-establish con-
tact with connector :.
X Close the side trim panel ( Y page 115).Windscreen wipers
Switching the windscreen wipers on/
off
! Do not operate the windscreen wipers
when the windscreen is dry, as this could
damage the wiper blades. Moreover, dust
that has collected on the windscreen can
scratch
the glass if wiping takes place when
the windscreen is dry.
If it is necessary to switch on the wind-
screen wipers in dry weather conditions,
always operate them using washer fluid.
! If the windscreen wipers leave smears on
the windscreen after the vehicle has been
washed in an automatic car wash, this may
be due to wax or other residue. Clean the
windscreen with washer fluid after an auto-
matic car wash. Combination switch
1
$ Windscreen wipers off
2 Ä Intermittent wipe, low (rain sensor
set to low sensitivity)
3 Å
Intermittent wipe, high (rain sensor
set to high sensitivity)
4 ° Continuous wipe, slow
5 ¯ Continuous wipe, fast
B í
Single wipe/ î to wipe the wind-
screen using washer fluid
X Turn the key to position 1
or 2 in the ignition
lock.
X Turn the combination switch to the corre-
sponding position.
! Vehicles with a rain sensor: if the wind-
screen becomes dirty in dry weather con-
ditions,
the windscreen wipers may be acti-
vated inadvertently. This could damage the
windscreen wiper blades or scratch the
windscreen.
For this reason, you should always switch
off the windscreen wipers in dry weather.
Vehicles with a rain sensor: in the Ä or
Å position, the appropriate wiping fre-
quency is automatically set according to the
intensity of the rain. In the Å position, the
rain sensor is more sensitive than in
the Ä position, causing the windscreen
wipers to wipe more frequently.
If the wiper blades are worn, the windscreen
will no longer be wiped properly. This could
prevent you from observing the traffic condi-
tions. Replace the wiper blades twice a year,
ideally in spring and autumn. Windscreen wipers
117Lights and windscreen wipers Z
Page 175 of 356
Shortly before the stored speed is reached, it
appears in the multifunction display.
Permanent SPEEDTRONIC remains active,
even
if variable SPEEDTRONIC is deactivated.
You cannot exceed the stored limit speed,
even if you depress the accelerator pedal
beyond the pressure point (kickdown). DISTRONIC PLUS
Important safety notes G
WARNING
DISTRONIC PLUS does not react to:
R people or animals
R stationary
obstacles on the road, e.g. stop-
ped or parked vehicles
R oncoming and crossing traffic
As a result, DISTRONIC PLUS may neither give
warnings nor intervene in such situations.
There is a risk of an accident.
Always pay careful attention to the traffic sit-
uation and be ready to brake. G
WARNING
DISTRONIC PLUS cannot always clearly iden-
tify other road users and complex traffic sit-
uations.
In such cases, DISTRONIC PLUS may:
R give an unnecessary warning and then
brake the vehicle
R neither give a warning nor intervene
R accelerate unexpectedly
There is a risk of an accident.
Continue to drive carefully and be ready to
brake, in particular when warned to do so by
DISTRONIC PLUS. G
WARNING
DISTRONIC PLUS brakes your vehicle with up
to 40% of the maximum braking force. If this
braking
force is insufficient, DISTRONIC PLUS
warns you visually and audibly. There is a risk
of an accident. In such cases, apply the brakes yourself and
try to take evasive action.
! If
DISTRONIC PLUS or the HOLD function
is activated, the vehicle brakes automati-
cally in certain situations. To prevent dam-
age to the vehicle, deactivate DISTRONIC
PLUS and the HOLD function in the follow-
ing or other similar situations:
R when towing the vehicle
R in the car wash
If you fail to adapt your driving style, DIS-
TRONIC PLUS can neither reduce the risk of
an accident nor override the laws of physics.
DISTRONIC PLUS cannot take road and
weather conditions or traffic conditions into
account. DISTRONIC PLUS is only an aid. You
are responsible for the distance to the vehicle
in front, for vehicle speed, for braking in good
time, and for staying in the lane.
Do not use DISTRONIC PLUS:
R in road and traffic conditions which do not
allow you to maintain a constant speed
(e.g. in heavy traffic or on winding roads).
R on smooth or slippery roads. Braking or
accelerating can cause the drive wheels to
lose traction and the vehicle could then
skid.
R when there is poor visibility, e.g. due to fog,
heavy rain or snow.
DISTRONIC PLUS may not detect narrow
vehicles driving in front, e.g. motorcycles, or
vehicles driving on a different line.
In particular, the detection of obstacles can
be impaired by:
R dirt on the sensors or anything else cover-
ing the sensors
R snow or heavy rain
R interference by other radar sources
R the possibility of strong radar reflections,
for example, in multi-storey car parks
If DISTRONIC PLUS no longer detects a vehi-
cle in front, it may unexpectedly accelerate to
the speed stored. Driving systems
173
Driving and parking Z
Page 176 of 356
This speed can:
R
be too high for a filter lane or a slip road
R be so high in the right lane that you pass
vehicles driving on the left
R be so high in the left lane that you pass
vehicles driving on the right
If
there is a change of drivers, advise the new
driver of the speed stored.
General notes DISTRONIC PLUS regulates the speed and
automatically helps you maintain the dis-
tance to the vehicle detected in front. DIS-
TRONIC PLUS brakes automatically so that
the set speed is not exceeded.
You
must select a lower gear in good time on
long and steep downhill gradients, especially
if the vehicle is laden or towing a trailer. For
this, you need to have selected manual drive
program M(Y page 166). By doing so, you will
make use of the braking effect of the engine.
This relieves the load on the brake system and
prevents the brakes from overheating and
wearing too quickly.
If a slower-moving vehicle is detected in front,
DISTRONIC PLUS brakes your vehicle. It
maintains the preset distance to the vehicle
in front.
If DISTRONIC PLUS detects that there is a risk
of a collision, you will be warned visually and
acoustically. Without your intervention, DIS-
TRONIC PLUS cannot prevent a collision. An
intermittent warning tone will then sound and
the distance warning lamp will light up in the
instrument cluster. Brake immediately to
increase the distance to the vehicle driving in
front, or take evasive action, provided it is
safe to do so.
The radar sensor system is switched off auto-
matically in the vicinity of radio telescope
facilities ( Y page 350).
For DISTRONIC PLUS to assist you when driv-
ing, the radar sensor system must be:
R activated (Y page 223)
R operational i
In some countries you must deactivate
the radar sensor system ( Y page 223).
For
further information about the radar sen-
sor system; see ( Y page 350).
DISTRONIC PLUS is automatically deactiva-
ted if:
R you are driving slower than 25 km/h and
there is no longer a vehicle in front or
R the vehicle ahead has not been detected
If there is no vehicle in front, DISTRONIC
PLUS operates in the same way as cruise
control in the speed range between
30 km/h and 200 km/h. If a vehicle is driving
in front of you, it operates in the speed range
between 0 km/h and 200 km/h.
Do not use DISTRONIC PLUS on roads with
steep gradients.
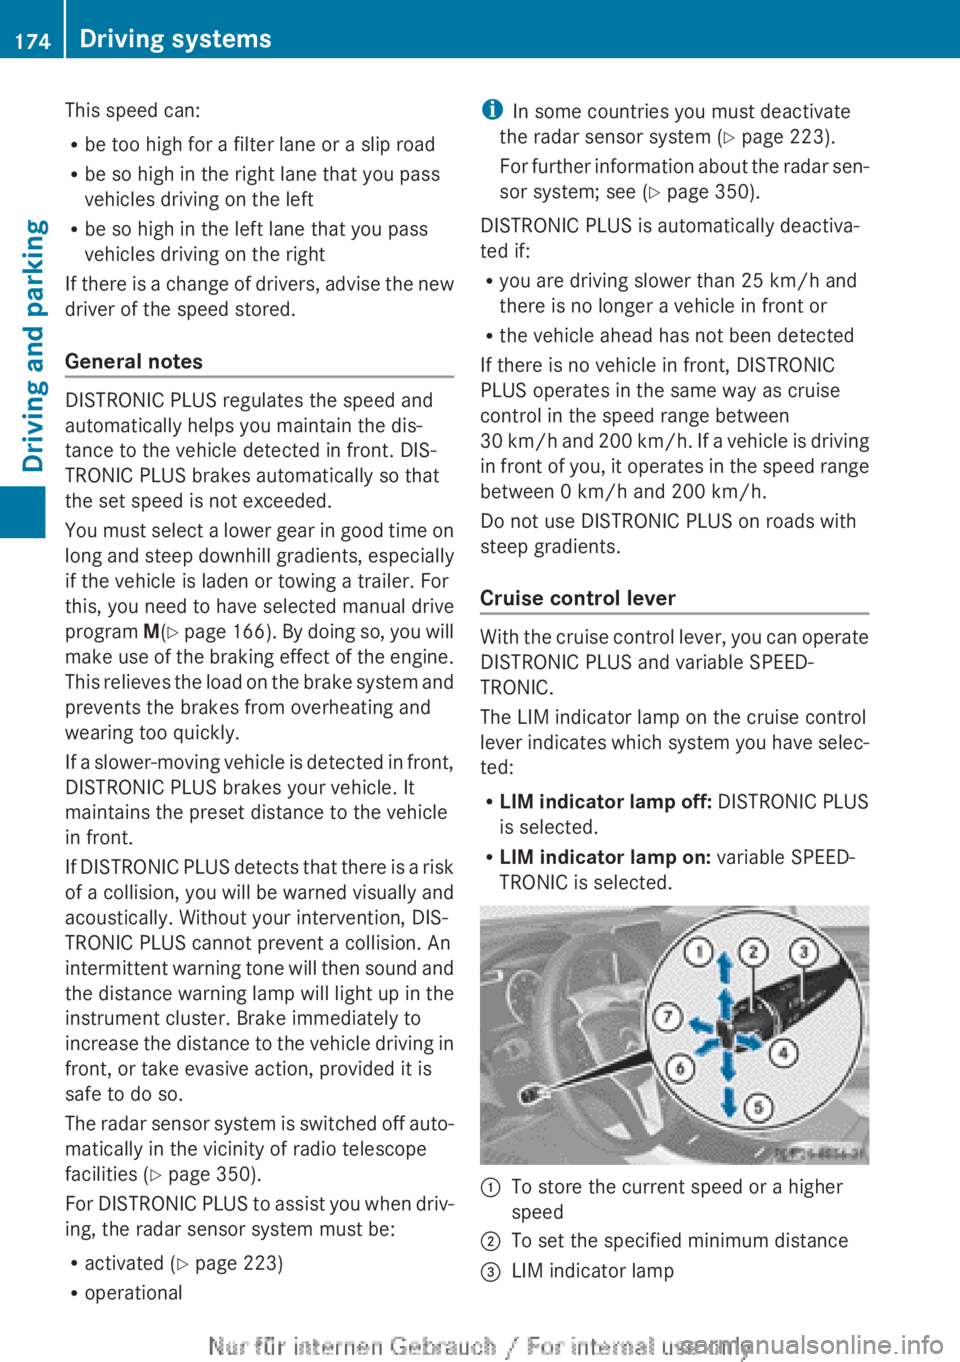
Cruise control lever With the cruise control lever, you can operate
DISTRONIC PLUS and variable SPEED-
TRONIC.
The LIM indicator lamp on the cruise control
lever
indicates which system you have selec-
ted:
R LIM indicator lamp off: DISTRONIC PLUS
is selected.
R LIM indicator lamp on: variable SPEED-
TRONIC is selected. :
To store the current speed or a higher
speed
; To set the specified minimum distance
= LIM indicator lamp174
Driving systems
Driving and parking
Page 180 of 356
DISTRONIC PLUS is automatically deactiva-
ted if:
R
you apply the electric parking brake or if
the vehicle is automatically secured with
the electric parking brake
R you are driving slower than
10 km/h and
there is no longer a vehicle in front, or if the
vehicle in front is no longer detected
R ESP ®
intervenes or you deactivate ESP ®
R the transmission is in the P, R or N position
R you switch off the radar sensor system
R you pull the cruise control lever towards
you in order to pull away and the front-
passenger door or one of the rear doors is
open
R the vehicle is skidding
R you activate Active Parking Assist
If DISTRONIC PLUS is deactivated, you will
hear a warning tone. You will see the DIS‐
TRONIC PLUS off message in the multifunc-
tion display for approximately five seconds.
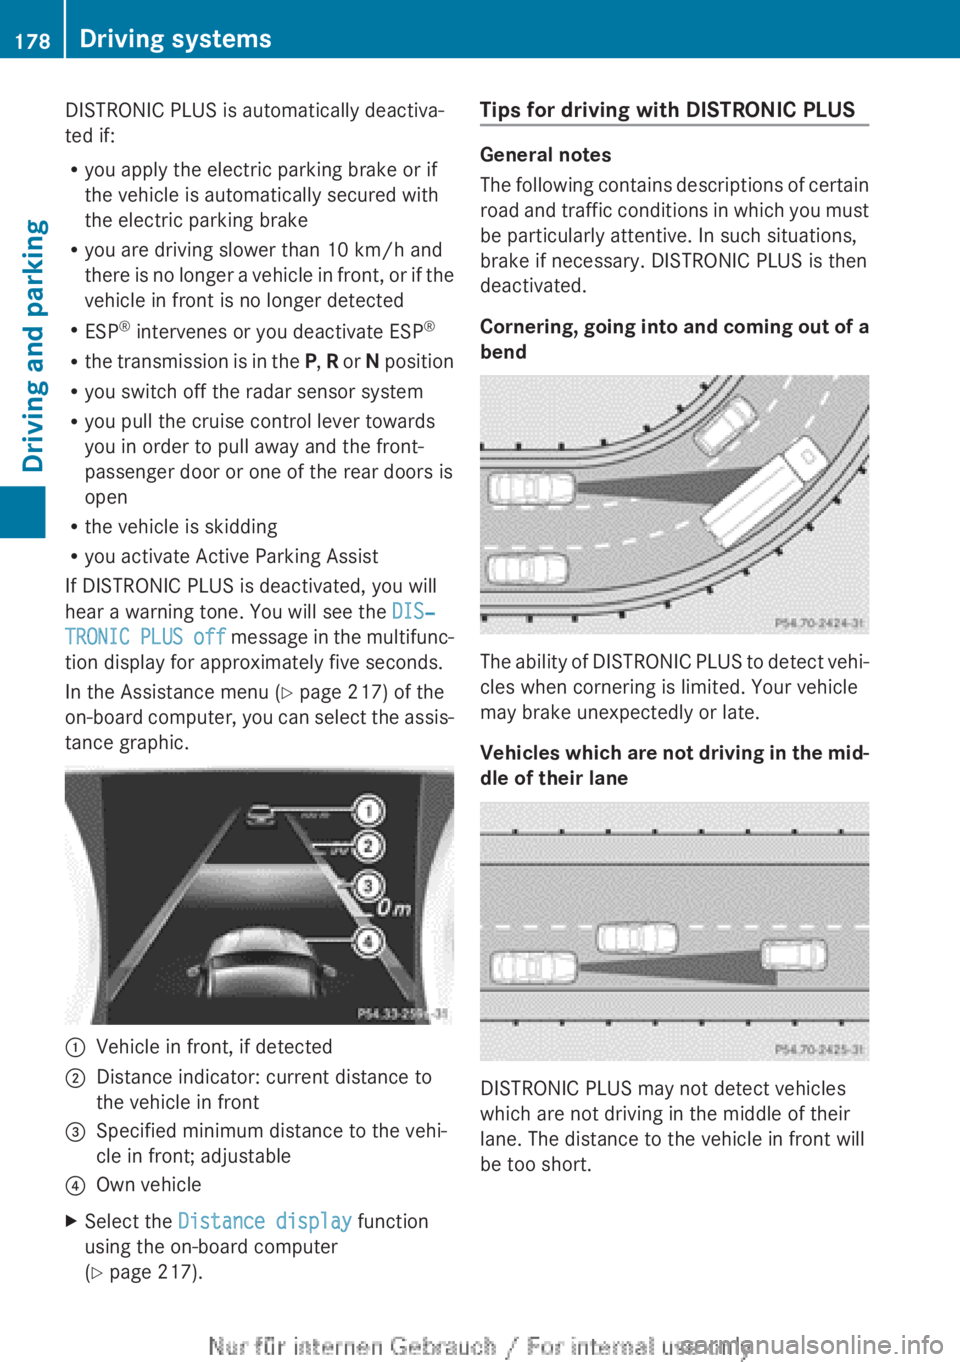
In the Assistance menu (Y page 217) of the
on-board computer, you can select the assis-
tance graphic. :
Vehicle in front, if detected
; Distance indicator: current distance to
the vehicle in front
= Specified minimum distance to the vehi-
cle in front; adjustable
? Own vehicle
X Select the Distance display function
using the on-board computer
(Y page 217). Tips for driving with DISTRONIC PLUS General notes
The
following contains descriptions of certain
road and traffic conditions in which you must
be particularly attentive. In such situations,
brake if necessary. DISTRONIC PLUS is then
deactivated.
Cornering, going into and coming out of a
bend The ability of DISTRONIC PLUS to detect vehi-
cles when cornering is limited. Your vehicle
may brake unexpectedly or late.
Vehicles
which are not driving in the mid-
dle of their lane DISTRONIC PLUS may not detect vehicles
which are not driving in the middle of their
lane. The distance to the vehicle in front will
be too short.178
Driving systems
Driving and parking
Page 184 of 356
i
If you do not depress the accelerator
pedal
within a few seconds, RACE START is
cancelled. The multifunction display shows
the RACE START cancelled message.
X Fully depress the accelerator pedal.
The engine speed is increased.
The RACE START Release brake to
start message appears in the multifunc-
tion display.
i If the brake pedal is not released after a
short while, RACE START is cancelled. The
multifunction display shows the RACE
START cancelled message.
X Take your foot off the brake, but keep the
accelerator pedal depressed.
The vehicle pulls away at maximum accel-
eration.
The RACE
START active message appears
in the multifunction display.
RACE START is deactivated when the vehicle
reaches a speed of approximately
50 km/h.
Drive program S is activated. SPORT handling
mode remains activated.
RACE START is deactivated immediately if
you release the accelerator pedal during
RACE START or if any of the activation condi-
tions are no longer fulfilled. The RACE START
not possible or RACE START cancelled
message appears in the multifunction dis-
play.
i After using it several times in short suc-
cession, RACE START will be unavailable
until a certain distance has been driven. 4MATIC (permanent all-wheel drive)
4MATIC ensures that all four wheels are per-
manently driven. Together with ESP ®
, it
improves the traction of your vehicle when-
ever a drive wheel spins due to insufficient
grip.
If
you fail to adapt your driving style, 4MATIC
can neither reduce the risk of accident nor
override the laws of physics. 4MATIC cannot take account of road, weather and traffic con-
ditions. 4MATIC is only an aid. You are
responsible for the distance to the vehicle in
front, for vehicle speed, for braking in good
time, and for staying in the lane.
If
a drive wheel spins due to insufficient grip:
R when pulling away, only depress the accel-
erator pedal as far as is necessary.
R accelerate less when driving.
! Never tow the vehicle with one axle
raised. This may damage the transfer case.
Damage of this sort is not covered by the
Mercedes-Benz implied warranty. All
wheels must remain either on the ground
or be fully raised. Observe the instructions
for towing the vehicle with all wheels in full
contact with the ground.
i In wintry driving conditions, the maximum
effect of 4MATIC can only be achieved if
you use winter tyres (M+S tyres), with snow
chains if necessary. PARKTRONIC
Important safety notes PARKTRONIC is only an aid. It is not a substi-
tute for your attention to the immediate sur-
roundings. The responsibility for safe
manoeuvring and parking remains with you.
Make
sure that there are no persons, animals
or objects in range while manoeuvring and
parking.
! When parking, pay particular attention to
objects above or below the sensors, such
as flower pots or trailer drawbars. PARK-
TRONIC does not detect such objects when
they are in the immediate vicinity of the
vehicle. You could damage the vehicle or
the objects.
The sensors may not detect snow and
objects which absorb ultrasonic sources.
Ultrasonic sources, such as an automatic
car wash, a lorry's compressed-air brakes 182
Driving systems
Driving and parking
Page 185 of 356
or a pneumatic drill, could cause PARK-
TRONIC to malfunction.
PARKTRONIC
may not function correctly on
uneven terrain.
PARKTRONIC is an electronic parking aid with
ultrasonic sensors. It indicates visually and
audibly the distance between your vehicle
and an object.
PARKTRONIC is activated automatically if
you:
R switch on the ignition
R shift to position D, R or N on vehicles with
automatic transmission
R release the electric parking brake
PARKTRONIC is deactivated at speeds above
18 km/h. It is reactivated at lower speeds.
PARKTRONIC monitors the area around your
vehicle using six sensors in the front bumper
and four sensors in the rear bumper.
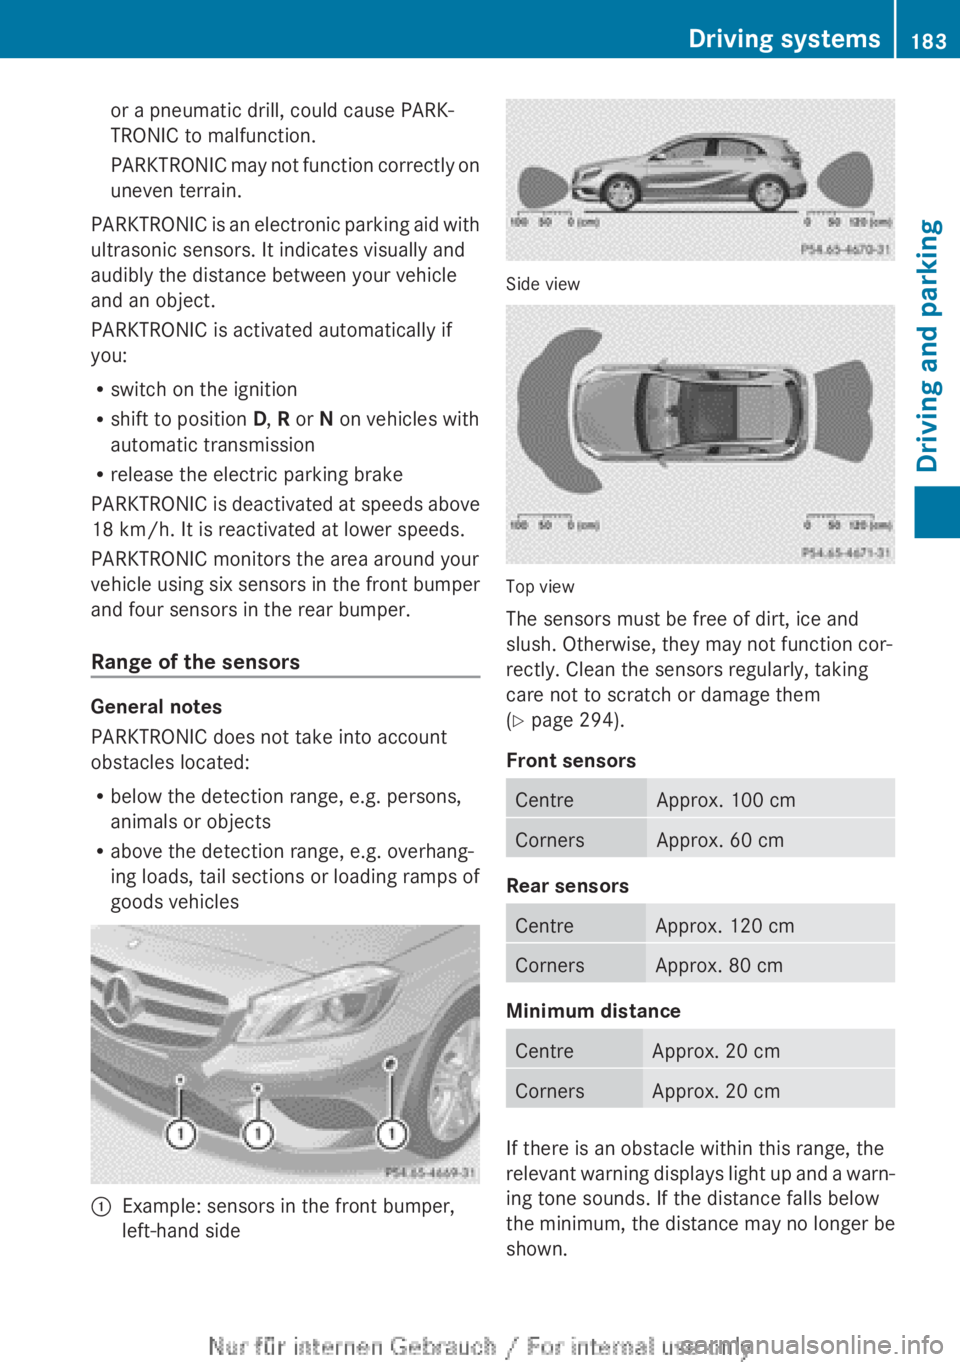
Range of the sensors General notes
PARKTRONIC does not take into account
obstacles located:
R
below the detection range, e.g. persons,
animals or objects
R above the detection range, e.g. overhang-
ing loads, tail sections or loading ramps of
goods vehicles :
Example: sensors in the front bumper,
left-hand side Side view
Top view
The sensors must be free of dirt, ice and
slush. Otherwise, they may not function cor-
rectly. Clean the sensors regularly, taking
care not to scratch or damage them
(Y page 294).
Front sensors
Centre Approx. 100 cm
Corners Approx. 60 cm
Rear sensors
Centre Approx. 120 cm
Corners Approx. 80 cm
Minimum distance
Centre Approx. 20 cm
Corners Approx. 20 cm
If there is an obstacle within this range, the
relevant
warning displays light up and a warn-
ing tone sounds. If the distance falls below
the minimum, the distance may no longer be
shown. Driving systems
183
Driving and parking Z
Page 186 of 356
Warning displays
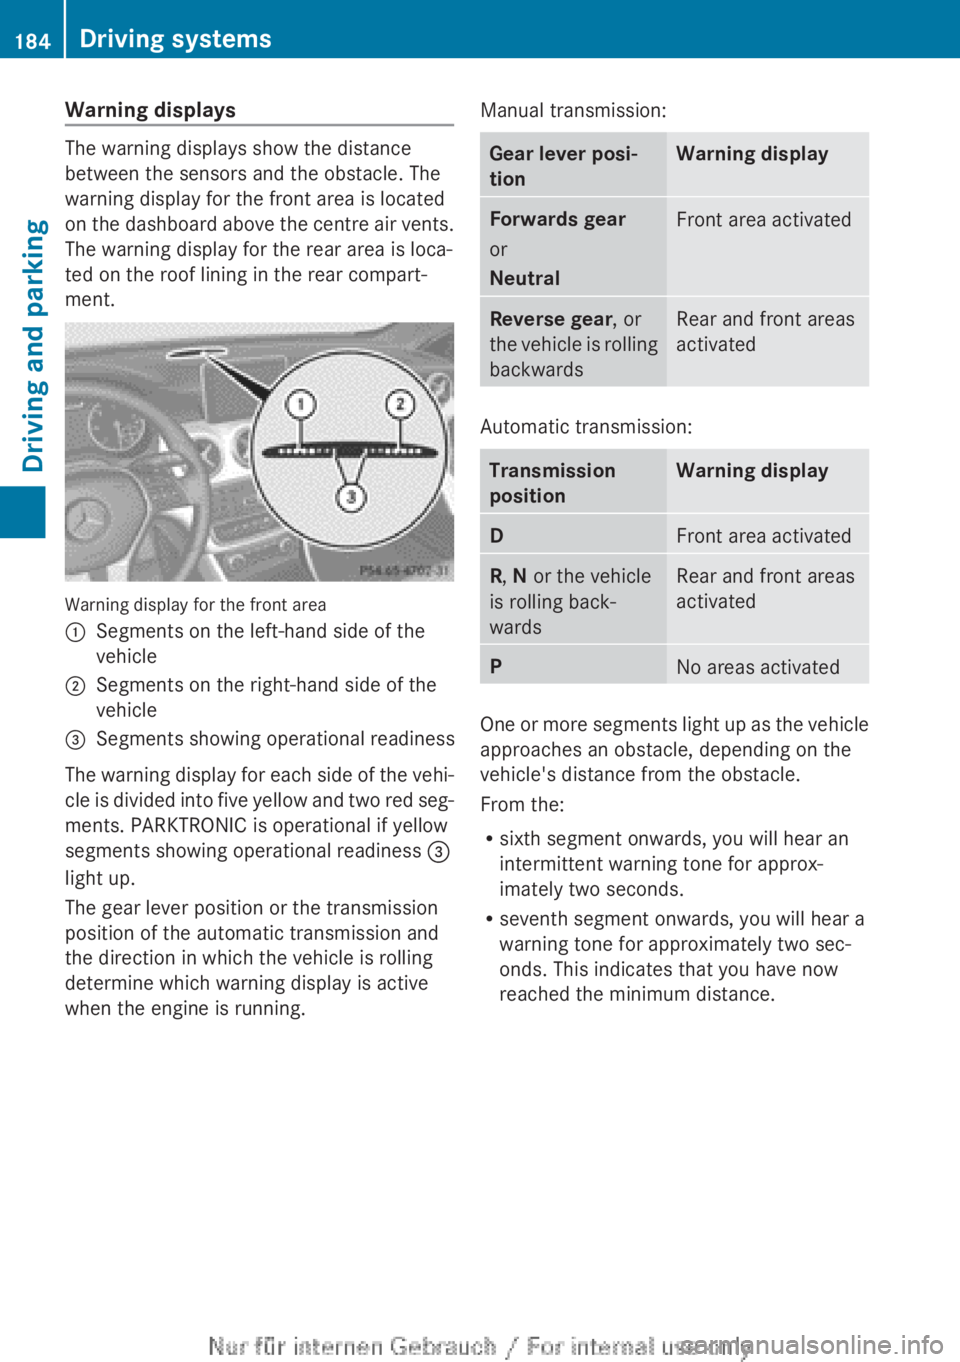
The warning displays show the distance
between the sensors and the obstacle. The
warning display for the front area is located
on
the dashboard above the centre air vents.
The warning display for the rear area is loca-
ted on the roof lining in the rear compart-
ment. Warning display for the front area
:
Segments on the left-hand side of the
vehicle
; Segments on the right-hand side of the
vehicle
= Segments showing operational readiness
The warning display for each side of the vehi-
cle
is divided into five yellow and two red seg-
ments. PARKTRONIC is operational if yellow
segments showing operational readiness =
light up.
The gear lever position or the transmission
position of the automatic transmission and
the direction in which the vehicle is rolling
determine which warning display is active
when the engine is running. Manual transmission: Gear lever posi-
tion Warning display
Forwards gear
or
Neutral
Front area activated
Reverse gear, or
the
vehicle is rolling
backwards Rear and front areas
activated
Automatic transmission:
Transmission
position Warning display
D
Front area activated
R, N or the vehicle
is rolling back-
wards Rear and front areas
activated
P
No areas activated
One or more segments light up as the vehicle
approaches an obstacle, depending on the
vehicle's distance from the obstacle.
From the:
R
sixth segment onwards, you will hear an
intermittent warning tone for approx-
imately two seconds.
R seventh segment onwards, you will hear a
warning tone for approximately two sec-
onds. This indicates that you have now
reached the minimum distance.184
Driving systems
Driving and parking