sensor MERCEDES-BENZ A CLASS 2012 Owner's Guide
[x] Cancel search | Manufacturer: MERCEDES-BENZ, Model Year: 2012, Model line: A CLASS, Model: MERCEDES-BENZ A CLASS 2012Pages: 356, PDF Size: 4.96 MB
Page 188 of 356
Problems with PARKTRONIC
Problem Possible causes/consequences and
M SolutionsOnly the red segments
in the PARKTRONIC
warning
displays are lit.
You also hear a warning
tone for approximately
two seconds.
PARKTRONIC is deacti-
vated after approx-
imately five seconds,
and the indicator lamp
in the PARKTRONIC
button lights up. PARKTRONIC has malfunctioned and has switched off.
X
If problems persist, have PARKTRONIC checked at a qualified
specialist workshop. Only the red segments
in the PARKTRONIC
warning
displays are lit.
PARKTRONIC is deacti-
vated after approx-
imately five seconds. The PARKTRONIC sensors are dirty or there is interference.
X
Clean the PARKTRONIC sensors ( Y page 294).
X Switch the ignition back on. The problem may be caused by an external source of radio or
ultrasound waves.
X
See if PARKTRONIC functions in a different location. Active Parking Assist
Important safety notes Active Parking Assist is only an aid. It is not a
substitute
for your attention to the immediate
surroundings. The responsibility for safe
manoeuvring and parking remains with you.
Make sure that there are no persons, animals
or objects in range while manoeuvring and
parking. G
WARNING
The vehicle will veer out when parking and can
take
you onto sections of the oncoming lane.
As a result, you may collide with other road
users. There is a risk of an accident.
When parking, pay attention to other road
users. Stop the vehicle if necessary or cancel
the Active Parking Assist parking procedure.
! If unavoidable, you should drive over
obstacles such as kerbs slowly and not at a sharp angle. Otherwise, you may damage
the wheels or tyres.
Active
Parking Assist may also display spaces
not suitable for parking, e.g.:
R parking or stopping prohibitions
R in front of driveways or entrances and exits
R unsuitable surfaces
Parking tips:
R on narrow roads, drive as closely as possi-
ble past the parking space.
R parking spaces that are littered, overgrown
or partially occupied by trailer drawbars
might be identified incorrectly or not at all.
R snowfall or heavy rain may lead to a parking
space being measured inaccurately.
R pay attention to the PARKTRONIC
(Y page 184) warning messages during the
parking procedure. 186
Driving systems
Driving and parking
Page 200 of 356
Blind Spot Assist is only an aid. It may fail to
detect
some vehicles and is no substitute for
attentive driving.
General notes
Blind Spot Assist uses a radar sensor system
to monitor the areas on both sides of your
vehicle. It supports you from speeds of
30 km/h. A warning display in the exterior
mirrors draws your attention to vehicles
detected in the monitored area. If you then
switch on the corresponding turn signal to
change lane, you will also receive an optical
and audible collision warning. For this pur-
pose, Blind Spot Assist uses sensors in the
rear bumper.
The radar sensor system is switched off auto-
matically in the vicinity of radio telescope
facilities ( Y page 350).
For Blind Spot Assist to assist you when driv-
ing, the radar sensor system must be:
R activated(Y page 223)
R operational
i In some countries you must deactivate
the radar sensor system ( Y page 223).
For further information about the radar sen-
sor system; see ( Y page 350).
Monitoring range of the sensors
In particular, the detection of obstacles can
be impaired in the case of:
R dirt on the sensors or anything else cover-
ing the sensors
R poor visibility, e.g. due to fog, heavy rain or
snow
R a narrow vehicle travelling in front, e.g. a
motorcycle or a bicycle
R very wide lanes
R narrow lanes
R vehicles not driving in the middle of their
lane
R barriers or other road boundaries
Vehicles in the monitoring range are then not
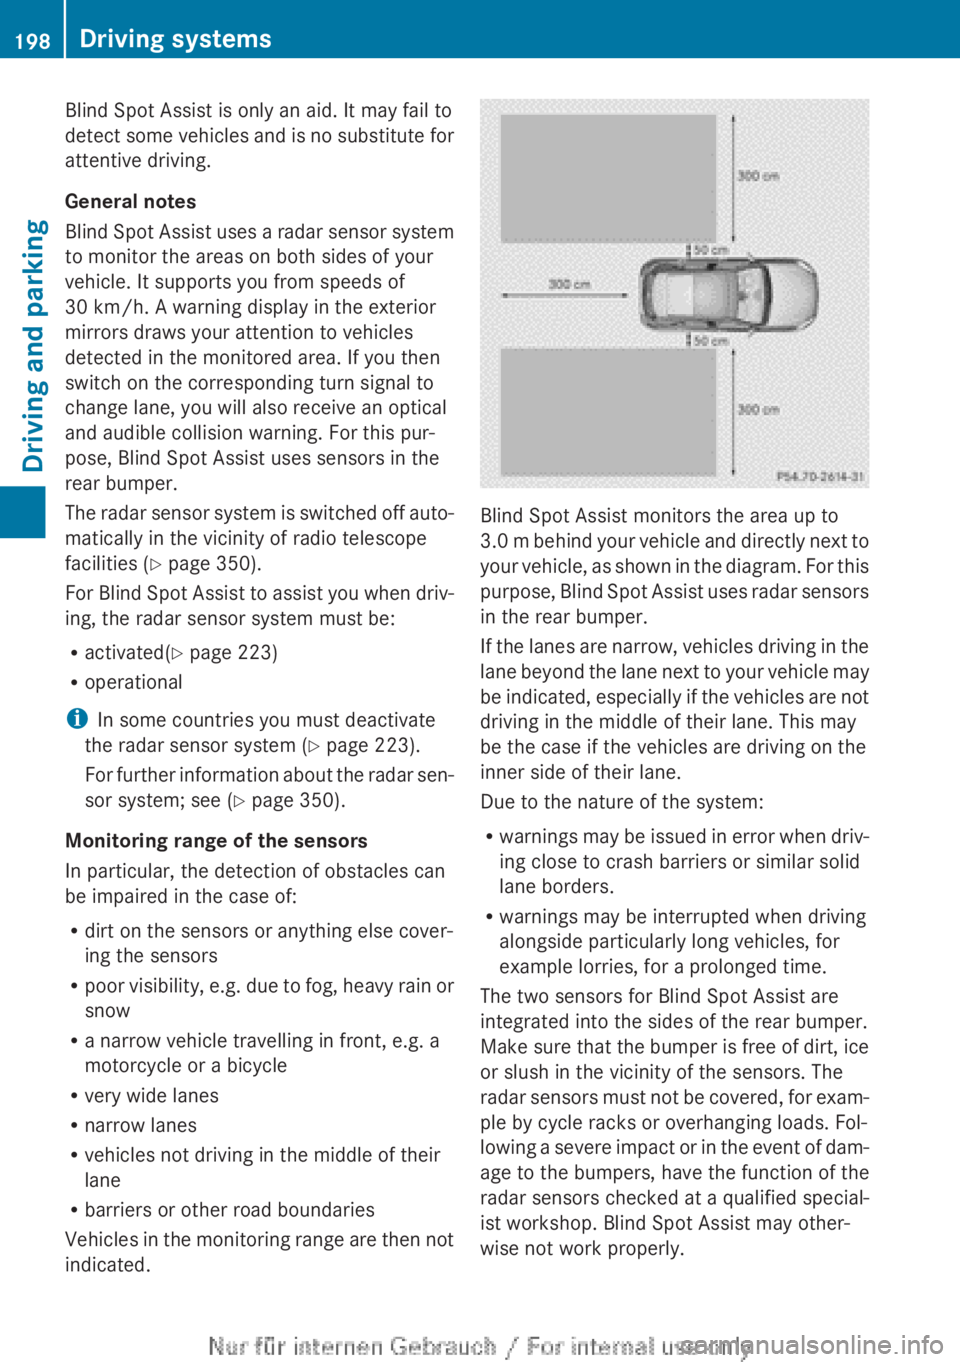
indicated. Blind Spot Assist monitors the area up to
3.0
m behind your vehicle and directly next to
your vehicle, as shown in the diagram. For this
purpose, Blind Spot Assist uses radar sensors
in the rear bumper.
If the lanes are narrow, vehicles driving in the
lane beyond the lane next to your vehicle may
be indicated, especially if the vehicles are not
driving in the middle of their lane. This may
be the case if the vehicles are driving on the
inner side of their lane.
Due to the nature of the system:
R warnings may be issued in error when driv-
ing close to crash barriers or similar solid
lane borders.
R warnings may be interrupted when driving
alongside particularly long vehicles, for
example lorries, for a prolonged time.
The two sensors for Blind Spot Assist are
integrated into the sides of the rear bumper.
Make sure that the bumper is free of dirt, ice
or slush in the vicinity of the sensors. The
radar sensors must not be covered, for exam-
ple by cycle racks or overhanging loads. Fol-
lowing a severe impact or in the event of dam-
age to the bumpers, have the function of the
radar sensors checked at a qualified special-
ist workshop. Blind Spot Assist may other-
wise not work properly. 198
Driving systems
Driving and parking
Page 201 of 356
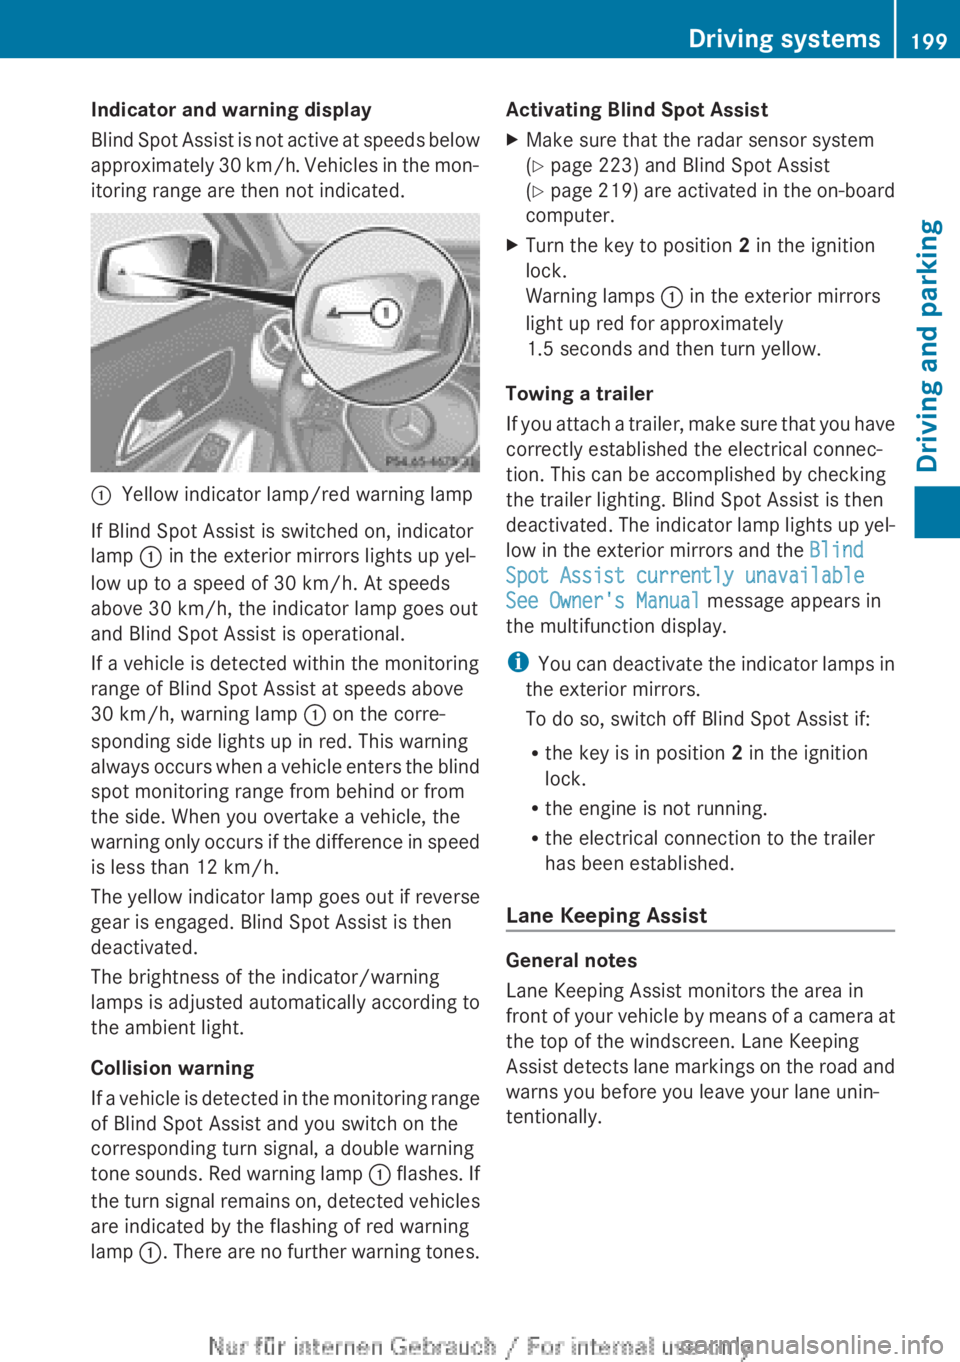
Indicator and warning display
Blind
Spot Assist is not active at speeds below
approximately 30 km/h. Vehicles in the mon-
itoring range are then not indicated. :
Yellow indicator lamp/red warning lamp
If Blind Spot Assist is switched on, indicator
lamp : in the exterior mirrors lights up yel-
low up to a speed of
30 km/h. At speeds
above 30 km/h, the indicator lamp goes out
and Blind Spot Assist is operational.
If a vehicle is detected within the monitoring
range of Blind Spot Assist at speeds above
30 km/h, warning lamp : on the corre-
sponding side lights up in red. This warning
always occurs when a vehicle enters the blind
spot monitoring range from behind or from
the side. When you overtake a vehicle, the
warning only occurs if the difference in speed
is less than 12 km/h.
The yellow indicator lamp goes out if reverse
gear is engaged. Blind Spot Assist is then
deactivated.
The brightness of the indicator/warning
lamps is adjusted automatically according to
the ambient light.
Collision warning
If a vehicle is detected in the monitoring range
of Blind Spot Assist and you switch on the
corresponding turn signal, a double warning
tone sounds. Red warning lamp : flashes. If
the turn signal remains on, detected vehicles
are indicated by the flashing of red warning
lamp :. There are no further warning tones. Activating Blind Spot Assist
X
Make sure that the radar sensor system
(Y page 223) and Blind Spot Assist
(Y page
219) are activated in the on-board
computer.
X Turn the key to position 2 in the ignition
lock.
Warning lamps : in the exterior mirrors
light up red for approximately
1.5 seconds
and then turn yellow.
Towing a trailer
If
you attach a trailer, make sure that you have
correctly established the electrical connec-
tion. This can be accomplished by checking
the trailer lighting. Blind Spot Assist is then
deactivated. The indicator lamp lights up yel-
low in the exterior mirrors and the Blind
Spot Assist currently unavailable
See Owner's Manual message appears in
the multifunction display.
i You can deactivate the indicator lamps in
the exterior mirrors.
To do so, switch off Blind Spot Assist if:
R the key is in position 2 in the ignition
lock.
R the engine is not running.
R the electrical connection to the trailer
has been established.
Lane Keeping Assist General notes
Lane Keeping Assist monitors the area in
front
of your vehicle by means of a camera at
the top of the windscreen. Lane Keeping
Assist detects lane markings on the road and
warns you before you leave your lane unin-
tentionally. Driving systems
199
Driving and parking Z
Page 210 of 356
Useful information
i This Owner's Manual describes all mod-
els,
series and optional equipment for your
vehicle that were available at the time of
going to press. National variations are pos-
sible. Note that your vehicle may not be
equipped with all of the functions descri-
bed. This is also the case for systems and
functions relevant to safety.
i Read the information on qualified special-
ist workshops: (Y page 24). Important safety notes
G
WARNING
Operating the integrated information systems
and
communications equipment in the vehicle
while driving will distract you from traffic con-
ditions. You could then lose control of the
vehicle. There is a risk of an accident.
Only operate these devices if road traffic con-
ditions permit. If you are unsure about the
surrounding conditions, pull over to a safe
location and make entries only while the vehi-
cle is stationary. G
WARNING
If the instrument cluster has failed or mal-
functioned, you may not recognise function
restrictions relevant to safety. The operating
safety
of your vehicle may be impaired. There
is a risk of an accident.
Drive on carefully. Have the vehicle checked
at a qualified specialist workshop immedi-
ately.
You must observe the legal requirements for
the country in which you are currently driving
when operating the on-board computer.
The on-board computer only shows messages
or warnings from certain systems in the mul-
tifunction display. You should therefore make
sure your vehicle is operating safely at all times. Otherwise, a vehicle that is not oper-
ating safely may cause an accident.
For an overview, see the instrument panel
illustration (
Y page 30). Displays and operation
Instrument cluster lighting
The lighting in the instrument cluster, in the
displays and the controls in the vehicle inte-
rior
can be adjusted using the brightness con-
trol knob.
The brightness control knob is on the bottom
left of the instrument cluster ( Y page 30).
X Turn the brightness control knob clockwise
or anti-clockwise.
If the light switch is set to Ã, T or
L, the brightness is dependant upon
the brightness of the ambient light.
i The
light sensor in the instrument cluster
automatically controls the brightness of
the multifunction display.
In daylight, the displays in the instrument
cluster are not illuminated. Coolant temperature gauge
The coolant temperature gauge is in the
instrument cluster on the right-hand side.
The
reading may rise up to 120 † below nor-
mal driving conditions if the coolant has been
filled correctly.
At high outside temperatures and when driv-
ing uphill, the coolant temperature may rise
to the end of the scale. Rev counter
! Do not drive in the overrevving range.
Doing so will damage the engine.
The
red band in the rev counter indicates the
engine's overrevving range. 208
Displays and operation
On-board computer and displays
Page 221 of 356
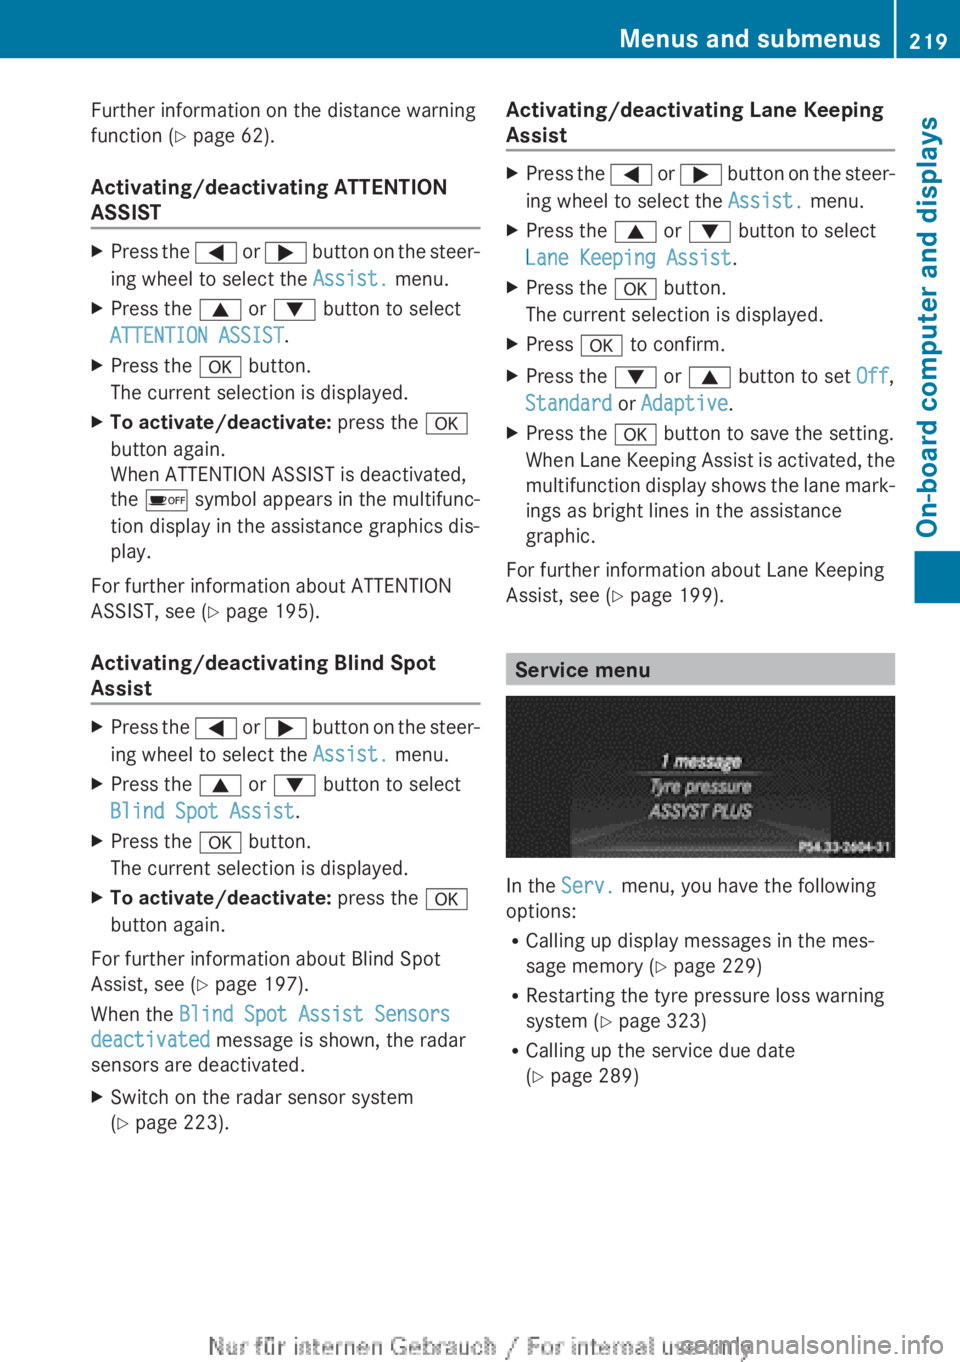
Further information on the distance warning
function (
Y page 62).
Activating/deactivating ATTENTION
ASSIST X
Press the = or ; button on the steer-
ing wheel to select the Assist. menu.
X Press the 9 or : button to select
ATTENTION ASSIST.
X Press the a button.
The current selection is displayed.
X To activate/deactivate: press the a
button again.
When ATTENTION ASSIST is deactivated,
the é
symbol appears in the multifunc-
tion display in the assistance graphics dis-
play.
For further information about ATTENTION
ASSIST, see ( Y page 195).
Activating/deactivating Blind Spot
Assist X
Press the =
or ; button on the steer-
ing wheel to select the Assist. menu.
X Press the 9 or : button to select
Blind Spot Assist.
X Press the a button.
The current selection is displayed.
X To activate/deactivate: press the a
button again.
For further information about Blind Spot
Assist, see (Y page 197).
When the Blind Spot Assist Sensors
deactivated message is shown, the radar
sensors are deactivated.
X Switch on the radar sensor system
(Y page 223). Activating/deactivating Lane Keeping
Assist X
Press the =
or ; button on the steer-
ing wheel to select the Assist. menu.
X Press the 9 or : button to select
Lane Keeping Assist.
X Press the a button.
The current selection is displayed.
X Press a to confirm.
X Press the : or 9 button to set Off,
Standard or Adaptive.
X Press the a button to save the setting.
When
Lane Keeping Assist is activated, the
multifunction display shows the lane mark-
ings as bright lines in the assistance
graphic.
For further information about Lane Keeping
Assist, see (Y page 199). Service menu
In the
Serv. menu, you have the following
options:
R Calling up display messages in the mes-
sage memory
(Y page 229)
R Restarting the tyre pressure loss warning
system (Y page 323)
R Calling up the service due date
(Y page 289) Menus and submenus
219
On-board computer and displays Z
Page 225 of 356
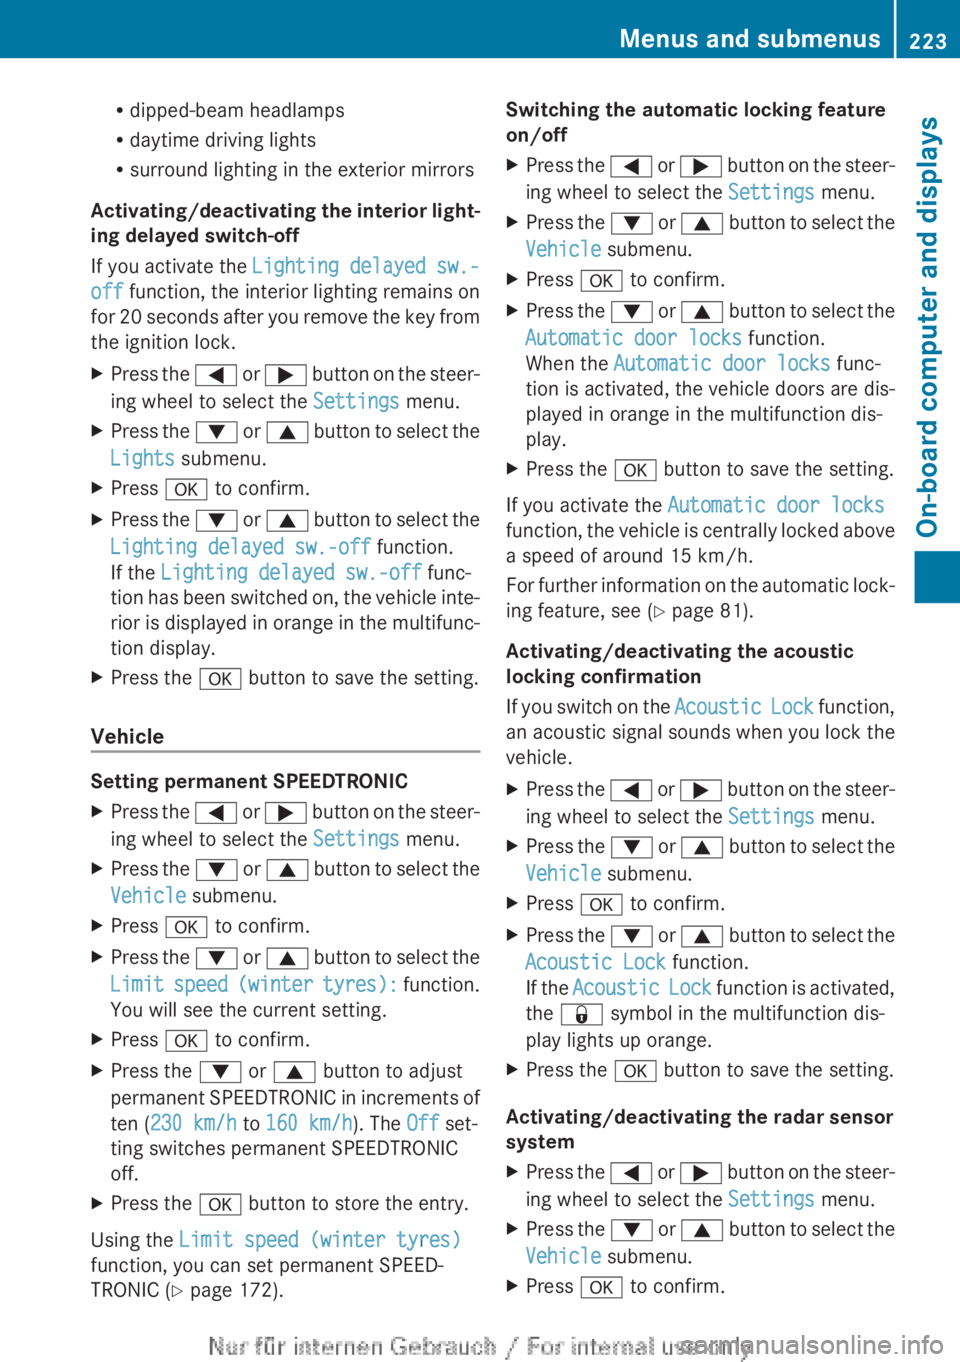
R
dipped-beam headlamps
R daytime driving lights
R surround lighting in the exterior mirrors
Activating/deactivating
the interior light-
ing delayed switch-off
If you activate the Lighting delayed sw.-
off function, the interior lighting remains on
for 20 seconds after you remove the key from
the ignition lock.
X Press the =
or ; button on the steer-
ing wheel to select the Settings menu.
X Press the :
or 9 button to select the
Lights submenu.
X Press a to confirm.
X Press the :
or 9 button to select the
Lighting delayed sw.-off function.
If the Lighting delayed sw.-off func-
tion has been switched on, the vehicle inte-
rior is displayed in orange in the multifunc-
tion display.
X Press the a button to save the setting.
Vehicle Setting permanent SPEEDTRONIC
X
Press the =
or ; button on the steer-
ing wheel to select the Settings menu.
X Press the :
or 9 button to select the
Vehicle submenu.
X Press a to confirm.
X Press the :
or 9 button to select the
Limit speed (winter tyres): function.
You will see the current setting.
X Press a to confirm.
X Press the : or 9 button to adjust
permanent
SPEEDTRONIC in increments of
ten (230 km/h to 160 km/h). The Off set-
ting switches permanent SPEEDTRONIC
off.
X Press the a button to store the entry.
Using the Limit speed (winter tyres)
function, you can set permanent SPEED-
TRONIC ( Y page 172). Switching the automatic locking feature
on/off
X
Press the =
or ; button on the steer-
ing wheel to select the Settings menu.
X Press the :
or 9 button to select the
Vehicle submenu.
X Press a to confirm.
X Press the :
or 9 button to select the
Automatic door locks function.
When the Automatic door locks func-
tion is activated, the vehicle doors are dis-
played in orange in the multifunction dis-
play.
X Press the a button to save the setting.
If you activate the Automatic door locks
function,
the vehicle is centrally locked above
a speed of around 15 km/h.
For further information on the automatic lock-
ing feature, see ( Y page 81).
Activating/deactivating the acoustic
locking confirmation
If you switch on the Acoustic Lock function,
an acoustic signal sounds when you lock the
vehicle.
X Press the =
or ; button on the steer-
ing wheel to select the Settings menu.
X Press the :
or 9 button to select the
Vehicle submenu.
X Press a to confirm.
X Press the :
or 9 button to select the
Acoustic Lock function.
If the Acoustic Lock function is activated,
the & symbol in the multifunction dis-
play lights up orange.
X Press the a button to save the setting.
Activating/deactivating the radar sensor
system
X Press the =
or ; button on the steer-
ing wheel to select the Settings menu.
X Press the :
or 9 button to select the
Vehicle submenu.
X Press a to confirm. Menus and submenus
223
On-board computer and displays Z
Page 226 of 356
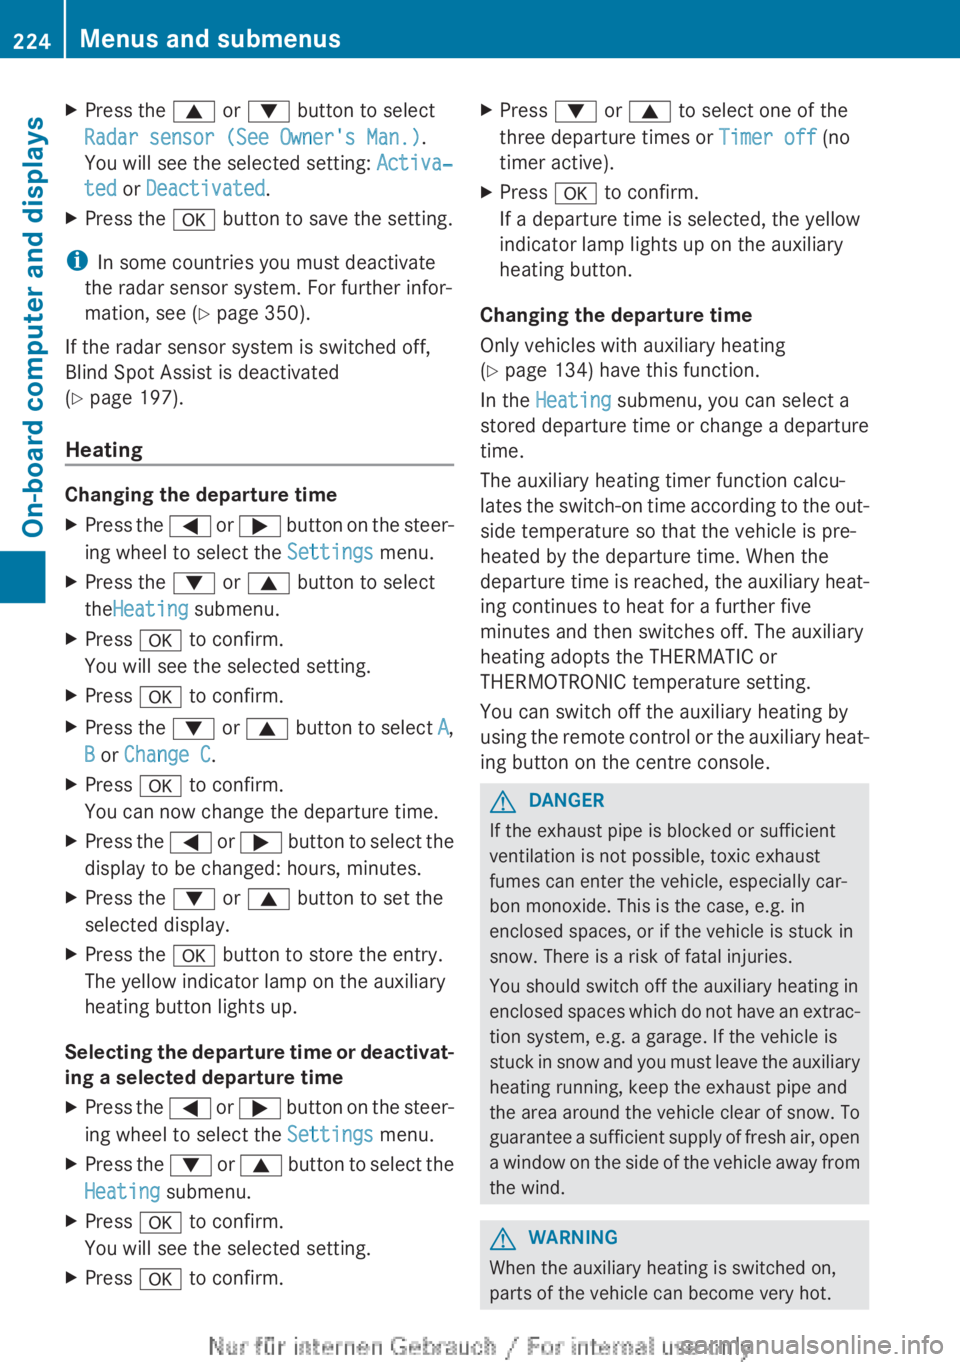
X
Press the 9 or : button to select
Radar sensor (See Owner's Man.).
You will see the selected setting: Activa‐
ted or Deactivated.
X Press the a button to save the setting.
i In some countries you must deactivate
the radar sensor system. For further infor-
mation, see ( Y page 350).
If the radar sensor system is switched off,
Blind Spot Assist is deactivated
(Y page 197).
Heating Changing the departure time
X
Press the = or ; button on the steer-
ing wheel to select the Settings menu.
X Press the : or 9 button to select
theHeating submenu.
X Press a to confirm.
You will see the selected setting.
X Press a to confirm.
X Press the : or 9
button to select A,
B or Change C.
X Press a to confirm.
You can now change the departure time.
X Press the =
or ; button to select the
display to be changed: hours, minutes.
X Press the : or 9 button to set the
selected display.
X Press the a button to store the entry.
The yellow indicator lamp on the auxiliary
heating button lights up.
Selecting the departure time or deactivat-
ing a selected departure time
X Press the =
or ; button on the steer-
ing wheel to select the Settings menu.
X Press the :
or 9 button to select the
Heating submenu.
X Press a to confirm.
You will see the selected setting.
X Press a to confirm. X
Press : or 9 to select one of the
three departure times or Timer off (no
timer active).
X Press a to confirm.
If a departure time is selected, the yellow
indicator lamp lights up on the auxiliary
heating button.
Changing the departure time
Only vehicles with auxiliary heating
(Y page 134) have this function.
In the Heating submenu, you can select a
stored
departure time or change a departure
time.
The auxiliary heating timer function calcu-
lates the switch-on time according to the out-
side temperature so that the vehicle is pre-
heated by the departure time. When the
departure time is reached, the auxiliary heat-
ing continues to heat for a further five
minutes and then switches off. The auxiliary
heating adopts the THERMATIC or
THERMOTRONIC temperature setting.
You can switch off the auxiliary heating by
using the remote control or the auxiliary heat-
ing button on the centre console. G
DANGER
If the exhaust pipe is blocked or sufficient
ventilation is not possible, toxic exhaust
fumes can enter the vehicle, especially car-
bon monoxide. This is the case, e.g. in
enclosed spaces, or if the vehicle is stuck in
snow. There is a risk of fatal injuries.
You should switch off the auxiliary heating in
enclosed
spaces which do not have an extrac-
tion system, e.g. a garage. If the vehicle is
stuck in snow and you must leave the auxiliary
heating running, keep the exhaust pipe and
the area around the vehicle clear of snow. To
guarantee a sufficient supply of fresh air, open
a window on the side of the vehicle away from
the wind. G
WARNING
When the auxiliary heating is switched on,
parts of the vehicle can become very hot. 224
Menus and submenus
On-board computer and displays
Page 239 of 356
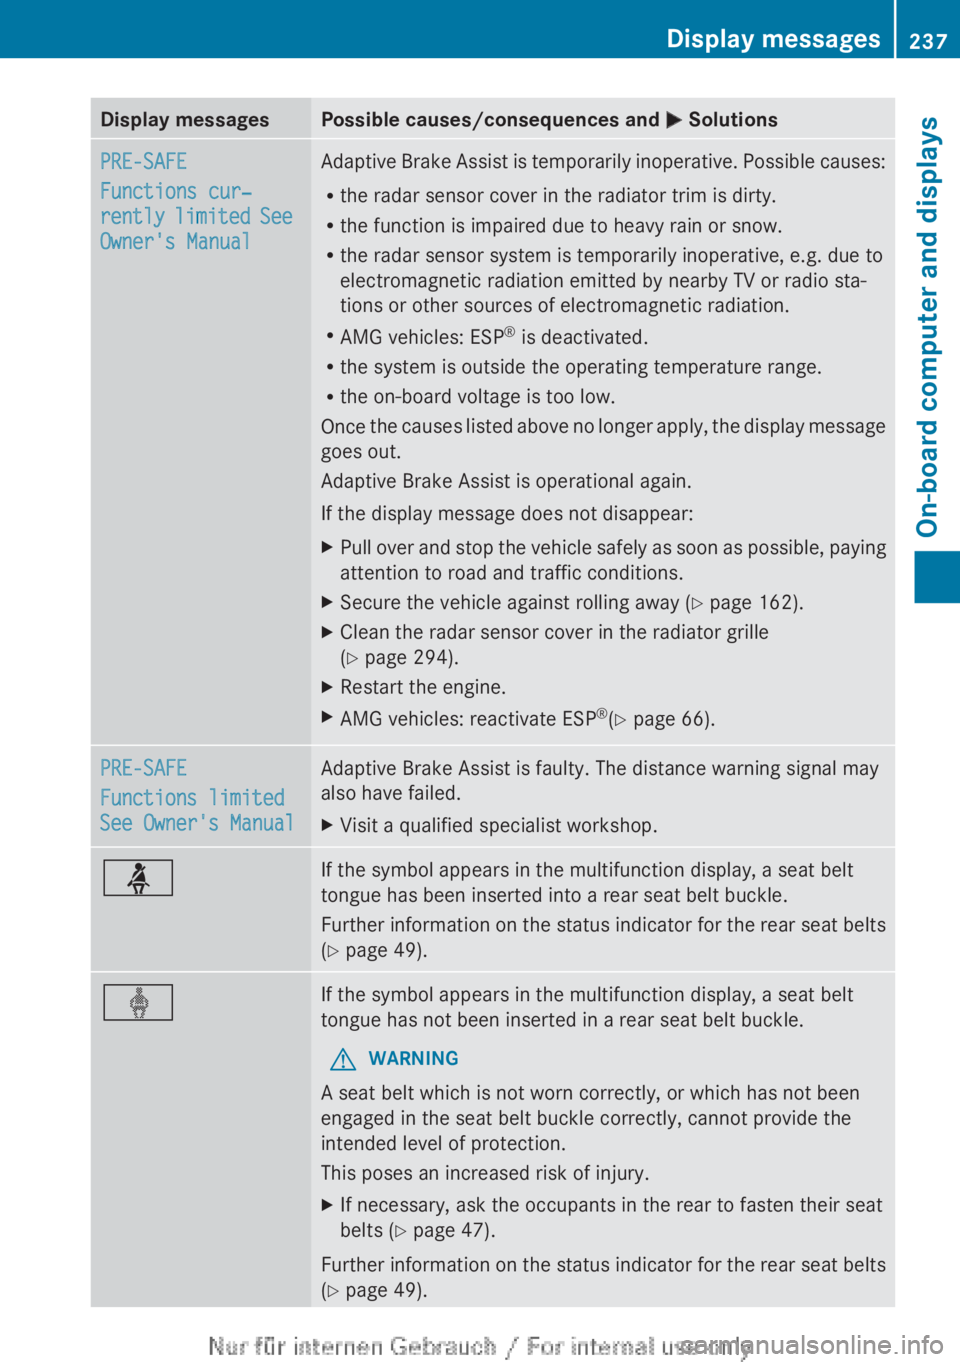
Display messages Possible causes/consequences and
M SolutionsPRE-SAFE
Functions cur‐
rently
limited See
Owner's Manual Adaptive Brake Assist is temporarily inoperative. Possible causes:
R
the radar sensor cover in the radiator trim is dirty.
R the function is impaired due to heavy rain or snow.
R the radar sensor system is temporarily inoperative, e.g. due to
electromagnetic radiation emitted by nearby TV or radio sta-
tions or other sources of electromagnetic radiation.
R AMG vehicles: ESP ®
is deactivated.
R the system is outside the operating temperature range.
R the on-board voltage is too low.
Once
the causes listed above no longer apply, the display message
goes out.
Adaptive Brake Assist is operational again.
If the display message does not disappear:
X Pull over and stop the vehicle safely as soon as possible, paying
attention to road and traffic conditions.
X Secure the vehicle against rolling away ( Y page 162).
X Clean the radar sensor cover in the radiator grille
(Y page 294).
X Restart the engine.
X AMG vehicles: reactivate ESP ®
(Y page 66). PRE-SAFE
Functions limited
See Owner's Manual Adaptive Brake Assist is faulty. The distance warning signal may
also have failed.
X
Visit a qualified specialist workshop. ü If the symbol appears in the multifunction display, a seat belt
tongue has been inserted into a rear seat belt buckle.
Further
information on the status indicator for the rear seat belts
(Y page 49). ý If the symbol appears in the multifunction display, a seat belt
tongue has not been inserted in a rear seat belt buckle.
G WARNING
A seat belt which is not worn correctly, or which has not been
engaged in the seat belt buckle correctly, cannot provide the
intended level of protection.
This poses an increased risk of injury.
X If necessary, ask the occupants in the rear to fasten their seat
belts ( Y page 47).
Further information on the status indicator for the rear seat belts
(Y page 49). Display messages
237
On-board computer and displays Z
Page 244 of 356
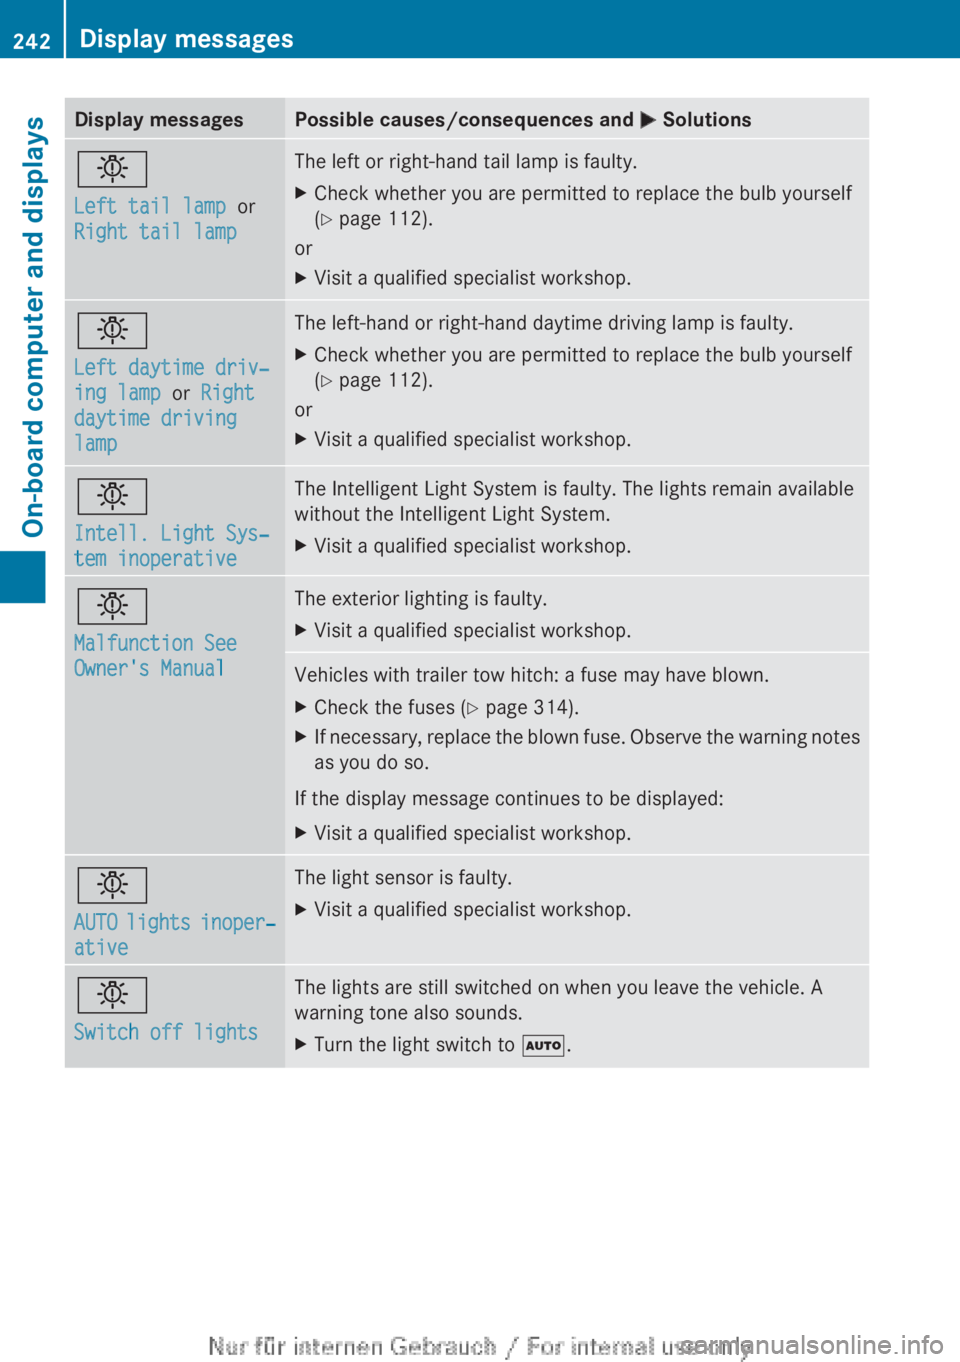
Display messages Possible causes/consequences and
M Solutionsb
Left tail lamp or
Right tail lamp The left or right-hand tail lamp is faulty.
X
Check whether you are permitted to replace the bulb yourself
(Y page 112).
or
X Visit a qualified specialist workshop. b
Left daytime driv‐
ing lamp or Right
daytime driving
lamp The left-hand or right-hand daytime driving lamp is faulty.
X
Check whether you are permitted to replace the bulb yourself
(Y page 112).
or
X Visit a qualified specialist workshop. b
Intell. Light Sys‐
tem inoperative The Intelligent Light System is faulty. The lights remain available
without the Intelligent Light System.
X
Visit a qualified specialist workshop. b
Malfunction See
Owner's Manual The exterior lighting is faulty.
X
Visit a qualified specialist workshop. Vehicles with trailer tow hitch: a fuse may have blown.
X
Check the fuses (Y page 314).
X If necessary, replace the blown fuse. Observe the warning notes
as you do so.
If the display message continues to be displayed:
X Visit a qualified specialist workshop. b
AUTO
lights inoper‐
ative The light sensor is faulty.
X
Visit a qualified specialist workshop. b
Switch off lights The lights are still switched on when you leave the vehicle. A
warning tone also sounds.
X
Turn the light switch to Ã.242
Display messages
On-board computer and displays
Page 248 of 356
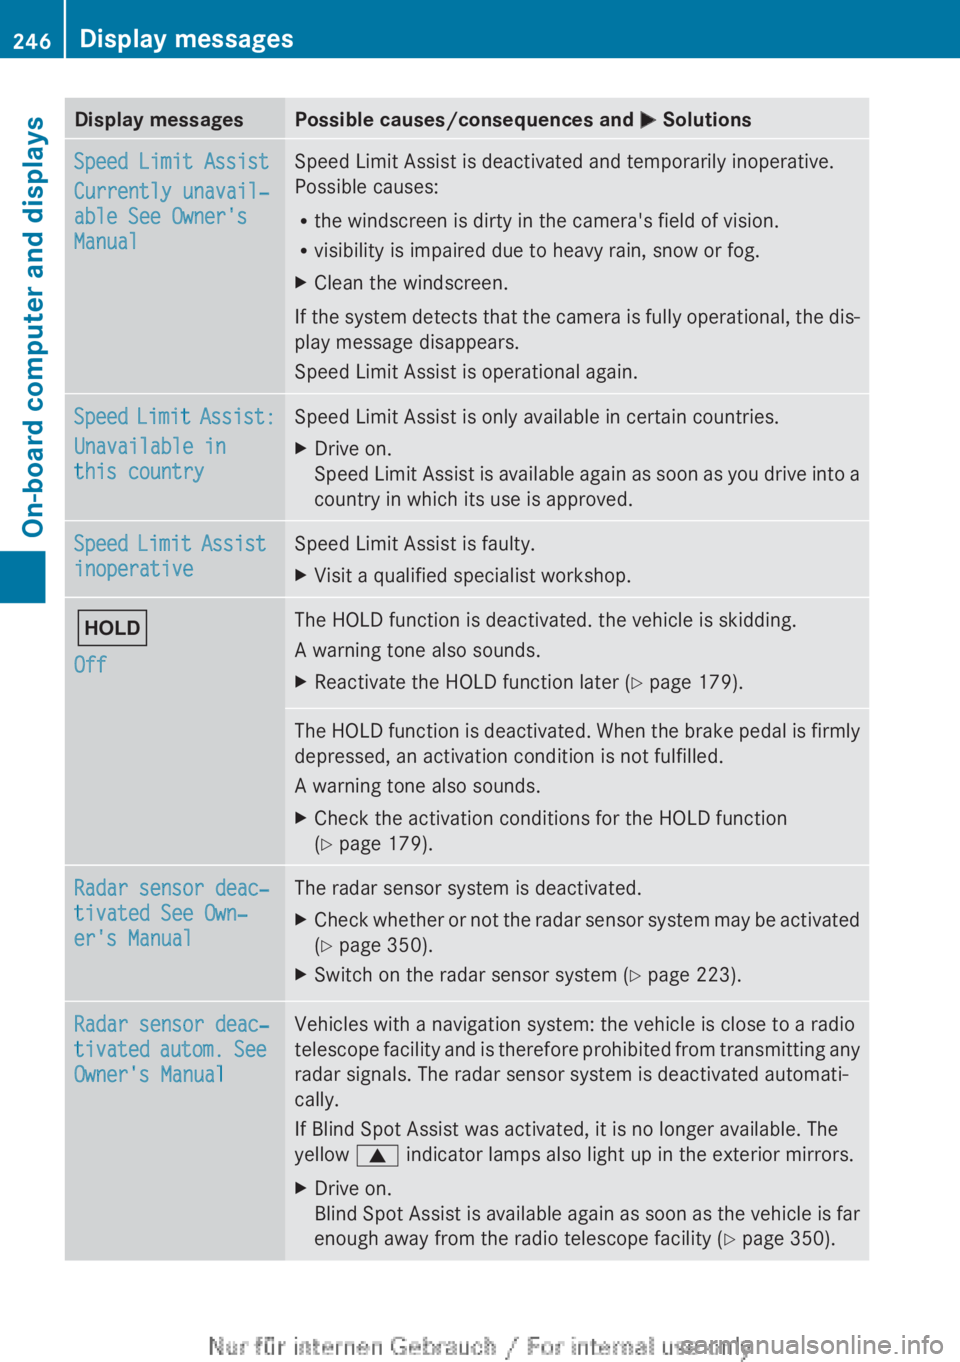
Display messages Possible causes/consequences and
M SolutionsSpeed Limit Assist
Currently unavail‐
able See Owner's
Manual Speed Limit Assist is deactivated and temporarily inoperative.
Possible causes:
R
the windscreen is dirty in the camera's field of vision.
R visibility is impaired due to heavy rain, snow or fog.
X Clean the windscreen.
If the system detects that the camera is fully operational, the dis-
play message disappears.
Speed Limit Assist is operational again. Speed Limit Assist:
Unavailable in
this country Speed Limit Assist is only available in certain countries.
X
Drive on.
Speed
Limit Assist is available again as soon as you drive into a
country in which its use is approved. Speed Limit Assist
inoperative Speed Limit Assist is faulty.
X
Visit a qualified specialist workshop. ë
Off The HOLD function is deactivated. the vehicle is skidding.
A warning tone also sounds.
X
Reactivate the HOLD function later (Y page 179). The HOLD function is deactivated. When the brake pedal is firmly
depressed, an activation condition is not fulfilled.
A warning tone also sounds.
X
Check the activation conditions for the HOLD function
(Y page 179). Radar sensor deac‐
tivated See Own‐
er's Manual The radar sensor system is deactivated.
X
Check whether or not the radar sensor system may be activated
(Y page 350).
X Switch on the radar sensor system (Y page 223). Radar sensor deac‐
tivated
autom. See
Owner's Manual Vehicles with a navigation system: the vehicle is close to a radio
telescope
facility and is therefore prohibited from transmitting any
radar signals. The radar sensor system is deactivated automati-
cally.
If Blind Spot Assist was activated, it is no longer available. The
yellow 9 indicator lamps also light up in the exterior mirrors.
X Drive on.
Blind
Spot Assist is available again as soon as the vehicle is far
enough away from the radio telescope facility ( Y page 350).246
Display messages
On-board computer and displays