display MERCEDES-BENZ A-CLASS HATCHBACK 2008 User Guide
[x] Cancel search | Manufacturer: MERCEDES-BENZ, Model Year: 2008, Model line: A-CLASS HATCHBACK, Model: MERCEDES-BENZ A-CLASS HATCHBACK 2008Pages: 305, PDF Size: 5.43 MB
Page 16 of 305
13
Trip meter.............................
26, 100, 102
Resetting. ......................................... 98
Turn signal lamps
Display message ............................. 217
Two-way radio
Installation. ..................................... 275
Tyre grip.............................................. 184
Tyre pressure ..................................... 178
Display message ............................. 211
see Tyre pressure
Tyre pressure loss warning system.1 79
Tyres Direction of rotatio n....................... 177
General notes. ................................ 176
Technical data. ............................... 283
Tyre tread............................................ 178 U
Unladen weight.......................... 287, 288
Unlocking Emergency unlocking...................... 241
From the inside (central unlocking
button) .............................................. 61 V
Variable Speedtronic .........................118
Vehicle Emergency unlocking .............241, 242
Individual settings (on-board com-
puter). ............................................. 106
Leaving parked up. .........................240
Towing. ........................................... 269
Tow-starting .................................... 270
Transporting ................................... 270
Vehicle battery................................... 263
Vehicle dimensions............................ 286
Vehicle electronics............................ 275
Vehicle identification number (VIN).2 77
Vehicle identification plates............. 276
Vehicle tool kit................................... 200
Vehicle weights.................................. 286 W
Warning and indicator lamp ABS (yellow).................................... 224
LIM (cruise control)......................... 116
LIM (variable Speedtronic). .............118
Warning and indicator lamps
ESP ®
......................................... 56, 226
Warning signal
Audible. .......................................... 230
Warning triangle................................. 200 Washer fluid
Display message ............................. 221
Washer fluid reservoir....................... 300
Filling capacity. ............................... 300
Wearing seat belts............................... 73
Wheel bolts Tightening torque............................ 262
Wheel chock
Use. ................................................ 201
Wheels
General notes. ................................ 176
Interchanging.................................. 181
Technical data. ............................... 283
Windowbags......................................... 42
Windows Cleaning. ........................................ 194
Cleaning the windscreen ...............194
see Side windows
Windscreen
Cleaning ......................................... 194
Windscreen washer fluid................... 300
Topping up. ..................................... 175
Windscreen washer fluid reservoir.. 175
Windscreen washer system.............. 300
Windscreen wipers.............................. 83
Cleaning. ........................................ 194
Malfunction..................................... 237
Replacing the wiper blades .............251
Winter diesel...................................... 170
Winter driving............................. 181, 182 Index
169_AKB; 2; 4, en-GB
wdomann,
Version: 2.10.6 2008-07-16T08:52:06+02:00 - Seite 13Dateiname: 6515_0315_02_buchblock.pdf; preflight
Page 30 of 305
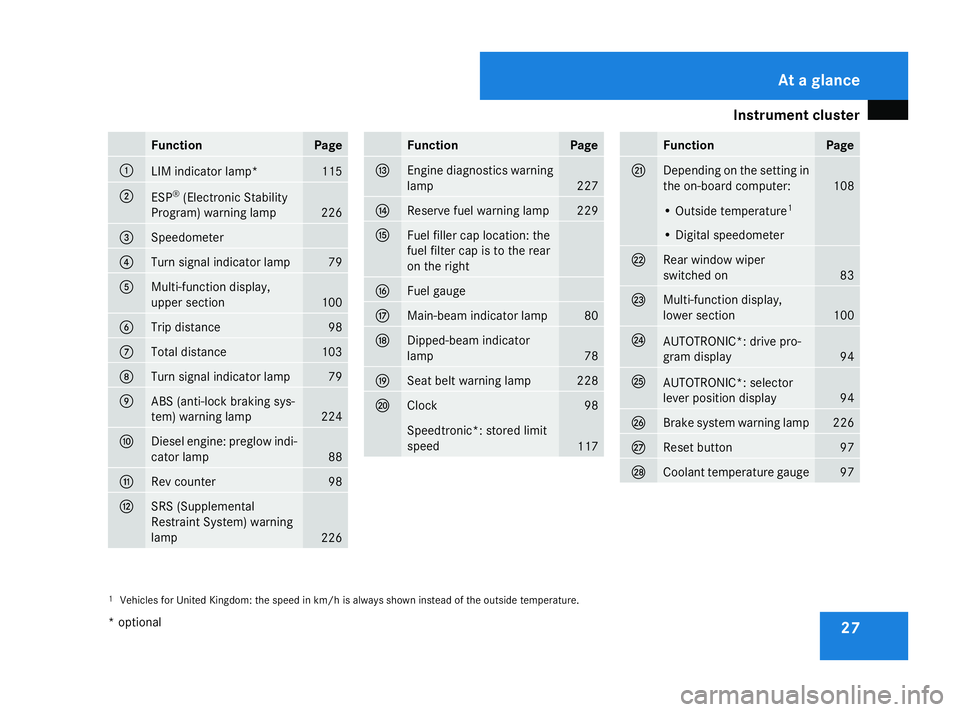
Instrument cluster
27Function Page
1
LIM indicator lamp* 115
2
ESP
®
(Electronic Stability
Program) warning lamp 226
3
Speedometer
4
Turn signal indicator lamp 79
5
Multi-function display,
upper section
100
6
Trip distance 98
7
Total distance 103
8
Turn signal indicator lamp 79
9
ABS (anti-lock braking sys-
tem) warning lamp
224
a
Diesel engine: preglow indi-
cator lamp
88
b
Rev counter 98
c
SRS (Supplemental
Restraint System) warning
lamp
226 Function Page
d
Engine diagnostics warning
lamp
227
e
Reserve fuel warning lamp 229
f
Fuel filler cap location: the
fuel filter cap is to the rear
on the right g
Fuel gauge
h
Main-beam indicator lamp 80
j
Dipped-beam indicator
lamp
78
k
Seat belt warning lamp 228
l
Clock 98
Speedtronic*: stored limit
speed
117 Function Page
m
Depending on the setting in
the on-board computer:
108
• Outside temperature
1 • Digital speedometer
n
Rear window wiper
switched on
83
o
Multi-function display,
lower section
100
p
AUTOTRONIC*: drive pro-
gram display
94
q
AUTOTRONIC*: selector
lever position display
94
r
Brake system warning lamp 226
s
Reset button 97
t
Coolant temperature gauge 97
1
Vehicles for United Kingdom: the speed in km/h is always shown instead of the outside temperature. At a glance
* optional
169_AKB; 2; 4, en-GB
wdomann,
Version: 2.10.6
2008-07-16T08:52:06+02:00 - Seite 27 Dateiname: 6515_0315_02_buchblock.pdf; preflight
Page 32 of 305
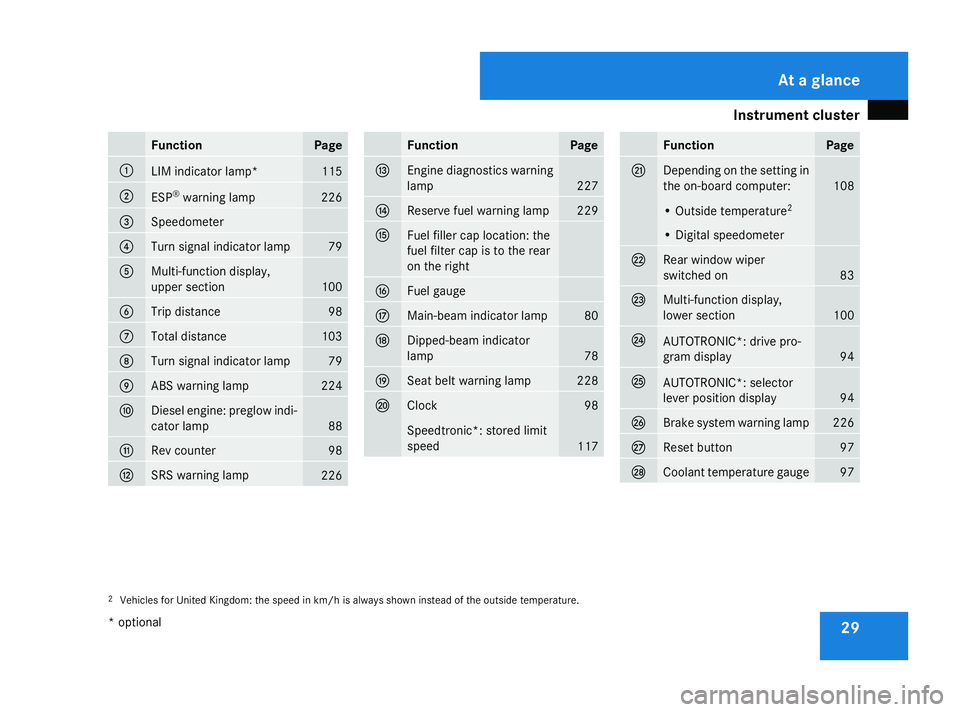
Instrument cluster
29Function Page
1
LIM indicator lamp* 115
2
ESP
®
warning lamp 226
3
Speedometer
4
Turn signal indicator lamp 79
5
Multi-function display,
upper section
100
6
Trip distance 98
7
Total distance 103
8
Turn signal indicator lamp 79
9
ABS warning lamp 224
a
Diesel engine: preglow indi-
cator lamp
88
b
Rev counter 98
c
SRS warning lamp
226 Function Page
d
Engine diagnostics warning
lamp
227
e
Reserve fuel warning lamp 229
f
Fuel filler cap location: the
fuel filter cap is to the rear
on the right g
Fuel gauge
h
Main-beam indicator lamp 80
j
Dipped-beam indicator
lamp
78
k
Seat belt warning lamp 228
l
Clock 98
Speedtronic*: stored limit
speed
117 Function Page
m
Depending on the setting in
the on-board computer:
108
• Outside temperature
2 • Digital speedometer
n
Rear window wiper
switched on
83
o
Multi-function display,
lower section
100
p
AUTOTRONIC*: drive pro-
gram display
94
q
AUTOTRONIC*: selector
lever position display
94
r
Brake system warning lamp 226
s
Reset button 97
t
Coolant temperature gauge 97
2
Vehicles for United Kingdom: the speed in km/h is always shown instead of the outside temperature. At a glance
* optional
169_AKB; 2; 4, en-GB
wdomann,
Version: 2.10.6
2008-07-16T08:52:06+02:00 - Seite 29 Dateiname: 6515_0315_02_buchblock.pdf; preflight
Page 33 of 305
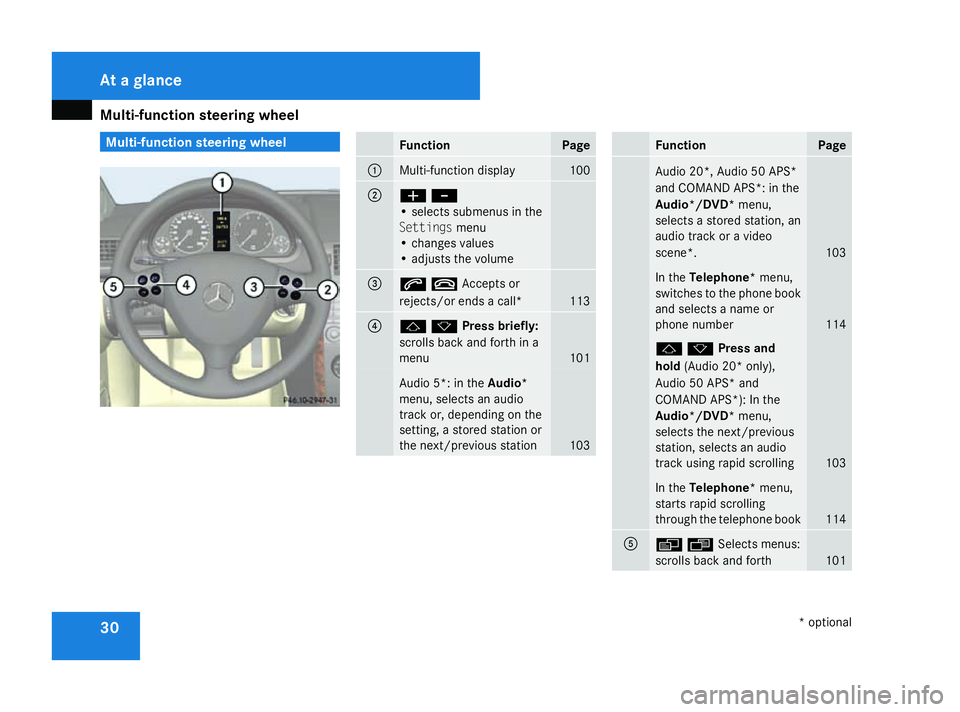
Multi-function steering wheel
30 Multi-function steering wheel
Function Page
1
Multi-function display 100
2
æ
-
• selects submenus in the
Settings menu
• changes values
• adjusts the volume 3
stAccepts or
rejects/or ends a call*
113
4
jkPress briefly:
scrolls back and forth in a
menu
101
Audio 5*: in the
Audio*
menu, selects an audio
track or, depending on the
setting, a stored station or
the next/previous station 103 Function Page
Audio 20*, Audio 50 APS*
and COMAND APS*: in the
Audio*/DVD*
menu,
selects a stored station, an
audio track or a video
scene*. 103
In the
Telephone* menu,
switches to the phone book
and selects a name or
phone number 114
jkPress and
hold
(Audio 20* only),
Audio 50 APS* and
COMAND APS*): In the
Audio*/DVD* menu,
selects the next/previous
station, selects an audio
track using rapid scrolling 103
In the
Telephone* menu,
starts rapid scrolling
through the telephone book 114
5
èÿSelects menus:
scrolls back and forth
101At a glance
* optional
169_AKB; 2; 4, en-GB
wdomann,
Version: 2.10.6
2008-07-16T08:52:06+02:00 - Seite 30 Dateiname: 6515_0315_02_buchblock.pdf; preflight
Page 73 of 305

Mirrors
70 Steering wheel
G
Risk of accident
Only adjust the steering wheel when the
vehicle is stationary and do not pull away
until the steering wheel adjustment mech-
anism is locked in position. You might oth-
erwise drive without the steering wheel
adjustment mechanism being locked in
position. As a result you could be distracted
from road and traffic conditions by an unex-
pected movement of the steering wheel
and thereby cause an accident.
However, the steerability of the vehicle is
not affected.
When you adjust the steering wheel, make
sure that:
R the steering wheel can be reached with
your arms slightly bent
R you can move your legs freely
R you can see all the displays in the instru-
ment cluster clearly 1
Release lever
2 Height adjustment
3 Fore-and-aft adjustment
X Pull handle 1out completely.
The steering column is unlocked.
X Adjust the steering wheel to the desired
position.
X Push handle 1in completely until you hear
it engage.
The steering wheel is locked in position. Mirrors
Rear-view mirror
X Adjust the rear-view mirror by hand so you
have a good overview of the traffic condi-
tions.
Rear-view mirror (manual anti-dazzle) 1
Anti-dazzle switch
X Anti-dazzle mode: flick anti-dazzle switch
1 forwards or back.
Rear-view mirror (automatic anti-daz-
zle*) The rear-view mirror automatically goes into
anti-dazzle mode if the ignition is switched onControls
169_AKB; 2; 4, en-GB
wdomann,
Version: 2.10.6 2008-07-16T08:52:06+02:00 - Seite 70Dateiname: 6515_0315_02_buchblock.pdf; preflight
Page 79 of 305
Seat belts
76 Rear seat belt status indicator
The rear-compartment seat belt status indi-
cator tells you if the rear passengers have
fastened their seat belts. The status indicator
for the rear rear-compartment also tells you
how many of the belt tongues are inserted
into the seat belt buckles.
The rear-compartment seat belt status indi-
cator appears in the multi-function display for
around 30 seconds if:
R you set off and have reached a speed of
approx. 10 km/h
R the rear passengers fasten or unfasten
their seat belts while driving
R someone gets in or out of the vehicle
You can also cancel the messages immedi-
ately (Y page 202).
The following messages appear in the multi-
function display:
R < No rear seat belt engaged
R < 1 rear seat belt engaged
R < 2 rear seat belts engaged
R < 3 rear seat belts engaged i
The status indicator for the rear-compart-
ment seat belts is only available for certain
countries. Correct driver's seat position
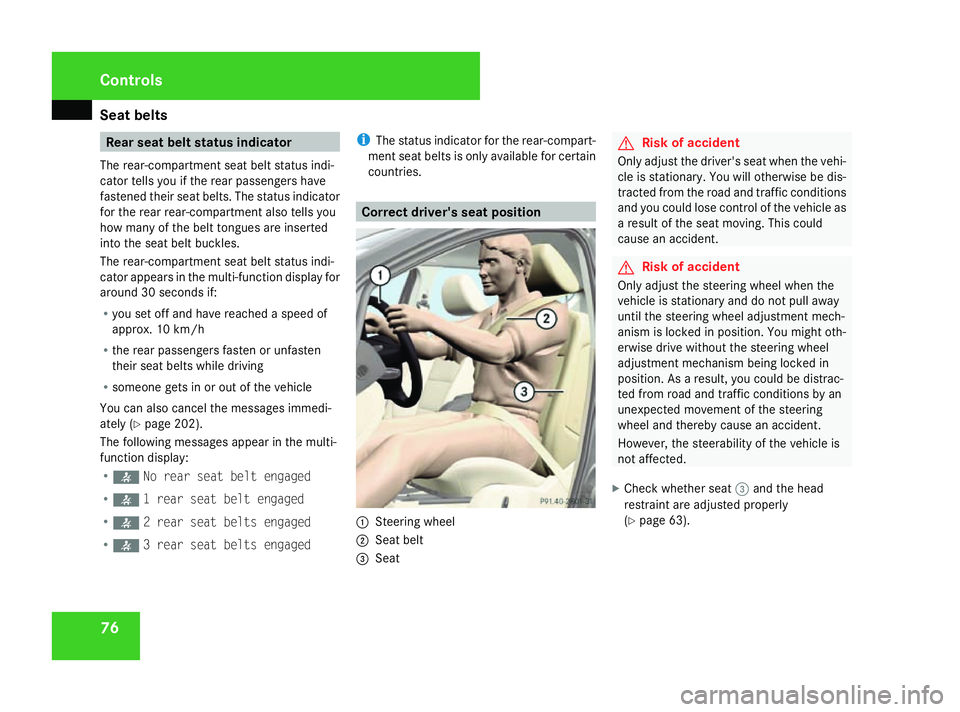
1
Steering wheel
2 Seat belt
3 Seat G
Risk of accident
Only adjust the driver's seat when the vehi-
cle is stationary. You will otherwise be dis-
tracted from the road and traffic conditions
and you could lose control of the vehicle as
a result of the seat moving. This could
cause an accident. G
Risk of accident
Only adjust the steering wheel when the
vehicle is stationary and do not pull away
until the steering wheel adjustment mech-
anism is locked in position. You might oth-
erwise drive without the steering wheel
adjustment mechanism being locked in
position. As a result, you could be distrac-
ted from road and traffic conditions by an
unexpected movement of the steering
wheel and thereby cause an accident.
However, the steerability of the vehicle is
not affected.
X Check whether seat 3and the head
restraint are adjusted properly
(Y page 63). Controls
169_AKB; 2; 4, en-GB
wdomann,
Version: 2.10.6
2008-07-16T08:52:06+02:00 - Seite 76 Dateiname: 6515_0315_02_buchblock.pdf; preflight
Page 80 of 305
Lights
77
Make sure that:
R
you are as far away from the driver's front
airbag as possible
R you are sitting in a normal upright posi-
tion
R you can fasten the seat belt properly
R you have moved the backrest to an
almost vertical position
R you have set the seat angle so that your
thighs are gently supported
R you can depress the pedals properly
R you have adjusted the head restraint so
that the back of your head is supported
at eye level by the central area of the
head restraint
X Check whether steering wheel 1is adjus-
ted properly (Y page 70).
Make sure that:
R you can hold the steering wheel with your
arms slightly bent
R you can move your legs freely
R you can see all the displays in the instru-
ment cluster clearly
X Check whether you have fastened seat belt
2 properly (Y page 73). It should:
R
fit snugly across your body
R be routed across the middle of your
shoulder
R routed in your pelvic area across the hip
joints Lights
Light switch
For safety reasons, Mercedes-Benz recom-
mends that you drive with the lights switched
on even during the daytime. In some coun-
tries, daytime operation of headlamps varies
due to legal and voluntary requirements. In
these countries, the constant headlamp
mode is automatically switched on when the
engine is started.
i If you drive in countries in which traffic
drives on the opposite side of the road to
the country where the vehicle is registered,
oncoming traffic may be dazzled by the
asymmetrical dipped-beam headlamps.
Have the headlamps changed to symmet-
rical dipped beam when driving in these
countries. You can obtain information
about this from any Mercedes-Benz Service
Centre. Controls
169_AKB; 2; 4, en-GB
wdomann,
Version: 2.10.6 2008-07-16T08:52:06+02:00 - Seite 77 ZDateiname: 6515_0315_02_buchblock.pdf; preflight
Page 94 of 305
Driving and pa
rking 91
X
To release: depress the brake pedal and
keep it depressed.
On vehicles with AUTOTRONIC*, the selec-
tor lever lock is released.
X Press release button 2on parking brake
1 and move the parking brake down to the
stop.
The 3 warning lamp in the instrument
cluster goes out. Switching off the engine
G
Risk of accident
If the engine is not running, there is no
power assistance for the steering and
brakes. Steering and braking then takes
much more effort.
As a result, you might lose control of the
vehicle, cause an accident and injure your-
self and others.
Do not switch off the engine while driving.
Vehicles with manual transmission X
Shift to either first or reverse gear.
X Turn the key to position 0(Y page 62) in
the ignition lock and remove it.
The immobiliser is activated. Vehicles with AUTOTRONIC* X
Move the selector lever to P.
X Turn the key to position 0(Y page 62) in
the ignition lock and remove it.
The immobiliser is activated. Automatic engine switch-off (ECO
start/stop function*)
The ECO start/stop function automatically
switches off the engine as soon as you stop
the vehicle, e.g. at traffic lights.
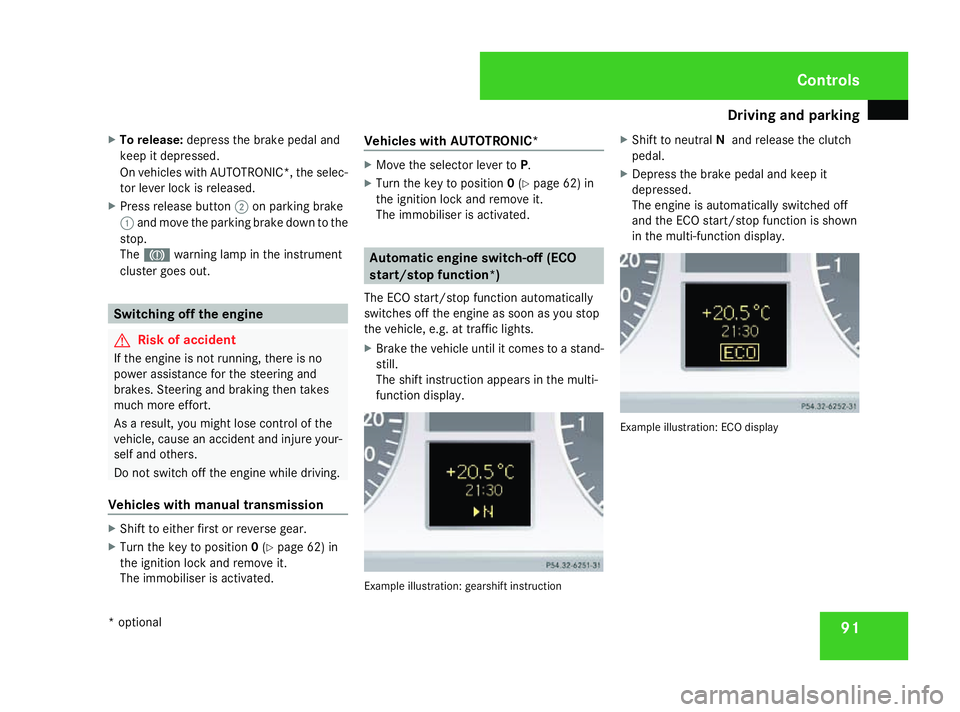
X Brake the vehicle until it comes to a stand-
still.
The shift instruction appears in the multi-
function display. Example illustration: gearshift instructionX
Shift to neutral Nand release the clutch
pedal.
X Depress the brake pedal and keep it
depressed.
The engine is automatically switched off
and the ECO start/stop function is shown
in the multi-function display. Example illustration: ECO display Controls
* optional
169_AKB; 2; 4, en-GB
wdomann,
Version: 2.10.6 2008-07-16T08:52:06+02:00 - Seite 91 ZDateiname: 6515_0315_02_buchblock.pdf; preflight
Page 96 of 305
Transmission
93
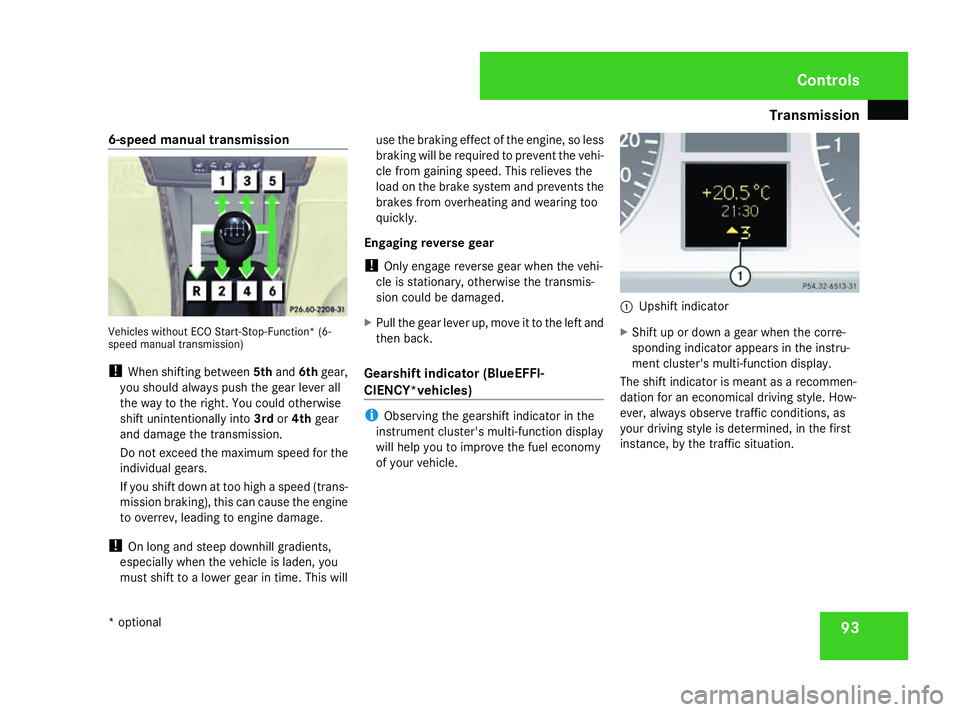
6-speed manual transmission
Vehicles without ECO Start-Stop-Function* (6-
speed manual transmission)
!
When shifting between 5thand 6thgear,
you should always push the gear lever all
the way to the right. You could otherwise
shift unintentionally into 3rdor4th gear
and damage the transmission.
Do not exceed the maximum speed for the
individual gears.
If you shift down at too high a speed (trans-
mission braking), this can cause the engine
to overrev, leading to engine damage.
! On long and steep downhill gradients,
especially when the vehicle is laden, you
must shift to a lower gear in time. This will use the braking effect of the engine, so less
braking will be required to prevent the vehi-
cle from gaining speed. This relieves the
load on the brake system and prevents the
brakes from overheating and wearing too
quickly.
Engaging reverse gear
! Only engage reverse gear when the vehi-
cle is stationary, otherwise the transmis-
sion could be damaged.
X Pull the gear lever up, move it to the left and
then back.
Gearshift indicator (BlueEFFI-
CIENCY*vehicles) i
Observing the gearshift indicator in the
instrument cluster's multi-function display
will help you to improve the fuel economy
of your vehicle. 1
Upshift indicator
X Shift up or down a gear when the corre-
sponding indicator appears in the instru-
ment cluster's multi-function display.
The shift indicator is meant as a recommen-
dation for an economical driving style. How-
ever, always observe traffic conditions, as
your driving style is determined, in the first
instance, by the traffic situation. Controls
* optional
169_AKB; 2; 4, en-GB
wdomann,
Version: 2.10.6 2008-07-16T08:52:06+02:00 - Seite 93 ZDateiname: 6515_0315_02_buchblock.pdf; preflight
Page 98 of 305
Transmission
95ë
Neutral
No power is transmitted from the
engine to the drive wheels. Releas-
ing the brakes will allow you to
move the vehicle freely, e.g. to
push it or tow it.
If ESP
®
is deactivated or faulty:
only move the selector lever to Nif
the vehicle is in danger of skidding,
e.g. on icy roads. ê
Drive
The transmission selects the opti-
mum gear ratio automatically for
forward mode.
One-touch gearshifting (manual opera-
tion) When the selector lever is in position
D, you
can select the seven gears yourself.
Activating manual operation
X Press the selector lever lightly to the left
towards D-or to the right towards D+.
M is shown in the multi-function display.
Manual operation is activated. X
To shift down: briefly press the selector
lever to the left towards D–.
The transmission shifts down to the next
gear, depending on the gear currently
selected.
i To prevent the engine from overrevving,
the transmission does not shift down if you
push the selector lever towards D–while
driving at too high a speed.
i AUTOTRONIC shifts down automatically if
the engine speed reaches the lower speed
range for the gear currently selected.
X To shift up: briefly press the selector lever
to the right towards D+.
The transmission shifts up to the next gear,
depending on the gear currently selected.
i If the upper engine speed limit for the gear
currently engaged is reached and you con-
tinue to accelerate, AUTOTRONIC shifts up
automatically.
X To select the ideal gear: press and hold
the selector lever to the left towards D–.
The transmission will shift to a range which
allows ideal acceleration and deceleration.
To do this, the transmission will shift down
one or more gears. Deactivating manual operation
X Press and hold the selector lever towards
D+ until Dis shown again in the multi-func-
tion display.
The transmission shifts from the current
gear to D.
Or:
X Briefly press the program selector button
next to the selector lever.
The letter for the last selected drive pro-
gram Cor Sis shown again in the multi-
function display. The transmission shifts
from the current gear to D.
i If you restart the engine and Mmanual
operation is selected, AUTOTRONIC shifts
into the automatic drive program Cor S. If
automatic drive program Cor Shas been
selected, the automatic transmission will
resume the relevant drive program when
you restart the engine. Controls
169_AKB; 2; 4, en-GB
wdomann,
Version: 2.10.6 2008-07-16T08:52:06+02:00 - Seite 95 ZDateiname: 6515_0315_02_buchblock.pdf; preflight