clock MERCEDES-BENZ A-CLASS HATCHBACK 2008 Owner's Manual
[x] Cancel search | Manufacturer: MERCEDES-BENZ, Model Year: 2008, Model line: A-CLASS HATCHBACK, Model: MERCEDES-BENZ A-CLASS HATCHBACK 2008Pages: 305, PDF Size: 5.43 MB
Page 252 of 305

Changing the bulbs
249
Replacing the turn signal lamps
X
Switch off the lights.
X Open the cover in the front wheel arch
(Y page 247).
X Open the bonnet.
X Left-hand headlamp: remove the washer
fluid reservoir (Y page 247).
X Turn bulb holder :anti-clockwise and pull
it out.
X Turn the bulb anti-clockwise, applying
slight pressure, and remove it from bulb
holder :. X
Insert the new bulb into bulb holder :and
turn clockwise while applying slight pres-
sure.
X Insert bulb holder :and turn it clockwise. Changing the rear bulbs
Opening and closing the side trim pan-
els You must open the side trim panel in the lug-
gage compartment before you can change
the bulbs in the tail lamps.
Left-hand side trim panel Right-hand side trim panel
Opening
X
Turn release catch 190° in the direction
of the arrow and remove side trim panel
2.
X Left side: remove the compressor.
X Right side: remove the stowage compart-
ment.
Closing
X Left side: insert the compressor.
X Right side: insert the stowage compart-
ment.
X Insert side trim panel 2and turn catch
1 90° in the opposite direction to the
arrow. Practical advice
169_AKB; 2; 4, en-GB
wdomann
,V ersion: 2.10.6
2008-07-16T08:52:06+02:00 - Seite 249 ZDateiname: 6515_0315_02_buchblock.pdf; preflight
Page 253 of 305

Changing the bulbs
250
Changing the tail lamps X
Switch off the lights.
X Open the luggage compartment.
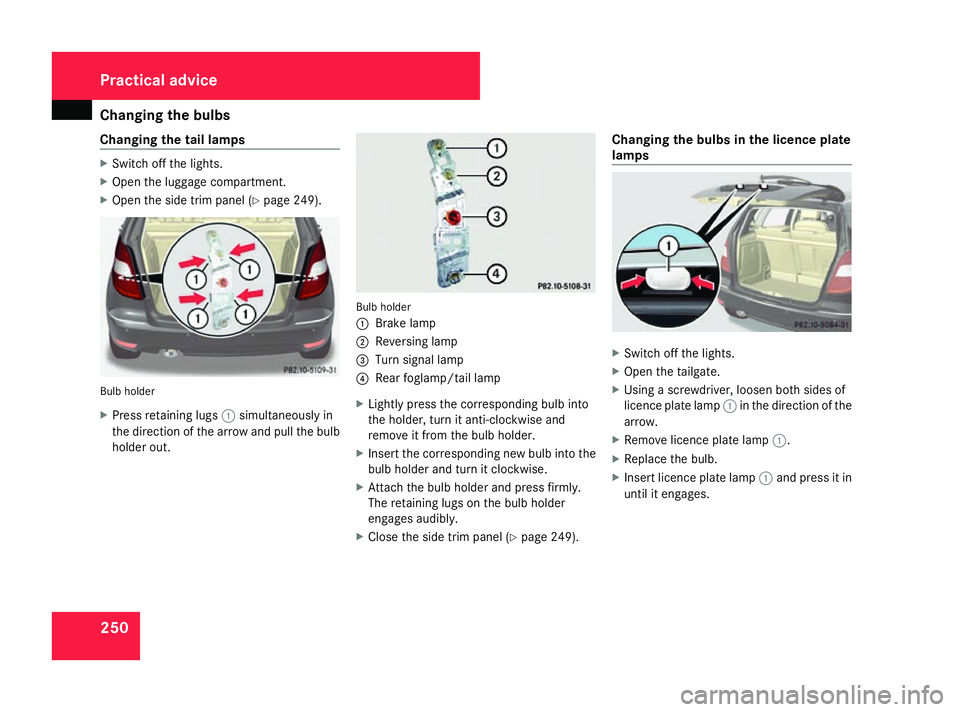
X Open the side trim panel (Y page 249).Bulb holder
X
Press retaining lugs 1simultaneously in
the direction of the arrow and pull the bulb
holder out. Bulb holder
1
Brake lamp
2 Reversing lamp
3 Turn signal lamp
4 Rear foglamp/tail lamp
X Lightly press the corresponding bulb into
the holder, turn it anti-clockwise and
remove it from the bulb holder.
X Insert the corresponding new bulb into the
bulb holder and turn it clockwise.
X Attach the bulb holder and press firmly.
The retaining lugs on the bulb holder
engages audibly.
X Close the side trim panel (Y page 249).Changing the bulbs in the licence plate
lamps
X
Switch off the lights.
X Open the tailgate.
X Using a screwdriver, loosen both sides of
licence plate lamp 1in the direction of the
arrow.
X Remove licence plate lamp 1.
X Replace the bulb.
X Insert licence plate lamp 1and press it in
until it engages. Practical advice
169_AKB; 2; 4, en-GB
wdomann
,V ersion: 2.10.6
2008-07-16T08:52:06+02:00 - Seite 250 Dateiname: 6515_0315_02_buchblock.pdf; preflight
Page 267 of 305

Battery
264 Take them to a Mercedes-Benz Service
Centre or to a special collection point for
old batteries. G
Risk of injury
For safety reasons, Mercedes-Benz recom-
mends that you only use batteries which
have been tested and approved for your
vehicle by Mercedes-Benz. These batteries
provide increased impact protection to pre-
vent vehicle occupants from suffering acid
burns should the battery be damaged in the
event of an accident.
To prevent acid burns, observe the follow-
ing safety notes when handling batteries:
R Do not lean over batteries.
R Do not place any metal objects on a bat-
tery. You could otherwise cause a short
circuit and the battery's gas mixture
could ignite.
R Make sure that you do not create an elec-
trostatic charge, e.g. by wearing syn-
thetic clothing or as a result of friction on
fabrics. Therefore, you should not pull or
slide the battery over carpets or other
synthetic materials.
R Never touch the battery first. To dis-
charge a possible electrostatic charge, step out of the vehicle first and touch the
bodywork.
R Do not wipe the battery using a cloth. The
battery could be destroyed as a result of
electrostatic charge or due to flying
sparks.
! Switch off the engine and remove the key
before disconnecting or removing the ter-
minal clamps from the battery. You may
otherwise destroy electronic components,
such as the alternator.
i Mercedes-Benz recommends that you
have all work involving the battery, e.g.
removing, charging and replacing, carried
out at a qualified specialist workshop, e.g.
a Mercedes-Benz Service Centre.
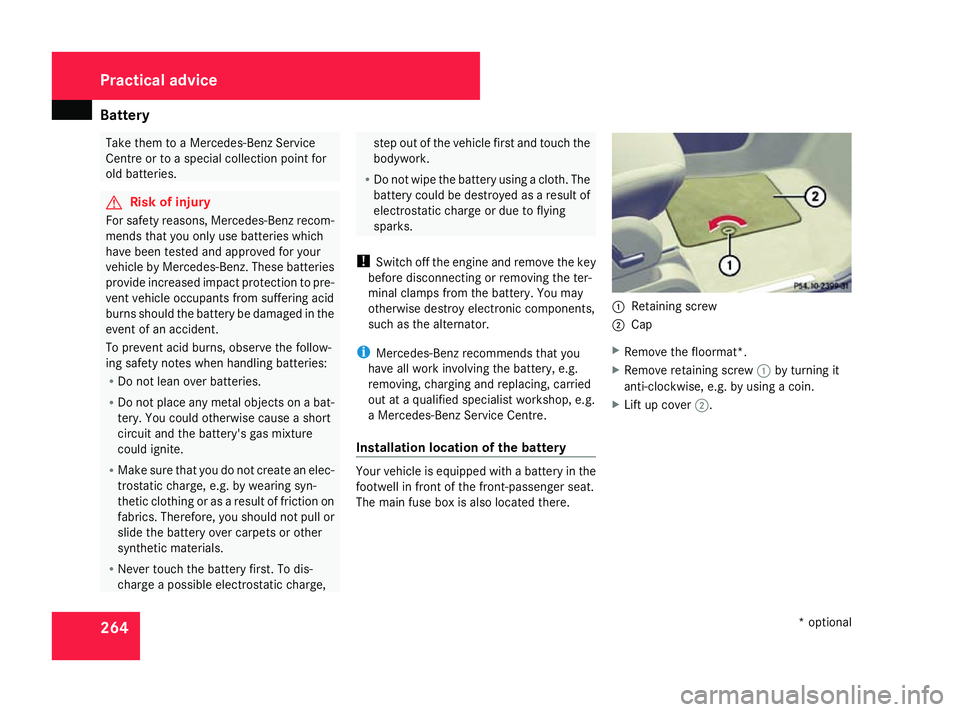
Installation location of the battery Your vehicle is equipped with a battery in the
footwell in front of the front-passenger seat.
The main fuse box is also located there. 1
Retaining screw
2 Cap
X Remove the floormat*.
X Remove retaining screw 1by turning it
anti-clockwise, e.g. by using a coin.
X Lift up cover 2. Practical advice
* optional
169_AKB; 2; 4, en-GB
wdomann,
Version: 2.10.6
2008-07-16T08:52:06+02:00 - Seite 264 Dateiname: 6515_0315_02_buchblock.pdf; preflight
Page 272 of 305

Towing and tow-starting
269Fitting the towing eye
Vehicles with a trailer tow hitch: if you
intend to use the vehicle for towing, fit the ball
coupling (Y page 186) and connect the tow-
bar to this.
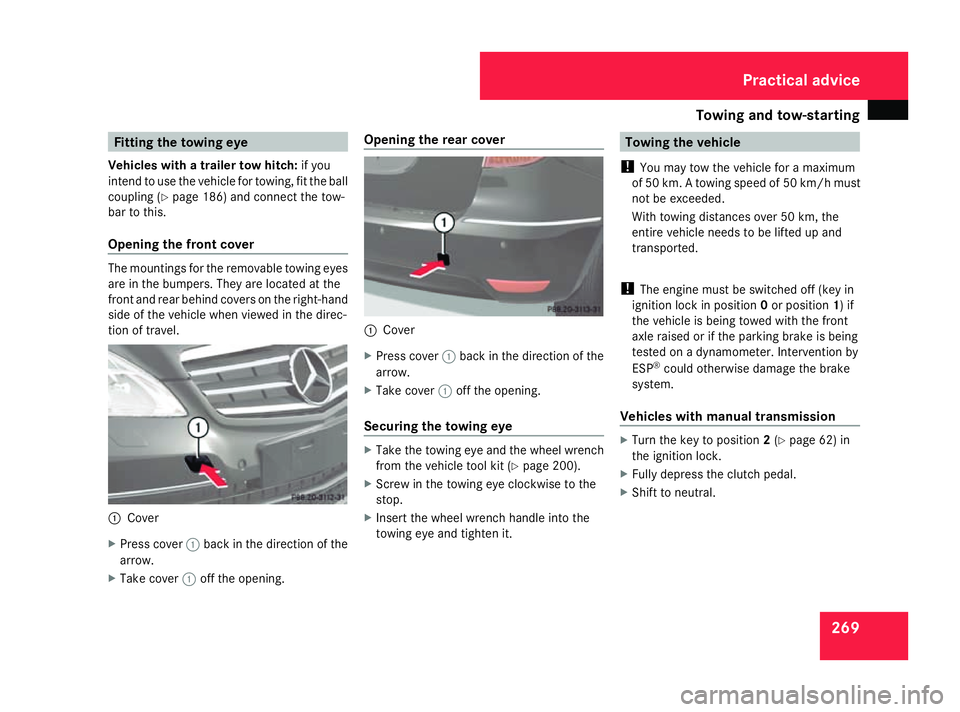
Opening the front cover The mountings for the removable towing eyes
are in the bumpers. They are located at the
front and rear behind covers on the right-hand
side of the vehicle when viewed in the direc-
tion of travel.
1
Cover
X Press cover 1back in the direction of the
arrow.
X Take cover 1off the opening. Opening the rear cover
1
Cover
X Press cover 1back in the direction of the
arrow.
X Take cover 1off the opening.
Securing the towing eye X
Take the towing eye and the wheel wrench
from the vehicle tool kit ( Ypage 200).
X Screw in the towing eye clockwise to the
stop.
X Insert the wheel wrench handle into the
towing eye and tighten it. Towing the vehicle
! You may tow the vehicle for a maximum
of 50 km. A towing speed of 50 km/h must
not be exceeded.
With towing distances over 50 km, the
entire vehicle needs to be lifted up and
transported.
! The engine must be switched off (key in
ignition lock in position 0or position 1) if
the vehicle is being towed with the front
axle raised or if the parking brake is being
tested on a dynamometer. Intervention by
ESP ®
could otherwise damage the brake
system.
Vehicles with manual transmission X
Turn the key to position 2(Y page 62) in
the ignition lock.
X Fully depress the clutch pedal.
X Shift to neutral. Practical advice
169_AKB; 2; 4, en-GB
wdomann,
Version: 2.10.6 2008-07-16T08:52:06+02:00 - Seite 269 ZDateiname: 6515_0315_02_buchblock.pdf; preflight
Page 273 of 305

Towing and tow-starting
270
Vehicles with AUTOTRONIC* X
Turn the key to position 2in the ignition
lock.
X Move the selector lever to N.Tow-starting (emergency engine
starting)
Please note:
R Vehicles with AUTOTRONIC* must not be
tow-started.
R The battery must be connected.
R The engine and catalytic converter must be
cold.
R Avoid repeated and lengthy starting
attempts.
Vehicles with manual transmission X
Turn the key to position 2(Y page 62) in
the ignition lock.
X Fully depress the clutch pedal.
X Shift to neutral. X
Tow the vehicle or let it roll.
X Shift to a suitable gear and bring the clutch
pedal up slowly. Do not depress the accel-
erator pedal.
The engine is started. Removing the towing eye
X Take the wheel wrench from the vehicle
tool kit ( Ypage 200).
X Insert the wheel wrench handle into the
towing eye and turn it anti-clockwise.
X Unscrew the towing eye.
X Replace the cover and press it until it
engages.
X Return the towing eye and the wheel
wrench to the vehicle tool kit. Transporting the vehicle
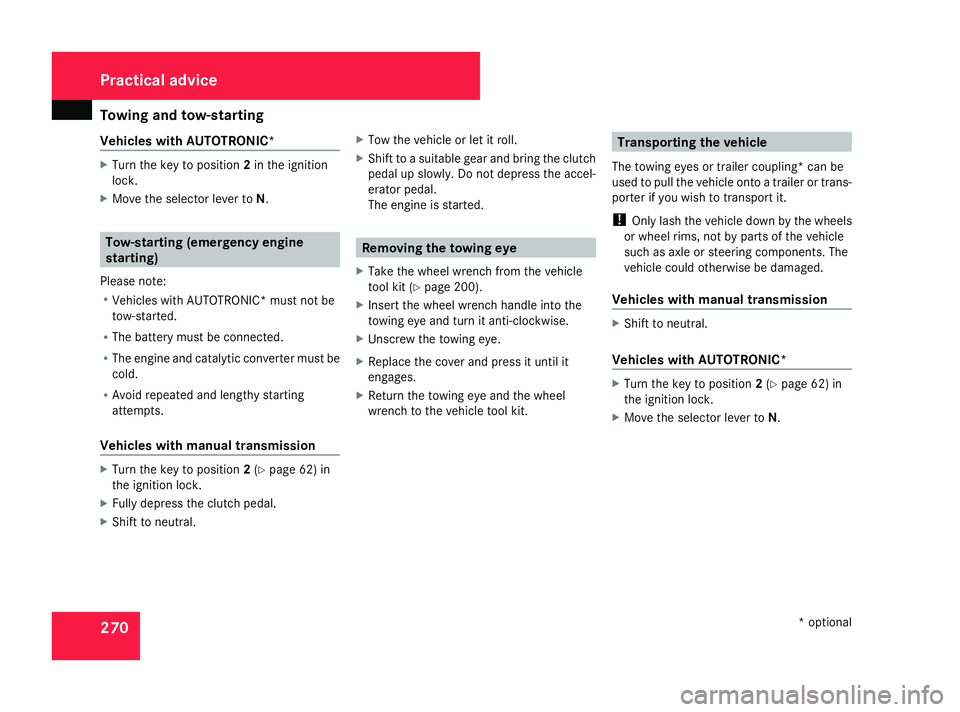
The towing eyes or trailer coupling *can be
used to pull the vehicle onto a trailer or trans-
porter if you wish to transport it.
! Only lash the vehicle down by the wheels
or wheel rims, not by parts of the vehicle
such as axle or steering components. The
vehicle could otherwise be damaged.
Vehicles with manual transmission X
Shift to neutral.
Vehicles with AUTOTRONIC* X
Turn the key to position 2(Y page 62) in
the ignition lock.
X Move the selector lever to N.Practical advice
* optional
169_AKB; 2; 4, en-GB
wdomann,
Version: 2.10.6
2008-07-16T08:52:06+02:00 - Seite 270 Dateiname: 6515_0315_02_buchblock.pdf; preflight
Page 274 of 305

Fuses
271Fuses
Notes on changing fuses
The fuses in your vehicle serve to close down
faulty circuits. If a fuse blows, all the compo-
nents on the circuit and their functions will
fail.
Blown fuses must be replaced with fuses of
the same rating, which you can recognise by
the colour and value. The fuse ratings are lis-
ted in the fuse allocation chart. A Mercedes-
Benz Service Centre will be happy to advise
you. G
Risk of fire
Only use fuses that have been approved for
Mercedes-Benz vehicles and which have
the correct fuse rating for the systems con-
cerned. Do not attempt to repair or bridge
faulty fuses. Otherwise, a circuit overload
could cause a fire. Have the cause traced
and rectified at a qualified specialist work-
shop, e.g. a Mercedes-Benz Service Centre.
If the newly inserted fuse also blows, have the
cause traced and rectified at a qualified spe-
cialist workshop, e.g. a Mercedes-Benz
Service Centre.
! Only use fuses that have been approved
for Mercedes-Benz vehicles and which have the correct fuse rating for the system
concerned. Otherwise, components or sys-
tems could be damaged.
The fuses are located in the main fuse box in
the front-passenger footwell.
Fuse allocation chart The fuse allocation chart is in the main fuse
box in the front-passenger footwell.
Before changing a fuse
X Park the vehicle.
X Switch off all electrical consumers.
X Remove the key from the ignition lock. Main fuse box
The main fuse box is in the front-passenger
footwell in front of the seat. 1
Cover
2 Retaining screw
X Remove the footmats*.
X Turn retaining screw 2anti-clockwise, e.g.
with a coin.
X Lift up cover 1.
X Remove the cover mat from the battery. Practical advice
* optional
169_AKB; 2; 4, en-GB
wdomann,
Version: 2.10.6 2008-07-16T08:52:06+02:00 - Seite 271 ZDateiname: 6515_0315_02_buchblock.pdf; preflight