key battery MERCEDES-BENZ A-CLASS HATCHBACK 2012 Owners Manual
[x] Cancel search | Manufacturer: MERCEDES-BENZ, Model Year: 2012, Model line: A-CLASS HATCHBACK, Model: MERCEDES-BENZ A-CLASS HATCHBACK 2012Pages: 357, PDF Size: 11.61 MB
Page 8 of 357
ATA (Anti-Theft Alarm system)
Activating/deactivating .................. .69
Function ........................................... 69
Interior motion senso r..................... 70
Switching off the alarm .................... 69
Tow-away protection ........................ 70
ATTENTION ASSIST
Activating/deactivating ................. 219
Display message ............................ 245
Function/note s............................. 195
Audio menu (on-board computer) .... 214
AUTO lights
Display message ............................ 242
see Lights
Automatic engine start (ECO start/
stop function) .................................... 147
Automatic engine switch-off (ECO
start/stop function) .......................... 146
Automatic headlamp mode .............. 105
Automatic transmission
Accelerator pedal position ............. 154
Automatic drive program ............... 156
Changing gear ............................... 154
DIRECT SELECT lever ..................... 151
Display message ............................ 252
Drive program display .................... 152
Driving tips .................................... 154
Emergency running mode .............. 159
Engaging drive position .................. 153
Engaging neutral ............................ 153
Engaging park position (AMG vehi-
cles) ............................................... 153
Engaging reverse gear ................... 153
Engaging the park position ............ 152
Holding the vehicle stationary on
uphill gradients .............................. 154
Kickdown ....................................... 154
Manual drive progra m.................... 156
Overview ........................................ 151
Problem (fault) ............................... 159
Program selector button ................ 155
Pulling away ................................... 144
Selector lever ................................ 153
Starting the engine ........................ 144
Steering wheel gearshift paddle s... 156
Trailer towing ................................. 155
Transmission position dis-
play ........................................ 152, 153 Transmission positions .................. 153
Automatic transmission emer-
gency running mode ......................... 159
Auxiliary heating
Activating/deactivating ................. 134
Activating/deactivating (on the
centre console ).............................. 135
Display message ............................ 255
Important safety notes .................. 134
Problem (display message) ............ 138
Remote control .............................. 135
Setting ........................................... 224
Setting the departure time ............. 136
Auxiliary ventilation
Activating/deactivating ................. 134
Activating/deactivating (on the
centre console ).............................. 135
Problem (display message) ............ 138
Remote control .............................. 135
Axle load, permissible (trailer tow-
ing) ...................................................... 349 B
Bag hook ............................................ 273
Ball coupling
Folding in ....................................... 205
Folding out ..................................... 203
BAS (Brake Assist System) ................. 62
Battery (key)
Checking .......................................... 76
Important safety notes .................... 76
Replacing ......................................... 76
Battery (vehicle)
Charging ........................................ 306
Display message ............................ 244
Important safety notes .................. 304
Jump starting ................................. 308
Belt force limiter
Activation ......................................... 49
Function ........................................... 49
Belt tensioner
Activation ......................................... 41
Function ........................................... 49
Blind Spot Assist
Activating/deactivating ................. 219
Display message ............................ 247
Notes/function .............................. 198 Index
5
Page 15 of 357

Overview ........................................1
11
Reading lamp ................................. 111
Setting the ambient lighting
brightness (on-board computer) .... 222
Interior motion sensor ........................ 70
ISOFIX child seat securing system .... 53J
Jack Storage location ............................ 299
Using ............................................. 326
Jump starting (engine) ......................308 K
Key Changing the battery ....................... 76
Checking the battery ....................... 76
Convenience closing feature ............ 85
Convenience opening feature .......... 84
Display message ............................ 256
Door central locking/unlocking ....... 75
Emergency key element ................... 75
Important safety notes .................... 74
Loss ................................................. 78
Modifying the programming ............. 75
Positions (ignition lock) ................. 143
Problem (malfunction) ..................... 78
Starting the engine ........................ 144
Key positions (ignition lock) ............ 143
Kickdown
Driving tips ................................... .154
Manual drive program .................... 158
Kneebag ............................................... 44 L
Lamps see Warning and indicator lamps
Lane Keeping Assist
Activating/deactivating ................. 219
Display message ............................ 247
Function/informatio n.................... 199
Lane package ..................................... 197
Lap time (RACETIMER) ...................... 226
Lashing eyelets ................................. 273
Licence plate lamp (display mes-
sage) ................................................... 241 Light sensor (display message)
....... 242
Lighting
see Lights
Lights
Activating/deactivating the Intel-
ligent Light System ........................ 221
Activating/deactivating the inte-
rior lighting delayed switch-off ....... 223
Active light function ....................... 108
Automatic headlamp mod e............ 105
Cornering light function ................. 109
Dipped-beam headlamp s............... 105
Display message ............................ 239
Driving abroad ............................... 104
Foglamps ....................................... 106
Foglamps (extended range) ........... 109
Hazard warning lamps ................... 108
Headlamp flashe r........................... 108
Headlamp rang e............................ 107
Light switch ................................... 105
Main-beam headlamp s................... 107
Motorway mod e............................. 109
Parking lamps ................................ 106
Rear foglamp ................................. 106
Setting the ambient lighting
brightness (on-board computer) .... 222
Side lamps ..................................... 106
Switching Adaptive Highbeam
Assist on/of f................................. 222
Switching the daytime driving
lights on/off (on-board com-
puter) ............................................. 221
Switching the daytime driving
lights on/off (switch) ..................... 105
Switching the exterior lighting
delayed switch-off on/off (on-
board computer) ............................ 222
Switching the surround lighting
on/off (on-board computer) .......... 222
Turn signals ................................... 107
see Interior lighting
see Replacing bulbs
LIM indicator lamp
Cruise control ................................ 169
DISTRONIC PLUS ........................... 174
Variable SPEEDTRONIC ................. 171
Limiting the speed
see SPEEDTRONIC 12
Index
Page 78 of 357
Key functions
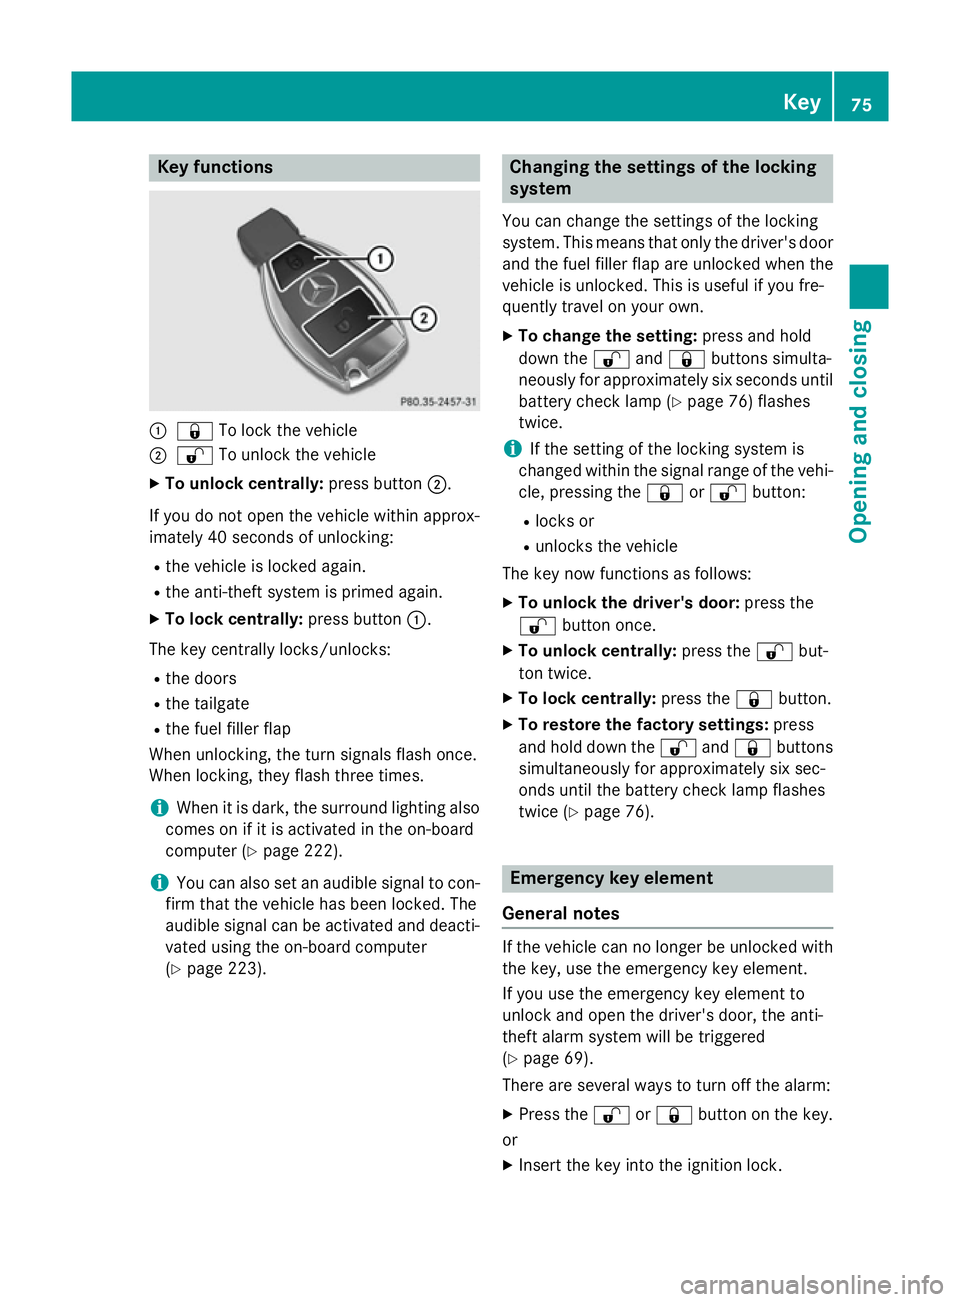
:
& To lock the vehicle
; % To unlock the vehicle
X To unlock centrally: press button;.
If you do not open the vehicle within approx-
imately 40 seconds of unlocking:
R the vehicle is locked again.
R the anti-theft system is primed again.
X To lock centrally: press button:.
The key centrally locks/unlocks: R the doors
R the tailgate
R the fuel filler flap
When unlocking, the turn signals flash once.
When locking, they flash three times.
i When it is dark, the surround lighting also
comes on if it is activated in the on-board
computer (Y page 222).
i You can also set an audible signal to con-
firm that the vehicle has been locked. The
audible signal can be activated and deacti-
vated using the on-board computer
(Y page 223). Changing the settings of the locking
system
You can change the settings of the locking
system. This means that only the driver's door
and the fuel filler flap are unlocked when the
vehicle is unlocked. This is useful if you fre-
quently travel on your own.
X To change the setting: press and hold
down the %and& buttons simulta-
neously for approximately six seconds until
battery check lamp (Y page 76) flashes
twice.
i If the setting of the locking system is
changed within the signal range of the vehi- cle, pressing the &or% button:
R locks or
R unlocks the vehicle
The key now functions as follows:
X To unlock the driver's door: press the
% button once.
X To unlock centrally: press the%but-
ton twice.
X To lock centrally: press the&button.
X To restore the factory settings: press
and hold down the %and& buttons
simultaneously for approximately six sec-
onds until the battery check lamp flashes
twice (Y page 76). Emergency key element
General notes If the vehicle can no longer be unlocked with
the key, use the emergency key element.
If you use the emergency key element to
unlock and open the driver's door, the anti-
theft alarm system will be triggered
(Y page 69).
There are several ways to turn off the alarm:
X Press the %or& button on the key.
or X Insert the key into the ignition lock. Key
75Opening and closing Z
Page 79 of 357
If you unlock the vehicle using the emergency
key element, the fuel filler flap will not be
unlocked automatically.
X To unlock the fuel filler flap: insert the
key into the ignition lock.
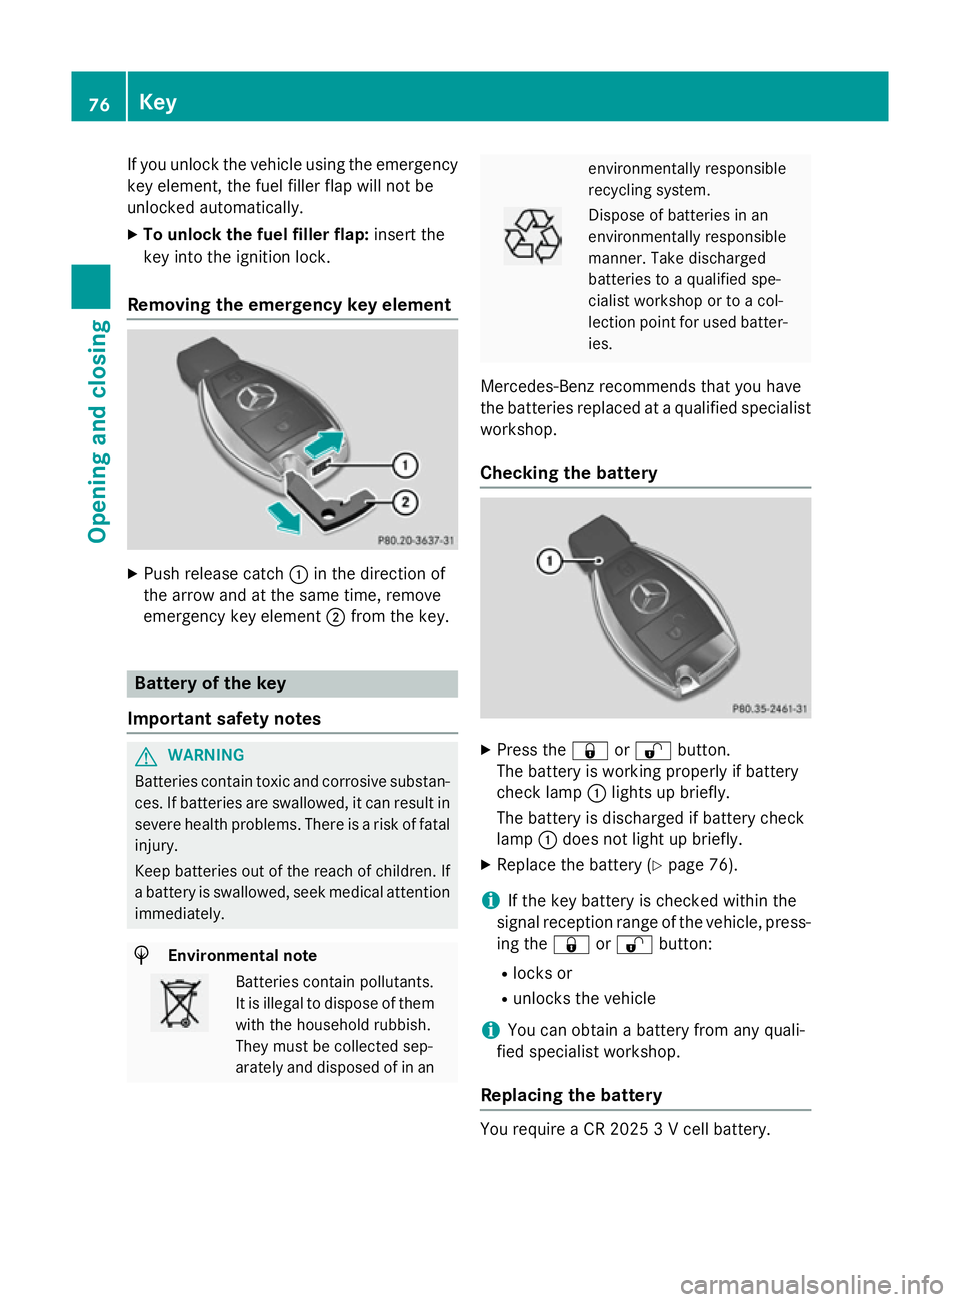
Removing the emergency key element X
Push release catch :in the direction of
the arrow and at the same time, remove
emergency key element ;from the key. Battery of the key
Important safety notes G
WARNING
Batteries contain toxic and corrosive substan- ces. If batteries are swallowed, it can result in
severe health problems. There is a risk of fatal injury.
Keep batteries out of the reach of children. If
a battery is swallowed, seek medical attention immediately. H
Environmental note Batteries contain pollutants.
It is illegal to dispose of them with the household rubbish.
They must be collected sep-
arately and disposed of in an environmentally responsible
recycling system.
Dispose of batteries in an
environmentally responsible
manner. Take discharged
batteries to a qualified spe-
cialist workshop or to a col-
lection point for used batter-
ies.
Mercedes-Benz recommends that you have
the batteries replaced at a qualified specialist workshop.
Checking the battery X
Press the &or% button.
The battery is working properly if battery
check lamp :lights up briefly.
The battery is discharged if battery check
lamp :does not light up briefly.
X Replace the battery (Y page 76).
i If the key battery is checked within the
signal reception range of the vehicle, press- ing the &or% button:
R locks or
R unlocks the vehicle
i You can obtain a battery from any quali-
fied specialist workshop.
Replacing the battery You require a CR 2025 3 V cell battery.76
KeyOpening and closing
Page 80 of 357
X
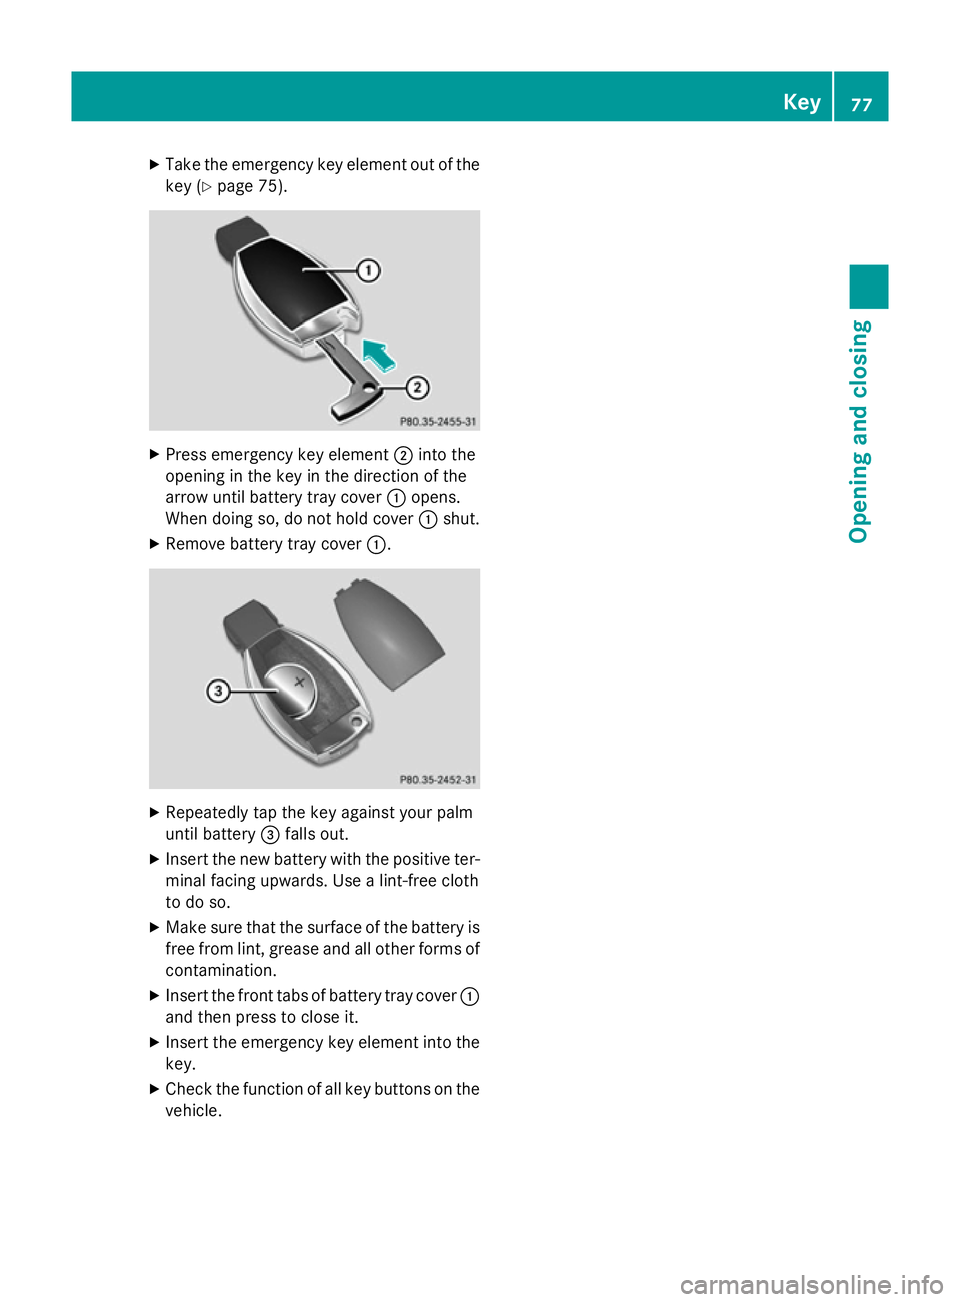
Take the emergency key element out of the
key (Y page 75). X
Press emergency key element ;into the
opening in the key in the direction of the
arrow until battery tray cover :opens.
When doing so, do not hold cover :shut.
X Remove battery tray cover :.X
Repeatedly tap the key against your palm
until battery =falls out.
X Insert the new battery with the positive ter-
minal facing upwards. Use a lint-free cloth
to do so.
X Make sure that the surface of the battery is
free from lint, grease and all other forms of contamination.
X Insert the front tabs of battery tray cover :
and then press to close it.
X Insert the emergency key element into the
key.
X Check the function of all key buttons on the
vehicle. Key
77Opening and closing Z
Page 81 of 357
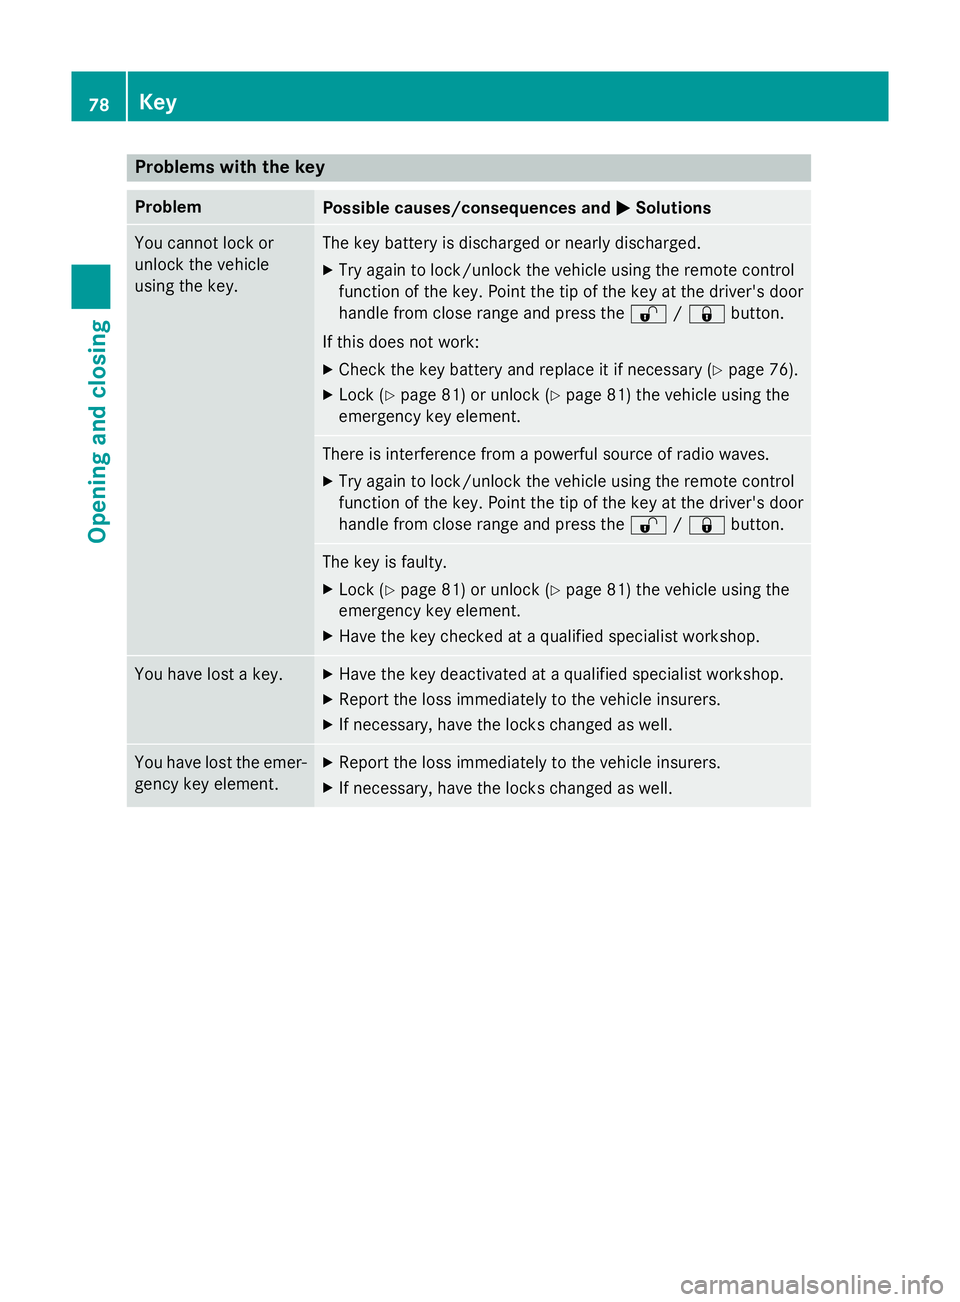
Problems with the key
Problem
Possible causes/consequences and
M
MSolutions You cannot lock or
unlock the vehicle
using the key. The key battery is discharged or nearly discharged.
X Try again to lock/unlock the vehicle using the remote control
function of the key. Point the tip of the key at the driver's door
handle from close range and press the %/& button.
If this does not work: X Check the key battery and replace it if necessary (Y page 76).
X Lock (Y page 81) or unlock (Y page 81) the vehicle using the
emergency key element. There is interference from a powerful source of radio waves.
X Try again to lock/unlock the vehicle using the remote control
function of the key. Point the tip of the key at the driver's door
handle from close range and press the %/& button. The key is faulty.
X Lock (Y page 81) or unlock (Y page 81) the vehicle using the
emergency key element.
X Have the key checked at a qualified specialist workshop. You have lost a key. X
Have the key deactivated at a qualified specialist workshop.
X Report the loss immediately to the vehicle insurers.
X If necessary, have the locks changed as well. You have lost the emer-
gency key element. X
Report the loss immediately to the vehicle insurers.
X If necessary, have the locks changed as well. 78
KeyOpening and closing
Page 82 of 357

Problem
Possible causes/consequences and
M
MSolutions The engine cannot be
started using the key. The on-board voltage is too low.
X Switch off non-essential consumers, e.g. seat heating or interior
lighting, and try to start the engine again.
If this does not work:
X Check the starter battery and charge it if necessary
(Y page 304).
or
X Jump-start the vehicle (Y page 308).
or
X Consult a qualified specialist workshop. The engine cannot be
started using the key. The steering lock is mechanically blocked.
X Remove the key and reinsert it into the ignition lock. While doing
this, turn the steering wheel in both directions. Doors
Important safety notes
G
WARNING
If children are left unsupervised in the vehicle, they could:
R open the doors, thus endangering other
people or road users.
R get out and disrupt traffic.
R operate the vehicle's equipment.
Additionally, children could set the vehicle in
motion if, for example, they:
R release the parking brake.
R shift the automatic transmission out of
parking position P.
R shift the manual transmission into neutral.
R start the engine.
There is a risk of an accident and injury.
When leaving the vehicle, always take the key with you and lock the vehicle. Never leave
children or animals unattended in the vehicle.Always keep the key out of reach of children. G
WARNING
If persons (particularly children) are exposed
to heat or cold for a prolonged period, there is a risk of serious or even fatal injuries. Never
leave persons (particularly children) unatten-
ded in the vehicle.
United Kingdom only: G
WARNING
When the double locks are activated, the
doors can no longer be opened from the
inside. People in the vehicle can no longer get out, e.g. in hazardous situations. There is a
risk of injury.
Therefore, do not leave any people unsuper-
vised in the vehicle, particularly children, eld-
erly people or people in need of special assis-
tance. Do not activate the double lock when
people are in the vehicle.
If the vehicle has been locked with the key,
then the double lock function is activated as
standard. You can deactivate the double lock
function by deactivating the interior motion
sensor (Y page 70). The doors can then be
opened from the inside after the vehicle has
been locked from the outside. The anti-theft Doors
79Opening and closing Z
Page 100 of 357
even suffer burn-like injuries. There is a risk of
injury.
Therefore, do not switch on the seat heating
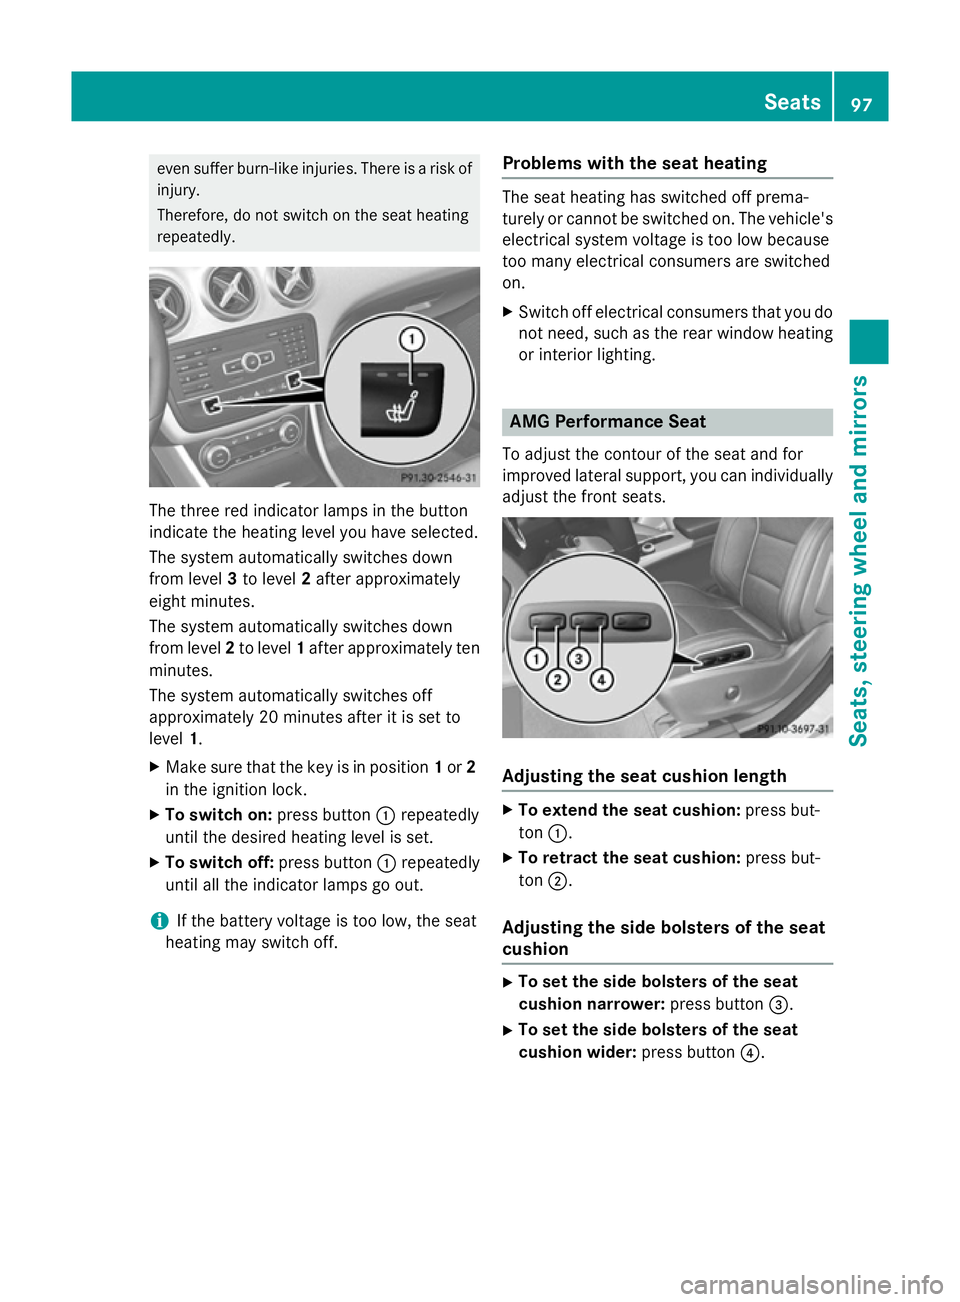
repeatedly. The three red indicator lamps in the button
indicate the heating level you have selected.
The system automatically switches down
from level 3to level 2after approximately
eight minutes.
The system automatically switches down
from level 2to level 1after approximately ten
minutes.
The system automatically switches off
approximately 20 minutes after it is set to
level 1.
X Make sure that the key is in position 1or 2
in the ignition lock.
X To switch on: press button:repeatedly
until the desired heating level is set.
X To switch off: press button:repeatedly
until all the indicator lamps go out.
i If the battery voltage is too low, the seat
heating may switch off. Problems with the seat heating The seat heating has switched off prema-
turely or cannot be switched on. The vehicle's
electrical system voltage is too low because
too many electrical consumers are switched
on.
X Switch off electrical consumers that you do
not need, such as the rear window heating
or interior lighting. AMG Performance Seat
To adjust the contour of the seat and for
improved lateral support, you can individually adjust the front seats. Adjusting the seat cushion length
X
To extend the seat cushion: press but-
ton :.
X To retract the seat cushion: press but-
ton ;.
Adjusting the side bolsters of the seat
cushion X
To set the side bolsters of the seat
cushion narrower: press button=.
X To set the side bolsters of the seat
cushion wider: press button?. Seats
97Seats, steering wheel and mirrors Z
Page 102 of 357
Exterior mirrors
Adjusting the exterior mirrors G
WARNING
The exterior mirrors reduce the size of the
image. Objects visible in the mirrors are
closer than they appear. You could misjudge
the distance from road users driving behind
you when changing lanes, for instance. There is a risk of an accident.
You should therefore always look over your
shoulder to determine the actual distance
from road users driving behind you. X
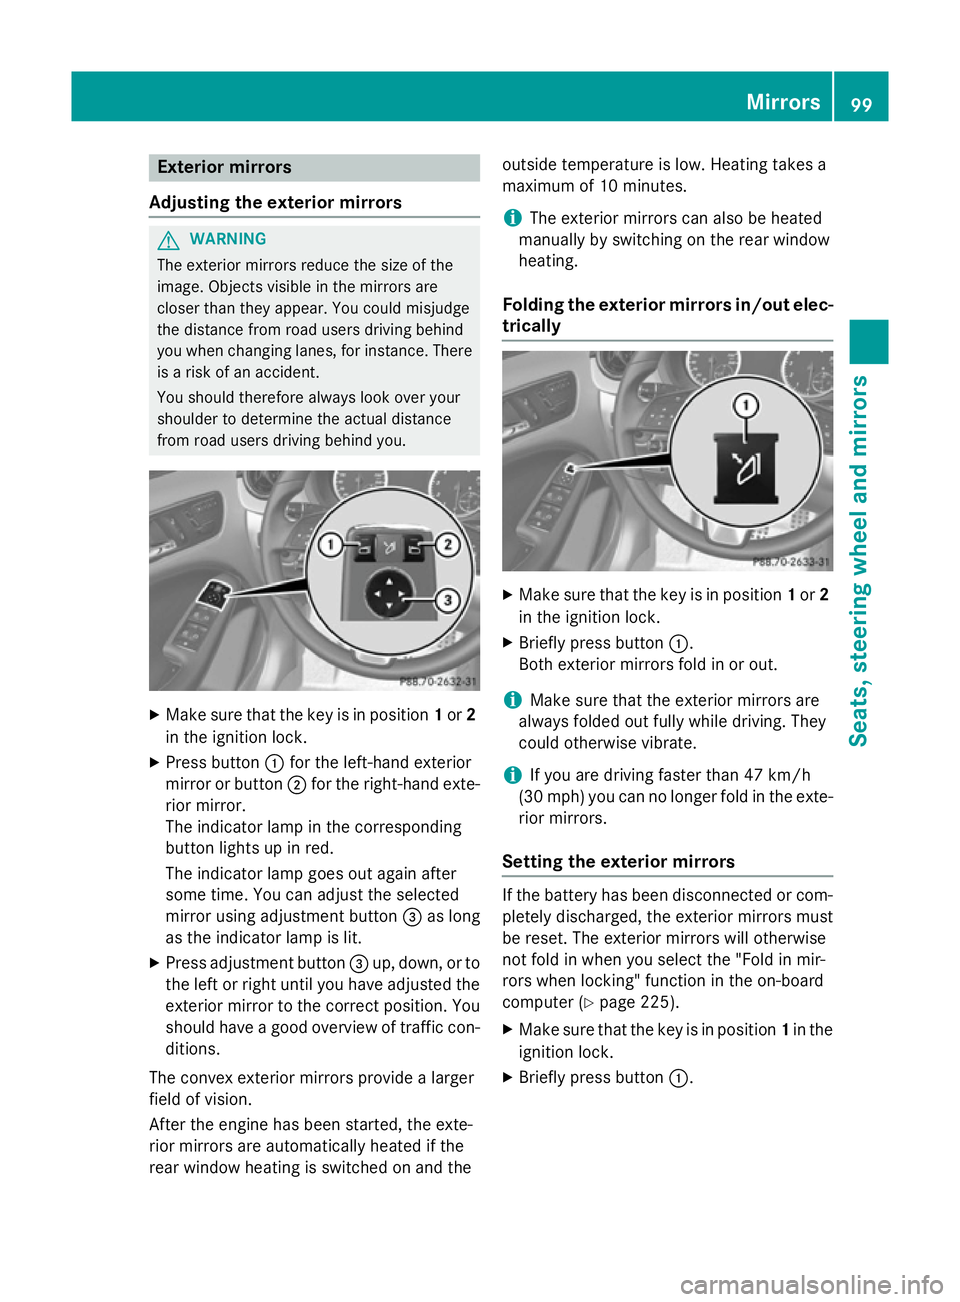
Make sure that the key is in position 1or 2
in the ignition lock.
X Press button :for the left-hand exterior
mirror or button ;for the right-hand exte-
rior mirror.
The indicator lamp in the corresponding
button lights up in red.
The indicator lamp goes out again after
some time. You can adjust the selected
mirror using adjustment button =as long
as the indicator lamp is lit.
X Press adjustment button =up, down, or to
the left or right until you have adjusted the
exterior mirror to the correct position. You
should have a good overview of traffic con- ditions.
The convex exterior mirrors provide a larger
field of vision.
After the engine has been started, the exte-
rior mirrors are automatically heated if the
rear window heating is switched on and the outside temperature is low. Heating takes a
maximum of 10 minutes.
i The exterior mirrors can also be heated
manually by switching on the rear window
heating.
Folding the exterior mirrors in/out elec-
trically X
Make sure that the key is in position 1or 2
in the ignition lock.
X Briefly press button :.
Both exterior mirrors fold in or out.
i Make sure that the exterior mirrors are
always folded out fully while driving. They
could otherwise vibrate.
i If you are driving faster than 47 km/h
(30 mp h) youcan no longer fold in the exte-
rior mirrors.
Setting the exterior mirrors If the battery has been disconnected or com-
pletely discharged, the exterior mirrors must
be reset. The exterior mirrors will otherwise
not fold in when you select the "Fold in mir-
rors when locking" function in the on-board
computer (Y page 225).
X Make sure that the key is in position 1in the
ignition lock.
X Briefly press button :. Mirrors
99Seats, steering wheel and mirrors Z
Page 109 of 357

even if the light sensor does not sense dark
ambient light conditions. This is advanta-
geous when there is fog or rain.
X To switch on the dipped-beam head-
lamps: turn the key in the ignition lock to
position 2or start the engine.
X Turn the light switch to L.
The green Lindicator lamp in the instru-
ment cluster lights up.
Foglamps
In conditions where visibility is poor due to
fog, snow or rain, the foglamps improve visi-
bility as well as making it easier for other road
users to see you. They can be operated
together with the side lamps or together with the side lamps and dipped-beam headlamps.
X To switch on the foglamps: turn the key
in the ignition lock to position 2or start the
engine.
X Turn the light switch to LorÃ.
X Press the Nbutton.
The green Nindicator lamp in the instru-
ment cluster lights up.
X To switch off the front foglamps: press
the N button.
The green Nindicator lamp in the instru-
ment cluster goes out.
Only vehicles with front foglamps are equip-
ped with the "Foglamp" function; for how to
operate the foglamps on vehicles with the
Intelligent Light System (Y page 109).
Rear foglamp
The rear foglamp improves the visibility of
your vehicle in heavy fog for the following
traffic. Please observe the country-specific
laws on the use of rear foglamps.
X To switch on the rear foglamp: turn the
key in the ignition lock to position 2or start
the engine.
X Turn the light switch to LorÃ. X
Press the Rbutton.
The yellow Rindicator lamp in the
instrument cluster lights up.
X To switch off the rear foglamp: press the
R button.
The yellow Rindicator lamp in the
instrument cluster goes out.
i Vehicles with bi-xenon headlamps or the
Intelligent Light System: when the rear fog- lamp is switched on, the lower 15 LEDs of
the brake lamp in the tail lamp switch off
due to a legal requirement: for right-hand
traffic only in the left-hand tail lamp and for left-hand traffic only in the right-hand tail
lamp.
Side lamps ! If the battery has been excessively dis-
charged, the side lamps or parking lamps
are automatically switched off to enable
the next engine start. Always park your
vehicle safely and sufficiently lit according
to legal standards. Avoid the continuous
use of the Tside lamps for several
hours. If possible, switch on the Xright
or the Wleft parking lamp.
X To switch on: turn the light switch to T.
Depending on the equipment level, the
green indicator lamp or the scale illumina-
tion in the instrument cluster light up.
Parking lamps
Switching on the parking lamps ensures the
corresponding side of the vehicle is illumina-
ted.
X To switch on the parking lamps: the key
is not in the ignition lock or it is in posi-
tion 0.
X Turn the light switch to W(left-hand side
of the vehicle) or X(right-hand side of
the vehicle). 106
Exterior lightingLights and windscreen wipers