ECO mode MERCEDES-BENZ A-CLASS HATCHBACK 2015 Owner's Manual
[x] Cancel search | Manufacturer: MERCEDES-BENZ, Model Year: 2015, Model line: A-CLASS HATCHBACK, Model: MERCEDES-BENZ A-CLASS HATCHBACK 2015Pages: 417, PDF Size: 11.91 MB
Page 183 of 417
Problems with the transmission
Problem
Possible causes/consequences and
M
MSolutions The transmission has
problems shifting gear. The transmission is losing oil.
X Have the transmission checked at a qualified specialist work-
shop immediately. The acceleration ability
is deteriorating.
The transmission no
longer shifts into all of
the gears.
Reverse gear can no
longer be engaged. The transmission is in emergency mode.
X Stop.
X Shift the transmission to position P.
X Switch off the engine.
X Wait at least ten seconds before restarting the engine.
X Shift the transmission to position D.
X Have the transmission checked at a qualified specialist work-
shop immediately. Refuelling
Important safety notes
G
WARNING
Fuel is highly flammable. If you handle fuel
incorrectly, there is a risk of fire and explo-
sion.
You must avoid fire, naked flames, creating
sparks and smoking. Switch off the engine
and, if applicable, the auxiliary heating before refuelling. G
WARNING
Fuels are poisonous and hazardous to health. There is a danger of injury.
Do not swallow fuel or let it come into contact
with skin, eyes or clothing. Do not inhale fuel
vapours. Keep fuels out of the reach of chil-
dren.
If you or others come into contact with fuel,
observe the following:
R Wash the fuel off any affected areas of skin
with water and soap immediately.
R If you get fuel in your eyes, rinse them thor-
oughly with clean water immediately. Seek immediate medical attention. R
If fuel is swallowed, seek immediate medi-
cal attention. Do not induce vomiting.
R Change any clothing that has come into
contact with fuel immediately. G
WARNING
Electrostatic charge can cause sparks and
thereby ignite fuel vapours. There is a risk of
fire and explosion.
Always touch the vehicle body before opening the fuel filler flap or touching the fuel pump
nozzle. This discharges any electrostatic
charge that may have built up. G
WARNING
Vehicles with a diesel engine:
If you mix diesel fuel with petrol, the flash
point of this fuel mixture is lower than that of pure diesel fuel. When the engine is running,
components in the exhaust system may over-
heat unnoticed. There is a risk of fire.
Never refuel with petrol. Never add petrol to
diesel fuel.
! Do not use diesel to refuel vehicles with a
petrol engine. Do not switch on the ignition if you accidentally refuel with the wrong 180
RefuellingDriving and parking
Page 192 of 417
economical driving. A higher level indicates a
more economical driving style. If the three
outer areas are completely filled at the same
time, the driver has adopted the most eco-
nomical driving style for the selected settings and prevailing conditions. The ECO display
border lights up.
The ECO display does not indicate the actual
fuel consumption. The additionally achieved
range displayed under Bonus fr. start
Bonus fr. start
does not indicate a fixed consumption reduc- tion.
In addition to driving style, the actual con-
sumption is affected by other factors, such
as:
R load
R tyre pressure
R cold start
R choice of route
R the use of electrical consumers
These factors are not included in the ECO dis-
play.
An economical driving style involves driving at a moderate engine speed.
To achieve a higher value in the categories
"Acceleration" and "Constant":
R observe the gearshift recommendation
R drive the vehicle in drive program Cor E
(vehicles with DYNAMIC SELECT button).
On long journeys at a constant speed, e.g. on
the motorway, only the outer area for "con-
stant" will change.
The ECO display summarises the driving style from the start of the journey to its completion.
Therefore, there are more marked changes in the outer areas at the start of a journey. Dur-
ing a prolonged driving time, these changes
are smaller. For more marked changes, per-
form a manual reset (Y page 243).
Further information on the ECO display
(Y page 242). Brakes
Important safety notes G
WARNING
If you shift down on a slippery road surface in an attempt to increase the engine's braking
effect, the drive wheels could lose their grip.
This increases the risk of skidding and having
an accident.
Do not shift down for additional engine brak-
ing on a slippery road surface.
Downhill gradients Change into a lower gear in good time on long
and steep downhill gradients. Take particular note of this when driving a laden vehicle and
when towing a trailer. For vehicles with auto-
matic transmission, you need to activate
manual gearshifting (Y page 177).
This also applies if you have activated cruise
control, SPEEDTRONIC or DISTRONIC PLUS.
This will use the braking effect of the engine,
so less braking will be required to maintain
vehicle speed. This relieves the load on the
brake system and prevents the brakes from
overheating and wearing too quickly.
Briefly depressing the accelerator pedal on
downhill gradients while the manual drive
program Mis temporarily activated (vehicles
with automatic transmission): the automatic
transmission may switch back to the last
active automatic drive program Eor S. The
automatic transmission may shift to a higher
gear. This can reduce the engine's braking
effect.
Heavy and light loads G
WARNING
The braking system can overheat if you leave your foot on the brake pedal while driving.
This increases the braking distance and could
even cause the braking system to fail. There is
a risk of an accident. Driving tips
189Driving and parking
Z
Page 193 of 417
Never use the brake pedal as a footrest. Do
not simultaneously depress both the brake
pedal and the accelerator pedal while driving.
! Depressing the brake pedal constantly
results in excessive and premature wear to
the brake pads.
If heavy demands are made on the brakes, do not park the vehicle immediately. Drive on for
a short while. This allows the airflow to cool
the brakes more quickly.
If the brakes have been used only moderately, you should occasionally test their effective-
ness. To do this, brake more firmly from a
higher speed, paying attention to traffic con-
ditions. This improves the grip of the brakes.
Wet road surfaces If you have driven for a long time in heavy rain
without braking, there may be a delayed reac- tion from the brakes when braking for the first
time. This may also occur after a car wash or after driving through deep water.
You will have to depress the brake pedal more
firmly. Maintain a greater distance to the vehi-
cle in front.
After driving on a wet road or having the vehi- cle washed, brake firmly while paying atten-
tion to the traffic conditions. This will warm upthe brake discs, thereby drying them more
quickly and protecting them against corro-
sion.
Limited braking performance on salt-
treated roads If you drive on salt-treated roads, a layer of
salt may form on the brake discs and pads.
This can increase the braking distance con-
siderably. R
In order to prevent any salt build-up, apply
the brakes occasionally while paying atten-
tion to the traffic conditions.
R Carefully depress the brake pedal at the
end of the journey and when starting the
next journey.
R Maintain a much greater distance to the
vehicle in front.
New brake pads/linings Brake pads/linings and discs that are either
new or have been replaced only achieve opti-
mum braking effect after several hundred kil-
ometres of driving. Compensate for the
reduced braking effect by applying greater
force to the brake pedal.
For safety reasons, Mercedes-Benz recom-
mends that you only have brake pads/linings
fitted to your vehicle which have been
approved for Mercedes-Benz vehicles or
which correspond to an equivalent quality
standard. Brake pads/linings which have not been approved for Mercedes-Benz vehicles or
which are not of an equivalent quality could
affect your vehicle's operating safety. Driving on wet roads
Aquaplaning If water has accumulated to a certain depth
on the road surface, there is a danger of aqua-
planing occurring, even if:
R you are driving at low speeds
R the tyres have adequate tread depth
For this reason, drive in the following manner in the event of heavy rain or in conditions in
which aquaplaning can occur:
R lower your speed
R avoid tyre ruts
R avoid sudden steering movements
R brake carefully 190
Driving tipsDriving and parking
Page 210 of 417
R
the transmission is in position D
R drive program S,S+ orRACE is selected
(Y page 167)
Activating RACE START X
Depress the brake pedal with your left foot
and keep it depressed.
X Pull and hold both steering wheel gearshift
paddles.
X The RACE START Confirm: Paddle UP
RACE START Confirm: Paddle UP
Cancel: Paddle DOWN
Cancel: Paddle DOWN message appears
in the multifunction display.
X Release both steering wheel gearshift pad-
dles.
i If the activation conditions are no longer
fulfilled, RACE START is cancelled. The
RACE START not possible See Own‐
RACE START not possible See Own‐
er's
er's Manual
Manual message appears in the mul-
tifunction display.
X To cancel: pull the left steering wheel shift
paddle (Y page 177).
or
X To confirm: pull the right steering wheel
shift paddle (Y page 177).
The RACE START available Depress
RACE START available Depress
accelerator
accelerator message appears in the mul-
tifunction display.
i If you do not depress the accelerator
pedal within a few seconds, RACE START is cancelled. The multifunction display shows
the RACE START cancelled
RACE START cancelled message.
X Fully depress the accelerator pedal.
The engine speed increases.
The RACE START Release brake to RACE START Release brake to
start
start message appears in the multifunc-
tion display.
i If the brake pedal is not released after a
short while, RACE START is cancelled. The
multifunction display shows the RACE
RACE
START cancelled
START cancelled message.
X Take your foot off the brake, but keep the
accelerator pedal depressed.
The vehicle pulls away at maximum accel-
eration. The
RACE RACE START
START active
active message appears
in the multifunction display.
RACE START is deactivated when the vehicle
reaches a speed of approximately 50 km/h.
RACE START is deactivated immediately if
you release the accelerator pedal during
RACE START or if any of the activation condi-
tions are no longer fulfilled. The RACE
RACE START START
not possible
not possible orRACE START cancelled
RACE START cancelled
message appears in the multifunction dis-
play.
i After using it several times in short suc-
cession, RACE START will be unavailable
until a certain distance has been driven. AMG RIDE CONTROL
General notes The electronically controlled damping system
works continuously. This improves driving
safety and ride comfort.
The damping is tuned individually to each
wheel and depends on:
R your driving style, e.g. sporty
R the road surface condition, e.g. bumps
R your individual selection of "Sport" or
"Comfort"
The suspension setting is adjusted using the
corresponding button in the centre console.
i The mode can also be set using the AMG
DYNAMIC SELECT controller (Y page 167).
If the ignition is switched off for less than four hours, the previously selected drive program
is activated when the engine is next started. If
the ignition is switched off for more than four hours, Comfort mode is activated when the
engine is next started. Driving systems
207Driving and parking Z
Page 246 of 417
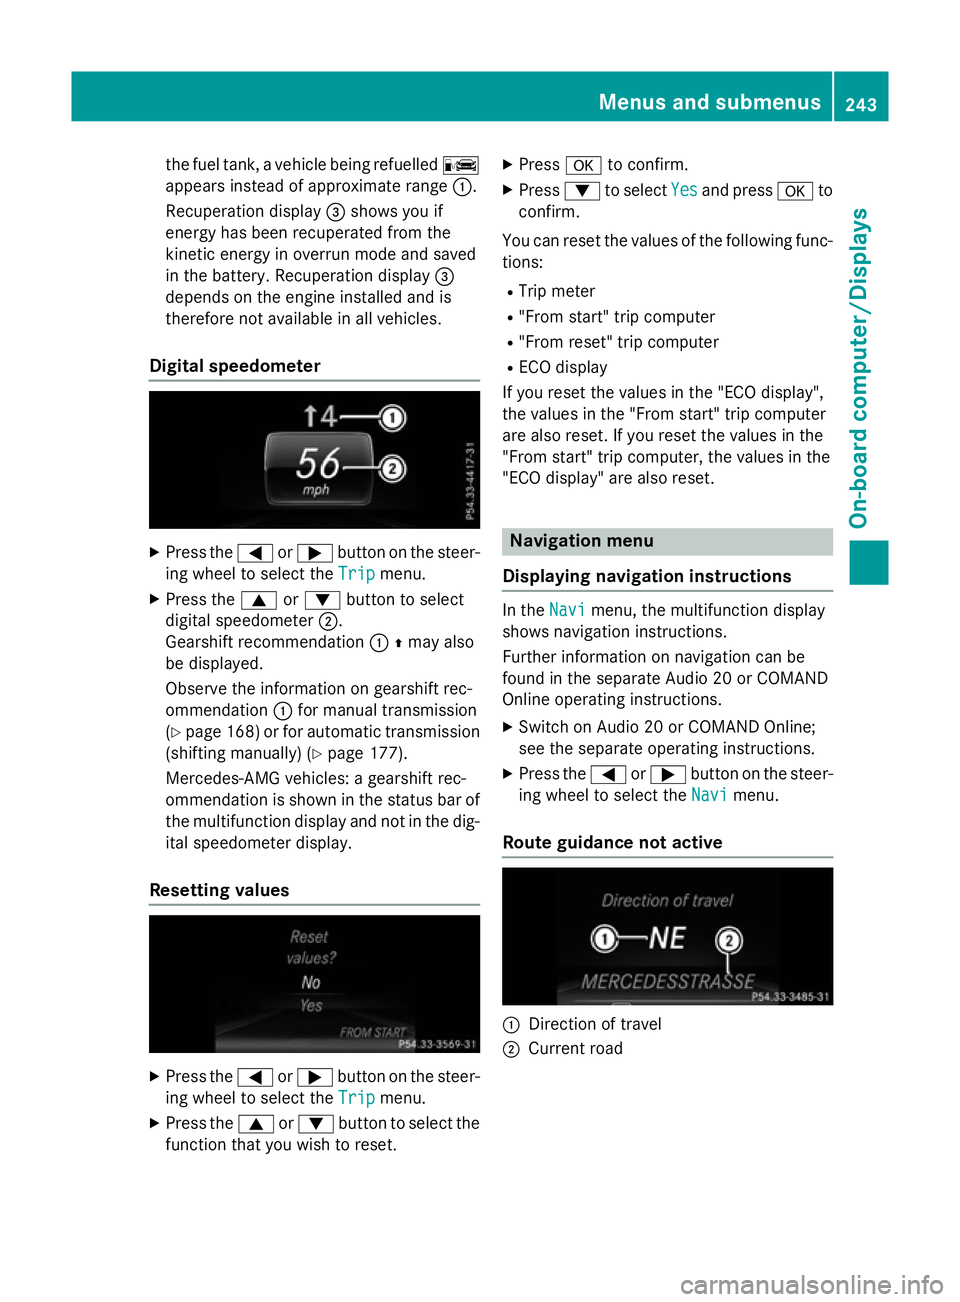
the fuel tank, a vehicle being refuelled
C
appears instead of approximate range :.
Recuperation display =shows you if
energy has been recuperated from the
kinetic energy in overrun mode and saved
in the battery. Recuperation display =
depends on the engine installed and is
therefore not available in all vehicles.
Digital speedometer X
Press the =or; button on the steer-
ing wheel to select the Trip
Trip menu.
X Press the 9or: button to select
digital speedometer ;.
Gearshift recommendation :Zmay also
be displayed.
Observe the information on gearshift rec-
ommendation :for manual transmission
(Y page 168 )or for automatic transmission
(shifting manually) (Y page 177).
Mercedes-AMG vehicles: a gearshift rec-
ommendation is shown in the status bar of
the multifunction display and not in the dig- ital speedometer display.
Resetting values X
Press the =or; button on the steer-
ing wheel to select the Trip
Trip menu.
X Press the 9or: button to select the
function that you wish to reset. X
Press ato confirm.
X Press :to select Yes Yesand press ato
confirm.
You can reset the values of the following func-
tions:
R Trip meter
R "From start" trip computer
R "From reset" trip computer
R ECO display
If you reset the values in the "ECO display",
the values in the "From start" trip computer
are also reset. If you reset the values in the
"From start" trip computer, the values in the
"ECO display" are also reset. Navigation menu
Displaying navigation instructions In the
Navi Navimenu, the multifunction display
shows navigation instructions.
Further information on navigation can be
found in the separate Audio 20 or COMAND
Online operating instructions.
X Switch on Audio 20 or COMAND Online;
see the separate operating instructions.
X Press the =or; button on the steer-
ing wheel to select the Navi
Navi menu.
Route guidance not active :
Direction of travel
; Current road Menus and submenus
243On-board computer/Displays Z
Page 248 of 417
A new route is calculated.
R Road not mapped
Road not mapped
The vehicle position is inside the area of the
digital map but the road is not recognised,
e.g. new roads, car parks or private land.
R No route No route
No route could be calculated to the selec-
ted destination.
R O
You have reached the destination or an
intermediate destination. Audio menu
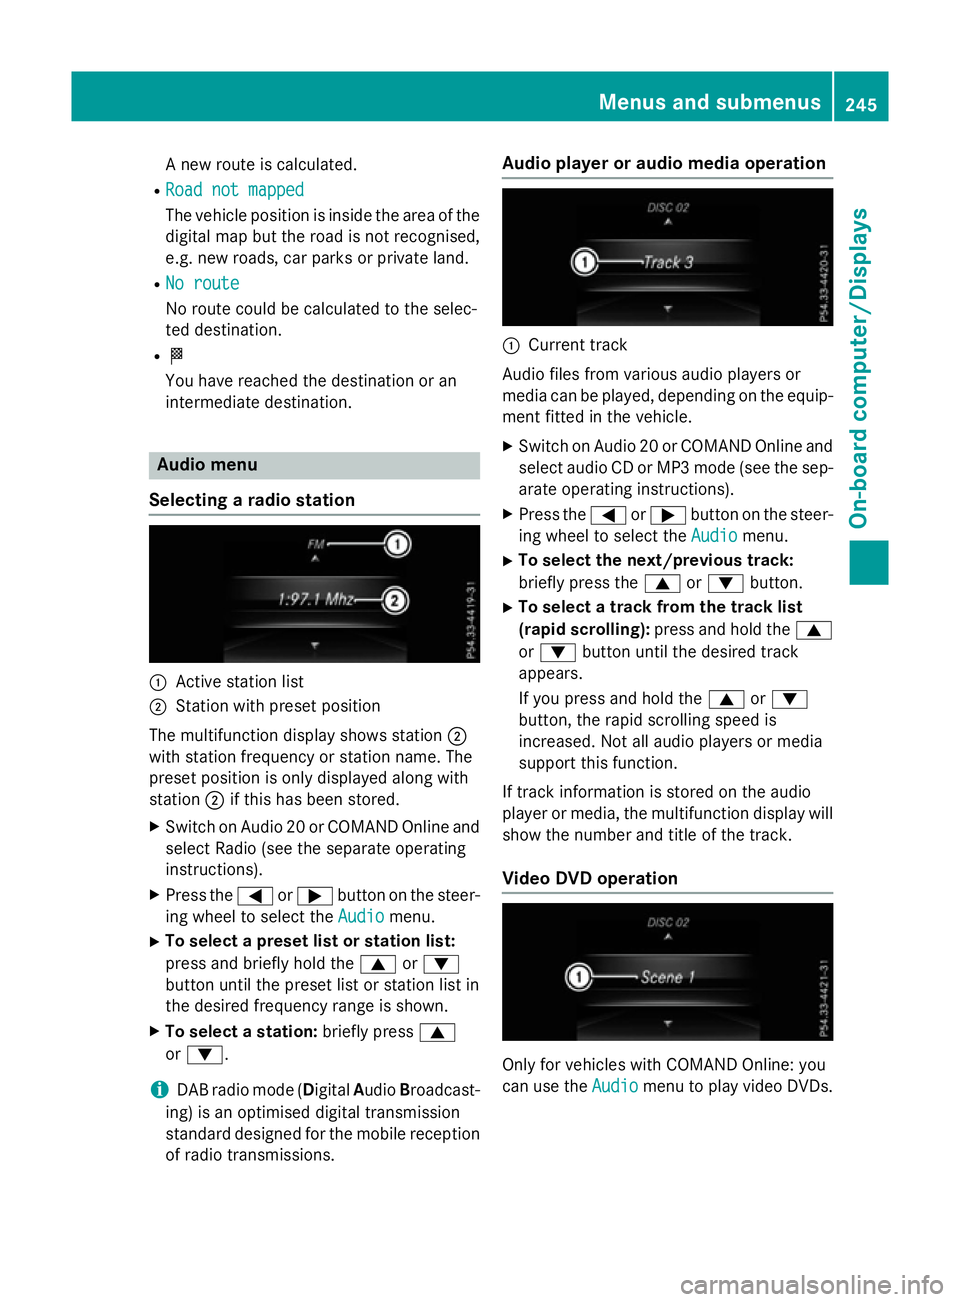
Selecting a radio station :
Active station list
; Station with preset position
The multifunction display shows station ;
with station frequency or station name. The
preset position is only displayed along with
station ;if this has been stored.
X Switch on Audio 20 or COMAND Online and
select Radio (see the separate operating
instructions).
X Press the =or; button on the steer-
ing wheel to select the Audio
Audio menu.
X To select a preset list or station list:
press and briefly hold the 9or:
button until the preset list or station list in
the desired frequency range is shown.
X To select a station: briefly press9
or :.
i DAB radio mode (Digital
AudioBroadcast-
ing) is an optimised digital transmission
standard designed for the mobile reception
of radio transmissions. Audio player or audio media operation
:
Current track
Audio files from various audio players or
media can be played, depending on the equip-
ment fitted in the vehicle.
X Switch on Audio 20 or COMAND Online and
select audio CD or MP3 mode (see the sep-
arate operating instructions).
X Press the =or; button on the steer-
ing wheel to select the Audio Audiomenu.
X To select the next/previous track:
briefly press the 9or: button.
X To select a track from the track list
(rapid scrolling): press and hold the 9
or : button until the desired track
appears.
If you press and hold the 9or:
button, the rapid scrolling speed is
increased. Not all audio players or media
support this function.
If track information is stored on the audio
player or media, the multifunction display will
show the number and title of the track.
Video DVD operation Only for vehicles with COMAND Online: you
can use the Audio Audiomenu to play video DVDs. Menus and submenus
245On-board computer/Displays Z
Page 321 of 417
Mobile phone
Important safety notes G
WARNING
Operating mobile communications equip-
ment while driving distracts you from paying
attention to traffic conditions. This could also cause you to lose control of the vehicle. There
is a risk of an accident.
Use this device only when the vehicle is sta-
tionary.
You must observe the legal requirements for
the country in which you are currently driving when operating mobile communications
equipment in the vehicle.
If it is permitted by law to operate communi-
cations equipment while the vehicle is in
motion, you may only do so if the traffic sit-
uation permits. You may otherwise be dis-
tracted from the traffic conditions, cause an
accident and injure yourself and others.
Excessive levels of electromagnetic radiation
may cause damage to your health and to the
health of others. The use of an exterior aerial
takes into consideration the scientific discus- sion surrounding the possible health risk
posed by electromagnetic fields.
Mercedes-Benz recommends the use of an
approved exterior aerial. This ensures:
R optimal mobile phone reception quality in
the vehicle
R that mutual interference between the vehi-
cle electronics and mobile phones is mini-
mised
An exterior aerial has the following advan-
tages:
R it conducts the electromagnetic fields gen-
erated by a wireless device to the exterior
R the field strength in the vehicle interior is
lower than in a vehicle that does not have
an exterior aerial
Information on retrofitting two-way radios
and mobile phones (RF transmitters)
(Y page 394). General notes There are various mobile phone brackets that
may be fitted in your vehicle; in some cases,
these are country-specific.
You can connect a Bluetooth ®
-capable
mobile phone with Audio 20 or COMAND
Online via the Bluetooth ®
interface. This also
applies if your vehicle is equipped with con-
venience telephony.
More information on suitable mobile phones,
mobile phone brackets and on connecting
Bluetooth ®
-capable mobile phones with
Audio 20 or COMAND Online can be obtained:
R at your Mercedes-Benz Service Centre
R on the Internet at http://www.mercedes-
benz.com/connect
The functions and services available when
you use the phone depend on your mobile
phone model and service provider.
Using a mobile phone To connect a mobile phone to the exterior
aerial and charge it, insert it into the mobile
phone bracket.
X Open the telephone compartment
(Y page 308).
X Place the mobile phone bracket into the
pre-installed fitting; see the separate instal-
lation instructions for the mobile phone fit-
ting.
X Insert the mobile phone into the mobile
phone bracket; see the separate installa-
tion instructions for the mobile phone fit-
ting.
i The mobile phone can also be operated
without being in the bracket. However, the charging function and aerial function are
not available.
In order to use Bluetooth ®
(SAP profile) on
your telephone module, you must first insert
the telephone module into the pre-installed
fitting. This connects it to the exterior aerial. 318
FeaturesStowing and features
Page 333 of 417
Washing by hand
In some countries, washing by hand is only
allowed at specially equipped washing bays.
Observe the legal requirements for each indi-
vidual country.
X Do not use hot water and do not wash the
vehicle in direct sunlight.
X Use a soft sponge to clean.
X Use a mild cleaning agent, such as a car
shampoo approved by Mercedes-Benz.
X Thoroughly hose down the vehicle with a
gentle jet of water.
X Do not point the water jet directly towards
the air inlet.
X Use plenty of water and rinse out the
sponge frequently.
X Rinse the vehicle with clean water and dry
thoroughly with a chamois.
X Do not let the cleaning agent dry on the
paintwork.
When using the vehicle in winter, remove all
traces of road salt deposits carefully and as
soon as possible.
High-pressure cleaning equipment G
WARNING
The water jet of circular-jet nozzles (dirt grind- ers) can cause damage not visible from the
outside to tyres or chassis components. Com-
ponents damaged in this way can unexpect-
edly fail. There is a risk of an accident.
Do not use high-pressure cleaners with circu-
lar-jet nozzles to clean the vehicle. Have dam- aged tyres or chassis components replaced
immediately.
! Always maintain a distance of at least
30 cm between the vehicle and the high-
pressure cleaner nozzle. Information about
the correct distance is available from the
equipment manufacturer.
Move the high-pressure cleaner nozzle
around when cleaning your vehicle. Do not aim directly at any of the following:
R tyres
R door gaps, roof gaps, joints etc.
R electrical components
R battery
R connectors
R lights
R seals
R trim elements
R ventilation slots
Damaged seals or electrical components
can lead to leaks or failures.
! Edition 1 special model: parts of your
vehicle are covered with a decorative foil.
Maintain a distance of at least 70 cm
between the foil-wrapped parts of the vehi-
cle and the nozzle of the high pressure
cleaner.
Information about the correct distance is
available from the equipment manufac-
turer.
Move the high-pressure cleaner nozzle
around when cleaning your vehicle.
Cleaning the paintwork !
Do not affix:
R stickers
R films
R magnetic plates or similar items
to painted surfaces. You could otherwise
damage the paintwork.
Scratches, corrosive deposits, areas affected by corrosion and damage caused by inade-
quate care cannot always be completely
repaired. In such cases, visit a qualified spe-
cialist workshop.
X Remove impurities immediately, where
possible, whilst avoiding rubbing too hard.
X Soak insect remains with insect remover
and rinse off the treated areas afterwards.
X Soak bird droppings with water and rinse
off the treated areas afterwards. 330
CareMaintenance and care
Page 343 of 417
Flat tyre
Preparing the vehicle
Your vehicle may be equipped with: R MOExtended tyres (tyres with run-flat char-
acteristics) (Y page 340)
Vehicle preparation is not necessary on
vehicles with MOExtended tyres.
R a TIREFIT kit (Y page 339)
R an emergency spare wheel (certain coun-
tries only) (Y page 389)
Vehicles with MOExtended tyres are not
equipped with a TIREFIT kit at the factory. It is therefore recommended that you additionallyequip your vehicle with a TIREFIT kit if you fit tyres that do not feature run-flat characteris-
tics, e.g. winter tyres. A TIREFIT kit can be
obtained from a qualified specialist work-
shop.
Information on changing and fitting a wheel
(Y page 367).
X Stop the vehicle as far away as possible
from traffic on solid, non-slippery and level
ground.
X Switch on the hazard warning lamps.
X Secure the vehicle against rolling away
(Y page 184).
X If possible, bring the front wheels into the
straight-ahead position.
X Switch off the engine.
X Vehicles without KEYLESS-GO: remove
the key from the ignition lock.
X Vehicles with KEYLESS-GO start-func-
tion or KEYLESS-GO: open the driver's
door.
The on-board electronics now have status
0 . This is the same as the key having been
removed.
X Vehicles with KEYLESS-GO start-func-
tion or KEYLESS-GO: remove the Start/
Stop button from the ignition lock
(Y page 157).
X Make sure that the passengers are not
endangered as they do so. Make sure that no one is near the danger area while a
wheel is being changed. Anyone who is not
directly assisting in the wheel change
should, for example, stand behind the bar-
rier.
X Get out of the vehicle. Pay attention to traf-
fic conditions when doing so.
X Close the driver's door.
X Place the warning triangle at a suitable dis-
tance (Y page 338). Observe legal require-
ments. MOExtended tyres (tyres with run-flat
characteristics)
General notes With MOExtended tyres (tyres with run-flat
characteristics), you can continue to drive
your vehicle even if there is a total loss of
pressure in one or more tyres. The affected
tyre must not show any clearly visible dam-
age.
You can recognise MOExtended tyres by the
MOExtended marking which appears on the
tyre wall. You will find this marking next to the
tyre size designation, the load-bearing capa-
city and the speed index.
MOExtended tyres may only be used in con-
junction with an activated tyre pressure loss
warning system or tyre pressure monitor.
If a pressure loss warning message
appears in the multifunction display:
R observe the instructions in the display mes-
sages (Y page 283)
R check the tyre for damage
R if driving on, observe the following notes
The driving distance possible in run-flat mode is approximately 80 km when the vehicle is
partially laden and approximately 30 km
when the vehicle is fully laden. 340
Flat tyreBreakdown assistance
Page 344 of 417
In addition to the vehicle load, the driving dis-
tance possible depends upon:
R vehicle speed
R road condition
R outside temperature
The driving distance possible in run-flat mode may be reduced by extreme driving condi-
tions/manoeuvres, or it can be increased
through a moderate style of driving.
The driving distance possible in run-flat mode
is counted from the moment the tyre pressure loss warning appears in the multifunction dis-
play.
You must not exceed a maximum speed of
80 km/h.
When replacing one or all tyres, observe the
following specifications for your vehicle's
tyres:
R size
R type and
R the "MOExtended" mark.
If a tyre has gone flat and cannot be replaced
with an MOExtended tyre, a standard tyre
may be used as a temporary measure. Make
sure that you use the proper size and type
(summer or winter tyre).
Vehicles with MOExtended tyres are not
equipped with a TIREFIT kit at the factory. It is therefore recommended that you additionally
equip your vehicle with a TIREFIT kit if you fit tyres that do not feature run-flat characteris- tics, e.g. winter tyres. A TIREFIT kit can be
obtained from a qualified specialist work-
shop.
Important safety notes G
WARNING
When driving in emergency mode, the driving characteristics deteriorate, e.g. when corner-
ing, accelerating quickly and when braking.
There is a risk of accident.
Do not exceed the stated maximum speed.
Avoid abrupt steering and driving manoeu-
vres, and driving over obstacles (kerbs, pot- holes, off-road). This applies in particular to a
laden vehicle.
Stop driving in emergency mode if:
R you hear banging noises.
R the vehicle starts to shake.
R you see smoke and smell rubber.
R ESP ®
is intervening constantly.
R there are tears in the sidewalls of the tyre.
After driving in emergency mode, have the
wheel rims checked at a qualified specialist
workshop with regard to their further use. The faulty tyre must be replaced. TIREFIT kit
Important safety notes TIREFIT is a tyre sealant.
You can use TIREFIT to seal punctures of up to
4 mm, particularly those in the tyre tread. You
can use TIREFIT at outside temperatures
down to Ò20 †. G
WARNING
In the following situations, the tyre sealant is
unable to provide sufficient breakdown assis- tance, as it is unable to seal the tyre properly:
R there are cuts or punctures in the tyre
larger than those mentioned above.
R the wheel rim is damaged.
R you have driven at very low tyre pressures
or on a flat tyre.
There is a risk of an accident.
Do not drive any further. Contact a qualified
specialist workshop. G
WARNING
The tyre sealant is harmful and causes irrita-
tion. It must not come into contact with your
skin, eyes or clothing or be swallowed. Do not inhale TIREFIT fumes. Keep tyre sealant away
from children. There is a risk of injury. Flat tyre
341Breakdown assistance
Z