child seat MERCEDES-BENZ A-CLASS HATCHBACK 2015 Owners Manual
[x] Cancel search | Manufacturer: MERCEDES-BENZ, Model Year: 2015, Model line: A-CLASS HATCHBACK, Model: MERCEDES-BENZ A-CLASS HATCHBACK 2015Pages: 417, PDF Size: 11.91 MB
Page 10 of 417
Plastic trim .................................... 334
Reversing camera .......................... 333
Roof lining ...................................... 335
Seat belt ........................................3 35
Seat cover ..................................... 335
Sensors ......................................... 332
Steering wheel ............................... 334
Trim pieces ................................... .335
Washing by hand ........................... 330
Wheels .......................................... .331
Windows ........................................ 331
Wiper blades .................................. 332
Wooden trim .................................. 335
CD player (on-board computer) ........245
Central locking
Automatic locking (on-board com-
puter) ............................................. 251
Locking/unlocking (key ).................. 83
Centre console
Lower section .................................. 35
Upper section .................................. 34
Changing bulbs
Brake lamps ................................... 128
Dipped-beam headlamp s............... 127
Main-beam headlamp s................... 127
Rear foglamp ................................. 128
Reversing lamps ............................ 128
Turn signals (front) ......................... 128
Turn signals (rear) .......................... 128
Child
Restraint system .............................. 58
Child seat
Forward-facing restraint system ...... 62
ISOFIX .............................................. 59
On the front-passenger sea t............ 61
Rearward-facing restraint system .... 62
Recommendations ........................... 66
Suitable positions ............................ 62
Top Tether ....................................... 60
Child-proof locks
Important safety notes .................... 67
Rear doors ....................................... 68
Cigarette lighter ................................ 316
Cleaning
Mirror turn signal ........................... 332
Trailer tow hitch ............................. 333
Climate control
Air conditioning ............................. 137 Auxiliary heating/ventilation .......... 148
Controlling automaticall
y............... 142
Convenience opening/closing
(air-recirculation mode) ................. 146
Cooling with air dehumidification .. 141
Demisting the windows .................. 144
Demisting the windscreen ............. 144
Indicator lamp ................................ 142
Information on using
THERMOTRONIC automatic cli-
mate control .................................. 139
Notes on using the air-condition-
ing system ..................................... 137
Overview of systems ...................... 136
Problem with the rear window
heating .......................................... 146
Problems with cooling with air
dehumidification ............................ 142
Setting the air distribution ............. 143
Setting the air vents ...................... 153
Setting the airflow ......................... 143
Setting the temperature ................ 142
Switching air-recirculation mode
on/of f............................................ 146
Switching on/of f........................... 140
Switching residual heat on/off ...... 147
Switching the rear window heat-
ing on/of f...................................... 145
Switching the ZONE function on/
off .................................................. 143
THERMOTRONIC (2-zone) auto-
matic climate control ..................... 139
Cockpit
Overview .......................................... 28
COLLISION PREVENTION ASSIST
PLUS
Activating/deactivating ................. 249
Display message ............................ 265
Operation/note s.............................. 70
COMAND display
Cleaning ......................................... 334
Combination switch .......................... 122
Consumption statistics (on-board
computer) .......................................... 242
Convenience closing feature .............. 95
Convenience opening feature ............ 95 Index
7
Page 15 of 417
H
Hazard warning lamps Display message ............................ 291
Switching on/off ........................... 123
Head restraints
Adjusting ....................................... 109
Adjusting (manually) ...................... 109
Adjusting (rear) .............................. 110
Fitting/removing (rear) .................. 110
Headlamp
Cleaning system (notes) ............... .403
Headlamp flasher .............................. 123
Headlamps
Misting up ...................................... 124
see Automatic headlamp mode
Heating
see Climate control
High-pressure cleaners .................... 330
Hill start assist .................................. 161
HOLD function
Activating ....................................... 205
Deactivating ................................... 205
Display message ............................ 278
Function/notes ............................ .204
Horn ...................................................... 28 I
Ignition lock see Key positions
Immobiliser .......................................... 77
Indicator and warning lamp
Restraint system ............................ 300
Indicator and warning lamps
COLLISION PREVENTION ASSIST
PLUS .............................................. 303
Coolant .......................................... 301
Engine diagnostics ......................... 301
SPORT handling mode ................... 298
Indicator lamps
Display message ............................ 272
see Warning and indicator lamps
Indicators
see Turn signals
Instrument cluster
Overview .......................................... 30
Settings ......................................... 250 Warning and indicator lamps ........... 31
Instrument cluster lighting .............. 238
Interior lighting
Control .......................................... .125
Emergency lighting ........................ 125
Overview ........................................ 124
Reading lamp ................................. 124
Interior motion sensor
Deactivating ..................................... 80
Function .......................................... .79
Priming ............................................ 79
Switching off .................................... 79
ISOFIX child seat securing system ....59 J
Jack Storage location ............................3 39
Using ............................................. 369
Jump starting (engine) ......................348 K
Key Changing the battery ....................... 86
Checking the battery ....................... 86
Convenience closing feature ............ 95
Convenience opening feature .......... 95
Display message ............................ 291
Door central locking/unlocking ....... 83
Emergency key element ................... 85
Important safety notes .................... 82
KEYLESS-GO start function .............. 84
Loss ................................................. 87
Modifying the programming ............. 84
Positions (ignition lock) ................. 157
Problem (malfunction) ..................... 87
Starting the engine ........................ 160
Key positions
Start/Stop button .......................... 157
Key positions (ignition lock) ............ 157
KEYLESS-GO
Convenience closing ........................ 95
Deactivation ..................................... 83
Locking ............................................ 83
Unlocking ......................................... 83
Kickdown
Driving tips ................................... .174 12
Index
Page 17 of 417
Mercedes-Benz Service Centre
see Qualified specialist workshop
Message memory (on-board com-
puter) .................................................. 257
Messages
see Display messages
Mirror turn signal
Cleaning ........................................ .332
Mirrors
see Exterior mirrors
see Rear-view mirror
see Vanity mirror (in sun visor)
Mobile phone
Frequencies ................................... 394
Installation ..................................... 394
Menu (on-board computer) ............ 246
Notes/placing in the bracket ......... 318
Transmission output (maximum) .... 394
Mobile telephone
Pre-installed bracket ..................... .319
Modifying the programming (key) ..... 84
MOExtended tyres .............................340
MP3
Operating ....................................... 245
Multifunction display
Function/notes ............................ .241
Permanent display ......................... 251
Multifunction steering wheel
Operating the on-board computer .. 239
Overview .......................................... 32 N
Navigation Menu (on-board computer) ............ 243
Notes on running in a new vehicle .. 156O
Occupant safety Automatic front-passenger front
airbag deactivatio n.......................... 49
Automatic measures after an acci-
dent ................................................. 57
Children in the vehicle ..................... 57
Important safety notes .................... 41
PASSENGER AIRBAG indicator
lamp ................................................. 41 Pets in the vehicle ........................... 69
PRE-SAFE
®
(anticipatory occu-
pant protection) ............................... 56
Restraint system introduction .......... 40
Restraint system warning lamp ........ 41
Seat belts ........................................ 42
Odometer ........................................... 242
On-board computer
AMG menu ..................................... 254
Assistance graphic menu ............... 248
Assistance menu ........................... 247
Audio menu ................................... 245
Convenience submenu .................. 253
Display messages .......................... 257
Displaying a service message ........ 328
DISTRONIC PLUS ........................... 202
Factory settings ............................. 253
Heating submenu ........................... 252
Important safety notes .................. 238
Instrument cluster submenu .......... 250
Light submenu ............................... 251
Menu overview .............................. 241
Message memory .......................... 257
Navigation menu ............................ 243
Operating the TV ............................ 246
Operating video DVD ..................... 245
Operation ....................................... 239
RACETIMER ................................... 254
Service menu ................................. 250
Settings menu ............................... 250
Standard display ............................ 242
Telephone menu ............................ 246
Trip menu ...................................... 242
Vehicle submenu ........................... 251
Opening and closing the side trim
panels ................................................. 128
Operating instructions
Vehicle equipment ........................... 23
Operating safety
Declaration of conformity ................ 23
Operating system
see On-board computer
Outside temperature display ........... 239
Overhead control panel ...................... 38
Override feature
Rear side window s........................... 68 14
Index
Page 19 of 417
Rain closing feature (panorama
sliding sunroof)
................................. 100
Reading lamp ..................................... 124
Rear bench seat
Folding the backrest forwards/
back ............................................... 310
Rear compartment
Setting the air vents ...................... 154
Rear foglamp
Changing bulb s.............................. 128
Display message ............................ 273
Switching on/of f........................... 121
Rear lamps
see Lights
Rear shelf ........................................... 311
Rear window heating
Problem (fault) ............................... 146
Switching on/of f........................... 145
Rear window wiper
Replacing the wiper blad e.............. 132
Switching on/of f........................... 130
Rear-compartment seat belt sta-
tus indicator ........................................ 46
Rear-view mirror
Anti-dazzle mode (automatic) ........ 114
Dipping (manual) ........................... 113
Refuelling
Fuel gaug e....................................... 30
Important safety notes .................. 180
Notes for Mercedes‑ AMG vehi-
cles ................................................ 398
Refuelling process ......................... 181
see Fuel
Remote control
Auxiliary heating/ventilation .......... 149
Changing the batteries (auxiliary
heating) ......................................... 151
Replacing bulbs
Important safety notes .................. 125
Overview of bulb types .................. 126
Removing/replacing the cover
(front wheel arch) .......................... 127
Replacing the battery (auxiliary
heating remote control) .................... 151
Rescue card ......................................... 25
Reserve (fuel tank)
see Fuel Reserve fuel
Display message ............................ 277
Warning lamp ................................. 301
Residual heat (climate control) ........ 147
Restraint system
Display message ............................ 267
Introduction ..................................... 40
Warning lamp ................................. 300
Warning lamp (function) ................... 41
Rev counter ........................................ 239
Reverse gear
Engaging (manual transmission) .... 168
Reverse gear (selector lever) ........... 172
Reversing camera
Cleaning instructions ..................... 333
Displays in the Audio display ......... 218
Displays in the COMAND display ... 218
Function/note s............................. 217
Switching on/of f........................... 218
Reversing feature
Panorama sliding sunroo f................ 99
Side windows ................................... 94
Reversing function
Roller sunblind ............................... 101
Reversing lamp
Changing bulb s.............................. 128
Reversing lamps
Display message ............................ 273
Roller sunblind
Panorama sliding sunroo f.............. 100
Roof carrier ........................................ 313
Roof lining and carpets (cleaning
instructions) ...................................... 335
Roof load (maximum) ........................ 404 S
Safety Children in the vehicle ..................... 57
Safety system
see Driving safety systems
Seat
Adjusting (Performance Seat) ........ 111
Folding the backrest (rear com-
partment) forwards/back .............. 310
Seat belt
Correct usage .................................. 44 16
Index
Page 43 of 417
Useful information
i This Owner's Manual describes all mod-
els, series and optional equipment for your
vehicle that were available at the time of
going to press. National variations are pos- sible. Note that your vehicle may not be
equipped with all of the functions descri-
bed. This is also the case for systems and
functions relevant to safety.
i Read the information on qualified special-
ist workshops: (Y page 24). Panic alarm
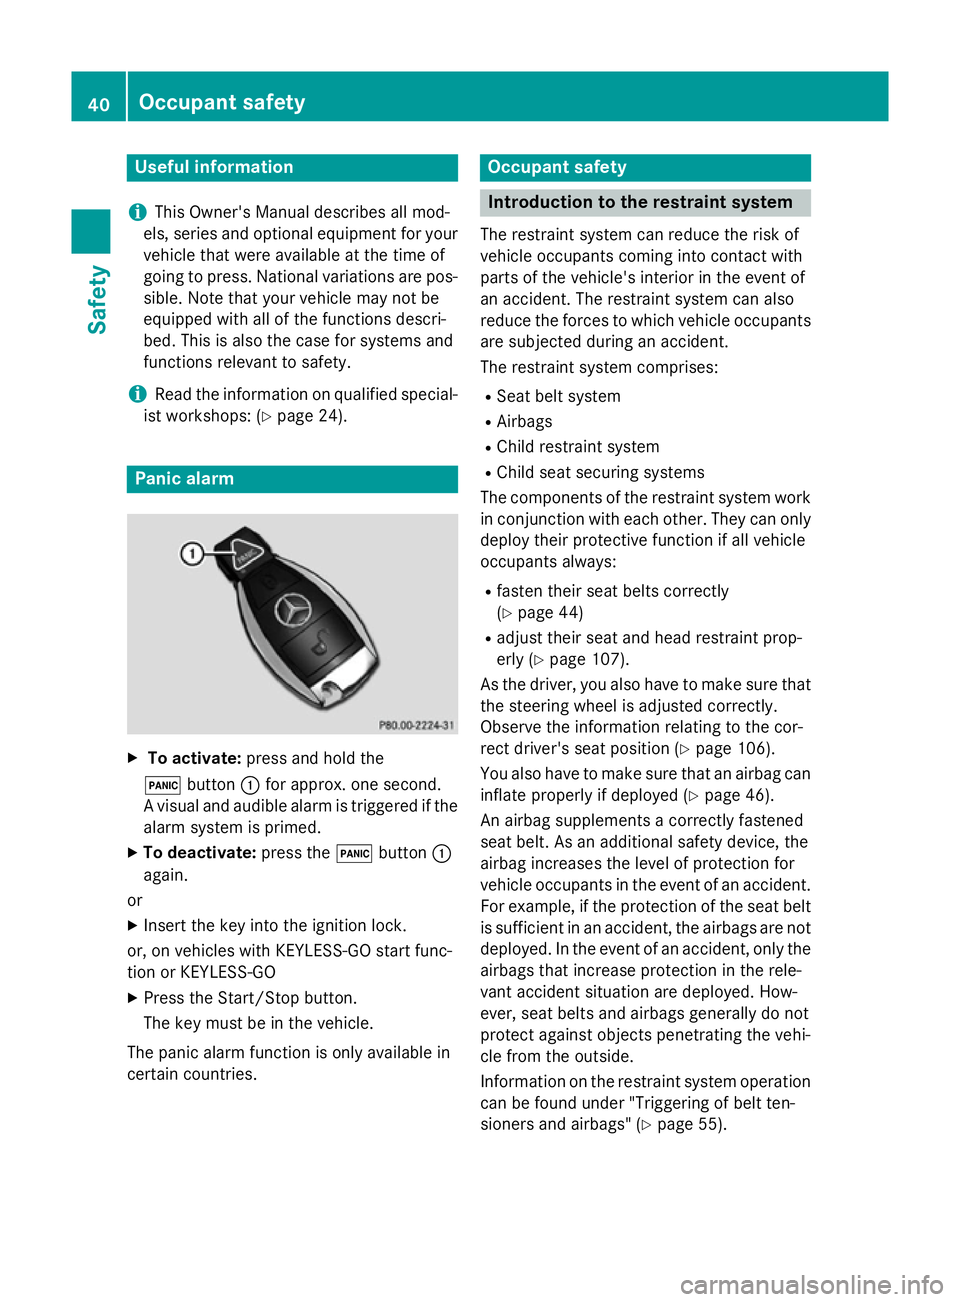
X
To activate: press and hold the
! button :for approx. one second.
A visual and audible alarm is triggered if the alarm system is primed.
X To deactivate: press the!button :
again.
or
X Insert the key into the ignition lock.
or, on vehicles with KEYLESS-GO start func-
tion or KEYLESS ‑GO
X Press the Start/Stop button.
The key must be in the vehicle.
The panic alarm function is only available in
certain countries. Occupant safety
Introduction to the restraint system
The restraint system can reduce the risk of
vehicle occupants coming into contact with
parts of the vehicle's interior in the event of
an accident. The restraint system can also
reduce the forces to which vehicle occupants
are subjected during an accident.
The restraint system comprises:
R Seat belt system
R Airbags
R Child restraint system
R Child seat securing systems
The components of the restraint system work
in conjunction with each other. They can only
deploy their protective function if all vehicle
occupants always:
R fasten their seat belts correctly
(Y page 44)
R adjust their seat and head restraint prop-
erly (Y page 107).
As the driver, you also have to make sure that
the steering wheel is adjusted correctly.
Observe the information relating to the cor-
rect driver's seat position (Y page 106).
You also have to make sure that an airbag can inflate properly if deployed (Y page 46).
An airbag supplements a correctly fastened
seat belt. As an additional safety device, the
airbag increases the level of protection for
vehicle occupants in the event of an accident.
For example, if the protection of the seat belt is sufficient in an accident, the airbags are not
deployed. In the event of an accident, only the airbags that increase protection in the rele-
vant accident situation are deployed. How-
ever, seat belts and airbags generally do not
protect against objects penetrating the vehi-
cle from the outside.
Information on the restraint system operation
can be found under "Triggering of belt ten-
sioners and airbags" (Y page 55).40
Occupant safetySafety
Page 45 of 417
Depending on the person in the front-
passenger seat, the front-passenger front air-
bag must either be disabled or enabled; see
the following points. You must make sure of
this both before and during a journey.
R Children in a rearward-facing child
restraint system: the PASSENGER AIR
BAG OFF indicator lamp must be lit. The
front-passenger front airbag is disabled. It
is imperative to observe the notes on the
"Automatic front-passenger front airbag
deactivation system" (Y page 49) and on
"Children in the vehicle" (Y page 57).
R Children in a forward-facing child
restraint system: depending on the instal-
led child restraint system and the age and
size of the child, the front-passenger front
airbag is either disabled or enabled. There-
fore, it is imperative to observe the notes
on the "Automatic front-passenger front
airbag deactivation system" (Y page 49)
and on "Children in the vehicle"
(Y page 57).
R All other persons: the PASSENGER AIR
BAG ON indicator lamp must be lit. The
front-passenger front airbag is enabled.
Depending on the build of the person on the
front-passenger seat, the PASSENGER AIR
BAG OFF indicator lamp may light up. The
front-passenger front airbag is disabled. It
will then not be deployed in the event of an accident. In this case, the front-passenger
seat should not be used.
It is imperative to observe the notes on the
"Automatic front-passenger front airbag
deactivation system" (Y page 49) as well
as on "Seat belts" (Y page 42) and "Air-
bags" (Y page 46). There you can also find
information on the correct seat position. Seat belts
Introduction A correctly worn seat belt is the most effec-
tive means of restraining the movement of vehicle occupants in the event of a collision or
if the vehicle overturns. This reduces the risk of vehicle occupants coming into contact with
parts of the vehicle interior or being ejected
from it. The seat belt also helps to keep the
vehicle occupants in the best position in rela-
tion to the airbag being deployed.
The seat belt system consists of:
R seat belts
R belt tensioners for the front seat belts and
the outer seat belts in the rear
R belt force limiters for the front seat belts
and the outer seat belts in the rear
If the seat belt is pulled quickly or sharply
from the belt outlet, the inertia reel locks. The belt strap cannot be pulled out any further.
The belt tensioner tightens the seat belt in the
event of a collision so that it fits tightly across
your body. However, it does not pull the vehi- cle occupants back in the direction of the seat
backrest.
The belt tensioner does not, however, correct an incorrect seat position or correct the rout-
ing of a seat belt that is worn incorrectly.
When triggered, seat belt force limiters help
to reduce the peak force exerted by the seat
belt on the vehicle occupant.
The belt force limiters on the front seats are
synchronised with the front airbags, which
take on a part of the deceleration force. This
can reduce the forces to which the vehicle
occupants are subjected during an accident.
! If the co-driver's seat is not occupied, do
not engage the seat belt tongue in the
buckle on the co-driver's seat. Otherwise,
the belt tensioner could be triggered in the
event of an accident and would have to be
replaced.
Important safety notes G
WARNING
The seat belt cannot perform its intended pro- tective function if it is not fastened correctly. Also, an improperly fastened seat belt can 42
Occupant safetySafety
Page 46 of 417
cause additional injuries in the event of an
accident, sudden braking or abrupt changes
of direction. There is an increased risk of
injury, possibly even fatal.
Always make sure that all vehicle occupants
are wearing their seat belt properly and are
seated correctly. G
WARNING
The seat belt does not offer the intended level of protection if you have not moved the back-
rest to an almost vertical position. When brak-
ing or in the event of an accident, you could
slide underneath the seat belt and sustain
abdomen or neck injuries, for example. This
poses an increased risk of injury or even fatal injury.
Adjust the seat properly before beginning
your journey. Always ensure that the backrest
is in an almost vertical position and that the
shoulder section of your seatbelt is routed
across the centre of your shoulder. G
WARNING
Persons under 1.50 mtall cannot wear the
seat belts correctly without a suitable, addi-
tional restraint system. The seat belt cannot
perform its intended protective function if it is not fastened correctly. Also, an improperly
fastened seat belt can cause additional inju-
ries in the event of an accident, sudden brak-
ing or abrupt changes of direction. There is an increased risk of injury, possibly even fatal.
Secure persons less than 1.50 mtall in a suit-
able restraint system.
If a child younger than twelve years old and
under 1.50 m in height is travelling in the
vehicle:
R always secure the child in a child restraint
system suitable for this Mercedes-Benz
vehicle. The child restraint system must be appropriate to the age, weight and size of
the child.
R always observe the instructions and safety
notes on the automatic front-passenger front airbag deactivation system
(Y
page 49)
R always observe the instructions and safety
notes on "Children in the vehicle" in this
Owner's Manual (Y page 57) in addition
to the child restraint system manufactur-
er's installation instructions G
WARNING
Seat belts cannot protect as intended, if:
R they are damaged, have been modified, are
extremely dirty, bleached or dyed
R the seat belt buckle is damaged or
extremely dirty
R modifications have been made to the belt
tensioners, belt anchorages or inertia reels
Seat belts may sustain non-visible damage in an accident, e.g. due to glass splinters. Modi-
fied or damaged seat belts can tear or fail, for example in the event of an accident. Modified
seat belt tensioners may be deployed unin-
tentionally or fail to be deployed when
required. There is an increased risk of injury,
possibly even fatal.
Never modify safety belts, seat belt tension-
ers, seat belt anchorages and inertia reels.
Ensure that seat belts are not damaged or
worn and are clean. After an accident, have
the seat belts checked immediately at a quali- fied specialist workshop.
Mercedes-Benz recommends that you only
use seat belts which have been approved
specifically for your vehicle by Mercedes-
Benz. Otherwise, your vehicle's general oper- ating permit could be invalidated.
Sports seat or AMG Performance seat: this
seat is designed for the standard three-point
seat belt. If you fit another multipoint seat
belt, e.g. sport or racing seat belts, the
restraint system cannot provide the best level of protection. G
WARNING
If you feed seat belts through the opening in
the seat backrest, the seat backrest may be
damaged or may even break in the event of an Occupant safety
43Safety
Z
Page 47 of 417
accident. This poses an increased risk of
injury or even fatal injury.
Only use the standard three-point seat belt.
Never modify the seat belt system.
Correct seat belt use Observe the safety notes on the seat belt
(Y page 42).
All vehicle occupants must be wearing the
seat belt correctly before beginning the jour-
ney. Also make sure that all vehicle occu-
pants are always wearing the seat belt cor-
rectly while the vehicle is in motion.
When fastening the seat belt, always make
sure that:
R the seat belt tongue is only inserted into the
belt buckle belonging to that seat
R the seat belt is tight across your body
Avoid wearing bulky clothing, e.g. a winter
coat.
R the seat belt is not twisted
Only then can forces which occur be dis-
tributed across the surface of the seat belt.
R the shoulder section of the belt is always
routed across the centre of your shoulder
The shoulder section of the seat belt should
not touch your neck nor be routed under
your arm. If possible, adjust the seat belt to
the appropriate height.
R the lap belt passes across your lap as
tightly and as low down as possible
The lap belt must always be routed across
your hip joints and never across your abdo-
men. This applies particularly to pregnant
women. If necessary, press the lap belt
down into your hip joints and pull tight with the shoulder section of the belt.
R the seat belt is not routed across sharp,
pointed or fragile objects
If you have such items located on or in your
clothing, e.g. pens, keys or spectacles,
store these in a suitable place.
R only one person is using a seat belt Infants and children must never travel sit-
ting on the lap of a vehicle occupant. In the
event of an accident, they could be crushed
between the vehicle occupant and seat
belt.
R objects are never secured with a seat belt if
the seat belt is also being used by one of the
vehicle's occupants
Also ensure that no objects are placed
between a person and the seat. e.g. a cush- ion.
Seat belts are only intended to secure and
restrain vehicle occupants. Always observe
the "Loading guidelines" for securing objects,
luggage or loads (Y page 306).
Fastening and adjusting the seat belts Observe the safety notes on the seat belt
(Y
page 42) and the information on the cor-
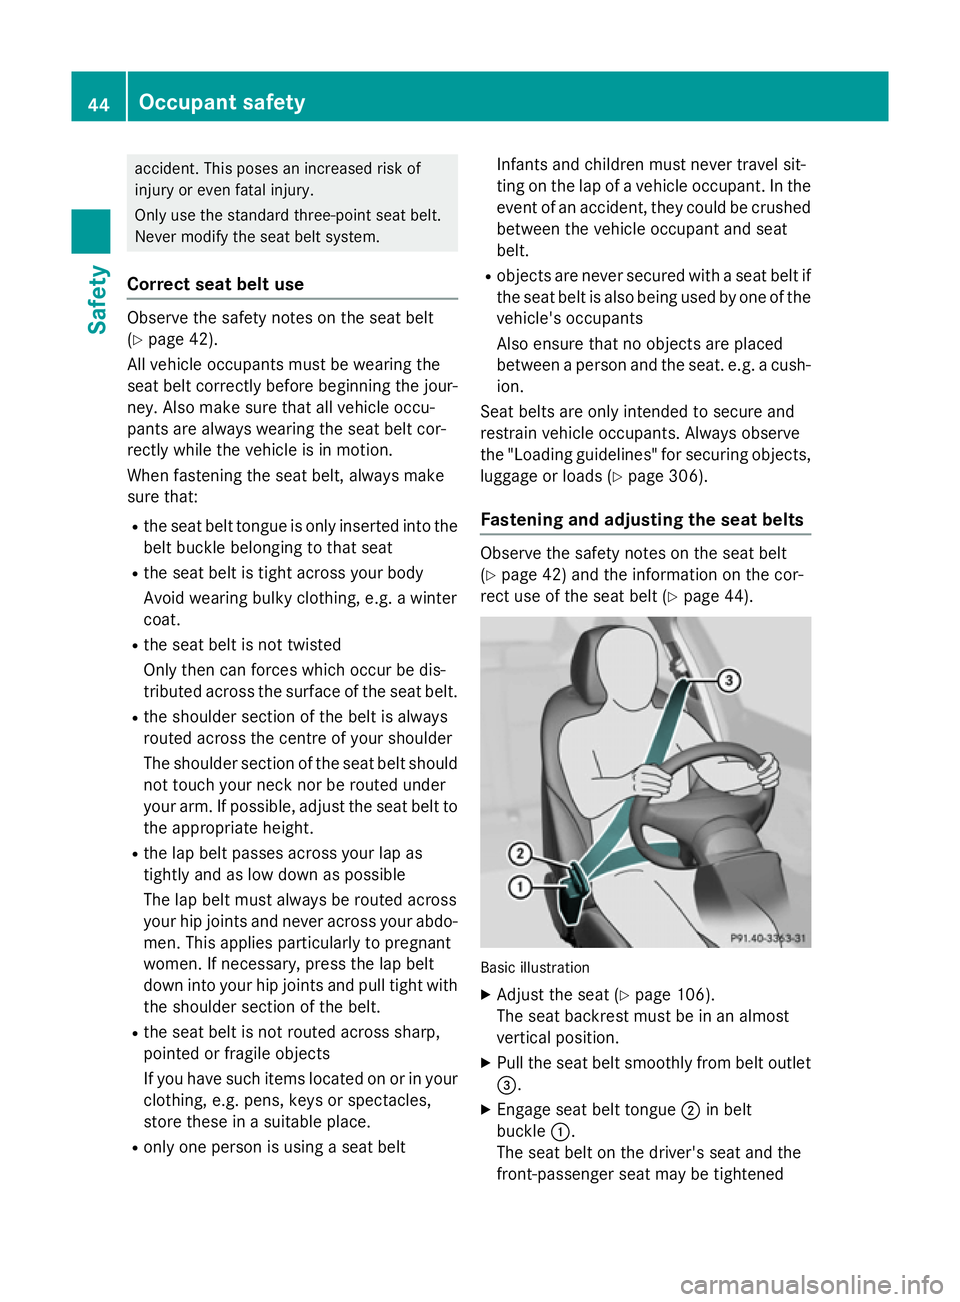
rect use of the seat belt (Y page 44). Basic illustration
X Adjust the seat (Y page 106).
The seat backrest must be in an almost
vertical position.
X Pull the seat belt smoothly from belt outlet
=.
X Engage seat belt tongue ;in belt
buckle :.
The seat belt on the driver's seat and the
front-passenger seat may be tightened 44
Occupant safetySafety
Page 50 of 417
the door or side window. You may other-
wise be in the deployment area of the air-
bags.
R Always keep your feet in the footwell in
front of the seat. Do not put your feet on the
dashboard, for example. Your feet may oth-
erwise be in the deployment area of the
airbag.
R Always secure persons less than 1.50 mtall
in suitable restraint systems. Up to this
height, the seat belt cannot be worn cor-
rectly.
If a child is travelling in your vehicle, also
observe the following notes:
R Always secure children under twelve years
of age and less than 1.50 mtall in suitable
child restraint systems.
R Child restraint systems should be fitted to
the rear seats.
R Only secure a child to the front-passenger
seat when the front-passenger front airbag
is disabled, and only then in a rearward-
facing child restraint system. If the
PASSENGER AIR BAG OFF indicator lamp is
permanently lit, the front-passenger front
airbag is disabled (Y page 41).
R Always observe the instructions and safety
notes on the automatic front-passenger
front airbag deactivation system
(Y page 49) and on "Children in the vehi-
cle" (Y page 57) in addition to the child
restraint system manufacturer's installa-
tion instructions.
Objects in the vehicle interior may pre-
vent the airbag from functioning cor-
rectly. Before starting your journey and to
avoid risks resulting from the speed of the
airbag as it deploys, make sure that:
R there are no people, animals or objects
between the vehicle occupants and an air-
bag.
R there are no objects between the seat, door
and B-pillar.
R no hard objects, e.g. coat hangers, are
hanging on the grab handles or coat hooks. R
no accessories, such as cup holders, are
attached to the vehicle within the deploy-
ment area of an airbag, e.g. to doors, side
windows, rear side trim or side walls.
R no heavy, sharp-edged or fragile objects
are in the pockets of your clothing. Store
such objects in a suitable place. G
WARNING
If you modify an airbag cover or affix objects
such as stickers to it, the airbag can no longer function correctly. There is an increased risk
of injury.
Never modify an airbag cover or affix objects
to it. G
WARNING
Sensors to control the airbags are located in
the doors. Modifications or work not per-
formed correctly to the doors or door panel-
ling, as well as damaged doors, can lead to the function of the sensors being impaired. The
airbags might therefore not function properly any more. Consequently, the airbags cannot
protect vehicle occupants as they are
designed to do. This poses an increased risk
of injury.
Never modify the doors or parts of the doors.
Always have work on the doors or door pan-
elling carried out at a qualified specialist
workshop.
Front airbags !
Do not place heavy objects on the front-
passenger seat. This could cause the sys-
tem to identify the seat as being occupied.
In the event of an accident, the restraint
systems on the front-passenger side may
be triggered and have to be replaced. Occupant safety
47Safety Z
Page 52 of 417
In the event of a side impact, the sidebag is
deployed on the side on which the impact
occurs.
Vehicles with the automatic front-passenger
airbag deactivation system: the sidebag on
the front-passenger side deploys under the
following conditions:
R an occupant is detected on the front-
passenger seat or
R the belt tongue is engaged in the belt
buckle of the front-passenger seat
If the belt tongue is engaged in the belt
buckle, the sidebag on the front-passenger
side deploys if an appropriate accident situa- tion occurs. In this case, deployment is inde- pendent of whether the front-passenger seat
is occupied or not.
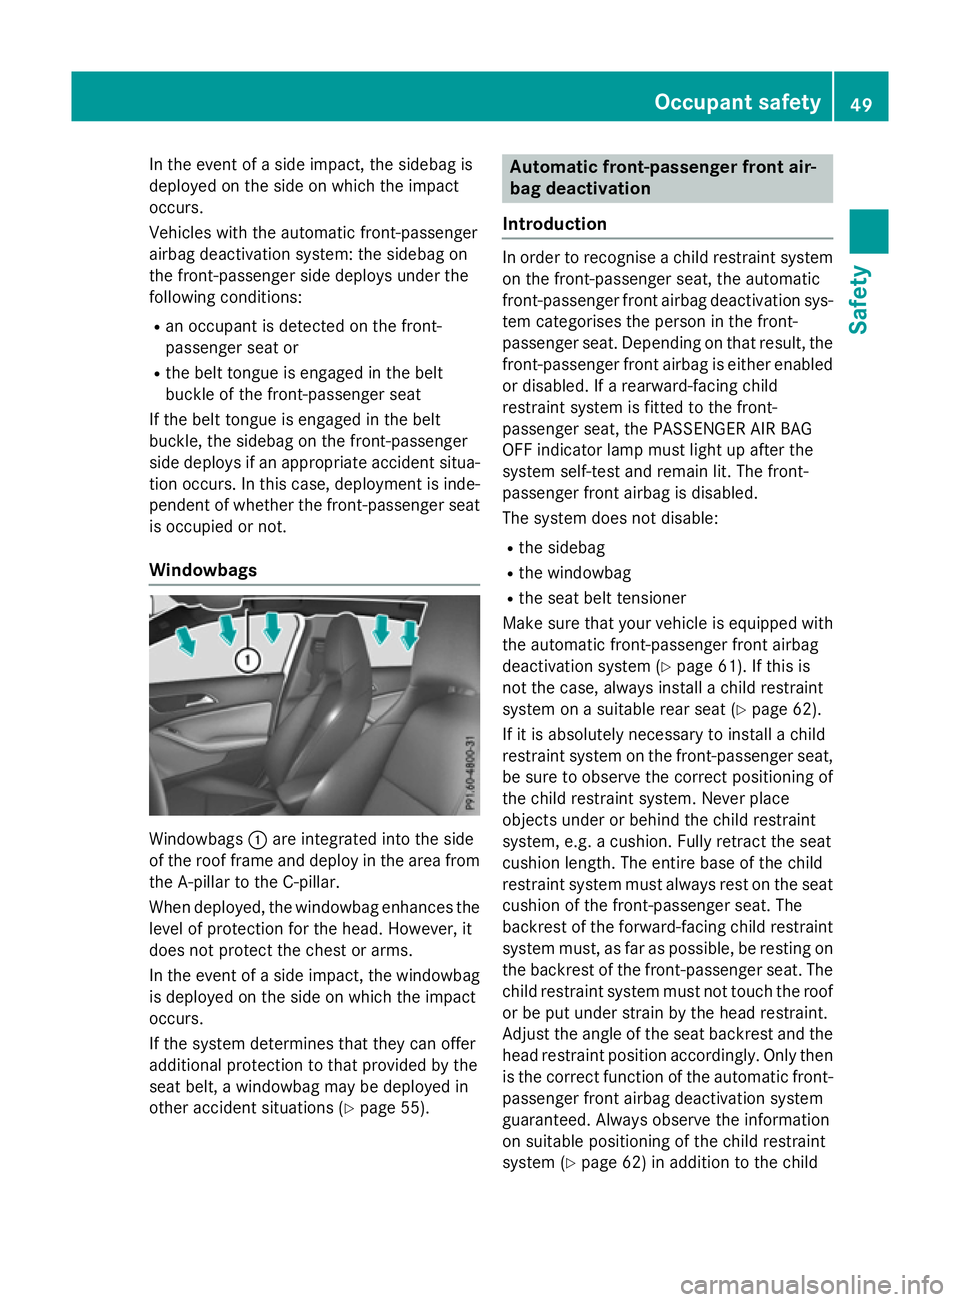
Windowbags Windowbags
:are integrated into the side
of the roof frame and deploy in the area from
the A-pillar to the C-pillar.
When deployed, the windowbag enhances the level of protection for the head. However, it
does not protect the chest or arms.
In the event of a side impact, the windowbag
is deployed on the side on which the impact
occurs.
If the system determines that they can offer
additional protection to that provided by the
seat belt, a windowbag may be deployed in
other accident situations (Y page 55). Automatic front-passenger front air-
bag deactivation
Introduction In order to recognise a child restraint system
on the front-passenger seat, the automatic
front-passenger front airbag deactivation sys- tem categorises the person in the front-
passenger seat. Depending on that result, the
front-passenger front airbag is either enabled or disabled. If a rearward-facing child
restraint system is fitted to the front-
passenger seat, the PASSENGER AIR BAG
OFF indicator lamp must light up after the
system self-test and remain lit. The front-
passenger front airbag is disabled.
The system does not disable:
R the sidebag
R the windowbag
R the seat belt tensioner
Make sure that your vehicle is equipped with
the automatic front-passenger front airbag
deactivation system (Y page 61). If this is
not the case, always install a child restraint
system on a suitable rear seat (Y page 62).
If it is absolutely necessary to install a child
restraint system on the front-passenger seat,
be sure to observe the correct positioning of
the child restraint system. Never place
objects under or behind the child restraint
system, e.g. a cushion. Fully retract the seat
cushion length. The entire base of the child
restraint system must always rest on the seat
cushion of the front-passenger seat. The
backrest of the forward-facing child restraint system must, as far as possible, be resting onthe backrest of the front-passenger seat. The
child restraint system must not touch the roof or be put under strain by the head restraint.
Adjust the angle of the seat backrest and the
head restraint position accordingly. Only then is the correct function of the automatic front- passenger front airbag deactivation system
guaranteed. Always observe the information
on suitable positioning of the child restraint
system (Y page 62) in addition to the child Occupant safety
49Safety Z