child seat MERCEDES-BENZ A-CLASS HATCHBACK 2018 Owner's Manual
[x] Cancel search | Manufacturer: MERCEDES-BENZ, Model Year: 2018, Model line: A-CLASS HATCHBACK, Model: MERCEDES-BENZ A-CLASS HATCHBACK 2018Pages: 609, PDF Size: 10.73 MB
Page 59 of 609
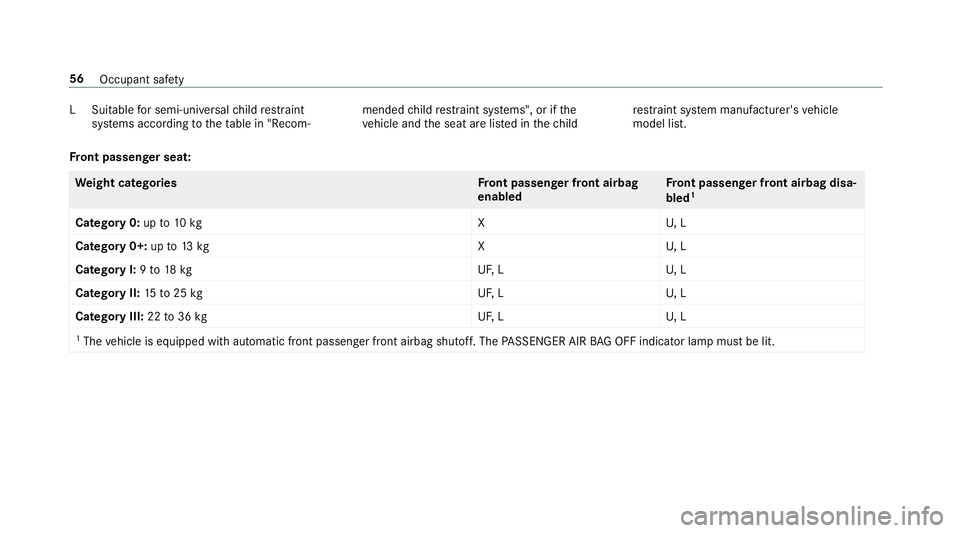
LS
uitable for semi-universal child restra int
sy stems according totheta ble in "Recom‐ mended
child restra int sy stems", or if the
ve hicle and the seat are lis ted in thech ild re
stra int sy stem manufacturer's vehicle
model list.
Fr ont passenger seat: We
ight categories Front passenger front airbag
enabled Fr
ont passenger front airbag disa‐
bled 1
Category 0: upto10 kg XU, L
Category 0+: upto13 kg XU, L
Category I: 9to 18 kg UF,LU , L
Category II: 15to25 kg UF,LU , L
Category III: 22to36 kg UF,LU , L
1 The vehicle is equipped with automatic front passenger front airbag shutoff. The PASSENGER AIR BAG OFF indicator lamp must be lit. 56
Occupant saf ety
Page 60 of 609
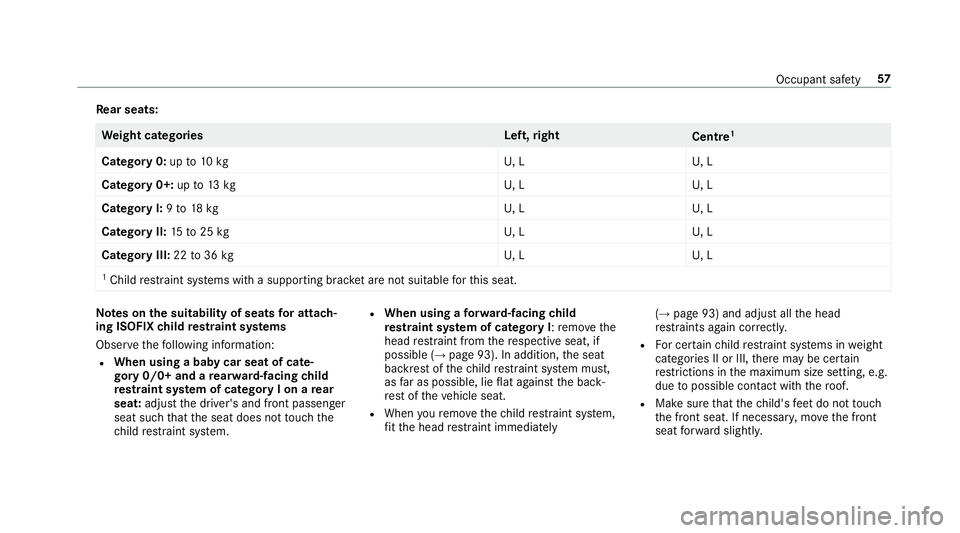
Re
ar seats: We
ight categories Left,right
Centre1
Category 0: upto10 kg U,LU , L
Category 0+: upto13 kg U,LU , L
Category I: 9to 18 kg U,LU , L
Category II: 15to25 kg U,LU , L
Category III: 22to36 kg U,LU , L
1 Child restra int sy stems with a supporting brac ket are not suitable forth is seat. Note
s onthe suitability of seats for attach‐
ing ISOFIX child restra int sy stems
Obser vethefo llowing information:
R When using a baby car seat of cate‐
gory 0/0+ and a rear wa rd-facing child
re stra int sy stem of category I on a rear
seat: adjustthe driver's and front passenger
seat such that the seat does not touch the
ch ild restra int sy stem. R
When using a forw ard-facing child
re stra int sy stem of category I: remo vethe
head restra int from there spective seat, if
possible (→ page 93). In addition, the seat
backrest of thech ild restra int sy stem must,
as far as possible, lie flat against the back‐
re st of theve hicle seat.
R When youre mo vethech ild restra int sy stem,
fi t th e head restra int immediately (→
page 93) and adjust all the head
re stra ints again cor rectl y.
R For cer tain child restra int sy stems in weight
categories II or III, there may be cer tain
re strictions in the maximum size setting, e.g.
due topossible con tact wi th thero of.
R Make sure that thech ild's feet do not touch
th e front seat. If necessar y,mo vethe front
seat forw ard slightl y. Occupant saf
ety57
Page 61 of 609
R
The child restra int sy stem must not touch the
ro of or be put under stra in by the head
re stra ints. Adjust the head restra ints accord‐
ing ly.
R Obser vethe manufacturer's ins tallation
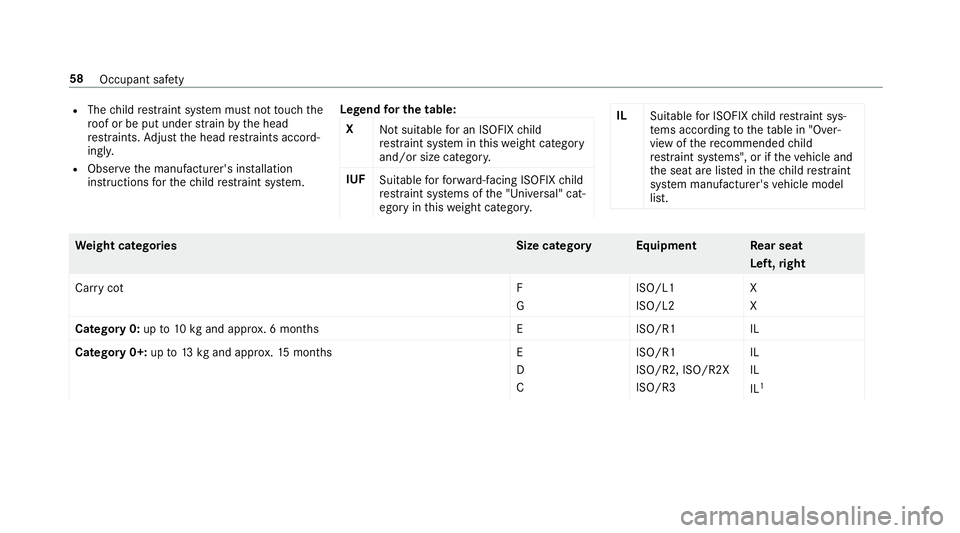
instructions forth ech ild restra int sy stem. Legend
for the table:
X Not suitable for an ISOFIX child
re stra int sy stem in this we ight category
and/or size categor y.
IUF Suitable forfo rw ard-facing ISOFIX child
re stra int sy stems of the "Universal" cat‐
egory in this we ight categor y. IL
Suitable for ISOFIX child restra int sys‐
te ms according totheta ble in "Over‐
view of there commended child
re stra int sy stems", or if theve hicle and
th e seat are lis ted in thech ild restra int
sy stem manufacturer's vehicle model
list. We
ight categories Size categoryEquipment Rear seat
Left ,ri ght
Car rycotF
GISO/L1
ISO/L2X
X
Category 0:up to10 kgand appr ox. 6 months EISO/R1I L
Category 0+: upto13 kgand appr ox.15 months E
D
CISO/R1
ISO/R2, ISO/R2X
ISO/R3IL
IL
IL
1 58
Occupant saf ety
Page 62 of 609
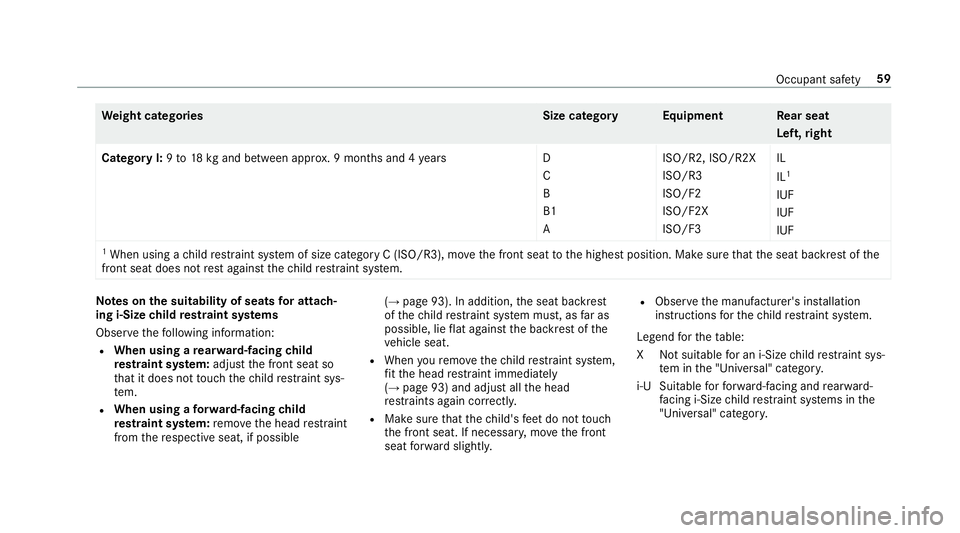
We
ight categories Size categoryEquipment Rear seat
Left ,ri ght
Category I: 9to 18 kgand between appr ox. 9 months and 4 yearsD
C
B
B1
A ISO/R2, ISO/R2X
ISO/R3
ISO/F2
ISO/F2X
ISO/F3IL
IL
1
IUF
IUF
IUF
1 When using a child restra int sy stem of size category C (ISO/R3), mo vethe front seat tothe highest position. Make sure that the seat backrest of the
front seat does not rest against thech ild restra int sy stem. Note
s onthe suitability of seats for attach‐
ing i‑Size child restra int sy stems
Obser vethefo llowing information:
R When using a rear wa rd-facing child
re stra int sy stem: adjust the front seat so
th at it does not touch thech ild restra int sys‐
te m.
R When using a forw ard-facing child
re stra int sy stem: remo vethe head restra int
from there spective seat, if possible (→
page 93). In addition, the seat backrest
of thech ild restra int sy stem must, as far as
possible, lie flat against the backrest of the
ve hicle seat.
R When youre mo vethech ild restra int sy stem,
fi t th e head restra int immediately
(→ page 93) and adjust all the head
re stra ints again cor rectly.
R Makesure that thech ild's feet do not touch
th e front seat. If necessar y,mo vethe front
seat forw ard slightl y. R
Obser vethe manufacturer's ins tallation
instructions forth ech ild restra int sy stem.
Legend forth eta ble:
XN otsuitable for an i-Size child restra int sys‐
te m in the "Universal" categor y.
i‑U Suitable forfo rw ard-facing and rear wa rd-
fa cing i-Size child restra int sy stems in the
"Universal" categor y. Occupant saf
ety59
Page 63 of 609
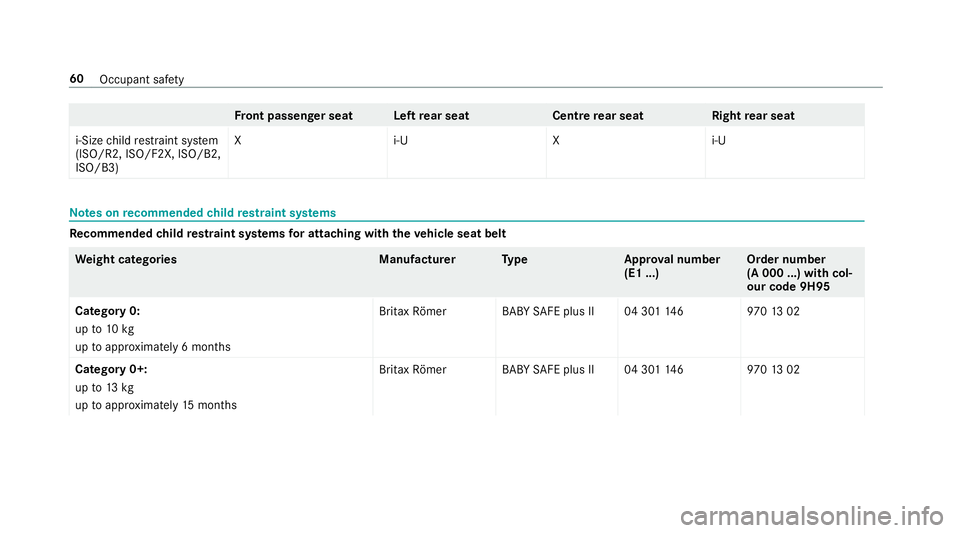
Fr
ont passenger seat Left rear seat Centrerear seat Rightrear seat
i-Size child restra int sy stem
(ISO/R2, ISO/F2X, ISO/B2,
ISO/B3) Xi
‑UXi ‑UNote
s onrecommended child restra int sy stems Re
commended child restra int sy stems for attaching with the vehicle seat belt We
ight categories Manufactu rerT ype Approval number
(E1 ...) Order number
(A 000 ...) with
col‐
our code 9H95
Category 0:
up to10 kg
up toappr oximately 6 mon ths Britax
Römer BABY SAFE plus II 04 301 1469 701302
Catego ry0+:
up to13 kg
up toappr oximately 15months Britax
Römer BABY SAFE plus II 04 301 1469 701302 60
Occupant saf ety
Page 92 of 609
Seats
Ad
justing the front seat mechanically (with‐
out Seat Comfort Package) &
WARNING Risk of becoming trapped if
th e seats are adjus tedby children
Children could become trapped if they adjust
th e seats, particularly when unattended. #
When leaving theve hicle, alw aysta ke
th eke y with you and lock theve hicle.
This also applies tothe digital vehicle
ke y if the "Digital Vehicle Key" function
is activated via Mercedes me connect. #
Never lea vechildren unat tended in the
ve hicle. &
WARNING Risk of becoming trapped
when adjusting the seats
When you adjust a seat, you or other vehicle
occupants could become trapped, e.g. on the
seat guide rail. #
When adjusting a seat, make sure that
no one has any body parts in the sweep
of the seat. Obser
vethe saf ety no tes on "Airbags" and "Chil‐
dren in theve hicle". &
WARNING Risk of accident due tothe
driver's seat not being engaged
If th e driver's seat is not engaged, it could
mo veunexpectedly while theve hicle is in
motion.
This could cause youto lose control of the
ve hicle. #
Alw ays make sure that the driver's seat
is engaged before starting theve hicle. &
WARNING Risk of inju rythro ugh adjust‐
ing vehicle settings while theve hicle is in
motion
Yo u could lose cont rol of theve hicle in the
fo llowing situations:
R ifyo u adjust the driver's seat, the head
re stra ints, thesteering wheel or the mir‐
ro r while theve hicle is in motion
R ifyo ufast enyour seat belt while theve hi‐
cle is in motion #
Before starting the engine: adjust the
driver's seat, the head restra ints, the
st eering wheel or the mir ror and fasten
yo ur seat belt. &
WARNING Risk of becoming trapped if
th e seat height is adjus ted carelessly
If yo u adjust the seat height carelessly, you
or other vehicle occupants could be trapped
and thereby injured. Seats and
stowing 89
Page 93 of 609
Children in particular could acciden
tally
press the electrical seat adjustment buttons
and become trapped. #
While moving the seats, make sure that
hands or other body parts do not get
under the le ver assembly of the seat
adjustment sy stem. &
WARNING Risk of inju rydue tohead
re stra ints which are not fitted or are
adjus ted incor rectly
If head restra ints are not fitted or are adjus‐
te d incor rectl y,they cannot pr ovide pr otec‐
tion as intended.
There is an increased risk of injury in the
head and neck area, e.g. in theeve nt of an
accident or when braking. #
Alw ays drive with the head restra ints
fi tted. #
Before driving off, ma kesure forev ery
ve hicle occupant that the cent reofthe
head restra int supports the back of the
head at about eye le vel. Do not inter
change the head restra ints of the
front and rear seats. Otherwise, you will not be
able toadjust the height and angle of the head
re stra ints cor rectl y.
Ad just the head restra int fore -and-aft position so
th at it is as close as possible tothe back of your
head. &
WARNING Risk of inju ryor death due to
incor rect seat position
The seat belt does not of ferth e intended
le ve l of pr otection if you ha venot mo vedthe
seat backrest toan almost vertical position.
When braking or in theeve nt of an accident,
yo u could slide underneath the seat belt and
sus tain abdominal or neck injuries, forex am‐
ple. #
Adjust the seat proper lybefore begin‐
ning your journe y. #
Alw ays ensure that the seat backrest is
in an almost vertical position and that
th e shoulder section of your seat belt is
ro uted across the cent reofyour shoul‐
der. #
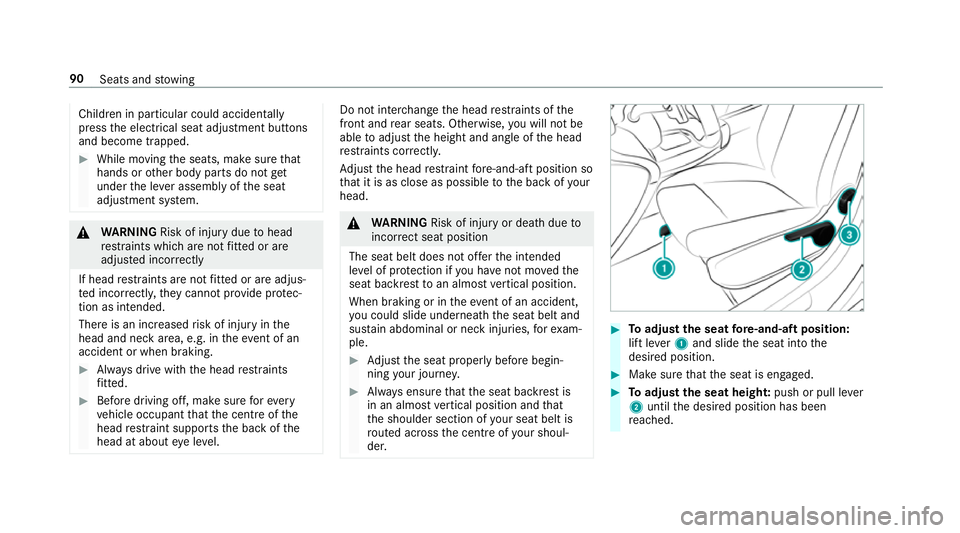
Toadjust the seat fore -and-aft position:
lift le ver1 and slide the seat into the
desired position. #
Make sure that the seat is engaged. #
Toadjust the seat heigh t:push or pull le ver
2 until the desired position has been
re ached. 90
Seats and stowing
Page 99 of 609
To
protect against overheating, the seat heating
may be temp orarily deactivated af ter it is
switched on repeatedly.
* NO
TEDama getothe seats caused by
objects or documents when the seat
heater is switched on When
the seat heater is switched on, over‐
heating can occur due toobjects or docu‐
ments placed on the seats e.g. seat cushions
or child seats. This could cause damage to
th e seat sur face. #
Makesure that no objects or docu‐
ments are on the seats when the seat
heater is switched on. Re
quirements:
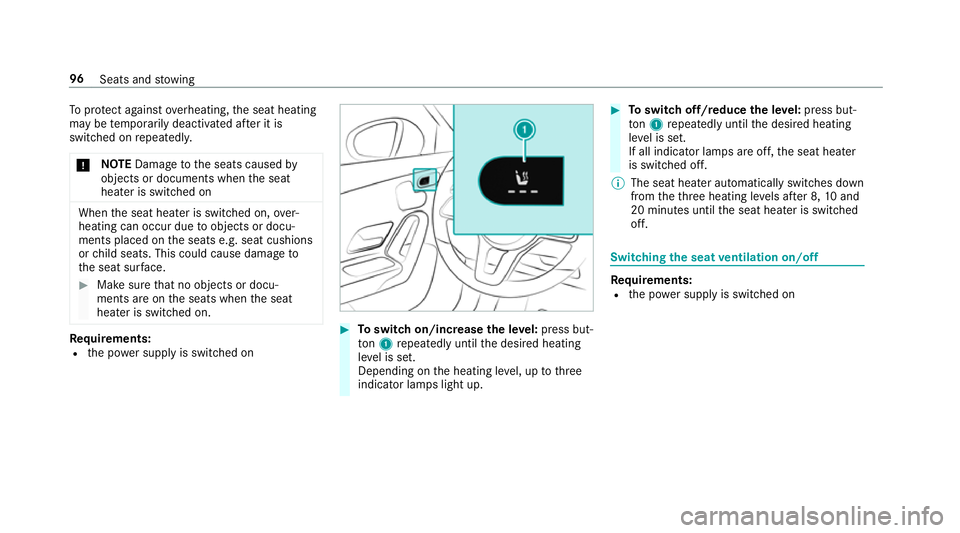
R the po wer supp lyis switched on #
Toswitch on/increase the le vel:press but‐
to n1 repeatedly until the desired heating
le ve l is set.
Depending on the heating le vel, up tothree
indicator lamps light up. #
Toswitch off/reduce the le vel:press but‐
to n1 repeatedly until the desired heating
le ve l is set.
If all indicator lamps are off, the seat heater
is switched off.
% The seat heater automatically switches down
from theth re e heating le vels af ter 8, 10and
20 minutes until the seat heater is switched
off. Switching
the seat ventilation on/off Re
quirements:
R the po wer supp lyis switched on 96
Seats and stowing
Page 100 of 609
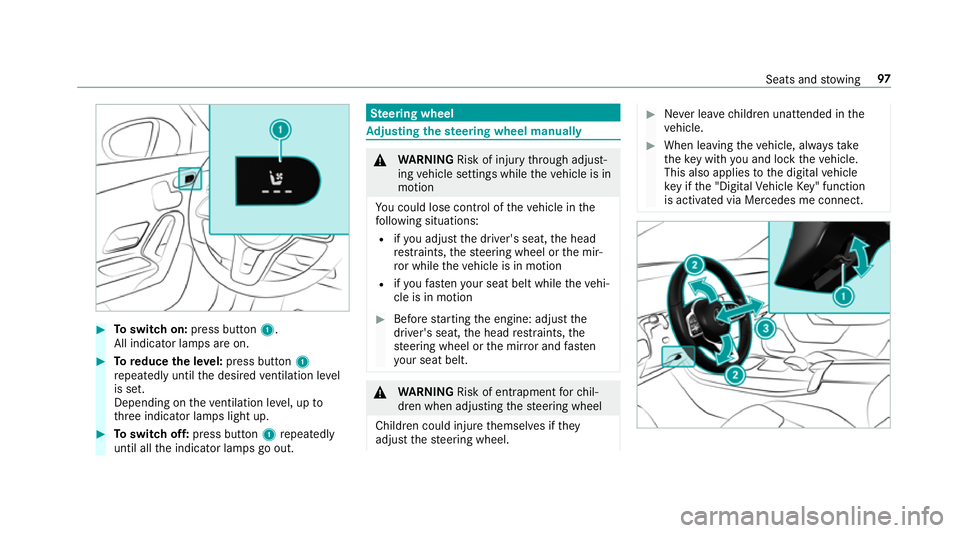
#
Toswitch on: press button 1.
All indicator lamps are on. #
Toreduce the le vel:press button 1
re peatedly until the desired ventilation le vel
is set.
Depending on theve ntilation le vel, up to
th re e indicator lamps light up. #
Toswitch off: press button 1repeatedly
until all the indicator lamps go out. Ste
ering wheel Ad
justing the steering wheel manually &
WARNING Risk of inju rythro ugh adjust‐
ing vehicle settings while theve hicle is in
motion
Yo u could lose cont rol of theve hicle in the
fo llowing situations:
R ifyo u adjust the driver's seat, the head
re stra ints, thesteering wheel or the mir‐
ro r while theve hicle is in motion
R ifyo ufast enyour seat belt while theve hi‐
cle is in motion #
Before starting the engine: adjust the
driver's seat, the head restra ints, the
st eering wheel or the mir ror and fasten
yo ur seat belt. &
WARNING Risk of entrapment forch il‐
dren when adjusting thesteering wheel
Children could injure themselves if they
adjust thesteering wheel. #
Never lea vechildren unat tended in the
ve hicle. #
When leaving theve hicle, alw aysta ke
th eke y with you and lock theve hicle.
This also applies tothe digital vehicle
ke y if the "Digital Vehicle Key" function
is activated via Mercedes me connect. Seats and
stowing 97
Page 101 of 609
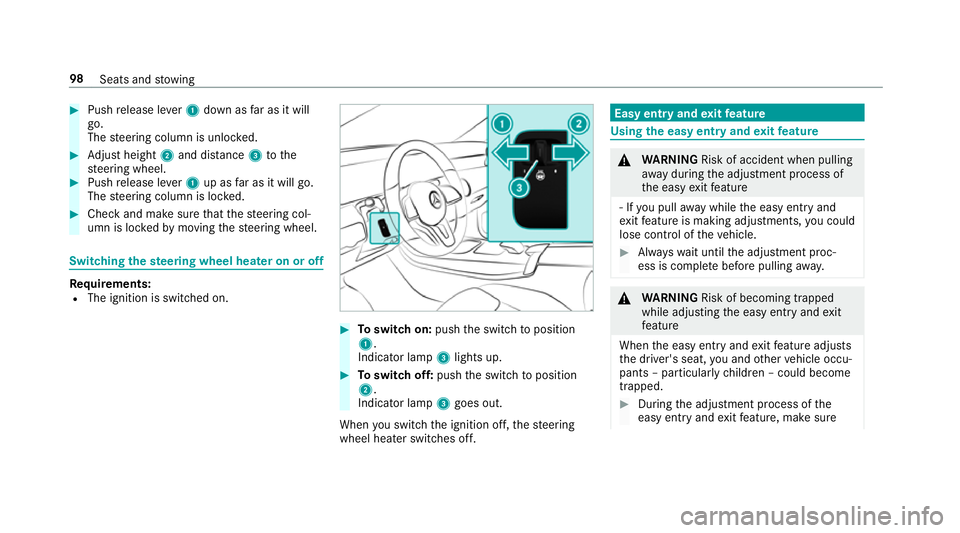
#
Push release le ver1 down as far as it will
go.
The steering column is unloc ked. #
Adjust height 2and di stance 3tothe
st eering wheel. #
Push release le ver1 up as far as it will go.
The steering column is loc ked. #
Check and make sure that thesteering col‐
umn is loc kedby moving thesteering wheel. Switching
thest eering wheel heater on or off Re
quirements:
R The ignition is switched on. #
Toswitch on: pushthe switch toposition
1.
Indicator lamp 3lights up. #
Toswitch off: pushthe switch toposition
2.
Indicator lamp 3goes out.
When you swit ch the ignition off, thesteering
wheel heater switches off. Easy entry and
exitfeature Using
the easy entry and exitfeature &
WARNING Risk of accident when pulling
aw ay during the adjustment process of
th e easy exitfeature
‑ If you pull away while the easy entry and
ex itfeature is making adjustments, you could
lose cont rol of theve hicle. #
Alw ayswa it until the adjustment proc‐
ess is comple tebefore pulling away. &
WARNING Risk of becoming trapped
while adjusting the easy entry andexit
fe ature
When the easy entry andexitfeature adjusts
th e driver's seat, you and other vehicle occu‐
pants – particularly children – could become
trapped. #
During the adjustment process of the
easy entry andexitfeature, make sure 98
Seats and stowing