door lock MERCEDES-BENZ AMG GT COUPE 2018 Owner's Guide
[x] Cancel search | Manufacturer: MERCEDES-BENZ, Model Year: 2018, Model line: AMG GT COUPE, Model: MERCEDES-BENZ AMG GT COUPE 2018Pages: 294, PDF Size: 4.76 MB
Page 226 of 294
The vehicle can be immediately remotely locked
within four days of the ignition being turned off.
After this time, remote closing may be delayed
by 15 to 60 minutes. After 30 days the vehicle
can no longer be locked remotely.
The vehicle remote closing feature is available if
the relevant mobile phone network is available
and a data connection is possible.
XContact the following service hotlines:
Mercedes-Benz Customer Assistance Center
at 1-800 FOR-MERCEDES (1-800-367-6372)
or 1-866-990-9007
You will be asked for your password.
The next time you are inside the vehicle and you
switch on the ignition, the Doors Locked
Remotelymessage appears in the multifunction
display.
Alternatively, the vehicle can be locked via:
Rthe Internet, under the "Owners Online" sec-
tion
Rtelephone applications (e.g. for iPhone®,
Android™)
To do this, you will need your identification num-
ber and password.
Stolen vehicle recovery service
If your vehicle has been stolen:
XNotify the police.
The police will issue a numbered incident
report.
XForward this number to the Mercedes-Benz
Customer Assistance Center along with your
PIN.
The Mercedes-Benz Customer Assistance
Center then tries to locate the system. The
Mercedes-Benz Customer Assistance Center
contacts you and the local law enforcement
agency if the vehicle is located.
However, only the law enforcement agency is
informed of the location of the vehicle.
If the anti-theft alarm system is activated for
longer than 30 seconds, mbrace automatically
notifies the Mercedes-Benz Customer Assis-
tance Center.
Vehicle Health Check
With the Vehicle Health Check, the Customer
Assistance Center can provide improved sup-
port for problems with your vehicle. During an existing call, vehicle data is transferred to the
Customer Assistance Center.
The customer service representative can use
the received data to decide what kind of assis-
tance is required. You are then, for example,
guided to the nearest Mercedes-Benz Service
Center or a recovery vehicle is called.
If vehicle data need to be transferred during an
Info call or a Roadside Assistance call, this is
initiated by the Customer Assistance Center.
The
Roadside Assistance Connected
mes-
sage appears in the display. If the Vehicle Health
Check can be started, the Request
forVehi‐cle Diagnostics Received Start vehi‐cle diagnostics?message appears in the
display.
XPress the Yesbutton to confirm the message.
XIf theVehicle Diagnostics PleaseStart Ignitionmessage appears: turn the
SmartKey to key position 2in the ignition
lock (
Ypage 106).
XIf the Please follow the instructionsreceivedbyphoneandmoveyourvehi‐cle to a safe position.message
appears: please follow the instructions
received by phone and move your vehicle to a
safe position.
The message in the display disappears.
The vehicle operating state check begins.
During this procedure, you will see the Vehi‐
cle Diagnostics Activemessage.
If you select Cancel
, the Vehicle Health
Check is canceled completely.
When the check is complete, the Sending
vehicle diagnostics data. (Voice con‐nection may be interrupted duringdatatransfer)message appears. The vehicle
data can now be sent.
XPress the OKbutton to confirm the message.
The voice connection with the Customer
Assistance Center is terminated.
The Vehicle Diagnostics: Transfer‐
ring Data...message appears.
The vehicle data is sent to the Customer
Assistance Center.
Depending on what the customer service rep-
resentative agreed with you, the voice connec-
tion is re-established after the transfer is com-
plete. If necessary, you will be contacted at a
later time by another means, e.g. by e-mail or
phone.
224Features
Stowage and features
Page 230 of 294
of movement of it. Release the switch imme-
diately if somebody becomes trapped. The
active aerodynamics profile then extends
again.
When leaving the vehicle, always take the
SmartKey with you and lock the vehicle. Never
leave children unsupervised in the vehicle.
!Take the restricted ground clearance into
account when the active aerodynamics pro-
file is extended.
You can extend and retract the active aerody-
namics profile manually for cleaning.
XSelect key position 2with the Start/Stop
button (Ypage 106).
XTo extend: press and hold button :until the
active aerodynamics profile is fully extended.
Button :flashes until the active aerodynam-
ics profile has extended and then lights up in
red. Extending Spoilers Press and Hold
Switchappears in the display.
XTo retract:
press and hold button :until the
active aerodynamics profile is fully retracted.
Button :flashes until the active aerodynam-
ics profile has retracted and then goes out.
Retracting Spoilers Press and Hold
Switchappears in the display.
If you release button :while retracting the
active aerodynamics profile, retracting stops.
Retracting continues when you press the button
again.
If you release button :while extending the
active aerodynamics profile, extending stops.
Extending continues when you press the button
again.
Problems with the active aerodynamics profile
ProblemPossible causes/consequences and MSolutions
The active aerodynamics
profile stops moving
when retracting or
extending manually.You have switched off the ignition.
XSwitch the ignition back on.
XPress button:.
The active aerodynamics profile then retracts or extends.
The active aerodynamics
profile does not extend
manually.The active aerodynamics profile can only be retracted or extended
manually when the vehicle is stationary and position jis engaged.
The active aerodynamics profile retracts automatically, as soon as the
vehicle starts moving.
The active aerodynamics
profile does not retract
or extend automatically.The active aerodynamics profile's movement is blocked, e.g. by a
trapped object.
XRemove the object.
Garage door opener
General notes
The HomeLink®garage door opener integrated
in the rear-view mirror allows you to operate up
to three different door and gate systems.
Use the integrated garage door opener only on
garage doors that:
Rhave safety stop and reverse features and
Rmeet current U.S. federal safety standards Once programed, the integrated garage door
opener in the rear-view mirror will assume the
function of the garage door system's remote
control. Please also read the operating instruc-
tions for the garage door system.
When programming a garage door opener, park
the vehicle outside the garage. Do not run the
engine while programming.
Certain garage door drives are incompatible
with the integrated garage door opener. If you
have difficulty programing the integrated garage
228Features
Stowage and features
Page 241 of 294
Regular careof your vehicl eis acondition for
retaining th equalit yin th elon gterm .
Use car eproducts and cleaning agents recom-
mended and approve dby Mercedes-Benz.
Washing the vehicle and cleaning the
paintwork
Automatic car wash
GWARNIN G
Braking efficiency is reduce dafter washing
th evehicle. There is aris kof an accident.
Afte rth evehicl ehas been washed, brak e
carefully while payin gattention to th etraffic
condition suntil full braking power is restored .
!When Active Brake Assist,Distanc ePilot
DISTRONI Cor th eHOLD function is activated,
th evehicl ebrakes automatically in certain
situations.
To avoi ddamag eto th evehicle, deactivat e
these systems in th efollowin gor similar sit -
uations:
Rwhen towin gth evehicl e
Rin thecar wash
!Never clean your vehicl ein aTouchles s
Automatic Car Wash as these use special
cleaning agents .These cleaning agents can
damag eth epaintwork or plastic parts.
If you hav eyour vehicl ecleane din ahigh -
pressur eautomatic car wash, small amounts
of water may ente rth evehicle.
!If th eSmartKey is within th erear detection
range of KEYLESS-GO ,th efollowin gsitua-
tions, for example, could lead to th euninten-
tional opening of th etailgate:
Rwhen usin gan automatic car wash
Rwhen usin g apowe rwashe r
Mak esur ethat th eSmartKey is at least 10 ft
(3 m) away from th evehicle.
!Mak esur ethat:
Rth eside windows are fully closed.
Rth eblowe rfor th eventilation/heating is
switched off .
Rthewindshield wiper switch is at position 0.
Rtherear vie wcamera is switched off .The vehicl
emay otherwise be damaged.
!When washing your vehicl ein atow-through
car wash, use th eSmartKey instead of th e
Start/Sto pbutton.
Start th eengin eusin gth eSmartKey. Se tth e
transmission to iwithth eE-SELECT selec-
to rlever. Switc hth eengin eoff again wit hth e
SmartKey by turnin gth eSmartKey to position
2. Mak esur ethat you then leav eth eSmart -
Key in position 2.You may otherwise dam-
age th evehicle, th etransmission or th ecar
wash.
Chec kth etransmission position in th einstru-
men tcluster.
!Befor eswitching off th eengine, set th e
transmission to iusin gth eE-SELECT selec-
to rlever. If you open th edriver' sdoor or front-
passenger door ,th etransmission remain sin
this position for up to 30 minute sif th eSmart -
Key is in th eignition ,eve nif th eengin eis
switched off .If you do no tshif tth etransmis -
sion to iusin gth eE-SELECT selector lever
beforehand, it shifts automatically to parking
position jand locks th ewheels if th edriv -
er' sdoor or front-passen ger d
oor is opened
and th eengin eis switched off .This may dam-
age th evehicle, th etransmission or th ecar
wash.
You can wash th evehicl ein an automatic car
wash from th ever ystart .
If th evehicl eis ver ydirty, pre-was hit before
cleaning it in an automatic car wash.
Afte rusin gan automatic car wash, wipe off wax
from th ewindshield and th ewiper blades. This
will preven tsmears and reduce wipin gnoises
caused by residue on th ewindshield.
Washing by hand
In som ecountries, washing by han dis only
allowe dat specially equipped washing bays.
Observ eth elegal requirements in eac hcountry.
XDo no tuse hot water and do no twash th e
vehicl ein direct sunlight.
XUse asof tspong eto clean.
XUse amild cleaning agent, suc has acar
shampoo approve dby Mercedes-Benz .
XThoroughly hosedown th evehicl ewit h a gen -
tl e je tof water.
XDo no tpoin tth ewater je tdirectly towards th e
air inlet .
Care239
Maintenance and care
Z
Page 249 of 294
XWith KEYLESS-GO start function or vehi-
cles with KEYLESS-GO:open the driver's
door.
The vehicle electronics are now in key posi-
tion u. This is the same as the SmartKey
having been removed.
or
XRemove the SmartKey from the ignition lock.
XMake sure that the passengers are not endan-
gered as they do so. Make sure that no one is
near the danger area while a wheel is being
changed. Anyone who is not directly assisting in the wheel change should, for example,
stand behind the barrier.
XGet out of the vehicle. Pay attention to traffic
conditions when doing so.
XClose the driver's door.
TIREFIT kit
Important safety notes
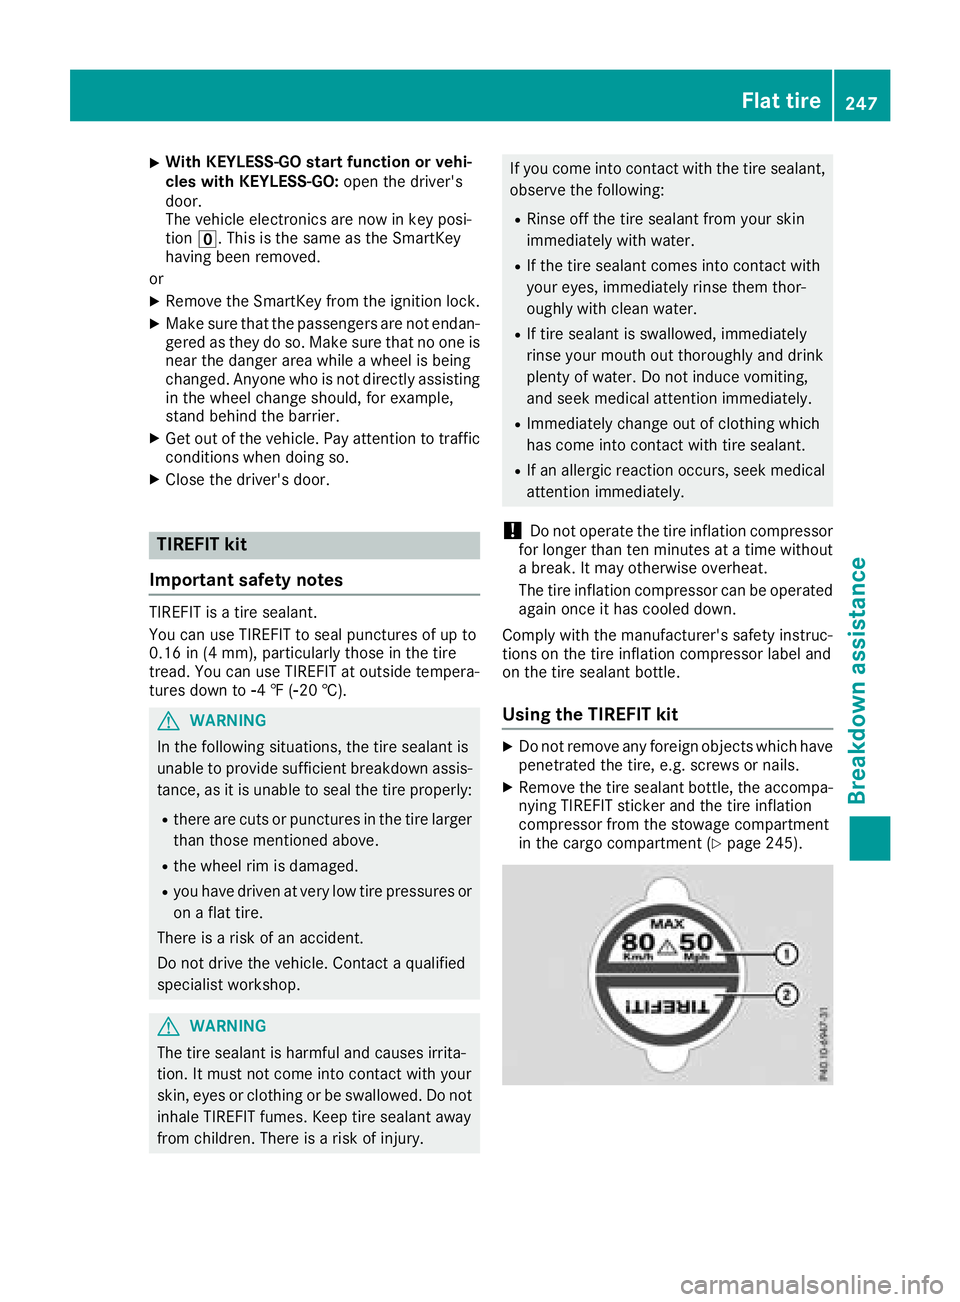
TIREFIT is a tire sealant.
You can use TIREFIT to seal punctures of up to
0.16 in (4 mm), particularly those in the tire
tread. You can use TIREFIT at outside tempera-
tures down to Ò4 ‡ (Ò20 †).
GWARNING
In the following situations, the tire sealant is
unable to provide sufficient breakdown assis-
tance, as it is unable to seal the tire properly:
Rthere are cuts or punctures in the tire larger
than those mentioned above.
Rthe wheel rim is damaged.
Ryou have driven at very low tire pressures or on a flat tire.
There is a risk of an accident.
Do not drive the vehicle. Contact a qualified
specialist workshop.
GWARNING
The tire sealant is harmful and causes irrita-
tion. It must not come into contact with your
skin, eyes or clothing or be swallowed. Do not inhale TIREFIT fumes. Keep tire sealant away
from children. There is a risk of injury.
If you come into contact with the tire sealant,observe the following:
RRinse off the tire sealant from your skin
immediately with water.
RIf the tire sealant comes into contact with
your eyes, immediately rinse them thor-
oughly with clean water.
RIf tire sealant is swallowed, immediately
rinse your mouth out thoroughly and drink
plenty of water. Do not induce vomiting,
and seek medical attention immediately.
RImmediately change out of clothing which
has come into contact with tire sealant.
RIf an allergic reaction occurs, seek medical
attention immediately.
!Do not operate the tire inflation compressor
for longer than ten minutes at a time without a break. It may otherwise overheat.
The tire inflation compressor can be operated
again once it has cooled down.
Comply with the manufacturer's safety instruc-
tions on the tire inflation compressor label and
on the tire sealant bottle.
Using the TIREFIT kit
XDo not remove any foreign objects which have
penetrated the tire, e.g. screws or nails.
XRemove the tire sealant bottle, the accompa-
nying TIREFIT sticker and the tire inflation
compressor from the stowage compartment
in the cargo compartment (
Ypage 245).
Flat tire247
Breakdown assistance
Z
Page 256 of 294
Towing and tow-starting
Important safety notes
GWARNING
The rear axle locks when:
Rthe engine is not running
Rthe engine stalls while the vehicle is being
towed
Rthere is a malfunction in the power supply
or the vehicle's electrical system
There is a risk of an accident.
In the event of a breakdown, you should
always have the vehicle transported.
GWARNING
If the brake system or power steering is mal-
functioning and your vehicle is then towed
away, significantly more effort may be
required to steer and brake than is normally
required. There is a risk of an accident.
In such cases, use a tow bar. Before towing,
make sure that the steering moves freely.
GWARNING
When towing or tow-starting another vehicle
and its weight is greater than the permissible
gross weight of your vehicle, the:
Rthe towing eye could detach itself
Rthe vehicle/trailer combination could roll-
over.
There is a risk of an accident.
When towing or tow-starting another vehicle,
its weight should not be greater than the per- missible gross weight of your vehicle.
Details on the permissible gross vehicle weight
of your vehicle can be found on the vehicle iden-
tification plate (
Ypage 282).
!Use the SmartKey instead of the Start/Stop
button when towing the vehicle.
Start the engine and keep it running. The
SmartKey is in position 2in the ignition lock.
Set the transmission to iusing the E-
SELECT selector lever. Make sure that you
then leave the SmartKey in position 2.Check the transmission position in the instru-
ment cluster.
!Make sure that the electric parking brake is
released. If the electric parking brake is faulty,
visit a qualified specialist workshop.
!Secure the tow rope or tow bar to the towing
eye only. Otherwise, the vehicle could
become damaged.
!When Active Brake Assist, Distance Pilot
DISTR ONIC or the HOLD function is activated,
the vehicle brakes automatically in certain
situations.
To avoid damage to the vehicle, deactivate
these systems in the following or similar sit-
uations:
Rwhen towing the vehicle
Rin the car wash
!Do not use the towing eyes for recovery pur-
poses as this could damage the vehicle. If in
doubt, recover the vehicle with a crane.
!When towing, pull away slowly and
smoothly. If the tractive power is too high, the
vehicles could be damaged.
!Shift the automatic transmission to position
i and do not open the driver's or front-
passenger door when towing the vehicle
away. Otherwise, the automatic transmission
may shift to position jwhich can cause
damage to both vehicles.
!Do not tow with sling-type equipment. This
could damage the vehicle.
!The vehicle can be towed a maximum of
30 miles (50km). The towing speed of 30 mph
(50 km/h) must not be exceeded.
If the vehicle has to be towed more than
30 miles (50km), the entire vehicle must be
raised and transported.
!Observe the transmission fluid temperature
(AMG menu) in the on-board computer when
towing. The transmission fluid temperature
must not exceed 250 ‡ (
120 †). If this
occurs, you must stop towing immediately.
!Tow-starting the vehicle is not permitted.
The transmission may otherwise be damaged.
254Towing and tow-starting
Breakdown assistance
Page 257 of 294
Also observe the following notes:
RIf the engine does not start, try jump-starting
it (Ypage 251). Tow-starting the vehicle is not
permitted.
RIf it is not possible to jump-start the vehicle,
have it transported to the nearest qualified
specialist workshop, e.g. an authorized
Mercedes-Benz Center.
If the vehicle can no longer be driven because of
an accident or breakdown, you have the follow-
ing options:
Rtransporting the vehicle
As a rule, you should have the vehicle trans-
ported.
Rtowing the vehicle with a tow rope or tow bar
Only tow the vehicle in exceptional cases. The
engine must be running if you tow the vehicle
with a tow rope or tow bar.
If the vehicle has suffered transmission damage,
have it transported on a transporter or trailer.
Observe the display messages in the instrument
cluster.
The battery must be connected and charged.
Otherwise, you:
Rwill not be able to switch on the ignition with
the Start/Stop button
Rcannot start the engine
Rcannot release the electric parking brake
Rcannot shift the automatic transmission to
position i
Disarm the automatic locking feature before the
vehicle is towed (
Ypage 72). You could other-
wise be locked out when pushing or towing the
ve
hicle.
Installing/removing the towing eye
Installing the towing eye
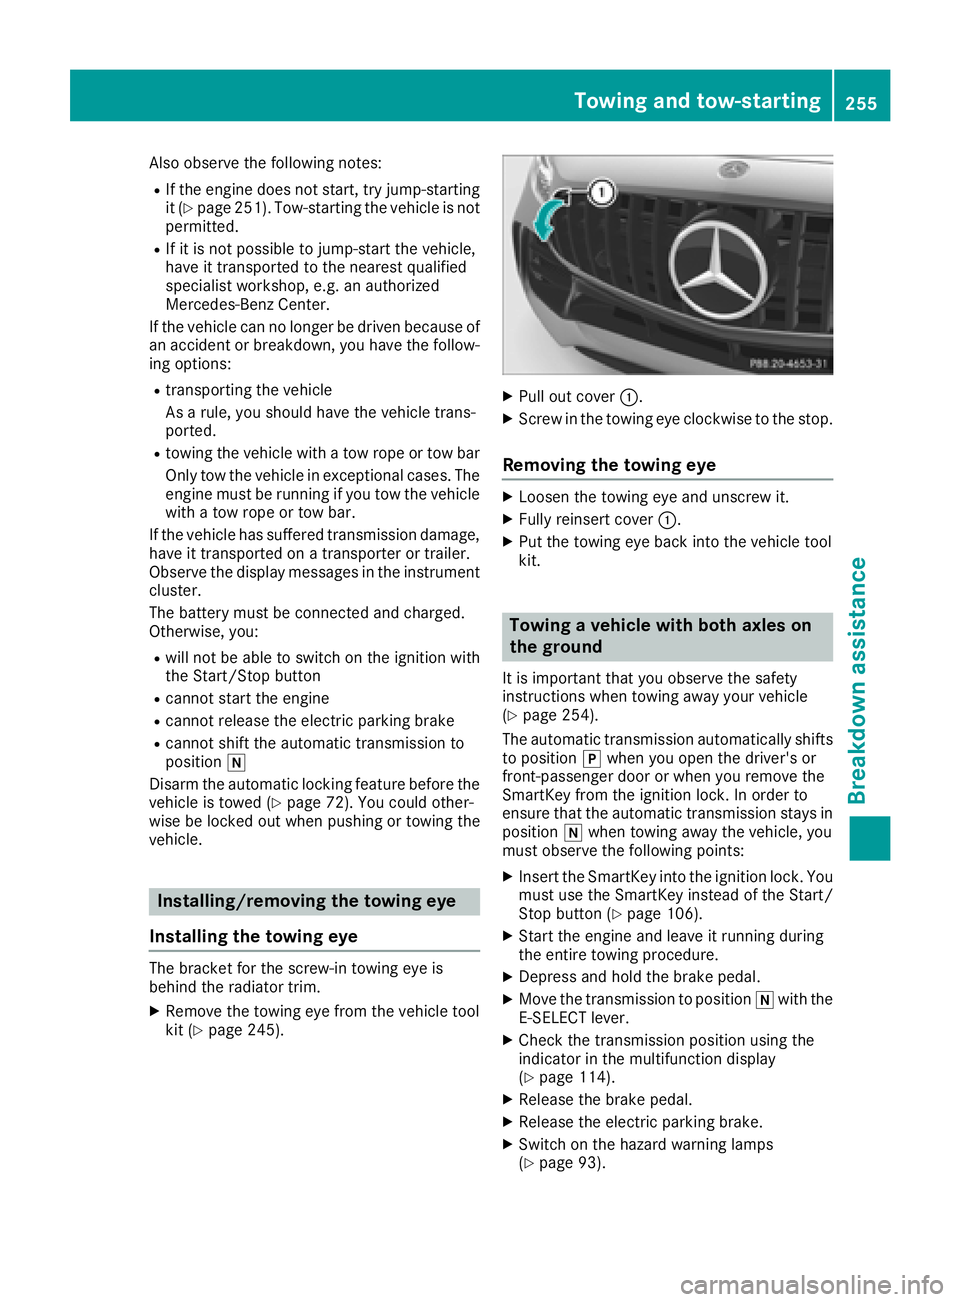
The bracket for the screw-in towing eye is
behind the radiator trim.
XRemove the towing eye from the vehicle tool
kit (Ypage 245).
XPull out cover :.
XScrew in the towing eye clockwise to the stop.
Removing the towing eye
XLoosen the towing eye and unscrew it.
XFully reinsert cover :.
XPut the towing eye back into the vehicle tool
kit.
Towing a vehicle with both axles on
the ground
It is important that you observe the safety
instructions when towing away your vehicle
(
Ypage 254).
The automatic transmission automatically shifts
to position jwhen you open the driver's or
front-passenger door or when you remove the
SmartKey from the ignition lock. In order to
ensure that the automatic transmission stays in
position iwhen towing away the vehicle, you
must observe the following points:
XInsert the SmartKey into the ignition lock. You
must use the SmartKey instead of the Start/
Stop button (
Ypage 106).
XStart the engine and leave it running during
the entire towing procedure.
XDepress and hold the brake pedal.
XMove the transmission to position iwith the
E-SELECT lever.
XCheck the transmission position using the
indicator in the multifunction display
(
Ypage 114).
XRelease the brake pedal.
XRelease the electric parking brake.
XSwitch on the hazard warning lamps
(Ypage 93).
Towing and tow-starting255
Breakdo wn assis tance
Z
Page 259 of 294
The fuses in your vehicle serve to close down
faulty circuits. If a fuse blows, all the compo-
nents on the circuit and their functions stop
operating.
Before changing a fuse
XSwitch off the engine.
XSwitch off all electrical consumers.
XOpen the driver's door.
The on-board electronics are now in key posi-
tionu. This is the same as the key having
been removed.
or, if the SmartKey is inserted in the ignition
lock:
XRemove the SmartKey from the ignition lock.
XSecure the vehicle against rolling away
(Ypage 122).
All indicator lamps in the instrument cluster
must be off.
Fuse box in the front-passenger foot-
well
!
The floor panel must be installed properly,
otherwise moisture or dirt could impair the
function of the fuses.
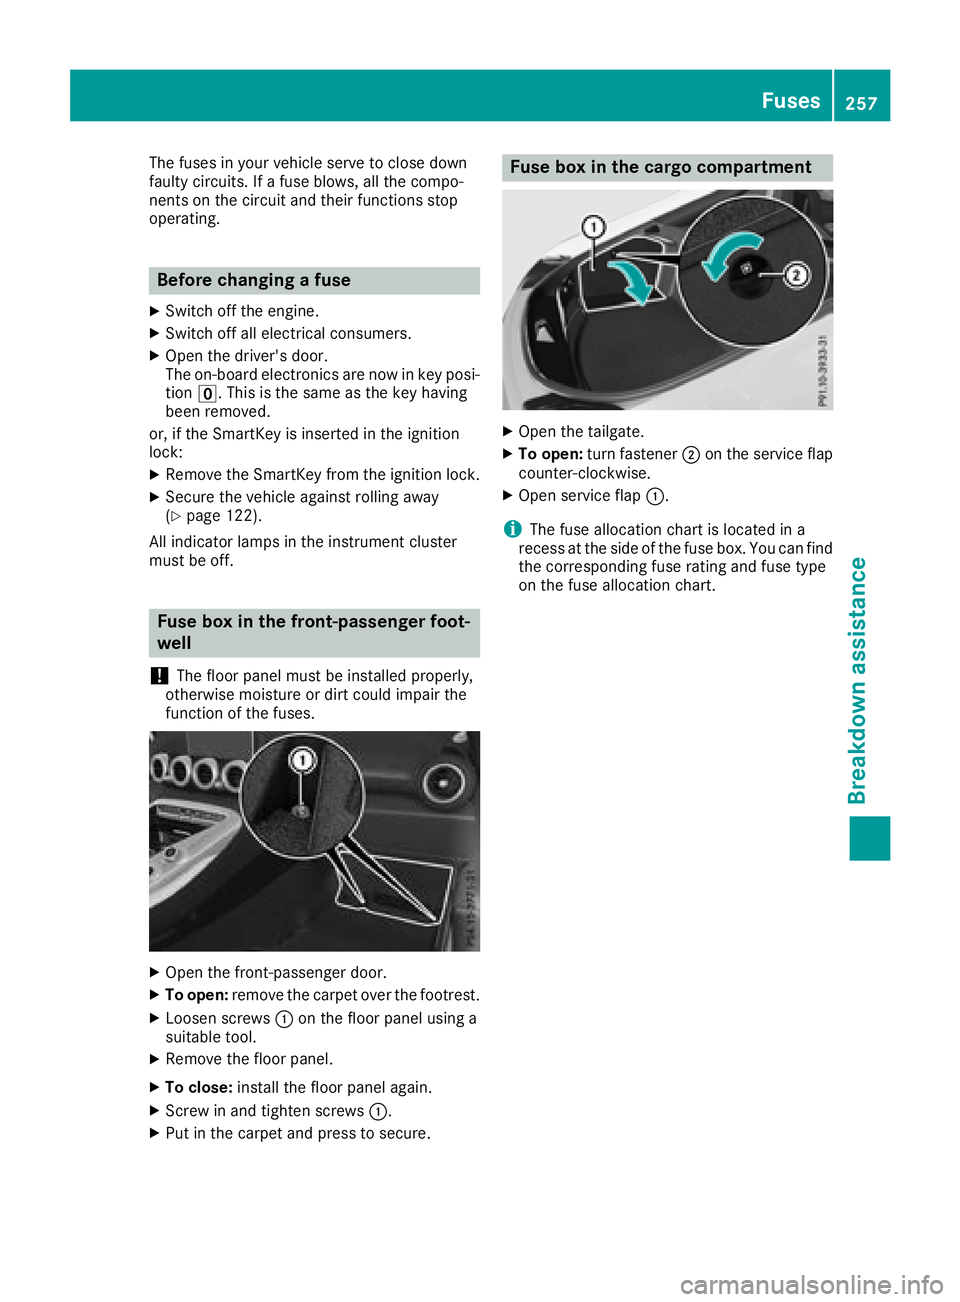
XOpen the front-passenger door.
XTo open: remove the carpet over the footrest.
XLoosen screws :on the floor panel using a
suitable tool.
XRemove the floor panel.
XTo close: install the floor panel again.
XScrew in and tighten screws :.
XPut in the carpet and press to secure.
Fuse box in the cargo compartment
XOpen the tailgate.
XTo open:turn fastener ;on the service flap
counter-clockwise.
XOpen service flap :.
iThe fuse allocation chart is located in a
recess at the side of the fuse box. You can find
the corresponding fuse rating and fuse type
on the fuse allocation chart.
Fuses257
Breakdown assistance
Z
Page 279 of 294

An arrow on the sidewall of the tire indicates its
correct direction of rotation.
Storing wheels
Store wheels that are not being used in a cool,
dry and preferably dark place. Protect the tires
from oil, grease, gasoline and diesel.
Mounting a wheel
Preparing the vehicle
XStop the vehicle on solid, non-slippery and
level ground.
XApply the electric parking brake manually.
XBring the front wheels into the straight-ahead position.
XShift the transmission to position j.
XSwitch off the engine.
XWith KEYLESS-GO start function or vehi-
cles with KEYLESS-GO:open the driver's
door.
The vehicle electronics are now in key posi-
tion u. This is the same as the SmartKey
having been removed.
or
XRemove the SmartKey from the ignition lock.
XIf included in the vehicle equipment, remove
the tire-change tool kit from the vehicle.
XSafeguard the vehicle against rolling away.
Securing the vehicle to prevent it from
rolling away
If your vehicle is equipped with a wheel chock, it
can be found in the tire-change tool kit
(
Ypage 245). The folding wheel chock is an additional safety
measure to prevent the vehicle from rolling
away, for example when changing a wheel.
XFold both plates up
:.
XFold out lower plate ;.
XGuide the lugs on the lower plate fully into the
openings in base plate =.
XPlace chocks or other suitable items under
the front and rear of the wheel that is diago-
nally opposite the wheel you wish to change.
Raising the vehicle
GWARNING
If you do not position the jack correctly at the
appropriate jacking point of the vehicle, the
jack could tip over with the vehicle raised.
There is a risk of injury.
Only position the jack at the appropriate jack-
ing point of the vehicle. The base of the jack
must be positioned vertically, directly under
the jacking point of the vehicle.
!Only position the jack at the appropriate
jacking point of the vehicle. Otherwise, you
could damage the vehicle.
Observe the following when raising the vehi-
cle:
RTo raise the vehicle, only use the vehicle-spe-
cific jack that has been tested and approved
by Mercedes-Benz. If used incorrectly, the
jack could tip over with the vehicle raised.
RThe jack is designed only to raise and hold the
vehicle for a short time while a wheel is being
changed. It must not be used for performing
maintenance work under the vehicle.
RAvoid changing the wheel on uphill and down- hill slopes.
Changing a wheel277
Wheels and tires
Z
Page 280 of 294
RBefore raising the vehicle, secure it from roll-
ing away by applying the parking brake and
inserting wheel chocks. Do not disengage the
parking brake while the vehicle is raised.
RThe jack must be placed on a firm, flat and
non-slip surface. On a loose surface, a large,
flat, load-bearing underlay must be used. On a
slippery surface, a non-slip underlay must be
used, e.g. rubber mats.
RDo not use wooden blocks or similar objects
as a jack underlay. Otherwise, the jack will not
be able to achieve its load-bearing capacity
due to the restricted height.
RMake sure that the distance between the
underside of the tires and the ground does not
exceed 1.2 in (3 cm).
RDo not place your hands or feet under the
raised vehicle.
RDo not lie under the vehicle.
RDo not start the engine when the vehicle is
raised.
RNever open or close a door or the tailgate
when the vehicle is raised.
RMake sure that no persons are present in the
vehicle when the vehicle is raised.
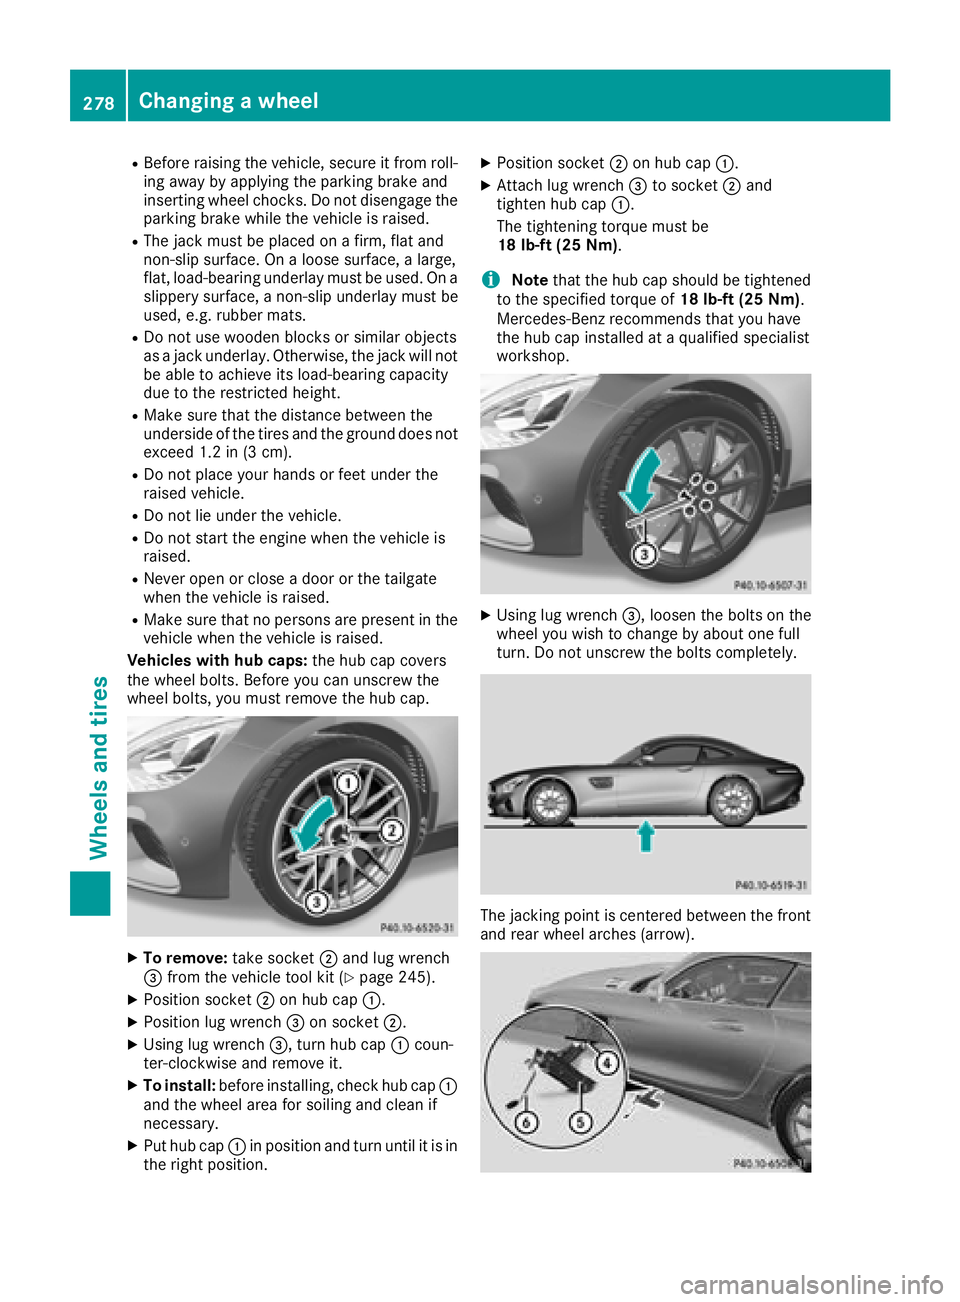
Vehicles with hub caps: the hub cap covers
the wheel bolts. Before you can unscrew the
wheel bolts, you must remove the hub cap.
XTo remove: take socket;and lug wrench
= from the vehicle tool kit (Ypage 245).
XPosition socket ;on hub cap :.
XPosition lug wrench =on socket ;.
XUsing lug wrench =, turn hub cap:coun-
ter-clockwise and remove it.
XTo install: before installing, check hub cap :
and the wheel area for soiling and clean if
necessary.
XPut hub cap :in position and turn until it is in
the right position.
XPosition socket ;on hub cap :.
XAttach lug wrench =to socket ;and
tighten hub cap :.
The tightening torque must be
18 lb-ft (25 Nm).
iNote that the hub cap should be tightened
to the specified torque of 18 lb-ft (25 Nm).
Mercedes-Benz recommends that you have
the hub cap installed at a qualified specialist
workshop.
XUsing lug wrench =, loosen the bolts on the
wheel you wish to change by about one full
turn. Do not unscrew the bolts completely.
The jacking point is centered between the front
and rear wheel arches (arrow).
278Changing a wheel
Wheels and tires