diagram MERCEDES-BENZ AMG GT R-ROADSTER 2020 Owners Manual
[x] Cancel search | Manufacturer: MERCEDES-BENZ, Model Year: 2020, Model line: AMG GT R-ROADSTER, Model: MERCEDES-BENZ AMG GT R-ROADSTER 2020Pages: 441, PDF Size: 7.76 MB
Page 205 of 441

or
quarter mile measure ment will be cancel‐
led.
Measuring braking #
Select Braking . #
Select Start Record .
Measurement is incremental, in steps of
50 km/h toast andstill. If the braking proce‐
dure is star ted e.g. at a speed of 160 km/h,
measurement starts as soon as 150 km/h
has been reached.
St oring and calling up measurement values
When a measurement has been comple ted or
cancelled, the measured time can be stored. #
After a measu rement, select Save measure-
ment? .
The stored measurements can be displa yed via
th eHistory menu item.
Editing measu rements #
Select History . #
Highlight the desired measurement. #
Select Üoptions. #
Select Weather orDelete.
% The measurements can be displa yedby cate‐
gor y,e.g. acceleration measurements, by
applying a filter. Calling up
thete lemetry display Multimedia sy
stem:
4 Vehicle 5
TRACK PACE 5
Telemetry
The telemetry display sho wscurrent vehicle data
as a digital value and as a diagram.
Up tofour parame ters can be selected that are
to be shown in the displa y,such as:
R engine speed
R wheel angle
R speed
R steering angle #
Set the desired parame ters. #
Set the time.
The set parame ters are evaluated in the dia‐
gram forth e time set. %
The time can range between 30 seconds and
a maximum of 20 minu tes. Configuring AMG TRA
CKPACE Re
quirements:
To use the TRACK PACE app:
R the TRA CKPACE app is ins talled on the
mobile end device.
R the mobile end device is connected tothe
multimedia sy stem via Wi-Fi.
Multimedia sy stem:
4 vehicle 5
TRACK PACE 5
Options
Setting driver profiles #
Select Driver Profile. #
Create a new driver profile.
or #
Select an existing driver profile.
The driver profile is activated. 202
Multimedia sy stem
Page 322 of 441

Electrical fuses
Note
s on electrical fuses &
WARNING Risk of accident and inju ry
due to ov erloaded lines
If yo u manipulate or bridge a faulty fuse or if
yo ure place it with a fuse with a higher
amperage, the electric line could be overloa‐
ded.
This could result in a fire. #
Alw aysre place faulty fuses with speci‐
fi ed new fuses conta iningthe cor rect
amperage. *
NO
TEDama gedue toincor rect fuses Electrical components or sy
stems may be
damaged byincor rect fuses, or their func‐
tionality may be significant lyimpaired. #
Only use fuses that ha vebeen appr oved
by Mercedes-Benz and which ha vethe
cor rect fuse rating. Blown fuses mu
stbe replaced with fuses of the
same rating, which you can recognise bythe col‐
our and fuse rating. The fuse ratings and fu rther
information tobe obser ved can be found in the
fuse assignment diagram.
Fu se assignment diag ram: onthe fuse box in
th e load compartment (/ page 320).
* NO
TEDama geor malfunctions caused
by moisture Moisture may cause dama
getothe electrical
sy stem or cause it tomalfunction. #
When the fuse box is open, make sure
th at no moisture can enter the fuse
box. #
When closing the fuse box, make sure
th at the seal of the lid is positioned cor‐
re ctly on the fuse box. If
th e newly inser ted fuse also blo ws, ha vethe
cause traced and rectified at a qualified special‐
ist workshop.
Ensure thefo llowing before replacing a fuse:
R The vehicle is secured against rolling away. R
All electrical consumers are switched off.
R The ignition is switched off.
The electrical fuses are located in various fuse
bo xes:
R Fuse box in the front passenger foot we ll
(/ page 319)
R Fuse box in the load compartment on the
left-hand side of theve hicle, when vie wed in
th e direction of tra vel (/ page 320) Opening and closing
the fuse box in the front
passenger foot we ll Obser
vethe no tes on electrical fuses
(/ page 319). Breakd
own assi stance 319
Page 323 of 441

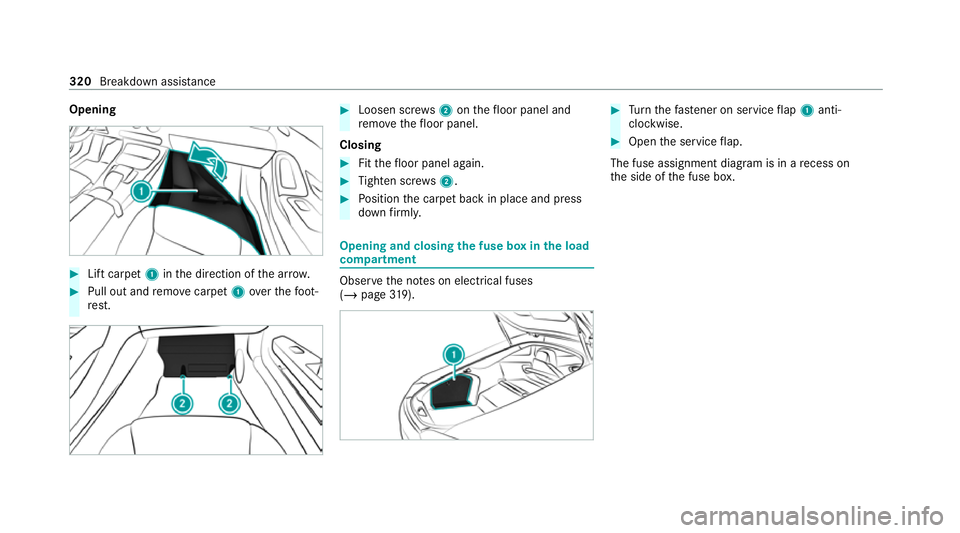
Opening
#
Lift carpet 1inthe direction of the ar row. #
Pull out and remo vecarpet 1over thefo ot‐
re st. #
Loosen scr ews2 onthefloor panel and
re mo vethefloor panel.
Closing #
Fitthefloor panel again. #
Tighten scr ews2. #
Position the carpet back in place and press
down firm ly. Opening and closing
the fuse box in the load
compa rtment Obse
rveth e no tes on electrical fuses
(/ page 319). #
Turn thefast ener on service flap 1 anti-
clo ckwise. #
Open the service flap.
The fuse assignment diagram is in a recess on
th e side of the fuse box. 320
Breakdown assis tance
Page 420 of 441

Fu
el .......................................................... .342
Ad ditives .............................................3 42
E10 ...................................................... 341
Fu elreser ve ........................................ 342
Pe trol ................................................... 341
Quality (p etro l) .................................... .341
Re fuelling ............................................. 12 3
Sulphur content ................................... 341
Ta nk content ....................................... 342
Fu nction seat
see Door cont rol panel
Fu ses ......................................................... 319
Before replacing a fuse ........................ 319
Fu se assignment diagram .................... 319
Fu se box in the front passenger foot‐
we ll ...................................................... 319
Fu se box in the load compartment ...... 320
No tes ................................................... 319G
Garage door opener Clearing the memory ........................... 12 8
Opening or closing the door ................1 28
Programming buttons .......................... 12 6
Re solving problems ............................. 12 8Synchronising
thero lling code ............ .127
Gearshift recommendation ....................12 2
Genera l operating permit number
(EU) .......................................................... .338
Genuine parts ............................................ 18
Glide mode ............................................... 12 3 H
Handbrake see Electric parking brake
Handling characteristics (unusual) ........321
Hazard warning lights .............................. .93
Head restra int
Fr ont (adjusting mechanically) .............. 80
Headlamp flashing ................................... .92
Headlamps see Automatic driving lights
Help call see Mercedes-Benz emergency call sy stem
High beam Activating/deactivating ......................... 92
Ad aptive Highbeam Assist .....................93 High-pressure cleaner (care)
.................. 297
Hill Start Assist ....................................... 14 4
HOLD function ......................................... 14 5
Fu nction/no tes ................................... 14 5
Switching on/off ................................. 14 5
Hotspot Setting up (Wi-Fi) ................................. 19 3
Vi a business telephony ........................ 19 0 I
Identification pla te
Engine ................................................. 338
Ve hicle ................................................ 338
Ignition Switching on (S tart/S top button) ........ 104
Ignition key
see Key
Immobiliser ................................................ 71
Implied warranty
Ve hicle ................................................... 27
In Car Of fice
Calling up ............................................ 24 4
Fe atures .............................................. 24 3 Index
417