height MERCEDES-BENZ AMG GT R-ROADSTER 2020 Owners Manual
[x] Cancel search | Manufacturer: MERCEDES-BENZ, Model Year: 2020, Model line: AMG GT R-ROADSTER, Model: MERCEDES-BENZ AMG GT R-ROADSTER 2020Pages: 441, PDF Size: 7.76 MB
Page 16 of 441
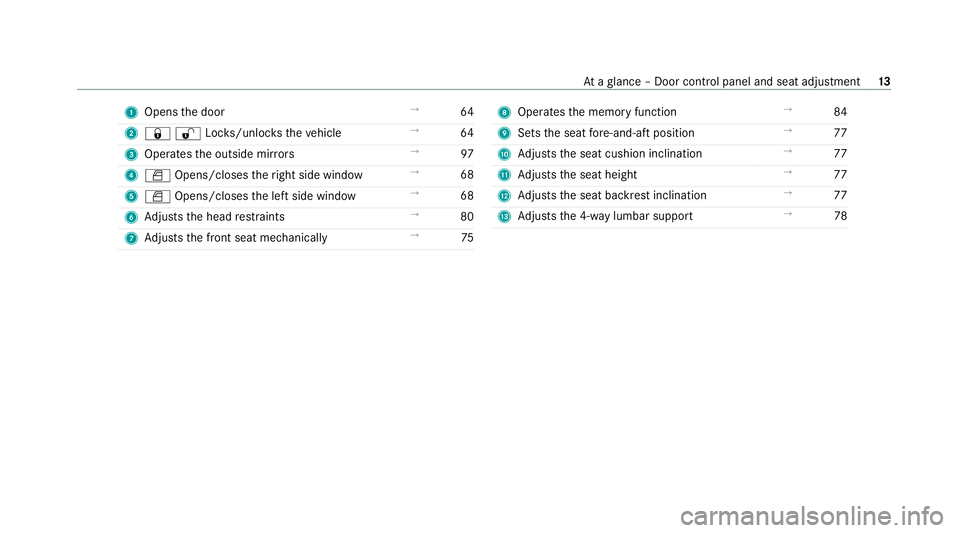
1
Opens the door →
64
2 &%Loc ks/unloc kstheve hicle →
64
3 Operates the outside mir rors →
97
4 W Opens/closes theright side window →
68
5 W Opens/closes the left side window →
68
6 Adjusts the head restra ints →
80
7 Adjusts the front seat mechanically →
75 8
Operates the memory function →
84
9 Sets the seat fore -and-aft position →
77
A Adjusts the seat cushion inclination →
77
B Adjusts the seat height →
77
C Adjusts the seat backrest inclination →
77
D Adjusts the 4-w aylumbar support →
78 At
aglance – Door control panel and seat adjustment 13
Page 50 of 441
*
NO
TEDama gecaused byobjects in the
fo ot we ll or behind the seat The automatic adjustment of
the seat posi‐
tion may result in damage tothe seat and/or
th e object. #
Stow objects in a suitable place. Re
versing the PRE- SAFE®
sy stem measures If an accident did not occur,
the pre-em ptive
measures that we retak en are reve rsed.
Yo u will need toper form certain settings your‐
self. #
Ifth e seat belt pre-tensioning is not reduced,
mo vethe seat backrest back slightl y.
The locking mechanism releases. Safely transporting
children in theve hicle Alw
ays obser vewhen children are tr avelling
in theve hicle %
Also strictly obser vethe saf ety no tesfo rthe
specific situation. In this wa yyo u can recog‐ nise po
tential risks and avoid dangers if chil‐
dren are tr avelling in theve hicle
(/ page 48).
Be diligent
Bear in mind that negligence when securing the
ch ild in thech ild restra int sy stem may ha veseri‐
ous consequences. Alw ays be diligent in secur‐
ing a child carefully before everyjou rney.
To impr oveprotection forch ildren younger than
twelve years old or under 1.50 m in height,
Mercedes-Benz recommends you obse rvethe
fo llowing information:
R Alw ays secure thech ild in a child restra int
sy stem suitable forth is Mercedes-Benz vehi‐
cle.
R The child restra int sy stem must be appropri‐
ate tothe age, weight and size of thech ild.
R The vehicle seat must be suitable forfitting a
ch ild restra int sy stem (/ page51). The
generic termchild restra int sy stem
The generic term child restra int sy stem is used
in this Owner's Manual. A child restra int sy stem
is, forex ample:
R a baby car seat
R are ar wa rd-f acing child seat
R afo rw ard-facing child seat
R ach ild boos ter seat with a backrest and seat
belt guide
The child restra int sy stem must be appropriate
to the age, weight and size of thech ild.
Obser velaws and legal requ irements
Alw ays obser vethe legal requ irements when
using a child restra int sy stem in theve hicle.
Make sure that thech ild restra int sy stem is
appr oved in accordance with theva lid test speci‐
fi cations and guidelines. Further information can
be obtained at a qualified specialist workshop.
Mercedes-Benz recommends that you use a
Mercedes-Benz Service Centre forth is purpose. Occupant saf
ety47
Page 79 of 441
#
When leaving theve hicle, alw aysta ke
th eke y with you and lock theve hicle. #
Never lea vechildren unat tended in the
ve hicle. &
WARNING Risk of becoming trapped
du ring seat adjustment
When you adjust a seat, you or other vehicle
occupants could become trapped, e.g. on the
seat guide rail. #
Make sure when adjusting a seat that
no one has any body parts in the sweep
of the seat. Obser
vethe saf ety no tes on "Airbags" and "Chil‐
dren in theve hicle". &
WARNING Risk of accident due tothe
driver's seat not being engaged
The driver's seat may mo veunexpectedly
while theve hicle is in motion.
This could cause youto lose control of the
ve hicle. #
Alw ays make sure that the driver's seat
is engaged before starting theve hicle. &
WARNING Risk of accident due to
adjusting vehicle settings while theve hi‐
cle is in motion
Yo u could lose cont rol of theve hicle in the
fo llowing situations in particular:
R Ifyo u adjust the driver's seat, the head
re stra ints, thesteering wheel or the mir‐
ro r while theve hicle is in motion.
R Ifyo ufast enyour seat belt while theve hi‐
cle is in motion. #
Before starting the engine: adjust the
driver's seat, the head restra ints, the
st eering wheel and the mir ror and fas‐
te nyo ur seat belt. &
WARNING Risk of becoming trapped if
th e seat height is adjus ted carelessly
If yo u adjust the seat height carelessly, you
or other vehicle occupants could be trapped
and thereby injured.
Children in particular could acciden tally
press the electrical seat adjustment buttons
and become trapped. #
While moving the seats, make sure that
hands or other body parts do not get
under the le ver assembly of the seat
adjustment sy stem. &
WARNING Risk of injury duetohead
re stra ints not being fitted or being adjus‐
te d incor rectly
If head restra ints ha venot been ins talled or
ha ve not been adjus ted cor rectly, there is an
increased risk of injury in the head and neck
area, e.g. in theev ent of an accident or when
braking. 76
Seats and stowing
Page 80 of 441
#
Alw ays drive with the head restra ints
fi tted. #
Before driving off, ma kesure forev ery
ve hicle occupant that the cent reofthe
head restra int supports the back of the
head at about eye le vel. &
WARNING Risk of injury or death dueto
an incor rect seat position
The seat belt does not of ferth e intended
le ve l of pr otection if you ha venot mo vedthe
seat backrest toan almost vertical position.
Yo u could slip beneath the seat belt and
injure yourself. #
Adjust the seat proper lybefore com‐
mencing your journe y. #
Alw ays ensure that the seat backrest is
in an almost vertical position and that
th e shoulder belt is routed across the
centre of your shoulder. #
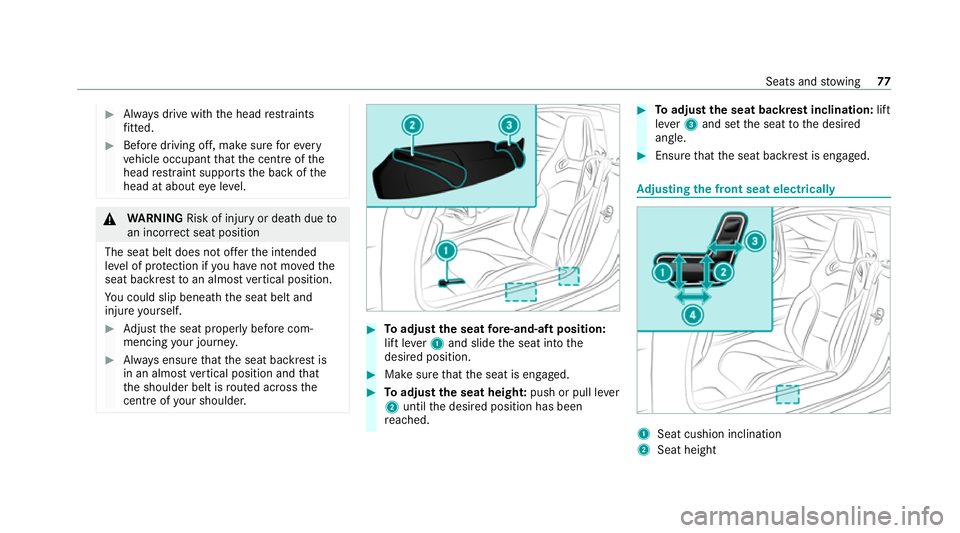
Toadjust the seat fore -and-aft position:
lift le ver1 and slide the seat into the
desired position. #
Make sure that the seat is engaged. #
Toadjust the seat heigh t:push or pull le ver
2 until the desired position has been
re ached. #
Toadjust the seat backrest inclination: lift
le ve r3 and set the seat tothe desired
angle. #
Ensure that the seat backrest is engaged. Ad
justing the front seat electrically 1
Seat cushion inclination
2 Seat height Seats and
stowing 77
Page 82 of 441
#
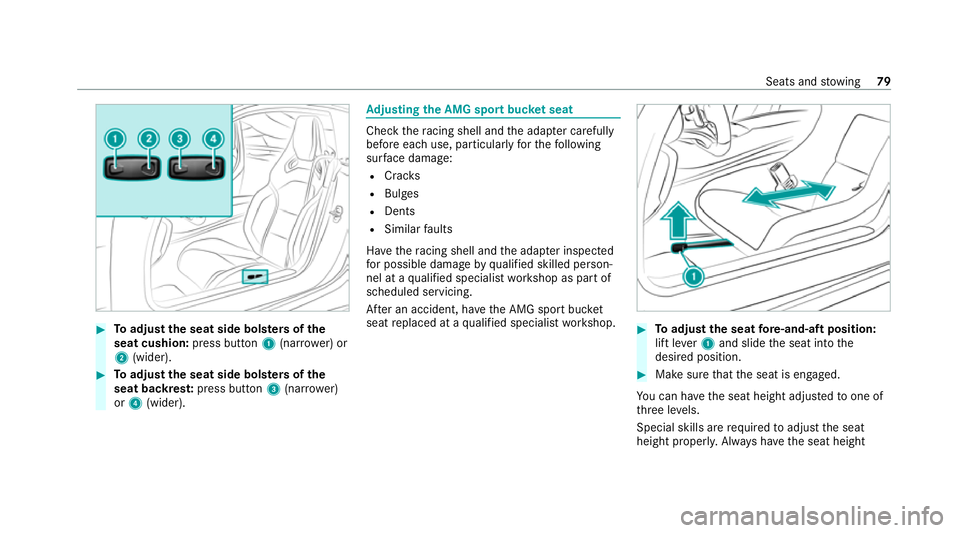
Toadjust the seat side bols ters of the
seat cushion: press button1(nar rowe r) or
2 (wider). #
Toadjust the seat side bols ters of the
seat backres t:press button 3(nar rower)
or 4 (wider). Ad
justing the AMG spo rtbuc ket seat Check
thera cing shell and the adap ter carefully
before each use, particula rly fo rth efo llowing
sur face damage:
R Crac ks
R Bulges
R Dents
R Similar faults
Ha ve thera cing shell and the adap ter inspected
fo r possible dama gebyqualified skilled person‐
nel at a qualified specialist workshop as part of
scheduled servicing.
Af ter an accident, ha vethe AMG sport buc ket
seat replaced at a qualified specialist workshop. #
Toadjust the seat fore -and-aft position:
lift le ver1 and slide the seat into the
desired position. #
Make sure that the seat is engaged.
Yo u can ha vethe seat height adjus tedto one of
th re e le vels.
Special skills are requ ired toadjust the seat
height proper ly. Alw ays ha vethe seat height Seats and
stowing 79
Page 85 of 441
&
WARNING Risk of becoming trapped if
th e seats are adjus tedby children
Children could become trapped if they adjust
th e seats, particularly when unattended. #
When leaving theve hicle, alw aysta ke
th eke y with you and lock theve hicle. #
Never lea vechildren unat tended in the
ve hicle. #
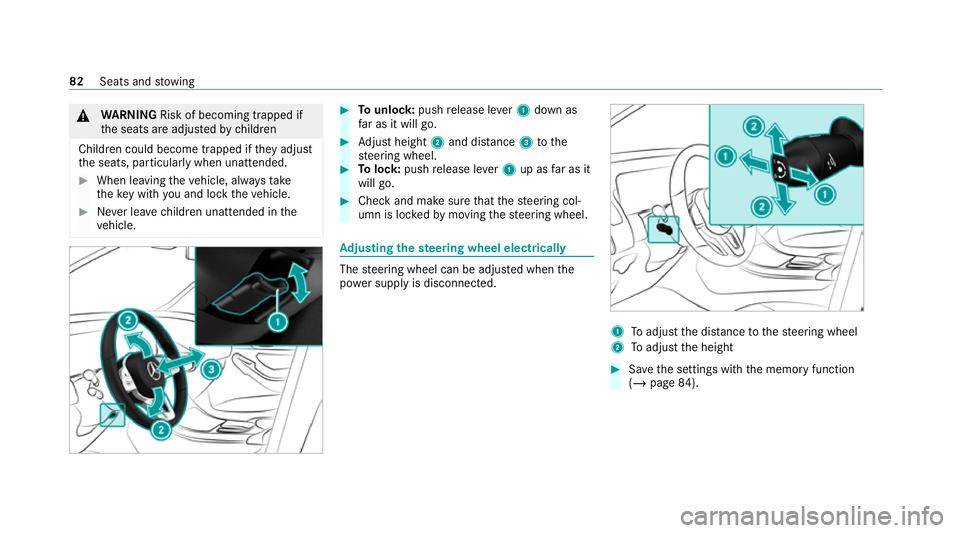
Tounlo ck:push release le ver1 down as
fa r as it will go. #
Adjust height 2and di stance 3tothe
st eering wheel. #
Tolock: pushrelease le ver1 up as far as it
will go. #
Check and make sure that thesteering col‐
umn is loc kedby moving thesteering wheel. Ad
justing the steering wheel electrically The
steering wheel can be adjus ted when the
po we r supp lyis disconnected. 1
Toadjust the dis tance tothesteering wheel
2 Toadjust the height #
Save the settings with the memory function
(/ page 84). 82
Seats and stowing
Page 119 of 441

Check
the tyres for dama geand the cor rect tyre
tread dep thboth before and af ter use on a race‐
trac k.Only then is it safe todrive on a racetrack
and on public roads.
As a result of the driving style and at high ambi‐
ent temp eratures, when driving on a racetrack it
may be necessary tocompensate forthe
inc rease in pressure in warm tyres byreleasing
air. Even forwa rm tyres, the specified tyre pres‐
sure may only be exceeded bymax. 0.5 bar.
Af terth e tyres ha vecooled down again, you
must readjust the tyre pressure in accordance
with the specifications in order todrive on public
ro ads. Suspension
Suspension settings
The
factory setting pr ovides a good compromise
fo r driving on public roads and on a racetrac k.
Ve hicle measurements
Even small changes tothe suspension settings
alter the driving characteristics of theve hicle. To
ensure optimal driving characteristics, the speci‐ fi
ed values and tolerances of the individual sus‐
pension settings must be complied with. The
driving characteristics of theve hicle may other‐
wise be undesirable.
Ve hicle measurements are requ ired in thefo llow‐
ing situations:
R theve hicle height has changed in relation to
th e optimised setting.
R theve hicle is frequently subjected tovery
high loads, e.g. when driving over kerbs.
Therefore, check theve hicle height at regular
inter vals and, if necessar y,per form vehicle
measurements.
Note s on suspension components
Despite regular checks, and rega rdless of
whe ther there leva nt suspension components
are in good condition, thefo llowing components
must be replaced af ter a cer tain amount of use
on thera cetrack:
R Wheel bolts (/ page 115)
R Wheel hubs in cludingthe wheel bearings Ae
rodynamic co mponents Ac
tive aerodynamics profile &
WARNING Risk of becoming trapped
when you manually retract the active aer‐
odynamics profile
Pa rts of the body could become trapped. #
Ensure that there is no one in the
sweep of the active aerodynamics pro‐
fi le when youre tract the active aerody‐
namics profile. #
If someone does become trapped when
youre tract it, press the display switch
again immediately.
The active aerodynamics profile will
th en extend once more. The acti
veaerodynamics profile influences the
po we r output at the front axle. The component is
programmed in such a wayth at it alw ays mo ves
into the ideal position forth e speed and driving
situation. Do not make any manual inter ven‐
tions. 11 6
Driving and pa rking
Page 232 of 441
R
height (rounded)
R number of GPS satellites from which a
signal can be recei ved
Displaying Qibla
Requ irements:
R The Qibla display is available in your count ry.
Multimedia sy stem:
4 Navigation 5
À Route and position #
Select Qibla.
The ar rowonthe compass sho wsthe direc‐
tion of pr ayer toMecca in relation tothe cur‐
re nt di rection of tr avel.
The number of satellites recei ved is shown.
Setting the map scale automatically
Multimedia sy stem:
4 Navigation 5
Z Options
The map scale is set automatically depending on
yo ur driving speed.
Fo r journe ysin cities with de tailed city models, a
map view from the driver's perspective is used. #
Switch Auto zoom onO or off ª. %
The automatically selected map scale can be
changed manually for a short time. The set‐
ting is reset automatically af ter a few sec‐
onds.
Displaying the satellite map
Multimedia sy stem:
4 Navigation 5
Z Options
5 Map content #
Switch Satellite map onO or off ª.
or #
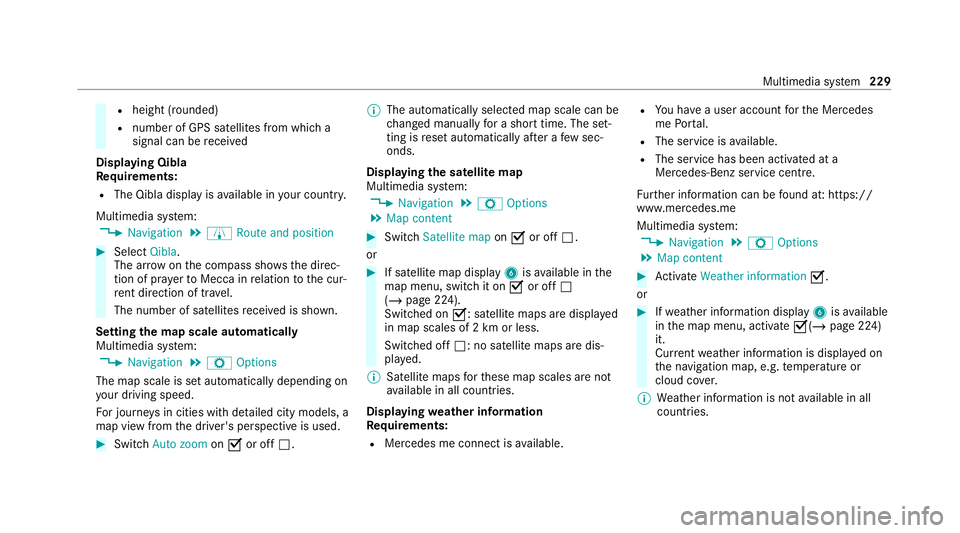
If satellite map display 6isavailable in the
map menu, switch it on Oor off ª
(/ page 224).
Switched on O: satellite maps are displa yed
in map scales of 2 km or less.
Swit ched off ª: no satellite maps are dis‐
pla yed.
% Satellite maps forth ese map scales are not
av ailable in all countries.
Displ aying weather information
Re quirements:
R Mercedes me connect is available. R
You ha vea user account forth e Mercedes
me Portal.
R The service is available.
R The service has been activated at a
Mercedes-Benz service centre.
Fu rther information can be found at: https://
www.mercedes.me
Multimedia sy stem:
4 Navigation 5
Z Options
5 Map content #
Activate Weather information O.
or #
Ifwe ather information display 6isavailable
in the map menu, activate O(/page 224)
it.
Cur rent we ather information is displa yed on
th e navigation map, e.g. temp erature or
cloud co ver.
% Weather information is not available in all
countries. Multimedia sy
stem 229
Page 295 of 441
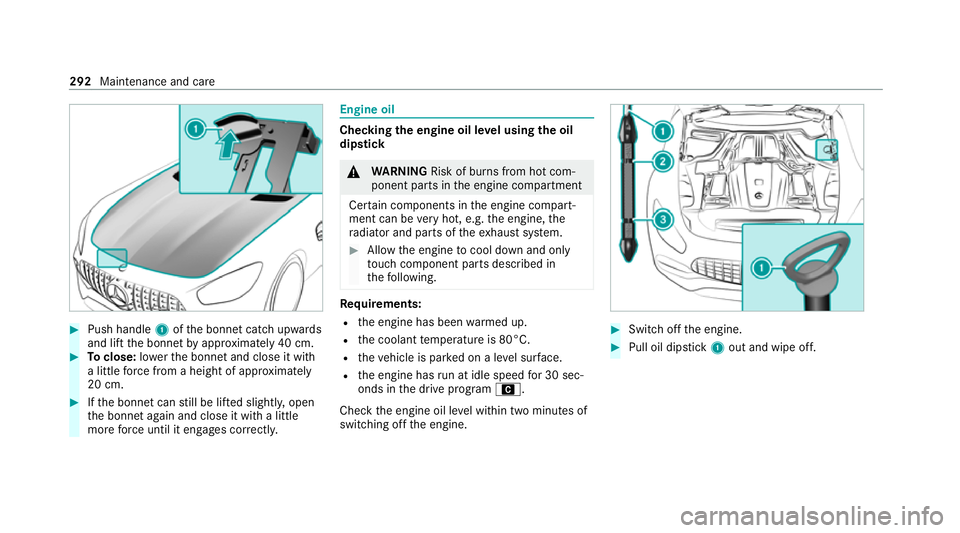
#
Push handle 1ofthe bonn etcatch up wards
and lift the bonn etby appr oximately 40 cm. #
Toclose: lowe rth e bonn etand close it with
a little forc e from a height of appr oximately
20 cm. #
Ifth e bonn etcan still be lif ted slightl y,open
th e bonn etagain and close it with a little
more forc e until it engages cor rectly. Engine oil
Che
cking the engine oil le vel using the oil
dip stick &
WARNING Risk of burn s from hot com‐
ponent parts in the engine compartment
Cer tain components in the engine compart‐
ment can be very hot, e.g. the engine, the
ra diator and parts of theex haust sy stem. #
Allow the engine tocool down and only
to uch co mponent parts described in
th efo llowing. Re
quirements:
R the engine has been warmed up.
R the coolant temp erature is 80°C.
R theve hicle is par ked on a le vel sur face.
R the engine has run at idle speed for 30 sec‐
onds in the drive program A.
Check the engine oil le vel within two minutes of
switching off the engine. #
Switch off the engine. #
Pull oil dipstick 1out and wipe off. 292
Maintenance and care
Page 348 of 441
#
Obser vethe instructions in the
Mercedes-Benz Specifications for Oper‐
ating Fluids 310.1. Ha
ve the coolant regularly replaced at a qualified
specialist workshop.
The proportion of cor rosion inhibitor/antifreeze
concentrate in the engine cooling sy stem should
be:
R a minimum of 50% (antifreeze pr otection
down toappr oximately -37°C)
R a maximum of 55% (antifreeze pr otection
down to-45°C) Note
s on windscreen washer fluid Obser
vethe no tes on operating fluids
(/ page 340). &
WARNING ‑ Risk of fire and injury due to
windscreen washer concentrate
Wi ndsc reen washer concentrate is highly
fl ammable. It could ignite if it comes into con
tact with hot engine component parts or
th eex haust sy stem. #
Make sure that no windscre enwasher
concentrate spills out next tothefiller
opening. *
NO
TEDama getotheex terior lighting
due tounsuitable windsc reen washer
fl uid Uns
uitable windsc reen washer fluids may
damage the plastic sur face of theex terior
lighting. #
Only use windscreen washer fluids
which are also suitable for use on plas‐
tic sur faces, e.g. MB SummerFit or MB
Wi nterFit. *
NO
TEBlocked spr aynozzles caused by
mixing windscreen washer fluids #
Do not mix MB SummerFit and MB Win‐
te rFit with other windscreen washer flu‐
ids. Do not use distilled or de-ionised
water asthefill
le ve l sensor may be triggered er roneously.
Re commended windscreen washer fluid:
R Abo vefreezing point: e.g. MB SummerFit
R Below freezing point: e.g. MB WinterFit
Fo rth e cor rect mixing ratio, referto the informa‐
tion on the antif reeze conta iner.
Mix thewa sher fluid with the windscreen washer
fl uid all year round. Ve
hicle data Ve
hicle dimensions The heights specifi
ed mayvary as a result of the
fo llowing factors:
R tyres
R load
R condition of the suspension
R optional equipment Te
ch nical da ta345