keyless MERCEDES-BENZ AMG GT ROADSTER 2018 Owner's Manual
[x] Cancel search | Manufacturer: MERCEDES-BENZ, Model Year: 2018, Model line: AMG GT ROADSTER, Model: MERCEDES-BENZ AMG GT ROADSTER 2018Pages: 294, PDF Size: 4.8 MB
Page 14 of 294
Horn...................................................... 33
Hydroplaning ..................................... 134
I
Ignition key
see SmartKey
Ignition lock
see Key positions
Immobilizer .......................................... 64
Indicator lamps
see Warning and indicator lamps
Indicators
see Turn signals
Inspection
see ASSYST PLUS
Instrument cluster
Overview .......................................... 34
Warning and indicator lamps ...........3 4
Instrument cluster lighting .............. 169
Interior lighting
Automatic control .......................... 100
Overview .......................................... 99
Reading lamp .................................. .99
Setting the brightness of the dis-
play/switch (on-board computer) .. 169
iPod
®
see also Digital Operator's Man-
ual .................................................. 208
J
Jack Using ............................................. 280
Jump starting (engine) ...................... 254
K
Key positions
SmartKey ....................................... 111
Start/Stop button .......................... 110
KEYLESS-GO
Convenience closing feature ............ 78
Deactivation ..................................... 67
Locking ............................................ 67
Start function ................................... 67
Unlocking ......................................... 67
KEYLESS-GO start function
Start/Stop button .......................... 110 Kickdown
Driving tips .................................... 120
Knee bag .............................................. 46
L
Lamps
see Warning and indicator lamps
Lane detection (automatic)
see Lane Keeping Assist
Lane Keeping Assist
Activating/deactivating (on-
board computer) ............................ 169
Display message ............................ 189
Function/information .................... 157
Lane Tracking package ..................... 155
Lap time (RACETIMER) ...................... 172
License plate lamp (display mes-
sage) ................................................... 185
Light sensor (display message) ....... 185
Lights
Automatic headlamp mode .............. 96
Fogged up headlamps ...................... 99
Hazard warning lamps ..................... 98
High beam flasher ............................ 97
High-beam headlamps ..................... 97
Light switch ..................................... 96
Low-beam headlamps ...................... 97
Parking lamps .................................. 97
Rear fog lamp .................................. 97
Setting exterior lighting ................... 96
Setting the brightness of the dis-
play/switch (on-board computer) .. 169
Standing lamps ................................ 97
Switching the daytime running
lamps on/off (on-board com-
puter) ............................................. 169
Turn signals ..................................... 97
see Interior lighting
Loading guidelines ............................ 217
Locking (doors)
Automatic ........................................ 72
Emergency locking ........................... 73
From inside (central locking but-
ton) .................................................. 72
see KEYLESS-GO
Locking centrally
see Central locking
12Index
Page 19 of 294
Important safety guidelines .............42
Introduction .....................................4 1
Releasin g ......................................... 44
Warning lamp ................................. 198
Warning lamp (function) ................... 44
Seat function
see Seat
Seats
Adjusting (electrically) ..................... 86
Adjusting (manually) ........................ 85
Adjusting (Performance Seat) .......... 87
Adjusting lumbar support ................ 86
Adjusting the head restraint ............ 86
Calling up a stored setting (mem-
ory function) .................................... 95
Cleaning the cover ......................... 246
Important safety notes .................... 84
Seat heating problem ...................... 88
Seat ventilation problem .................. 88
Storing settings (memory func-
tion) ................................................. 94
Switching AIRSCARF on/off ............ 89
Switching seat heating on/off ......... 87
Switching seat ventilation on/off .... 88
Selecting a gear
see Automatic transmission
Selector lever
Cleaning ......................................... 246
Positions ........................................ 117
Sensors (cleaning instructions) ....... 245
Service Center
see Qualified specialist workshop
Service menu (on-board com-
puter) .................................................. 168
Service message
see ASSYST PLUS
Service products
Brake fluid ..................................... 289
Coolant (engine) ............................ 290
Engine oil ....................................... 289
Fuel ................................................ 286
Important safety notes .................. 286
Refrigerant (air-conditioning sys-
tem) ............................................... 291
Washer fluid ................................... 290
Setting the date/time format
see also Digital Operator's Man-
ual .................................................. 208 Setting the language
see also Digital Operator's Man-
ual .................................................. 208
Setting the time
see also Digital Operator's Man-
ual .................................................. 208
Settings
Factory (on-board compu
ter) ......... 170
On-board computer ....................... 168
SETUP (on-board computer,
Mercedes-AMG vehicles) .................. 171
Side impact air bag ............................. 47
Side marker lamp (display mes-
sage) ................................................... 185
Side windows
Cleaning ......................................... 243
Convenience closing feature ............ 78
Convenience opening feature .......... 78
Important safety information ........... 76
Opening/closing .............................. 77
Problem (malfunction) ..................... 79
Resetting ......................................... 78
Reversing feature ............................. 77
SIRIUS services
see also Digital Operator's Man-
ual .................................................. 208
SmartKey
Changing the battery ....................... 69
Changing the programming ............. 67
Checking the battery ....................... 69
Convenience closing feature ............ 78
Convenience opening feature .......... 78
Display message ............................ 196
Door central locking/unlocking ....... 66
Important safety notes .................... 66
KEYLESS-GO start function .............. 67
Loss ................................................. 70
Mechanical key ................................ 68
Opening/closing soft top ................. 81
Overview .......................................... 66
Positions (ignition lock) ................. 111
Problem (malfunction) ..................... 70
Starting the engine ........................ 112
SMS
see also Digital Operator's Man-
ual .................................................. 208
Snow chains ...................................... 263
Index17
Page 22 of 294
Optional equipment weight (defi-
nition) ............................................ 279
PSI (pounds per square inch) (def-
inition) ...........................................278
Replacing ....................................... 279
Service life ..................................... 262
Sidewall (definition) ....................... 278
Speed rating (definition) ................ 278
Storing ...........................................2 80
Structure and characteristics
(definition) ..................................... 277
Summer tires in winter .................. 263
Temperature .................................. 273
TIN (Tire Identification Number)
(definition) ..................................... 279
Tire bead (definition) ......................2 78
Tire pressure (definition) ................ 278
Tire pressures (recommended) ...... 277
Tire size (data) ............................... 283
Tire size designation, load-bearing
capacity, speed rating .................... 274
Tire tread ....................................... 262
Tire tread (definition) ..................... 278
Total load limit (definition) ............. 279
Traction ......................................... 273
Traction (definition) ....................... 279
Tread wear ..................................... 273
Uniform Tire Quality Grading
Standards ...................................... 272
Uniform Tire Quality Grading
Standards (definition) .................... 277
Wear indicator (definition) ............. 279
Wheel and tire combination ........... 283
Wheel rim (definition) .................... 277
see Flat tire
Tool
see Vehicle tool kit
Touchpad
Changing the station/music
track .............................................. 211
Character suggestions ................... 210
Deleting characters ....................... 210
Entering a space ............................ 210
Entering characters ....................... 210
Gesture control .............................. 210
Handwriting recognition ................ 210
Operating the touchpad ................. 210
Overview ........................................ 210 Quick access for Audio .................. 211
Switching ....................................... 210
Switching input line ....................... 210
Tow-starting
Emergency engine starting ............ 259
Towing away
Important safety guidelines ........... 257
Installing the towing eye ................ 258
Removing the towing eye ............... 258
Transporting the vehicle ................ 259
With both axles on the ground ....... 258
Towing eye ......................................... 248
Traction system
see ETS (Electronic Traction System)
Traffic reports
see also Digital Operator's Man-
ual .................................................. 208
Transmission
Driving tips .................................... 120
Selector lever ................................ 117
see Automatic transmission
Transmission position display ......... 119
Transmission positions
General notes ................................ 117
Overview ........................................ 118
Transporting the vehicle .................. 259
Trim pieces (cleaning instruc-
tions) .................................................. 246
Trip computer (on-board com-
puter) .................................................. 162
Trip odometer
Calling up ....................................... 161
Resetting (on-board computer) ...... 162
Trunk lid
Display message ............................ 195
Important safety notes .................... 73
Locking separately ........................... 76
Opening (automatically from
inside) .............................................. 75
Opening dimensions ...................... 291
Opening/closing (from the out-
side) ................................................. 74
Unlocking with KEYLESS-GO ............ 74
Trunk load (maximum) ...................... 291
Turn signals
Display message ............................ 185
Switching on/off .............................. 97
20Index
Page 66 of 294
The spinning of the wheels results in a cut for
better traction on loose surfaces.
Rtraction control is still activated
RAdaptive Brake Assist is unavailable
Active Brake Assist is also not activated if you
brake firmly with assistance from ESP
®.
RPRE-SAFE®is unavailable
PRE-SAFE®is also not activated if you brake
firmly with assistance from ESP®.
RESP®still provides support when you brake
firmly
EBD (electronic brake force distribu-
tion)
General information
EBD monitors and controls the brake pressure
on the rear wheels to improve driving stability
while braking.
Important safety notes
iObserve the "Important safety notes" sec-
tion (Ypage 58).
GWARNING
If EBD is malfunctioning, the rear wheels can
lock, e.g. under full braking. This increases the
risk of skidding and an accident.
You should therefore adapt your driving style
to the different handling characteristics. Have
the brake system checked at a qualified spe-
cialist workshop.
Observe information regarding indicator and
warning lamps (
Ypage 200) as well as display
messages (Ypage 177).
ADAPTIVE BRAKE
ADAPTIVE BRAKE enhances braking safety and
offers increased braking comfort. In addition to
the braking function, ADAPTIVE BRAKE also fea-
tures the hill start assist function (
Ypage 112).
Protection against theft
Immobilizer
The immobilizer prevents your vehicle from
being started without the correct SmartKey.
XTo activate with KEYLESS-GO start-func-
tion or KEYLESS-GO: switch the ignition off
and open the driver's door.
XTo activate with the SmartKey: remove the
SmartKey from the ignition lock.
XTo deactivate: switch on the ignition.
When leaving the vehicle, always take the
SmartKey with you and lock the vehicle. Anyone
can start the engine if a valid SmartKey has been
left inside the vehicle.
iThe immobilizer is always deactivated when
you start the engine.
In the event that the engine cannot be started
(yet the vehicle's battery is charged), the sys-
tem is not operational. Contact an authorized
Mercedes-Benz Center or call
1-800-FOR-MERCedes (in the USA) or
1-800-387-0100 (in Canada).
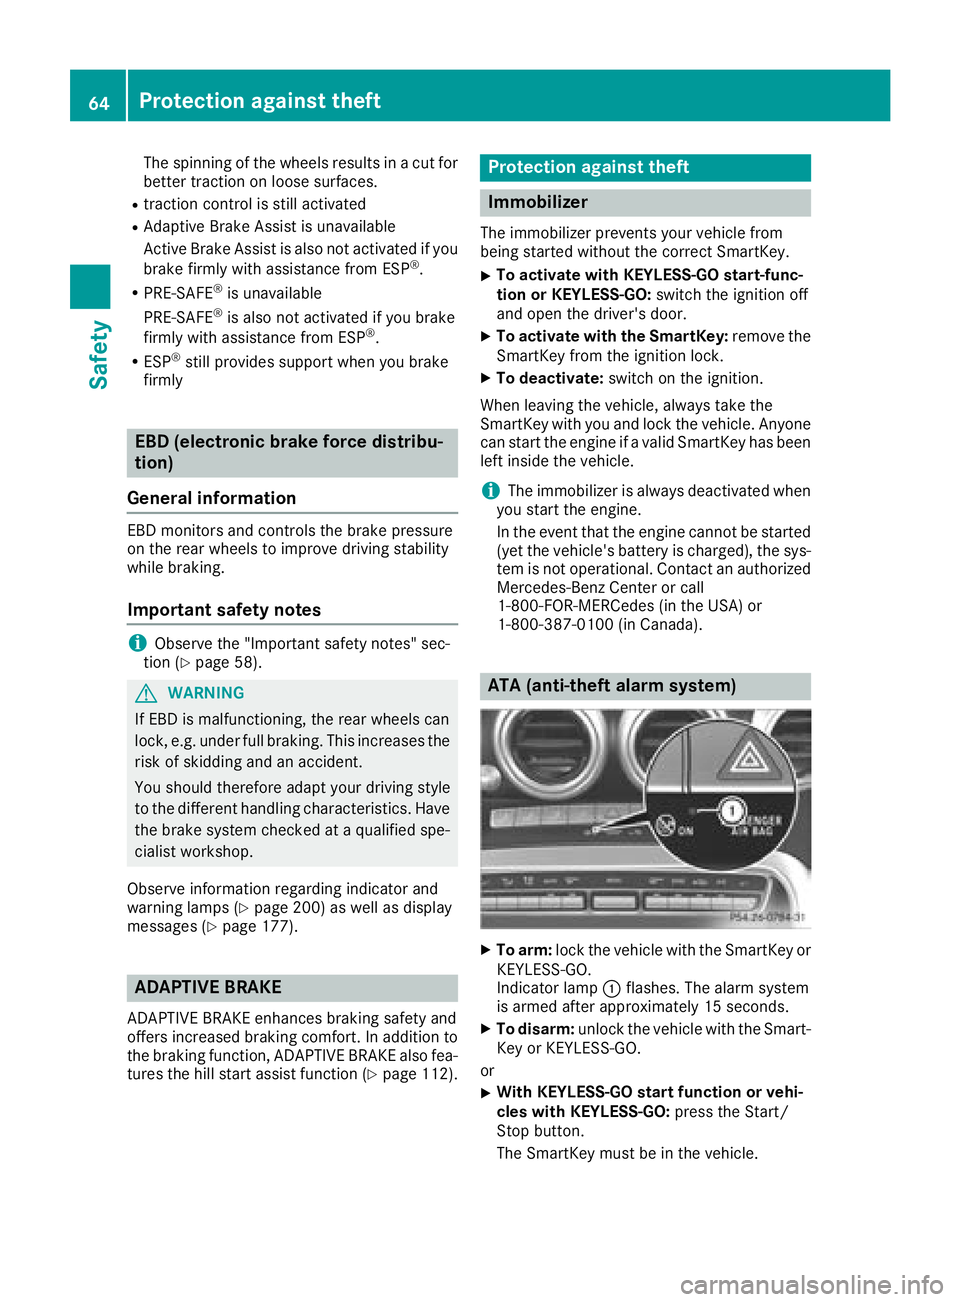
ATA (anti-theft alarm system)
XTo arm: lock the vehicle with the SmartKey or
KEYLESS-GO.
Indicator lamp :flashes. The alarm system
is armed after approximately 15 seconds.
XTo disarm: unlock the vehicle with the Smart-
Key or KEYLESS-GO.
or
XWith KEYLESS-GO start function or vehi-
cles with KEYLESS-GO: press the Start/
Stop button.
The SmartKey must be in the vehicle.
64Protection against theft
Safety
Page 67 of 294
or
XInsert the SmartKey into the ignition lock.
A visual and audible alarm is triggered if the
alarm system is armed and you open:
Ra door
Rthe vehicle with the mechanical key
Rthe trunk lid
Rthe hood
Rthe glove box
XTo turn the alarm off with the SmartKey:
press the %or& button on the Smart-
Key.
The alarm is stopped.
or
XInsert the SmartKey into the ignition lock.
The alarm is stopped.
XTo stop the alarm using KEYLESS-GO:
grasp the outside door handle. The SmartKey
must be outside the vehicle.
The alarm is stopped.
or
XPress the Start/Stop button. The SmartKey
must be inside the vehicle.
The alarm is stopped.
The alarm is not switched off, even if you close
the open door that triggered it, for example.
iIf the alarm continues for more than
30 seconds, the mbrace emergency call sys-
tem automatically notifies the Customer
Assistance Center. This is done either by text
message or data connection.
The emergency call system sends a message
or establishes a data connection provided
that:
Ryou have subscribed to the mbrace service.
Rthe mbrace service has been activated
properly.
Rthe necessary mobile phone network is
available.
Protection against theft65
Safety
Z
Page 68 of 294
SmartKey
Important safety notes
GWARNING
If children are left unsupervised in the vehicle,
they could:
Ropen the doors, thus endangering other
people or road users.
Rget out and disrupt traffic.
Roperate the vehicle's equipment.
Additionally, children could set the vehicle in
motion if, for example, they:
Rrelease the parking brake.
Rshifting the automatic transmission out of
park position P
RStart the engine.
There is a risk of an accident and injury.
When leaving the vehicle, always take the
SmartKey with you and lock the vehicle. Never
leave children or animals unattended in the
vehicle. Always keep the SmartKey out of
reach of children.
GWARNING
If you attach heavy or large objects to the
SmartKey, the SmartKey could be uninten-
tionally turned in the ignition lock. This could
cause the engine to be switched off. There is a risk of an accident.
Do not attach any heavy or large objects to the
SmartKey. Remove any bulky key rings before
inserting the SmartKey into the ignition lock.
!Keep the SmartKey away from strong mag-
netic fields. Otherwise, the remote control
function could be affected.
Strong magnetic fields can occur in the vicin-
ity of powerful electrical installations.
Do not keep the SmartKey:
Rwith electronic devices, e.g. a mobile phone
or another SmartKey
Rwith metallic objects, e.g. coins or metal foil
Rinside metallic objects, e.g. a metal case
This can affect the functionality of the Smart-
Key. Vehicles with KEYLESS-GO start function:
do
not keep the SmartKey in the trunk. Otherwise,
the SmartKey may not be detected, e.g. when
starting the engine using the Start/Stop button.
A brief radio connection between the vehicle
and the SmartKey determines whether a valid
SmartKey is in, or in the direct vicinity of, the
vehicle. This occurs, for example:
Rwhen starting the engine
Rwhile driving
Rwhen using the trunk unlocking sensor
Rwhen the external door handles are touched
Rduring convenience closing
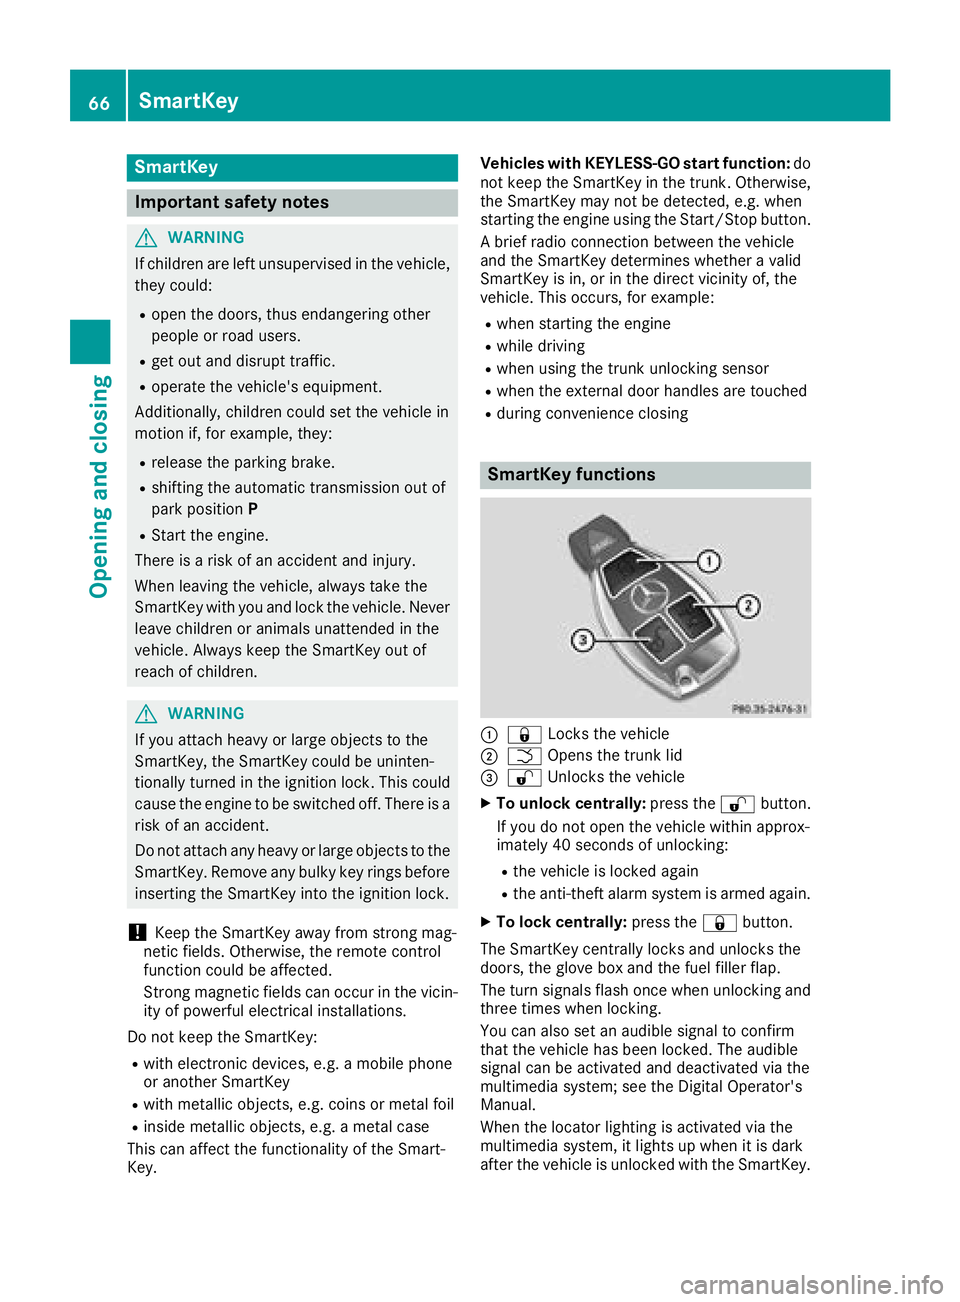
SmartKey functions
:& Locks the vehicle
;FOpens the trunk lid
=%Unlocks the vehicle
XTo unlock centrally: press the%button.
If you do not open the vehicle within approx-
imately 40 seconds of unlocking:
Rthe vehicle is locked again
Rthe anti-theft alarm system is armed again.
XTo lock centrally: press the&button.
The SmartKey centrally locks and unlocks the
doors, the glove box and the fuel filler flap.
The turn signals flash once when unlocking and
three times when locking.
You can also set an audible signal to confirm
that the vehicle has been locked. The audible
signal can be activated and deactivated via the
multimedia system; see the Digital Operator's
Manual.
When the locator lighting is activated via the
multimedia system, it lights up when it is dark
after the vehicle is unlocked with the SmartKey.
66SmartKey
Opening and closing
Page 69 of 294
Information on activating and deactivating the
locator lighting can be found in the Digital Oper-
ator's Manual.
XTo open the trunk lid:press and hold the
F button until the trunk lid opens.
KEYLESS-GO
General notes
Bear in mind that the engine can be started by
any of the vehicle occupants if there is a Smart-
Key in the vehicle (
Ypage 112).
Locking/unlocking centrally
You can start, lock or unlock the vehicle using
KEYLESS-GO. To do this, you only need carry the
SmartKey with you. You can combine the func-
tions of KEYLESS-GO with those of a conven-
tional SmartKey. Unlock the vehicle by using
KEYLESS-GO, for instance, and lock it using the
& button on the SmartKey.
The driver's door and the door at which the han-
dle is used, must both be closed. The SmartKey
must be outside the vehicle. When locking or
unlocking with KEYLESS-GO, the distance
between the SmartKey and the corresponding
door handle must not be greater than 3 ft (1 m).
A check which periodically establishes a radio
connection between the vehicle and the Smart-
Key determines whether a valid SmartKey is in
the vehicle. This occurs, for example:
Rwhen starting the engine
Rwhile driving
Rwhen using the remote trunk lid opening sen- sor
Rwhen the external door handles are touched
Rduring convenience closing
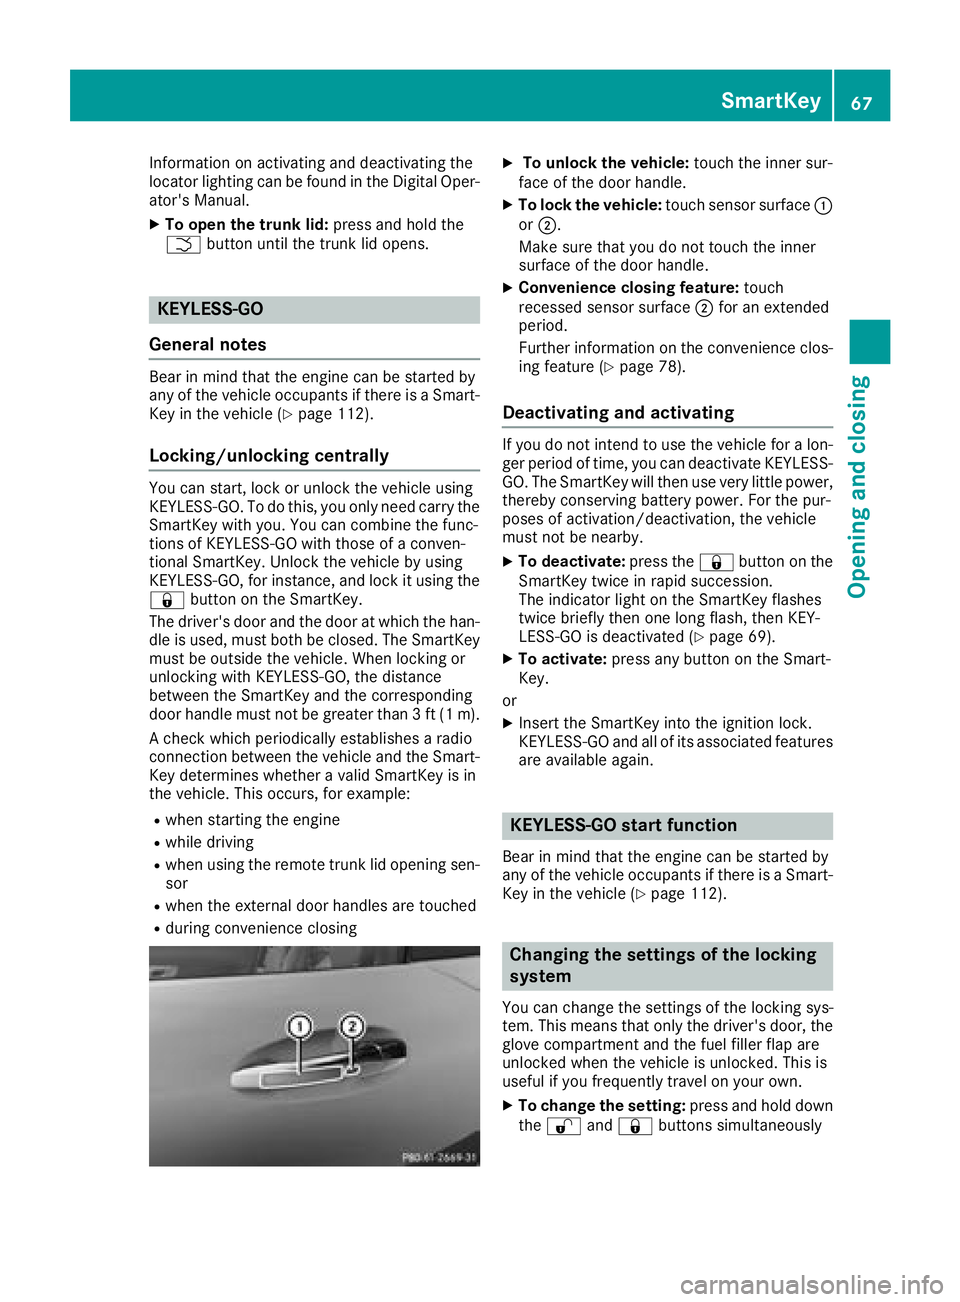
XTo unlock the vehicle: touch the inner sur-
face of the door handle.
XTo lock the vehicle: touch sensor surface :
or ;.
Make sure that you do not touch the inner
surface of the door handle.
XConvenience closing feature: touch
recessed sensor surface ;for an extended
period.
Further information on the convenience clos-
ing feature (
Ypage 78).
Deactivating and activating
If you do not intend to use the vehicle for a lon-
ger period of time, you can deactivate KEYLESS-
GO. The SmartKey will then use very little power,
thereby conserving battery power. For the pur-
poses of activation/deactivation, the vehicle
must not be nearby.
XTo deactivate: press the&button on the
SmartKey twice in rapid succession.
The indicator light on the SmartKey flashes
twice briefly then one long flash, then KEY-
LESS-GO is deactivated (
Ypage 69).
XTo activate: press any button on the Smart-
Key.
or
XInsert the SmartKey into the ignition lock.
KEYLESS-GO and all of its associated features
are available again.
KEYLESS-GO start function
Bear in mind that the engine can be started by
any of the vehicle occupants if there is a Smart-
Key in the vehicle (
Ypage 112).
Changing the settings of the locking
system
You can change the settings of the locking sys-
tem. This means that only the driver's door, the
glove compartment and the fuel filler flap are
unlocked when the vehicle is unlocked. This is
useful if you frequently travel on your own.
XTo change the setting: press and hold down
the % and& buttons simultaneously
SmartKey67
Opening and closing
Z
Page 70 of 294
for about six seconds until the battery indica-
tor lamp flashes twice (Ypage 69).
If the setting of the locking system is changed
within the signal range of the vehicle, pressing
the & or% button:
Rlocks or
Runlocks the vehicle
The SmartKey now functions as follows:
XTo unlock: press the%button once.
XTo unlock centrally: press the%button
twice.
XTo lock: press the &button.
The KEYLESS-GO functions can be changed as
follows:
XTo unlock the driver's door: touch the inner
surface of the door handle on the driver's
door.
XTo unlock centrally: touch the inner surface
of the front-passenger door handle.
XTo lock centrally: touch the outer sensor
surface on one of the door handles.
Restoring factory settings:
XPress the %and& buttons simultane-
ously for approximately six seconds until the
battery check lamp flashes twice
(
Ypage 69).
Mechanical key
General notes
If the vehicle can no longer be locked or
unlocked with the SmartKey or KEYLESS-GO,
use the mechanical key.
If you use the mechanical key to unlock and
open the driver's door, the anti-theft alarm sys-
tem will be triggered. Switch off the alarm
(
Ypage 64).
If you unlock the vehicle using the mechanical
key, the fuel filler flap will not be unlocked auto-
matically.
XTo unlock the fuel filler flap: insert the
SmartKey into the ignition lock.
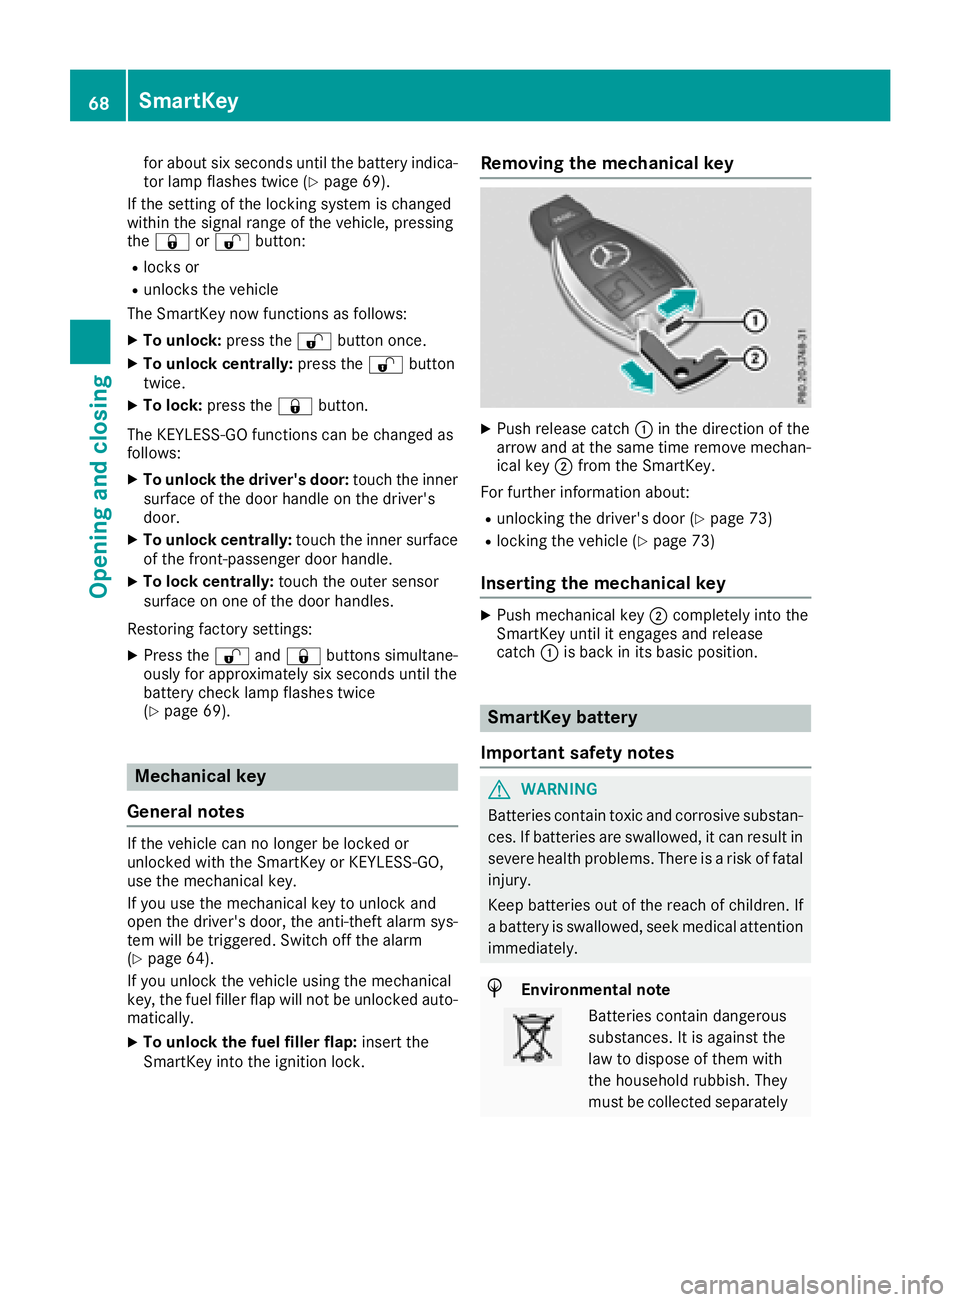
Removing the mechanical key
XPush release catch :in the direction of the
arrow and at the same time remove mechan- ical key ;from the SmartKey.
For further information about:
Runlocking the driver's door (Ypage 73)
Rlocking the vehicle (Ypage 73)
Inserting the mechanical key
XPush mechanical key ;completely into the
SmartKey until it engages and release
catch :is back in its basic position.
SmartKey battery
Important safety notes
GWARNING
Batteries contain toxic and corrosive substan- ces. If batteries are swallowed, it can result in
severe health problems. There is a risk of fatalinjury.
Keep batteries out of the reach of children. If
a battery is swallowed, seek medical attention immediately.
HEnvironmental note
Batteries contain dangerous
substances. It is against the
law to dispose of them with
the household rubbish. They
must be collected separately
68SmartKey
Opening and closing
Page 72 of 294
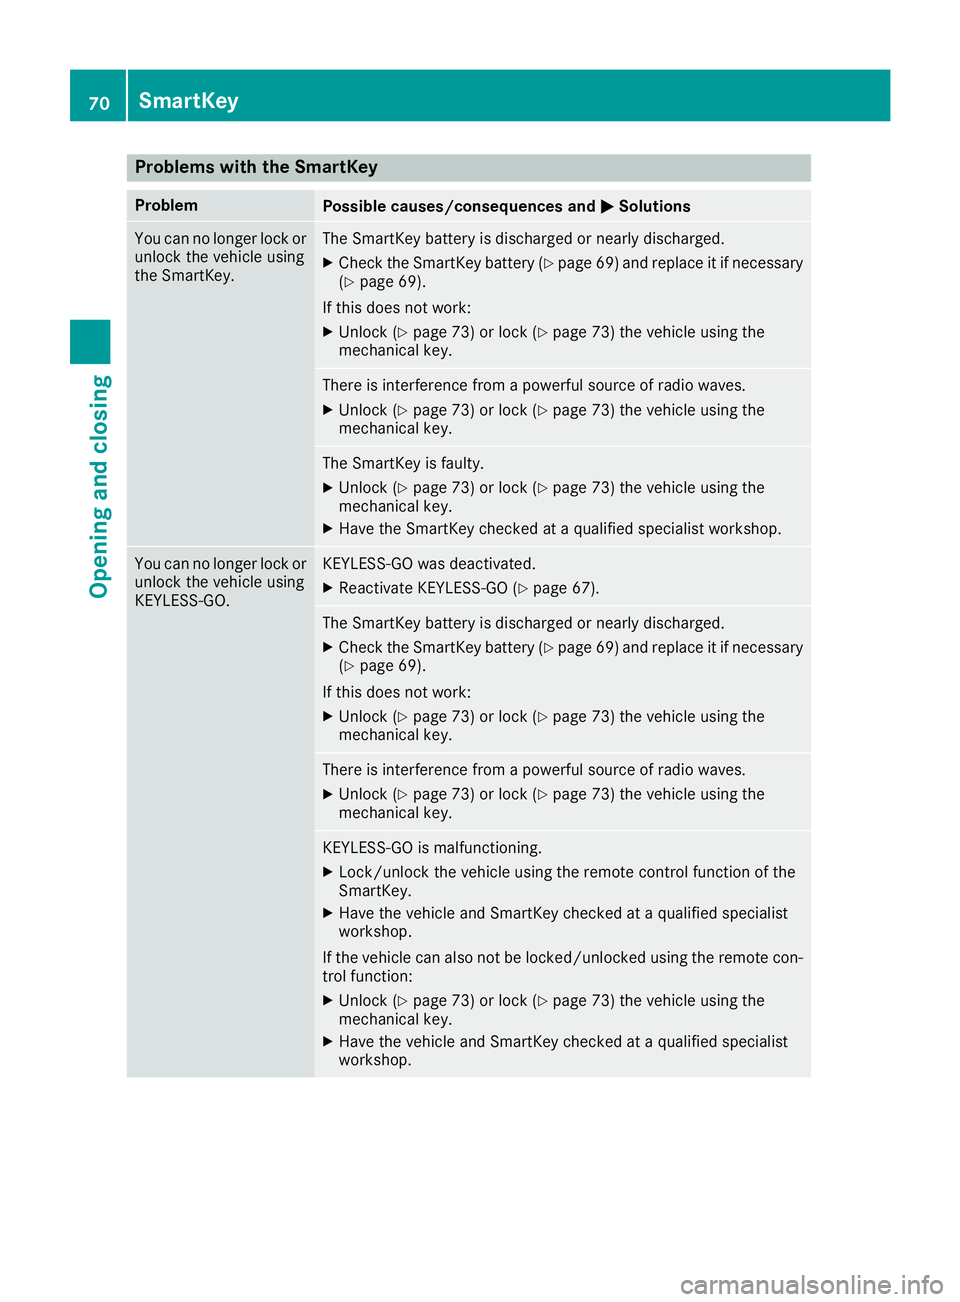
Problems with the SmartKey
ProblemPossible causes/consequences andMSolutions
You can no longer lock or
unlock the vehicle using
the SmartKey.The SmartKey battery is discharged or nearly discharged.
XCheck the SmartKey battery (Ypage 69) and replace it if necessary
(Ypage 69).
If this does not work:
XUnlock (Ypage 73) or lock (Ypage 73) the vehicle using the
mechanical key.
There is interference from a powerful source of radio waves.
XUnlock (Ypage 73) or lock (Ypage 73) the vehicle using the
mechanical key.
The SmartKey is faulty.
XUnlock (Ypage 73) or lock (Ypage 73) the vehicle using the
mechanical key.
XHave the SmartKey checked at a qualified specialist workshop.
You can no longer lock or
unlock the vehicle using
KEYLESS-GO.KEYLESS-GO was deactivated.
XReactivate KEYLESS-GO (Ypage 67).
The SmartKey battery is discharged or nearly discharged.
XCheck the SmartKey battery (Ypage 69) and replace it if necessary
(Ypage 69).
If this does not work:
XUnlock (Ypage 73) or lock (Ypage 73) the vehicle using the
mechanical key.
There is interference from a powerful source of radio waves.
XUnlock (Ypage 73) or lock (Ypage 73) the vehicle using the
mechanical key.
KEYLESS-GO is malfunctioning.
XLock/unlock the vehicle using the remote control function of the
SmartKey.
XHave the vehicle and SmartKey checked at a qualified specialist
workshop.
If the vehicle can also not be locked/unlocked using the remote con-
trol function:
XUnlock (Ypage 73) or lock (Ypage 73) the vehicle using the
mechanical key.
XHave the vehicle and SmartKey checked at a qualified specialist
workshop.
70SmartKey
Opening and closing
Page 74 of 294
!The side windows will not open/close if the
battery is discharged or if the side windows
have iced up. It will then not be possible to
close the door. Do not attempt to force the
door closed. You could otherwise damage the
door or the side window.
Unlocking and opening doors from
the inside
You can open a door from inside the vehicle
even if it has been locked. If the vehicle has been
locked with the SmartKey or with KEYLESS-GO,
opening a door from the inside will trigger the
anti-theft alarm system. Switch off the alarm
(
Ypage 64).
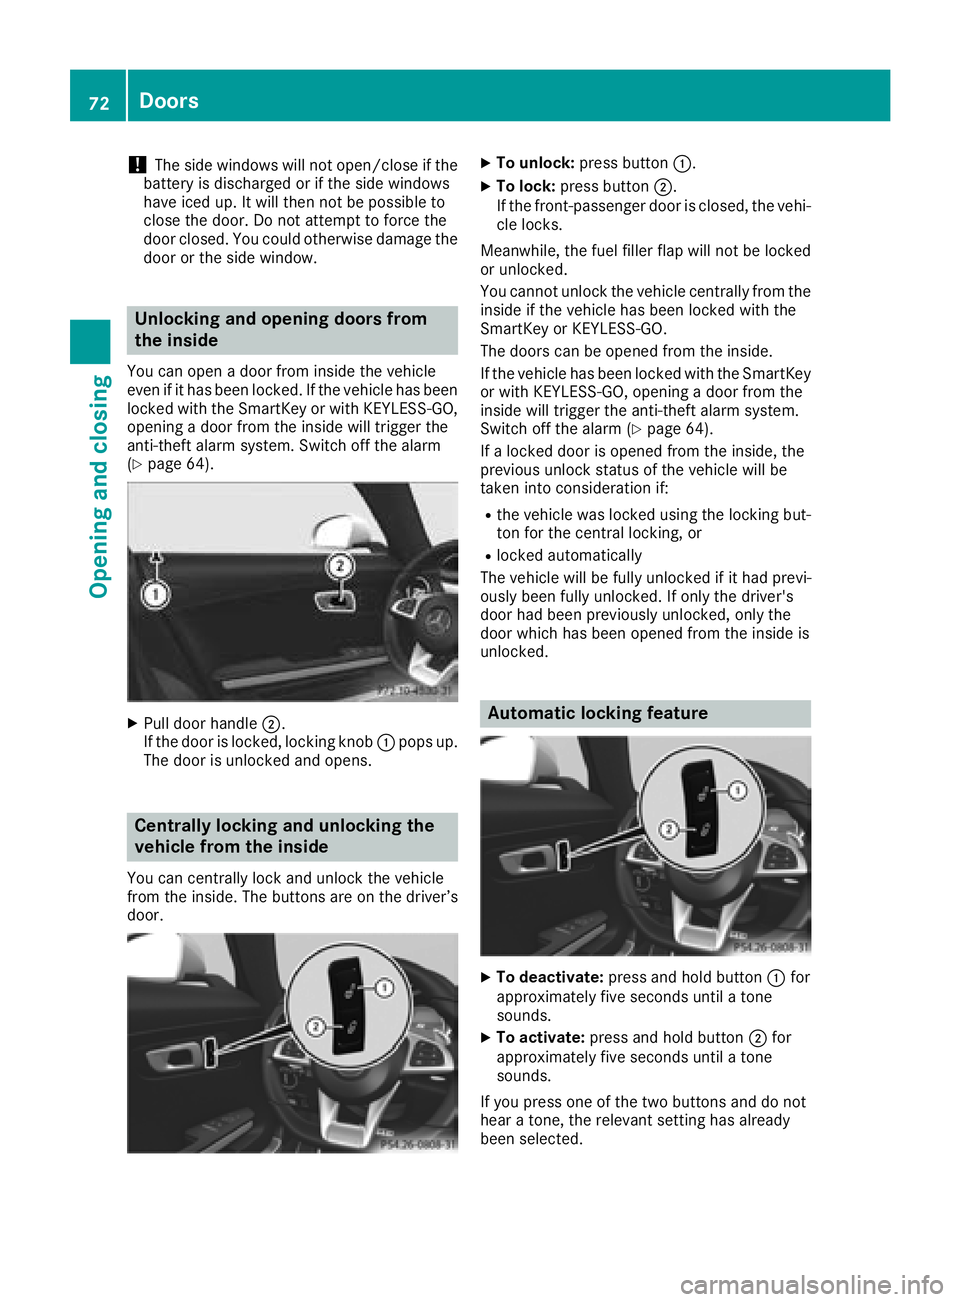
XPull door handle ;.
If the door is locked, locking knob :pops up.
The door is unlocked and opens.
Centrally locking and unlocking the
vehicle from the inside
You can centrally lock and unlock the vehicle
from the inside. The buttons are on the driver’s
door.
XTo unlock: press button :.
XTo lock:press button ;.
If the front-passenger door is closed, the vehi-
cle locks.
Meanwhile, the fuel filler flap will not be locked
or unlocked.
You cannot unlock the vehicle centrally from the
inside if the vehicle has been locked with the
SmartKey or KEYLESS-GO.
The doors can be opened from the inside.
If the vehicle has been locked with the SmartKey
or with KEYLESS-GO, opening a door from the
inside will trigger the anti-theft alarm system.
Switch off the alarm (
Ypage 64).
If a locked door is opened from the inside, the
previous unlock status of the vehicle will be
taken into consideration if:
Rthe vehicle was locked using the locking but-
ton for the central locking, or
Rlocked automatically
The vehicle will be fully unlocked if it had previ-
ously been fully unlocked. If only the driver's
door had been previously unlocked, only the
door which has been opened from the inside is
unlocked.
Automatic locking feature
XTo deactivate: press and hold button :for
approximately five seconds until a tone
sounds.
XTo activate: press and hold button ;for
approximately five seconds until a tone
sounds.
If you press one of the two buttons and do not
hear a tone, the relevant setting has already
been selected.
72Doors
Opening and closing