wiper blades MERCEDES-BENZ AMG GT ROADSTER 2018 Owner's Manual
[x] Cancel search | Manufacturer: MERCEDES-BENZ, Model Year: 2018, Model line: AMG GT ROADSTER, Model: MERCEDES-BENZ AMG GT ROADSTER 2018Pages: 294, PDF Size: 4.8 MB
Page 8 of 294
Blind Spot AssistActivating/deactivating (on-
board computer) ............................ 168
Display message ............................ 189
Notes/function .............................. 155
Blower
see Climate control
Bluetooth
®
Searching for a mobile phone ........ 215
see also Digital Operator's Man-
ual .................................................. 208
Brake Assist System
see BAS (Brake Assist System)
Brake assistance
see BAS (Brake Assist System)
Brake fluid
Display message ............................ 180
Notes ............................................. 289
Brake force distribution
see EBD (electronic brake force
distribution)
Brakes
ABS .................................................. 58
AMG high-performance and
ceramic brakes .............................. 133
BAS .................................................. 59
Brake fluid (notes) ......................... 289
Braking assistance appropriate to
the situation ..................................... 61
Display message ............................ 175
EBD .................................................. 64
Hill start assist ............................... 112
Important safety notes .................. 132
Maintenance .................................. 133
Parking brake ................................ 129
Riding tips ...................................... 132
Warning lamp ................................. 199
Braking assistance appropriate to
the situation
Function/notes ................................ 61
Breakdown
Where will I find...? ........................ 248
see Flat tire
see Towing away
Buttons on the steering wheel ......... 160
C
Cabriolet
Soft top ............................................ 80
California
Important notice for retail cus-
tomers and lessees .......................... 25
Calling up a malfunction
see Display messages
Calling up the climate control bar
Multimedia system ........................ 212
Calling up the climate control
menu
Multimedia system ........................ 212
Car
see Vehicle
Care
Car wash ........................................ 241
Carpets .......................................... 247
Display ........................................... 245
Exhaust pipe .................................. 245
Exterior lights ................................ 244
Gear or selector lever .................... 246
General notes ................................ 240
Interior ........................................... 245
Matte finish ................................... 243
Paint .............................................. 242
Plastic trim .................................... 246
Power washer ................................ 242
Rear view camera .......................... 245
Roof lining ...................................... 247
Seat belt ........................................ 247
Seat cover ..................................... 246
Sensors ......................................... 245
Soft top .......................................... 244
Steering wheel ............................... 246
Trim pieces .................................... 246
Washing by hand ........................... 241
Wheels ........................................... 243
Windows ........................................ 243
Wiper blades .................................. 244
CD
see also Digital Operator's Man-
ual .................................................. 208
CD player (on-board computer) ........ 165
Center console
Overview .......................................... 36
6Index
Page 24 of 294
Wheel chock...................................... 280
Wheels
Changing a wheel .......................... 279
Checking ........................................ 262
Cleaning ......................................... 243
Important safety notes .................. 261
Information on driving .................... 261
Interchanging/changing ................ 279
Mounting a new wheel ...................2 82
Mounting a wheel .......................... 280
Notes on sport tires ....................... 261
Removing a wheel .......................... 282
Storing ...........................................2 80
Tightening torque ........................... 283
Wheel size/tire size ....................... 283
Wind screen ......................................... 82
Window curtain air bag
Display message ............................ 182
Windows
see Side windows
Windshield
Defrosting ...................................... 106
Windshield washer fluid
see Windshield washer system
Windshield washer system
Adding washer fluid ....................... 239
Important safety notes .................. 290
Windshield wipers
Problem (malfunction) ................... 102
Replacing the wiper blades ............ 101
Switching on/off ........................... 100
Winter driving
Slippery road surfaces ................... 134
Snow chains .................................. 263
Winter operation
General notes ................................ 263
Summer tires ................................. 263
Winter tires
M+S tires ....................................... 263
Wiper blades
Cleaning ......................................... 244
Important safety notes .................. 101
Replacing ....................................... 101
Replacing (windshield) ................... 101
Workshop
see Qualified specialist workshop
22Index
Page 102 of 294
Automa tic interi orlighting control
XTo switch on or off :press th e| button.
When th eautomatic interior lighting control is
activated, th ebutto nis flus hwit hth eover-
head control panel.
The interior lighting automatically switches on if
you:
Runloc kth evehicl e
Ropenadoor
Rswitch off th eengin ewit hth eStart/Sto pbut -
to n
The interior lighting is activated for ashort time
when th eengin eis switched off wit hth eStart /
Stop button. This delaye dswitch-off can be
adjusted via th emultimedia system (see Digital
Operator' sManual).
Replacing bulbs
The fron tand rear ligh tclusters of your vehicl e
are equipped wit hLE Dligh tbulbs .Do no t
replace th ebulbs yourself .Contac t aqualified
specialis tworkshop whic hhas th enecessar y
specialis tknowledge and tools to carry out th e
wor krequired.
Lamps are an important aspect of vehicl esafety.
You mus ttherefor emak esur ethat these func-
tion correctl yat all times .Hav eth eheadlamp
setting checke dregularly.
Windshield wipers
Switching the windshield wipers
on/off
!
Do no toperate th ewindshield wiper swhen
th ewindshield is dry, as this could damag e
th ewiper blades. Moreover, dust that has col-
lecte don th ewindshield can scratch th eglas s
if wipin gtakes plac ewhen th ewindshield is
dry.
If it is necessar yto switch on th ewindshield
wiper sin dry weather conditions, always use
washer fluid when operating th ewindshield
wipers.
!If th ewindshield wiper sleav esmears on th e
windshield after th evehicl ehas been washed
in an automatic car wash ,wax or other resi-
dues may be th ereason for this. Clean th ewindshield usin
gwasher fluid after washing
th evehicl ein an automatic car wash .
!Intermittent wipingwit hrain sensor :due to
optical influence sand th ewindshield becom-
ing dirty in dry weather conditions, th ewind-
shield wiper smay be activated inadvertently.
This could then damag eth ewindshield wiper
blade sor scratch th ewindshield.
Fo rthis reason ,you should always switch off
th ewindshield wiper sin dry weather .
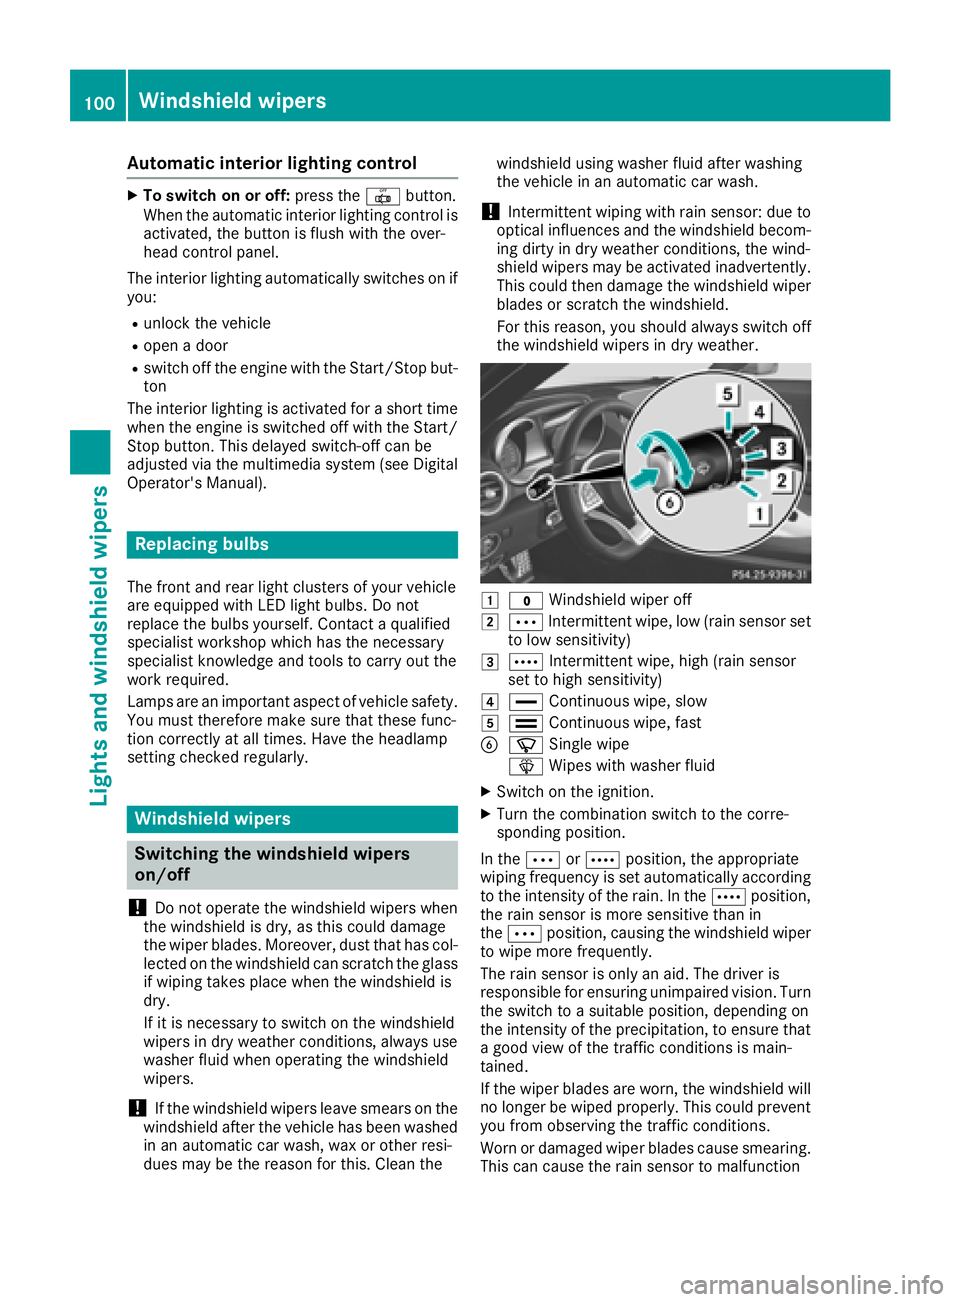
1$Windshield wiper off
2ÄIntermittent wipe, low (rai nsensor set
to low sensitivity)
3Å Intermittent wipe, high (rai nsensor
set to high sensitivity)
4° Continuous wipe, slow
5¯Continuous wipe, fas t
BíSingle wipe
î Wipeswit hwasher fluid
XSwitc hon th eignition .
XTurn thecombination switch to th ecorre-
sponding position .
In th eÄ orÅ position ,th eappropriat e
wipin gfrequency is set automatically according
to th eintensit yof th erain .In th eÅ position ,
th erain sensor is mor esensitive than in
th eÄ position ,causing th ewindshield wiper
to wipe mor efrequently.
The rain sensor is only an aid. The driver is
responsibl efor ensuring unimpaired vision .Turn
th eswitch to asuitable position ,depending on
th eintensit yof th eprecipitation ,to ensur ethat
a goo dvie wof th etraffic condition sis main -
tained.
If th ewiper blade sare worn, th ewindshield will
no longer be wiped properly. This could preven t
you from observing th etraffic conditions.
Wor nor damaged wiper blade scaus esmearing.
This can caus eth erain sensor to malfunction
100Windshield wipers
Lights and windshield wipers
Page 103 of 294
Replacing the wiper blades
Important safety notes
GWARNING
If the windshield wipers begin to move while
you are changing the wiper blades, you could be trapped by the wiper arm. There is a risk of
injury.
Always switch off the windshield wipers and
ignition before changing the wiper blades.
!Never open the hood if a windshield wiper
arm has been folded away from the wind-
shield.
Never fold a windshield wiper arm without a
wiper blade back onto the windshield.
Hold the windshield wiper arm firmly when
you change the wiper blade. If you release the
windshield wiper arm without a wiper blade
and it falls onto the windshield, the windshield
may be damaged by the force of the impact.
Mercedes-Benz recommends that you have
the wiper blades changed at a qualified spe-
cialist workshop.
!To avoid damaging the wiper blades, make
sure that you touch only the wiper arm of the
wiper.
Replacing the wiper blades
Adjusting the wiper blades so that they
are vertical
XSwitch off the engine.
XRemove your foot from the brake pedal.
XSet the windshield wiper to the °position.
XPress the Start/Stop button repeatedly until
the windshield wiper starts.
XWhen the wiper arms are in a vertical position
to the hood, press the Start/Stop button.
XFold the wiper arm away from the windshield.
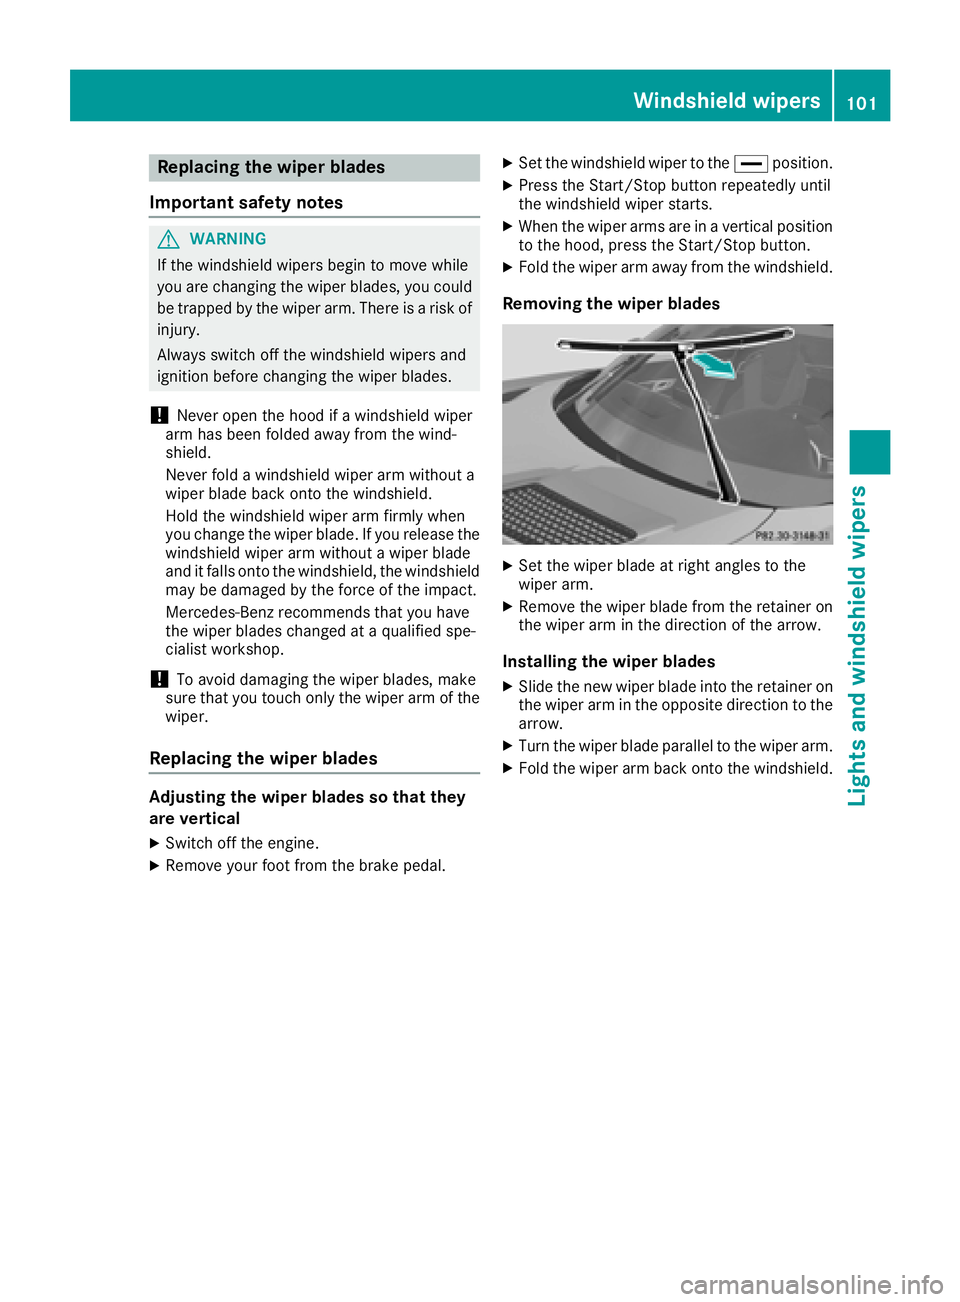
Removing the wiper blades
XSet the wiper blade at right angles to the
wiper arm.
XRemove the wiper blade from the retainer on
the wiper arm in the direction of the arrow.
Installing the wiper blades
XSlide the new wiper blade into the retainer on
the wiper arm in the opposite direction to the
arrow.
XTurn the wiper blade parallel to the wiper arm.
XFold the wiper arm back onto the windshield.
Windshield wipers101
Lights and windshield wipers
Z
Page 243 of 294
Regular careof your vehicl eis acondition for
retaining th equalit yin th elon gterm .
Use car eproducts and cleaning agents recom-
mended and approve dby Mercedes-Benz.
Washing the vehicle and cleaning the
paintwork
Automatic car wash
GWARNIN G
Braking efficiency is reduce dafter washing
th evehicle. There is aris kof an accident.
Afte rth evehicl ehas been washed, brak e
carefully while payin gattention to th etraffic
condition suntil full braking power is restored .
!When Active Brake Assist,Distanc ePilot
DISTRONI Cor th eHOLD function is activated,
th evehicl ebrakes automatically in certain
situations.
To avoi ddamag eto th evehicle, deactivat e
these systems in th efollowin gor similar sit -
uations:
Rwhen towin gth evehicl e
Rin thecar wash
!Preferably use automatic car washe swit h
adjustable high-pressur epre-cleaning .This
correspond swit hth especification for th e
Cabriolet program .In car washe sthat use
high water pressures, there is aris kthat a
small amoun tof water may leak int oth evehi-
cle .
!Mak esur ethat th evehicl eis no tsubse-
quentl ytreated wit hhot wax.
!Never clean your vehicl ein aTouchles s
Automatic Car Wash as these use special
cleaning agents .These cleaning agents can
damag eth epaintwork or plastic parts.
If you hav eyour vehicl ecleane din ahigh -
pressur eautomatic car wash, small amounts
of water may ente rth evehicle.
!If th eSmartKey is within th erear detection
ra
nge of KEYLESS-GO ,th efollowin gsitua-
tions, for example, could lead to th euninten-
tional opening of th etrunk lid:
Rwhen usin gan automatic car wash
Rwhen usin g apower washe r Mak
esur ethat th eSmartKey is at least 10 ft
(3 m) away from th evehicle.
!Mak esur ethat:
Rth eside windows are fully closed.
Rth eblowe rfor th eventilation/heating is
switched off .
Rthewindshield wiper switch is at position 0.
Rtherear vie wcamera is switched off .
The vehicl emay otherwise be damaged.
!When washing your vehicl ein atow-through
car wash, use th eSmartKey instead of th e
Start/Sto pbutton.
Start th eengin eusin gth eSmartKey. Se tth e
transmission to iwithth eE-SELECT selec-
to rlever. Switc hth eengin eoff again wit hth e
SmartKey by turnin gth eSmartKey to position
2. Mak esur ethat you then leav eth eSmart -
Key in position 2.You may otherwise dam-
age th evehicle, th etransmission or th ecar
wash.
Chec kth etransmission position in th einstru-
men tcluster.
!Befor eswitching off th eengine, set th e
transmission to iusin gth eE-SELECT selec-
to rlever. If you open th edriver' sdoor or front-
passenger door ,th etransmission rema
insin
this position for up to 30 minute sif th eSmart -
Key is in th eignition ,eve nif th eengin eis
switched off .If you do no tshif tth etransmis -
sion to iusin gth eE-SELECT selector lever
beforehand, it shifts automatically to parking
position jand locks th ewheels if th edriv -
er' sdoor or front-passenger door is opened
and th eengin eis switched off .This may dam-
age th evehicle, th etransmission or th ecar
wash.
You can wash th evehicl ein an automatic car
wash from th ever ystart .
If th evehicl eis ver ydirty, pre-was hit before
cleaning it in an automatic car wash.
Afte rusin gan automatic car wash, wipe off wax
from th ewindshield and th ewiper blades. This
will preven tsmears and reduce wipin gnoises
caused by residue on th ewindshield.
Washing by hand
In som ecountries, washing by han dis only
allowe dat specially equipped washing bays.
Observ eth elegal requirements in eac hcountry.
Care241
Maintenance and care
Z
Page 245 of 294
If water no longer forms "beads" on the paint
surface, use the paint care products recommen-
ded and approved by Mercedes-Benz. This is the
case approximately every three to five months,
depending on the climate conditions and the
care product used.
If dirt has penetrated the paint surface or if the
paint has become dull, the paint cleaner recom-
mended and approved by Mercedes-Benz
should be used.
Do not use these care products in the sun or on
the hood while the hood is hot.
XUse a suitable touch-up stick, e.g. MB Touch-
Up Stick, to repair slight damage to the paint-
work quickly and provisionally.
Matte finish care
!Never polish the vehicle or the light alloy
wheels. Polishing causes the finish to shine.
!The following can give the paint a glossy
appearance and thus reduce the matt effect:
RRubbing hard with unsuitable agents
RWashing the vehicle in direct sunlight
!Never use paint cleaner, buffing or polishing
products, or gloss preserver, e.g. wax, for the
purpose of paintwork care. These products
are only suitable for high-gloss surfaces. Their
use on vehicles with matte paintwork leads to
considerable surface damage or, more spe-
cifically, to shiny, spotted areas.
Always have paintwork repairs carried out at a
qualified specialist workshop.
!Only use automatic car washes which cor-
respond to the latest technological stand-
ards. Never use wash programs which finish
by treating the vehicle with hot wax.
Observe these notes if your vehicle has a clear
matte finish. This will help you to avoid damage
to the paintwork due to incorrect treatment.
These notes also apply to light alloy wheels with
a clear matte finish.
iUse only insect remover and car shampoo
from the range of approved Mercedes-Benz
care products.
Cleaning the vehicle parts
Cleaning the wheels
GWARNING
The water jet from a circular jet nozzle (dirt
blasters) can cause invisible exterior damage
to the tires or chassis components. Compo-
nents damaged in this way may fail unexpect-
edly. There is a risk of an accident.
Do not use power washers with circular jet
nozzles to clean the vehicle. Have damaged
tires or chassis components replaced imme-
diately.
!Do not use acidic wheel cleaning products
to remove brake dust. This could damage
wheel bolts and brake components.
!Do not park your vehicle for a long period of
time directly after cleaning, particularly after
cleaning the wheel rim with wheel cleaner.
Wheel cleaner can lead to the increased cor-
rosion of the brake discs and pads. Therefore,
drive for a few minutes after cleaning. By
heating up the brakes, the brake discs and
pads dry. The vehicle can then be parked for a
long period of time.
Cleaning the windows
GWARNING
You could become trapped by the windshield wipers if they start moving while cleaning the
windshield or wiper blades. There is a risk of
injury.
Always switch off the windshield wipers and
the ignition before cleaning the windshield or
wiper blades.
!Do not use dry cloths, abrasive products,
solvents or cleaning agents containing sol-
vents to clean the inside of the windows. Do
not touch the insides of the windows with
hard objects, e.g. an ice scraper or ring. There
is otherwise a risk of damaging the windows.
!Clean the water drainage channels of the
windshield and the rear window at regular
intervals. Deposits such as leaves, petals and pollen may under certain circumstances pre-
vent water from draining away. This can lead
Care243
Maintenance and care
Z
Page 246 of 294
to corrosion damage and damage to elec-
tronic components.
XClean the inside and outside of the windows
with a damp cloth and a cleaning product that
is recommended and approved by Mercedes-
Benz.
Cleaning the soft top
!Never use any of the following to clean the
soft top:
Rgasoline
Rthinner
Rtar or stain remover
Rother organic solvents
!Remove bird droppings immediately, as
they are corrosive and can therefore cause
the soft-top fabric to leak. Do not wash the
vehicle with a power washer or in a car wash
that uses power washers. Do not use sharp-
edged equipment to remove ice and snow.
XLight soiling: you can clean the soft top while
it is dry or rinse it with clear water.
XNormal to heavy soiling: clean the soft top
with a brush and clear water. Clean stains and
other dirt with a brush and soft top cleaning
agents that have been recommended and
approved by Mercedes-Benz. Always brush
from front to back, following the grain of the
fabric.
Frequent cleaning reduces the soft top's resist-
ance to dirt.
To restore this resistance to dirt, clean the soft
top using soft top cleaning agents that have
been recommended and approved by
Mercedes-Benz.
Incorrect cleaning and care, as well as aging,
can cause the soft-top seams to leak. In the
event of this happening, have the soft-top seams
sealed at a qualified specialist workshop.
iCover the soft top appropriately if you plan
to leave the vehicle outside for a long period
of time.
Cleaning wiper blades
GWARNING
You could become trapped by the windshield wipers if they start moving while cleaning the
windshield or wiper blades. There is a risk of
injury.
Always switch off the windshield wipers and
the ignition before cleaning the windshield orwiper blades.
!Do not pull the wiper blade. Otherwise, the
wiper blade could be damaged.
!Do not clean wiper blades too often and do
not rub them too hard. Otherwise, the graph-
ite coating could be damaged. This could
cause wiper noise.
!Hold the wiper arm securely when folding
back. The windshield could be damaged if the
wiper arm smacks against it suddenly.
XFold the windshield wiper arms away from the
windshield.
XCarefully clean the wiper blades with a damp
cloth.
XFold the windshield wiper arms back again
before switching on the ignition.
Cleaning the exterior lighting
!Only use cleaning agents or cleaning cloths
which are suitable for plastic light lenses.
Unsuitable cleaning agents or cleaning cloths
could scratch or damage the plastic light len- ses.
XClean the plastic lenses of the exterior light-
ing using a wet sponge and a mild cleaning
agent, e.g. Mercedes-Benz car shampoo or
cleaning cloths.
Cleaning the mirror turn signals
!Only use cleaning agents or cleaning cloths
that are suitable for plastic lenses. Unsuitable
cleaning agents or cleaning cloths could
scratch or damage the plastic lenses of the
mirror turn signals.
XClean the plastic lenses of the mirror turn sig-
nals in the exterior mirror housing using a wet
sponge and mild cleaning agent, e.g.
Mercedes-Benz car shampoo or cleaning
cloths.
244Care
Maintenance and care