change time MERCEDES-BENZ AMG GT ROADSTER 2018 Owners Manual
[x] Cancel search | Manufacturer: MERCEDES-BENZ, Model Year: 2018, Model line: AMG GT ROADSTER, Model: MERCEDES-BENZ AMG GT ROADSTER 2018Pages: 409, PDF Size: 7.66 MB
Page 4 of 409
We
lcome totheworl d of Mercedes-Benz
Before youfirs t drive off, read this Owner's Man‐
ual carefully and familiarise yourself with your
ve hicle. Foryo ur ow n sa fety and a longer operat‐
ing li fespan, follow the instructions and warning
notices in this Owner's Manual. Disregarding
th em may lead todamage totheve hicle or per‐
sonal injur y.
The equipment or model designation of your
ve hicle may vary according to:
R Model
R order
R national version
R availability
The illustrations in this Owner's Manual show a
left-hand drive vehicle. On right-hand-drive vehi‐
cles, the la yout of co mponents and contro l ele‐
ments dif fers accordin gly.
Mercedes-Benz is cons tantly de veloping its vehi‐
cles fur ther. Mercedes-Benz
therefore reser vesth eright to
int roduce changes in thefo llowing areas:
R design
R equipment
R tech nical features
The equipment in your vehicle may therefore dif‐
fe r from that shown in the descriptions and illus‐
trations.
The following are integral parts of theve hicle:
R Digital Owner's Manual
R Printed Owner's Manual
R service booklet
R equipment-dependent Supplements
Ke ep these documents in theve hicle at all
times. If you sell theve hicle, alw ays pass all of
th e documents on tothe new owner.
1905846105Z102
1905846105Z102
Page 6 of 409
Driving and pa
rking .................................. 11 3
Driving ......................................................... 11 3
DY NA MIC SELECT switch ............................1 19
Au tomatic transmission .............................. 121
Re fuelling .................................................... 12 5
Pa rking ...................................................... .128
Driving and driving saf ety sy stems .............1 35
Ve hicle towing instructions ........................ .164 Instrument Display and on-board
compu ter.................................................. 16 6
Instrument display overview ...................... .166
Overview of the buttons on thesteering
wheel ..........................................................1 67
Operating the on-board computer ............... 167
Setting the design ....................................... 16 9
Setting the additional value range .............. 16 9
Overview of displa yson the multifunc‐
tion display .................................................1 70
Menus and submenus ................................. 17 0Multimedia sy
stem .................................. 17 8
Overview and operation .............................. 178
Sy stem settings .......................................... 186AMG TR
ACKPA CE ...................................... .196
Te lephone .................................................. .200
Online and Internet functions ..................... 223
Media .......................................................... 231
Ra dio ...........................................................2 41
Sound ......................................................... 24 4 Maintenance and care
.............................247
ASS YST PLUS service inter val display ........ .247
Engine compartment .................................. 24 8
Cleaning and care ...................................... .254 Breakdown assistance
............................265
Emergency .................................................. 265
Flat tyre ...................................................... 266
Battery (vehicle) ......................................... 272
To w- starting or towing away ....................... 278
Electrical fuses ........................................... 282 Wheels and tyres
..................................... 285
No tes on noise or unusual handling char‐
acteristics .................................................. .285 No
tes on regular lyinspecting wheels and
tyres .......................................................... .285
No tes on snow chains ................................ 285
Ty re pressure .............................................. 286
Wheel change ............................................ .293
Collapsible spa rewheel .............................. 303 Te
ch nical data .......................................... 306
No tes on tech nical da ta.............................. 306
On-board electronics .................................. 306
Ve hicle identification plate, VIN and
engine number ...........................................3 06
Operating fluids .......................................... 307
Ve hicle data ................................................ 313 Display messages and
warning/indi‐
cator lamps ............................................... 316
Displ aymessa ges ....................................... 316
Wa rning and indicator lamps ...................... 357 Index
......................................................... 372 Con
tents 3
Page 22 of 409
Pr
otection of the environment
+ ENVIRONMENTAL
NOTEEnvironmental
dama gedue tooperating conditions and
personal driving style The pollutant emission of
your vehicle is
directly related tothewa yyo u operate your
ve hicle.
Help toprotect the environment byoperating
yo ur vehicle in an environmentally responsi‐
ble manner. Please obser vethefo llowing rec‐
ommendations on ope rating conditions and
pe rsonal driving style.
Operating conditions: #
Make sure that the tyre pressure is cor‐
re ct. #
Do not car ryany unnecessary weight
(e.g. roof luggage rack s once you no
lon ger need them). #
Adhere tothe service inter vals.
A regularly serviced vehicle will contri b‐
ute toenvironmen tal pr otection. #
Alw ays ha vemaintenance workcar ried
out at a qualified specialist workshop.
Pe rsonal driving style: #
Do not depress the accelera tor pedal
when starting the engine. #
Do not warm upthe engine while the
ve hicle is stationar y. #
Drive carefully and maintain a suitable
di st ance from theve hicle in front. #
Avoid frequent, sudden acceleration
and braking. #
Change gear in good time and use each
ge ar on lyup toÔ of its maximum
engine speed. #
Switch off the engine in stationary traf‐
fi c, e.g. byusing the ECO start/ stop
function. #
Drive fuel-ef ficiently. Obser vethe ECO
display for a fuel-ef ficient driving style. Ta
ke -back of end-of-life vehicles
EU countries onl y:
Mercedes-Benz will take back your end-of-life
ve hicle for environment-friendly disposal in
accordance with the European Union(EU) End-
of-Life Vehicles Directive.
A network of vehicle take -ba ckpoints and dis‐
mantlers has been es tablished foryo uto return
yo ur vehicle. You can lea veit at any of these
points free of charge . This makes an impor tant
contribution toclosing there cycling circle and
conse rving resources.
Fo r fur ther information about there cycling and
disposal of end-of-li fevehicles, and theta ke-
back conditions, please visit the national
Mercedes-Benz website foryo ur count ry. Gene
ral no tes 19
Page 30 of 409
Depending on
the selected equipment, you can
import data into theve hicle's comfort and info‐
ta inment functions yourself.
This includes, forex ample:
R multimedia data such as music, films or pho‐
to sfo r playback in an integrated multimedia
sy stem
R address book data for use in connection with
an integrated hands-free sy stem or an inte‐
grated navigation sy stem
R entered navigation destinations
R data about the use of Internet services
This data can be sa ved locally in theve hicle or it
is located on a device which you ha veconnected
to theve hicle (e.g. smartphone, USB flash drive
or MP3 pla yer). If this data is stored in theve hi‐
cle, you can dele teit at any time. This data is
sent tothird parties only at your requ est, partic‐
ular lywhen you use online services in accord‐
ance with the settings that you ha veselected.
Yo u can store or change con venience settings/
individualisations in theve hicle at any time. Depending on
the equipment, this includes, for
ex ample:
R settings forth e seat and steering wheel posi‐
tions
R suspension and climate control settings
R customisations such as interior lighting
If yo ur vehicle is accordingly equipped, you can
connect your smartphone or ano ther mobile end
device totheve hicle. You can cont rolth is by
means of the control elements integrated in the
ve hicle. Images and audio from the smartphone
can be output via the multimedia sy stem. Cer‐
ta in information is simultaneously transfer redto
yo ur smartphone.
Depending on the type of integration, this can
include:
R general vehicle data
R position data
This allo wsyouto use selected apps on your
smartphone, such as navigation or music play‐
bac k.There is no fur ther interaction between the
smartphone and theve hicle; in particular, vehi‐
cle data is not directly accessible. Which type of fur
ther data processing occurs is de term ined by
th e pr ovider of the specific app used. Which set‐
tings you can make, if an y,depends on the spe‐
cific app and the operating sy stem of your
smartphone. Online services
Wire
less network connection
If yo ur vehicle has a wireless network connec‐
tion, it enables data tobe exc hanged between
yo ur vehicle and additional sy stems. The wire‐
less network connection is enabled via theve hi‐
cle's transmission and reception unit or via con‐
nected mobile end devices (e.g. sma rtphones).
Online functions can be used via the wireless
network connection. This includes online serv‐
ices and applications/apps pr ovided bythe man‐
ufacturer or other pr oviders.
Manu factu rer's se rvices
Re garding online services of the manufacturer,
th e individual functions are described bythe
manufacturer in a suita ble place (e.g. Owner's
Manual, website of the manufacturer) along with
th ere leva nt da taprotection information. Per‐ General no
tes27
Page 114 of 409
The synchronisation function is deactivated if
th
e settings for one of theot her climate zones
are changed. Ac
tivating or deactivating the climate con‐
trol syn chronisation function using the mul‐
timedia sy stem Multimedia sy
stem:
4 Vehicle 5
b Climate control
5 SYNC
The climate control can be controlled cent rally
using the synchronisation function. The temp era‐
ture setting is automatically adop tedfo r all cli‐
mate zones. #
Activate Oor deacti vate ª the function. Demisting
the windo ws Wi
ndo wsmis ted up on the inside #
Press button ¿. #
Press button Ã. #
Ifth e windo wscontinue tomist up: press the
¬ button.
Wi ndo wsmis ted up on the outside #
Switch on the windscreen wipers. #
Press button Ã. Switching air-recirculation mode on/off
#
Press theg button.
The interior air will be recirculated.
Air-reci rculation mode automatically swit ches to
fresh air mode af ter some time.
% If air-recirculation mode is switched on, the
windo wsmay mist up more quickl y.Switch
on ai r-re circulation mode only brie fly. Air
vents Ad
justing the air vents &
WARNING ‑ Risk of bu rns/frostbite due
to not maintaining a su fficient dis tance
to the air vents
Ve ry hot or very cold air can flow from the air
ve nts.
This could result in burns or frostbite in the
immediate vicinity of the air vents. #
Alw ays ensure that all vehicle occu‐
pants maintain a suf ficient di stance to
th e air vents. #
If necessa ry,re direct the air flow to
ano ther area of theve hicle interior. To
guarantee theflow of fresh air thro ugh the air
ve nts into theve hicle interior, comply with the
fo llowing:
R Alw ayske ep theve nts and theve ntilation
grille in theve hicle interior free.
R Keep the air inlet free of deposits
(/ page 254). Climate control
111
Page 125 of 409
#
Never lea vechildren and animals unat‐
te nded in theve hicle. #
When leaving theve hicle, alw aysta ke
th eke y with you and lock theve hicle. #
Keep theke y out of there ach of chil‐
dren. &
WARNING Risk of accident due toincor‐
re ct gearshifting
If th e engine speed is higher than the idle
speed and you en gage the transmission posi‐
tion hork, theve hicle may accelerate
sharply. #
Ifyo u en gage the transmission position
h ork always depress the brake
pedal firm lyand do not accelerate at
th e same time. Use
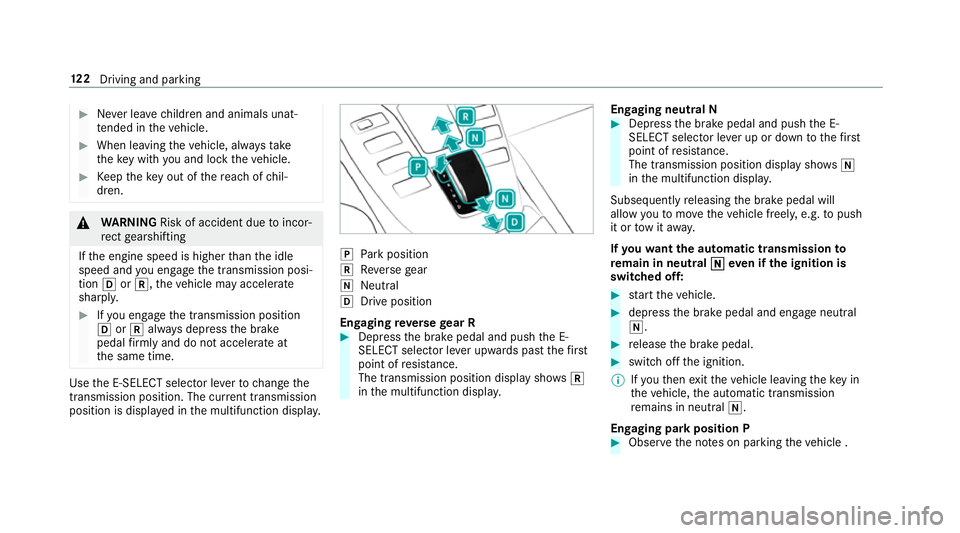
the E-SELECT selector le verto change the
transmission position. The cur rent transmission
position is displ ayed in the multifunction displa y. j
Park position
k Reversege ar
i Neut ral
h Drive position
En gaging reve rsege ar R #
Depress the brake pedal and push the E-
SELECT selector le ver upwards past thefirst
point of resis tance.
The transmission position displ aysho wsk
in the multifunction displa y. Engaging neut
ral N #
Depress the brake pedal and push the E-
SELECT selector le ver up or down tothefirst
point of resis tance.
The transmission position displ aysho wsi
in the multifunction displa y.
Subsequently releasing the brake pedal will
allow youto mo vetheve hicle freel y,e.g. topush
it or tow it away.
If yo uwa ntthe automatic transmission to
re main in neutral i
ieven if the ignition is
switched off: #
start theve hicle. #
depress the brake pedal and engage neutral
i. #
release the brake pedal. #
switch off the ignition.
% Ifyo uth en exitth eve hicle leaving theke y in
th eve hicle, the automatic transmission
re mains in neutral i.
Engaging park position P #
Obser vethe no tes on parking theve hicle . 12 2
Driving and pa rking
Page 146 of 409
This pr
ovides traf fic tr ave lling behind you with an
eve n more noticeable warning.
If th eve hicle is tr avelling at speeds of more than
70 km/h at the beginning of the brake applica‐
tion, the hazard warning lights switch on once
th eve hicle is stationar y.When you pull away
again, the hazard warning lights will switch off
automatically at appr oximately 10km/h. Yo u
can also switch off the hazard warning lights
using the hazard warning button. Cruise control and limiter
Fu
nction of cruise control
Cruise cont rolre gulates the speed totheva lue
selec tedby the driver.
If yo u accelerate toove rtake, forex ample, the
st ored speed is not dele ted. If youre mo veyour
fo ot from the accelerator pedal af terove rtaking,
cruise control will resume speed regulation back
to thestored speed.
Cruise contro l is operated using the cor respond‐
ing steering wheel buttons. You can store any
speed abo ve30 km/h up tothe maximum speed
or up tothe set winter tyre limit. If
yo ufa ilto adapt your driving style, cruise con‐
trol can neither reduce therisk of an accident
nor override the la wsof ph ysics. It cannot take
into account road, weather or traf fic conditions.
Cruise control is only an aid. You are responsible
fo r maintaining a safe dis tance totheve hicle in
front, forve hicle speed, for braking in good time
and forst ay ing in lane.
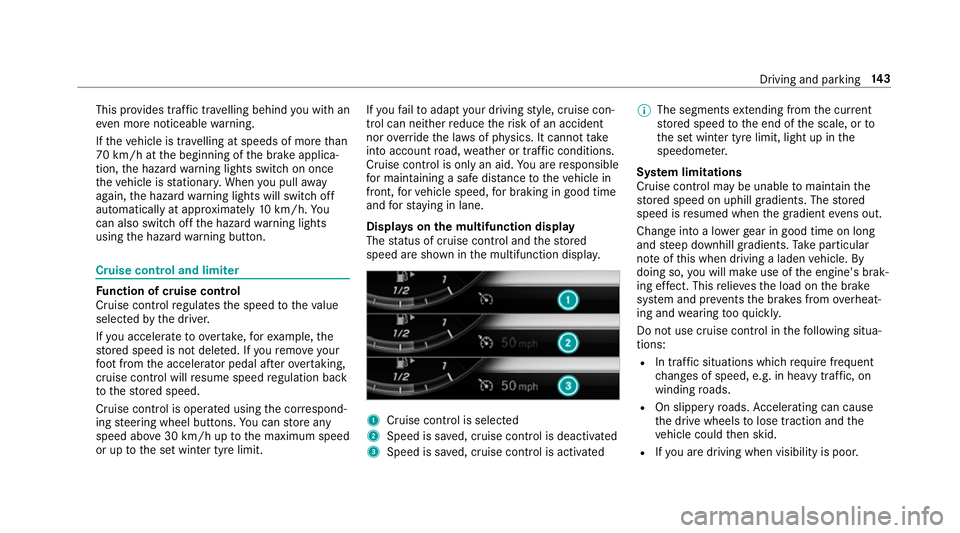
Displa yson the multifunction display
The status of cruise control and thestored
speed are shown in the multifunction displa y. 1
Cruise cont rol is selec ted
2 Speed is sa ved, cruise control is deactivated
3 Speed is sa ved, cruise control is activated %
The segments extending from the cur rent
st ored speed tothe end of the scale, or to
th e set winter tyre limit, light up in the
speedome ter.
Sy stem limitations
Cruise control may be unable tomaintain the
st ored speed on uphill gradients. The stored
speed is resumed when the gradient evens out.
Change into a lo werge ar in good time on long
and steep downhill gradients. Take particular
no te ofthis when driving a laden vehicle. By
doing so, you will make use of the engine's brak‐
ing ef fect. This relie vesth e load on the brake
sy stem and pr events the brakes from overheat‐
ing and wearing tooqu ickl y.
Do not use cruise control in thefo llowing situa‐
tions:
R In traf fic situations whi chrequ ire frequent
ch anges of speed, e.g. in heavy traf fic, on
winding roads.
R On slippe ryroads. Accelerating can cause
th e drive wheels tolose traction and the
ve hicle could then skid.
R Ifyo u are driving when visibility is poor. Driving and parking
14 3
Page 149 of 409
Increasing/decreasing
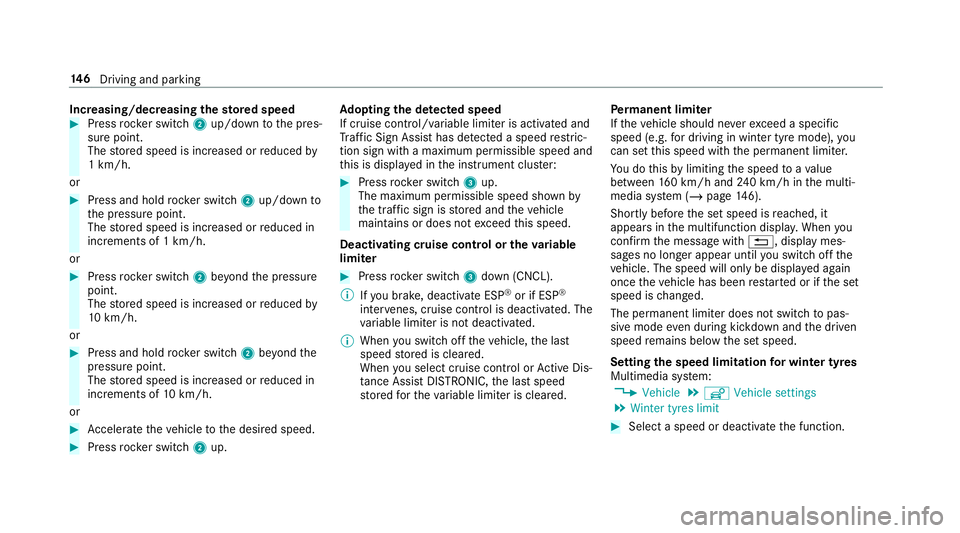
thesto red speed #
Press rocker switch 2up/down tothe pres‐
sure point.
The stored speed is increased or reduced by
1 km/h.
or #
Press and hold rocker switch 2up/down to
th e pressure point.
The stored speed is increased or reduced in
increments of 1 km/h.
or #
Press rocker switch 2beyond the pressure
point.
The stored speed is increased or reduced by
10 km/h.
or #
Press and hold rocker switch 2beyond the
pressure point.
The stored speed is increased or reduced in
increments of 10km/h.
or #
Accelerate theve hicle tothe desired speed. #
Press rocker switch 2up. Ad
opting the de tected speed
If cruise control/ variable limiter is activated and
Tr af fic Sign Assi sthas de tected a speed restric‐
tion sign wi tha maximum permissible speed and
th is is displa yed in the instrument clus ter: #
Press rocker switch 3up.
The maximum permissible speed shown by
th e traf fic sign is stored and theve hicle
maintains or does not exceed this speed.
Deactivating cruise control or theva riable
limi ter #
Press rocker switch 3down (CNCL).
% Ifyo u brake, deactivate ESP ®
or if ESP ®
inter venes, cruise control is deacti vated. The
va riable limiter is not deactivated.
% When you swit choff theve hicle, the last
speed stored is cleared.
When you select cruise cont rol or Active Dis‐
ta nce Assi stDISTRONIC, the last speed
st ored forth eva riable limiter is cleared. Pe
rm anent limi ter
If th eve hicle should ne verexc eed a specific
speed (e.g. for driving in winter tyre mode), you
can set this speed with the permanent limiter.
Yo u do this by limiting the speed toava lue
between 160 km/h and 240 km/h in the multi‐
media sy stem (/ page146).
Shortly before the set speed is reached, it
appears in the multifunction displa y.When you
confirm the message with %, display mes‐
sages no longer appear until you swit choff the
ve hicle. The speed will only be displa yed again
once theve hicle has been restar ted or if the set
speed is changed.
The permanent limiter does not swit chtopas‐
sive mode even du ring kickdown and the driven
speed remains below the set speed.
Setting the speed limitation for winter tyres
Multimedia sy stem:
4 Vehicle 5
î Vehicle settings
5 Winter tyres limit #
Select a speed or deactivate the function. 14 6
Driving and pa rking
Page 157 of 409
%
Inthis phase you can adjust RACE START
depending on thero ad conditions: you can
va ry the engine speed bypulling on one of
th esteering wheel gearshift paddles. The
segments in the multifunction display flic ker
ra pidly.
% Ifth e brake pedal is not released af ter a
short while, RACE START is cancelled. The
RACE START cancelled messageappears in
th e multifunction displa y.#
Take your foot off the brake, but keep the
accelerator pedal depressed.
The vehicle pulls away at maximum accelera‐
tion. The RACE START active message
appears in the multifunction displa y.
RACE START is deacti vated when theve hicle rea‐
ch es a speed of appr oximately 50 km/h.
RACE START is deacti vated immediately if you
re lease the accelerator pedal during RACE
ST ART or if any of the activation conditions are
no longer fulfilled. The RACE START cancelled
message appears in the multifunction displa y.%
After using it se veral times in short succes‐
sion, RACE START is una vailable until a cer‐
ta in dis tance has been driven. Fu
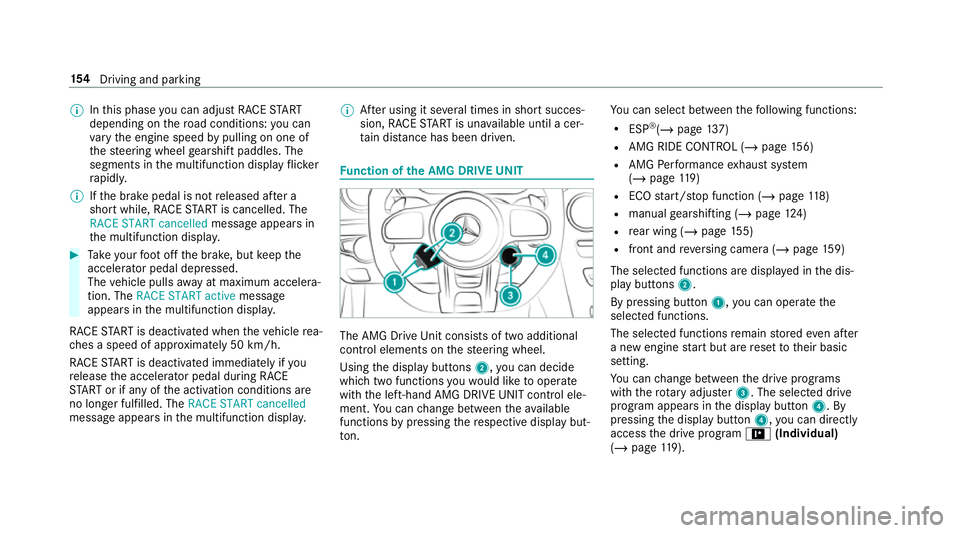
nction of the AMG DRIVE UNIT The AMG Drive
Unit consists of two additional
control elements on thesteering wheel.
Using the display buttons 2,you can decide
which two functions youwo uld like tooperate
with the left-hand AMG DRIVE UNIT control ele‐
ment. You can change between theav ailable
functions bypressing there spective display but‐
to n. Yo
u can select between thefo llowing functions:
R ESP ®
(/ page 137)
R AMG RIDE CONTROL (/ page156)
R AMG Performance exhaust sy stem
(/ page 119)
R ECO start/ stop function (/ page118)
R manual gearshifting (/ page124)
R rear wing (/ page155)
R fron t and reve rsing camera (/ page159)
The selected functions are displa yed in the dis‐
play buttons 2.
By pressing button 1,you can operate the
selected functions.
The selected functions remain stored even af ter
a new engine start but are reset totheir basic
setting.
Yo u can change between the drive programs
with thero tary adjus ter3. The selected drive
program appears in the display button 4. By
pressing the display button 4,you can direct ly
access the drive program =(Individual)
(/ page 119). 15 4
Driving and pa rking
Page 167 of 409
Whe
ther a warning is issued and when this
occurs also depends on the selected sensitivity
setting (s tandard or adaptive).
Lane Keeping Assist can neither reduce therisk
of an accident if youfa ilto adapt your driving
st yle nor override the la wsof ph ysics. It cannot
ta ke into account road, weather or traf fic condi‐
tions. Lane Keeping Assist is only an aid. You are
re sponsible for maintaining a safe dis tance to
th eve hicle in front, forve hicle speed, for braking
in good time and forst ay ing in lane.
Lane Keeping Assist is available in the speed
ra nge between 60 km/h and 200 km/h.
Sy stem limitations
The sy stem may be impaired or may not function
in thefo llowing situations:
R Ifth ere is poor visibility, e.g. due toinsuf fi‐
cient illumination of thero ad, if there are
highly variable shade conditions or in rain,
sno w,fog or heavy spr ay.
R Ifth ere is glare, e.g. from oncoming traf fic,
th e sun or reflections. R
Ifth e windscreen in the area of the multi‐
function camera is dirty, or if the camera is
mis ted up, damaged or co vered.
R Ifth ere are no lane markings, or se veral
unclear lane markings are present for one
lane, e.g. around roadwor ks.
R Ifth e lane markings are worn, dark or cov‐
ered.
R Ifth e dis tance totheve hicle in front is too
short and thus the lane markings cann otbe
de tected.
R Ifth e lane markings change quickl y,e.g.
lanes branch off, cross one ano ther or
mer ge.
R Ifth e car riag ewa y is very nar row and wind‐
ing.
Sensitivity of Lane Keeping Assist
Wi th th eSt andard or Adaptive setting, you can
influence when thewa rning vibration of Lane
Ke eping Assist take s place. In bo
th theSt andard and Adaptive settings, no
wa rning vibration occurs in thefo llowing situa‐
tions:
R You ha veswitched on the turn signal indica‐
to r.
R A driving sa fety sy stem inter venes, su chas
ABS, BAS or ESP ®
.
In theAd aptive setting, there will also be no
wa rning vibration in thefo llowing situations:
R The vehicle is accelerated or braked consid‐
erabl y.
R Yousteer actively, e.g. swer vetoavoid an
obs tacle or change lane quickl y.
R You cut the corner on a sharp bend. Ve
hicle towing instructions
The vehicle is not suitable forth e use of tow bar
sy stems that are used forflat towing or ding hy
to wing, forex ample. Attach ing and using tow bar
sy stems can lead todamage on theve hicle.
When you are towing a vehicle with tow bar sys‐
te ms, safe driving characteristics cannot be 16 4
Driving and pa rking