display MERCEDES-BENZ AMG GT ROADSTER 2018 Owners Manual
[x] Cancel search | Manufacturer: MERCEDES-BENZ, Model Year: 2018, Model line: AMG GT ROADSTER, Model: MERCEDES-BENZ AMG GT ROADSTER 2018Pages: 409, PDF Size: 7.66 MB
Page 6 of 409
Driving and pa
rking .................................. 11 3
Driving ......................................................... 11 3
DY NA MIC SELECT switch ............................1 19
Au tomatic transmission .............................. 121
Re fuelling .................................................... 12 5
Pa rking ...................................................... .128
Driving and driving saf ety sy stems .............1 35
Ve hicle towing instructions ........................ .164 Instrument Display and on-board
compu ter.................................................. 16 6
Instrument display overview ...................... .166
Overview of the buttons on thesteering
wheel ..........................................................1 67
Operating the on-board computer ............... 167
Setting the design ....................................... 16 9
Setting the additional value range .............. 16 9
Overview of displa yson the multifunc‐
tion display .................................................1 70
Menus and submenus ................................. 17 0Multimedia sy
stem .................................. 17 8
Overview and operation .............................. 178
Sy stem settings .......................................... 186AMG TR
ACKPA CE ...................................... .196
Te lephone .................................................. .200
Online and Internet functions ..................... 223
Media .......................................................... 231
Ra dio ...........................................................2 41
Sound ......................................................... 24 4 Maintenance and care
.............................247
ASS YST PLUS service inter val display ........ .247
Engine compartment .................................. 24 8
Cleaning and care ...................................... .254 Breakdown assistance
............................265
Emergency .................................................. 265
Flat tyre ...................................................... 266
Battery (vehicle) ......................................... 272
To w- starting or towing away ....................... 278
Electrical fuses ........................................... 282 Wheels and tyres
..................................... 285
No tes on noise or unusual handling char‐
acteristics .................................................. .285 No
tes on regular lyinspecting wheels and
tyres .......................................................... .285
No tes on snow chains ................................ 285
Ty re pressure .............................................. 286
Wheel change ............................................ .293
Collapsible spa rewheel .............................. 303 Te
ch nical data .......................................... 306
No tes on tech nical da ta.............................. 306
On-board electronics .................................. 306
Ve hicle identification plate, VIN and
engine number ...........................................3 06
Operating fluids .......................................... 307
Ve hicle data ................................................ 313 Display messages and
warning/indi‐
cator lamps ............................................... 316
Displ aymessa ges ....................................... 316
Wa rning and indicator lamps ...................... 357 Index
......................................................... 372 Con
tents 3
Page 7 of 409
In
this Owner's Manual, you will find thefo llow‐
ing symbols: &
DANG ER Dan ger due tonot observing
th ewa rning notices
Wa rning notices dr awyour attention tohaz‐
ards that may endanger your health or life, or
th e health or life of others. #
Obser vethewa rning notices. +
ENVIRONMENTAL
NOTEEnvironmental
dama gedue tofailure toobser veenvi‐
ro nmental no tes Environmental no
tes include information on
environmentally responsible behaviour or
environmentally responsible disposal. #
Obser veenvironmen tal no tes. *
NO
TEDama getoproperty due tofailure
to obser venotes on material damage No
tes on material damage inform you of
ri sks which may lead to yourvehicle being
damaged. #
Obser venotes on material damage. %
Useful instructions or fur ther information
th at could be helpful to you.
X In
stru ction
(Q page) Fu
rther information on a topic
Display Information on
the multifunction dis‐
play/media display
+ Highest menu le vel, which is tobe
selected in the multimedia sy stem
* Corresponding submenus, which are
to be selected in the multimedia sys‐
tem
*M arks a cause 4
Symbols
Page 10 of 409
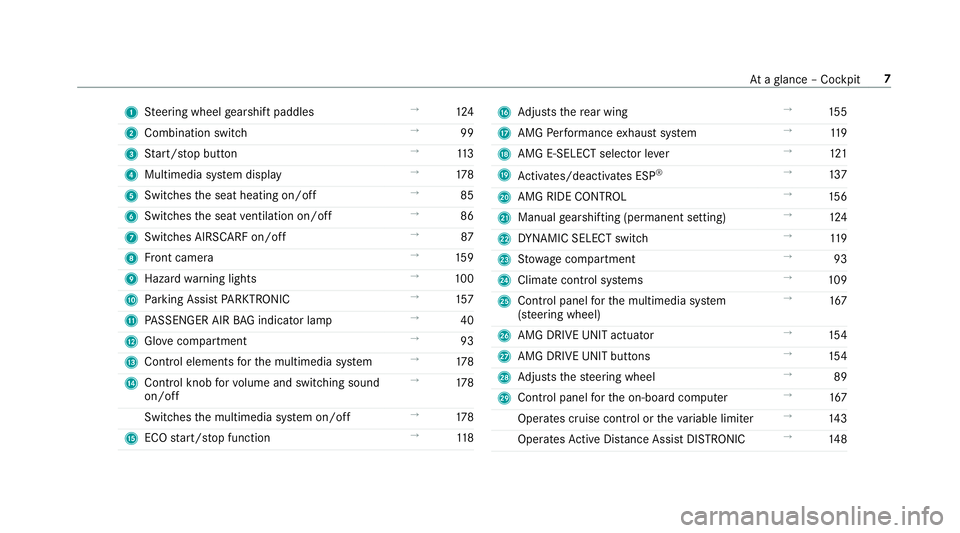
1
Steering wheel gearshift paddles →
124
2 Combination swit ch →
99
3 Start/ stop button →
11 3
4 Multimedia sy stem display →
178
5 Switches the seat heating on/off →
85
6 Switches the seat ventilation on/o ff →
86
7 Switches AIRSCARF on/off →
87
8 Front camera →
15 9
9 Haza rdwa rning lights →
100
A Parking Assist PARKTRONIC →
157
B PASSENGER AIR BAG indicator lamp →
40
C Glovecompa rtment →
93
D Control elements forth e multimedia sy stem →
178
E Control knob forvo lume and switching sound
on/off →
178
Switches the multimedia sy stem on/off →
178
F ECO start/ stop function →
11 8 G
Adjusts there ar wing →
15 5
H AMG Performance exhaust sy stem →
11 9
I AMG E-SELECT selector le ver→
121
J Activates/deacti vates ESP ®
→
137
K AMG RIDE CONTROL →
15 6
L Manual gearshifting (permanent setting) →
124
M DYNA MIC SELECT switch →
11 9
N Stow age compartment →
93
O Climate control sy stems →
109
P Control panel forth e multimedia sy stem
(s te ering wheel) →
167
Q AMG DRIVE UNIT actuator →
154
R AMG DRIVE UNIT buttons →
154
S Adjusts thesteering wheel →
89
T Control panel forth e on-board computer →
167
Operates cruise contro l ortheva riable limiter →
14 3
Operates Active Dis tance Assi stDISTRONIC →
14 8 At
aglance – Cockpit 7
Page 13 of 409
Instrument display10
Ataglance – Warning and indicator lamps
Page 14 of 409
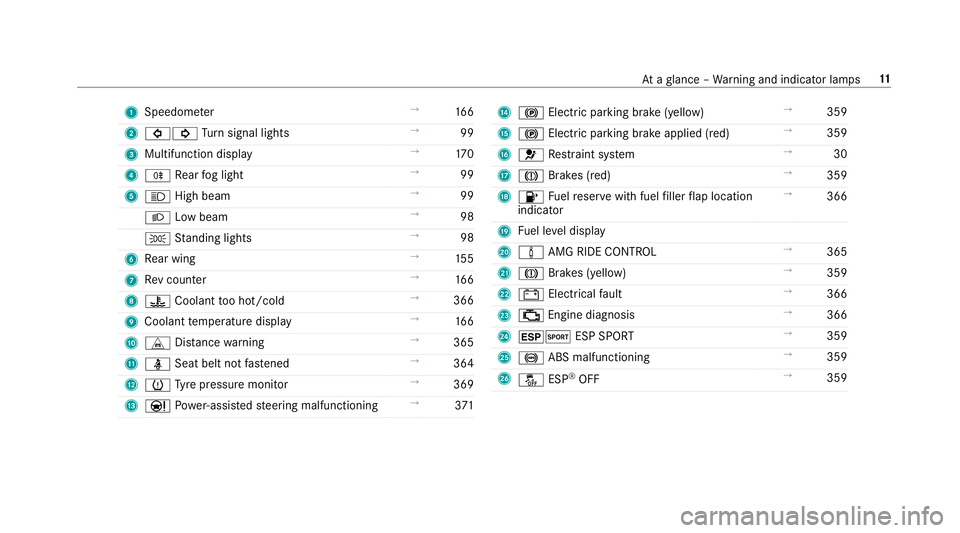
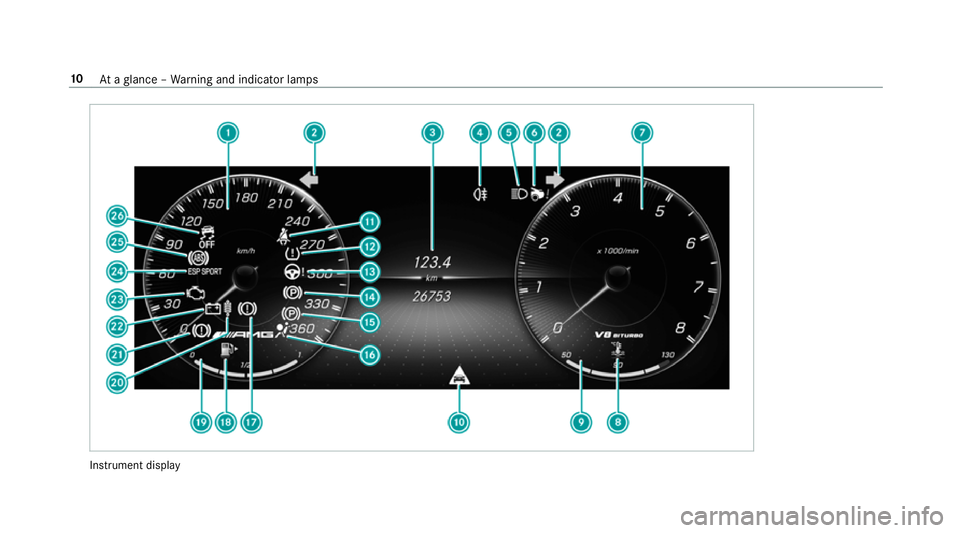
1
Speedom eter →
16 6
2 #! Turn signal lights →
99
3 Multifunction display →
17 0
4 R Rear fog light →
99
5 K High beam →
99
L Low beam →
98
T Standing lights →
98
6 Rear wing →
15 5
7 Rev counter →
16 6
8 ? Coolant too hot/cold →
366
9 Coolant temp erature display →
16 6
A L Distance warning →
365
B ü Seat belt not fastened →
364
C h Tyre pressure monitor →
369
D Ð Powe r-assis tedsteering malfunctioning →
371 E
! Electric pa rking brake (yellow) →
359
F ! Electric parking brake applied (red) →
359
G 6 Restra int sy stem →
30
H J Brakes (red) →
359
I 8 Fuelreser vewith fuel filler flap location
indicator →
366
J Fuel le vel display
K à AMG RIDE CONTROL →
365
L J Brakes (yellow) →
359
M # Electrical fault →
366
N ; Engine diagnosis →
366
O ±M ESP SPORT →
359
P ! ABS malfunctioning →
359
Q å ESP®
OFF →
359 At
aglance – Warning and indicator lamps 11
Page 22 of 409
Pr
otection of the environment
+ ENVIRONMENTAL
NOTEEnvironmental
dama gedue tooperating conditions and
personal driving style The pollutant emission of
your vehicle is
directly related tothewa yyo u operate your
ve hicle.
Help toprotect the environment byoperating
yo ur vehicle in an environmentally responsi‐
ble manner. Please obser vethefo llowing rec‐
ommendations on ope rating conditions and
pe rsonal driving style.
Operating conditions: #
Make sure that the tyre pressure is cor‐
re ct. #
Do not car ryany unnecessary weight
(e.g. roof luggage rack s once you no
lon ger need them). #
Adhere tothe service inter vals.
A regularly serviced vehicle will contri b‐
ute toenvironmen tal pr otection. #
Alw ays ha vemaintenance workcar ried
out at a qualified specialist workshop.
Pe rsonal driving style: #
Do not depress the accelera tor pedal
when starting the engine. #
Do not warm upthe engine while the
ve hicle is stationar y. #
Drive carefully and maintain a suitable
di st ance from theve hicle in front. #
Avoid frequent, sudden acceleration
and braking. #
Change gear in good time and use each
ge ar on lyup toÔ of its maximum
engine speed. #
Switch off the engine in stationary traf‐
fi c, e.g. byusing the ECO start/ stop
function. #
Drive fuel-ef ficiently. Obser vethe ECO
display for a fuel-ef ficient driving style. Ta
ke -back of end-of-life vehicles
EU countries onl y:
Mercedes-Benz will take back your end-of-life
ve hicle for environment-friendly disposal in
accordance with the European Union(EU) End-
of-Life Vehicles Directive.
A network of vehicle take -ba ckpoints and dis‐
mantlers has been es tablished foryo uto return
yo ur vehicle. You can lea veit at any of these
points free of charge . This makes an impor tant
contribution toclosing there cycling circle and
conse rving resources.
Fo r fur ther information about there cycling and
disposal of end-of-li fevehicles, and theta ke-
back conditions, please visit the national
Mercedes-Benz website foryo ur count ry. Gene
ral no tes 19
Page 29 of 409
of an accident,
rescue services can use the QR
code toquickly find the appropriate rescue card
fo ryo ur vehicle. The cur rent rescue card con‐
ta ins the most impor tant information about your
ve hicle in a compact form , e.g. thero uting of the
electric lines.
Fu rther information can be obtained at http://
www.mercedes-benz.de/qr-code. Data
storage Electronic control units
Elect
ronic control units are fitted in your vehicle.
Some of these are necessary forth e safe opera‐
tion of your vehicle, while some assist you when
driving (driver assis tance sy stems). In addition,
yo ur vehicle pr ovides com fort and enter tainment
functions, which are also made possible byelec‐
tronic control units.
Elect ronic control units contain da tamemories
which can temp orarily or permanently store
te ch nical information about theve hicle's operat‐
ing state, component loads, main tenance
re qu irements and tech nical events or faults. In
general, this information documents thest ate
of a component part, a module, a sy stem or the
sur roundings such as:
R operating status of sy stem components (e.g.
fi ll le vels, battery status, tyre pressure)
R status messages concerning theve hicle or
its individual components (e.g. number of
wheel revo lutions/speed, longitudinal accel‐
eration, lateral acceleration, display of fas‐
te ned seat belts)
R malfunctions or faults in impor tant sy stem
components (e.g. lights, brakes)
R information on events leading tovehicle
damage
R system reactions in special driving situations
(e.g. airbag deployment, inter vention of sta‐
bility control sy stems)
R ambient conditions (e.g. temp erature, rain
sensor)
In addition toprov iding the actual control unit
function, this data assists the manufacturer in
de tecting and rectifying faults and optimising
ve hicle functions. The majority of this data is te
mp orary and is only processed in theve hicle
itself. Only a small portion of the data is stored
in theeve nt or fault memor y.
When your vehicle is serviced, tech nical da ta
from theve hicle can be read out byservice net‐
wo rkemplo yees (e.g. workshops, manufactur‐
ers) or third parties (e.g. breakdown services).
Services include repair services, maintenance
processes, warranty claims and quality assur‐
ance measures, forex ample. The read out is per‐
fo rm ed via the legally prescribed port forthe
diagnostics connection in theve hicle. The
re spective service network locations or third
parties collect, process and use the data. They
document tech nical statuses of theve hicle,
assist in finding faults and impr oving quality and
are transmitted tothe manufacturer, if neces‐
sar y.Fu rthermore, the manufacturer is subject
to product liability. Forth is, the manufacturer
requ irestech nical da tafrom vehicles.
Fa ult memories in theve hicle can be reset by a
service outlet as part of repair or maintenance
wo rk. 26
General no tes
Page 38 of 409
also deploy in
theev ent of an accident along
with other sy stems. #
Only one person should use each seat
belt at any one time. Seat belt adjustment function
Ve
hicles with PRE-SAFE ®
:if th e front seat belt
is not pulled tight across your body, the seat belt
adjustment may automatically apply a cer tain
tigh tening forc e. Do not hold the seat belt tightly
while it is adjusting.
Yo u can activate and deactivate the seat belt
adjustment function using the multimedia sys‐
te m (/ page 35). Re
leasing a seat belt #
Press there lease button in the seat belt
buckle and guide the seat belt back with the
seat belt tongue. Ac
tivating/deactivating seat belt adjustment
via the multimedia sy stem Multimedia sy
stem:
4 Vehicle 5
î Vehicle settings
5 Belt adjustment #
Activate Oor deacti vate ª the function. Seat belt
warning function for the driver and
front passen ger The
ü seat belt warning lamp in the instru‐
ment display is a reminder that all vehicle occu‐
pants must weartheir seat belts cor rectly.
In addition, a warning tone may sound.
As soon as the driver and front passenger fasten
th eir seat belts, the seat belt warning goes out. Airbags
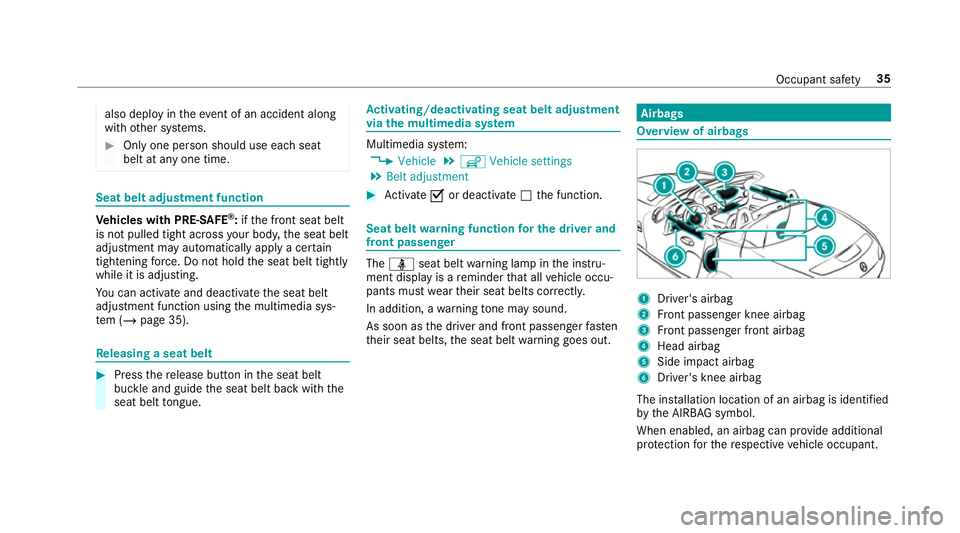
Overview of airbags
1
Driver's airbag
2 Front passenger knee airbag
3 Front passenger front airbag
4 Head airbag
5 Side impact airbag
6 Driver's knee airbag
The ins tallation location of an airbag is identified
by the AIRB AGsymbol.
When enabled, an airbag can pr ovide additional
pr otection forth ere spective vehicle occupant. Occupant saf
ety35
Page 44 of 409
light up simultaneousl
y,the front passenger seat
may not be used. Also in this case, do not fit a
ch ild restra int sy stem tothe front passenger
seat. Ha veautomatic front passenger front air‐
bag shutoff checked and repaired immediately at
a qu alified specialist workshop.
St atus display
If th e front passenger seat is occupied, ensure,
bo th before and during the journe y,that thest a‐
tus of the front passenger front airbag is cor rect
fo rth e cur rent situation.
Af terfitting a rear wa rd-facing child restra int
sy stem tothe front passenger seat:
PA SSENGER AIR BAG OFF must be lit continu‐
ousl y. &
WARNING Risk of inju ryor death from
using a rear wa rd-facing child restra int
sy stem when the front passenger front
airbag is enabled
If yo u secure a child in a rear wa rd-facing
ch ild restra int sy stem on the front passenger
seat and thePA SSENGER AIR BAG OFF indi‐ cator lamp is off,
the front passenger airbag
can deploy in theev ent of an accident.
The child could be stru ck bythe airbag.
Alw ays ensure that the front passenger air‐
bag is disabled. The PASSENGER AIR BAG
OFF indicator lamp must be lit.
NEVER use a rear wa rd-facing child restra int
sy stem on a seat pr otected byan ENABLED
FRONT AIRB AGin front of it, DE ATH or SERI‐
OUS INJU RYtotheCH ILD can occur. When
fitting a child restra int sy stem tothe front
passenger seat, obser vetheve hicle-specific
information (/ page 53).
Depending on thech ild restra int sy stem and the
st ature of thech ild, thePA SSENGER AIR BAG
OFF indicator lamp may be off. In this case, do
not fit th ere ar wa rd-facing child restra int sy stem
to the front passenger seat.
Af terfitting a forw ard-facing child restra int
sy stem tothe front passenger seat: depend‐
ing on thech ild restra int sy stem and thest ature
of thech ild, PASSENGER AIR BAG OFF may be lit continuously or be off. Alw
ays obser vethefo l‐
lowing information. &
WARNING Risk of inju ryor death due to
incor rect positioning of thech ild
re stra int sy stem
If yo u secure a child in a forw ard-facing child
re stra int sy stem on the front passenger seat
and you position the front passenger seat too
close tothe cockpit, in theeve nt of an acci‐
dent, thech ild could:
R come into con tact wi thparts of theve hi‐
cle's interior if thePA SSENGER AIR BAG
OFF indicator lamp is lit, forex ample.
R bestru ck bythe airbag if thePA SSENGER
AIR BAG OFF indicator lamp is off. #
Alw ays mo vethe front passenger seat
as far back as possible. Alw ays make
sure that the shoulder belt stra p is cor‐
re ctly routed from the seat belt guide
on theve hicle tothe shoulder belt
guide on thech ild restra int sy stem. The
shoulder belt stra p must be routed for‐ Occupant saf
ety41
Page 76 of 409
*
NO
TEPossible damage tothe soft top
when opening or closing The soft
top can be damaged when opening
or closing. #
Make sure there is suf ficient clearance
ab ove it. #
Ifth e soft top is dirty, wet or frozen, do
not open the soft top. #
Ifth e outside temp erature is below
-10 °C, do not open the soft top. *
NO
TEDama getothe soft top caused by
heavy objects Heavy objects placed on
the soft-to p com‐
partment co ver can dama gethe soft top or
soft-to p compartment co ver. #
Do not place he avy objects on the soft-
to p compartment co ver. #
Do not sit on the soft-to p compartment
co ver. Fo
r saf etyre asons, Mercedes-Benz recommends
opening or closing the soft top when theve hicle
is stationar y.
To open or close the soft top while you are driv‐
ing, do not exceed a maximum speed of
50 km/h. Toavo id inter rupting the closing proc‐
ess while you are slightly exceeding this speed,
do not drive at a speed greater than 60 km/h. #
Make sure that the boot separator is closed. #
Switch on the ignition. #
Keep the brake pedal depressed when the
ve hicle is stationar y. #
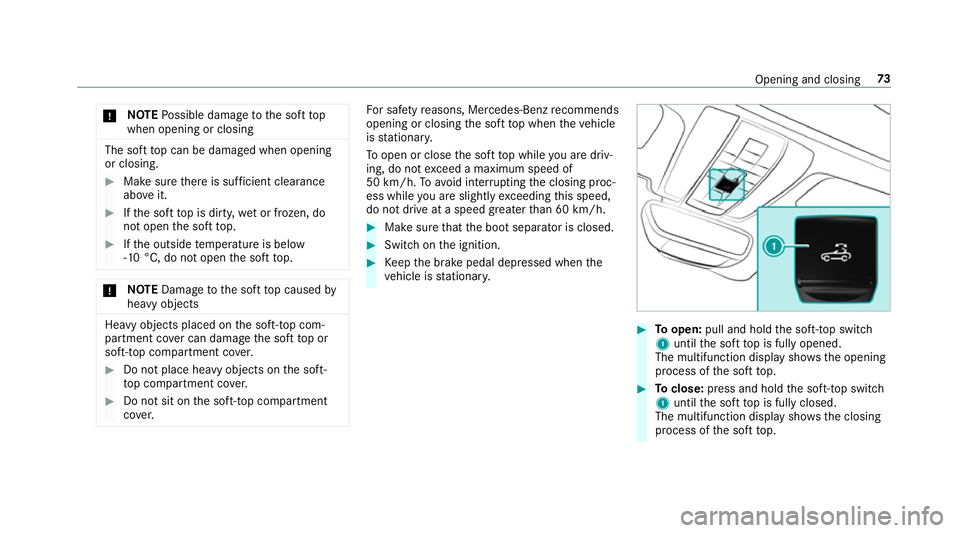
Toopen: pull and hold the soft-to p switch
1 until the soft top is fully opened.
The multifunction display sho wsthe opening
process of the soft top. #
Toclose: press and hold the soft-to p switch
1 until the soft top is fully closed.
The multifunction display sho wsthe closing
process of the soft top. Opening and closing
73