USB port MERCEDES-BENZ AMG GT ROADSTER 2019 Owner's Manual
[x] Cancel search | Manufacturer: MERCEDES-BENZ, Model Year: 2019, Model line: AMG GT ROADSTER, Model: MERCEDES-BENZ AMG GT ROADSTER 2019Pages: 298, PDF Size: 7.9 MB
Page 9 of 298
Seat belt ........................................ 248
Seat cove
r..................................... 248
Sensors ......................................... 246
Soft top .......................................... 245
Steering wheel ............................... 247
Trim pieces .................................... 247
Washing by hand ........................... 243
Wheels ........................................... 245
Windows ........................................ 245
Wiper blades .................................. 246
CD
see also Digital Operator's Man-
ual .................................................. 209
CD player (on-board computer) ........ 165
Center console
Overview .......................................... 36
Central control panel
Overview .......................................... 38
Central locking
Locking/unlocking (SmartKey )........ 66
Changing the media source ............. 165
Charge retention
Socket ........................................... 130
Charge-air pressure (on-board
computer) .......................................... 170
Child
Restraint system .............................. 56
Child seat
Forward-facing restraint system ...... 57
On the front-passenger sea t............ 57
Rearward-facing restraint system .... 57
Children
Special seat belt retractor ............... 56
Children in the vehicle
Important safety notes .................... 55
Cigarette lighter ................................ 222
Cleaning
Mirror turn signal ........................... 246
Climate control
Air-recirculation mode ................... 107
Automatic climate control (dual-
zone) .............................................. 103
Controlling automaticall y............... 105
Cooling with air dehumidification .. 104
Cooling with air dehumidification
(multimedia system) ...................... 213
Defrosting the windows ................. 106
Defrosting the windshield .............. 106 ECO start/stop function (3-zone
automatic climate control) ............. 104
General notes ................................ 103
Indicator lamp ................................ 105
Information about using auto-
matic climate control ..................... 104
Overview ........................................ 213
Overview of systems ...................... 103
Problem with the rear window
defroster ........................................ 107
Problems with cooling with air
dehumidification ............................ 105
Refrigerant ..................................... 293
Refrigerant filling capacity ............. 293
Setting the air distribution ............. 105
Setting the air vents ...................... 107
Setting the airflow ......................... 106
Setting the climate mode (multi-
media system) ............................... 213
Setting the temperature ................ 105
Switching air-recirculation mode
on/of f............................................ 107
Switching on/of f........................... 104
Switching the rear window
defroster on/of f............................ 106
Switching the synchronization
function on and off ........................ 106
Synchronization function (multi-
media system) ............................... 214
Climate control settings
Multimedia system ........................ 213
Climate control system
Climate control (3-zone automatic
climate control )............................. 104
Cockpit
Overview .......................................... 33
Code for Apps
see QR code
COMAND display
Cleaning ......................................... 247
Combination switch ............................ 97
Connecting a USB device
see also Digital Operator's Man-
ual .................................................. 209
Consumption statistics (on-board
computer) .......................................... 162
Controller ........................................... 210
Convenience closing feature .............. 78 Index
7
Page 23 of 298
Two-way radio
Frequencies ................................... 287
Installation ..................................... 287
Transmission output (maximum) .... 287
Type identification plate
see Vehicle identification plate U
Unlocking Emergency unlocking ....................... 73
From inside the vehicle (central
unlocking button) ............................. 72
USB devices
Connecting to the Media Inter-
face .............................................. .217 V
Vanity mirror (in the sun visor) ........221
Vehicle
Correct use ...................................... 28
Data acquisition ............................... 29
Display message ............................ 194
Electronics ..................................... 287
Equipment ....................................... 25
Individual settings .......................... 168
Limited Warranty ............................ .29
Loading .......................................... 271
Locking (in an emergency) ............... 73
Locking (SmartKey) .......................... 66
Lowering ........................................ 285
Maintenance .................................... 26
Operating safety .............................. 26
Parking .......................................... 127
Parking for a long period ................ 130
Pulling away ................................... 112
Raising ........................................... 282
Reporting problems ......................... 28
Securing from rolling away ............ 282
Towing away .................................. 258
Transporting .................................. 260
Unlocking (in an emergency) ........... 73
Unlocking (SmartKey )...................... 66
Vehicle data ................................... 293
Vehicle battery
see Battery (vehicle)
Vehicle data
Trunk load (maximum) ................... 293 Vehicle dimensions
........................... 293
Vehicle emergency locking ................ 73
Vehicle identification number
see VIN
Vehicle identification plate .............. 287
Vehicle maintenance
see ASSYST PLUS
Vehicle tool kit .................................. 249
Ventilation
see Climate control
Video
Operating the DVD ......................... 166
see also Digital Operator's Man-
ual .................................................. 209
VIN
Seat ............................................... 288
Type plate ...................................... 287 W
Warning and indicator lamps ABS ................................................ 201
Active Brake Assist ........................ 206
Brakes ........................................... 200
Check Engine ................................. 204
Coolant .......................................... 204
Distance warning ........................... 206
ESP ®
.............................................. 201
ESP ®
OFF ....................................... 202
Fuel tank ........................................ 204
Overview .......................................... 34
Parking brake ................................ 203
PASSENGER AIR BAG ...................... 41
Reserve fue l................................... 204
Restraint system ............................ 203
Seat belt ........................................ 199
SPORT handling mod e................... 203
Steering ......................................... 208
Tire pressure monitor .................... 207
Warranty .............................................. 25
Washer fluid
Display message ............................ 197
Weather display (COMAND)
see also Digital Operator's Man-
ual.................................................. 209
Wheel and tire combinations
Tires ............................................... 285
Wheel bolt tightening torque ........... 285 Index
21
Page 167 of 298
position is only displayed along with station
0044if
this has been stored.
You can store stations 0044in the multimedia sys-
tem.
X Switch on the multimedia system.
X Press 00E2on the steering wheel to open the
menu list.
X Press 0064or0063 on the steering wheel to
select the Radio
Radio menu.
X Confirm by pressing 0076on the steering
wheel.
Currently set station 0044appears in the multi-
function display.
X To open the station list: press0064or0063
briefly.
X To select a station in the station list:
press 0064or0063 briefly.
X To select a station in the station list using
rapid scroll: press and hold 0064or0063.
X To select the frequency range or station
memory: press0076briefly.
X Press 0064or0063 to select the frequency
range or station memory.
X Press 0076to confirm your selection.
i SIRIUS XM satellite radio functions like a
normal radio.
Further information about radio operation can be found in the multimedia system in the Dig-
ital Operator's Manual. Media menu
Changing the media source You can change the media source and playback
mode (audio or video) at any time in the Media
Media
menu.
X Switch on the multimedia system.
X Press 00E2on the steering wheel to open the
menu list.
X Press 0064or0063 on the steering wheel to
select the Media
Media menu.
X Confirm by pressing 0076on the steering
wheel.
X To open/close the media sources list:
press
0076briefly.
The list shows the following media sources,
for example: R
Disc (CD/DVD) (DVD, COMAND only)
R SD card (COMAND)
R Media Register (COMAND)
R USB storage device
R Bluetooth ®
capable audio device
Please observe further information on media
support and media operation in the multimedia
system.
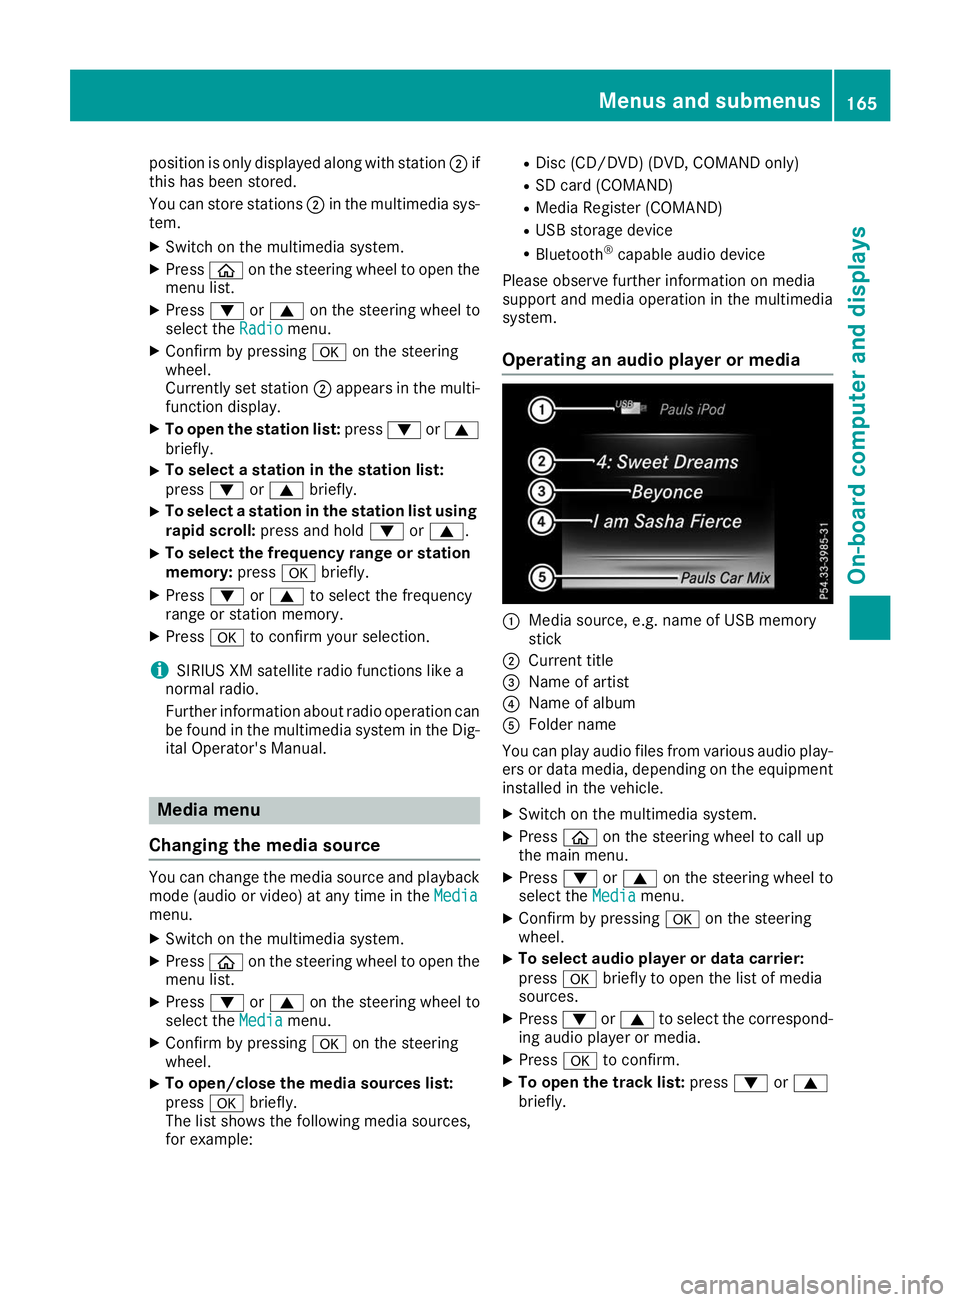
Operating an audio player or media 0043
Media source, e.g. name of USB memory
stick
0044 Current title
0087 Name of artist
0085 Name of album
0083 Folder name
You can play audio files from various audio play- ers or data media, depending on the equipment
installed in the vehicle.
X Switch on the multimedia system.
X Press 00E2on the steering wheel to call up
the main menu.
X Press 0064or0063 on the steering wheel to
select the Media Mediamenu.
X Confirm by pressing 0076on the steering
wheel.
X To select audio player or data carrier:
press 0076briefly to open the list of media
sources.
X Press 0064or0063 to select the correspond-
ing audio player or media.
X Press 0076to confirm.
X To open the track list: press0064or0063
briefly. Menus and submenus
165On-board computer and displays Z
Page 218 of 298
If the mobile phone supports the PBAP (Phone
Book Access Profile) and MAP (Message
Access Profile) Bluetooth ®
profiles, the follow-
ing information will be transmitted after you
connect:
R Phone book
R Call lists
R Messages
i Further information on suitable mobile
phones can be obtained on the Internet at:
http://www.mercedes-benz.com/
connect
i In the USA, you can get in touch with the
Mercedes-Benz Customer Assistance Center
on 1-800-FOR-MERCedes (1-800-367-6372).
In Canada, you can get in touch with the Cus- tomer Relations Center on 1-800-387-0100.
Searching for and authorizing a mobile
phone Before using your mobile phone with the multi-
media system for the first time, you will need to
search for the phone and then authorize (con-
nect) it. Depending on the mobile phone, author- ization either takes place by means of Secure
Simple Pairing or by entering a passkey. The
multimedia system automatically makes the
procedure that is relevant for your mobile phone
available. The mobile phone is always connec-
ted automatically after authorization. Further
information on using a mobile phone with the
multimedia system (see the Digital Operator's
Manual).
If the multimedia system does not detect your
mobile phone, this may be due to particular
security settings on your mobile phone (see the manufacturer's operating instructions).
Only one mobile phone can be connected to the
multimedia system at any one time.
Searching for a mobile phone
Multimedia system:
X Select Phone
Phone007BConnect Device Connect Device007BCon‐ Con‐
nect Another Device nect Another Device.
X One-telephone mode: selectMain Phone
Main Phone.
X Two-telephone mode: selectAdditional
Additional
Phone (Incoming Calls Only)
Phone (Incoming Calls Only) when a
mobile phone is already connected.
X Select Start Search
Start Search.
X Select mobile phone. Connecting a mobile phone
Authorization via Secure Simple Pairing
X The code on the multimedia system and
mobile phone are the same:
if applicable,
select Yes Yeson the multimedia system.
X Confirm code on the mobile phone. Depend-
ing on the mobile phone used, confirm the
connection to the multimedia system and for
the PBAP and MAP Bluetooth ®
profiles. The
prompt to confirm may take up to two
minutes to be displayed (see the manufactur-
er's operating instructions).
X If the codes are different: selectNo Noon the
multimedia system.
The process is canceled.
Repeat authorization.
Authorization via passkey entry (access code)
X Choose a one to sixteen-digit number combi-
nation as a passkey.
X Enter the passkey on the multimedia system.
X Press 0054to confirm.
X Enter and confirm the passkey on the mobile
phone. Depending on the mobile phone used,
confirm the connection to the multimedia sys-
tem and for the PBAP and MAP Bluetooth ®
profiles. The prompt to confirm may take up
to two minutes to be displayed (see the man- ufacturer's operating instructions). Media mode
General notes If you wish to play external media sources, the
appropriate media mode must already be turned
on. Further information on media mode (see the Digital Operator's Manual).
The following external media sources can be
used:
R Apple ®
devices (e.g. iPhone ®
)
R USB devices (e.g. USB flash drive, MP3
player)
R CD/DVD (COMAND)
R SD cards (COMAND)
R Via devices connected by Bluetooth ®
i Information on the single DVD drive (see the
Digital Operator's Manual). 216
Operating systemMultimedia system
Page 219 of 298
Activating media mode
Multimedia system:
X Select Media
Media007B Devices
Devices.
The available media sources will be shown.
X Select the media source.
Playable files are played.
Inserting and removing the SD card
(COMAND) Important safety notes
G
WARNING
SD cards are small parts. They can be swal-
lowed and cause choking. This poses an
increased risk of injury or even fatal injury.
Keep the SD card out of the reach of children. If a SD card is swallowed, seek medical atten-
tion immediately.
! If the SD card is no longer in use, you should
take it out and remove it from the vehicle.
High temperatures can damage the card.
Inserting an SD card
The SD card slot is located in the stowage com- partment under the armrest.
X Insert the SD card into the SD card slot until
the SD card engages. The side with the con-
tacts must face down.
X Select the media source (Y page 217).
Removing an SD card X Press the SD card.
The SD card is ejected.
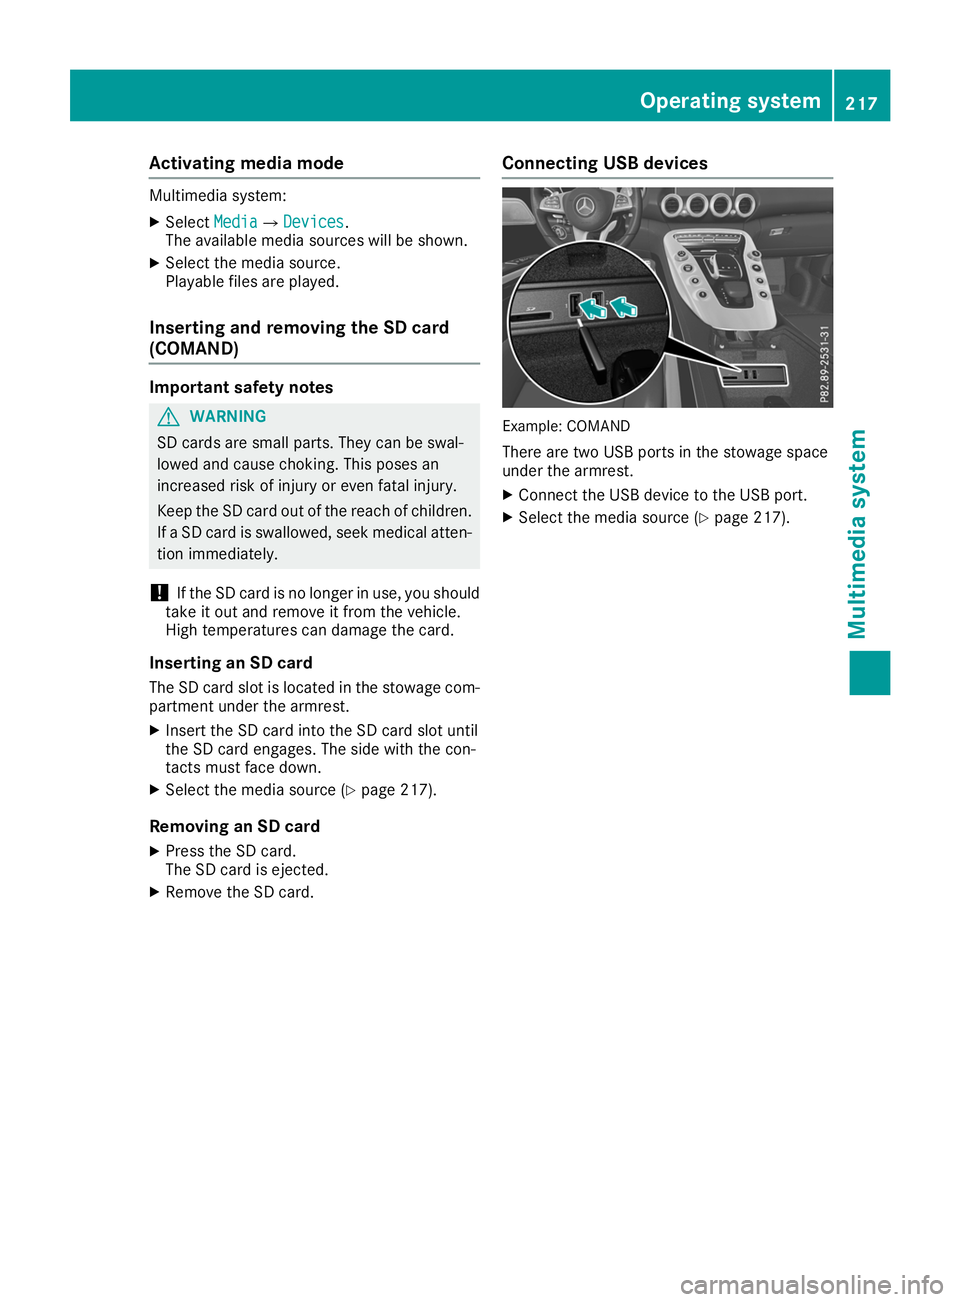
X Remove the SD card. Connecting USB devices Example: COMAND
There are two USB ports in the stowage space
under the armrest.
X Connect the USB device to the USB port.
X Select the media source (Y page 217). Operating system
217Multimedia system Z
Page 221 of 298
Glove compartment
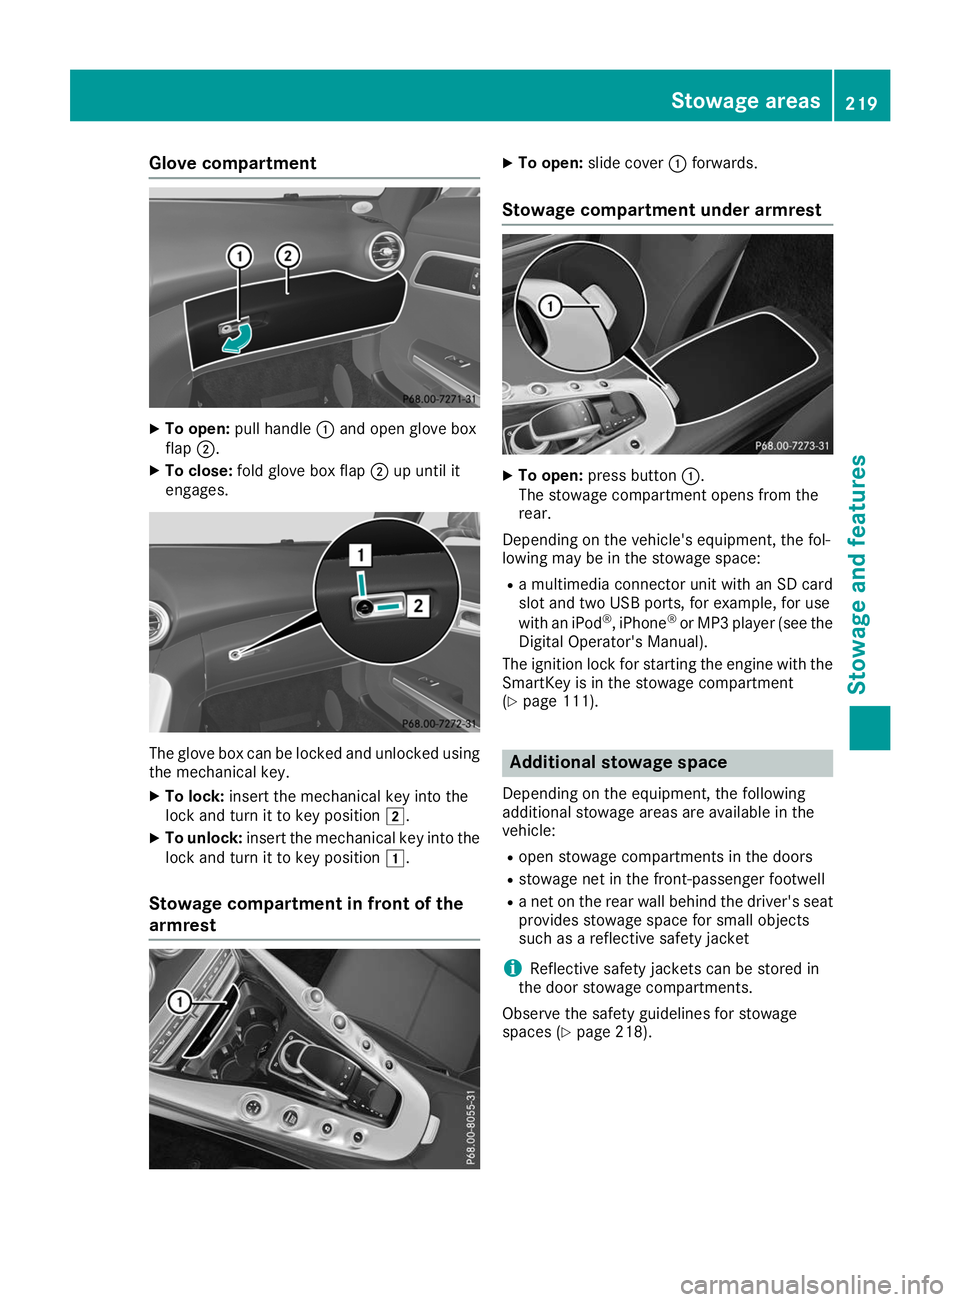
X
To open: pull handle 0043and open glove box
flap 0044.
X To close: fold glove box flap 0044up until it
engages. The glove box can be locked and unlocked using
the mechanical key.
X To lock: insert the mechanical key into the
lock and turn it to key position 0048.
X To unlock: insert the mechanical key into the
lock and turn it to key position 0047.
Stowage compartment in front of the
armrest X
To open: slide cover 0043forwards.
Stowage compartment under armrest X
To open: press button 0043.
The stowage compartment opens from the
rear.
Depending on the vehicle's equipment, the fol-
lowing may be in the stowage space: R a multimedia connector unit with an SD card
slot and two USB ports, for example, for use
with an iPod ®
, iPhone ®
or MP3 player (see the
Digital Operator's Manual).
The ignition lock for starting the engine with the
SmartKey is in the stowage compartment
(Y page 111). Additional stowage space
Depending on the equipment, the following
additional stowage areas are available in the
vehicle:
R open stowage compartments in the doors
R stowage net in the front-passenger footwell
R a net on the rear wall behind the driver's seat
provides stowage space for small objects
such as a reflective safety jacket
i Reflective safety jackets can be stored in
the door stowage compartments.
Observe the safety guidelines for stowage
spaces (Y page 218). Stowage areas
219Stowage and features Z