child lock MERCEDES-BENZ AMG GT ROADSTER 2019 Owner's Manual
[x] Cancel search | Manufacturer: MERCEDES-BENZ, Model Year: 2019, Model line: AMG GT ROADSTER, Model: MERCEDES-BENZ AMG GT ROADSTER 2019Pages: 298, PDF Size: 7.9 MB
Page 9 of 298
Seat belt ........................................ 248
Seat cove
r..................................... 248
Sensors ......................................... 246
Soft top .......................................... 245
Steering wheel ............................... 247
Trim pieces .................................... 247
Washing by hand ........................... 243
Wheels ........................................... 245
Windows ........................................ 245
Wiper blades .................................. 246
CD
see also Digital Operator's Man-
ual .................................................. 209
CD player (on-board computer) ........ 165
Center console
Overview .......................................... 36
Central control panel
Overview .......................................... 38
Central locking
Locking/unlocking (SmartKey )........ 66
Changing the media source ............. 165
Charge retention
Socket ........................................... 130
Charge-air pressure (on-board
computer) .......................................... 170
Child
Restraint system .............................. 56
Child seat
Forward-facing restraint system ...... 57
On the front-passenger sea t............ 57
Rearward-facing restraint system .... 57
Children
Special seat belt retractor ............... 56
Children in the vehicle
Important safety notes .................... 55
Cigarette lighter ................................ 222
Cleaning
Mirror turn signal ........................... 246
Climate control
Air-recirculation mode ................... 107
Automatic climate control (dual-
zone) .............................................. 103
Controlling automaticall y............... 105
Cooling with air dehumidification .. 104
Cooling with air dehumidification
(multimedia system) ...................... 213
Defrosting the windows ................. 106
Defrosting the windshield .............. 106 ECO start/stop function (3-zone
automatic climate control) ............. 104
General notes ................................ 103
Indicator lamp ................................ 105
Information about using auto-
matic climate control ..................... 104
Overview ........................................ 213
Overview of systems ...................... 103
Problem with the rear window
defroster ........................................ 107
Problems with cooling with air
dehumidification ............................ 105
Refrigerant ..................................... 293
Refrigerant filling capacity ............. 293
Setting the air distribution ............. 105
Setting the air vents ...................... 107
Setting the airflow ......................... 106
Setting the climate mode (multi-
media system) ............................... 213
Setting the temperature ................ 105
Switching air-recirculation mode
on/of f............................................ 107
Switching on/of f........................... 104
Switching the rear window
defroster on/of f............................ 106
Switching the synchronization
function on and off ........................ 106
Synchronization function (multi-
media system) ............................... 214
Climate control settings
Multimedia system ........................ 213
Climate control system
Climate control (3-zone automatic
climate control )............................. 104
Cockpit
Overview .......................................... 33
Code for Apps
see QR code
COMAND display
Cleaning ......................................... 247
Combination switch ............................ 97
Connecting a USB device
see also Digital Operator's Man-
ual .................................................. 209
Consumption statistics (on-board
computer) .......................................... 162
Controller ........................................... 210
Convenience closing feature .............. 78 Index
7
Page 42 of 298
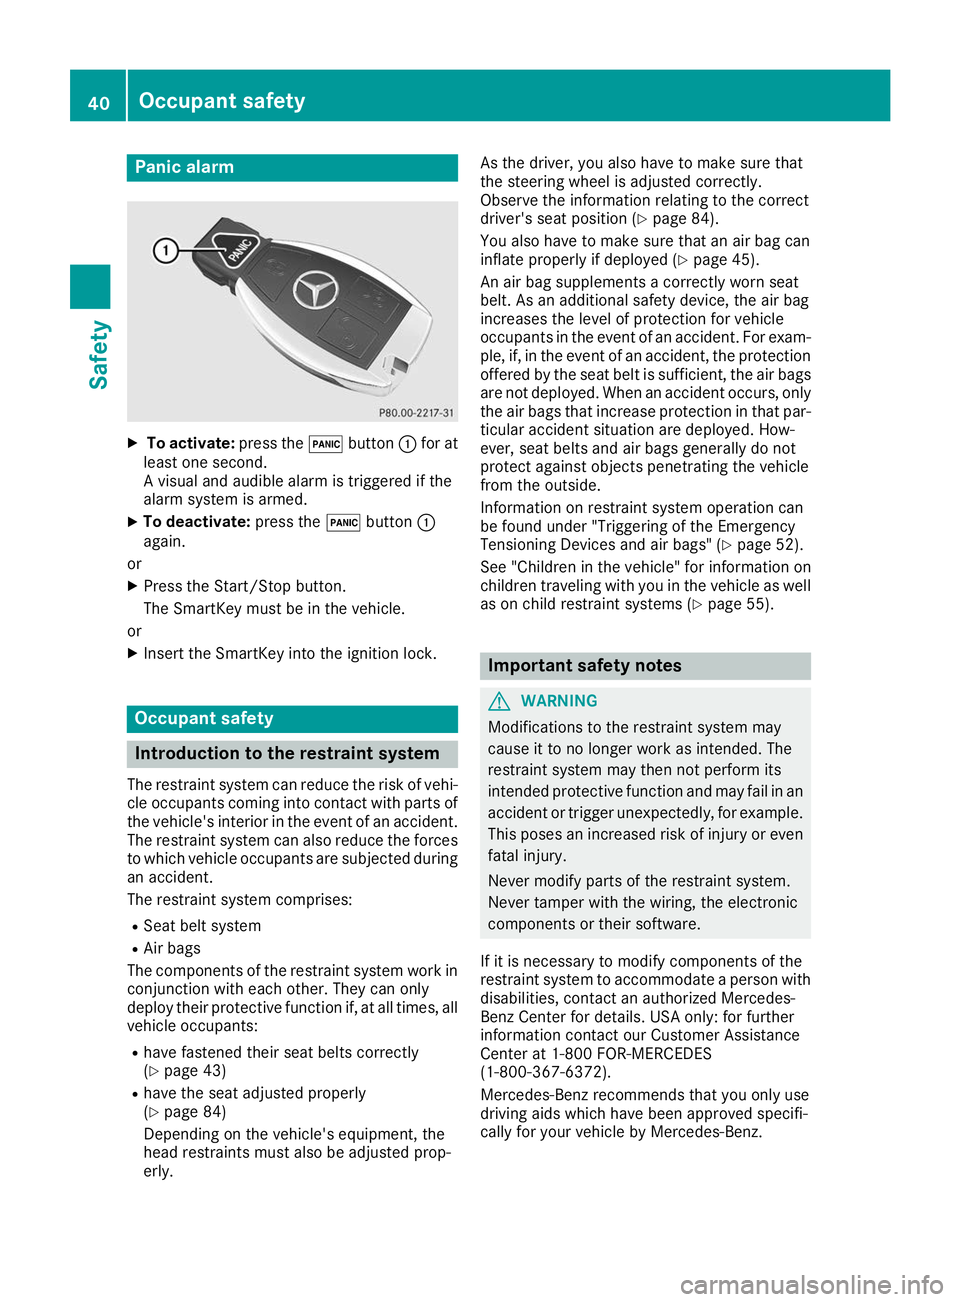
Panic alarm
X
To activate: press the0033button 0043for at
least one second.
A visual and audible alarm is triggered if the
alarm system is armed.
X To deactivate: press the0033button 0043
again.
or X Press the Start/Stop button.
The SmartKey must be in the vehicle.
or X Insert the SmartKey into the ignition lock. Occupant safety
Introduction to the restraint system
The restraint system can reduce the risk of vehi- cle occupants coming into contact with parts of
the vehicle's interior in the event of an accident.
The restraint system can also reduce the forces to which vehicle occupants are subjected during
an accident.
The restraint system comprises:
R Seat belt system
R Air bags
The components of the restraint system work in
conjunction with each other. They can only
deploy their protective function if, at all times, all vehicle occupants:
R have fastened their seat belts correctly
(Y page 43)
R have the seat adjusted properly
(Y page 84)
Depending on the vehicle's equipment, the
head restraints must also be adjusted prop-
erly. As the driver, you also have to make sure that
the steering wheel is adjusted correctly.
Observe the information relating to the correct
driver's seat position (Y
page 84).
You also have to make sure that an air bag can
inflate properly if deployed (Y page 45).
An air bag supplements a correctly worn seat
belt. As an additional safety device, the air bag
increases the level of protection for vehicle
occupants in the event of an accident. For exam- ple, if, in the event of an accident, the protection
offered by the seat belt is sufficient, the air bags are not deployed. When an accident occurs, only
the air bags that increase protection in that par- ticular accident situation are deployed. How-
ever, seat belts and air bags generally do not
protect against objects penetrating the vehicle
from the outside.
Information on restraint system operation can
be found under "Triggering of the Emergency
Tensioning Devices and air bags" (Y page 52).
See "Children in the vehicle" for information on
children traveling with you in the vehicle as well
as on child restraint systems (Y page 55). Important safety notes
G
WARNING
Modifications to the restraint system may
cause it to no longer work as intended. The
restraint system may then not perform its
intended protective function and may fail in an accident or trigger unexpectedly, for example.
This poses an increased risk of injury or even fatal injury.
Never modify parts of the restraint system.
Never tamper with the wiring, the electronic
components or their software.
If it is necessary to modify components of the
restraint system to accommodate a person with
disabilities, contact an authorized Mercedes-
Benz Center for details. USA only: for further
information contact our Customer Assistance
Center at 1-800 FOR-MERCEDES
(1‑800‑367‑6372).
Mercedes-Benz recommends that you only use
driving aids which have been approved specifi-
cally for your vehicle by Mercedes-Benz. 40
Occupant safetySafety
Page 44 of 298
occupant in the best position in relation to the
air bag.
The seat belt system comprises:
R Seat belts
R Emergency Tensioning Devices and seat belt
force limiters
If the seat belt is pulled quickly or sharply by the
seat belt guide, the inertia reel locks. The belt
strap cannot be extracted any further.
The Emergency Tensioning Device tightens the
seat belt in an accident, pulling the belt close
against the body. However it does not pull the
vehicle occupant back in the direction of the
backrest.
The Emergency Tensioning Device does not cor- rect an incorrect seat position or the routing of
an incorrectly fastened seat belt.
When triggered, a seat belt force limiter helps to
reduce the force exerted by the seat belt on the vehicle occupant.
The seat belt force limiters are synchronized
with the front air bags which absorb part of the
deceleration force. This can reduce the force
exerted on the vehicle occupants during an acci-
dent.
! If the front-passenger seat is not occupied,
do not engage the seat belt tongue in the
buckle on the front-passenger seat. Other-
wise, in the event of an accident the Emer-
gency Tensioning Device and the side impact
air bag, in addition to other systems, may be
triggered and have to be replaced.
Important safety notes The use of seat belts and child restraint systems
is required by law in:
R all 50 states
R the U.S. territories
R the District of Columbia
R all Canadian provinces
Even where this is not required by law, all vehicle occupants should correctly fasten their seat
belts before starting the journey. G
WARNING
If the seat belt is not worn correctly, it cannot perform its intended protective function. An
incorrectly fastened seat belt can also cause
injuries, for example, in the event of an acci- dent or when braking or changing direction
abruptly. This poses an increased risk of injury or even fatal injury.
Always ensure that all vehicle occupants have
their seat belts fastened correctly and are sit- ting properly.
The components of the restraint system work in
conjunction with each other. They can only
deploy their protective function if, at all times, all vehicle occupants:
R have fastened their seat belts correctly
(Y page 43)
R have the seat adjusted properly
(Y page 84)
Depending on the vehicle's equipment, the
head restraints must also be adjusted prop-
erly. G
WARNING
The seat belt does not offer the intended level of protection if you have not moved the back-
rest to an almost vertical position. When brak-
ing or in the event of an accident, you could
slide underneath the seat belt and sustain
abdomen or neck injuries, for example. This
poses an increased risk of injury or even fatal injury.
Adjust the seat properly before beginning
your journey. Always ensure that the backrest
is in an almost vertical position and that the
shoulder section of your seat belt is routed
across the center of your shoulder. G
WARNING
Persons less than 5 ft (1.50 m) tall cannot
wear the seat belt correctly without an addi-
tional and suitable restraint system. If the
seat belt is not worn correctly, it cannot per-
form its intended protective function. An
incorrectly fastened seat belt can also cause
injuries, for example, in the event of an acci-
dent or when braking or changing direction
abruptly. This poses an increased risk of injury or even fatal injury.
For this reason, always secure persons under
5 ft (1.50 m) tall in suitable additional restraint
systems. 42
Occupant safetySafety
Page 50 of 298
Occupant Classification System
(OCS)
Introduction The Occupant Classification System (OCS) cat-
egorizes the person in the front-passenger seat.
Depending on that result, the front-passenger
front air bag and front-passenger knee bag are
either enabled or deactivated.
The system does not deactivate:
R the side impact air bag
R the headbag
R the Emergency Tensioning Devices
In vehicles with the AMG Performance seat, the sidebag and the seat belt tensioner are deacti-
vated in the following situation:
R OCS has not categorized the person on the
front-passenger seat as an adult or a person
of corresponding stature and
R the seat belt buckle tongue of the seat belt is
not inserted into the front-passenger seat beltbuckle
Requirements To be classified correctly, the front passenger
must sit:
R with the seat belt fastened correctly
R in an almost upright position with their back
against the seat backrest
R with their feet resting on the floor, if possible
If the front passenger does not observe these
conditions, OCS may produce a false classifica- tion, e.g. because the front passenger:
R transfers their weight by supporting them-
selves on a vehicle armrest
R sits in such a way that their weight is raised
from the seat cushion
If you install a child restraint system on the
front-passenger seat, be sure to observe the
correct positioning of the child restraint system. Never place objects under or behind the child
restraint system, e.g. a cushion. The entire base
of the child restraint system must always rest on the seat cushion of the front-passenger seat.
The backrest of the forward-facing child
restraint system must lie as flat as possible
against the backrest of the front-passenger
seat. The child restraint system must not touch the
roof or be subjected to a load by the head
restraint. Adjust the angle of the seat backrest
and the head restraint position accordingly.
Only then can OCS be guaranteed to function
correctly. Always observe the child restraint sys-
tem manufacturer's installation and operating
instructions.
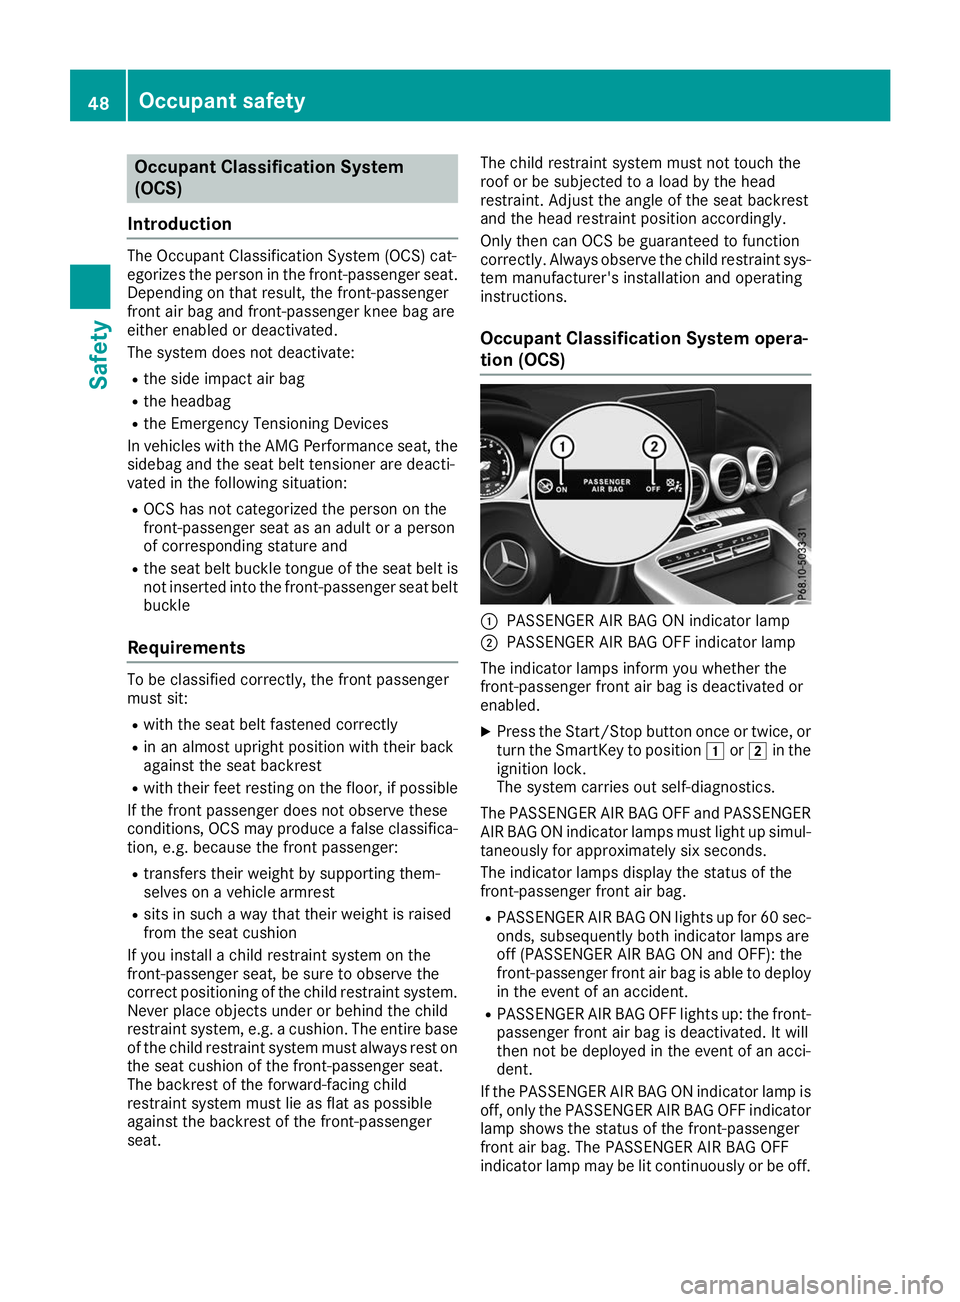
Occupant Classification System opera-
tion (OCS) 0043
PASSENGER AIR BAG ON indicator lamp
0044 PASSENGER AIR BAG OFF indicator lamp
The indicator lamps inform you whether the
front-passenger front air bag is deactivated or
enabled.
X Press the Start/Stop button once or twice, or
turn the SmartKey to position 0047or0048 in the
ignition lock.
The system carries out self-diagnostics.
The PASSENGER AIR BAG OFF and PASSENGER
AIR BAG ON indicator lamps must light up simul- taneously for approximately six seconds.
The indicator lamps display the status of the
front-passenger front air bag.
R PASSENGER AIR BAG ON lights up for 60 sec-
onds, subsequently both indicator lamps are
off (PASSENGER AIR BAG ON and OFF): the
front-passenger front air bag is able to deploy
in the event of an accident.
R PASSENGER AIR BAG OFF lights up: the front-
passenger front air bag is deactivated. It will
then not be deployed in the event of an acci-
dent.
If the PASSENGER AIR BAG ON indicator lamp is off, only the PASSENGER AIR BAG OFF indicator
lamp shows the status of the front-passenger
front air bag. The PASSENGER AIR BAG OFF
indicator lamp may be lit continuously or be off. 48
Occupant safetySafety
Page 57 of 298
If the seat belt pre-tensioning is not reduced:
X Move the seat backrest or seat back slightly
when the vehicle is stationary.
The seat belt pre-tensioning is reduced and
the locking mechanism is released.
The seat-belt adjustment is an integral part of
the PRE-SAFE ®
convenience function. Informa-
tion about the convenience function can be
found under "Belt adjustment" (Y page 44).Automatic measures after an acci-
dent
Immediately after an accident, the following
measures are implemented, depending on the
type and severity of the impact:
R the hazard warning lamps are switched on
R the emergency lighting is activated
R the vehicle doors are unlocked
R the front side windows are lowered
R vehicles with a memory function: the electri-
cally adjustable steering wheel is raised when
the driver's door is opened
R the engine is switched off and the fuel supply
is cut off
R vehicles with Mercedes me connect: auto-
matic emergency call Children in the vehicle
Important safety notes
If a child younger than twelve years old and
under 5 ft (1.50 m) in height is traveling in the
vehicle: R always secure the child in a child restraint
system suitable for Mercedes-Benz vehicles.
The child restraint system must be appropri-
ate to the age, weight and size of the child.
R be sure to observe the instructions and safety
notes in this section in addition to the child
restraint system manufacturer's installation
instructions.
R always observe the instructions and safety
notes on the "Occupant classification system
(OCS)". (Y page 48) G
WARNING
If you leave children unsupervised in the vehi- cle, they could set it in motion, for example by:
R releasing the parking brake
R shifting the transmission to the neutral
position
R starting the engine
In addition, they may operate vehicle equip-
ment and become trapped. There is a risk of
an accident and injury.
When leaving the vehicle, always take the
SmartKey with you and lock the vehicle. Never leave children unsupervised in the vehicle. G
WARNING
If persons, particularly children are subjected to prolonged exposure to extreme heat or
cold, there is a risk of injury, possibly even
fatal. Never leave children unattended in the
vehicle. G
WARNING
If the child restraint system is subjected to
direct sunlight, parts may get very hot. Chil-
dren may burn themselves on these parts,
particularly on the metal parts of the child
restraint system. There is a risk of injury.
If you leave the vehicle, taking the child with
you, always ensure that the child restraint
system is not exposed to direct sunlight. Pro- tect it with a blanket, for example. If the child
restraint system has been exposed to direct
sunlight, let it cool down before securing the
child in it. Never leave children unattended in the vehicle.
Always ensure that all vehicle occupants have
their seat belts fastened correctly and are sitting properly. Particular attention must be paid to
children.
Observe the safety notes on the seat belt
(Y page 42) and the notes on correct use of seat
belts (Y page 43).
A booster seat may be necessary to achieve
proper seat belt positioning for children over
40 lbs (18 kg) until they reach a height where a Children in the vehicle
55Safety Z
Page 68 of 298
SmartKey
Important safety notes
G
WARNING
If children are left unsupervised in the vehicle, they could:
R open the doors, thus endangering other
people or road users.
R get out and disrupt traffic.
R operate the vehicle's equipment.
Additionally, children could set the vehicle in
motion if, for example, they:
R release the parking brake.
R shifting the automatic transmission out of
park position P
R Start the engine.
There is a risk of an accident and injury.
When leaving the vehicle, always take the
SmartKey with you and lock the vehicle. Never
leave children or animals unattended in the
vehicle. Always keep the SmartKey out of
reach of children. G
WARNING
If you attach heavy or large objects to the
SmartKey, the SmartKey could be uninten-
tionally turned in the ignition lock. This could
cause the engine to be switched off. There is a risk of an accident.
Do not attach any heavy or large objects to the
SmartKey. Remove any bulky key rings before
inserting the SmartKey into the ignition lock.
! Keep the SmartKey away from strong mag-
netic fields. Otherwise, the remote control
function could be affected.
Strong magnetic fields can occur in the vicin- ity of powerful electrical installations.
Do not keep the SmartKey: R with electronic devices, e.g. a mobile phone
or another SmartKey
R with metallic objects, e.g. coins or metal foil
R inside metallic objects, e.g. a metal case
This can affect the functionality of the Smart-
Key. Vehicles with KEYLESS-GO start function:
do
not keep the SmartKey in the trunk. Otherwise, the SmartKey may not be detected, e.g. when
starting the engine using the Start/Stop button.
A brief radio connection between the vehicle
and the SmartKey determines whether a valid
SmartKey is in, or in the direct vicinity of, the
vehicle.
This occurs, for example:
R when starting the engine
R while driving
R when using the trunk lid unlocking sensor
R when the external door handles are touched
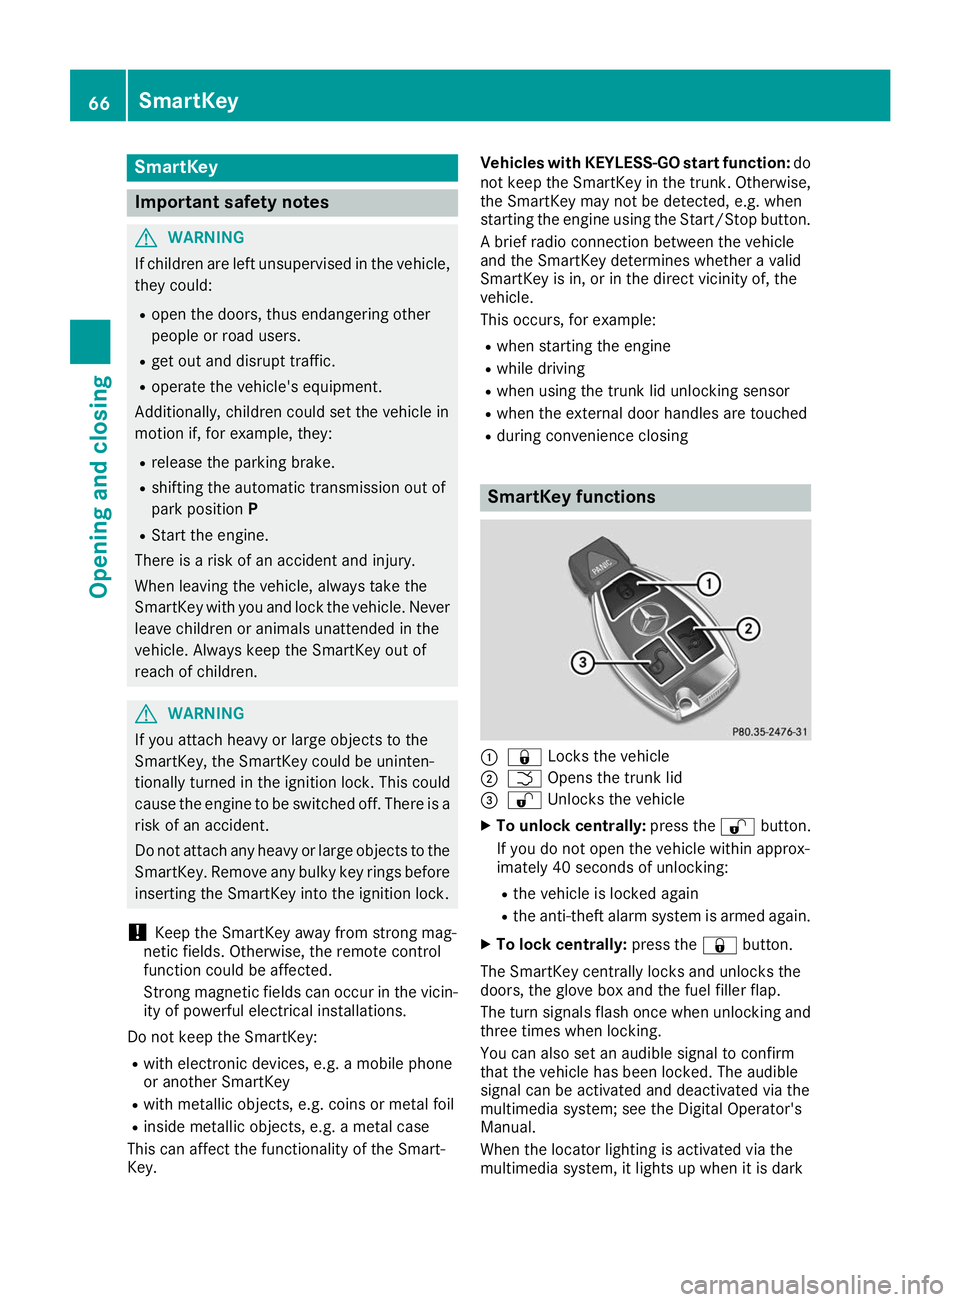
R during convenience closing SmartKey functions
0043
0037 Locks the vehicle
0044 0054 Opens the trunk lid
0087 0036 Unlocks the vehicle
X To unlock centrally: press the0036button.
If you do not open the vehicle within approx-
imately 40 seconds of unlocking:
R the vehicle is locked again
R the anti-theft alarm system is armed again.
X To lock centrally: press the0037button.
The SmartKey centrally locks and unlocks the
doors, the glove box and the fuel filler flap.
The turn signals flash once when unlocking and three times when locking.
You can also set an audible signal to confirm
that the vehicle has been locked. The audible
signal can be activated and deactivated via the
multimedia system; see the Digital Operator's
Manual.
When the locator lighting is activated via the
multimedia system, it lights up when it is dark 66
SmartKeyOpening and closing
Page 70 of 298
Changing the settings of the locking
system
You can change the settings of the locking sys-
tem. This means that only the driver's door, the
glove box and the fuel filler flap are unlocked
when the vehicle is unlocked. This is useful if you
frequently travel on your own.
X To change the setting: press and hold down
the 0036 and0037 buttons simultaneously
for approximately six seconds until the indi-
cator lamp flashes twice (Y page 69).
If the setting of the locking system is changed
within the signal range of the vehicle, pressing
the 0037 or0036 button:
R locks or
R unlocks the vehicle
The SmartKey now functions as follows:
X To unlock: press the0036button once.
X To unlock centrally: press the0036button
twice.
X To lock: press the 0037button.
The KEYLESS-GO functions can be changed as
follows:
X To unlock the driver's door: touch the inner
surface of the door handle on the driver's
door.
X To unlock centrally: touch the inner surface
of the front-passenger door handle.
X To lock centrally: touch the outer sensor
surface on one of the door handles.
Restoring factory settings:
X Press the 0036and0037 buttons simultane-
ously for approximately six seconds until the
indicator lamp flashes twice (Y page 69).Mechanical key
General notes If the vehicle can no longer be locked or
unlocked with the SmartKey or KEYLESS-GO,
use the mechanical key.
If you use the mechanical key to unlock and
open the driver's door, the anti-theft alarm sys- tem will be triggered. Switch off the alarm
(Y page 64). If you unlock the vehicle using the mechanical
key, the fuel filler flap will not be unlocked auto-
matically.
X To unlock the fuel filler flap: insert the
SmartKey into the ignition lock.
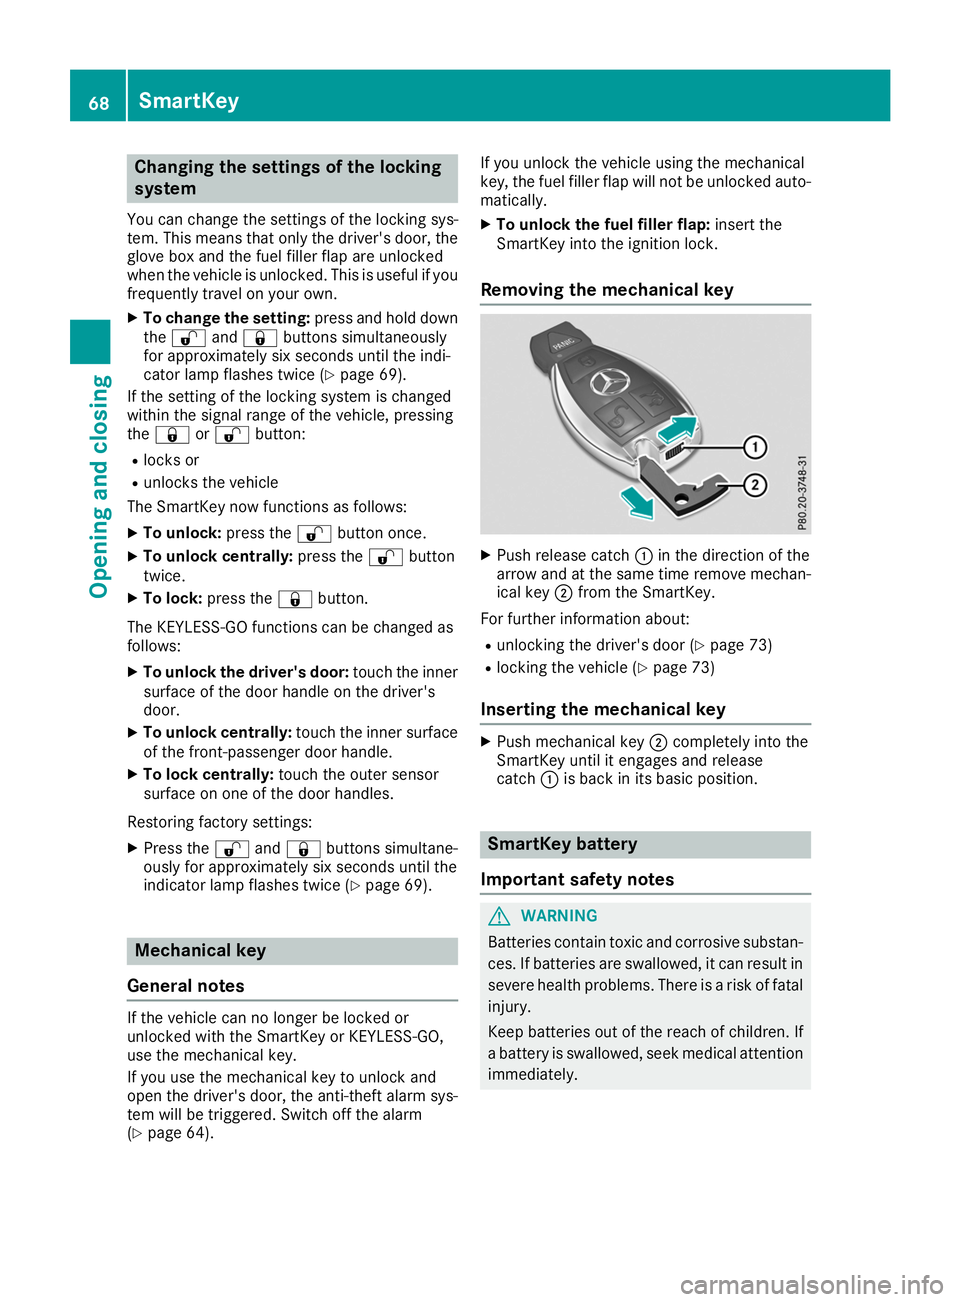
Removing the mechanical key X
Push release catch 0043in the direction of the
arrow and at the same time remove mechan- ical key 0044from the SmartKey.
For further information about:
R unlocking the driver's door (Y page 73)
R locking the vehicle (Y page 73)
Inserting the mechanical key X
Push mechanical key 0044completely into the
SmartKey until it engages and release
catch 0043is back in its basic position. SmartKey battery
Important safety notes G
WARNING
Batteries contain toxic and corrosive substan- ces. If batteries are swallowed, it can result in
severe health problems. There is a risk of fatal injury.
Keep batteries out of the reach of children. If
a battery is swallowed, seek medical attention immediately. 68
SmartKeyOpening and closing
Page 74 of 298
Doors
Important safety notes
G
WARNING
If children are left unsupervised in the vehicle, they could:
R open the doors, thus endangering other
people or road users.
R get out and disrupt traffic.
R operate the vehicle's equipment.
Additionally, children could set the vehicle in
motion if, for example, they:
R release the parking brake.
R shifting the automatic transmission out of
park position P
R Start the engine.
There is a risk of an accident and injury.
When leaving the vehicle, always take the
SmartKey with you and lock the vehicle. Never
leave children or animals unattended in the
vehicle. Always keep the SmartKey out of
reach of children.
When a door is opened, the side window on that
side opens slightly. When the door is closed, the side window closes again.
! The side windows will not open/close if the
battery is discharged or if the side windows
have iced up. It will then not be possible to
close the door. Do not attempt to force the
door closed. You could otherwise damage the door or the side window. Unlocking and opening doors from
the inside
You can open a door from inside the vehicle
even if it has been locked. If the vehicle has been
locked with the SmartKey or with KEYLESS-GO,
opening a door from the inside will trigger the
anti-theft alarm system. Switch off the alarm
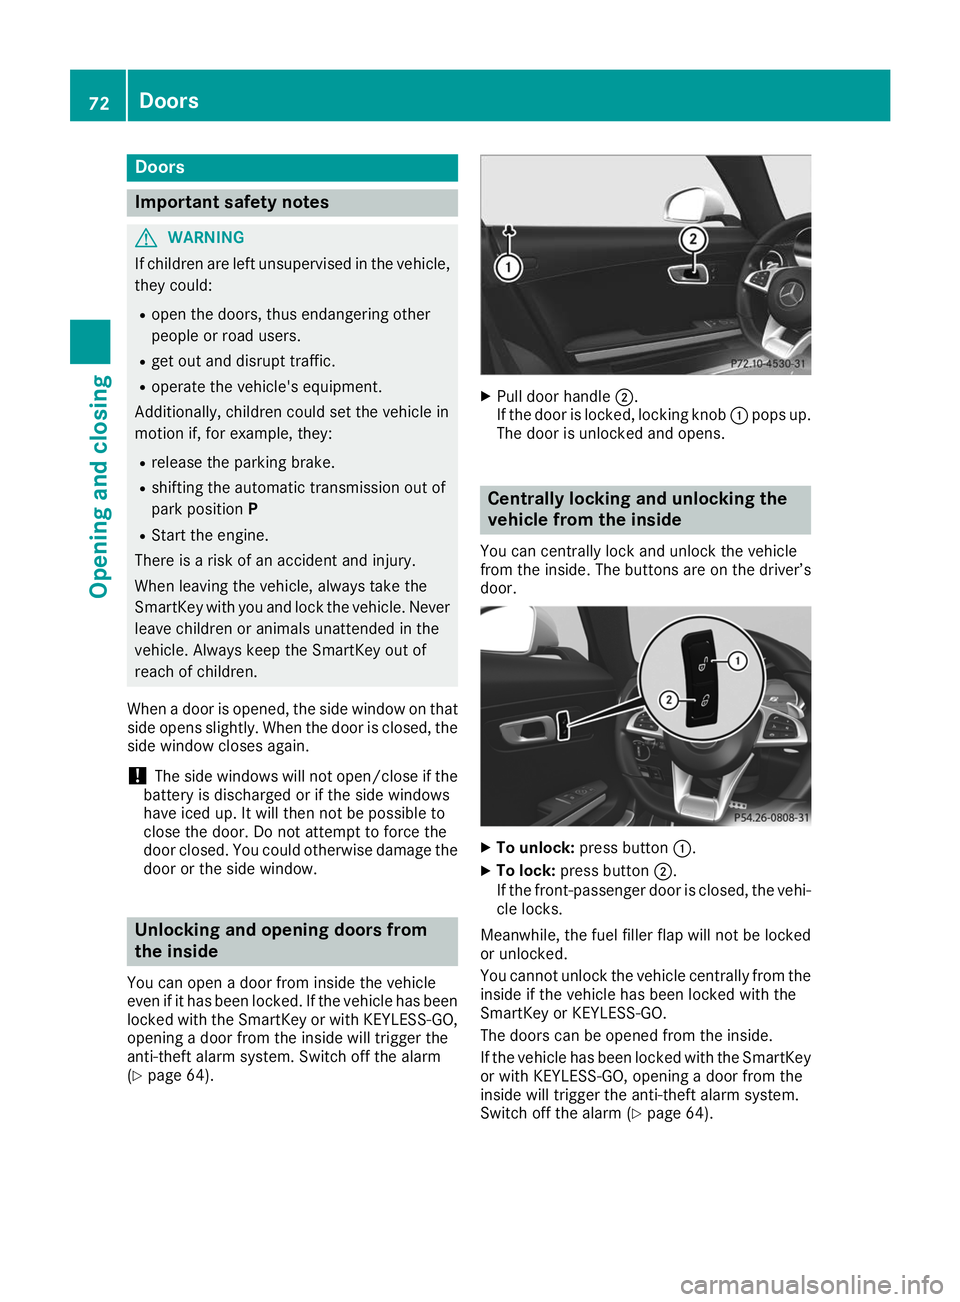
(Y page 64). X
Pull door handle 0044.
If the door is locked, locking knob 0043pops up.
The door is unlocked and opens. Centrally locking and unlocking the
vehicle from the inside
You can centrally lock and unlock the vehicle
from the inside. The buttons are on the driver’s
door. X
To unlock: press button 0043.
X To lock: press button 0044.
If the front-passenger door is closed, the vehi-
cle locks.
Meanwhile, the fuel filler flap will not be locked
or unlocked.
You cannot unlock the vehicle centrally from the
inside if the vehicle has been locked with the
SmartKey or KEYLESS-GO.
The doors can be opened from the inside.
If the vehicle has been locked with the SmartKey
or with KEYLESS-GO, opening a door from the
inside will trigger the anti-theft alarm system.
Switch off the alarm (Y page 64).72
DoorsOpening and closing
Page 79 of 298
Make sure that nobody touches the side win-
dow during the opening procedure. If some-
body becomes trapped, release the switch or pull the switch to close the side window again. G
WARNING
While closing the side windows, body parts in the closing area could become trapped. There is a risk of injury.
When closing make sure that no parts of the
body are in the closing area. If somebody
becomes trapped, release the switch or press
the switch to open the side window again. G
WARNING
If children operate the side windows they
could become trapped, particularly if they are left unsupervised. There is a risk of injury.
When leaving the vehicle, always take the
SmartKey with you and lock the vehicle. Never
leave children unsupervised in the vehicle. Side window reversing feature
The side windows are equipped with an auto-
matic reversing feature. If a solid object blocks
or restricts a side window from traveling
upwards during the automatic closing process,
the side window opens again automatically. Dur-
ing the manual closing process, the side window only opens again automatically after the corre-
sponding switch is released. The automatic
reversing feature is only an aid and does not
relieve you of the responsibility to pay attention
when closing a side window. G
WARNING
The reversing feature does not react:
R to soft, light and thin objects, e.g. small fin-
gers
R while adjusting
This means that the reversing feature cannot
prevent someone being trapped in these sit-
uations. There is a risk of injury.
Make sure that no body parts are in close
proximity during the closing procedure. If someone becomes trapped, press the
0062
button to open the side window again. Opening and closing the side win-
dows
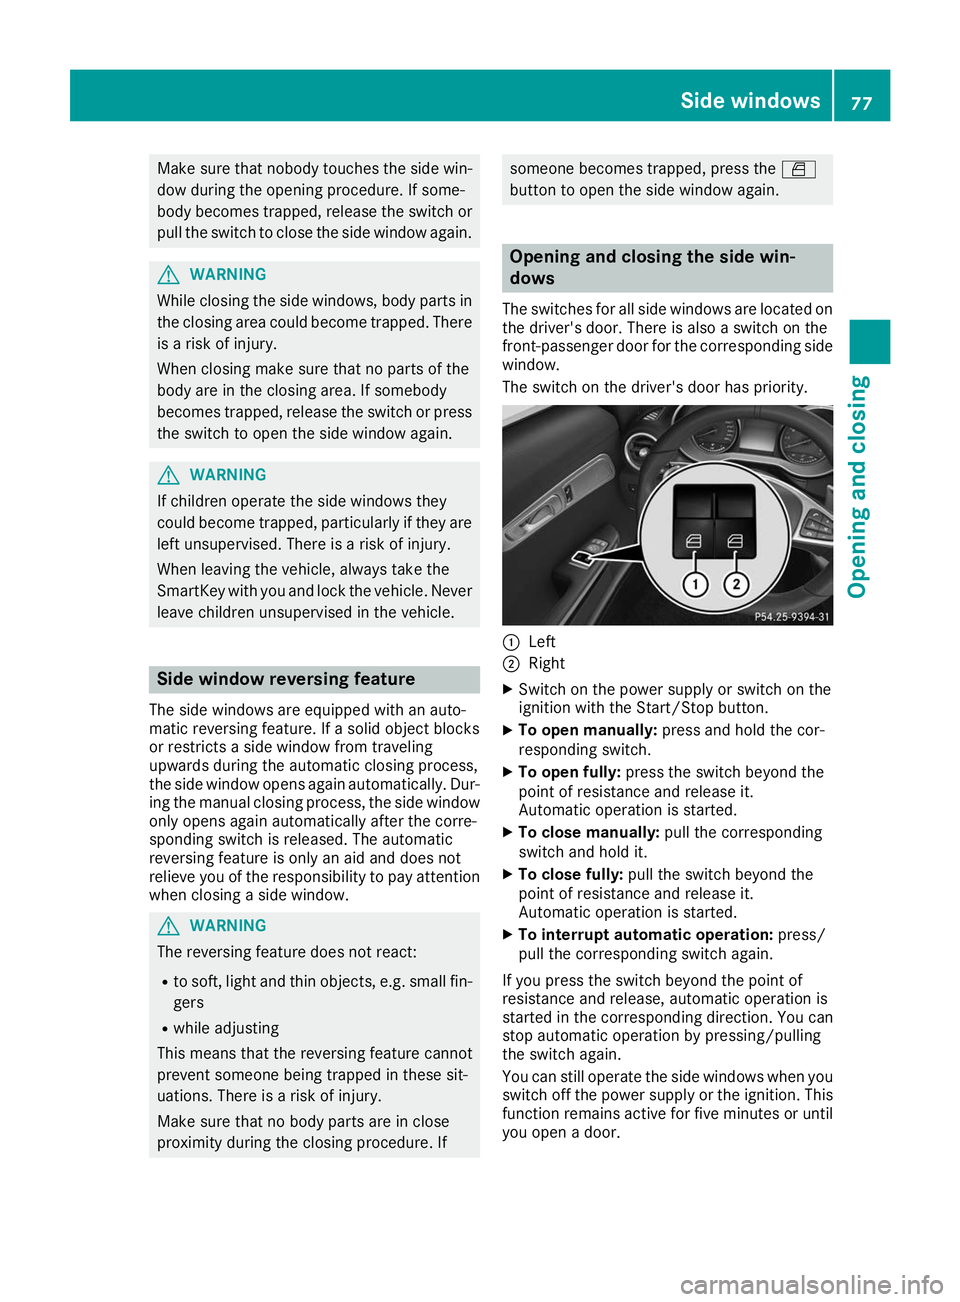
The switches for all side windows are located on
the driver's door. There is also a switch on the
front-passenger door for the corresponding side
window.
The switch on the driver's door has priority. 0043
Left
0044 Right
X Switch on the power supply or switch on the
ignition with the Start/Stop button.
X To open manually: press and hold the cor-
responding switch.
X To open fully: press the switch beyond the
point of resistance and release it.
Automatic operation is started.
X To close manually: pull the corresponding
switch and hold it.
X To close fully: pull the switch beyond the
point of resistance and release it.
Automatic operation is started.
X To interrupt automatic operation: press/
pull the corresponding switch again.
If you press the switch beyond the point of
resistance and release, automatic operation is
started in the corresponding direction. You can
stop automatic operation by pressing/pulling
the switch again.
You can still operate the side windows when you switch off the power supply or the ignition. This
function remains active for five minutes or until
you open a door. Side windows
77Opening and closing Z
Page 86 of 298
Correct driver's seat position
G
WARNING
You could lose control of your vehicle if you do the following while driving:
R adjust the driver's seat, head restraint,
steering wheel or mirrors
R fasten the seat belt
There is a risk of an accident.
Adjust the driver's seat, head restraint, steer-
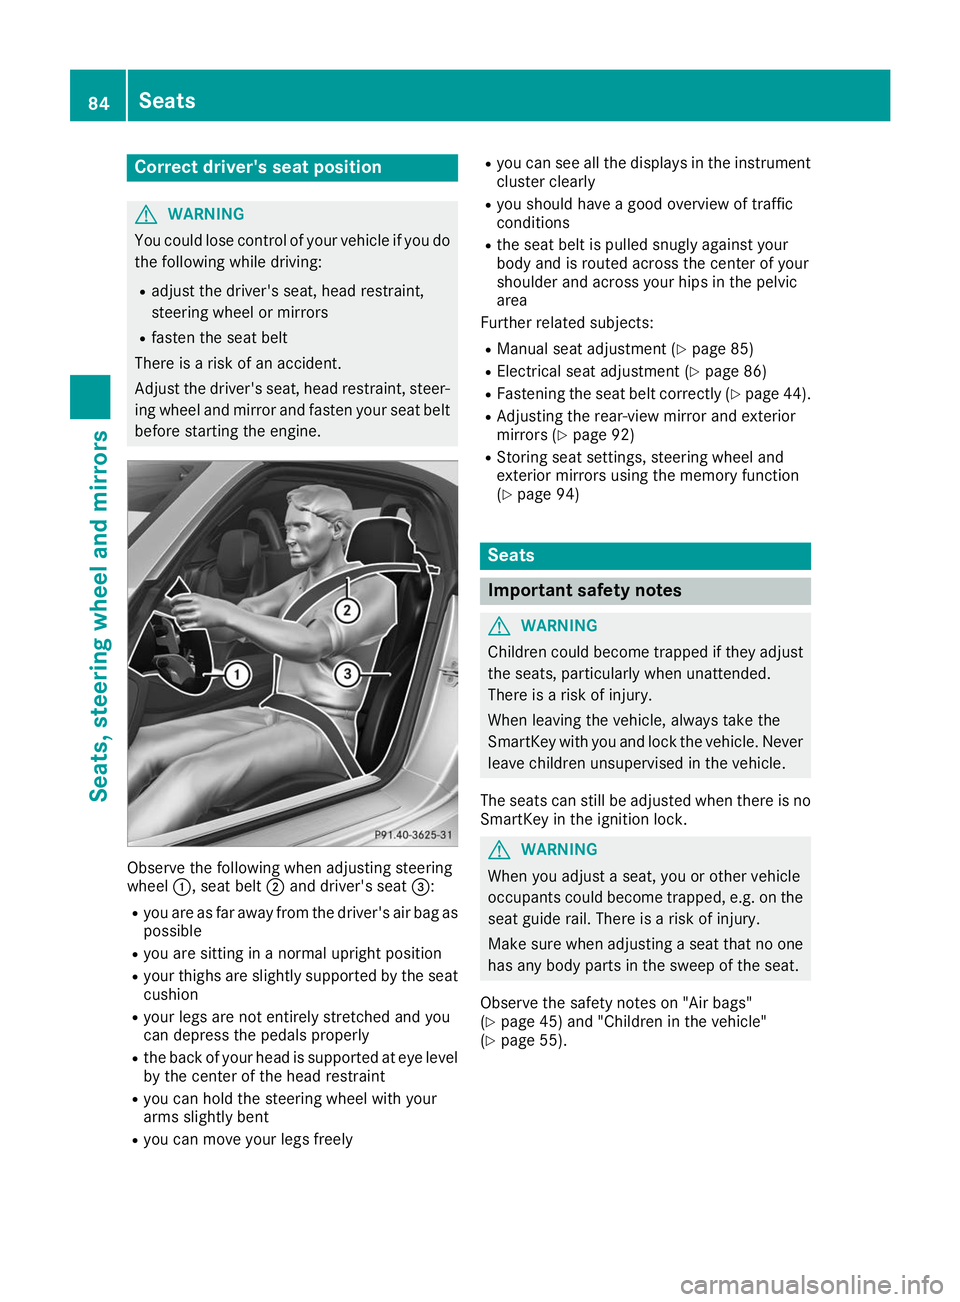
ing wheel and mirror and fasten your seat belt before starting the engine. Observe the following when adjusting steering
wheel
0043, seat belt 0044and driver's seat 0087:
R you are as far away from the driver's air bag as
possible
R you are sitting in a normal upright position
R your thighs are slightly supported by the seat
cushion
R your legs are not entirely stretched and you
can depress the pedals properly
R the back of your head is supported at eye level
by the center of the head restraint
R you can hold the steering wheel with your
arms slightly bent
R you can move your legs freely R
you can see all the displays in the instrument
cluster clearly
R you should have a good overview of traffic
conditions
R the seat belt is pulled snugly against your
body and is routed across the center of your
shoulder and across your hips in the pelvic
area
Further related subjects:
R Manual seat adjustment (Y page 85)
R Electrical seat adjustment (Y page 86)
R Fastening the seat belt correctly (Y page 44).
R Adjusting the rear-view mirror and exterior
mirrors (Y page 92)
R Storing seat settings, steering wheel and
exterior mirrors using the memory function
(Y page 94) Seats
Important safety notes
G
WARNING
Children could become trapped if they adjust the seats, particularly when unattended.
There is a risk of injury.
When leaving the vehicle, always take the
SmartKey with you and lock the vehicle. Neverleave children unsupervised in the vehicle.
The seats can still be adjusted when there is no
SmartKey in the ignition lock. G
WARNING
When you adjust a seat, you or other vehicle
occupants could become trapped, e.g. on the seat guide rail. There is a risk of injury.
Make sure when adjusting a seat that no one
has any body parts in the sweep of the seat.
Observe the safety notes on "Air bags"
(Y page 45) and "Children in the vehicle"
(Y page 55). 84
SeatsSeats, steering wheel and
mirrors