MERCEDES-BENZ AMG GT ROADSTER 2020 Owners Manual
Manufacturer: MERCEDES-BENZ, Model Year: 2020, Model line: AMG GT ROADSTER, Model: MERCEDES-BENZ AMG GT ROADSTER 2020Pages: 381, PDF Size: 7.37 MB
Page 241 of 381
R
the blo werfo rth eve ntilation/heating is
switched off.
R the windscreen wiper switch is in position
g.
R theke y is at a minimum dis tance of 3 m
aw ay from theve hicle, otherwise the boot lid
could open unintentionally.
R in car washes with a con veyo r sy stem: neu‐
tral iis engaged.
% In car washes with a con veyo r sy stem: if you
wo uld like tolea vetheve hicle while it is
being washed, make sure theke y is located
in theve hicle. The park position jisother‐
wise automatically engaged.
% If, af terth e car wash, youre mo vethewax
from the windscreen and wiper rubbers, this
will pr event smearing and reduce wiper
noise. Information on using a high-p
ressure cleaner &
WARNING Risk of an accident when
using high-pressure cleane rswith round-
spray nozzles
The wate r jet can cause extern ally invisible
damage.
Components damaged in this wa y may unex‐
pec tedly fail. #
Do not use a high-pressure cleaner with
round-spr aynozzles. #
Have damaged tyres or chassis parts
re placed immediatel y. To
avo id damage to yourvehicle, obser vethefo l‐
lowing when using a high-pressure cleaner:
R keep theke y at least 3 m away from theve hi‐
cle. Otherwise the boot lid could open unin‐
te ntional ly.
R maintain a dis tance of at least 30 cm tothe
ve hicle.
R vehicles with decora tivefoil: parts of your
ve hicle are co vered with a decorative foil. Maintain a dis
tance of at least 70 cm
between thefo il-c ove red parts of theve hicle
and the nozzle of the high-pressure cleaner.
Mo vethe high-pressure cleaner nozzle
around whilst cleaning. The waterte mp era‐
ture of the high-pressure cleaner must not
exc eed 60 °C.
R obser vethe information on the cor rect dis‐
ta nce in the equipment manufacturer's oper‐
ating instructions.
R do not point the nozzle of the high-pressure
cleaner directly at sensitive parts such as
tyres, the soft top, the wind deflector net,
slits, electrical component parts, batteries,
light sources and ventilation sl ots. Wa
shing theve hicle byhand Obser
vethe legal requirements, e.g. in a number
of countries, washing byhand is only permitted
in specially designated wash ba ys. #
Use a mild cleaning agent, e.g. car shampoo. 238
Maintenance and care
Page 242 of 381
#
Washtheve hicle with luk ewarmwate r using
a soft car sponge. When doing so, do not
ex pose theve hicle todirect sunlight. #
Carefully hose theve hicle off with water and
dry using a chamois. Take care not topoint
th ewate r jet directly towa rdsth e air inlet
grille below the bonn et. Note
s on paint work/matt finish paintwork
care Obse
rveth e no tes on cleaning and care toavo id
damaging the paintwor k.
Pa int
R Insect remains: soak with insect remo ver and
ri nse off the treated areas af terw ards.
R Bird droppings: soak with water and rinse off
af te rw ards.
R Tree resin, oils, fuels and greases: remo veby
ru bbing gently wi tha clo thsoaked in petro‐
leum ether or lighter fluid.
R Coolant and brake fluid: remo vewith a damp
clo thand clean water.
R Tarst ains: use tar remo ver. R
Wax: use silicone remo ver.
R Do not attach sticke rs,fi lms or similar mate‐
ri als.
R Remo vedirt immediately, where possible.
Matt finish
R Only use care products appr ovedfor
Mercedes-Benz.
R Do not polish theve hicle and light-alloy
wheels.
R Only use car washes that cor respond tothe
latest engineering standards.
R Do not use car wash programmes with a final
hot wax treatment.
R Do not use paint cleane rs, buf fing or polish‐
ing products, gloss preser vers, e.g. wax.
R Alw ays ha vepaintwork repairs car ried out at
a qu alified specialist workshop. Note
s on cleaning decorative foils Obser
vethe no tes on matt finish care in the
ch ap ter "No tes on paintwork/matt finish paint‐ wo
rkcare" (/ page 239). They also apply to
matt decorative foils.
Obser vethe no tes on cleaning decorative foils to
av oid vehicle damage.
Cleaning
R For cleaning, use plenty of water and a mild
cleaning agent without additives or abrasive
subs tances, e.g. a car sha mpoo appr ovedfor
Mercedes-Benz.
R Remo vedirt immediatel y,where possible,
whilst avoiding rubbing too hard. There is
ot herwise a risk of damaging the decorative
fo il ir reparabl y.
R Ifth ere is dirt on thefinish or if the decora‐
tive foil is dull: use thePa int Cleaner recom‐
mended and appr oved for Mercedes-Benz.
R Insect remains: soak with insect remo ver and
ri nse off the treated areas af terw ards.
R Bird droppings: soak with water and rinse off
af te rw ards.
R Topreve ntwate rst ains, dry a foil-wrapped
ve hicle with a soft, absorbent clo thafter
eve rycar wash. Maintenance and care
239
Page 243 of 381
Av
oiding dama getothe decorative foil
R The service life and colouring of decorative
foils are impaired by:
- sunlight
- temp erature, e.g. hot air blo wer
- weather conditions
- stone chippings and dirt
- chemical cleaning agents
- oily products
R Do not use polish on matt decorative foil.
Po lishing will ha vethe ef fect of shining the
fo il-wrapped sur face.
R Do not treat matt or stru ctured deco rative
fo ils with wax.Pe rm anent stains may occur.
Sc ratches, cor rosive deposits, areas af fected by
cor rosion and damage caused byincor rect care
cannot al ways be comple tely re paired. In such
cases, visit a qualified specialist workshop.
Yo u can obtain more information on care and
cleaning products from the manufacturer.
In the case of foil-wrapped sur faces, optical dif‐
fe re nces may occur between the sur faces that we
renot pr otected bya decorative foil af ter
re moving a decorative foil.
% Have wo rkor repairs todecorative foils car‐
ri ed out at a qualified specialist workshop,
e.g. in a Mercedes-Benz Service Centre. Note
s on cleaning and care of the soft top Obser
vethefo llowing no tes in order topreve nt
dama getothe soft top.
Light soiling
R Clean the soft top when dr y.
R Rinse with clean water.
Norm alto heavy soiling
R Clean the soft top with a brush and clean
wate r.
R Clean stains and other heavy soiling with a
brush and soft top cleaning agents recom‐
mended and appr ovedby Mercedes-Benz.
R Alw ays brush from front toback in the direc‐
tion of thefa bric. Av
oiding dama getothe soft top
R Never use petrol, thinners, tarre mo vers,
st ain remo vers or other or ganic sol vents.
R Remo vebird droppings immediately because
th ey are cor rosive and can cause the soft top
fa bric toleak.
R Never use a high-p ressure cleaner.
R Do not use sharp-edged equipment to
re mo veice or sno w.
Fr equent cleaning reduces the soft top's resist‐
ance todirt. Torestore the ef fect, clean the soft
to p with the care products and cleaning agents
re commended and appr oved byMercedes-Benz.
Incor rect cleaning and care as well as ageing
can cause the soft top seams toleak. Ha vethe
soft top seams sealed at a qualified specialist
wo rkshop, e.g. at your Mercedes-Benz service
centre.
% Place a suitable co verove rth e soft top if you
plan tolea vetheve hicle outside for a long
period of time. 240
Maintenance and care
Page 244 of 381
Note
s on care of car parts &
WARNING Risk of entrapment if the
windscreen wipers are swit ched on while
th e windscreen is being cleaned
If th e windscreen wipers are set in motion
while you are cleaning the windscreen or
wiper blades, you can be trapped bythe
wiper arm. #
Alw ays switch off the windscreen wip‐
ers and the ignition before cleaning the
windscreen or wiper blades. &
WARNING Risk of burn s fromtheta il‐
pipe and tailpipe trims
The exhaust tailpipe and tailpipe trims can
become very hot. If you come into contact
with these parts of theve hicle, you could
burn yourself. #
Alw ays be particular lycareful around
th eta ilpipe and theta ilpipe trims and
supervise children especially closely in
th is area. #
Allow vehicle parts tocool down before
to uching them. Obser
vethe no tes on cleaning and care of the
fo llowing vehicle parts toavoid damage.
Wheels/rims R Use water and acid-free wheel cleaners.
R Do not use acidic wheel cleaners toremo ve
brake dust. This could damage wheel bolts
and brake components.
R Toavo id cor rosion of the brake discs and
brake pads, drive theve hicle for a few
minutes af ter cleaning before parking it. The
brake discs and brake pads warm up and dry
out.
Wi ndo ws
R Clean wind owsinside and outside with a
damp clo thand with a cleaning agent recom‐
mended for Mercedes-Benz.
R Do not use dry clo ths or abrasive or sol vent-
based cleaning agents toclean the inside of
windo ws. Wi
per blades
R Fold out the wiper blades and clean them
using a damp clo th.
R Do not clean the wiper blades too of ten.
Ex terior lighting
R Clean the lenses with a wet sponge and mild
cleaning agent, e.g. car sha mpoo.
R Only use cleaning agents or cleaning clo ths
th at are suitable for plast ic lenses.
Sensors
R Clean the sensors in the front and rear
bumpers with a soft clo thand car shampoo
(/ page 132).
R When using a high-pressure cleaner,maintain
a minimum dis tance of 30 cm.
Re versing camera and front camera
R Use clean water and a soft clo thtoclean the
came ralens.
R Do not use a high-pressure cleaner.
Extendable rear wing
R Extend there ar wing when washing byhand
(/ page 148). Main
tenance and care 241
Page 245 of 381
R
Clean there ar wing with a soft car spon ge
and mild cleaning agent, e.g. car shampoo.
R Retract there ar wing comple tely afte r drying
(/ page 148).
R Do not use a high-pressu recleane r.
Ta ilpipes
R Clean with a cleaning agent recommended
fo r Mercedes-Benz, especially inthe winter
and af terwa shing theve hicle.
R Do not use acidic cleaning agents. Note
s on care of the interior &
WARNING Risk of injury from plastic
parts breaking off af terth e use of sol‐
ve nt-based care products
Ca reand cleaning products con taining sol‐
ve nts can cause su rfaces in the cockpit to
become porous. When the airbags are
deplo yed, plastic parts may break away. #
Do not use any care or cleaning prod‐
ucts containing sol vents toclean the
cockpit. &
WARNING Risk of injury or death from
bleached seat belts
Bleaching or dyeing seat belts can se verely
we aken them.
This can, forex ample, cause seat belts to
te ar or fail in an accident. #
Never blea chor dye seat belts. Obser
vethe no tes on cleaning and care toavo id
ve hicle damage.
Seat belts R Clean with luk ewarmand soapy water.
R Do not use chemical cleaning agents.
R Do not dry seat belts byheating them toover
80 °C or exposing them todirect sunlight.
Display
R Switch off the display and let it cool down. R
Clean the sur face carefully with a microfibre
clo thand a suitable display care product
(TFT/LCD).
R Do not use any other agents.
Plastic trim
R Clean with a damp microfibre clo th.
R For heavy soiling: use a care product recom‐
mended for Mercedes-Benz.
R Do not attach sticke rs,fi lms or similar mate‐
ri als.
R Do not allow cosmetics, insect repellent or
sun cream tocome in contact wi th the plas‐
tic trim.
Re alwo od/t rim elements
R Clean wi tha mic rofibre clo th.
R Blackpiano-lac quer look: clean with a damp
clo thand soapy water.
R For heavy soiling: use a care product recom‐
mended for Mercedes-Benz.
R Do not use sol vent-based cleaning agents,
polishes or waxes. 242
Maintenance and care
Page 246 of 381
Ro
of lining
R Clean with a brush or dry shampoo.
Carpet R Use a carpet and textile cleaning agent rec‐
ommended for Mercedes-Benz.
Genuine leather seat co vers
R Clean with a damp clo thand then wipe with a
dry clo th.
R Leather care: use a leath er care agentthat
has been recommended for Mercedes-Benz.
R Do not allow th e leathertobecome too
damp.
R Do not use a microfibre clo th.
DINAMICA seat co vers
R Clean with a damp clo th.
R Do not use a mic rofibre clo th.
Imitation leather seat co vers
R Clean with a damp clo thand 1% soapy water.
R Do not use a mic rofibre clo th. Clo
thseat co vers
R Clean with a damp mic rofibre clo thand 1%
soap solution and allow todry. Maintenance and care
243
Page 247 of 381
Emer
gency Re
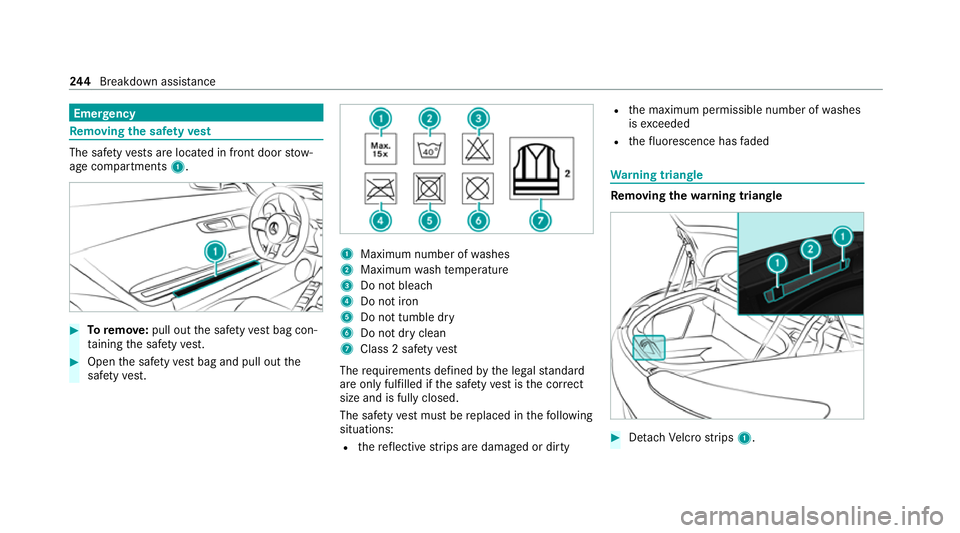
moving the saf etyve st The saf
etyve sts are located in front door stow‐
age compartments 1.#
Toremo ve:pull out the saf etyve st bag con‐
ta ining the saf etyve st. #
Open the saf etyve st bag and pull out the
saf etyve st. 1
Maximum number of washes
2 Maximum wash temp erature
3 Do not bleach
4 Do not iron
5 Do not tumble dry
6 Do not dry clean
7 Class 2 saf etyve st
The requ irements defined bythe legal standard
are on ly fulfilled if the saf etyve st isthe cor rect
size and is fully closed.
The saf etyve st must be replaced in thefo llowing
situations:
R there flective strips are damaged or dirty R
the maximum permissible number of washes
is exc eeded
R thefluorescence has faded Wa
rning triangle Re
moving the warning triangle #
Detach Velcro strips 1. 244
Breakdown assis tance
Page 248 of 381
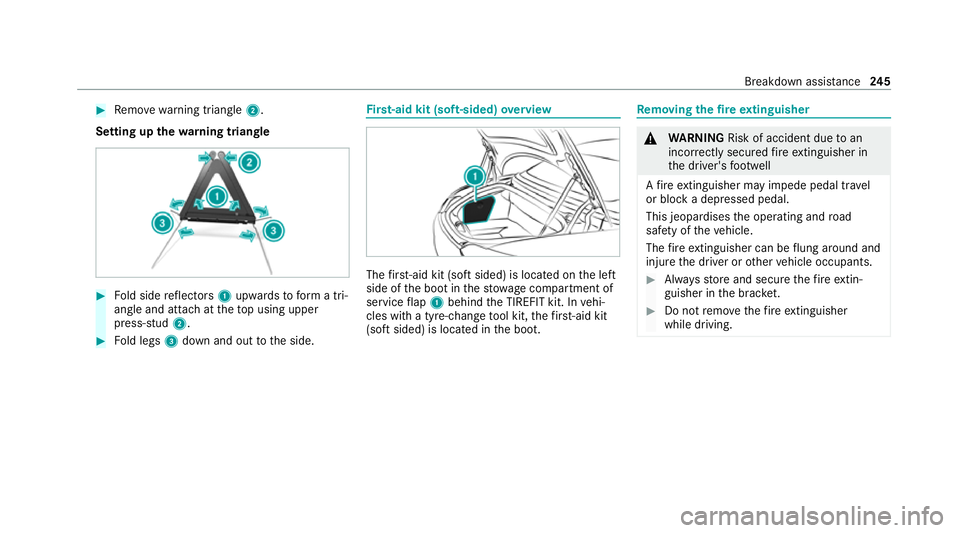
#
Remo ve wa rning triangle 2.
Setting up thewa rning triangle #
Fold side reflectors 1upwards toform a tri‐
angle and attach at theto p using upper
press-stud 2. #
Fold legs 3down and out tothe side. Fi
rs t-aid kit (soft-sided) overview The
firs t-aid kit (soft sided) is located on the left
side of the boot in thestow age compartment of
service flap 1 behind the TIREFIT kit. In vehi‐
cles with a tyre-change tool kit, thefirs t-aid kit
(soft sided) is located in the boot. Re
moving the fire extinguisher &
WARNING Risk of accident due toan
incor rectly secu redfire extinguisher in
th e driver's foot we ll
A fire extinguisher may impede pedal tr avel
or block a depressed pedal.
This jeopardises the operating and road
saf ety of theve hicle.
The fire extinguisher can be flung around and
injure the driver or other vehicle occupants. #
Alw aysst ore and secure thefire extin‐
guisher in the brac ket. #
Do not remo vethefire extinguisher
while driving. Breakdown assi
stance 245
Page 249 of 381
#
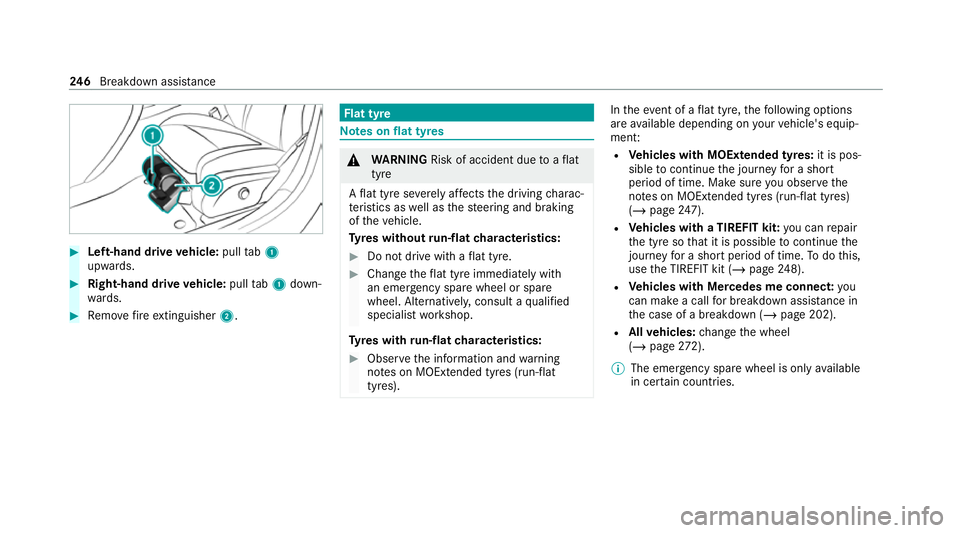
Left-hand drive vehicle: pulltab1
upwards. #
Right-hand drive vehicle: pulltab1 down‐
wa rds. #
Remo vefire extinguisher 2. Flat tyre
Note
s onflat tyres &
WARNING Risk of accident due toaflat
tyre
A flat tyre se verely affects the driving charac‐
te rist ics as well as thesteering and braking
of theve hicle.
Ty res without run-flat characteristics: #
Do not drive with a flat tyre. #
Chan getheflat tyre immediately with
an emer gency spa rewheel or spare
wheel. Alternativel y,consult a qualified
specialist workshop.
Ty res with run-flat characteristics: #
Obse rveth e information and warning
no tes on MOExtended tyres (run-flat
tyres). In
theeve nt of a flat tyre, thefo llowing options
are available depending on your vehicle's equip‐
ment:
R Vehicles with MOExtended tyres: it is pos‐
sible tocontinue the journey for a short
period of time. Make sure you obse rvethe
no tes on MOExtended tyres (run-flat tyres)
(/ page 247).
R Vehicles with a TIREFIT kit: you can repair
th e tyre so that it is possible tocontinue the
jou rney for a short period of time. Todo this,
use the TIREFIT kit (/ page248).
R Vehicles with Mercedes me connect: you
can make a call for breakdown assi stance in
th e case of a breakdown (/ page 202).
R Allvehicles: change the wheel
(/ page 272).
% The emergency spare wheel is onlyavailable
in cer tain countries. 246
Breakdown assis tance
Page 250 of 381
Note
s on MOExtended tyres (run-flat tyres) &
WARNING Risk of accident when driving
in limp -home mode
Driving in emergency mode impairs the han‐
dling characteristics of theve hicle. #
Do not exceed the permissible maxi‐
mum speed of the MOEx tended tyres. #
Avoid any abrupt steering and driving
manoeuvres as well as driving over
obs tacles (kerbs, pot holes, off-road).
This applies, in pa rticular, toa loaded
ve hicle. #
Stop driving in the emer gency mode if
yo u notice:
R banging noise
R vehicle vibration
R smoke which smells like rubber
R continuous ESP ®
inter vention
R crac ksinthe tyre side walls #
After driving in emergency mode, ha ve
th erims checkedby aqu alified special‐ ist
workshop with rega rd totheir fur ther
use. #
The defective tyre must be replaced in
eve rycase. Wi
th MOExtended tyres (run-flat tyres), you can
continue todrive your vehicle even if there is a
tot al loss of pressure in one or more tyres. How‐
eve r,th e tyre af fected must not show any clearly
visible damage.
Yo u can recognise MOExtended tyres bythe
MOExtended marking which appears on the side
wa ll of the tyre.
Ve hicles with tyre pressure monitoring sys‐
te m: MOExtended tyres may only be used in
conjunction wi than activated tyre pressure mon‐
itoring sy stem.
If a pressure loss warning message appears in
th e multifunction displa y,proceed as follo ws:
R Check the tyre for dama ge.
R If driving on, obser vethefo llowing no tes. Driving distance possible in emer
gency
mode af ter the pressure loss warning: Load condition Driving distance pos‐
sible in emergency
mode
Pa rtially laden 80 km
Fu lly laden 30 km The driving dis
tance possible in emergency
mode may vary depending on the driving style.
Obser vethe maximum permissible speed of
80 km/h.
If a tyre has gone flat and cannot be replaced
with an MOEx tended tyre, you can use a stand‐
ard tyre as a temp orary measure. Breakdown assis
tance 247