lights MERCEDES-BENZ AMG GT ROADSTER 2020 Owners Manual
[x] Cancel search | Manufacturer: MERCEDES-BENZ, Model Year: 2020, Model line: AMG GT ROADSTER, Model: MERCEDES-BENZ AMG GT ROADSTER 2020Pages: 381, PDF Size: 7.37 MB
Page 14 of 381
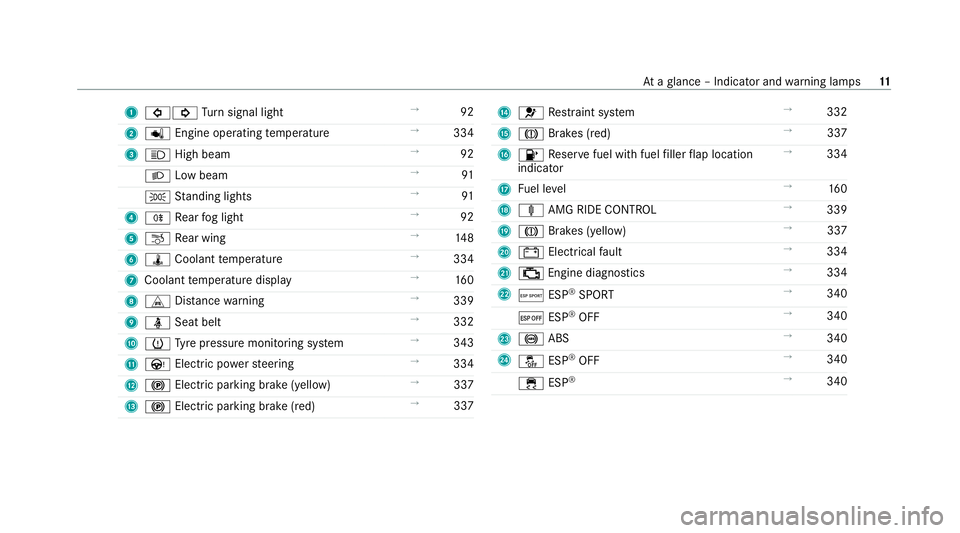
1
#! Turn signal light →
92
2 p Engine operating temp erature →
334
3 K High beam →
92
L Low beam →
91
T Standing lights →
91
4 R Rear fog light →
92
5 ~ Rear wing →
14 8
6 ÿ Coolant temp erature →
334
7 Coolant temp erature display →
16 0
8 L Distance warning →
339
9 ü Seat belt →
332
A h Tyre pressure monitoring sy stem →
343
B Ù Electric po werst eering →
334
C ! Electric pa rking brake (yellow) →
337
D ! Electric parking brake (red) →
337 E
6 Restra int sy stem →
332
F J Brakes (red) →
337
G 8 Reser vefuel with fuel filler flap location
indicator →
334
H Fuel le vel →
16 0
I ä AMG RIDE CONTROL →
339
J J Brakes (yellow) →
337
K # Electrical fault →
334
L ; Engine diagnostics →
334
M Æ ESP®
SPORT →
340
¤ ESP®
OFF →
340
N ! ABS →
340
O å ESP®
OFF →
340
÷ ESP®
→
340 At
aglance – Indicator and warning lamps 11
Page 33 of 381
In
general, this information documents thest ate
of a component part, a module, a sy stem or the
sur roundings such as:
R operating status of sy stem components (e.g.
fi ll le vels, battery status, tyre pressure)
R status messages concerning theve hicle or
its individual components (e.g. number of
wheel revo lutions/speed, longitudinal accel‐
eration, lateral acceleration, display of fas‐
te ned seat belts)
R malfunctions or faults in impor tant sy stem
components (e.g. lights, brakes)
R information on events leading tovehicle
damage
R system reactions in special driving situations
(e.g. airbag deployment, inter vention of sta‐
bility control sy stems)
R ambient conditions (e.g. temp erature, rain
sensor)
In addition toprov iding the actual control unit
function, this data assists the manufacturer in
de tecting and rectifying faults and optimising
ve hicle functions. The majority of this data is te
mp orary and is only processed in theve hicle
itself. Only a small portion of the data is stored
in theeve nt or fault memor y.
When your vehicle is serviced, tech nical da ta
from theve hicle can be read out byservice net‐
wo rkemplo yees (e.g. workshops, manufactur‐
ers) or third parties (e.g. breakdown services).
Services include, forex ample, repair services,
maintenance processes, warranty claims and
qu ality assurance measures. The read out is per‐
fo rm ed via the legally prescribed port forthe
diagnostics connection in theve hicle. The
re spective service network locations or third
parties collect, process and use the data. They
document tech nical statuses of theve hicle,
assist in finding faults and impr oving quality and
are transmitted tothe manufacturer, if neces‐
sar y.Fu rthermore, the manufacturer is subject
to product liability. Forth is, the manufacturer
requ irestech nical da tafrom vehicles.
Fa ult memories in theve hicle can be reset by a
service outlet as part of repair or maintenance
wo rk. Depending on
the selected equipment, you can
import data into vehicle con venience and info‐
ta inment functions yourself.
This includes, forex ample:
R multimedia data such as music, films or pho‐
to sfo r playback in an integrated multimedia
sy stem
R address book data for use in connection with
an integrated hands-free sy stem or an inte‐
grated navigation sy stem
R entered navigation destinations
R data about the use of internet services
This data can be sa ved locally in theve hicle or it
is located on a device which you ha veconnected
to theve hicle (e.g. a smartphone, USB flash
drive or MP3 pla yer). If this data is stored in the
ve hicle, you can dele teit at any time. This data
is sent tothird parties only at your requ est, par‐
ticular lywhen you use online services in accord‐
ance with the settings that you ha veselected.
Yo u can store or change con venience settings/
individualisations in theve hicle at any time. 30
General no tes
Page 37 of 381
te
m wa rning lamp lights up. It goes out no later
th an a few seconds af terth eve hicle is star ted.
The components of there stra int sy stem are then
functional. Malfunctioning
restra int sy stem A malfunction has occur
red in there stra int sys‐
te m if:
R the6 restra int sy stem warning lamp does
not light up when the ignition is switched on
R the6 restra int sy stem warning lamp
lights up continuously or repeatedly during a
journey &
WARNING Risk of injury duetomalfunc‐
tions in there stra int sy stem
Components in there stra int sy stem may be
activated unintentionally or not deploy as
intended in an accident. #
Have there stra int sy stem checked and
re paired immediately at a qualified spe‐
cialist workshop. Fu
nction of there stra int sy stem in an acci‐
dent How
there stra int sy stem works is de term ined by
th e se verity of the impact de tected and the type
of accident anticipated:
R Frontal impact
R Rear impact
R Side impact
R Rollover
The activation thre sholds forth e components of
th ere stra int sy stem are de term ined based on
th eev aluation of the sensor values measured at
va rious points in theve hicle. This process is pre-
em ptive in nature. The triggering/deployment of
th e components of there stra int sy stem must
ta ke place in good time at thest art of the colli‐
sion.
Fa ctors whi chcan only be seen and measu red
af te r a collision has occur red do not play a deci‐
sive role in the deployment of an airbag. Nordo
th ey prov ide an indication of airbag deployment.
The vehicle may be deformed significantly with‐
out an airbag being deplo yed. This is the case if only parts which are
relatively easily deformed
are af fected and thera te ofvehicle deceleration
is not high. Con versely, an airbag may be
deplo yedev en though theve hicle suf fers only
minor deformation. If very rigid vehicle parts
such as longitudinal members are hit, this may
re sult in suf ficiently high le vels of vehicle decel‐
eration.
Depending on the de tected deployment situa‐
tion, the components of there stra int sy stem can
be activated or deplo yed independently of each
ot her:
R Seat belt tensioner: frontal impact, rear
impact, side impact, rollo ver
R Driver's airbag, front passenger airbag: fron‐
talimpact
R Knee airbag: frontal impact
R Side airbag: side impact
R Head airbag: side impact, rollo ver,frontal
impact
The front passenger airbag can only be depl oyed
in an accident if thePA SSENGER AIR BAG OFF
indicator lamp is off. If the front passenger seat 34
Occupant saf ety
Page 48 of 381
not
fit th ere ar wa rd-facing child restra int sy stem
to the front passenger seat.
Af terfitting a forw ard-facing child restra int
sy stem tothe front passenger seat: depend‐
ing on thech ild restra int sy stem and thest ature
of thech ild, PASSENGER AIR BAG OFF may be lit
continuously or be off. Alw ays obser vethefo l‐
lowing information. &
WARNING Risk of injury or death dueto
incor rect positioning of thech ild
re stra int sy stem
If yo u secure a child in a forw ard-facing child
re stra int sy stem on the front passenger seat
th at is positioned too close tothe cockpit, in
th eev ent of an accident, thech ild could:
R come into con tact with th eve hicle inte‐
ri or if thePA SSENGER AIR BAG OFF indi‐
cator lamp is lit, forex ample
R bestru ck bythe airbag if thePA SSENGER
AIR BAG OFF indicator lamp is off #
Alw ays mo vethe front passenger seat
as far back as possible. Alw ays make
sure that the shoulder belt stra p is cor‐ re
ctly routed from the seat belt guide
on theve hicle tothe shoulder belt
guide on thech ild restra int sy stem. The
shoulder belt stra p must be routed for‐
wa rds and down wards from the seat
belt guide. #
Alw ays comply with thech ild restra int
sy stem manufacturer's ins tallation
instructions. When
fitting a child restra int sy stem tothe front
passenger seat, obser vetheve hicle-specific
information (/ page 53).
If a person is sitting on the front passenger
seat: PASSENGER AIR BAG OFF may be lit con‐
tinuously or be off, depending on the person's
st ature.
A person on the front passenger seat must
alw ays obser vethefo llowing information:
R Ifth e front passenger seat is occupied byan
adult or a person with a stature cor respond‐
ing tothat of an adult, thePA SSENGER AIR
BA G OFF indicator lamp must be off. This indicates
that the front passenger airbag is
enabled.
If th ePA SSENGER AIR BAG OFF indicator
lamp is lit continuousl y,an adult or person
with a build cor responding tothat of an adult
should not use the front passenger seat.
R Ifth e front passenger seat is occupied by a
person of smaller stature (e.g. a teenager or
small adult), thePA SSENGER AIR BAG OFF
indicator lamp either lights up continuously
or remains off, depending on the classifica‐
tion.
- Ifth ePA SSENGER AIR BAG OFF indicator
lamp is off: mo vethe front passenger
seat as far back as possible.
- Ifth ePA SSENGER AIR BAG OFF indicator
lamp is lit continuously: the person of
smaller stature should not use the front
passenger seat. Occupant saf
ety45
Page 60 of 381
Ac
tivating/deactivating the acoustic lo cking
ve rification signal Multimedia sy
stem:
4 Vehicle 5
î Vehicle settings
5 Acoustic lock #
Activate Oor deacti vate ª the function.
% Please no
te:
The selected setting forth e acoustic locking
ve rification signal must comply wi th there le‐
va nt national road and traf fic re gulations. In
some countri es, including German y,using
th e acoustic locking verification signal is for‐
bidden bytraf fic la ws(in accordance with
§16 Para. 1 and §30 Para. 1 of the German
national road traf fic re gulations). The driver
of theve hicle must comply with these regu‐
lations. In countri es wherethe use of this
function is forbidden, this function is not
activated in theve hicle and must not be acti‐
va ted. Changing
the unlocking settings Po
ssible unlocking functions of theke y:
R Central unlocking
R Unlocking the driver's door and fuel filler flap #
Toswitch between settings: pressthe
Ü andß buttons simultaneously for
appr oximately six seconds until the indicator
lamp flashes twice.
Options if the unlocking function forth e driver's
door and fuel filler flap has been selec ted:
R Tounlo cktheve hicle centrall y:press the
Ü button twice.
R Vehicles with KEYLESS-GO: ifyo uto uch
th e inner sur face of the door handle on the
driver's door, only the driver's door and fuel
fi ller flap are unlo cked. Deactivating
theke y functions If
yo u do not use theve hicle or a keyfo r an
ex tended pe riod of time, you can reduce the
energy consum ption of there spective key.Todo
so, deactivate theke y functions. #
Todeactivate: pressthe& button on the
ke y twice in quick succession.
The key indicator lamp flashes twice brief ly
and lights up once. #
Toactivate: press any button on thekey.
% When theve hicle is star ted with theke y in
th estow age compartment of the cent recon‐
sole, theke y functions are automatical ly
activated (/ page107). Re
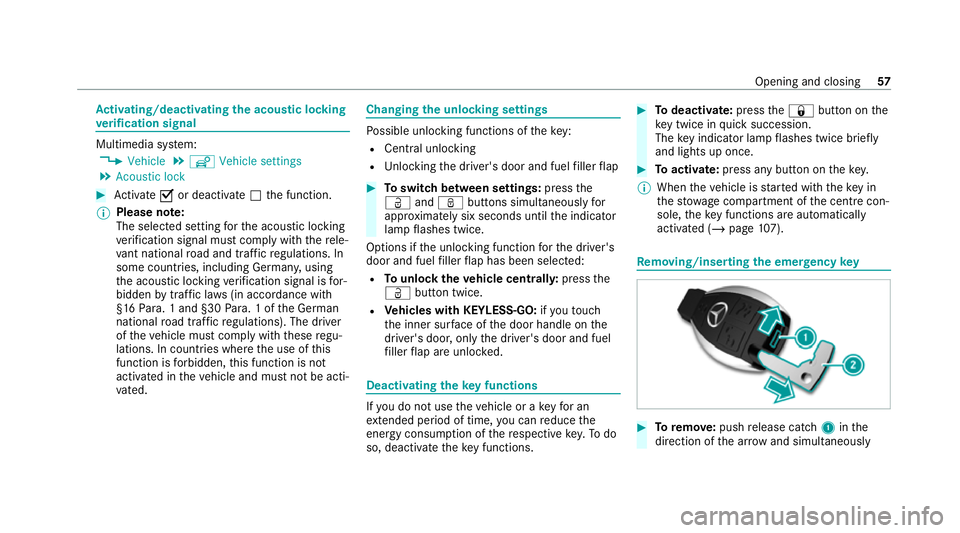
moving/inserting the eme rgency key #
Toremo ve:push release cat ch1 inthe
direction of the ar row and simul taneously Opening and closing
57
Page 94 of 381
Exterior lighting
Note
s onchanging the lights when driving
abroad It is not necessary
toadjust the headlamps. The
legal requirements are also met in countries in
which traf fic drives on theot her side of thero ad. Information about lighting sy
stems and your
re sponsibility The
various lighting sy stems of theve hicle are
only aids. The driver of theve hicle is responsible
fo r cor rect vehicle illumination in accordance
with the pr evailing light and visibility conditions,
legal requirements and traf fic situation. Light switch
Ope
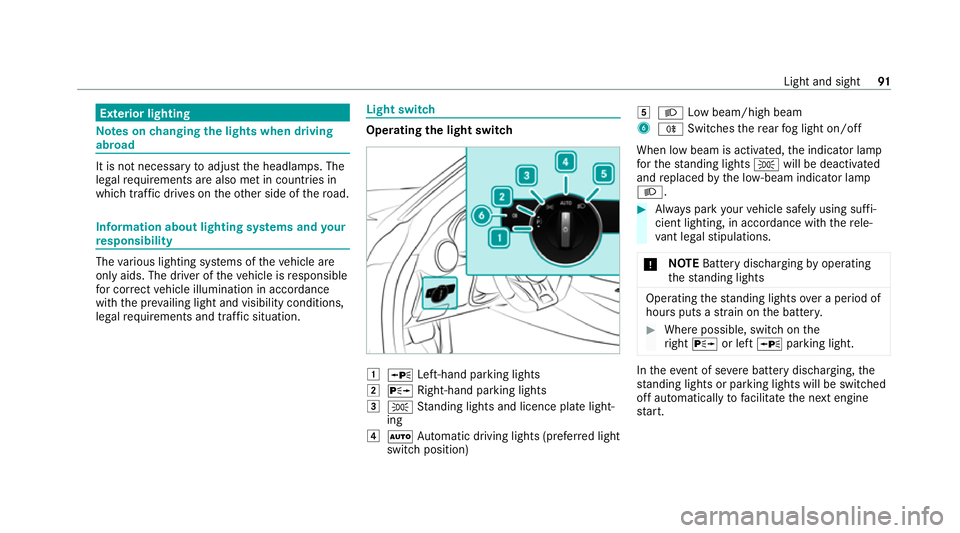
rating the light switch 1
W Left-hand pa rking lights
2 X Right-hand parking lights
3 T Standing lights and licence plate light‐
ing
4 Ã Automatic driving lights (prefer red light
switch position) 5
L Low beam/high beam
6 R Switches there ar fog light on/off
When low beam is activated, the indicator lamp
fo rth est anding lights Twill be deactivated
and replaced bythe lo w-beam indicator lamp
L. #
Alw ays park your vehicle safely using suf fi‐
cient lighting, in acco rdance with there le‐
va nt le galst ipulations.
* NO
TEBattery discharging byoperating
th est anding lights Operating
thest anding lights over a period of
hours puts a stra in on the batter y. #
Where possible, switch on the
ri ght X or left Wparking light. In
theeve nt of se vere battery discharging, the
st anding lights or parking lights will be swit ched
off automatically tofacilitate the next engine
st art. Light and sight
91
Page 95 of 381
The
exterior lighting (e xcept standing and park‐
ing lights) will swit choff automatically when the
driver's door is opened.
R Obser vethe no tes on sur round lighting
(/ page 95).
Au tomatic driving lights function
The standing lights, low beam and daytime run‐
ning lights are switched on au tomatically
depending on the ignition status and the light
conditions. &
WARNING Risk of accident when the
dipped beam is switched off in poor visi‐
bility
When the light switch is set toà ,the
dipped beam may not be switched on auto‐
matically if there is fog, snow or other causes
of poor visibility such as spr ay.#
In such cases, turn the light switch to
L . The automatic driving lights are only an aid.
Yo u
are responsible forve hicle lighting. Switching
there ar fog lights on or off
Re quirements:
R The light switch is in theL orà posi‐
tion. #
Press the R button.
Please obser vethe count ry-specific la wsonthe
use of rear fog lamps. Operating
the combination switch for the
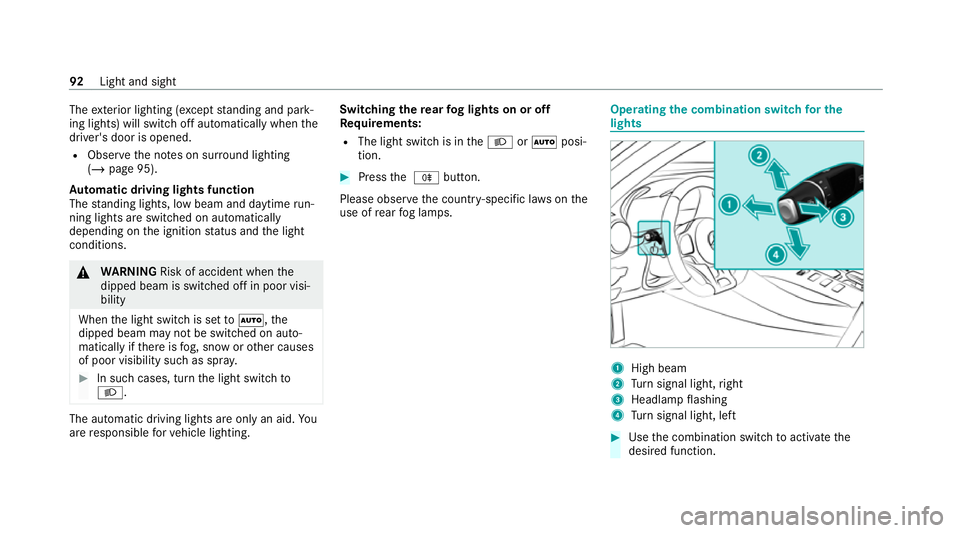
lights 1
High beam
2 Turn signal light, right
3 Headlamp flashing
4 Turn signal light, left #
Use the combination switch toactivate the
desired function. 92
Light and sight
Page 96 of 381
High beam
#
Toswitch on: turnthe light switch tothe
L orà position. #
Push the combination switch be yond the
point of resis tance in the direction of ar row
1 .
When the high beam is activated, the indica‐
to r lamp for low beam Lwill be deactiva‐
te d and replaced bythe indicator lamp for
high beam K. #
Toswitch off: movethe combination switch
back toits starting position.
Headla mpflashing #
Pull the combination switch in the direction
of ar row3.
Tu rn signal indicator #
Toindicate briefl y:push the combination
switch briefly tothe point of resis tance in the
direction of ar row2or4.
The cor responding turn signal light will flash
th re e times. #
Toindicate permanentl y:push the combi‐
nation switch be yond the point of resis tance
in the direction of ar row2or4. Ac
tivating/deactivating the hazard warning
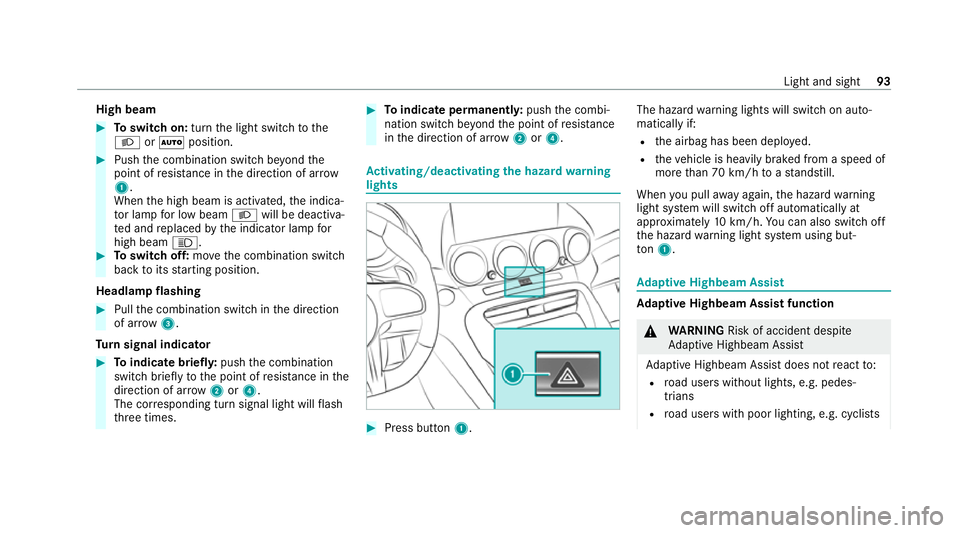
lights #
Press button 1. The hazard
warning lights will switch on auto‐
matically if:
R the airbag has been deplo yed.
R theve hicle is heavily braked from a speed of
more than 70 km/h toast andstill.
When you pull away again, the hazard warning
light sy stem will switch off automatically at
appr oximately 10km/h. You can also swit choff
th e hazard warning light sy stem using but‐
to n1. Ad
aptive Highbeam Assist Ad
aptive Highbeam Assist function &
WARNING Risk of accident despite
Ad aptive Highbeam Assist
Ad aptive Highbeam Assist does not react to:
R road users without lights, e.g. pedes‐
trians
R road users with poor lighting, e.g. cyclists Light and sight
93
Page 98 of 381
#
Switch on the high beam using the combina‐
tion switch.
When the high beam is switched on automat‐
ically in the dar k,the_ indicator lamp on
th e multifunction display will light up. #
Toswitch off: switch offthe high beam
using the combination switch. Setting
theex terior lighting switch-off delay
time Multimedia sy
stem:
4 Vehicle 5
÷ Light settings
5 Exterior light shut-off #
Set the switch-off delay time. Setting
the sur round lighting Multimedia sy
stem:
4 Vehicle 5
÷ Light settings
5 Locator lighting #
Activate Oor deacti vate ª the function. If
th e sur round lighting is swit ched on, theex te‐
ri or lighting remains lit for 40 seconds af terthe
ve hicle is unloc ked. When youstart theve hicle,
th e sur round lighting is deactivated and the
automatic driving lights are activated. Interior lighting
Ad
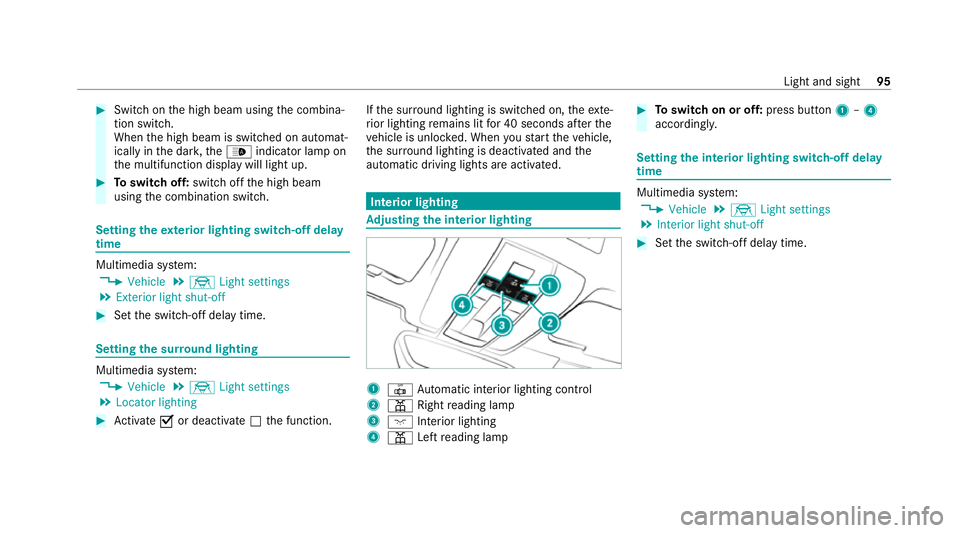
justing the in terior lighting 1
| Automatic interior lighting control
2 p Rightreading lamp
3 c Inte rior lighting
4 p Leftreading lamp #
Toswitch on or off: press button1–4
accordingly. Setting
the interior lighting switch-off delay
time Multimedia sy
stem:
4 Vehicle 5
÷ Light settings
5 Interior light shut-off #
Set the switch-off delay time. Light and sight
95
Page 131 of 381
#
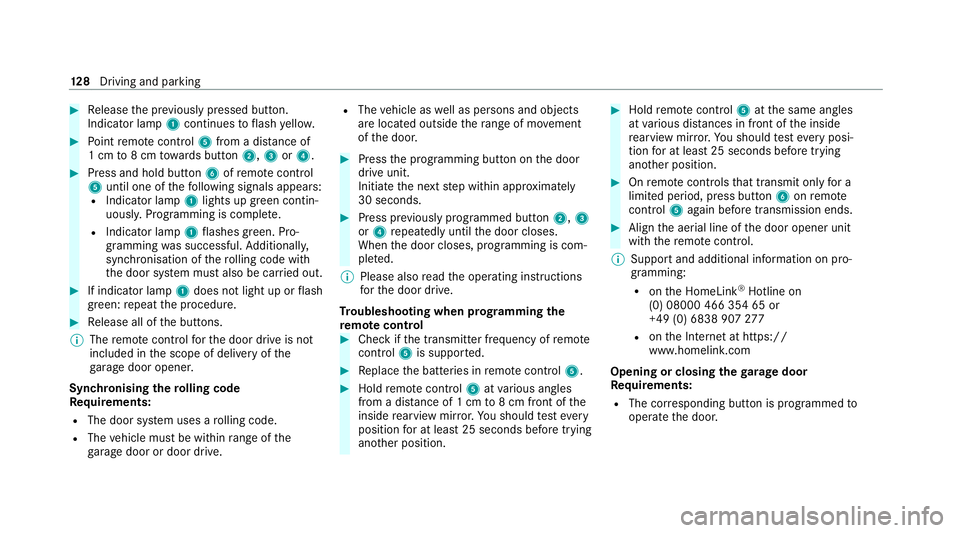
Release the pr eviously pressed button.
Indicator lamp 1continues toflash yello w. #
Point remo tecontrol 5from a dist ance of
1 cm to8 cm towa rds button 2,3or4. #
Press and hold button 6ofremo tecontrol
5 until one of thefo llowing signals appears:
R Indicator lamp 1lights up green contin‐
uousl y.Programming is comple te.
R Indicator lamp 1flashes green. Pro‐
gramming was successful. Additionall y,
synchronisation of thero lling code with
th e door sy stem must also be car ried out. #
If indicator lamp 1does not light up or flash
green: repeat the procedure. #
Release all of the buttons.
% The remo tecontrol forth e door drive is not
included in the scope of delivery of the
ga rage door opener.
Synchronising thero lling code
Re quirements:
R The door sy stem uses a rolling code.
R The vehicle must be within range of the
ga rage door or door drive. R
The vehicle as well as persons and objects
are located outside thera nge of mo vement
of the door. #
Press the programming button on the door
drive unit.
Initiate the next step within appr oximately
30 seconds. #
Press pr eviously prog rammed button 2,3
or 4 repeatedly until the door closes.
When the door closes, programming is com‐
ple ted.
% Please also read the operating instructions
fo rth e door drive.
Tr oubleshooting when prog ramming the
re mo tecont rol #
Check if the transmit ter frequency of remo te
control 5is support ed. #
Replace the batteries in remo tecontrol 5. #
Hold remo tecontrol 5atvarious angles
from a dis tance of 1 cm to8 cm front of the
inside rearview mir ror.Yo u should test eve ry
position for at least 25 seconds before trying
ano ther position. #
Hold remo tecontrol 5atthe same angles
at various dis tances in front of the inside
re arview mir ror.Yo u should test eve ryposi‐
tion for at least 25 seconds before trying
ano ther position. #
Onremo tecontrols that transmit on lyfor a
limi ted period, press button 6onremo te
control 5again before transmission ends. #
Align the aerial line of the door opener unit
with there mo tecontrol.
% Support and additional information on pro‐
gramming:
R onthe HomeLink ®
Hotline on
(0) 08000 466 354 65 or
+49 (0) 6838 907 277
R onthe Internet at https://
www.homelin k.com
Opening or closing the garage door
Re quirements:
R The cor responding button is programmed to
operate the door. 12 8
Driving and pa rking